reset NISSAN FRONTIER 1999 D22 / 1.G Owners Manual
[x] Cancel search | Manufacturer: NISSAN, Model Year: 1999, Model line: FRONTIER, Model: NISSAN FRONTIER 1999 D22 / 1.GPages: 247, PDF Size: 1.89 MB
Page 46 of 247
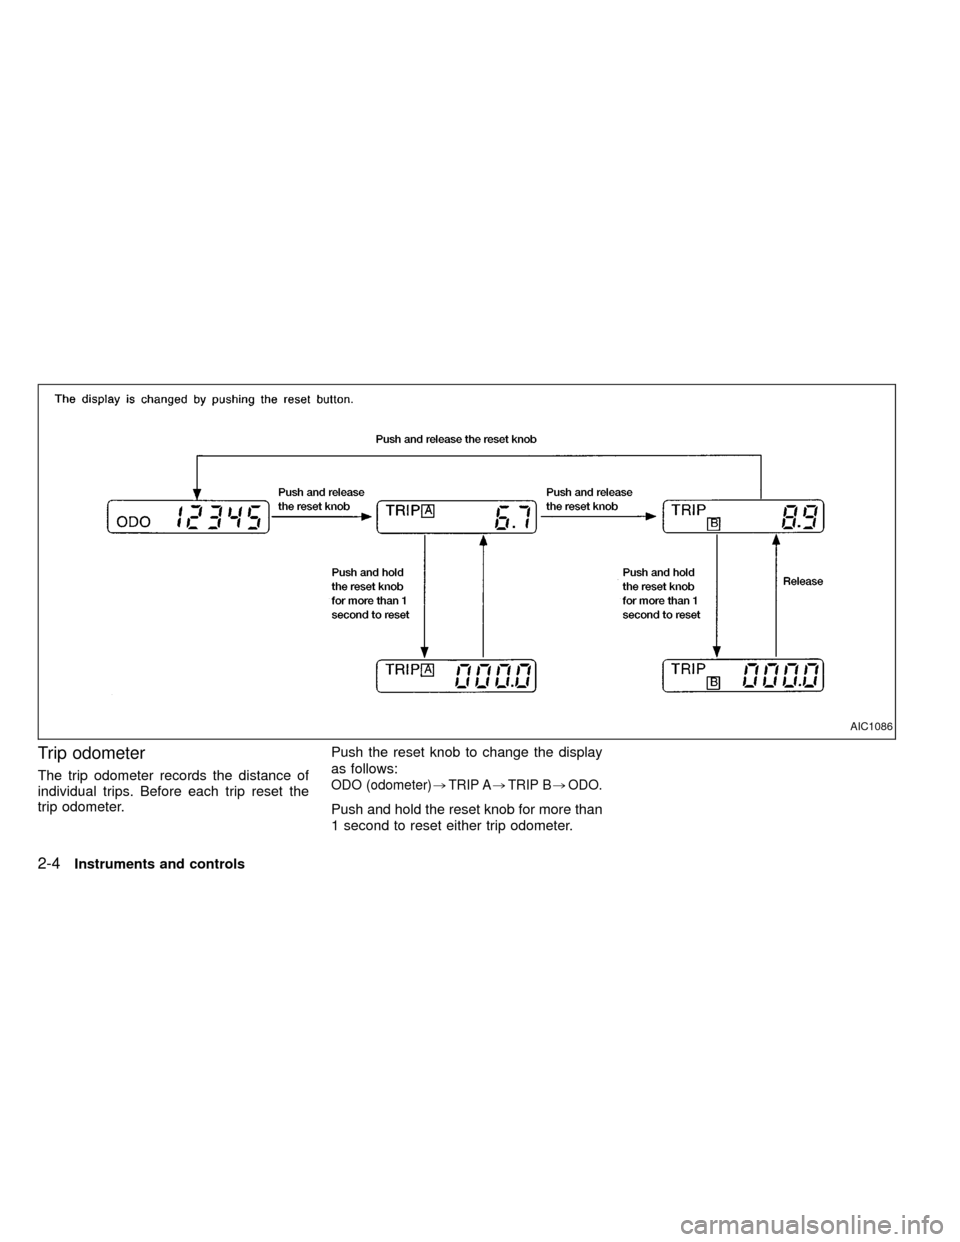
Trip odometer
The trip odometer records the distance of
individual trips. Before each trip reset the
trip odometer.Push the reset knob to change the display
as follows:ODO (odometer),TRIP A,TRIP B,ODO.
Push and hold the reset knob for more than
1 second to reset either trip odometer.
AIC1086
2-4Instruments and controls
ZX
Page 76 of 247
device must accept any interference re-
ceived including interference that may
cause undesired operation of the device.
WARNING
IMake sure the hood is completely
closed and latched before driving.
Failure to do so could cause the
hood to fly open and result in an
accident.
IIf you see steam or smoke coming
from the engine compartment, to
avoid injury do not open the hood.
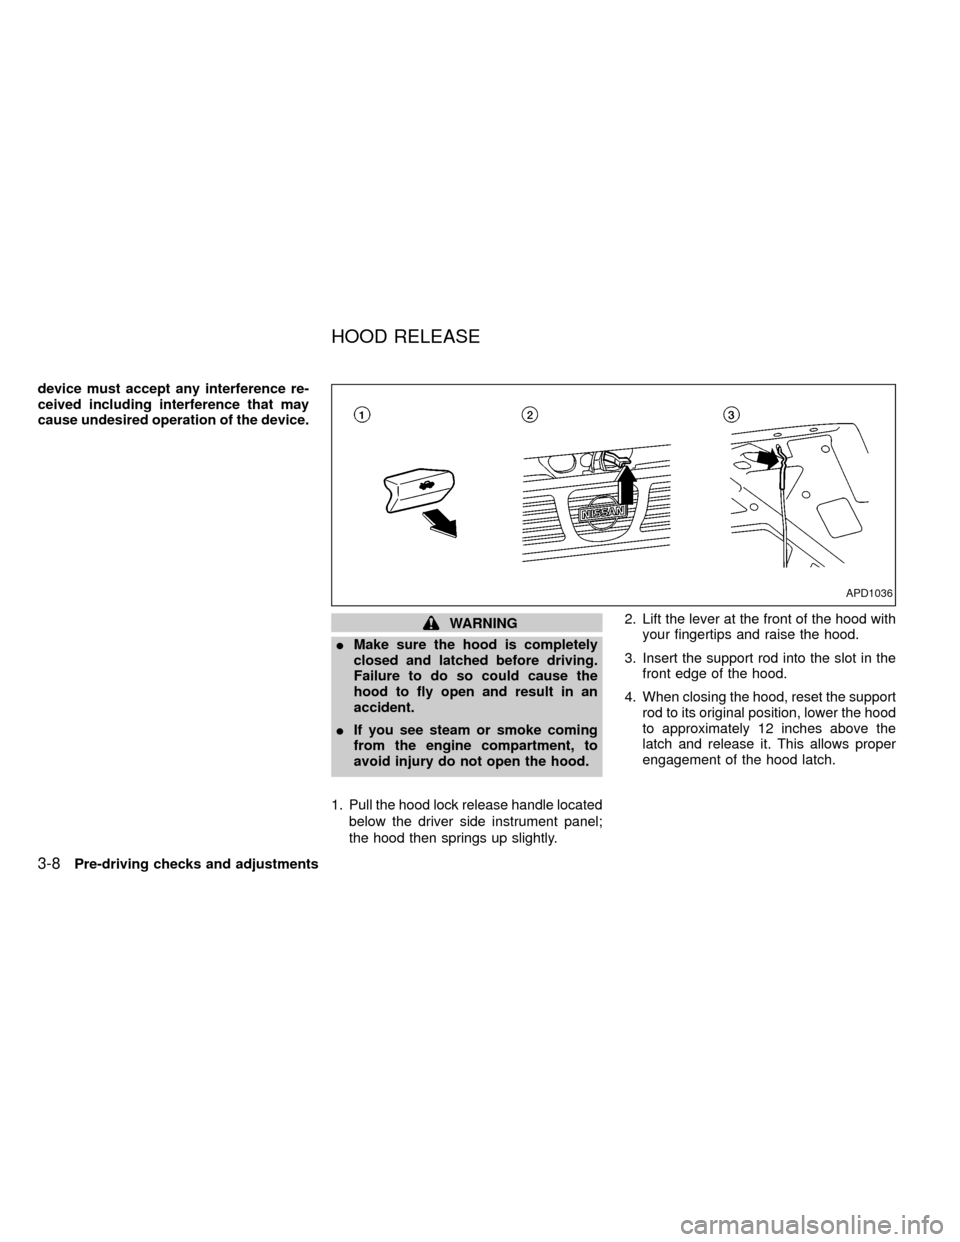
1. Pull the hood lock release handle located
below the driver side instrument panel;
the hood then springs up slightly.2. Lift the lever at the front of the hood with
your fingertips and raise the hood.
3. Insert the support rod into the slot in the
front edge of the hood.
4. When closing the hood, reset the support
rod to its original position, lower the hood
to approximately 12 inches above the
latch and release it. This allows proper
engagement of the hood latch.
APD1036
HOOD RELEASE
3-8Pre-driving checks and adjustments
ZX
Page 97 of 247
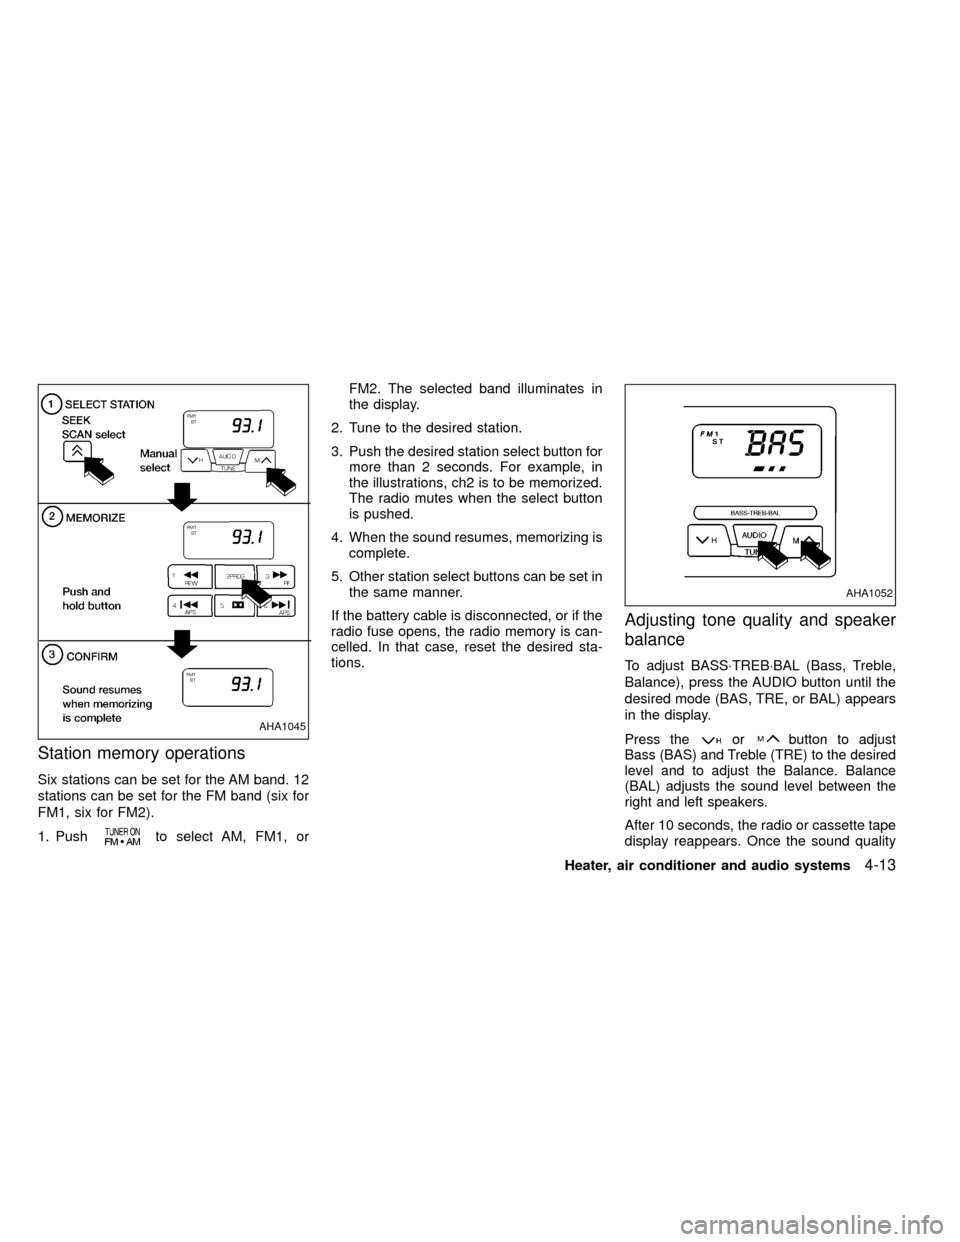
Station memory operations
Six stations can be set for the AM band. 12
stations can be set for the FM band (six for
FM1, six for FM2).
1. Push
to select AM, FM1, orFM2. The selected band illuminates in
the display.
2. Tune to the desired station.
3. Push the desired station select button for
more than 2 seconds. For example, in
the illustrations, ch2 is to be memorized.
The radio mutes when the select button
is pushed.
4. When the sound resumes, memorizing is
complete.
5. Other station select buttons can be set in
the same manner.
If the battery cable is disconnected, or if the
radio fuse opens, the radio memory is can-
celled. In that case, reset the desired sta-
tions.
Adjusting tone quality and speaker
balance
To adjust BASS×TREB×BAL (Bass, Treble,
Balance), press the AUDIO button until the
desired mode (BAS, TRE, or BAL) appears
in the display.
Press theorbutton to adjust
Bass (BAS) and Treble (TRE) to the desired
level and to adjust the Balance. Balance
(BAL) adjusts the sound level between the
right and left speakers.
After 10 seconds, the radio or cassette tape
display reappears. Once the sound quality
AHA1045
AHA1052
Heater, air conditioner and audio systems4-13
ZX
Page 102 of 247
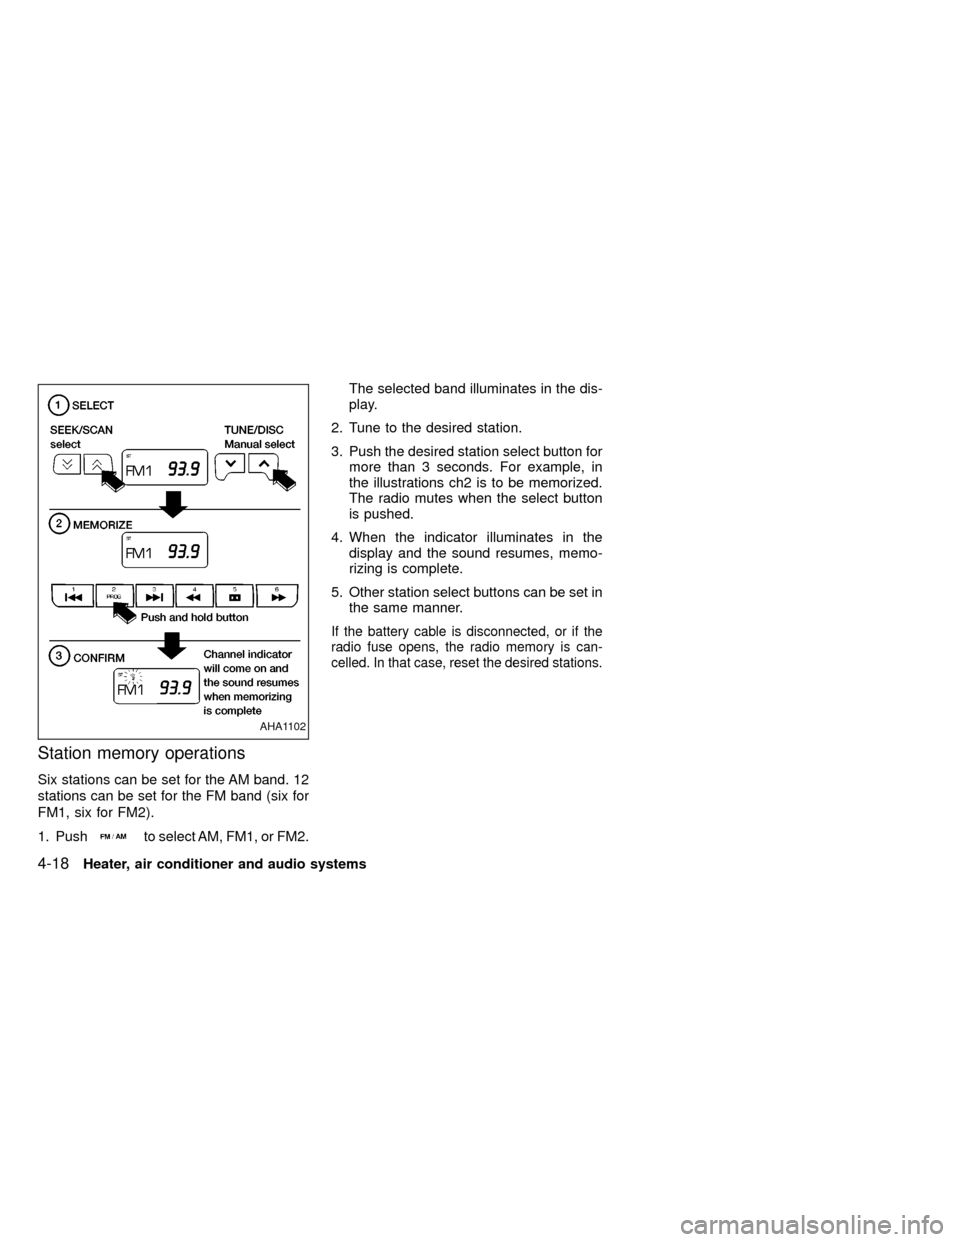
Station memory operations
Six stations can be set for the AM band. 12
stations can be set for the FM band (six for
FM1, six for FM2).
1. Push
to select AM, FM1, or FM2.The selected band illuminates in the dis-
play.
2. Tune to the desired station.
3. Push the desired station select button for
more than 3 seconds. For example, in
the illustrations ch2 is to be memorized.
The radio mutes when the select button
is pushed.
4. When the indicator illuminates in the
display and the sound resumes, memo-
rizing is complete.
5. Other station select buttons can be set in
the same manner.
If the battery cable is disconnected, or if the
radio fuse opens, the radio memory is can-
celled. In that case, reset the desired stations.
AHA1102
4-18Heater, air conditioner and audio systems
ZX
Page 119 of 247
Accelerator downshift
In D position
For rapid passing or hill climbing, while
driving fully depress the accelerator pedal to
the floor. This shifts the transmission down
into second gear or first gear, depending on
the vehicle speed.
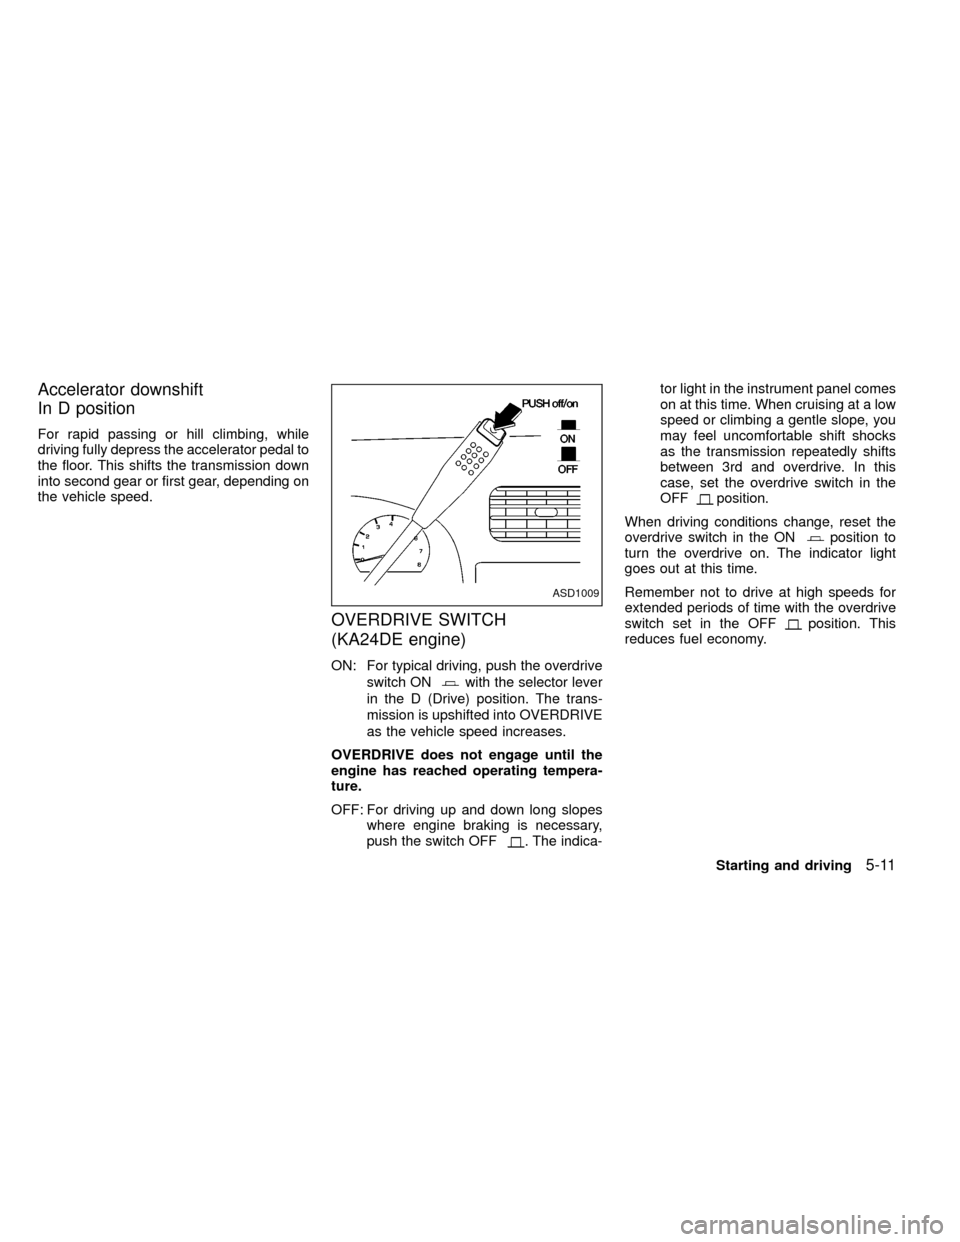
OVERDRIVE SWITCH
(KA24DE engine)
ON: For typical driving, push the overdrive
switch ON
with the selector lever
in the D (Drive) position. The trans-
mission is upshifted into OVERDRIVE
as the vehicle speed increases.
OVERDRIVE does not engage until the
engine has reached operating tempera-
ture.
OFF: For driving up and down long slopes
where engine braking is necessary,
push the switch OFF
. The indica-tor light in the instrument panel comes
on at this time. When cruising at a low
speed or climbing a gentle slope, you
may feel uncomfortable shift shocks
as the transmission repeatedly shifts
between 3rd and overdrive. In this
case, set the overdrive switch in the
OFF
position.
When driving conditions change, reset the
overdrive switch in the ON
position to
turn the overdrive on. The indicator light
goes out at this time.
Remember not to drive at high speeds for
extended periods of time with the overdrive
switch set in the OFF
position. This
reduces fuel economy.
ASD1009
Starting and driving5-11
ZX
Page 125 of 247

on. Take your foot off the accelerator pedal.
Your vehicle maintains the set speed.
To pass another vehicle,depress the ac-
celerator pedal. When you release the
pedal, the vehicle returns to the previously
set speed.
IThe vehicle may not maintain the set
speed when going up or down steep
hills. If this happens, drive without the
cruise control.
To cancel the preset speed,use one of the
following three methods:
a) Push the CANCEL button; the CRUISE
light in the instrument panel goes out.
b) Tap the brake pedal; the CRUISE light
goes out.
c)
Turn the main switch off. Both the CRUISE
CONT and CRUISE lights go out.
The cruise control is automatically can-
celled and the CRUISE light goes out if:
Iyou depress the brake pedal while push-
ing the RES/ACCEL set switch.
Ithe vehicle slows down more than 8 MPH
(13 km/h) below the set speed.Iyou depress the clutch pedal (manual
transmission), or move the shift lever to
the N (Neutral) position (automatic trans-
mission).
To reset at a faster cruising speed,use
one of the following three methods:
a) Depress the accelerator pedal. When the
vehicle attains the desired speed, push
and release the COAST/SET switch.
b) Push and hold the RES/ACCEL set
switch. When the vehicle attains the
speed you desire, release the switch.
c)
Push, and release the RES/ACCEL set
switch. Each time you do this, the set
speed increases by about 1 MPH (1.6
km/h).
To reset at a slower cruising speed,use
one of the following three methods:
a) Lightly tap the brake pedal. When the
vehicle attains the desired speed, push
the COAST/SET switch and release it.
b) Push and hold the COAST/SET switch.
Release the switch when the vehicle
slows down to the desired speed.
c) Push, and release the COAST/SETswitch. Each time you do this, the set
speed decreases by about 1 MPH (1.6
km/h).
To resume the preset speed,push and
release the RES/ACCEL switch. The ve-
hicle returns to the last set cruising speed
when the vehicle speed is over 30 MPH (48
km/h).
Starting and driving
5-17
ZX
Page 238 of 247
Due to legal requirements in some states
and Canadian provinces, your vehicle may
be required to be in the ready condition for
an Inspection/Maintenance (I/M) test of the
emission control system.
The vehicle is set to the ready condition
when it is driven through certain driving
patterns. Usually, the ready condition can
be obtained by ordinary usage of the ve-
hicle.
If a powertrain system component is re-
paired or the battery is disconnected, the
vehicle may be reset to a not ready condi-
tion. Before taking the I/M test, drive the
vehicle through the following pattern to set
the vehicle to the ready condition. If you
cannot or do not want to perform the driving
pattern, an authorized NISSAN dealer can
conduct it for you.
WARNING
Always drive the vehicle in a safe man-
ner according to traffic conditions and
obey all traffic laws.1. Start the engine when the engine coolant
temperature gauge needle points to C.
Allow the engine to idle until the gauge
needle points between the C and H (nor-
mal operating temperature).
2. Accelerate the vehicle to 55 mph (88
km/h), then quickly release the accelera-
tor pedal completely and keep it released
for at least 6 seconds.
3. Quickly depress the accelerator pedal for
a moment, then drive the vehicle at a
speed of 53 to 60 mph (85 to 97 km/h) for
at least 5 minutes.
4. Stop the vehicle.
5. Accelerate the vehicle to 35 mph (55
km/h) and maintain the speed for 20
seconds.
6. Repeat steps four through five least three
times.
7. Accelerate the vehicle to 55 mph (88
km/h) and maintain the speed for at least
3 minutes.
8. Stop the vehicle and turn the engine off.
9. Repeat steps one through eight at least
one more time.
If step one through seven interrupted, repeat
the preceding step. Any safe driving mode is
acceptable between steps. Do not stop the
engine until step seven is completed.
READINESS FOR
INSPECTION/MAINTENANCE
(I/M) TEST (US only)
10-28Technical and consumer information
ZX