engine NISSAN FRONTIER 2000 D22 / 1.G User Guide
[x] Cancel search | Manufacturer: NISSAN, Model Year: 2000, Model line: FRONTIER, Model: NISSAN FRONTIER 2000 D22 / 1.GPages: 269, PDF Size: 2.19 MB
Page 74 of 269
WARNING
The cigarette lighter should not be
used while driving so that full attention
may be given to the driving operation.
CAUTION
The cigarette lighter socket is a power
source for the cigarette lighter element
only. The use of the cigarette lighter
socket as a power source for any other
accessory is not recommended.
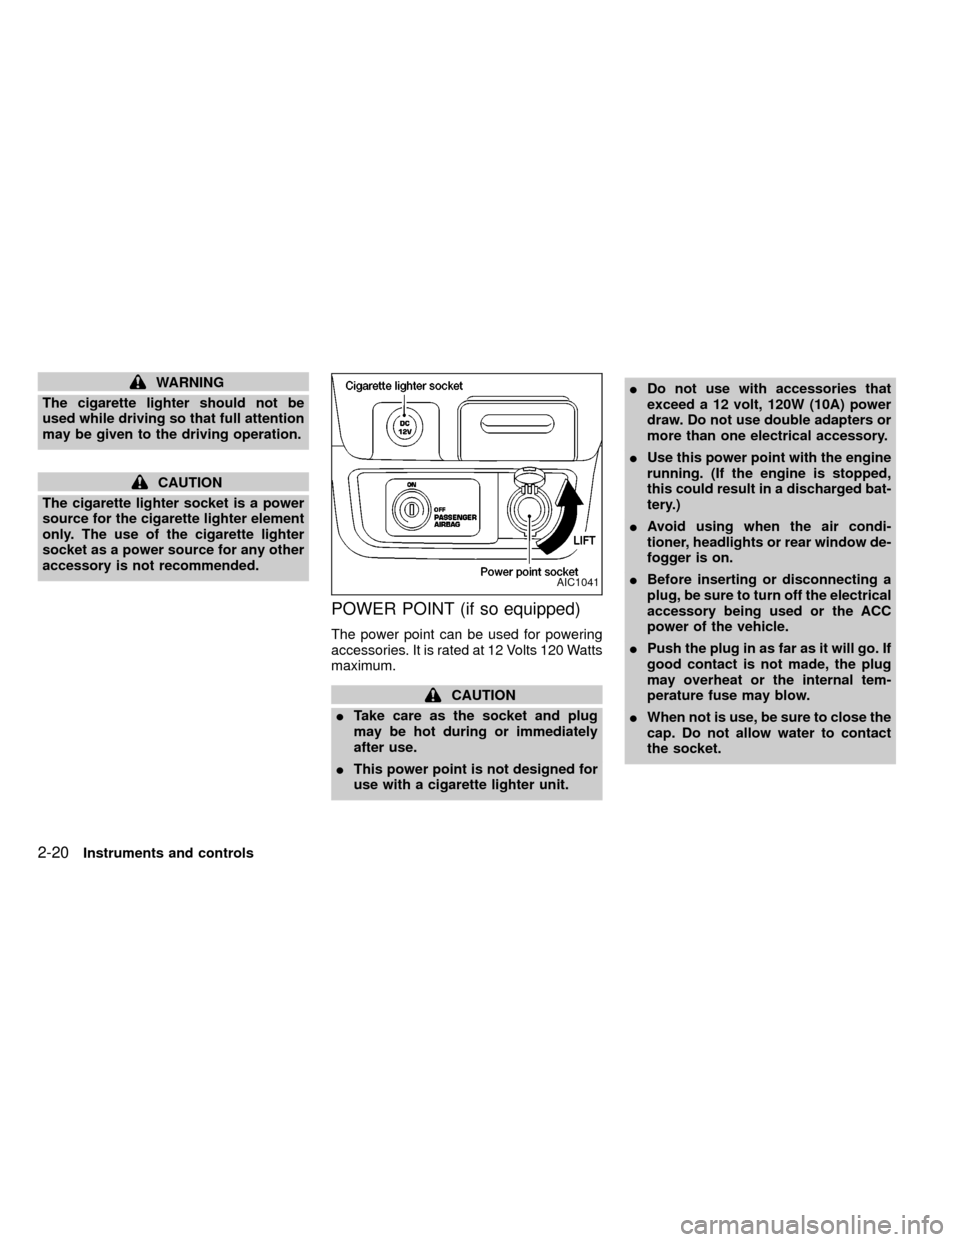
POWER POINT (if so equipped)
The power point can be used for powering
accessories. It is rated at 12 Volts 120 Watts
maximum.
CAUTION
ITake care as the socket and plug
may be hot during or immediately
after use.
IThis power point is not designed for
use with a cigarette lighter unit.IDo not use with accessories that
exceed a 12 volt, 120W (10A) power
draw. Do not use double adapters or
more than one electrical accessory.
IUse this power point with the engine
running. (If the engine is stopped,
this could result in a discharged bat-
tery.)
IAvoid using when the air condi-
tioner, headlights or rear window de-
fogger is on.
IBefore inserting or disconnecting a
plug, be sure to turn off the electrical
accessory being used or the ACC
power of the vehicle.
IPush the plug in as far as it will go. If
good contact is not made, the plug
may overheat or the internal tem-
perature fuse may blow.
IWhen not is use, be sure to close the
cap. Do not allow water to contact
the socket.
AIC1041
2-20Instruments and controls
ZX
Page 77 of 269
CAUTION
Leaving the dome light switch in the ON
position for extended periods of time
will result in a discharged battery.
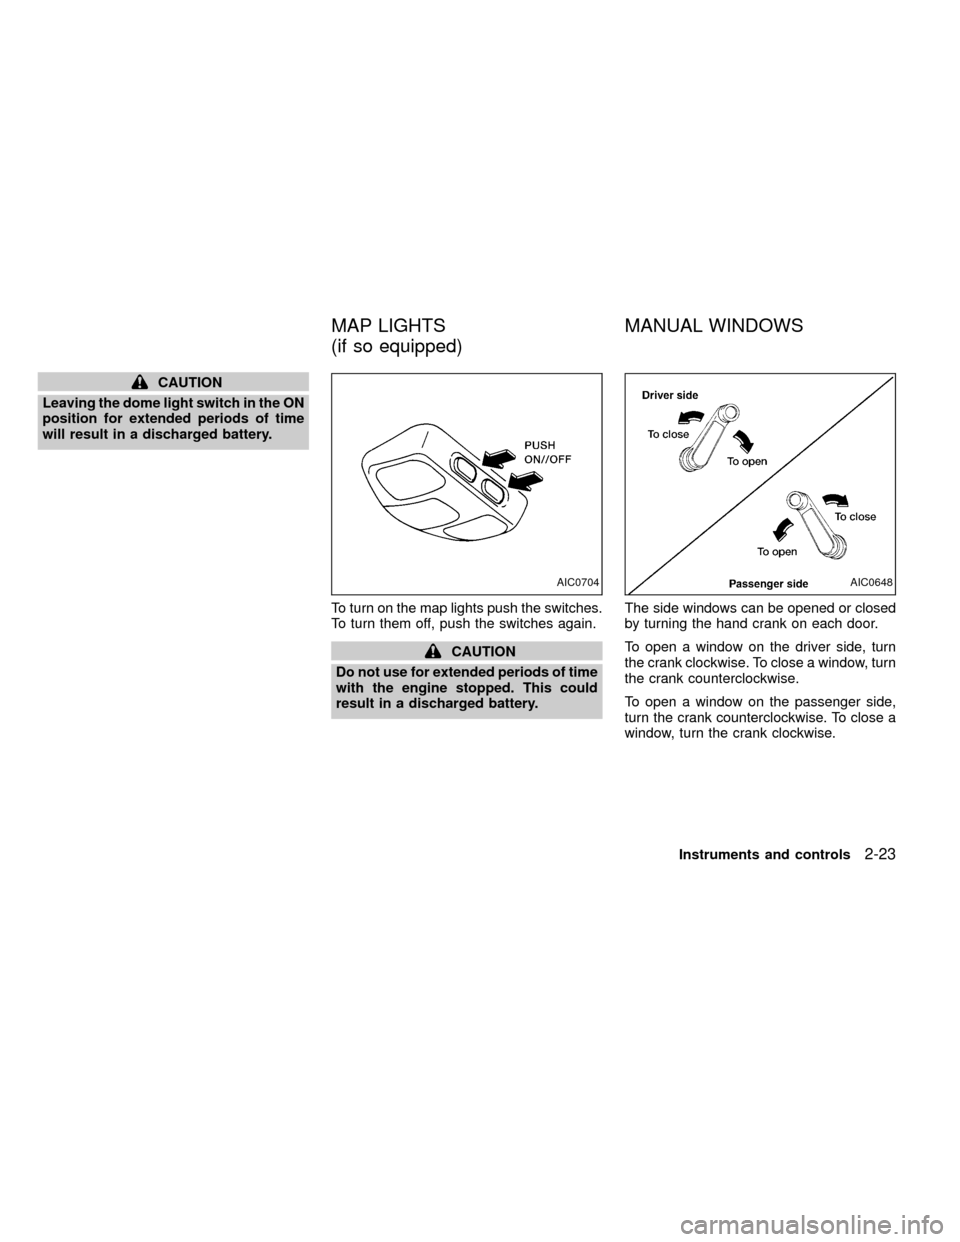
To turn on the map lights push the switches.
To turn them off, push the switches again.
CAUTION
Do not use for extended periods of time
with the engine stopped. This could
result in a discharged battery.The side windows can be opened or closed
by turning the hand crank on each door.
To open a window on the driver side, turn
the crank clockwise. To close a window, turn
the crank counterclockwise.
To open a window on the passenger side,
turn the crank counterclockwise. To close a
window, turn the crank clockwise.
AIC0704AIC0648
MAP LIGHTS
(if so equipped)MANUAL WINDOWS
Instruments and controls2-23
ZX
Page 90 of 269
device must accept any interference re-
ceived including interference that may
cause undesired operation of the device.
WARNING
IMake sure the hood is completely
closed and latched before driving.
Failure to do so could cause the
hood to fly open and result in an
accident.
IIf you see steam or smoke coming
from the engine compartment, to
avoid injury do not open the hood.
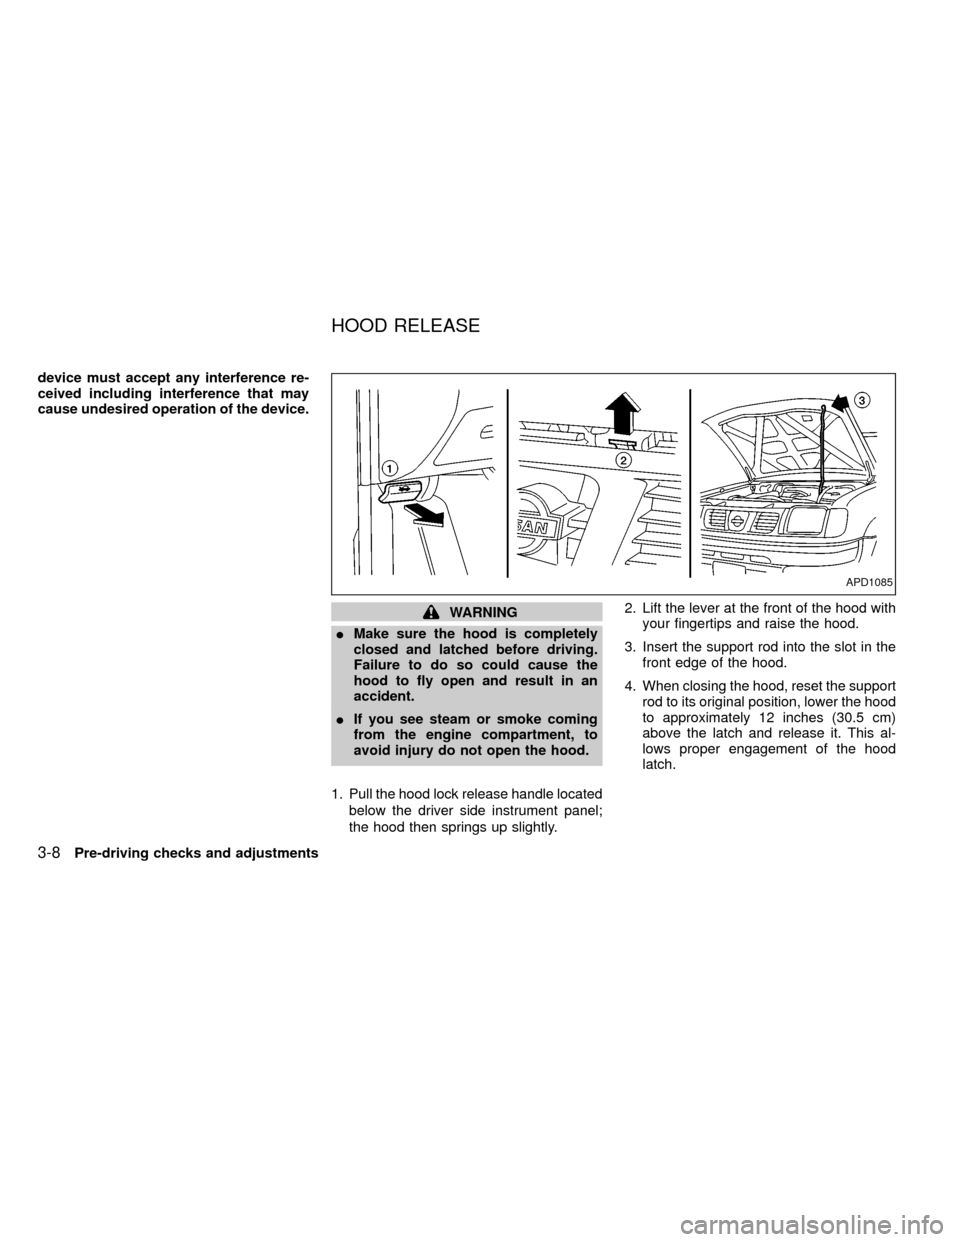
1. Pull the hood lock release handle located
below the driver side instrument panel;
the hood then springs up slightly.2. Lift the lever at the front of the hood with
your fingertips and raise the hood.
3. Insert the support rod into the slot in the
front edge of the hood.
4. When closing the hood, reset the support
rod to its original position, lower the hood
to approximately 12 inches (30.5 cm)
above the latch and release it. This al-
lows proper engagement of the hood
latch.
APD1085
HOOD RELEASE
3-8Pre-driving checks and adjustments
ZX
Page 93 of 269
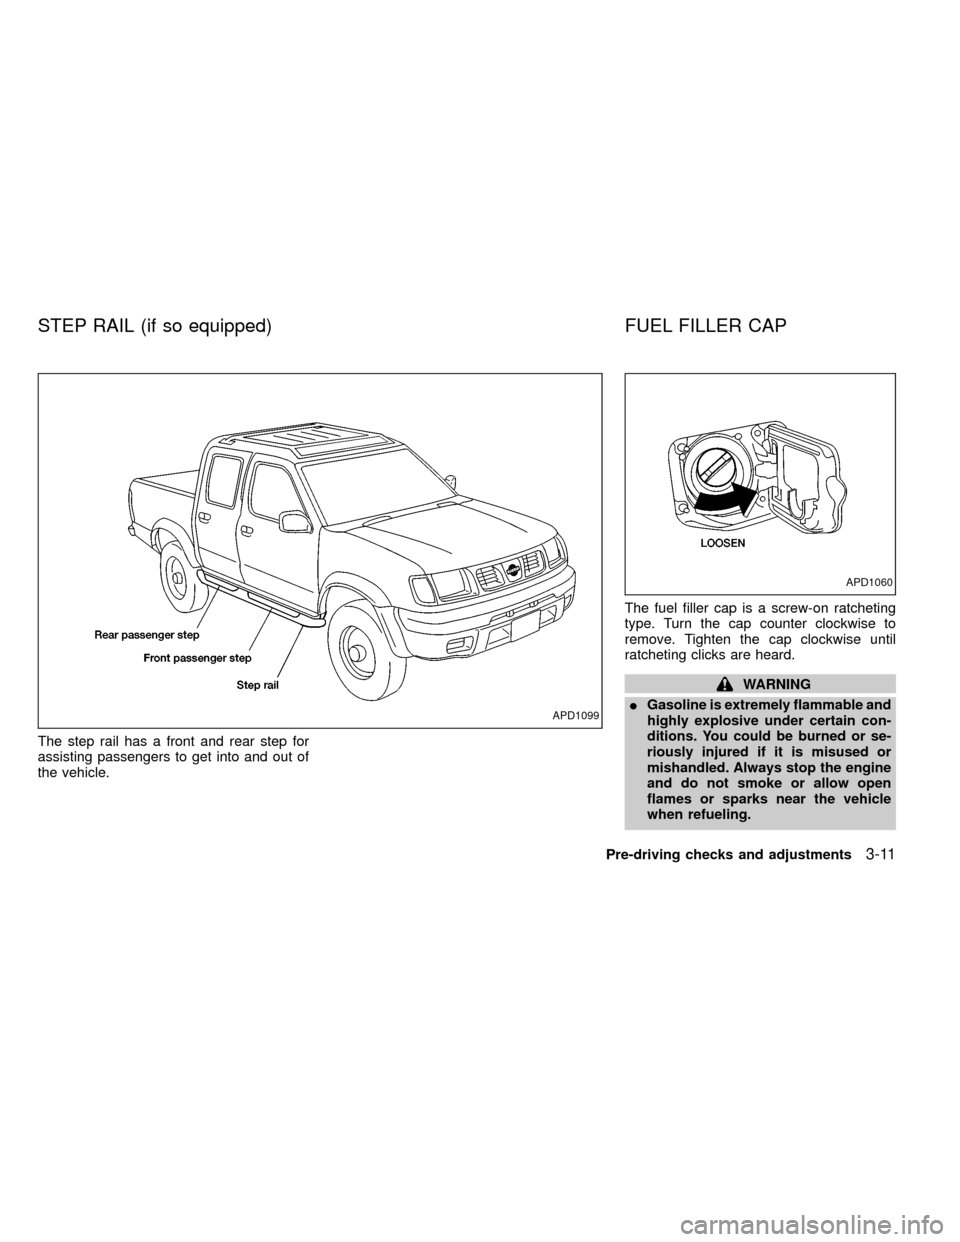
The step rail has a front and rear step for
assisting passengers to get into and out of
the vehicle.The fuel filler cap is a screw-on ratcheting
type. Turn the cap counter clockwise to
remove. Tighten the cap clockwise until
ratcheting clicks are heard.
WARNING
IGasoline is extremely flammable and
highly explosive under certain con-
ditions. You could be burned or se-
riously injured if it is misused or
mishandled. Always stop the engine
and do not smoke or allow open
flames or sparks near the vehicle
when refueling.
APD1099
APD1060
STEP RAIL (if so equipped) FUEL FILLER CAP
Pre-driving checks and adjustments3-11
ZX
Page 103 of 269
WARNING
IThe air conditioner cooling function
operates only when the engine is
running.
IDo not leave children, unreliable
adults, or pets alone in your vehicle.
On hot, sunny days, temperatures in
a closed vehicle could quickly be-
come high enough to cause severe
or possibly fatal injuries to people or
animals.
IDo not use the recirculation mode
for long periods as it may cause the
interior air to become stale and the
windows to fog up.
IPositioning of the heater and air con-
ditioner controls should not be done
while driving, in order that full atten-
tion may be given to the driving
operation.
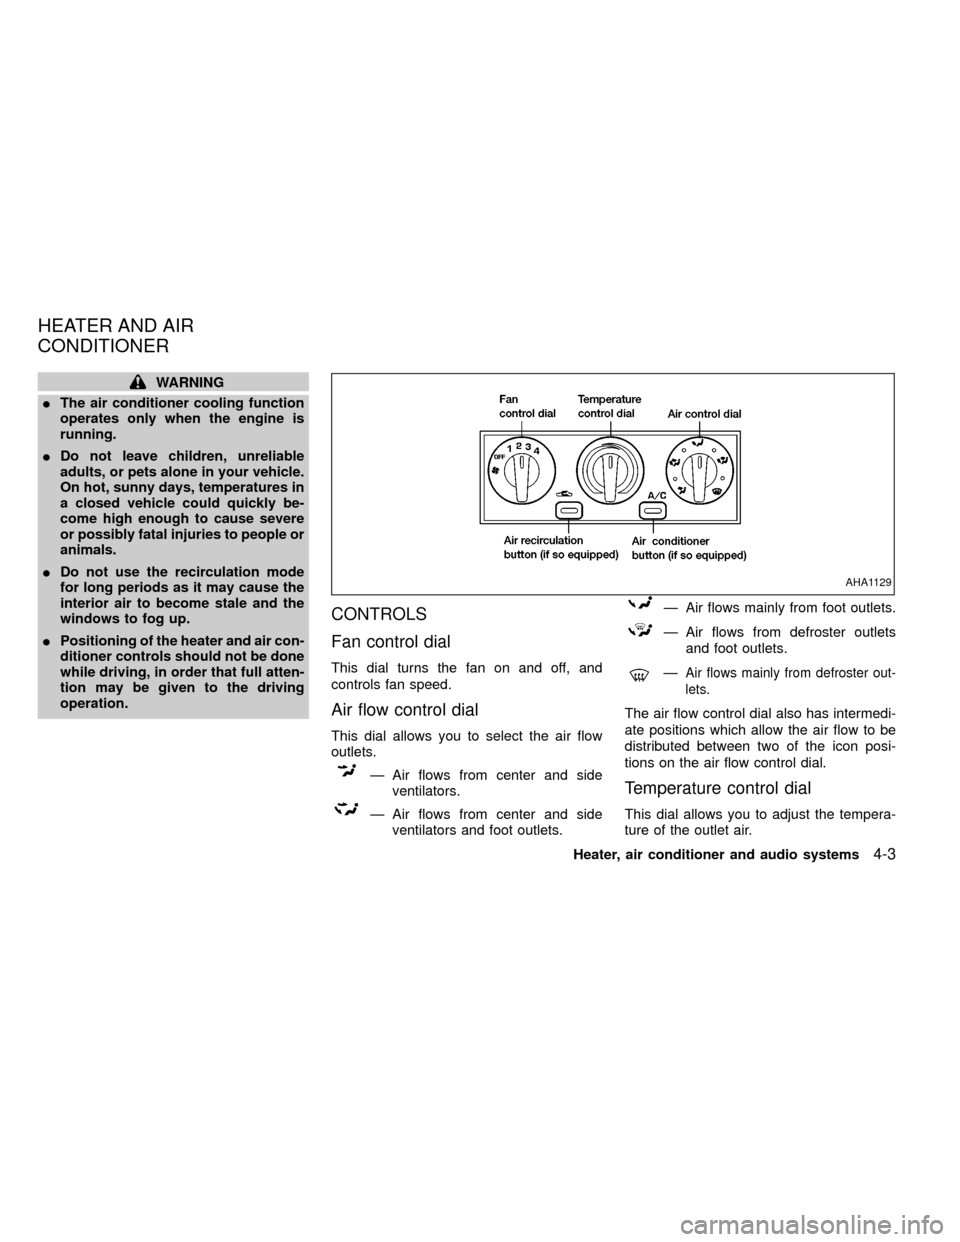
CONTROLS
Fan control dial
This dial turns the fan on and off, and
controls fan speed.
Air flow control dial
This dial allows you to select the air flow
outlets.
Ð Air flows from center and side
ventilators.
Ð Air flows from center and side
ventilators and foot outlets.
Ð Air flows mainly from foot outlets.
Ð Air flows from defroster outlets
and foot outlets.
ÐAir flows mainly from defroster out-
lets.
The air flow control dial also has intermedi-
ate positions which allow the air flow to be
distributed between two of the icon posi-
tions on the air flow control dial.
Temperature control dial
This dial allows you to adjust the tempera-
ture of the outlet air.
AHA1129
HEATER AND AIR
CONDITIONER
Heater, air conditioner and audio systems4-3
ZX
Page 104 of 269

Air recirculation button (if
so equipped)
NOTE:
The air recirculation feature is available
only on those vehicles equipped with air
conditioning.
OFF position (indicator light off):
Outside air is drawn into the passenger
compartment and distributed through the
selected outlets.
Use the OFF position for normal heater or
air conditioner operation.
ON position (indicator light on):
Interior air is recirculated inside the vehicle.
Push the
button to the on position
when:
Idriving on a dusty road.
Ito prevent traffic fumes from entering the
passenger compartment.
Ifor maximum cooling when using the air
conditioner.
Air conditioner button (if so
equipped)
Start the engine, move the fan control dial to
the desired (one to four) position, and push
the air conditioner button to turn on the air
conditioner. The indicator light comes on
when the air conditioner is operating. To turn
off the air conditioner, push the button
again.
The air conditioner cooling function op-
erates only when the engine is running.
HEATER OPERATION
Heating
This mode is used to direct hot air mainly
from the floor outlets. A small amount of air
also flows from the defrost outlets.
1. Push the
button (if so equipped) to
the off position for normal heating.
2. Turn the air control dial to the
po-
sition.
3. Turn the fan control dial to the desired
position.
4. Turn the temperature control dial to thedesired position between the middle and
the hot position.
Ventilation
This mode directs outside air from the side
and center vents.
1. Push the
button (if so equipped) to
the off position.
2. Turn the air control dial to the
po-
sition.
3. Turn the fan control dial to the desired
position.
4. Turn the temperature control dial to the
desired position.
Defrosting/defogging
This mode is used to defrost/defog the
windows.
1. Turn the air control dial to the
po-
sition.
IWhen the
position is selected, the
air conditioner automatically turns on
(however, the indicator light will not illu-
minate) if the outside temperature is
more than 45äF(7äC). This dehumidifies
the air which helps defog the windshield.
4-4Heater, air conditioner and audio systems
ZX
Page 105 of 269

Themode automatically turns off,
allowing outside air to be drawn into the
passenger compartment to further im-
prove the defogging performance
2. Move the fan control dial to the desired
position.
3. Move the temperature control dial to the
desired position between the middle and
the hot position.
Bi-level heating
This mode directs cooler air from the side
and center vents and warmer air from the
floor outlets. When the temperature control
dial is moved to the full hot or full cool
position, the air between the vents and the
floor outlets is the same temperature.
1. Push the
button (if so equipped) to
the off position.
2. Turn the air control dial to the
po-
sition.
3. Turn the fan control dial to the desired
position.
4. Turn the temperature control dial to the
desired position.
Heating and defrosting/defogging
This mode heats the interior and defogs the
windshield.
1. Turn the air control dial to the
po-
sition.
IWhen the
position is selected, the
air conditioner automatically turns on
(however, the indicator light will not illu-
minate) if the outside temperature is
more than 45äF(7äC). This dehumidifies
the air which helps defog the windshield.
The
mode automatically turns off,
allowing outside air to be drawn into the
passenger compartment to further im-
prove the defogging performance.
2. Turn the fan control dial to the desired
position.
3. Turn the temperature control dial to the
desired position between the middle and
the hot postion.
Operating tips
Clear snow and ice from the wiper
blades and air inlet in front of the wind-
shield. This improves heater operation.
AIR CONDITIONER OPERATION
(if so equipped)
Start the engine, move the fan control dial to
the desired (one to four) position, and push
in the air conditioner button to activate the
air conditioner. When the air conditioner is
on, cooling and dehumidfying functions are
added to the heater operation.
The air conditioner cooling function op-
erates only when the engine is running.
Cooling
This mode is used to cool and dehumidify
the air.
1. Push the
button to the off position.
2. Turn the air control dial to the
po-
sition.
3. Turn the fan control dial to the desired
position.
4. Turn on the air conditioner button. The
indicator light comes on.
5. Turn the temperature control dial to the
desired position.
For quick cooling when the outside tem-
perature is high, push the
button to
Heater, air conditioner and audio systems
4-5
ZX
Page 106 of 269

the on position. Be sure to return the air
recirculation button to the off position for
normal cooling.
Dehumidfied heating
This mode is used to heat and dehumidfy
the air.
1. Push the
button to the off position.
2. Turn the air control dial to the
po-
sition.
3. Turn the fan control dial to the desired
position.
4. Turn on the air conditioner button. The
indicator light comes on.
5. Turn the temperature control dial to the
desired position.
Dehumidfied defrosting/defogging
This mode is used to defog the windows
and dehumidify the air.
1. Turn the air control dial to the
po-
sition.
IWhen the
,or positions in
between are selected, the air conditioner
automatically turns on (however, the in-
dicator light will not illuminate) if theoutside temperature is more than 45äF
(7äC). This dehumidifies the air which
helps defog the windshield. The
mode automatically turns off, al-
lowing outside air to be drawn into the
passenger compartment to further im-
prove the defogging performance.
2. Turn the fan control dial to the desired
position.
3. Turn the temperature control dial to the
desired position.
Operating tips
IKeep windows and sunroof closed while
the air conditioner is in operation.
IAfter parking in the sun, drive for two or
three minutes with the windows open to
vent hot air from the passenger compart-
ment. Then, close the windows. This
allows the air conditioner to cool the
interior more quickly.
IThe air conditioning system should be
operated for approximately ten min-
utes at least once a month. This helps
prevent damage to the system due to
lack of lubrication.
IIf the engine coolant temperaturegauge indicates engine coolant tem-
perature over the normal range, turn
the air conditioner off. See²If your
vehicle overheats²in the²In case of
emergency²section of this manual.
AIR FLOW CHARTS
The following charts show the button and
dial positions forMAXIMUM AND QUICK
heating, cooling or defrosting.The air recir-
culation switch should always be in the
OFF position for heating and defrosting.
When the
,or positions in be-
tween are selected, the air conditioner au-
tomatically turns on (however, the indicator
light will not illuminate) if the outside tem-
perature is more than 45äF(7äC). This de-
humidifies the air which helps defog the
windshield. The
mode automatically
turns off, allowing outside air to be drawn
into the passenger compartment to further
improve the defogging performance..
4-6Heater, air conditioner and audio systems
ZX
Page 110 of 269

AM-FM RADIO WITH CASSETTE
PLAYER
This audio system has the FADER function
installed in Crew Cab models. Standard and
King Cab models, equipped with this audio
system, do not have the FADER function.
ON×OFF/VOL control knob
Turn the ignition key to the ACC or ON
position, then push the ON×OFF/VOL con-
trol knob. If you listen to the radio with the
engine not running, turn the key to the ACC
position. The mode (radio or cassette)
which was playing immediately before the
system was turned off resumes playing.
When no cassette is loaded, the radio
comes on. Pushing the ON×OFF/VOL con-
trol knob again turns the system off.
Turn the ON×OFF/VOL control knob to ad-
just the volume.
Clock operation
Pressing the CLOCK button alternates the
clock and the radio/cassette tape options in
the display.
AHA1004
4-10Heater, air conditioner and audio systems
ZX
Page 115 of 269

FM-AM RADIO WITH COMPACT
DISC (CD) PLAYER
Audio main operation
To turn the radio on, turn the ignition key to
ACC or ON. If you listen to the radio with the
engine not running, turn the key to the ACC
position.
Radio reception is affected by station signal
strength, distance from radio transmitter,
buildings, bridges, mountains and other ex-
ternal influences. Intermittent changes in
reception quality normally are caused by
these external influences.
Using a cellular phone in or near the
vehicle may influence radio reception
quality.
Power/Volume control
Turn the ignition key to the ACC or ON, then
push the power/volume control knob. The
mode (radio or CD) which was playing im-
mediately before the system was turned off
resumes playing. When no CD is loaded,
the radio comes on. Pushing the
power/volume control knob again turns the
system off.LHA0002
AUDIO SYSTEM
Heater, air conditioner and audio systems4-15
ZX