transmission oil NISSAN FRONTIER 2001 D22 / 1.G Owners Manual
[x] Cancel search | Manufacturer: NISSAN, Model Year: 2001, Model line: FRONTIER, Model: NISSAN FRONTIER 2001 D22 / 1.GPages: 290, PDF Size: 3.14 MB
Page 63 of 290
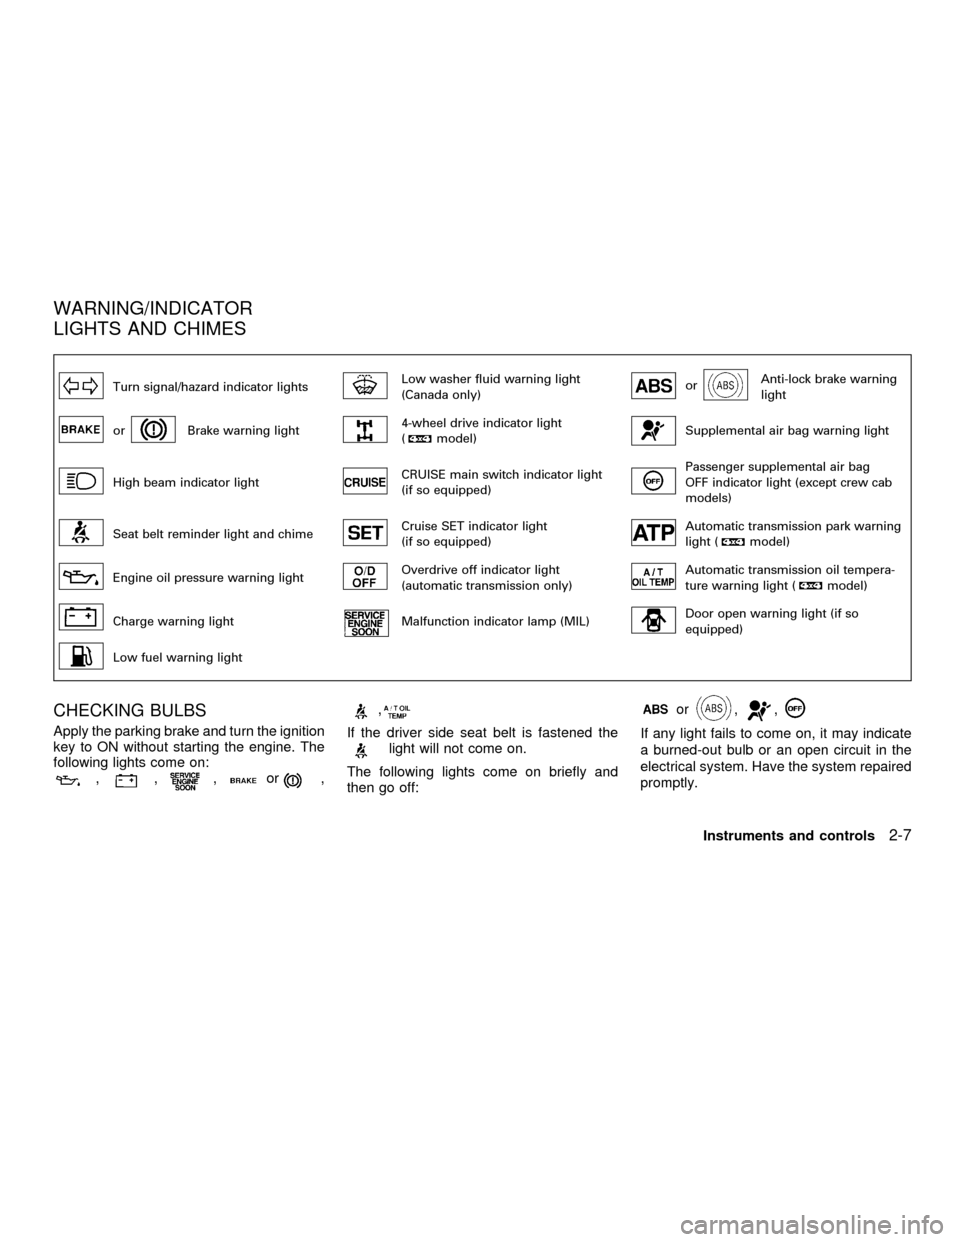
Turn signal/hazard indicator lightsLow washer fluid warning light
(Canada only)orAnti-lock brake warning
light
orBrake warning light4-wheel drive indicator light
(model)Supplemental air bag warning light
High beam indicator lightCRUISE main switch indicator light
(if so equipped)Passenger supplemental air bag
OFF indicator light (except crew cab
models)
Seat belt reminder light and chimeCruise SET indicator light
(if so equipped)Automatic transmission park warning
light (model)
Engine oil pressure warning lightOverdrive off indicator light
(automatic transmission only)Automatic transmission oil tempera-
ture warning light (model)
Charge warning lightMalfunction indicator lamp (MIL)Door open warning light (if so
equipped)
Low fuel warning light
CHECKING BULBS
Apply the parking brake and turn the ignition
key to ON without starting the engine. The
following lights come on:
,,,or,
,
If the driver side seat belt is fastened thelight will not come on.
The following lights come on briefly and
then go off:
or,,
If any light fails to come on, it may indicate
a burned-out bulb or an open circuit in the
electrical system. Have the system repaired
promptly.
WARNING/INDICATOR
LIGHTS AND CHIMES
Instruments and controls2-7
ZX
Page 64 of 290
WARNING LIGHTS
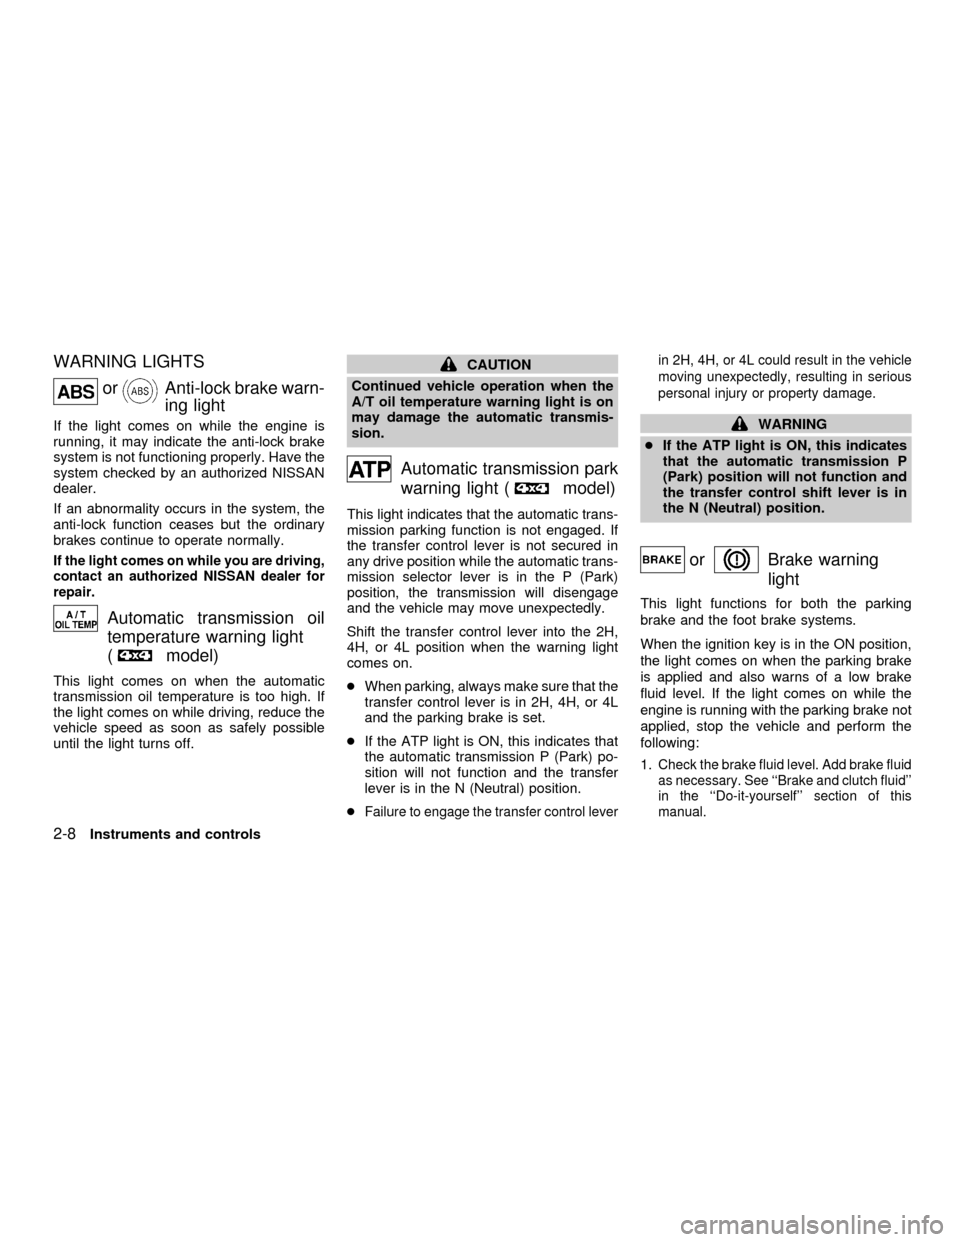
orAnti-lock brake warn-
ing light
If the light comes on while the engine is
running, it may indicate the anti-lock brake
system is not functioning properly. Have the
system checked by an authorized NISSAN
dealer.
If an abnormality occurs in the system, the
anti-lock function ceases but the ordinary
brakes continue to operate normally.
If the light comes on while you are driving,
contact an authorized NISSAN dealer for
repair.
Automatic transmission oil
temperature warning light
(
model)
This light comes on when the automatic
transmission oil temperature is too high. If
the light comes on while driving, reduce the
vehicle speed as soon as safely possible
until the light turns off.
CAUTION
Continued vehicle operation when the
A/T oil temperature warning light is on
may damage the automatic transmis-
sion.
Automatic transmission park
warning light (
model)
This light indicates that the automatic trans-
mission parking function is not engaged. If
the transfer control lever is not secured in
any drive position while the automatic trans-
mission selector lever is in the P (Park)
position, the transmission will disengage
and the vehicle may move unexpectedly.
Shift the transfer control lever into the 2H,
4H, or 4L position when the warning light
comes on.
cWhen parking, always make sure that the
transfer control lever is in 2H, 4H, or 4L
and the parking brake is set.
cIf the ATP light is ON, this indicates that
the automatic transmission P (Park) po-
sition will not function and the transfer
lever is in the N (Neutral) position.
c
Failure to engage the transfer control leverin 2H, 4H, or 4L could result in the vehicle
moving unexpectedly, resulting in serious
personal injury or property damage.
WARNING
cIf the ATP light is ON, this indicates
that the automatic transmission P
(Park) position will not function and
the transfer control shift lever is in
the N (Neutral) position.
orBrake warning
light
This light functions for both the parking
brake and the foot brake systems.
When the ignition key is in the ON position,
the light comes on when the parking brake
is applied and also warns of a low brake
fluid level. If the light comes on while the
engine is running with the parking brake not
applied, stop the vehicle and perform the
following:
1.
Check the brake fluid level. Add brake fluid
as necessary. See ``Brake and clutch fluid''
in the ``Do-it-yourself'' section of this
manual.
2-8Instruments and controls
ZX
Page 152 of 290
cMake sure the area around the vehicle is
clear.
cCheck fluid levels such as engine oil,
coolant, brake and clutch fluid, and win-
dow washer fluid as frequently as pos-
sible, at least whenever you refuel.
cCheck that all windows and lights are
clean.
cVisually inspect tires for their appearance
and condition. Also check tires for proper
inflation.
cLock all doors.
cPosition seat and adjust head restraints.
cAdjust inside and outside mirrors.
cFasten seat belts and ask all passengers
to do likewise.
cCheck the operation of warning lights
when key is turned to the ON (3) position.
See9Warning/Indicator lights and
chimes9in the9Instruments and controls9
section.1. Apply the parking brake.
2.Automatic transmission:
Move the selector lever to P (Park) or N
(Neutral). P (Park) is preferred.
The selector lever cannot be moved
out of P (Park) and into any of the
other gear positions if the ignition key
is turned to OFF or if the key is re-
moved from the ignition switch.
The starter is designed not to operate
if the selector lever is in one of the
driving positions.
Manual transmission:
Move the shift lever to N (Neutral), and
fully depress the clutch pedal to the floor
while starting the engine.
The starter is designed not to operate
unless the clutch pedal is fully de-
pressed.
3.With your foot off the accelerator
pedal,turn the ignition key to START.
Release the key when the engine starts.
If the engine starts, but fails to run, repeat
the above procedure.cIf the engine is very hard to start in
extremely cold or hot weather, depress
the accelerator pedal fully and hold it
to help start the engine.
cIn the summer, when restarting the
engine within 30 minutes after it has
been stopped, keep the accelerator
pedal fully depressed while starting.
CAUTION
Do not operate the starter for more than
15 seconds at a time. If the engine does
not start, turn the key off and wait 10
seconds before cranking again, other-
wise the starter could be damaged.
4.Warm-up
Always allow the engine to idle for at
least 30 seconds after starting. Drive at a
moderate speed for a short distance first,
especially in cold weather.
BEFORE STARTING THE
ENGINESTARTING THE ENGINE
5-8Starting and driving
ZX
Page 196 of 290

8 Do-it-yourself
Maintenance precautions .......................................8-2
Engine compartment check locations ....................8-3
Engine cooling system ...........................................8-6
Checking engine coolant level ..........................8-6
Changing engine coolant ..................................8-7
Engine oil .............................................................8-10
Checking engine oil level ................................8-10
Changing engine oil ........................................8-11
Changing engine oil filter.................................8-13
Automatic transmission fluid ................................8-14
Temperature conditions for checking ..............8-14
Power steering fluid..............................................8-15
Brake and clutch fluid...........................................8-16
Window washer fluid ............................................8-16
Window washer fluid reservoir ........................8-16
Battery ..................................................................8-17
Jump starting ...................................................8-18
Drive belts ............................................................8-19
Spark plugs ..........................................................8-20
Replacing spark plugs
(except supercharger) .....................................8-20Replacing spark plugs
(with supercharger)..........................................8-21
Air cleaner ............................................................8-21
Windshield wiper blades ......................................8-23
Cleaning ..........................................................8-23
Replacing .........................................................8-23
Parking brake and brake pedal ............................8-24
Checking parking brake...................................8-24
Checking brake pedal .....................................8-24
Brake booster ..................................................8-25
Clutch pedal .........................................................8-26
Checking clutch pedal .....................................8-26
Fuses ....................................................................8-27
Passenger compartment .................................8-27
Multi-remote controller battery replacement ........8-28
Lights ....................................................................8-29
Headlights ........................................................8-29
Fog lights (if so equipped)...............................8-32
Exterior and interior lights ...............................8-33
Wheels and tires ..................................................8-36
Tire pressure ...................................................8-36
ZX
Page 198 of 290
When performing any inspection or mainte-
nance work on your vehicle, always take
care to prevent serious accidental injury to
yourself or damage to the vehicle. The
following are general precautions which
should be closely observed.
WARNING
cPark the vehicle on a level surface,
apply the parking brake securely and
block the wheels to prevent the ve-
hicle from moving. For manual trans-
mission models, move the shift lever
to N (Neutral). For automatic trans-
mission models, move the selector
lever to P (Park).
cBe sure the ignition key is in the OFF
or LOCK position when performing
any parts replacement or repairs.
cNever leave the engine or automatic
transmission related component
harnesses disconnected while the
ignition switch is in the ON position.
cNever connect or disconnect the bat-
tery or any transistorized compo-
nent while the ignition switch is in
the ON position.cIf you must work with the engine
running, keep your hands, clothing,
hair and tools away from moving
fans, belts, and any other moving
parts.
cIt is advisable to secure or remove
any loose clothing and remove any
jewelry, such as rings, watches, etc.,
before working on your vehicle.
cAlways wear eye protection when-
ever you work on your vehicle.
cIf you must run the engine in an
enclosed space such as a garage, be
sure there is proper ventilation for
exhaust gases to escape.
cNever get under the vehicle while it
is supported only by a jack. If it is
necessary to work under the vehicle,
support it with safety stands.
cKeep smoking materials, flame and
sparks away from fuel tank and bat-
tery.
cOn gasoline engine models with the
multiport fuel injection (MFI) system,
the fuel filter or fuel lines should be
serviced by an authorized NISSANdealer because the fuellines are un-
der high pressure even when the
engine is off.
CAUTION
cDo not work under the hood while
the engine is hot. Turn the engine off
and wait until it cools down.
cNever connect or disconnect either
the battery or any transistorized
component connector while the igni-
tion is on.
cAvoid contact with used engine oil
and coolant. Improperly disposed
engine oil, engine coolant and/or
other vehicle fluids can damage the
environment. Always conform to lo-
cal regulations for disposal of ve-
hicle fluid.
This ``Do-it-yourself'' section gives instruc-
tions regarding only those items which are
relatively easy for an owner to perform.
You should be aware that incomplete or
improper servicing may result in operating
difficulties or excessive emissions, and
could affect your warranty coverage.If in
doubt about any servicing, have it done
by an authorized NISSAN dealer.
MAINTENANCE
PRECAUTIONS
8-2Do-it-yourself
ZX
Page 242 of 290

for smooth operation and make sure it has
the proper distance under it when de-
pressed fully. Check the brake booster func-
tion. Be certain to keep the floor mat away
from the pedal.
Parking brake*Check that the lever has
the proper travel and confirm that your
vehicle is held securely on a fairly steep hill
with only the parking brake applied.
Automatic transmission P (Park) posi-
tion mechanismCheck that the lock re-
lease button on the selector lever operates
properly and smoothly. On a fairly steep hill
check that your vehicle is held securely with
the selector lever in the P position without
applying any brakes.
Under the hood and vehicle
The maintenance items listed here should
be checked periodically (e.g., each time you
check the engine oil or refuel).
Additional information on the following
items with an ``*'' is found in the ``Do-it-
yourself operations'' section.
Windshield washer fluid*Check that there
is adequate fluid in the reservoir.
Engine oil level*Check the level afterparking the vehicle on a level surface with
the engine off. Wait a few minutes for the oil
to drain back into the oil pan.
Brake and clutch fluid levels*Make sure
that the brake and clutch fluid level is be-
tween the MIN and MAX lines on the reser-
voir.
Power steering fluid level* and lines
Check the level when the fluid is cold, with
the engine off. Check the lines for proper
attachment, leaks, cracks, etc.
Automatic transmission fluid level*
Check the level after putting the selector
lever in P with the engine idling at operating
temperature.
Engine coolant level*Check the coolant
level when the engine is cold.
Radiator and hosesCheck the front of the
radiator and clean off any dirt, insects,
leaves, etc., that may have accumulated.
Make sure the hoses have no cracks, de-
formation, rot or loose connections.
Engine drive belts*Make sure the drive
belts are not frayed, worn, cracked or oily.
Battery*Check the fluid level in each cell. It
should be between the MAX and MIN lines.Exhaust systemMake sure there are no
loose supports, cracks or holes. If the sound
of the exhaust seems unusual or there is a
smell of exhaust fumes, immediately have
the exhaust system inspected by an autho-
rized NISSAN dealer. See the carbon mon-
oxide warning in the ``Starting and driving''
section of this manual.
UnderbodyThe underbody is frequently
exposed to corrosive substances such as
those used on icy roads or to control dust. It
is very important to remove these sub-
stances from the underbody, otherwise rust
may form on the floor pan, frame, fuel lines
and exhaust system. At the end of winter,
the underbody should be thoroughly flushed
with plain water, in those areas where mud
and dirt may have accumulated. See the
``Appearance and care'' section of this
manual.
Fluid leaksCheck under the vehicle for
fuel, oil, water or other fluid leaks after the
vehicle has been parked for a while. Water
dripping from the air conditioner after use is
normal. If you should notice any leaks or if
gasoline fumes are evident, check for the
cause and have it corrected immediately.
9-4Maintenance
ZX
Page 245 of 290
![NISSAN FRONTIER 2001 D22 / 1.G Owners Manual Schedule 1
Abbreviations: R = Replace I = Inspect. Correct or replace if necessary. L = Lubricate [ ]: At the mileage intervals only
MAINTENANCE OPERATIONMAINTENANCE INTERVAL
Perform at number of mile](/img/5/645/w960_645-244.png "NISSAN FRONTIER 2001 D22 / 1.G Owners Manual Schedule 1
Abbreviations: R = Replace I = Inspect. Correct or replace if necessary. L = Lubricate [ ]: At the mileage intervals only
MAINTENANCE OPERATIONMAINTENANCE INTERVAL
Perform at number of mile")
Schedule 1
Abbreviations: R = Replace I = Inspect. Correct or replace if necessary. L = Lubricate [ ]: At the mileage intervals only
MAINTENANCE OPERATIONMAINTENANCE INTERVAL
Perform at number of miles, kilometers
or months, whichever comes first.Miles ý 1,000 3.75 7.5 11.25 15 18.75 22.5 26.25 30 33.75 37.5 41.25 45 48.75 52.5 56.25 60
(km ý 1,000) (6) (12) (18) (24) (30) (36) (42) (48) (54) (60) (66) (72) (78) (84) (90) (96)
Months 3 6 9 12 15 18 21 24 27 30 33 36 39 42 45 48
Chassis and body maintenance
Brake lines & cablesIIII
Brake pads, rotors, drums & liningsIIIIIIII
Automatic transmission, transfer & differ-
ential gear oil (exc. LSD)See NOTE (1)IIII
Limited-slip differential (LSD) gear oil See NOTE (1)IRIR
Manual transmission oil See NOTE (1) I I I [R]
Steering gear (box) & linkage, axle & suspension partsIIIIIIII
Tire rotation See NOTE (4)
Drive shaft boots (
) IIIIIIII
Propeller shaft (
) LLLLLLLL
Front wheel bearing grease (4x2)II
Front wheel bearing grease & free-running
hub grease (
)See NOTE (2)IRIR
Exhaust systemIIIIIIII
Supplemental air bag system See NOTE (3)
NOTE: (1) If towing a trailer, using a camper or a car-top carrier, or driving on rough or muddy roads, change (not just inspect) oil at every 30,000
miles (48,000 km) or 24 months except for LSD. Change LSD gear oil every 15,000 miles (24,000 km) or 12 months.
(2) If operating frequently in water, replace grease every 3,750 miles (6,000 km) or 3 months.
(3) Inspect the supplemental air bag system 10 years after the date of manufacture noted on the FMVSS certification label.
(4) Refer to(Tire rotation(under the(General maintenance(heading earlier in this section.
Maintenance9-7
ZX
Page 247 of 290
![NISSAN FRONTIER 2001 D22 / 1.G Owners Manual Schedule 2
Abbreviations: R = Replace I = Inspect. Correct or replace if necessary. L = Lubricate [ ]: At the mileage intervals only
MAINTENANCE OPERATIONMAINTENANCE INTERVAL
Perform at number of mile](/img/5/645/w960_645-246.png "NISSAN FRONTIER 2001 D22 / 1.G Owners Manual Schedule 2
Abbreviations: R = Replace I = Inspect. Correct or replace if necessary. L = Lubricate [ ]: At the mileage intervals only
MAINTENANCE OPERATIONMAINTENANCE INTERVAL
Perform at number of mile")
Schedule 2
Abbreviations: R = Replace I = Inspect. Correct or replace if necessary. L = Lubricate [ ]: At the mileage intervals only
MAINTENANCE OPERATIONMAINTENANCE INTERVAL
Perform at number of miles, kilometers or
months, whichever comes first.Miles ý 1,000 7.5 15 22.5 30 37.5 45 52.5 60
(km ý 1,000) (12) (24) (36) (48) (60) (72) (84) (96)
Months 6 12 18 24 30 36 42 48
Chassis and body maintenance
Brake lines & cablesIIII
Brake pads, rotors, drums & liningsIIII
Automatic transmission, transfer & differential gear oil (exc. LSD)IIII
Manual transmission oil I I I [R]
Limited-slip differential (LSD) gear oil I R I R
Steering gear (box) & linkage, axle & suspension parts I I
Tire rotation See NOTE (2)
Drive shaft boots (
) IIII
Propeller shaft (
) LLLL
Front wheel bearing grease (4x2) I I
Front wheel bearing grease & free-running hub grease (
)I R I R
Exhaust systemII
Supplemental air bag system See NOTE (1)
NOTE: (1) Inspect the supplemental air bag system 10 years after the date of manufacture noted on the FMVSS certification label.
(2) Refer to(Tire rotation(under the(General maintenance(heading earlier in this section.
Maintenance9-9
ZX
Page 248 of 290

Maintenance for off-road driving
(
only)
Whenever you drive off-road through sand,
mud or water as deep as the wheel hub,
more frequent maintenance may be re-
quired of the following items:
¶Brake pads and rotors
¶Brake linings and drums
¶Brake lines and hoses
¶Wheel bearing grease and free-running
hub grease
¶Differential, transmission and transfer oil
¶Steering linkage
¶Propeller shafts and front drive shafts
¶Air cleaner filter
These items should be checked frequently
to assure safe and proper operation of your
vehicle.
EXPLANATION OF
MAINTENANCE ITEMS
Additional information on the following
items with an ``*'' is found in the ``Do-it-
yourself'' section of this manual.
Emission control system
maintenance
Drive belts*Check drive belts for wear,
fraying or cracking and also for proper ten-
sion. Replace any damaged drive belts.
Air cleaner filterUnder normal driving con-
ditions, the air cleaner filter should be re-
placed in accordance with the maintenance
schedule. However, driving the vehicle in
dusty areas may cause rapid clogging of the
element. Consequently, the element may
have to be replaced more frequently.
Positive crankcase ventilation (PCV) fil-
terUnder normal driving conditions, the
filter should be replaced in accordance with
the maintenance schedule. If the vehicle is
operated under extremely adverse weather
conditions or in areas where ambient tem-
peratures are either extremely low or ex-
tremely high, the filter may become cloggedmore rapidly. In such an event, replace the
filter immediately.
EVAP Vapor linesCheck vapor lines and
connections for leaks, looseness, or dete-
rioration. If leaks are found, replace the
lines.
Fuel linesCheck the fuel hoses, piping and
connections for leaks, looseness or deterio-
ration. Replace any damaged parts.
Fuel filterIf the vehicle is operated under
extremely adverse weather conditions or in
areas where ambient temperatures are ei-
ther extremely low or extremely high, the
filter might become clogged. In such an
event, replace the filter immediately.
Engine coolant*Flush and refill the cooling
system.
Engine oil and oil filter*Under normal
driving conditions, the engine oil and oil filter
should be replaced in accordance with the
maintenance schedule. However, under se-
vere driving conditions, they may have to be
replaced more frequently.
Spark plugs*Replace with new plugs hav-
ing the correct heat range.
9-10Maintenance
ZX
Page 249 of 290

Chassis and body maintenance
Brake lines and cablesCheck the brake
lines and hoses (including brake booster
vacuum hoses, connections & check valve)
and parking brake cables for proper attach-
ment, leaks, cracks, chafing, abrasion, de-
terioration, etc.
Brake pads, rotors, drums and linings
Check these and the other brake compo-
nents for wear, deterioration and leaks. Un-
der severe driving conditions, they may have
to be inspected more frequently.
Manual and automatic transmission,
transfer and differential gear oilVisually
inspect for signs of leakage and replace oil
for limited-slip differential. Under severe
driving conditions, the oil should be re-
placed at the specified interval.
Steering gear and linkage, axle and sus-
pension parts and drive shaft boots
Check for damage, looseness and leakage
of oil or grease. Under severe driving con-
ditions, they may have to be inspected more
frequently.Propeller shaft(s)Check the propeller
shaft(s) for damage, looseness and grease
leakage under severe driving conditions
(
only).
Front wheel bearing grease and free-
running hub greaseCheck the wheel
bearing for grease leakage around grease
seals, axial end play and smooth turning.
Repack these in accordance with the main-
tenance schedule (4x2).
Check the wheel bearing and free-running
hub for grease leakage around grease
seals, axial end play and smooth turning.
Repack these in accordance with the main-
tenance schedule. In case of frequent driv-
ing in muddy water, the bearing grease and
free-running hub grease inspection should
be performed more frequently (
).
Exhaust systemVisually check the ex-
haust pipes, muffler, and hangers for proper
attachment, leaks, cracks, chafing, abra-
sion, deterioration, etc. Under severe driv-
ing conditions, inspection should be per-
formed more frequently.
Supplemental air bag systemCheck the
supplemental air bag system components
for proper attachment, damage, deformities,cracks, rust, etc. Work around and on the
supplemental air bag system should be
done by an authorized NISSAN dealer.
Maintenance
9-11
ZX