remove seats NISSAN FRONTIER 2005 D22 / 1.G User Guide
[x] Cancel search | Manufacturer: NISSAN, Model Year: 2005, Model line: FRONTIER, Model: NISSAN FRONTIER 2005 D22 / 1.GPages: 336, PDF Size: 7.24 MB
Page 52 of 336
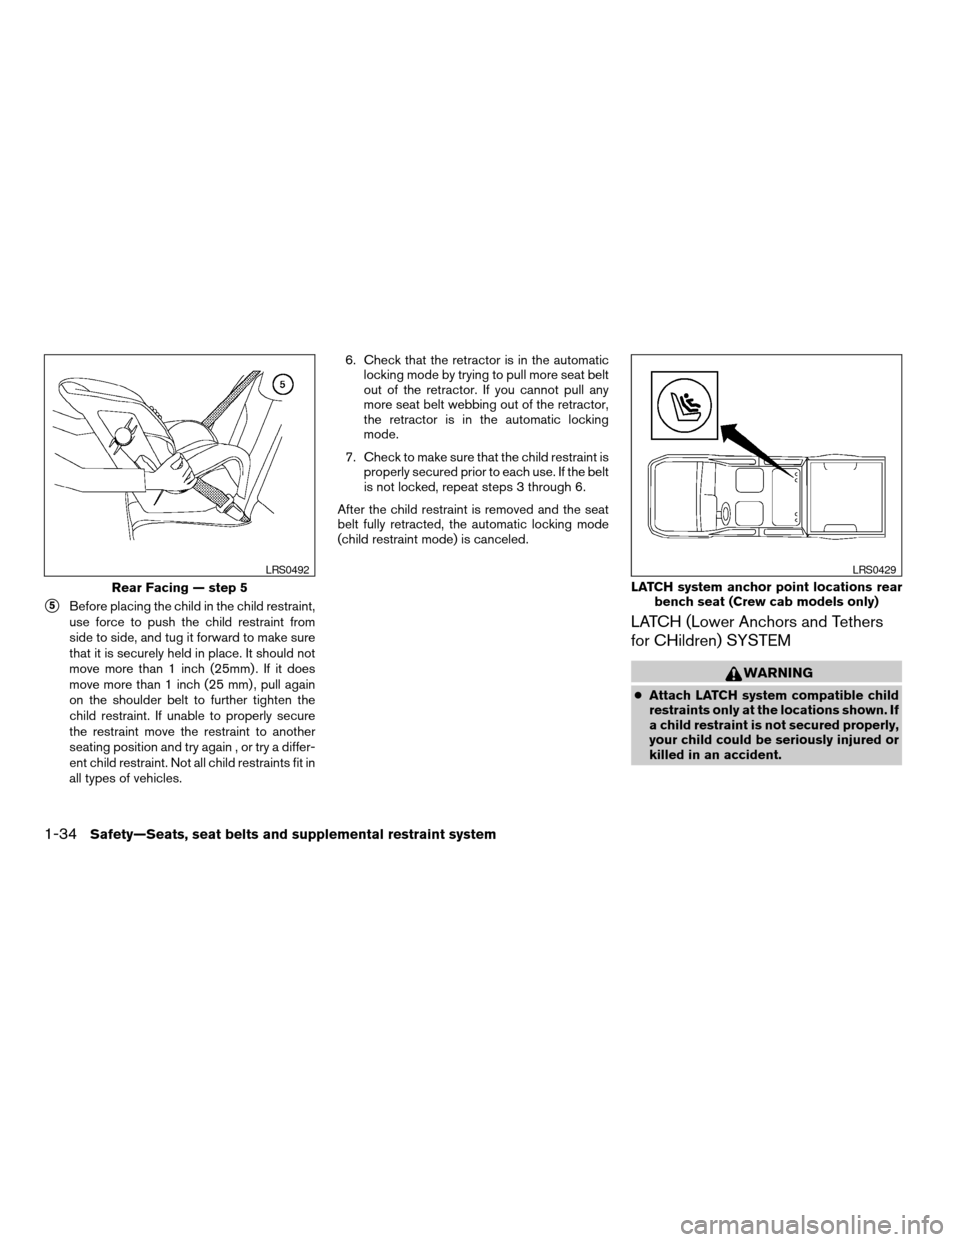
s5Before placing the child in the child restraint,
use force to push the child restraint from
side to side, and tug it forward to make sure
that it is securely held in place. It should not
move more than 1 inch (25mm) . If it does
move more than 1 inch (25 mm) , pull again
on the shoulder belt to further tighten the
child restraint. If unable to properly secure
the restraint move the restraint to another
seating position and try again , or try a differ-
ent child restraint. Not all child restraints fit in
all types of vehicles.6. Check that the retractor is in the automatic
locking mode by trying to pull more seat belt
out of the retractor. If you cannot pull any
more seat belt webbing out of the retractor,
the retractor is in the automatic locking
mode.
7. Check to make sure that the child restraint is
properly secured prior to each use. If the belt
is not locked, repeat steps 3 through 6.
After the child restraint is removed and the seat
belt fully retracted, the automatic locking mode
(child restraint mode) is canceled.
LATCH (Lower Anchors and Tethers
for CHildren) SYSTEM
WARNING
cAttach LATCH system compatible child
restraints only at the locations shown. If
a child restraint is not secured properly,
your child could be seriously injured or
killed in an accident.
Rear Facing — step 5
LRS0492
LATCH system anchor point locations rear
bench seat (Crew cab models only)
LRS0429
1-34Safety—Seats, seat belts and supplemental restraint system
ZREVIEW COPYÐ2005 Truck/Frontier(d22)
Owners ManualÐUSA_English(nna)
11/30/04Ðdebbie
X
Page 54 of 336
TOP TETHER STRAP CHILD
RESTRAINT
If your child restraint has a top tether strap, it must
be secured to the provided anchor point. Secure
the child restraint with a seat belt. Secure the top
tether strap to the anchor bracket which provides
the straightest installation of the tether strap.
Tighten the strap according to the manufactur-
er’s instructions to remove any slack.
WARNING
Child restraint anchor points are designed
to withstand only those loads imposed by
correctly fitted child restraints. Under no
circumstances are they to be used for
adult seat belts or harnesses.
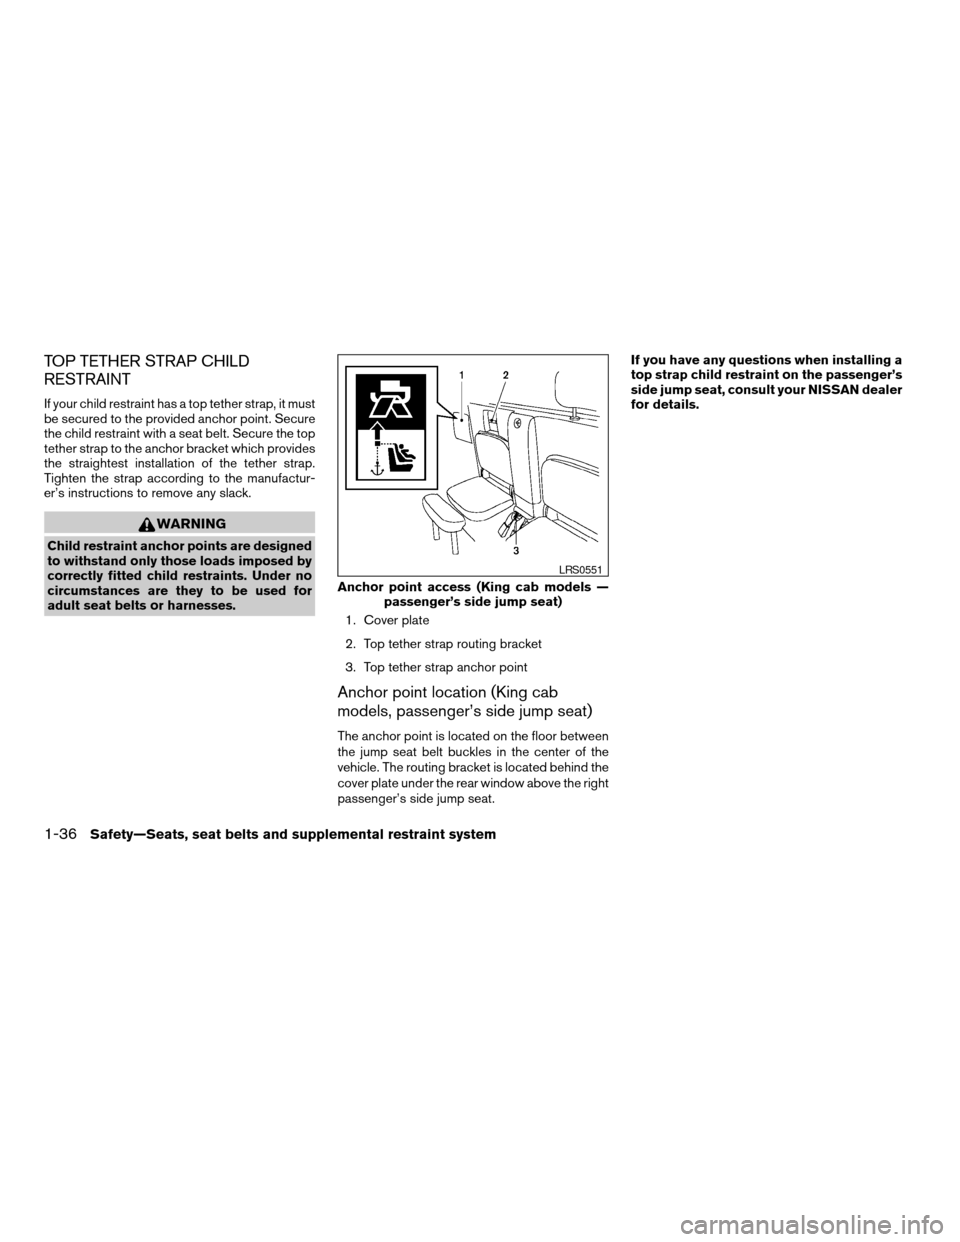
1. Cover plate
2. Top tether strap routing bracket
3. Top tether strap anchor point
Anchor point location (King cab
models, passenger’s side jump seat)
The anchor point is located on the floor between
the jump seat belt buckles in the center of the
vehicle. The routing bracket is located behind the
cover plate under the rear window above the right
passenger’s side jump seat.If you have any questions when installing a
top strap child restraint on the passenger’s
side jump seat, consult your NISSAN dealer
for details.
Anchor point access (King cab models —
passenger’s side jump seat)
LRS0551
1-36Safety—Seats, seat belts and supplemental restraint system
ZREVIEW COPYÐ2005 Truck/Frontier(d22)
Owners ManualÐUSA_English(nna)
11/30/04Ðdebbie
X
Page 56 of 336
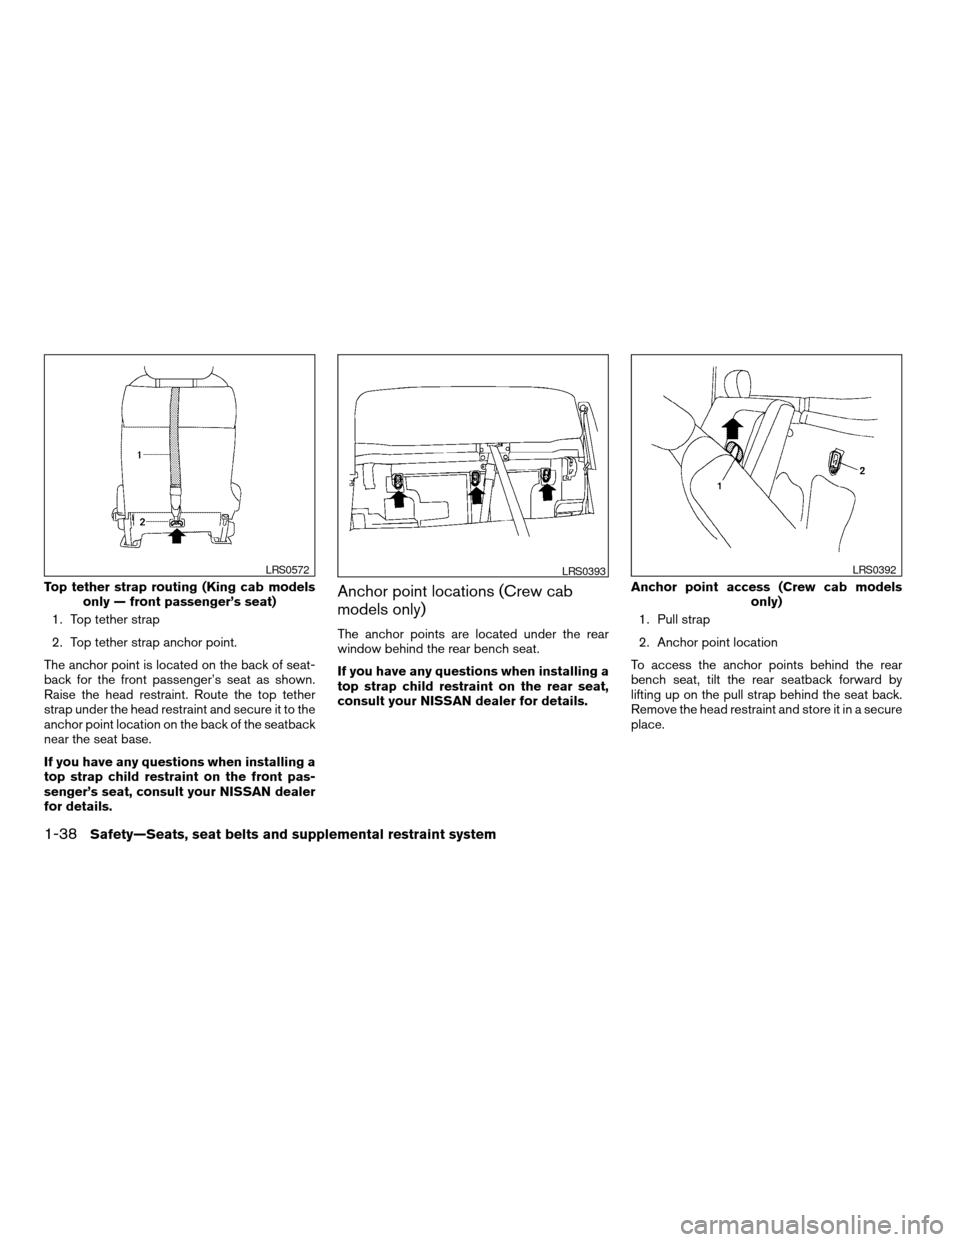
1. Top tether strap
2. Top tether strap anchor point.
The anchor point is located on the back of seat-
back for the front passenger’s seat as shown.
Raise the head restraint. Route the top tether
strap under the head restraint and secure it to the
anchor point location on the back of the seatback
near the seat base.
If you have any questions when installing a
top strap child restraint on the front pas-
senger’s seat, consult your NISSAN dealer
for details.
Anchor point locations (Crew cab
models only)
The anchor points are located under the rear
window behind the rear bench seat.
If you have any questions when installing a
top strap child restraint on the rear seat,
consult your NISSAN dealer for details.1. Pull strap
2. Anchor point location
To access the anchor points behind the rear
bench seat, tilt the rear seatback forward by
lifting up on the pull strap behind the seat back.
Remove the head restraint and store it in a secure
place.
Top tether strap routing (King cab models
only — front passenger’s seat)
LRS0572LRS0393
Anchor point access (Crew cab models
only)
LRS0392
1-38Safety—Seats, seat belts and supplemental restraint system
ZREVIEW COPYÐ2005 Truck/Frontier(d22)
Owners ManualÐUSA_English(nna)
11/30/04Ðdebbie
X
Page 58 of 336

cA child restraint with a top tether strap
should not be used in the front passen-
ger’s seat unless the vehicle is a King
Cab model only.
cThe three-point seat belt in your vehicle
is equipped with an automatic locking
mode retractor which must be used
when installing a child restraint.
cFailure to use the retractor’s locking
mode will result in the child restraint
not being properly secured. The re-
straint could tip over or otherwise be
unsecured and cause injury to the child
in a sudden stop or collision. Also, it can
change the operation of the front pas-
senger air bag. See “Front passenger
air bag and status light” later in this
section.If you must install a child restraint in the front seat,
follow these steps:
s1Position the child restraint on the front pas-
senger seat.It should be placed in a
front-facing direction only. Move the
seat to the rearmost position.Adjust the
head restraint to its highest position. Always
follow the child restraint manufacturer’s in-
structions.Child restraints for infants
must be used in the rear-facing direc-
tion and therefore must not be used in
the front seat.
The back of the child restraint should be
secured against the vehicle seat back. Ifnecessary, adjust or remove the head re-
straint to obtain the correct child restraint fit.
See “Head restraint adjustment” earlier in
this section. If the head restraint is removed,
store it in a secure place. Be sure to install
the head restraint when the child restraint is
removed. If the seating position does not
have an adjustable head restraint and it is
interfering with the proper child restraint fit,
try another seating position or a different
child restraint.
Front Facing — step 1WRS0379
1-40Safety—Seats, seat belts and supplemental restraint system
ZREVIEW COPYÐ2005 Truck/Frontier(d22)
Owners ManualÐUSA_English(nna)
11/30/04Ðdebbie
X
Page 59 of 336

s2Route the seat belt tongue through the child
restraint and insert it into the buckle until you
hear and feel the latch engage.
Be sure to follow the child restraint manu-
facturer’s instructions for belt routing.s3Pull on the shoulder belt until all of the belt is
fully extended. At this time, the seat belt
retractor is in the automatic locking mode
(child restraint mode) . It reverts to emer-
gency locking mode when the seat belt is
fully retracted.s4Allow the seat belt to retract slightly. Pull up
on the shoulder belt to remove any slack in
the belt.
Front Facing — step 2
WRS0159
Front Facing — step 3
WRS0160
Front Facing — step 4
LRS0457
Safety—Seats, seat belts and supplemental restraint system1-41
ZREVIEW COPYÐ2005 Truck/Frontier(d22)
Owners ManualÐUSA_English(nna)
11/30/04Ðdebbie
X
Page 60 of 336
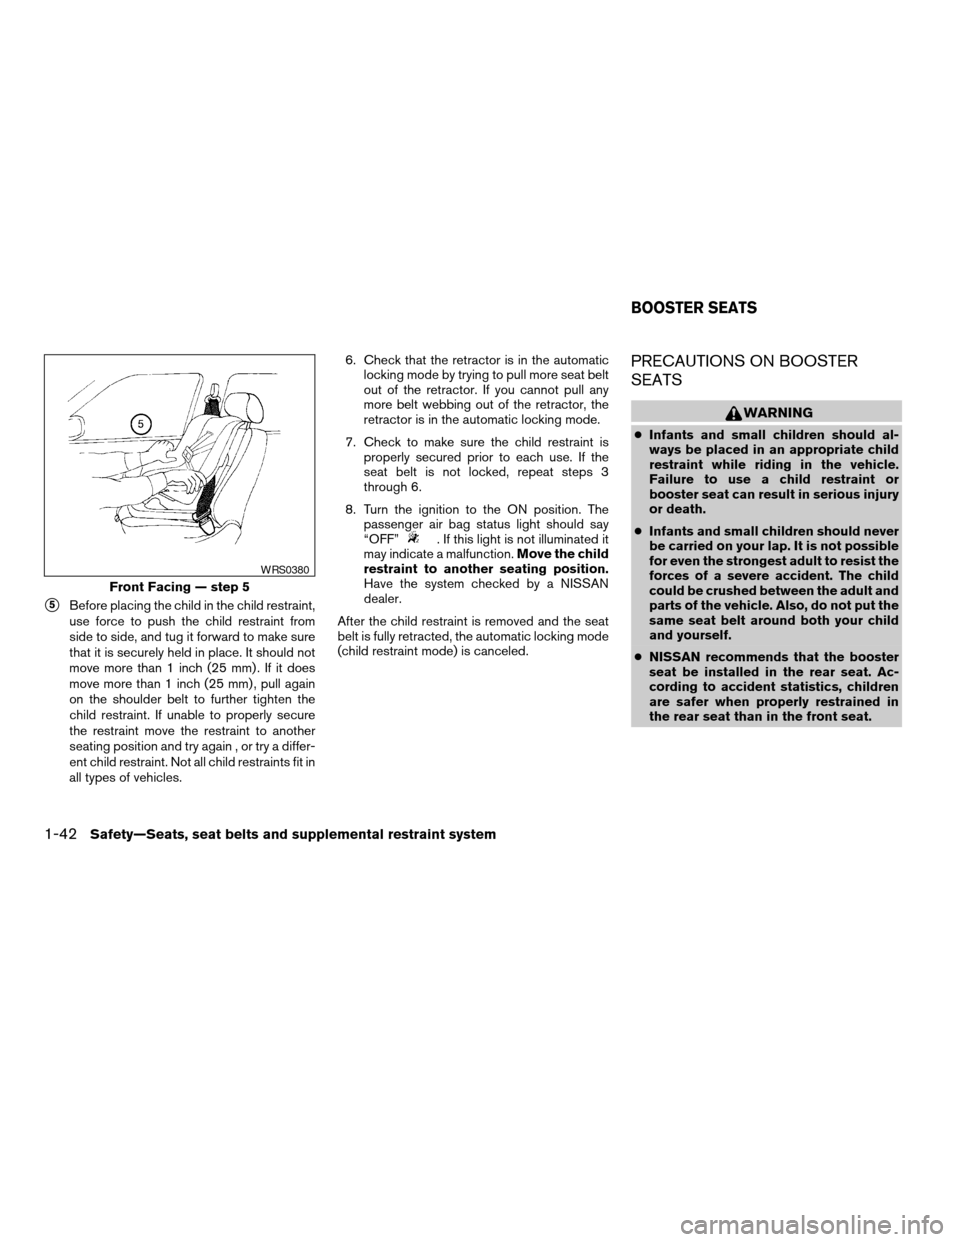
s5Before placing the child in the child restraint,
use force to push the child restraint from
side to side, and tug it forward to make sure
that it is securely held in place. It should not
move more than 1 inch (25 mm) . If it does
move more than 1 inch (25 mm) , pull again
on the shoulder belt to further tighten the
child restraint. If unable to properly secure
the restraint move the restraint to another
seating position and try again , or try a differ-
ent child restraint. Not all child restraints fit in
all types of vehicles.6. Check that the retractor is in the automatic
locking mode by trying to pull more seat belt
out of the retractor. If you cannot pull any
more belt webbing out of the retractor, the
retractor is in the automatic locking mode.
7. Check to make sure the child restraint is
properly secured prior to each use. If the
seat belt is not locked, repeat steps 3
through 6.
8. Turn the ignition to the ON position. The
passenger air bag status light should say
“OFF”
. If this light is not illuminated it
may indicate a malfunction.Move the child
restraint to another seating position.
Have the system checked by a NISSAN
dealer.
After the child restraint is removed and the seat
belt is fully retracted, the automatic locking mode
(child restraint mode) is canceled.
PRECAUTIONS ON BOOSTER
SEATS
WARNING
cInfants and small children should al-
ways be placed in an appropriate child
restraint while riding in the vehicle.
Failure to use a child restraint or
booster seat can result in serious injury
or death.
cInfants and small children should never
be carried on your lap. It is not possible
for even the strongest adult to resist the
forces of a severe accident. The child
could be crushed between the adult and
parts of the vehicle. Also, do not put the
same seat belt around both your child
and yourself.
cNISSAN recommends that the booster
seat be installed in the rear seat. Ac-
cording to accident statistics, children
are safer when properly restrained in
the rear seat than in the front seat.
Front Facing — step 5
WRS0380
BOOSTER SEATS
1-42Safety—Seats, seat belts and supplemental restraint system
ZREVIEW COPYÐ2005 Truck/Frontier(d22)
Owners ManualÐUSA_English(nna)
11/30/04Ðdebbie
X
Page 64 of 336

2. Position the booster seat on the seat. Only
place it in a front facing direction. Always
follow the booster seat manufacturer’s in-
structions.3. The booster seat should be positioned on
the vehicle seat so that it is stable. If neces-
sary, adjust or remove the head restraint to
obtain the correct booster seat fit. See
“Head restraint adjustment” earlier in this
section. If the head restraint is removed,
store it in a secure place. Be sure to install
the head restraint when the booster seat is
removed. If the seating position does not
have an adjustable head restraint and it is
interfering with the proper booster seat fit,
try another seating position or a different
booster seat.
4. Position the lap portion of the seat belt low
and snug on the child’s hips. Be sure to
follow the booster seat manufacturer’s in-
structions for adjusting the belt routing.
5. Pull the shoulder belt portion of the seat belt
toward the retractor to take up extra slack.
Be sure the shoulder belt is positioned
across the top, middle portion of the child’s
shoulder. Be sure to follow the booster seat
manufacturer’s instructions for adjusting the
belt routing.
6. Follow the warnings, cautions and instruc-
tions for properly fastening a seat belt
shown in the “Three-point seat belt with
retractor” earlier in this section.
Booster seat installation on rear seat
center or outboard positions (Crew
cab models only)
CAUTION
Do not use a lap/shoulder belt automatic
locking mode when using a booster seat
with the seat belts. When you install a
booster seat in the rear seat follow these
steps:
LRS0539
Outboard position
LRS0563
1-46Safety—Seats, seat belts and supplemental restraint system
ZREVIEW COPYÐ2005 Truck/Frontier(d22)
Owners ManualÐUSA_English(nna)
11/30/04Ðdebbie
X
Page 65 of 336

1. Position the booster seat on the seat. Only
place it in a front facing direction. Always
follow the booster seat manufacturer’s in-
structions.2. The booster seat should be positioned on
the vehicle seat so that it is stable. If neces-
sary, adjust or remove the head restraint to
obtain the correct booster seat fit. See
“Head restraint adjustment” earlier in this
section. If the head restraint is removed,
store it in a secure place. Be sure to install
the head restraint when the booster seat is
removed. If the seating position does not
have an adjustable head restraint and it is
interfering with the proper booster seat fit,
try another seating position or a different
booster seat.
3. Position the lap portion of the seat belt low
and snug on the child’s hips. Be sure to
follow the booster seat manufacturer’s in-
structions for adjusting the belt routing.
4. Pull the shoulder belt portion of the seat belt
toward the retractor to take up extra slack.
Be sure the shoulder belt is positioned
across the top, middle portion of the child’s
shoulder. Be sure to follow the booster seat
manufacturer’s instructions for adjusting the
belt routing.
5. Follow the warnings, cautions and instruc-
tions for properly fastening a seat belt
shown in the “Three-point seat belt with
retractor” earlier in this section.Booster seat installation on front
passenger seat
WARNING
NISSAN recommends that child restraints
be installed in the rear seat. However, if
you must install a booster seat in the front
passenger seat, move the passenger’s
seat to the rearmost position.
If you must install a booster seat in the front seat,
follow these steps:
1. Move the seat to the rear-most position.
Center position
LRS0596LRS0454
Safety—Seats, seat belts and supplemental restraint system1-47
ZREVIEW COPYÐ2005 Truck/Frontier(d22)
Owners ManualÐUSA_English(nna)
11/30/04Ðdebbie
X
Page 66 of 336

2. Position the booster seat on the seat. Only
place it in a front facing direction. Always
follow the booster seat manufacturer’s in-
structions.
3. The booster seat should be positioned on
the vehicle seat so that it is stable. If neces-
sary, adjust or remove the head restraint to
obtain the correct booster seat fit. See
“Head restraint adjustment” earlier in this
section. If the head restraint is removed,
store it in a secure place. Be sure to install
the head restraint when the booster seat is
removed. If the seating position does not
have an adjustable head restraint and it is
interfering with the proper booster seat fit,
try another seating position or a different
booster seat.
4. Position the lap portion of the seat belt low
and snug on the child’s hips. Be sure to
follow the booster seat manufacturer’s in-
structions for adjusting the belt routing.
5. Pull the shoulder belt portion of the seat belt
toward the retractor to take up extra slack.
Be sure the shoulder belt is positioned
across the top, middle portion of the child’s
shoulder. Be sure to follow the booster seat
manufacturer’s instructions for adjusting the
belt routing.6. Follow the warnings, cautions and instruc-
tions for properly fastening a seat belt
shown in the “Three-point seat belt with
retractor” earlier in this section.
7. When the ignition is turned to the ON posi-
tion, the passenger air bag status light may
or may not be illuminated, depending on the
size of the child and the type of booster seat
being used. See “NISSAN advanced air bag
system” later in this section.PRECAUTIONS ON
SUPPLEMENTAL RESTRAINT
SYSTEM
This Supplemental Restraint System (SRS) sec-
tion contains important information concerning
the driver and passenger supplemental front air
bags (NISSAN Advanced Air Bag System) ,
supplemental side air bags, curtain side-impact
and rollover air bags and pre-tensioner seat belts.
Supplemental front impact air bag system:
The NISSAN Advanced Air Bag System can help
cushion the impact force to the head and chest of
the driver and front passenger in certain frontal
collisions.
Supplemental side-impact air bag system
(if so equipped):This system can help cushion
the impact force to the chest area of the driver
and front passenger in certain side impact colli-
sions. The front seat side-impact supplemental
side air bags are designed to inflate on the side
where the vehicle is impacted.
Supplemental curtain side-impact and roll-
over air bag system (if so equipped):This
system can help cushion the impact force to the
head of occupants in front and rear outboard
seating positions in certain side impact or rollover
collisions. In a side impact, the curtain air bags
are designed to inflate on the side where the
SUPPLEMENTAL RESTRAINT
SYSTEM
1-48Safety—Seats, seat belts and supplemental restraint system
ZREVIEW COPYÐ2005 Truck/Frontier(d22)
Owners ManualÐUSA_English(nna)
11/30/04Ðdebbie
X
Page 153 of 336
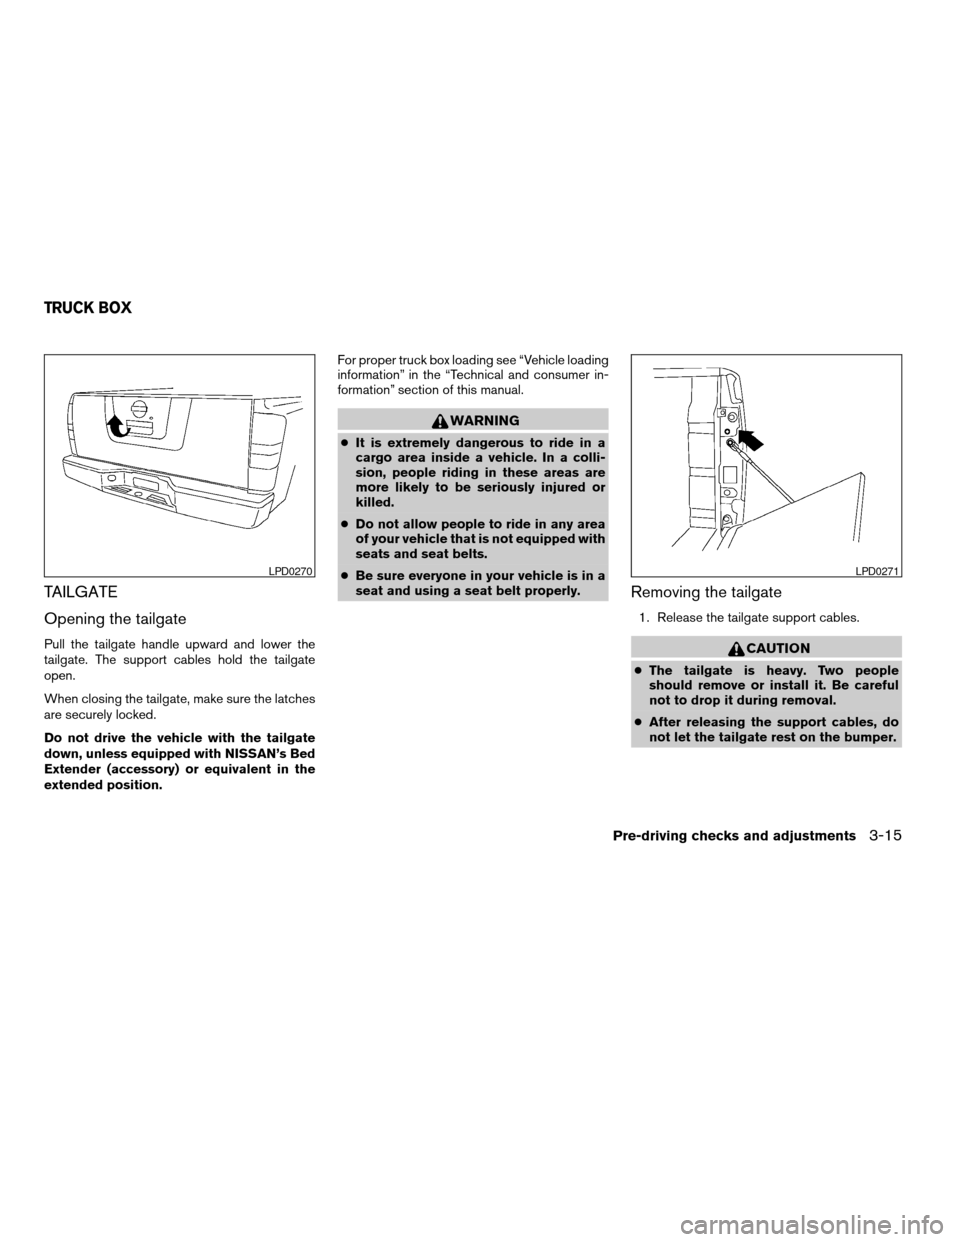
TAILGATE
Opening the tailgate
Pull the tailgate handle upward and lower the
tailgate. The support cables hold the tailgate
open.
When closing the tailgate, make sure the latches
are securely locked.
Do not drive the vehicle with the tailgate
down, unless equipped with NISSAN’s Bed
Extender (accessory) or equivalent in the
extended position.For proper truck box loading see “Vehicle loading
information” in the “Technical and consumer in-
formation” section of this manual.
WARNING
cIt is extremely dangerous to ride in a
cargo area inside a vehicle. In a colli-
sion, people riding in these areas are
more likely to be seriously injured or
killed.
cDo not allow people to ride in any area
of your vehicle that is not equipped with
seats and seat belts.
cBe sure everyone in your vehicle is in a
seat and using a seat belt properly.
Removing the tailgate
1. Release the tailgate support cables.
CAUTION
cThe tailgate is heavy. Two people
should remove or install it. Be careful
not to drop it during removal.
cAfter releasing the support cables, do
not let the tailgate rest on the bumper.
LPD0270LPD0271
TRUCK BOX
Pre-driving checks and adjustments3-15
ZREVIEW COPYÐ2005 Truck/Frontier(d22)
Owners ManualÐUSA_English(nna)
11/30/04Ðdebbie
X