stop start NISSAN FRONTIER 2005 D22 / 1.G Owner's Guide
[x] Cancel search | Manufacturer: NISSAN, Model Year: 2005, Model line: FRONTIER, Model: NISSAN FRONTIER 2005 D22 / 1.GPages: 336, PDF Size: 7.24 MB
Page 231 of 336
WARNING
cDo not continue to drive if your vehicle
overheats. Doing so could cause engine
damage or a vehicle fire.
cTo avoid the danger of being scalded,
never remove the radiator or coolant
reservoir cap while the engine is still
hot. When the radiator or coolant reser-
voir cap is removed, pressurized hot
water will spurt out, possibly causing
serious injury.
cDo not open the hood if steam is com-
ing out.
If your vehicle is overheating (indicated by an
extremely high temperature gauge reading and
the illumination of the engine oil pressure/engine
coolant temperature high indicator light) , or if you
feel a lack of engine power, detect abnormal
noise, etc. take the following steps.
1. Move the vehicle safely off the road, apply
the parking brake and move the shift lever to
P (Park) .
Do not stop the engine.
2. Turn off the air conditioner. Open all the
windows, move the heater or air conditioner
temperature control to maximum hot and fan
control to high speed.3. Get out of the vehicle. Look and listen for
steam or coolant escaping from the radiator
before opening the hood. (If steam or cool-
ant is escaping, turn off the engine.) Do not
open the hood further until no steam or
coolant can be seen.
4. Open the engine hood.
WARNING
If steam or water is coming from the en-
gine, stand clear to prevent getting
burned.
5. Visually check drive belts for damage or
looseness. Also check if the cooling fan is
running. The radiator hoses and radiator
should not leak water. If coolant is leaking,
the water pump belt is missing or loose, or
the cooling fan does not run, stop the en-
gine.
WARNING
Be careful not to allow your hands, hair,
jewelry or clothing to come into contact
with, or get caught in, engine belts or the
engine cooling fan. The engine cooling
fan can start at any time when the coolant
temperature is high.6. After the engine cools down, check the cool-
ant level in the engine coolant reservoir tank
with the engine running. Add coolant to the
engine coolant reservoir tank if necessary.
Have your vehicle repaired at a NISSAN
dealer.
IF YOUR VEHICLE OVERHEATS
In case of emergency6-11
ZREVIEW COPYÐ2005 Truck/Frontier(d22)
Owners ManualÐUSA_English(nna)
11/30/04Ðdebbie
X
Page 262 of 336
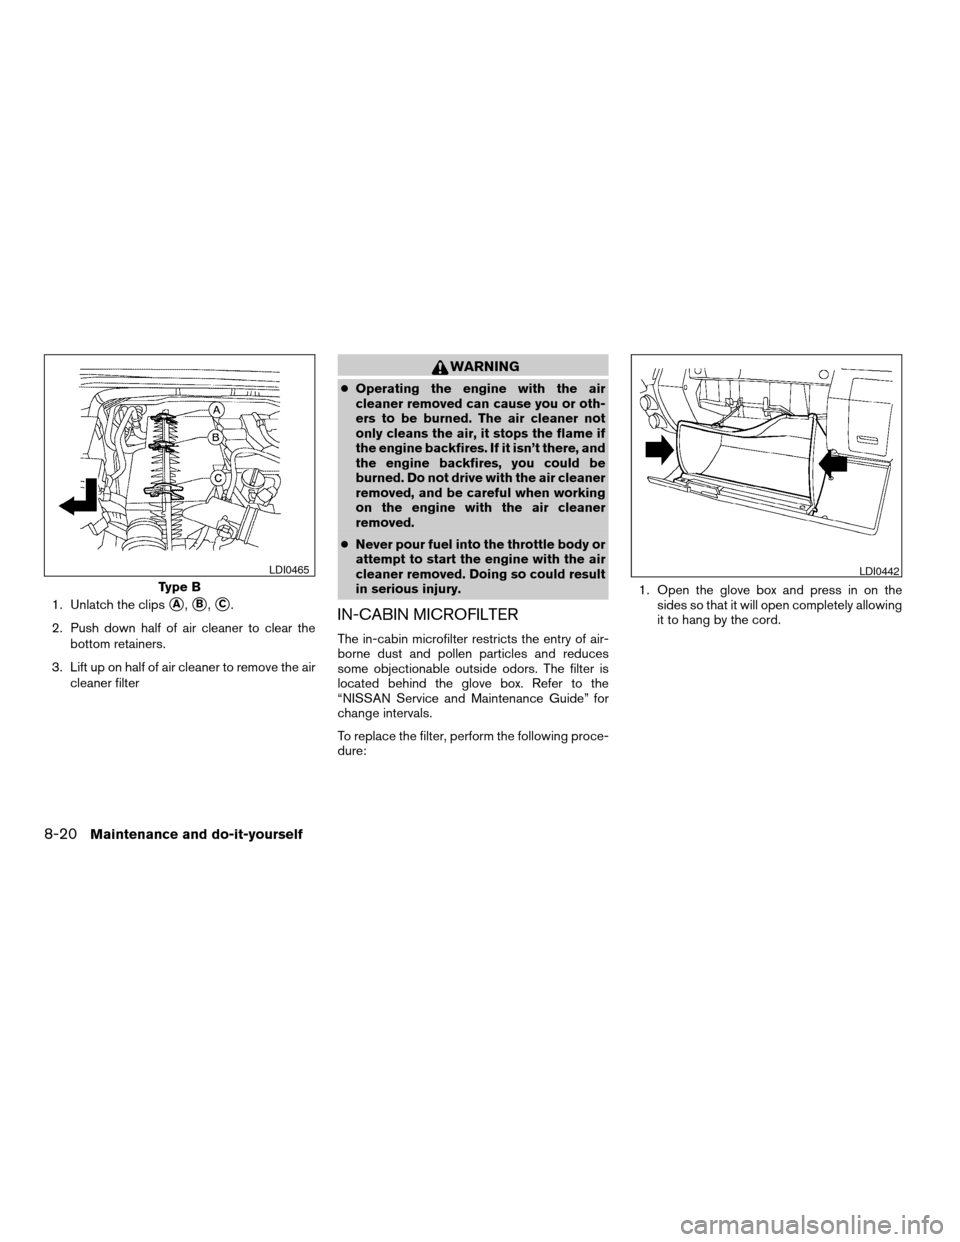
1. Unlatch the clipssA,sB,sC.
2. Push down half of air cleaner to clear the
bottom retainers.
3. Lift up on half of air cleaner to remove the air
cleaner filter
WARNING
cOperating the engine with the air
cleaner removed can cause you or oth-
ers to be burned. The air cleaner not
only cleans the air, it stops the flame if
the engine backfires. If it isn’t there, and
the engine backfires, you could be
burned. Do not drive with the air cleaner
removed, and be careful when working
on the engine with the air cleaner
removed.
cNever pour fuel into the throttle body or
attempt to start the engine with the air
cleaner removed. Doing so could result
in serious injury.
IN-CABIN MICROFILTER
The in-cabin microfilter restricts the entry of air-
borne dust and pollen particles and reduces
some objectionable outside odors. The filter is
located behind the glove box. Refer to the
“NISSAN Service and Maintenance Guide” for
change intervals.
To replace the filter, perform the following proce-
dure:1. Open the glove box and press in on the
sides so that it will open completely allowing
it to hang by the cord.
Type B
LDI0465LDI0442
8-20Maintenance and do-it-yourself
ZREVIEW COPYÐ2005 Truck/Frontier(d22)
Owners ManualÐUSA_English(nna)
11/30/04Ðdebbie
X
Page 266 of 336
WARNING
See a NISSAN dealer for a brake system
check if the brake pedal height does not
return to normal.
Brake pad wear indicators
The disc brake pads on your vehicle have audible
wear indicators. When a brake pad requires re-
placement, a high pitched scraping or screech-
ing sound will be heard when the vehicle is in
motion. The noise will be heard whether or not the
brake pedal is depressed. Have the brakes
checked as soon as possible if the wear indicator
sound is heard.
Under some driving or climate conditions, occa-
sional brake squeak, squeal or other noise may
be heard. Occasional brake noise during light to
moderate stops is normal and does not affect the
function or performance of the brake system.
Proper brake inspection intervals should
be followed.For more information regarding
brake inspections, see the appropriate mainte-
nance schedule information in the “NISSAN Ser-
vice and Maintenance Guide”.
BRAKE BOOSTER
Check the brake booster function as follows:
1. With the engine off, press and release the
brake pedal several times. When brake
pedal movement (distance of travel) remains
the same from one pedal application to the
next, continue on to the next step.
2. While depressing the brake pedal, start the
engine. The pedal height should drop a little.
3. With the brake pedal depressed, stop the
engine. Keep the pedal depressed for about
30 seconds. The pedal height should not
change.
4. Run the engine for one minute without de-
pressing the brake pedal, then turn it off.
Depress the brake pedal several times. The
pedal travel distance will decrease gradually
with each depression as the vacuum is re-
leased from the booster.
If the brakes do not operate properly, have the
brakes checked by a NISSAN dealer.Two types of fuses are used. Type A is used in the
fuse boxes in the engine compartment. Type B is
used in the passenger compartment fuse box.
Type A fuses are provided as spare fuses. They
are stored in the passenger compartment fuse
box.
Type A fuses can be installed in the engine com-
partment and passenger compartment fuse
boxes.
LDI0455
FUSES
8-24Maintenance and do-it-yourself
ZREVIEW COPYÐ2005 Truck/Frontier(d22)
Owners ManualÐUSA_English(nna)
11/30/04Ðdebbie
X
Page 314 of 336
Trailer lights
CAUTION
When splicing into the vehicle electrical
system, a commercially available power-
type module/converter must be used to
provide power for all trailer lighting. This
unit uses the vehicle battery as a direct
power source for all trailer lights while
using the vehicle tail light, stoplight and
turn signal circuits as a signal source. The
module/converter must draw no more
that 15 milliamps from the stop and tail
lamp circuits. Using a module/converter
that exceeds these power requirements
may damage the vehicle’s electrical sys-
tem. See a reputable trailer dealer to ob-
tain the proper equipment and to have it
installed.
Trailer lights should comply with federal and/or
local regulations. For assistance in hooking up
trailer lights, contact a NISSAN dealer or repu-
table trailer dealer. Vehicles equipped with the
optional trailer tow package are equipped with a
7-pin trailer harness connector. If your trailer is
equipped with a flat 4-pin connector, an adapter
will be needed to connect the trailer lights to the
vehicle. Adapters are available at auto parts
stores and hitch retailers.
Trailer brakes
If your trailer is equipped with a braking system,
make sure it conforms to federal and/or local
regulations and that it is properly installed.
WARNING
Never connect a trailer brake system di-
rectly to the vehicle brake system.
Pre-towing tips
cBe certain your vehicle maintains a level
position when a loaded and/or unloaded
trailer is hitched. Do not drive the vehicle if it
has an abnormal nose-up or nose-down
condition; check for improper tongue load,
overload, worn suspension or other possible
causes of either condition.
cAlways secure items in the trailer to prevent
load shift while driving.
cLoad the trailer so approximately 60% of the
trailer load is in the front half and 40% is in
the back half.
cCheck your hitch, trailer tire pressure, ve-
hicle tire pressure, trailer light operation, and
trailer wheel lug nuts every time you attach a
trailer to the vehicle.cBe certain your rearview mirrors conform to
all federal, state or local regulations. If not,
install any mirrors required for towing before
driving the vehicle.
Trailer towing tips
In order to gain skill and an understanding of the
vehicle’s behavior, you should practice turning,
stopping and backing up in an area which is free
from traffic. Steering stability and braking perfor-
mance will be somewhat different than under
normal driving conditions.
cAlways secure items in the trailer to prevent
load shift while driving.
cAvoid abrupt starts, acceleration or stops.
cAvoid sharp turns or lane changes.
cAlways drive your vehicle at a moderate
speed.
cWhen backing up, hold the bottom of the
steering wheel with one hand. Move your
hand in the direction in which you want the
trailer to go. Make small corrections and
back up slowly. If possible, have someone
guide you when you are backing up.
cAlways block the wheels on both vehicle and
trailer when parking. Parking on a slope is
not recommended; however, if you must do
so, first block the wheels and apply the park-
9-30Technical and consumer information
ZREVIEW COPYÐ2005 Truck/Frontier(d22)
Owners ManualÐUSA_English(nna)
12/01/04Ðdebbie
X
Page 316 of 336
FLAT TOWING
Towing your vehicle with all four wheels on the
ground is sometimes called flat towing. This
method is sometimes used when towing a vehicle
behind a recreational vehicle, such as a motor
home.
CAUTION
cFailure to follow these guidelines can
result in severe transmission damage.
cWhenever flat towing your vehicle, al-
ways tow forward, never backward.
cDO NOT tow any automatic transmis-
sion vehicle with all four wheels on the
ground (flat towing) . Doing so WILL
DAMAGE internal transmission parts
due to lack of transmission lubrication.
cFor emergency towing procedures refer
to “Towing recommended by NISSAN”
in the “In case of emergency” section of
this manual.
Automatic Transmission
To tow a vehicle equipped with an automatic
transmission, an appropriate vehicle dollyMUST
be placed under the towed vehicle’s drive
wheels.Alwaysfollow the dolly manufacturer’s
recommendations when using their product.
Manual Transmission
cAlways tow with the manual transmission in
Neutral.
cOn four-wheel drive vehicles, place the
transfer case in the 2H range. Failure to do
so will cause the powertrain to bind up.
cAfter towing 500 miles (805 km) , start and
idle the engine with the transmission in Neu-
tral for two minutes. Failure to idle the engine
after every 500 miles (805 km) of towing
may cause damage to internal transmission
parts.DOT (Department of Transportation) Quality
Grades: All passenger car tires must conform to
federal safety requirements in addition to these
grades.
Quality grades can be found where applicable on
the tire sidewall between tread shoulder and
maximum section width. For example:
Treadwear 200 Traction AA Temperature A
Treadwear
Treadwear grade is a comparative rating based
on tire wear rate when tested under controlled
conditions on specified government test courses.
For example, a tire graded 150 would wear one
and a half (1-1/2) times as well on the govern-
ment course as a tire graded 100. However,
relative tire performance depends on actual driv-
ing conditions, and may vary significantly due to
variations in driving habits, service practices and
differences in road characteristics and climate.
Traction AA, A, B and C
The traction grades, from highest to lowest, are
AA, A, B, and C. Those grades represent the
tire’s ability to stop on wet pavement as mea-
sured under controlled conditions on specified
government test surfaces of asphalt and con-
crete. A tire marked C may have poor traction
performance.
UNIFORM TIRE QUALITY GRADING
9-32Technical and consumer information
ZREVIEW COPYÐ2005 Truck/Frontier(d22)
Owners ManualÐUSA_English(nna)
12/01/04Ðdebbie
X
Page 318 of 336

If you believe that your vehicle has a de-
fect which could cause a crash or could
cause injury or death, you should immedi-
ately inform the National Highway Traffic
Safety Administration (NHTSA) in addi-
tion to notifying NISSAN.
If NHTSA receives similar complaints, it
may open an investigation, and if it finds
that a safety defect exists in a group of
vehicles, it may order a recall and remedy
campaign. However, NHTSA cannot be-
come involved in individual problems be-
tween you, your dealer, or NISSAN.
To contact NHTSA, you may call the Auto
Safety Hotline toll-free at 1-888-327-
4236. You may also write to: NHTSA,
U.S. Department of Transportation,
Washington, D.C. 20590. You can also
obtain other information about motor ve-
hicle safety from the Hotline.
You may notify NISSAN by contacting our
Consumer Affairs Department, toll-free, at
1-800-NISSAN-1.Due to legal requirements in some states and
Canadian Provinces, your vehicle may be re-
quired to be in what is called the “ready condi-
tion” for an Inspection/Maintenance (I/M) test of
the emission control system.
The vehicle is set to the “ready condition” when it
is driven through certain driving patterns. Usually,
the ready condition can be obtained by ordinary
usage of the vehicle.
If a powertrain system component is repaired or
the battery is disconnected, the vehicle may be
reset to a “not ready” condition. Before taking the
I/M test, check the vehicle’s
inspection/maintenance test readiness condi-
tion. Turn the ignition switch ON without starting
the engine. If the Malfunction Indicator Lamp
(MIL) comes on steady for 20 seconds and then
blinks for 10 seconds , the I/M test condition is
9not ready9. If the MIL does not blink after 20
seconds, the I/M test condition is9ready.9If the
MIL indicates the vehicle is in a9not ready9con-
dition, drive the vehicle through the following
pattern to set the vehicle to the ready condition. If
you cannot or do not want to perform the driving
pattern, a NISSAN dealer can conduct it for you.WARNING
Always drive the vehicle in a safe and
prudent manner according to traffic con-
ditions and obey all traffic laws.
1. Start the engine when the engine coolant
temperature gauge needle points to C. Al-
low the engine to idle until the gauge needle
points between the C and H (normal oper-
ating temperature) .
2. Accelerate the vehicle to 55 MPH (88
km/h) , then quickly release the accelerator
pedal completely and keep it released for at
least 10 seconds.
3. Quickly depress the accelerator pedal for a
moment, then drive the vehicle at a speed of
53 - 60 MPH (86 - 96 km/h) for at least 9
minutes.
4. Stop the vehicle.
5. Accelerate the vehicle to 35 MPH (55 km/h)
and maintain the speed for 20 seconds.
6. Repeat steps 4 through 5 at least 10 times.
7. Accelerate the vehicle to 55 MPH (88 km/h)
and maintain the speed for at least 3 min-
utes.
REPORTING SAFETY DEFECTS (US
only)READINESS FOR INSPECTION/
MAINTENANCE (I/M) TEST
9-34Technical and consumer information
ZREVIEW COPYÐ2005 Truck/Frontier(d22)
Owners ManualÐUSA_English(nna)
12/01/04Ðdebbie
X
Page 323 of 336

10 Index
4WD warning light...............2-15
A
Active brake limited slip (ABLS) system
(if so equipped).................5-30
Active head restraint...............1-7
Air bag (See supplemental restraint
system).....................1-48
Air bag system
Front (See supplemental front impact air
bag system).................1-56
Air bag warning labels.............1-63
Air bag warning light...........1-64, 2-17
Air cleaner housing filter............8-19
Air conditioner
Air conditioner operation...........4-5
Air conditioner service............4-9
Air conditioner specification label.....9-11
Air conditioner system refrigerant and
lubrication recommendations........9-6
Heater and air conditioner controls.....4-2
Servicing air conditioner...........4-9
Air flow charts..................4-6
Alarm system (See vehicle security system). .2-21
Anchor point locations.............1-38
Antenna.....................4-26
Anti-lock brake system (ABS).........5-29
Anti-lock brake warning light..........2-13
Audible reminders................2-21
Audio system..................4-10Compact Disc (CD) changer.......4-23
Compact disc (CD) player.........4-19
FM-AM radio with compact disc (CD)
player.................4-16, 4-20
Radio....................4-10
Steering wheel audio control switch. . . .4-25
Autolight switch.................2-26
Automatic
Automatic power window switch.....2-46
Automatic transmission position indicator
light.....................2-17
Driving with automatic transmission. . . .5-10
Transmission selector lever lock release. .5-12
Automatic anti-glare inside mirror.......3-13
B
Battery......................8-15
Charge warning light............2-14
Battery replacement
(See remote keyless entry system)......8-27
Before starting the engine............5-9
Belts (See drive belts).............8-18
Booster seats..................1-42
Brake
Anti-lock brake system (ABS).......5-29
Brake booster................8-24
Brake fluid..................8-14
Brake light (See stop light).........8-29
Brake pedal.................8-23
Brake system................5-28Brake warning light.............2-14
Brake wear indicators........2-21, 8-24
Parking brake check............8-23
Parking brake operation..........5-16
Self-adjusting brakes............8-23
Break-in schedule................5-19
Brightness control
Instrument panel..............2-28
Bulb check/instrument panel..........2-13
Bulb replacement................8-29
C
Capacities and recommended
fuel/lubricants...................9-2
Car phone or CB radio.............4-26
Cargo light switch...............2-30
Cargo (See vehicle loading information) . . .9-12
CD care and cleaning.............4-25
CD changer (See audio system)........4-23
CD player (See audio system).........4-19
Check engine indicator light
(See malfunction indicator lamp).......2-18
Child restraint with top tether strap......1-36
Child restraints.......1-14, 1-15, 1-21, 1-34
Precautions on child restraints . . .1-21, 1-42
Top tether strap anchor point locations . .1-38
Child safety rear door lock............3-6
Chimes, audible reminders...........2-21
Cleaning exterior and interior..........7-2
Clock......................4-17
ZREVIEW COPYÐ2005 Truck/Frontier(d22)
Owners ManualÐUSA_English(nna)
12/01/04Ðdebbie
X
Page 325 of 336

G
Garage door opener, HomeLinkTUniversal
Transceiver...................2-50
Gascap.....................3-10
Gauge
Engine coolant temperature gauge.....2-6
Engine oil pressure gauge..........2-8
Fuel gauge..................2-7
Odometer...................2-4
Speedometer.................2-4
Tachometer..................2-6
Trip computer.................2-5
Trip odometer.................2-4
Voltmeter...................2-8
General maintenance..............8-2
Glove box....................2-38
H
Hazard warning flasher switch.........2-29
Head restraints..................1-6
Active head restraint.............1-7
Headlight and turn signal switch........2-25
Headlights....................8-28
Heated seats..................2-30
Heater
Heater and air conditioner controls.....4-2
Heater operation...............4-4
Hill descent control (HDC) switch.......2-31
Hill descent control (HDC) system......5-32
Hill start assist (HSA) system.........5-32
HomeLinkTUniversal Transceiver.......2-50
Hood release...................3-9Horn.......................2-30
I
Ignition switch..................5-7
Immobilizer system..........2-23, 3-2, 5-8
Important vehicle information label.......9-10
In-cabin microfilter...............8-20
Increasing fuel economy............5-19
Indicator lights and audible reminders
(See warning/indicator lights and audible
reminders)....................2-12
Inside automatic anti-glare mirror.......3-13
Inside mirror...................3-13
Instrument brightness control.........2-28
Instrument panel..............0-6, 2-2
Interior light...................2-48
ISOFIX child restraints.............1-34
J
Jump seat.....................1-6
Jump starting...................6-8
K
Key ........................3-2
Keyless entry system
(See remote keyless entry system).......3-6L
Labels
Air conditioner specification label.....9-11
Emission control information label.....9-11
Engine serial number............9-10
F.M.V.S.S. certification label........9-10
Vehicle identification number (VIN) plate . .9-9
Warning labels (for SRS)..........1-63
LATCH (Lower Anchors and Tethers for CHildren)
System......................1-34
License plate
Installing the license plate.........9-12
Light
Air bag warning light.........1-64, 2-17
Brake light (See stop light).........8-29
Bulb check/instrument panel........2-13
Bulb replacement..............8-29
Charge warning light............2-14
Fog light switch...............2-29
Headlight and turn signal switch......2-25
Headlights..................8-28
Interior light.................2-48
Light bulbs..................8-28
Low tire pressure warning light......2-15
Low washer fluid warning light.......2-16
Passenger air bag and status light .1-58, 2-19
Personal lights...............2-50
Security indicator light........1-58, 2-19
Warning/indicator lights and audible
reminders..................2-12
Lights
Map lights..................2-50
Lock
Child safety rear door lock..........3-6
10-3
ZREVIEW COPYÐ2005 Truck/Frontier(d22)
Owners ManualÐUSA_English(nna)
12/01/04Ðdebbie
X
Page 327 of 336

Rear window and outside mirror defroster
switch......................2-25
Recorders
Event data..................9-35
Refrigerant recommendation..........9-6
Registering your vehicle in another country. . .9-9
Remote keyless entry system..........3-6
Reporting safety defects (US only)......9-34
Roof rack....................2-43
S
Safety
Child safety rear door lock..........3-6
Child seat belts...........1-21, 1-42
Reporting safety defects (US only). . . .9-34
Seat
Jump seat...................1-6
Seat adjustment
Front manual seat adjustment........1-2
Front power seat adjustment........1-4
Seat belt
Child safety.................1-14
Infants and small children.........1-15
Injured Person................1-16
Larger children...............1-15
Precautions on seat belt usage......1-12
Pregnant women..............1-16
Pre-tensioner seat belt system.......1-62
Seat belt extenders.............1-21
Seat belt maintenance...........1-21
Seat belts..................1-12
Shoulder belt height adjustment......1-20
Three-point type with retractor.......1-16
Seat belt warning light.............2-16Seatback pockets................2-40
Seats
Adjustment..................1-2
Front seats..................1-2
Heated seats................2-30
Manual front seat adjustment........1-2
Security indicator light..........1-58, 2-19
Security system (Nissan vehicle immobilizer
system) , engine start.........2-23, 3-2, 5-8
Self-adjusting brakes..............8-23
Service manual order form...........9-36
Servicing air conditioner.............4-9
Shift lock release................5-12
Shifting
Automatic transmission...........5-11
Manual transmission............5-14
Shoulder belt height adjustment........1-20
Side air bag system (See supplemental side air
bag, curtain and rollover air bag systems). . .1-60
Spark plug replacement............8-19
Speedometer...................2-4
SRS warning label...............1-63
Starting
Before starting the engine..........5-9
Jump starting.................6-8
Precautions when starting and driving . . .5-2
Push starting................6-10
Starting the engine..............5-9
Steering
Power steering fluid.............8-13
Power steering system...........5-28
Tilting steering wheel............3-11
Steering wheel audio control switch......4-25
Stop light....................8-29
Storage.....................2-35
Storage tray...............2-35, 2-37Sun visors....................3-12
Sunglasses case................2-39
Sunroof.....................2-47
Supplemental air bag warning labels.....1-63
Supplemental air bag warning light . . .1-64, 2-17
Supplemental front impact air bag system . .1-56
Supplemental restraint system
Information and warning labels.......1-63
Precautions on supplemental restraint
system....................1-48
Supplemental restraint system
(Supplemental air bag system).........1-48
Switch
Autolight switch...............2-26
Automatic power window switch.....2-46
Clutch interlock (clutch start) switch . . .2-33
Electronic locking rear differential (E-Lock)
system switch................2-32
Fog light switch...............2-29
Hazard warning flasher switch.......2-29
Headlight and turn signal switch......2-25
Hill descent control (HDC) switch.....2-31
Ignition switch................5-7
Overdrive switch..............5-13
Power door lock switch...........3-4
Rear window and outside mirror defroster
switch....................2-25
Vehicle dynamic control (VDC) off
switch....................2-31
Windshield wiper and washer switch . . .2-24
T
Tachometer....................2-6
Tailgate latch..................3-15
10-5
ZREVIEW COPYÐ2005 Truck/Frontier(d22)
Owners ManualÐUSA_English(nna)
12/01/04Ðdebbie
X