roof NISSAN FRONTIER 2005 D22 / 1.G Owners Manual
[x] Cancel search | Manufacturer: NISSAN, Model Year: 2005, Model line: FRONTIER, Model: NISSAN FRONTIER 2005 D22 / 1.GPages: 336, PDF Size: 7.24 MB
Page 72 of 336
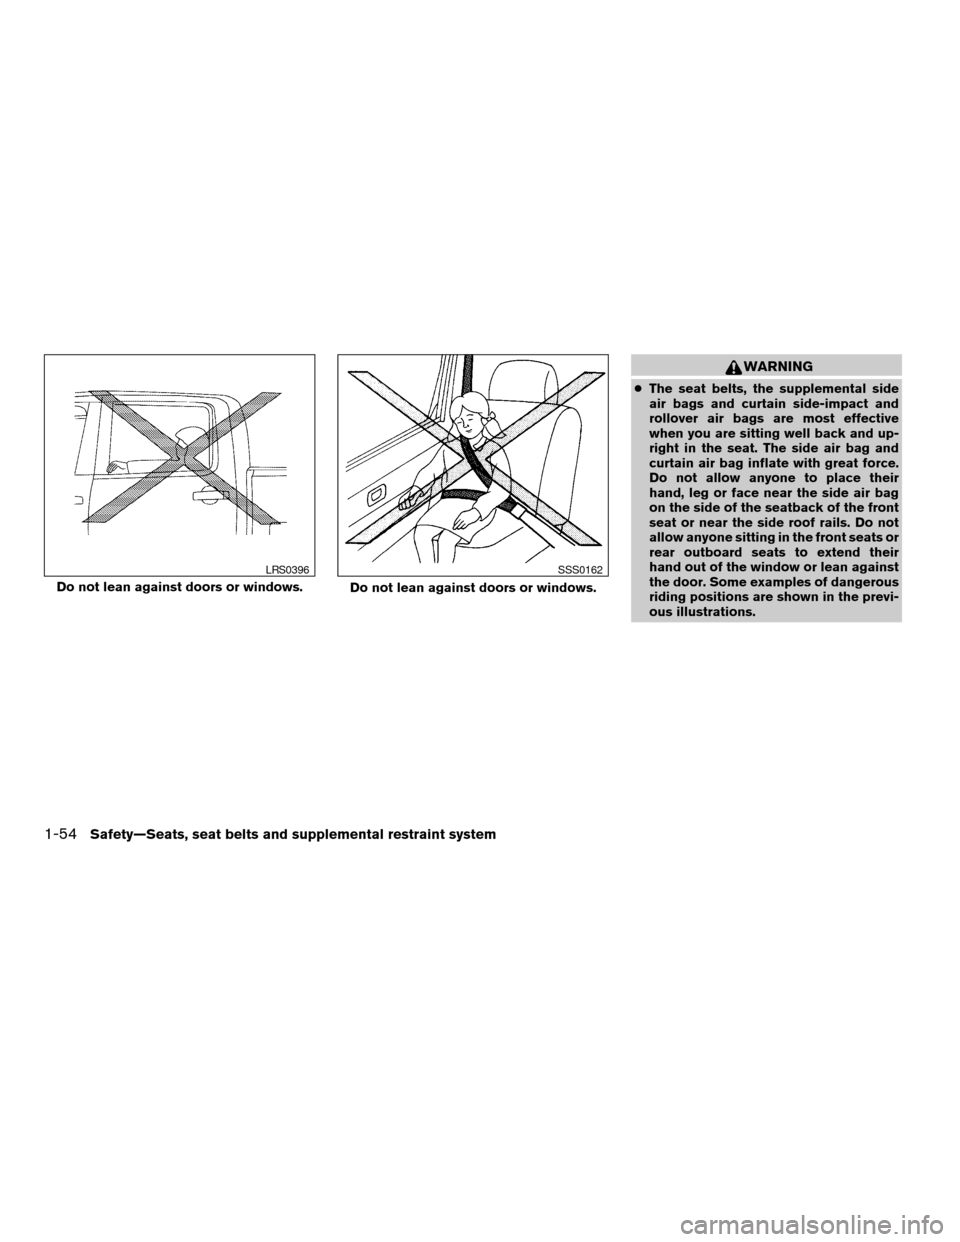
WARNING
cThe seat belts, the supplemental side
air bags and curtain side-impact and
rollover air bags are most effective
when you are sitting well back and up-
right in the seat. The side air bag and
curtain air bag inflate with great force.
Do not allow anyone to place their
hand, leg or face near the side air bag
on the side of the seatback of the front
seat or near the side roof rails. Do not
allow anyone sitting in the front seats or
rear outboard seats to extend their
hand out of the window or lean against
the door. Some examples of dangerous
riding positions are shown in the previ-
ous illustrations.
Do not lean against doors or windows.
LRS0396
Do not lean against doors or windows.
SSS0162
1-54Safety—Seats, seat belts and supplemental restraint system
ZREVIEW COPYÐ2005 Truck/Frontier(d22)
Owners ManualÐUSA_English(nna)
11/30/04Ðdebbie
X
Page 78 of 336
cDo not make unauthorized changes to
your vehicle’s electrical system, sus-
pension system or front end structure.
This could affect proper operation of
the supplemental front air bag system.
cTampering with the supplemental front
air bag system may result in serious
personal injury. Tampering includes
changes to the steering wheel and the
instrument panel assembly by placing
material over the steering wheel pad
and above the instrument panel or by
installing additional trim material
around the air bag system.
cModifying or tampering with the front
passenger seat may result in serious
personal injury. For example, do not
change the front seats by placing mate-
rial on the seat cushion or by installing
additional trim material, such as seat
covers, on the seat that are not specifi-
cally designed to assure proper air bag
operation. Additionally, do not stow any
objects under the front passenger seat
or the seat cushion and seatback. Such
objects may interfere with the proper
operation of the occupant classifica-
tion system (weight sensor) .cNo unauthorized changes should be
made to any components or wiring of
the seat belt system. This may affect the
supplemental front air bag system.
Tampering with the seat belt system
may result in serious personal injury.
cWork on and around the supplemental
front air bag system should be done by
a NISSAN dealer. Installation of electri-
cal equipment should also be done by a
NISSAN dealer. The Supplemental Re-
straint System (SRS) wiring should not
be modified or disconnected. Unautho-
rized electrical test equipment and
probing devices should not be used on
the air bag system.
cA cracked windshield should be re-
placed immediately by a qualified re-
pair facility. A cracked windshield could
affect the function of the supplemental
air bag system.
cThe SRS wiring harness connectors are
yellow and orange for easy
identification.
When selling your vehicle, we request that you
inform the buyer about the supplemental front air
bag system and guide the buyer to the appropri-
ate sections in this Owner’s Manual.
Supplemental side-impact air bag and
curtain side-impact and rollover air
bags system (if so equipped)
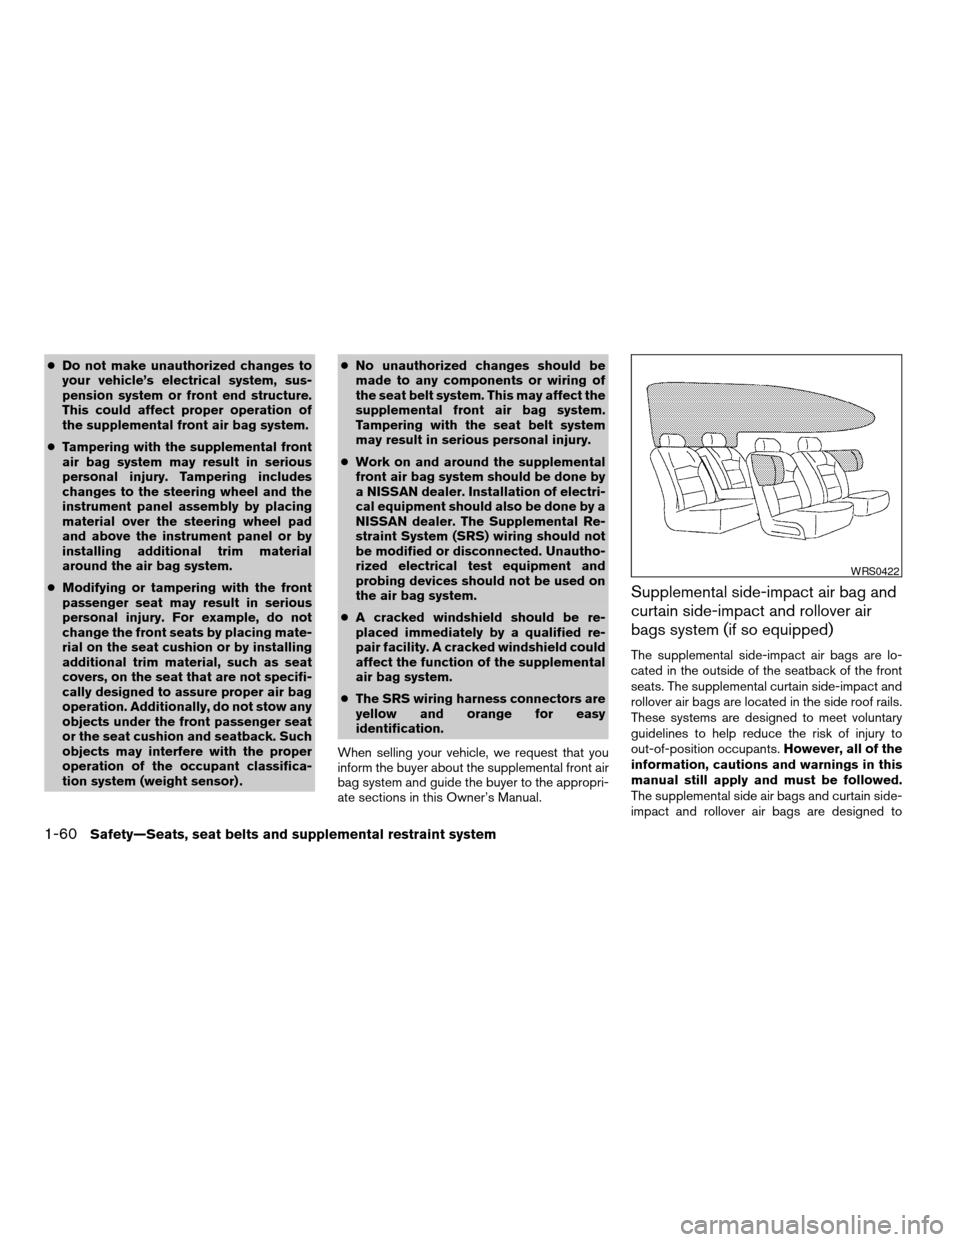
The supplemental side-impact air bags are lo-
cated in the outside of the seatback of the front
seats. The supplemental curtain side-impact and
rollover air bags are located in the side roof rails.
These systems are designed to meet voluntary
guidelines to help reduce the risk of injury to
out-of-position occupants.However, all of the
information, cautions and warnings in this
manual still apply and must be followed.
The supplemental side air bags and curtain side-
impact and rollover air bags are designed to
WRS0422
1-60Safety—Seats, seat belts and supplemental restraint system
ZREVIEW COPYÐ2005 Truck/Frontier(d22)
Owners ManualÐUSA_English(nna)
11/30/04Ðdebbie
X
Page 79 of 336
inflate in higher severity side collisions, although
they may inflate if the forces in another type of
collision are similar to those of a higher severity
side impact. They are designed to inflate on the
side where the vehicle is impacted. They may not
inflate in certain side collisions.
Curtain side-impact and rollover air bags are also
designed to inflate in certain types of rollover
collisions or near rollovers.
Vehicle damage (or lack of it) is not always an
indication of proper supplemental side air bag
and curtain side-impact and rollover air bag op-
eration.
When the supplemental side air bag and curtain
air bags inflate, a fairly loud noise may be heard,
followed by release of smoke. This smoke is not
harmful and does not indicate a fire. Care should
be taken not to inhale it, as it may cause irritation
and choking. Those with a history of a breathing
condition should get fresh air promptly.
Supplemental side air bags, along with the use of
seat belts, help to cushion the impact force on
the chest of the front occupants. Curtain side-
impact and rollover air bags help to cushion the
impact force to the head of occupants in the front
and rear outboard seating positions. They can
help save lives and reduce serious injuries. How-
ever, an inflating side air bag, or curtain air bag
may cause abrasions or other injuries. Supple-mental side air bags and curtain side-impact and
rollover air bags do not provide restraint to the
lower body.
The seat belts should be correctly worn and the
driver and passenger seated upright as far as
practical away from the supplemental side air
bag. Rear seat passengers should be seated as
far away as practical from the door finishers and
side roof rails. The side air bags and curtain
side-impact and rollover air bag inflate quickly in
order to help protect the occupants. Because of
this, the force of the side air bag and curtain air
bag inflating can increase the risk of injury if the
occupant is too close to, or is against, these air
bag modules during inflation. The side air bag will
deflate quickly after the collision is over.
The curtain side-impact and rollover air bag will
remain inflated for a short time.
The supplemental side air bags and curtain
side-impact and rollover air bags operate
only when the ignition switch is in the ON
or START positions.
After turning the ignition key to the ON
position, the supplemental air bag warning
light illuminates. The supplemental air bag
warning light will turn off after about 7
seconds if the system is operational.WARNING
cDo not place any objects near the seat-
back of the front seats. Also, do not
place any objects (an umbrella, bag,
etc.) between the front door finisher
and the front seat. Such objects may
become dangerous projectiles and
cause injury if the supplemental side air
bag inflates.
cRight after inflation, several side air bag
and curtain side-impact and rollover air
bag system components will be hot. Do
not touch them; you may severely burn
yourself.
cNo unauthorized changes should be
made to any components or wiring of
the side air bag and curtain air bag
system. This is to prevent accidental
inflation of the side air bag and curtain
air bag or damage to the side air bag
and curtain air bag system.
cDo not make unauthorized changes to
your vehicle’s electrical system, sus-
pension system or side panel. This
could affect proper operation of the
supplemental curtain air bag system.
Safety—Seats, seat belts and supplemental restraint system1-61
ZREVIEW COPYÐ2005 Truck/Frontier(d22)
Owners ManualÐUSA_English(nna)
11/30/04Ðdebbie
X
Page 85 of 336

Under-seat storage bins........................2-37
Console box..................................2-38
Glove box....................................2-38
Sunglasses holder (if so equipped)..............2-39
Map pockets..................................2-39
Seat pockets (if so equipped)...................2-40
Cup holders..................................2-41
Roof rack (if so equipped)......................2-43
Windows........................................2-44
Power windows (if so equipped)................2-44
Manual windows..............................2-46
Rear sliding window (if so equipped)............2-46
Sunroof (if so equipped)...........................2-47
Automatic sunroof.............................2-47Interior lights.....................................2-48
Personal lights (if so equipped)....................2-50
Map lights (if so equipped)........................2-50
HomeLinkTuniversal transceiver (if so equipped).....2-50
Programming HomeLinkT.......................2-51
Programming HomeLinkTfor Canadian
customers....................................2-52
Operating the HomeLinkTuniversal
transceiver....................................2-52
Programming trouble-diagnosis.................2-53
Clearing the programmed information............2-53
Reprogramming a single HomeLinkTbutton......2-53
If your vehicle is stolen.........................2-53
ZREVIEW COPYÐ2005 Truck/Frontier(d22)
Owners ManualÐUSA_English(nna)
11/30/04Ðdebbie
X
Page 127 of 336

ROOF RACK (if so equipped)
Always evenly distribute the cargo on the tubular
roof rack.The maximum total load is 125 lb
(56 kg) evenly distributed.Be careful that your
vehicle does not exceed the Gross Vehicle
Weight Rating (GVWR) or the Gross AxleWeight Ratings (GAWR front and rear) . The
GVWR and GAWR are located on the F.M.V.S.S.
label (located on the driver’s side door jamb
pillar) . For more information regarding GVWR
and GAWR, refer to “Vehicle loading information”
in the “Technical and consumer information” sec-
tion later in this manual.The front crossbar can be adjusted or removed.
Use the Torxdriver provided in the tool kit to
loosen both crossbar adjusting screws.
To adjust:
1. Loosen the adjusting screws with the
Torxdriver
s1by turning counterclockwise
sA.
2. When the clamp is loosened, move the
crossbar so the cargo can be positioned on
the crossbar
sB.
3. Tighten the crossbar adjusting screws with
the Torxdriver by turning clockwise.
4. Secure the cargo with rope.
5. Always check the tightness of the crossbar
adjusting screws.
To remove:
1. Loosen the adjusting screws with the
Torxdriver
s1by turning counterclockwise
sA.
2. Rotate the clamps
sC.
3. Remove the crossbar.
4. Reverse to install.
5. Always check the tightness of the crossbar
adjusting screws.
WIC0857
Instruments and controls2-43
ZREVIEW COPYÐ2005 Truck/Frontier(d22)
Owners ManualÐUSA_English(nna)
11/30/04Ðdebbie
X
Page 128 of 336
If you hear wind noise coming from the roof rack
while driving, adjust the roof rack crossbar to the
neutral position, rearward ofDon the side rails.
WARNING
Properly secure all cargo with ropes or
straps to help prevent it from sliding or
shifting. In a sudden stop or collision, un-
secured cargo could cause personal
injury.
CAUTION
Use care when placing or removing items
from the roof rack. If you cannot comfort-
ably lift the items onto the roof rack from
the ground, use a ladder or stool.
POWER WINDOWS (if so equipped)
WARNING
cMake sure that all passengers have
their hands, etc. inside the vehicle while
it is in motion and before closing the
windows. Use the window lock switch
to prevent unexpected use of the power
windows.
cDo not leave children unattended inside
the vehicle. They could unknowingly ac-
tivate switches or controls and become
trapped in a window. Unattended chil-
dren could become involved in serious
accidents.
The power windows operate when the ignition
switch is in the ON position, or for about 45
seconds after the ignition switch is turned to the
OFF position. If the driver’s or passenger’s door
is opened during this period of about 45 sec-
onds, power to the windows is canceled.
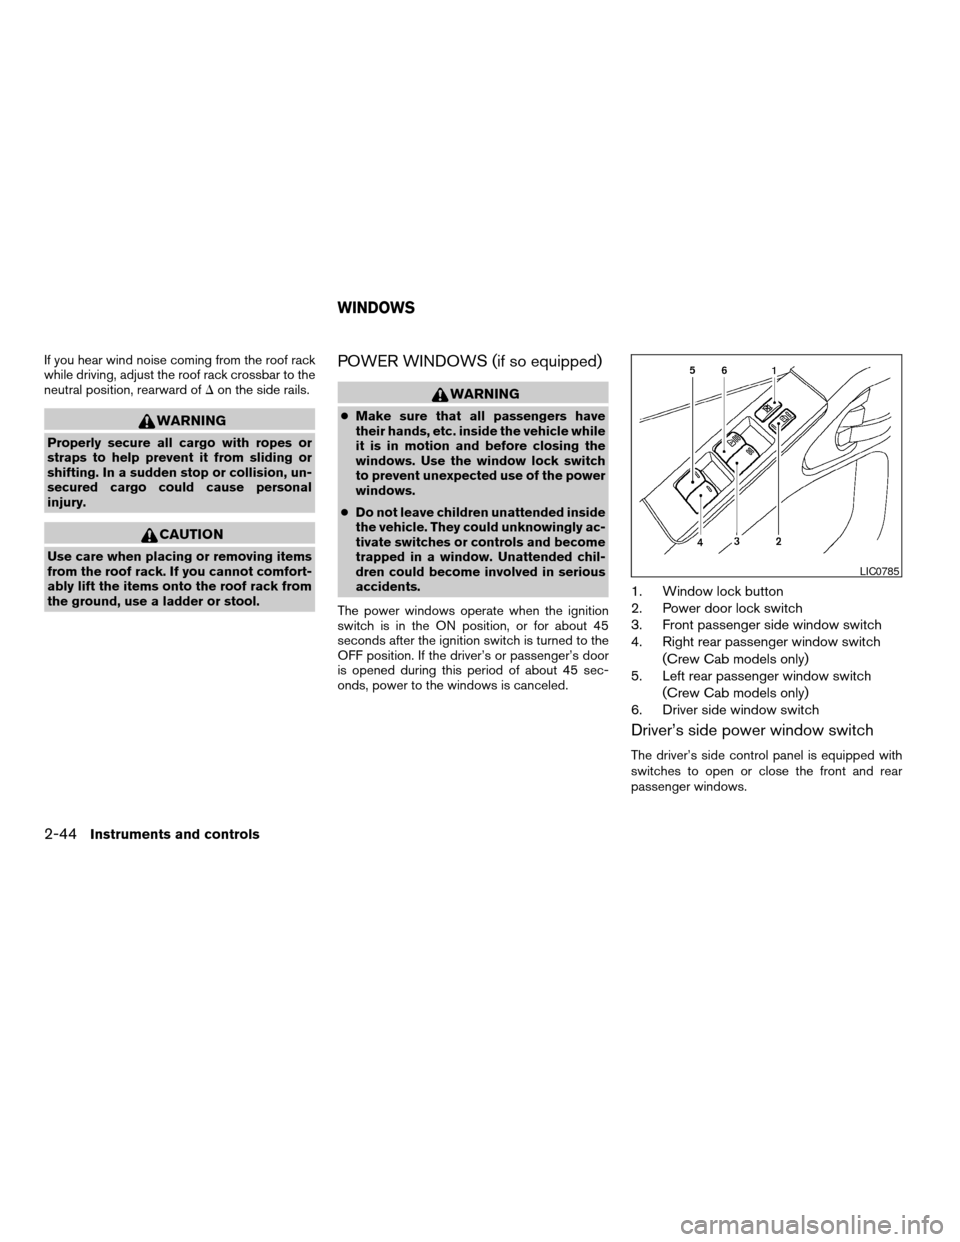
1. Window lock button
2. Power door lock switch
3. Front passenger side window switch
4. Right rear passenger window switch
(Crew Cab models only)
5. Left rear passenger window switch
(Crew Cab models only)
6. Driver side window switch
Driver’s side power window switch
The driver’s side control panel is equipped with
switches to open or close the front and rear
passenger windows.
LIC0785
WINDOWS
2-44Instruments and controls
ZREVIEW COPYÐ2005 Truck/Frontier(d22)
Owners ManualÐUSA_English(nna)
11/30/04Ðdebbie
X
Page 131 of 336
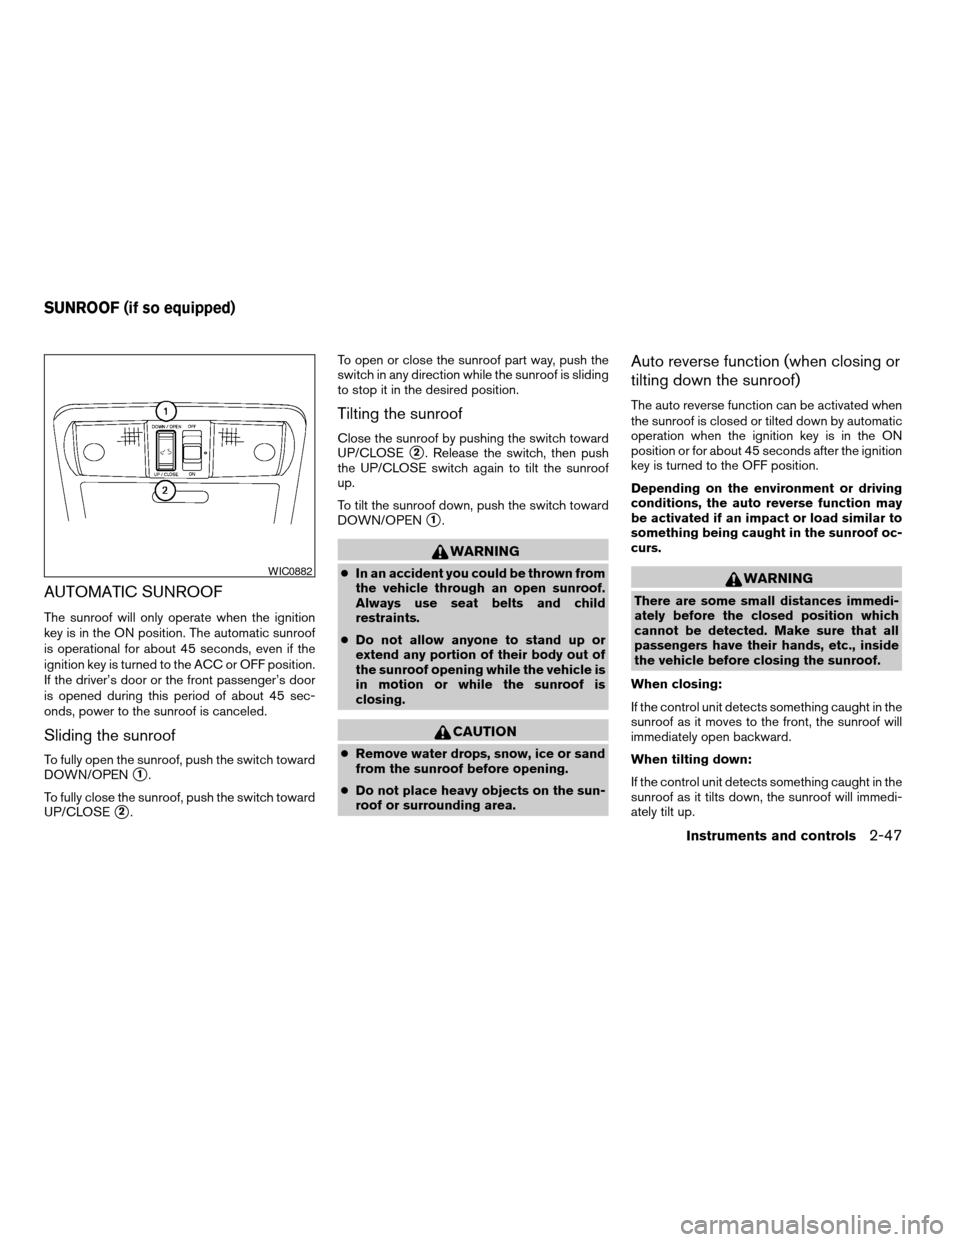
AUTOMATIC SUNROOF
The sunroof will only operate when the ignition
key is in the ON position. The automatic sunroof
is operational for about 45 seconds, even if the
ignition key is turned to the ACC or OFF position.
If the driver’s door or the front passenger’s door
is opened during this period of about 45 sec-
onds, power to the sunroof is canceled.
Sliding the sunroof
To fully open the sunroof, push the switch toward
DOWN/OPEN
s1.
To fully close the sunroof, push the switch toward
UP/CLOSE
s2.To open or close the sunroof part way, push the
switch in any direction while the sunroof is sliding
to stop it in the desired position.
Tilting the sunroof
Close the sunroof by pushing the switch toward
UP/CLOSE
s2. Release the switch, then push
the UP/CLOSE switch again to tilt the sunroof
up.
To tilt the sunroof down, push the switch toward
DOWN/OPEN
s1.
WARNING
cIn an accident you could be thrown from
the vehicle through an open sunroof.
Always use seat belts and child
restraints.
cDo not allow anyone to stand up or
extend any portion of their body out of
the sunroof opening while the vehicle is
in motion or while the sunroof is
closing.
CAUTION
cRemove water drops, snow, ice or sand
from the sunroof before opening.
cDo not place heavy objects on the sun-
roof or surrounding area.
Auto reverse function (when closing or
tilting down the sunroof)
The auto reverse function can be activated when
the sunroof is closed or tilted down by automatic
operation when the ignition key is in the ON
position or for about 45 seconds after the ignition
key is turned to the OFF position.
Depending on the environment or driving
conditions, the auto reverse function may
be activated if an impact or load similar to
something being caught in the sunroof oc-
curs.
WARNING
There are some small distances immedi-
ately before the closed position which
cannot be detected. Make sure that all
passengers have their hands, etc., inside
the vehicle before closing the sunroof.
When closing:
If the control unit detects something caught in the
sunroof as it moves to the front, the sunroof will
immediately open backward.
When tilting down:
If the control unit detects something caught in the
sunroof as it tilts down, the sunroof will immedi-
ately tilt up.
WIC0882
SUNROOF (if so equipped)
Instruments and controls2-47
ZREVIEW COPYÐ2005 Truck/Frontier(d22)
Owners ManualÐUSA_English(nna)
12/01/04Ðtmchalpi
X
Page 132 of 336
If the auto reverse function malfunctions and re-
peats opening or tilting up the sunroof, keep
pushing the tilt down switch within 5 seconds
after it happens, then the sunroof will fully close
gradually. In this case, make sure nothing is
caught in the sunroof.
WARNING
cIn an accident you could be thrown from
the vehicle through an open sunroof.
Always use seat belts and child
restraints.
cDo not allow anyone to stand up or
extend any portion of their body out of
the sunroof opening while the vehicle is
in motion or while the sunroof is
closing.
CAUTION
cRemove water drops, snow, ice or sand
from the sunroof before opening.
cDo not place heavy objects on the sun-
roof or surrounding area.
Sunshade
Open and close the sunshade by sliding it for-
ward or backward.
If the sunroof does not close
Have your NISSAN dealer check and repair the
sunroof.
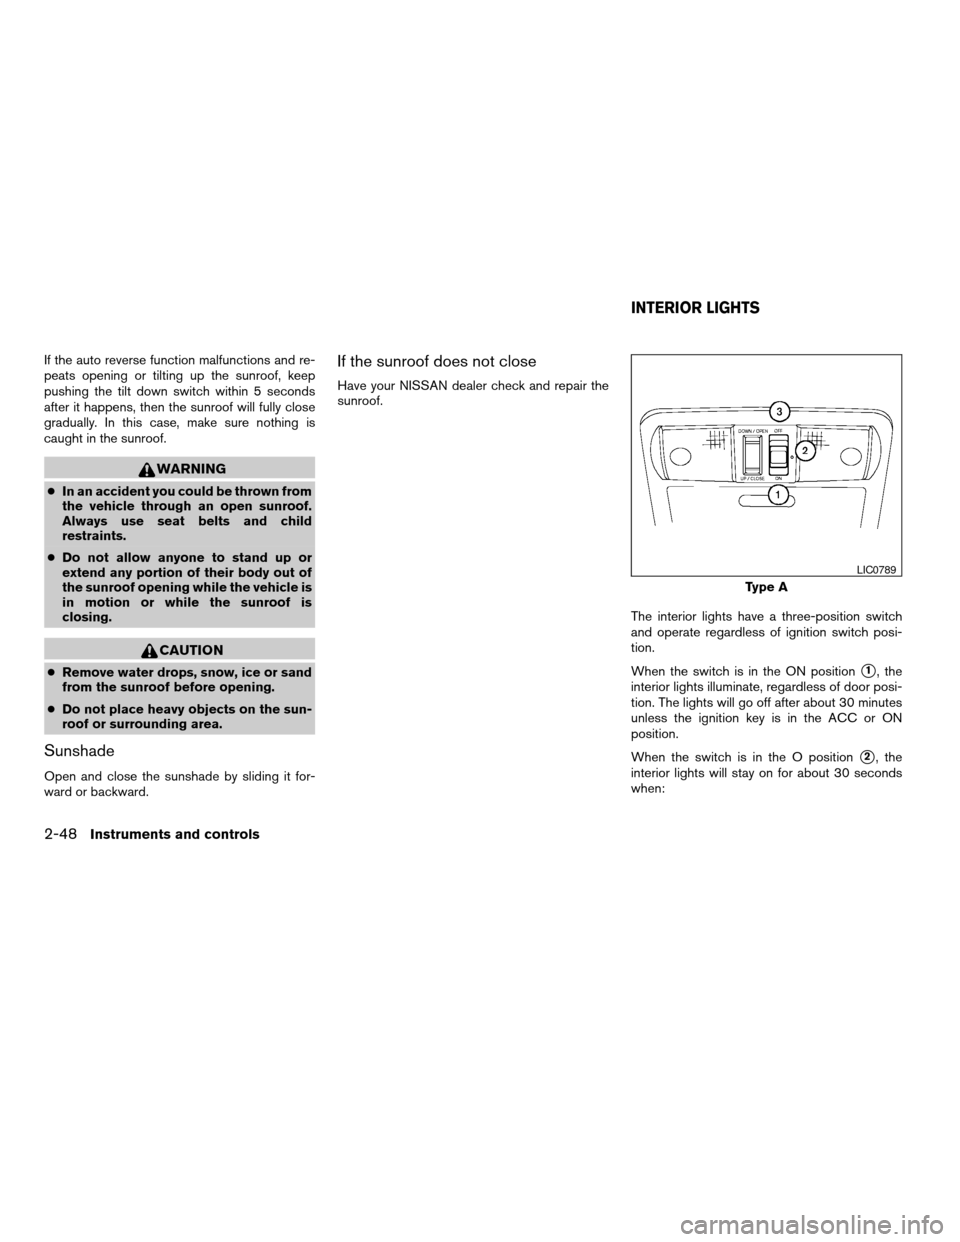
The interior lights have a three-position switch
and operate regardless of ignition switch posi-
tion.
When the switch is in the ON position
s1, the
interior lights illuminate, regardless of door posi-
tion. The lights will go off after about 30 minutes
unless the ignition key is in the ACC or ON
position.
When the switch is in the O position
s2, the
interior lights will stay on for about 30 seconds
when:
Type A
LIC0789
INTERIOR LIGHTS
2-48Instruments and controls
ZREVIEW COPYÐ2005 Truck/Frontier(d22)
Owners ManualÐUSA_English(nna)
11/30/04Ðdebbie
X
Page 162 of 336

Dehumidified heating
This mode is used to heat and dehumidify the air.
1. Push the
button to the off position.
2. Turn the air flow control dial to the
position.
3. Turn the fan control dial to the desired posi-
tion.
4. Push the
button. The indicator light
comes on.
5. Turn the temperature control dial to the de-
sired position.
Dehumidified defogging
This mode is used to defog the windows and
dehumidify the air.
1. Turn the air flow control dial to the
position.
2. Turn the fan control dial to the desired posi-
tion.
3. Push the
button. The indicator light
comes on.
When the
,or positions in between
are selected, the air conditioner automatically
turns on (however, the indicator light will not
illuminate) if the outside temperature is more than36°F (2°C) . The air conditioning system will con-
tinue to operate until the fan control dial is turned
to OFF or the vehicle is shut off, even if the air flow
control dial is turned to a position other than
the
position. This dehumidifies the air
which helps defog the windshield. The
mode automatically turns off, allowing outside air
to be drawn into the passenger compartment to
further improve the defogging performance.
4. Turn the temperature control dial to the de-
sired position.
Operating tips
cKeep the windows and sunroof (if so
equipped) closed while the air conditioner is
in operation.
cAfter parking in the sun, drive for 2 or 3
minutes with the windows open to vent hot
air from the passenger compartment. Then,
close the windows. This allows the air con-
ditioner to cool the interior more quickly.
cThe air conditioning system should be
operated for approximately 10 minutes
at least once a month. This helps pre-
vent damage to the system due to lack
of lubrication.
cIf the engine coolant temperature
gauge indicates engine coolant tem-
perature over the normal range, turnthe air conditioner off. See “If your
vehicle overheats” in the “In case of
emergency” section of this manual.
AIR FLOW CHARTS
The following charts show the button and dial
positions forMAXIMUM AND QUICKheating,
cooling or defrosting. For additional information
on heating and cooling see “Heater and air con-
ditioner” in this section”.The air recirculation
(
) button should always be in the OFF
position for heating and defrosting.
4-6Heater, air conditioner and audio systems
ZREVIEW COPYÐ2005 Truck/Frontier(d22)
Owners ManualÐUSA_English(nna)
11/30/04Ðdebbie
X
Page 167 of 336

the vehicle outside of any metal or large building
for satellite radio to receive all of the necessary
data.
No satellite radio reception is available and “NO
SAT” is displayed when the SAT band option is
selected unless optional satellite receiver and
antenna are installed and an XMTor SIRIUS™
satellite radio service subscription is active.
Satellite radio performance may be affected if
cargo carried on the roof blocks the satellite radio
signal.
If possible, do not put cargo over the satellite
antenna.
AUDIO OPERATION PRECAUTIONS
Compact disc (CD) player
cOnly use high quality 4.7 inches (12 cm)
round discs that have the “COMPACTdisc DIGITAL AUDIO” logo on the disc
or packaging.
cDuring cold weather or rainy days, the
player may malfunction due to the hu-
midity. If this occurs, remove the CD
and dehumidify or ventilate the player
completely.
cThe player may skip while driving on
rough roads.
cThe CD player sometimes cannot func-
tion when the compartment tempera-
ture is extremely high. Decrease the
temperature before use.
cDo not expose the CD to direct sun-
light.
cCDs that are in poor condition or are
dirty, scratched or covered with finger-
prints may not work properly.
cThe following CDs may not work prop-
erly:
cCopy control compact discs (CCCD)
cRecordable compact discs (CD-R)
cRewritable compact discs (CD-RW)
cDo not use the following CDs as they
may cause the CD player to malfunc-
tion:
LHA0099
Heater, air conditioner and audio systems4-11
ZREVIEW COPYÐ2005 Truck/Frontier(d22)
Owners ManualÐUSA_English(nna)
11/30/04Ðdebbie
X