air condition NISSAN FRONTIER 2006 D22 / 1.G User Guide
[x] Cancel search | Manufacturer: NISSAN, Model Year: 2006, Model line: FRONTIER, Model: NISSAN FRONTIER 2006 D22 / 1.GPages: 336, PDF Size: 7.27 MB
Page 100 of 336

WARNING
cIf the light does not illuminate with the
ignition switch turned ON, have the ve-
hicle checked by a NISSAN dealer as
soon as possible.
cIf the light illuminates while driving,
avoid sudden steering maneuvers or
abrupt braking, reduce vehicle speed,
pull off the road to a safe location and
stop the vehicle as soon as possible.
Serious vehicle damage could occur
and may lead to an accident and could
result in serious personal injury. Check
the tire pressure for all four tires. Adjust
the tire pressure to the recommended
COLD tire pressure shown on the Tire
and Loading Information label to turn
the low tire pressure warning light OFF.
If the light still illuminates while driving
after adjusting the tire pressure, a tire
may be flat. If you have a flat tire, re-
place it with a spare tire as soon as
possible.cWhen a spare tire is mounted or a wheel
is replaced, tire pressure will not be
indicated, the TPMS will not function
and the low tire pressure warning light
will flash. Contact your NISSAN dealer
as soon as possible for tire replacement
and/or system resetting.
cReplacing tires with those not originally
specified by NISSAN could affect the
proper operation of the TPMS.
CAUTION
cThe TPMS is not a substitute for the
regular tire pressure check. Be sure to
check the tire pressure regularly.
cIf the vehicle is being driven at speeds
of less than 16 MPH (25 km/h) , the
TPMS may not operate correctly.
cBe sure to install the specified size of
tires to the 4 wheels correctly.
Low windshield washer fluid
warning light
This light comes on when the windshield washer
fluid is at a low level. Add windshield washer fluid
as necessary. See “Window washer fluid” in the
“Maintenance and do-it-yourself” section of this
manual.
Seat belt warning light and
chime
The light and chime remind you to fasten your
seat belts. The light illuminates whenever the
ignition key is turned to the ON or START position
and remains illuminated until the driver’s seat belt
is fastened. At the same time, the chime sounds
for about 6 seconds unless the driver’s seat belt
is securely fastened.
The seat belt warning light may also illuminate if
the front passenger’s seat belt is not fastened
when the front passenger’s seat is occupied (if
so equipped) . For 5 seconds after the ignition
switch is in the ON position, the system does not
activate the warning light for the front passenger.
Refer to “Seat belts” in the “Safety—Seats, seat
belts and supplemental restraint system” section
for precautions on seat belt usage.
Supplemental air bag warning
light
When the ignition key is in the ON or START
position, the supplemental air bag warning light
illuminates for about 7 seconds and then turns
off. This means the system is operational.
If any of the following conditions occur, the
supplemental front air bag, supplemental side air
bag (if so equipped) , curtain side-impact air bags
2-16Instruments and controls
ZREVIEW COPYÐ2006 Truck/Frontier(d22)
Owners ManualÐUSA_English(nna)
10/14/05Ðdebbie
X
Page 103 of 336

– do not drive at speeds above 45 MPH
(72 km/h) .
– avoid hard acceleration or deceleration.
– avoid steep uphill grades.
– if possible, reduce the amount of cargo
being hauled or towed.
The malfunction indicator light may stop blinking
and come on steady. Have the vehicle inspected
by a NISSAN dealer. You do not need to have
your vehicle towed to the dealer.
CAUTION
Continued vehicle operation without hav-
ing the emission control system checked
and repaired as necessary could lead to
poor driveability, reduced fuel economy,
and possible damage to the emission con-
trol system.
Overdrive off indicator light
(automatic transmission
models only)
This light comes on when the overdrive function
is OFF.
The automatic transmission overdrive function is
controlled by the overdrive switch.See “Driving the vehicle” in the “Starting and
driving” section of this manual.
Security indicator light (if so
equipped)
This light blinks whenever the ignition switch is in
the LOCK, OFF or ACC position. This function
indicates the security system equipped on the
vehicle is operational.
For additional information, see “Security sys-
tems” later in this section.
Slip indicator light for models
with ABLS (if so equipped)
This indicator light comes on if the active brake
limited slip is activated. If activated, the system
will apply braking to the slipping drive wheel(s) ,
giving the non-slipping wheel(s) more traction.
Slip indicator light for models
with VDC (if so equipped)
This indicator light will blink when the traction
control system is limiting wheel spin. Slippery
road conditions may exist if the slip indicator
blinks on. If this happens, adjust your driving
accordingly.
The slip indicator light also comes on when you
turn the ignition key to the ON position. The light
will turn off after about 2 seconds if the system isoperational. If the light does not come on or does
not go off, have the traction control system
checked by a NISSAN dealer.
If the battery is removed or discharged, the trac-
tion control system is disabled and the slip indi-
cator light will not turn off after 2 seconds when
the ignition switch is turned to the ON position.
To reset the system, you must perform the reset
procedure. Refer to “Vehicle dynamic control
(VDC) system” in the “Starting and driving” sec-
tion of this manual.
If the light does not go off after performing the
reset procedure, have the traction control system
checked by a NISSAN dealer.
Transfer 4LO position
indicator light (
model)
The light should turn off within 1 second after
turning the ignition switch to ON.
This light comes on when the 4WD shift switch is
set in the 4LO position with the ignition key in the
ON position.
The transfer case may be damaged if you shift the
switch while driving.
Make sure the transfer 4LO position indicator
light turns on when you shift the 4WD shift switch
to 4LO.
Instruments and controls2-19
ZREVIEW COPYÐ2006 Truck/Frontier(d22)
Owners ManualÐUSA_English(nna)
10/17/05Ðdebbie
X
Page 118 of 336

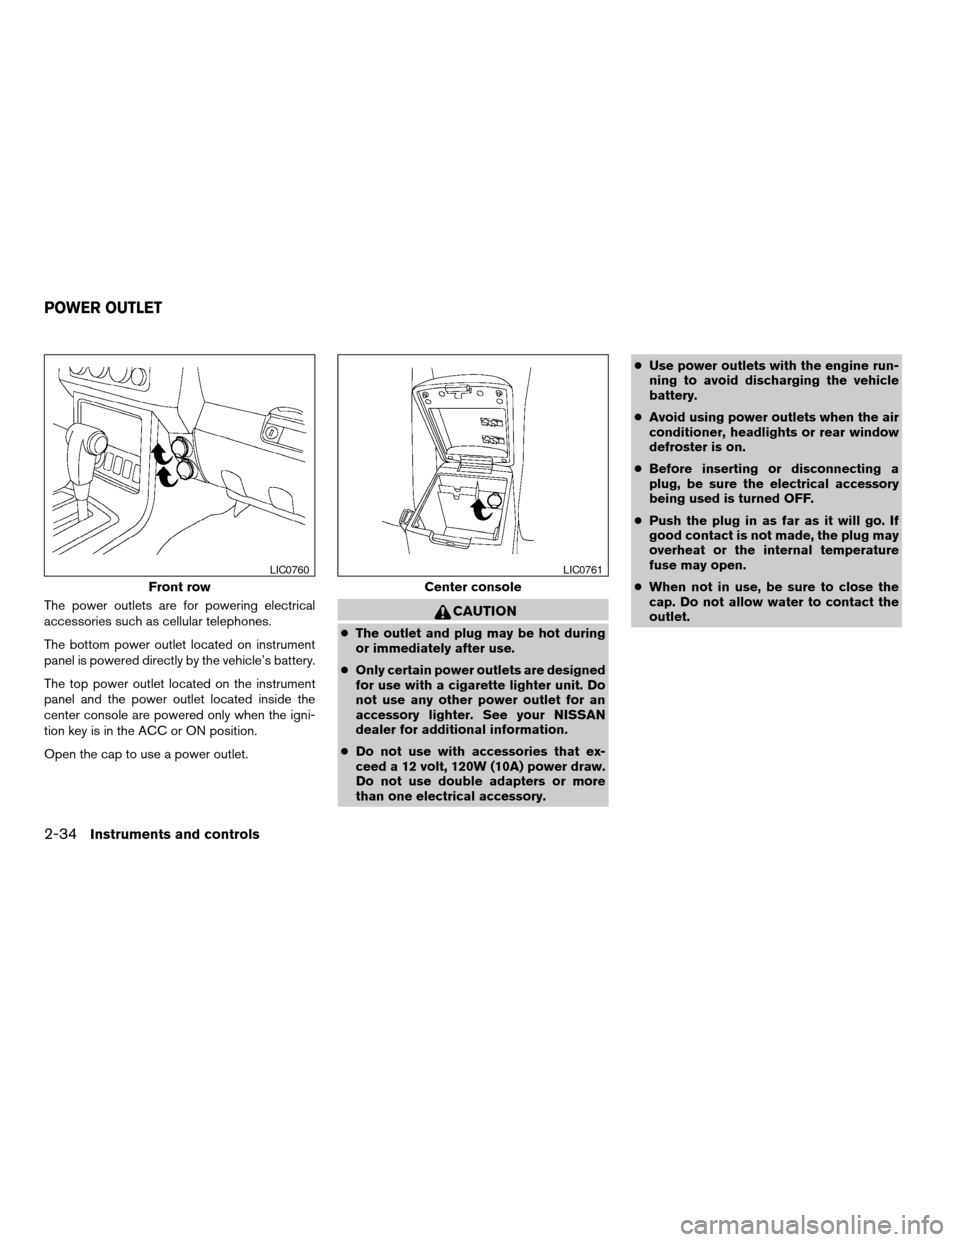
The power outlets are for powering electrical
accessories such as cellular telephones.
The bottom power outlet located on instrument
panel is powered directly by the vehicle’s battery.
The top power outlet located on the instrument
panel and the power outlet located inside the
center console are powered only when the igni-
tion key is in the ACC or ON position.
Open the cap to use a power outlet.CAUTION
cThe outlet and plug may be hot during
or immediately after use.
cOnly certain power outlets are designed
for use with a cigarette lighter unit. Do
not use any other power outlet for an
accessory lighter. See your NISSAN
dealer for additional information.
cDo not use with accessories that ex-
ceed a 12 volt, 120W (10A) power draw.
Do not use double adapters or more
than one electrical accessory.cUse power outlets with the engine run-
ning to avoid discharging the vehicle
battery.
cAvoid using power outlets when the air
conditioner, headlights or rear window
defroster is on.
cBefore inserting or disconnecting a
plug, be sure the electrical accessory
being used is turned OFF.
cPush the plug in as far as it will go. If
good contact is not made, the plug may
overheat or the internal temperature
fuse may open.
cWhen not in use, be sure to close the
cap. Do not allow water to contact the
outlet.
Front row
LIC0760
Center console
LIC0761
POWER OUTLET
2-34Instruments and controls
ZREVIEW COPYÐ2006 Truck/Frontier(d22)
Owners ManualÐUSA_English(nna)
10/17/05Ðdebbie
X
Page 137 of 336

PROGRAMMING TROUBLE-
DIAGNOSIS
If the HomeLinkTdoes not quickly learn the hand-
held transmitter information:
creplace the hand-held transmitter batteries
with new batteries.
cposition the hand-held transmitter with its
battery area facing away from the
HomeLinkTsurface.
cpress and hold both the HomeLinkTand
hand-held transmitter buttons without inter-
ruption.
cposition the hand-held transmitter1-3
inches (26 - 76 mm) away from the
HomeLinkTsurface. Hold the transmitter in
that position for up to 15 seconds. If
HomeLinkTis not programmed within that
time, try holding the transmitter in another
position – keeping the indicator light in view
at all times.
If you continue to have programming difficulties,
please contact the NISSAN Consumer Affairs
Department. The phone numbers are located in
the Foreword of this manual.
CLEARING THE PROGRAMMED
INFORMATION
Individual buttons cannot be cleared. However,
to clear all programming, press and hold the two
outside buttons and release when the indicator
light begins to flash (approximately 20 seconds) .
REPROGRAMMING A SINGLE
HOMELINKTBUTTON
To reprogram a HomeLinkTUniversal Transceiver
button, complete the following.
1. Press and hold the desired HomeLinkTbut-
ton.Do notrelease the button until step 4
has been completed.
2. When the indicator light begins to flash
slowly (after 20 seconds) , position the
hand-held transmitter1-3inches (26 - 76
mm) away from the HomeLinkTsurface.
3. Press and hold the hand-held transmitter
button.
4.
The HomeLinkTindicator light will flash, first
slowly and then rapidly. When the indicator light
begins to flash rapidly, release both buttons.
The HomeLinkTUniversal Transceiver button has
now been reprogrammed. The new device can be
activated by pushing the HomeLinkTbutton that
was just programmed. This procedure will not affect
any other programmed HomeLinkTbuttons.
IF YOUR VEHICLE IS STOLEN
If your vehicle is stolen, you should change the
codes of any non-rolling code device that has
been programmed into HomeLinkT. Consult the
Owner’s Manual of each device or call the manu-
facturer or dealer of those devices for additional
information.
When your vehicle is recovered, you will
need to reprogram the HomeLinkTUniver-
sal Transceiver with your new transmitter
information.
FCC Notice:
This device complies with FCC rules part
15. Operation is subject to the following
two conditions: (1) This device may not
cause harmful interference and (2) This de-
vice must accept any interference that may
be received, including interference that
may cause undesired operation.
This transmitter has been tested and com-
plies with FCC and DOC/MDC rules.
Changes or modifications not expressly ap-
proved by the party responsible for compli-
ance could void the user’s authority to op-
erate the equipment.
DOC: ISTC 1763K1313
FCC I.D. CV2V67690
Instruments and controls2-53
ZREVIEW COPYÐ2006 Truck/Frontier(d22)
Owners ManualÐUSA_English(nna)
10/17/05Ðdebbie
X
Page 157 of 336

4 Heater, air conditioner and audio
systems
Ventilators........................................4-2
Heater and air conditioner (manual)..................4-2
Controls.......................................4-3
Heater operation...............................4-4
Air conditioner operation (if so equipped).........4-5
Air flow charts..................................4-6
Servicing air conditioner............................4-9
Audio system....................................4-10
Radio........................................4-10
FM radio reception............................4-10
AM radio reception............................4-10Satellite radio reception (if so equipped).........4-10
Audio operation precautions....................4-11
FM-AM radio with compact disc (CD) player
(if so equipped)...............................4-16
FM-AM-SAT radio with compact disc (CD)
changer......................................4-20
CD care and cleaning..........................4-25
Steering wheel switch for audio control
(if so equipped)...............................4-26
Antenna......................................4-26
Car phone or CB radio............................4-27
ZREVIEW COPYÐ2006 Truck/Frontier(d22)
Owners ManualÐUSA_English(nna)
10/17/05Ðdebbie
X
Page 158 of 336

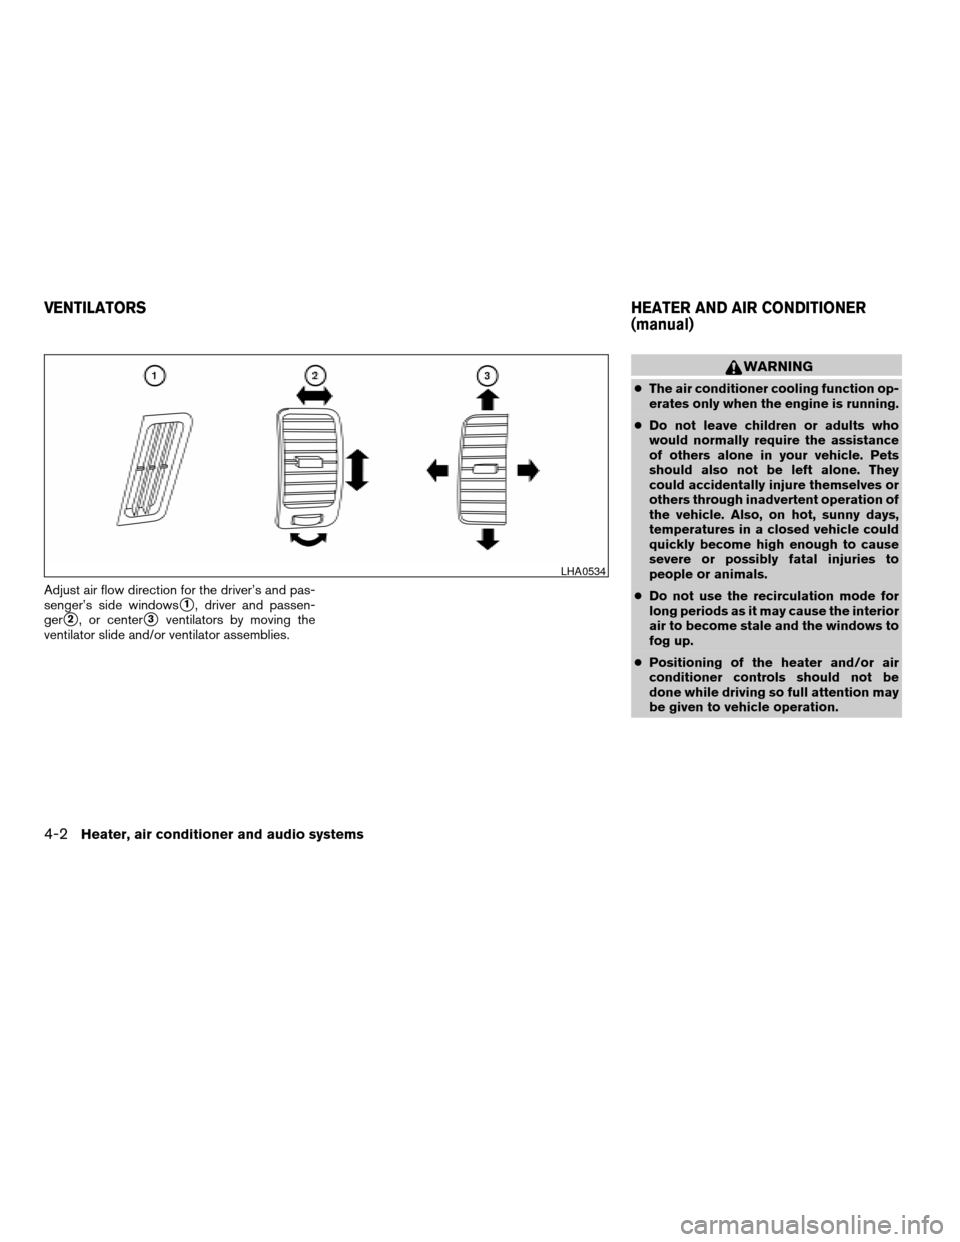
Adjust air flow direction for the driver’s and pas-
senger’s side windows
s1, driver and passen-
ger
s2, or centers3ventilators by moving the
ventilator slide and/or ventilator assemblies.
WARNING
cThe air conditioner cooling function op-
erates only when the engine is running.
cDo not leave children or adults who
would normally require the assistance
of others alone in your vehicle. Pets
should also not be left alone. They
could accidentally injure themselves or
others through inadvertent operation of
the vehicle. Also, on hot, sunny days,
temperatures in a closed vehicle could
quickly become high enough to cause
severe or possibly fatal injuries to
people or animals.
cDo not use the recirculation mode for
long periods as it may cause the interior
air to become stale and the windows to
fog up.
cPositioning of the heater and/or air
conditioner controls should not be
done while driving so full attention may
be given to vehicle operation.
LHA0534
VENTILATORSHEATER AND AIR CONDITIONER
(manual)
4-2Heater, air conditioner and audio systems
ZREVIEW COPYÐ2006 Truck/Frontier(d22)
Owners ManualÐUSA_English(nna)
10/17/05Ðdebbie
X
Page 159 of 336

1. Fan control dial
2. Temperature control dial
3. Air flow control dial
4. Air conditioner button (if so equipped)
5. Rear window defrost button (if so
equipped)
6. Air recirculation button
CONTROLS
Fan control dial
The fan control dial turns the fan on and off, and
controls fan speed.
Air flow control dial
The air flow control dial allows you to select the
air flow outlets.
MAX
A/C— Air flows from center and side
vents with maximum cooling (air
conditioning) .
— Air flows from center and side
ventilators.
— Air flows from center and side
ventilators and the front and rear
floor outlets.
— Air flows mainly from the front and
rear floor outlets.
— Air flows from defroster outlets
and the front and rear floor
outlets.
— Air flows mainly from defroster
outlets.
The air flow control dial also has intermediate
positions which allow the air flow to be distrib-
uted between 2 of the icon positions on the air
flow control dial.
Temperature control dial
The temperature control dial allows you to adjust
the temperature of the outlet air. To lower the
temperature, turn the dial to the left. To increase
the temperature, turn the dial to the right.
Air recirculation button
ON position:
Push the air recirculation buttonto recir-
culate air inside the vehicle. The indicator light on
the
button will come on.
Push the
button to the on position:
cwhen driving on a dusty road.
cto prevent traffic fumes from entering pas-
senger compartment.
cfor maximum cooling when using the air con-
ditioner.
LHA0489
Heater, air conditioner and audio systems4-3
ZREVIEW COPYÐ2006 Truck/Frontier(d22)
Owners ManualÐUSA_English(nna)
10/17/05Ðdebbie
X
Page 160 of 336

OFF position:
Push the air recirculation buttonagain to
turn air recirculation off. The indicator light on
the
button will turn off. Outside air is drawn
into the passenger compartment and distributed
through the selected outlet.
Use the off position for normal heater or air con-
ditioner operation.
Air conditioner button (if so
equipped)
The button is provided only on vehicles equipped
with an air conditioner.
Start the engine, turn the fan control dial to the
desired (1 - 4) position and push the
button to turn on the air conditioner. The indicator
light comes on when the air conditioner is oper-
ating. To turn off the air conditioner, push
the
button again.
The air conditioner cooling function oper-
ates only when the engine is running.
Rear window defroster switch
For more information about the rear window de-
froster switch, see “Rear window and outside
mirror (if so equipped) defroster switch” in the
“Instruments and controls” section of this manual.
HEATER OPERATION
Heating
This mode is used to direct heated air to the foot
outlets. Some air also flows from the defrost
outlets.
1. Push the
button to the OFF position
for normal heating. The indicator light on
the
button will go off.
2. Turn the air flow control dial to the
position.
3. Turn the fan control dial to the desired posi-
tion.
4. Turn the temperature control dial to the de-
sired position between the middle and the
hot position.
Ventilation
This mode directs outside air to the side and
center ventilators.
1. Push the
button to the OFF position.
The indicator light on thebutton will
go off.
2. Turn the air flow control dial to the
position.
3. Turn the fan control dial to the desired posi-
tion.4. Turn the temperature control dial to the de-
sired position.
Defrosting or defogging
This mode directs the air to the defrost outlets to
defrost/defog the windows.
1. Turn the air flow control dial to the
position.
2. Turn the fan control dial to the desired posi-
tion.
3. Turn the temperature control dial to the de-
sired position between the middle and the
hot position.
cTo quickly remove ice or fog from the win-
dows, turn the fan control dial to 4 and the
temperature control lever to the full HOT
position.
cWhen the
position is selected, the air
conditioner automatically turns on (however,
the indicator light will not illuminate) if the
outside temperature is more than 36°F
(2°C) . The air conditioning system will con-
tinue to operate until the fan control dial is
turned to OFF or the vehicle is shut off, even
if the air flow control dial is turned to a
position other than the
position. This
dehumidifies the air which helps defog the
windshield. The
mode automatically
4-4Heater, air conditioner and audio systems
ZREVIEW COPYÐ2006 Truck/Frontier(d22)
Owners ManualÐUSA_English(nna)
10/17/05Ðdebbie
X
Page 161 of 336

turns off, allowing outside air to be drawn
into the passenger compartment to further
improve the defogging performance.
Bi-level heating
This mode directs cooler air from the side and
center vents and warmer air from the floor outlets.
When the temperature control dial is moved to
the full hot or full cool position, the air between
the vents and the floor outlets is the same tem-
perature.
1. Push the
button to the off position.
2. Turn the air flow control dial to the
position.
3. Turn the fan control dial to the desired posi-
tion.
4. Turn the temperature control dial to the de-
sired position.
Heating and defogging
This mode heats the interior and defogs the wind-
shield.
1. Turn the air flow control dial to the
position.
2. Turn the fan control dial to the desired posi-
tion.3. Turn the temperature control dial to the de-
sired position between the middle and the
hot position.
cWhen the
position is selected, the air
conditioner automatically turns on (however,
the indicator light on the
button will
not come on) if the outside temperature is
more than 36°F (2°C) . If in defrost mode for
more than one minute, the air conditioning
system will continue to operate until the fan
control dial is turned to OFF or the vehicle is
shut off, even if the air flow control dial is
turned to a position other than the
position. This dehumidifies the air which
helps defog the windshield. The
mode automatically turns off, allowing out-
side air to be drawn into the passenger
compartment to further improve the defog-
ging performance.
Operating tips
Clear snow and ice from the wiper blades
and air inlet in front of the windshield. This
improves heater operation.
AIR CONDITIONER OPERATION (if
so equipped)
Start the engine, turn the fan control dial to the
desired (1 - 4) position, and push in the
button to activate the air conditioner. When the
air conditioner is on, cooling and dehumidifying
functions are added to the heater operation.
The air conditioner cooling function oper-
ates only when the engine is running.
Cooling
This mode is used to cool and dehumidify the air.
1. Push the
button to the off position.
2. Turn the air flow control dial to the
position.
3. Turn the fan control dial to the desired posi-
tion.
4. Push the
button. The indicator light
comes on.
5. Turn the temperature control dial to the de-
sired position.
cFor quick cooling when the outside tem-
perature is high, push the
button to
the on position (indicator light on) . Be sure
to return the
button to the off position
for normal cooling.
Heater, air conditioner and audio systems4-5
ZREVIEW COPYÐ2006 Truck/Frontier(d22)
Owners ManualÐUSA_English(nna)
10/17/05Ðdebbie
X
Page 162 of 336

Dehumidified heating
This mode is used to heat and dehumidify the air.
1. Push the
button to the off position.
2. Turn the air flow control dial to the
position.
3. Turn the fan control dial to the desired posi-
tion.
4. Push the
button. The indicator light
comes on.
5. Turn the temperature control dial to the de-
sired position.
Dehumidified defogging
This mode is used to defog the windows and
dehumidify the air.
1. Turn the air flow control dial to the
position.
2. Turn the fan control dial to the desired posi-
tion.
3. Push the
button. The indicator light
comes on.When the
,or positions in between
are selected, the air conditioner automatically
turns on (however, the indicator light will not
illuminate) if the outside temperature is more than
36°F (2°C) . The air conditioning system will con-
tinue to operate until the fan control dial is turned
to OFF or the vehicle is shut off, even if the air flow
control dial is turned to a position other than
the
position. This dehumidifies the air
which helps defog the windshield. The
mode automatically turns off, allowing outside air
to be drawn into the passenger compartment to
further improve the defogging performance.
4. Turn the temperature control dial to the de-
sired position.
Operating tips
cKeep the windows and sunroof (if so
equipped) closed while the air conditioner is
in operation.
cAfter parking in the sun, drive for 2 or 3
minutes with the windows open to vent hot
air from the passenger compartment. Then,
close the windows. This allows the air con-
ditioner to cool the interior more quickly.cThe air conditioning system should be
operated for approximately 10 minutes
at least once a month. This helps pre-
vent damage to the system due to lack
of lubrication.
cIf the engine coolant temperature
gauge indicates engine coolant tem-
perature over the normal range, turn
the air conditioner off. See “If your
vehicle overheats” in the “In case of
emergency” section of this manual.
AIR FLOW CHARTS
The following charts show the button and dial
positions forMAXIMUM AND QUICKheating,
cooling or defrosting. For additional information
on heating and cooling see “Heater and air con-
ditioner” in this section”.The air recirculation
(
) button should always be in the OFF
position for heating and defrosting.
4-6Heater, air conditioner and audio systems
ZREVIEW COPYÐ2006 Truck/Frontier(d22)
Owners ManualÐUSA_English(nna)
10/17/05Ðdebbie
X