AUX NISSAN FRONTIER 2009 Owner´s Manual
[x] Cancel search | Manufacturer: NISSAN, Model Year: 2009, Model line: FRONTIER, Model: NISSAN FRONTIER 2009Pages: 366, PDF Size: 6.43 MB
Page 12 of 366
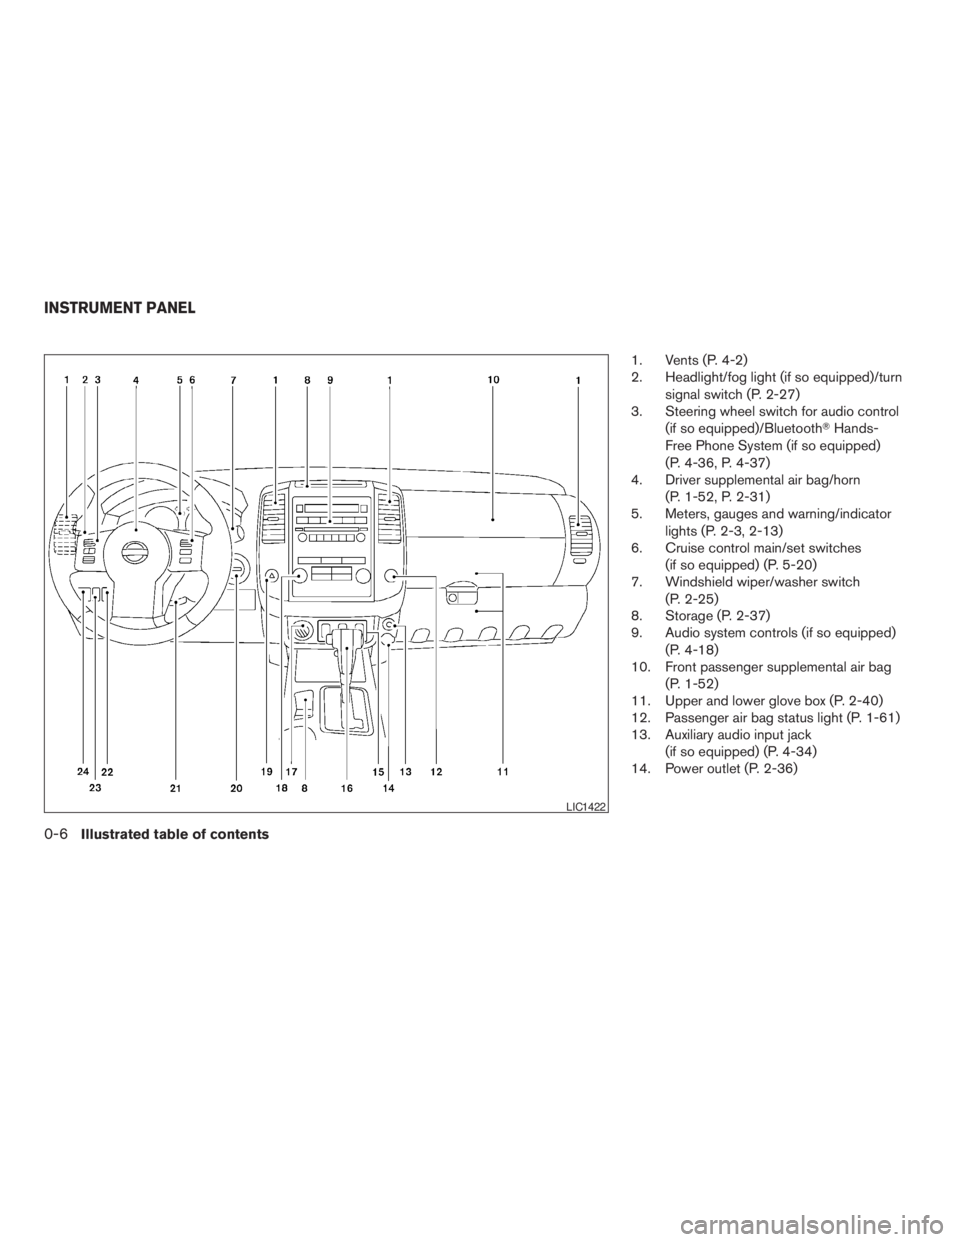
1. Vents (P. 4-2)
2. Headlight/fog light (if so equipped)/turn
signal switch (P. 2-27)
3. Steering wheel switch for audio control
(if so equipped)/BluetoothTHands-
Free Phone System (if so equipped)
(P. 4-36, P. 4-37)
4. Driver supplemental air bag/horn
(P. 1-52, P. 2-31)
5. Meters, gauges and warning/indicator
lights (P. 2-3, 2-13)
6. Cruise control main/set switches
(if so equipped) (P. 5-20)
7. Windshield wiper/washer switch
(P. 2-25)
8. Storage (P. 2-37)
9. Audio system controls (if so equipped)
(P. 4-18)
10. Front passenger supplemental air bag
(P. 1-52)
11. Upper and lower glove box (P. 2-40)
12. Passenger air bag status light (P. 1-61)
13. Auxiliary audio input jack
(if so equipped) (P. 4-34)
14. Power outlet (P. 2-36)
LIC1422
INSTRUMENT PANEL
0-6Illustrated table of contents
ZREVIEW COPYÐ2009 08+ Truck/Frontier(fro)
Owners ManualÐUSA_English(nna)
05/24/08Ðdebbie
X
Page 90 of 366
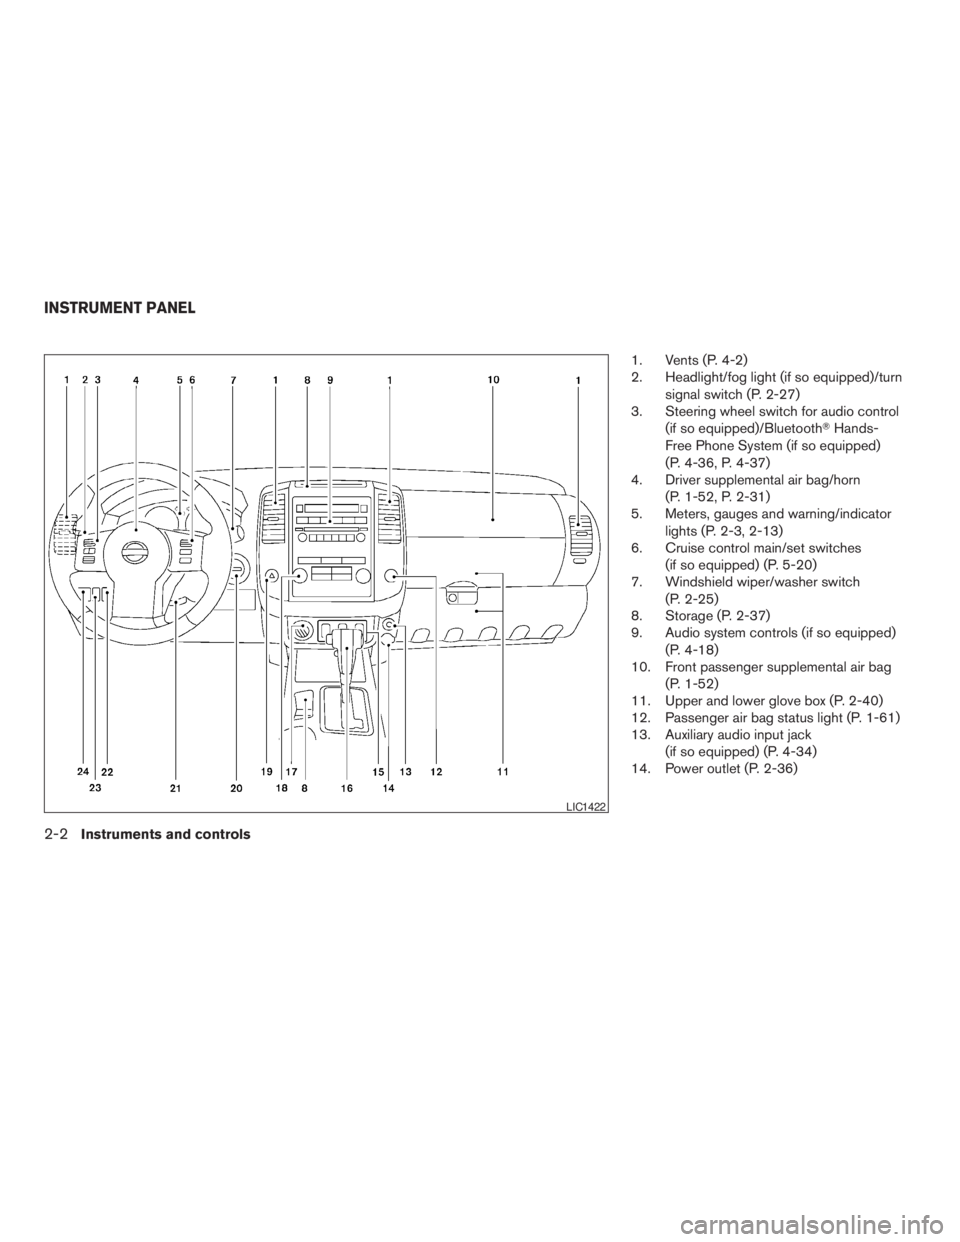
1. Vents (P. 4-2)
2. Headlight/fog light (if so equipped)/turn
signal switch (P. 2-27)
3. Steering wheel switch for audio control
(if so equipped)/BluetoothTHands-
Free Phone System (if so equipped)
(P. 4-36, P. 4-37)
4. Driver supplemental air bag/horn
(P. 1-52, P. 2-31)
5. Meters, gauges and warning/indicator
lights (P. 2-3, 2-13)
6. Cruise control main/set switches
(if so equipped) (P. 5-20)
7. Windshield wiper/washer switch
(P. 2-25)
8. Storage (P. 2-37)
9. Audio system controls (if so equipped)
(P. 4-18)
10. Front passenger supplemental air bag
(P. 1-52)
11. Upper and lower glove box (P. 2-40)
12. Passenger air bag status light (P. 1-61)
13. Auxiliary audio input jack
(if so equipped) (P. 4-34)
14. Power outlet (P. 2-36)
LIC1422
INSTRUMENT PANEL
2-2Instruments and controls
ZREVIEW COPYÐ2009 08+ Truck/Frontier(fro)
Owners ManualÐUSA_English(nna)
05/24/08Ðdebbie
X
Page 189 of 366
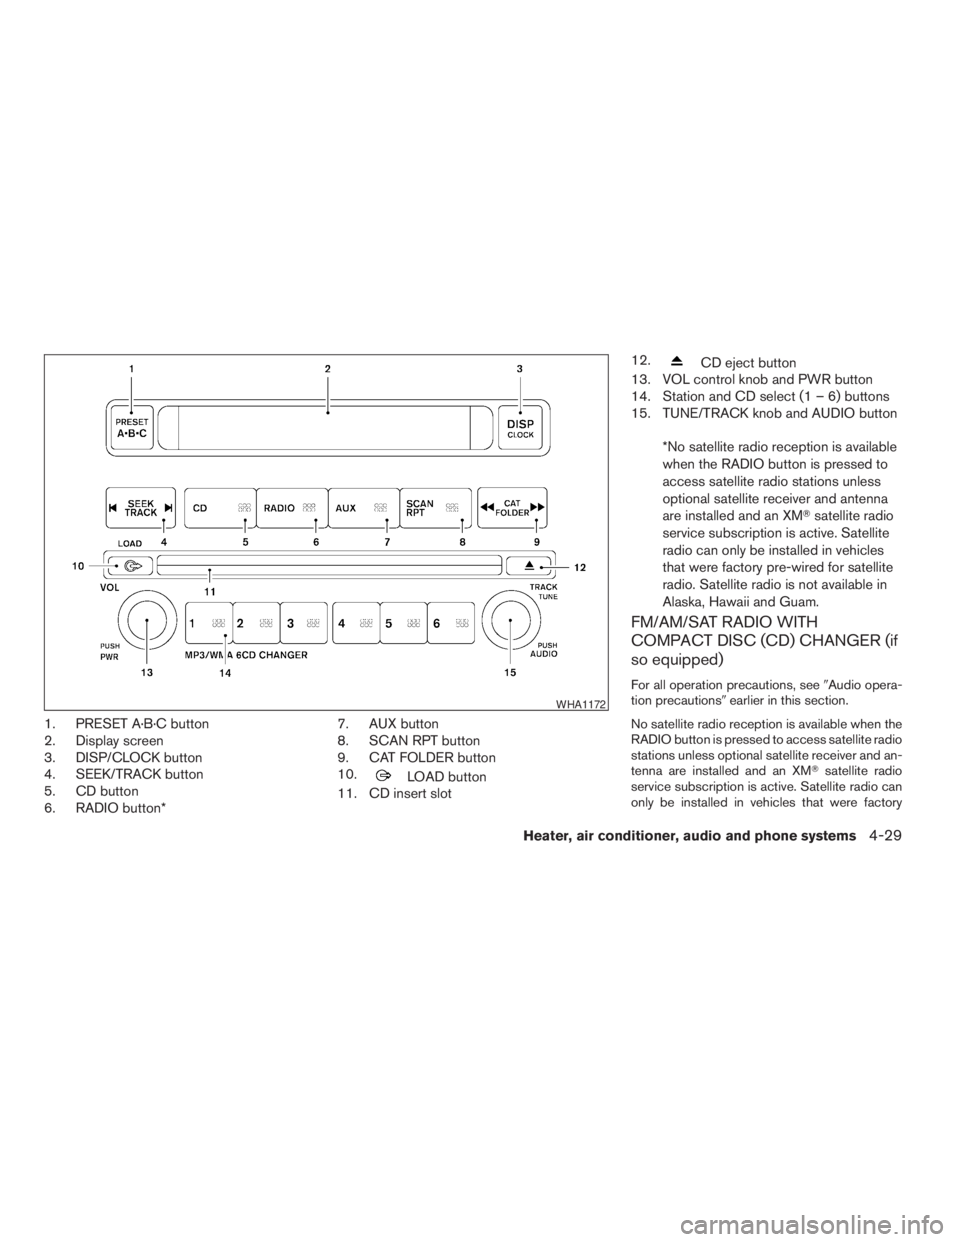
1. PRESET A·B·C button
2. Display screen
3. DISP/CLOCK button
4. SEEK/TRACK button
5. CD button
6. RADIO button*7. AUX button
8. SCAN RPT button
9. CAT FOLDER button
10.
LOAD button
11. CD insert slot12.
CD eject button
13. VOL control knob and PWR button
14. Station and CD select (1 – 6) buttons
15. TUNE/TRACK knob and AUDIO button
*No satellite radio reception is available
when the RADIO button is pressed to
access satellite radio stations unless
optional satellite receiver and antenna
are installed and an XMTsatellite radio
service subscription is active. Satellite
radio can only be installed in vehicles
that were factory pre-wired for satellite
radio. Satellite radio is not available in
Alaska, Hawaii and Guam.
FM/AM/SAT RADIO WITH
COMPACT DISC (CD) CHANGER (if
so equipped)
For all operation precautions, see9Audio opera-
tion precautions9earlier in this section.
No satellite radio reception is available when the
RADIO button is pressed to access satellite radio
stations unless optional satellite receiver and an-
tenna are installed and an XMTsatellite radio
service subscription is active. Satellite radio can
only be installed in vehicles that were factory
WHA1172
Heater, air conditioner, audio and phone systems4-29
ZREVIEW COPYÐ2009 08+ Truck/Frontier(fro)
Owners ManualÐUSA_English(nna)
05/27/08Ðdebbie
X
Page 194 of 366
ALL DISC RPT: All discs loaded will be repeated.
1 DISC RPT: The disc that is currently playing will
be repeated.
1 TRACK RPT: The track that is currently playing
will be repeated
ALL DISC RDM: Tracks from all discs will be
played randomly
1 DISC RDM: Tracks from the disc that is cur-
rently playing will be played randomly
CD EJECT:
Current/Selected disc:
cPress the
button, then press the slot
number (1 – 6) for the desired disc. The
compact disc will be ejected. If no slot num-
ber (1 – 6) is pressed, the current loaded
disc will be ejected. Also, if the ejected disc
is not removed within 15 seconds, the disc
will reload.
All discs:
cPress and hold the
button for more
than 1.5 seconds. The compact discs will be
ejected one by one. If a disc is not removed
within 15 seconds or the
button is
pressed again during the eject sequence,
the entire disc eject sequence will be can-
celed.When this button is pressed while the compact
disc is being played, the compact disc will eject
and the last source will be played.
CD IN indicator:
The slot numbers (1 – 6) will illuminate if CDs
have been loaded into the changer in CD mode
only.
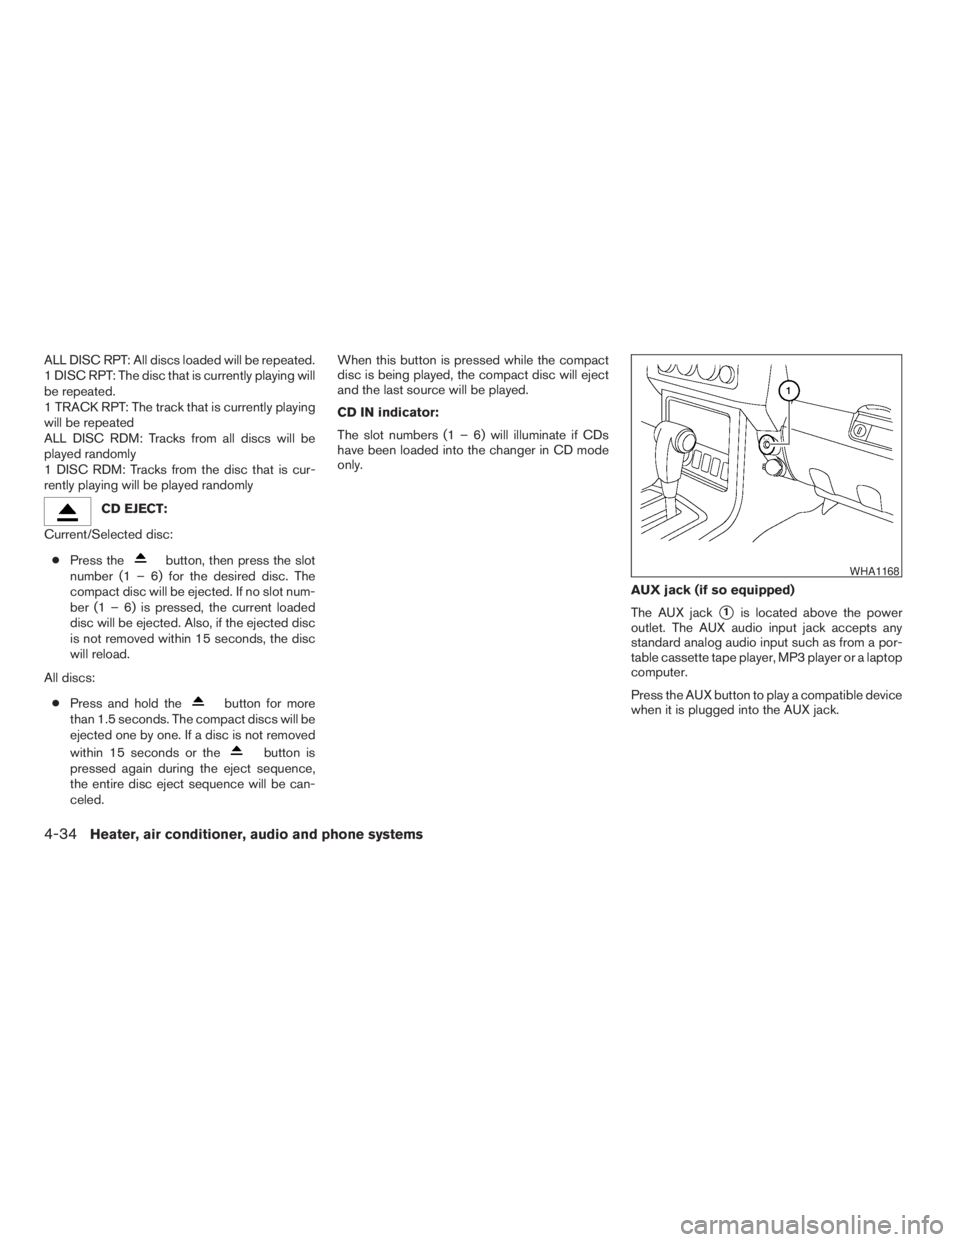
AUX jack (if so equipped)
The AUX jack
s1is located above the power
outlet. The AUX audio input jack accepts any
standard analog audio input such as from a por-
table cassette tape player, MP3 player or a laptop
computer.
Press the AUX button to play a compatible device
when it is plugged into the AUX jack.
WHA1168
4-34Heater, air conditioner, audio and phone systems
ZREVIEW COPYÐ2009 08+ Truck/Frontier(fro)
Owners ManualÐUSA_English(nna)
05/27/08Ðdebbie
X
Page 196 of 366
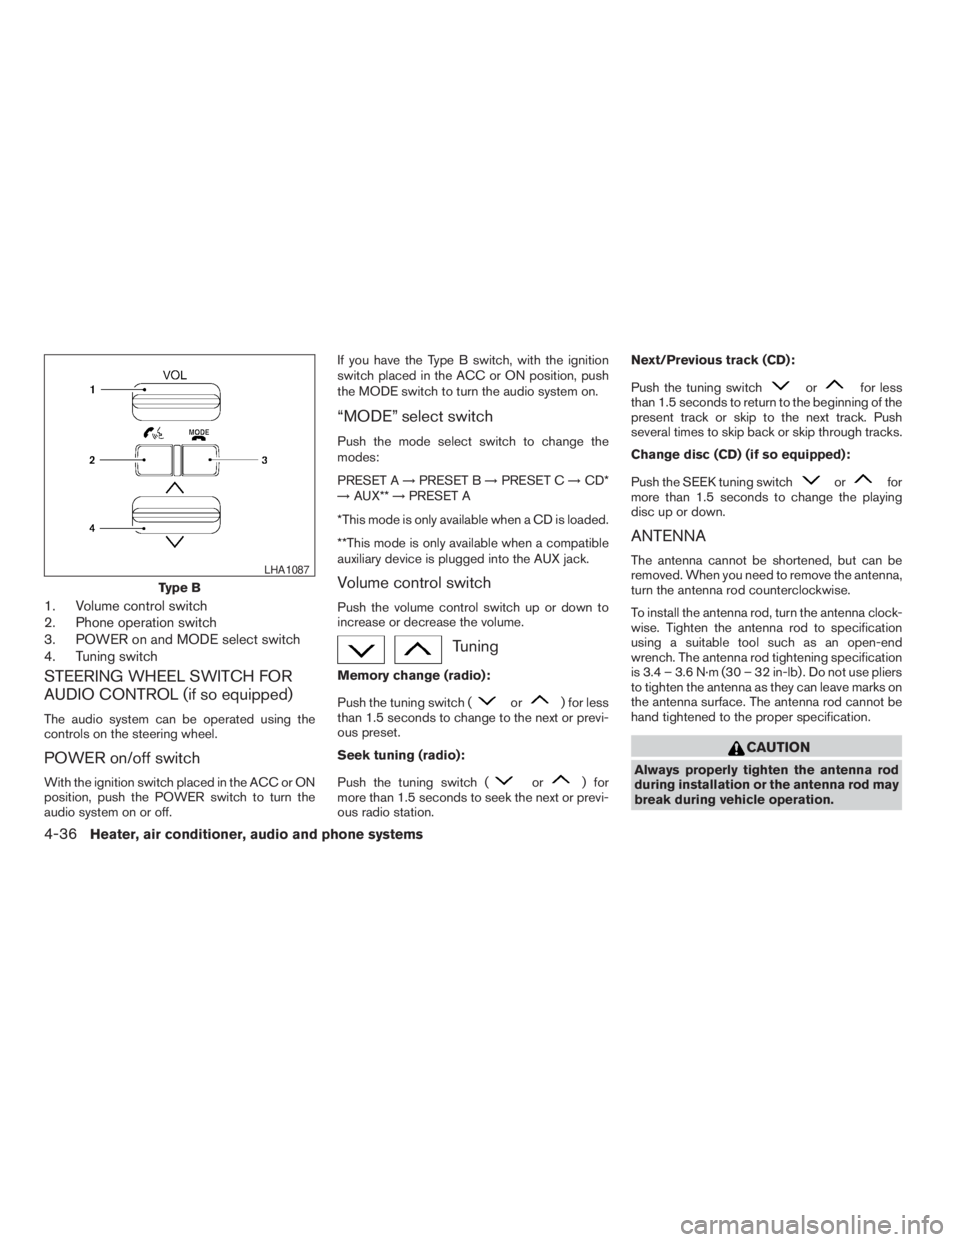
1. Volume control switch
2. Phone operation switch
3. POWER on and MODE select switch
4. Tuning switch
STEERING WHEEL SWITCH FOR
AUDIO CONTROL (if so equipped)
The audio system can be operated using the
controls on the steering wheel.
POWER on/off switch
With the ignition switch placed in the ACC or ON
position, push the POWER switch to turn the
audio system on or off.If you have the Type B switch, with the ignition
switch placed in the ACC or ON position, push
the MODE switch to turn the audio system on.
“MODE” select switch
Push the mode select switch to change the
modes:
PRESET A!PRESET B!PRESET C!CD*
!AUX**!PRESET A
*This mode is only available when a CD is loaded.
**This mode is only available when a compatible
auxiliary device is plugged into the AUX jack.
Volume control switch
Push the volume control switch up or down to
increase or decrease the volume.
Tuning
Memory change (radio):
Push the tuning switch (
or) for less
than 1.5 seconds to change to the next or previ-
ous preset.
Seek tuning (radio):
Push the tuning switch (
or) for
more than 1.5 seconds to seek the next or previ-
ous radio station.Next/Previous track (CD):
Push the tuning switch
orfor less
than 1.5 seconds to return to the beginning of the
present track or skip to the next track. Push
several times to skip back or skip through tracks.
Change disc (CD) (if so equipped):
Push the SEEK tuning switch
orfor
more than 1.5 seconds to change the playing
disc up or down.
ANTENNA
The antenna cannot be shortened, but can be
removed. When you need to remove the antenna,
turn the antenna rod counterclockwise.
To install the antenna rod, turn the antenna clock-
wise. Tighten the antenna rod to specification
using a suitable tool such as an open-end
wrench. The antenna rod tightening specification
is 3.4 – 3.6 N·m (30 – 32 in-lb) . Do not use pliers
to tighten the antenna as they can leave marks on
the antenna surface. The antenna rod cannot be
hand tightened to the proper specification.
CAUTION
Always properly tighten the antenna rod
during installation or the antenna rod may
break during vehicle operation.
Type B
LHA1087
4-36Heater, air conditioner, audio and phone systems
ZREVIEW COPYÐ2009 08+ Truck/Frontier(fro)
Owners ManualÐUSA_English(nna)
05/27/08Ðdebbie
X
Page 359 of 366
10 Index
4WD warning light...............2-16
A
Active brake limited slip (ABLS) system
(if so equipped).................5-34
Active Head Restraint..............1-6
Air bag (See supplemental restraint
system).....................1-52
Air bag system
Front (See supplemental front impact
air bag system)...............1-60
Air bag warning labels.............1-67
Air bag warning light...........1-67, 2-18
Air cleaner housing filter............8-20
Air conditioner
Air conditioner operation.......4-5, 4-13
Air conditioner service...........4-17
Air conditioner specification label.....9-12
Air conditioner system refrigerant and
oil recommendations.............9-7
Heater and air conditioner
controls.................4-2, 4-10
Servicing air conditioner..........4-17
Air flow charts...............4-7, 4-14
Alarm system
(See vehicle security system).........2-23
Anchor point locations.............1-27
Antenna.....................4-36
Anti-lock brake warning light..........2-14
Anti-lock Braking System (ABS)........5-33Audible reminders................2-22
Audio system..................4-18
Compact Disc (CD) changer. . . .4-29, 4-33
Compact disc (CD) player.........4-27
FM-AM radio with compact disc (CD)
changer...................4-29
FM/AM radio with compact disc (CD)
player....................4-25
Radio....................4-18
Steering wheel audio control switch. . . .4-36
Autolight switch.................2-28
Automatic
Automatic power window switch.....2-47
Automatic transmission position indicator
light.....................2-18
Driving with automatic transmission. . . .5-13
Automatic anti-glare inside mirror.......3-14
AUX jack.....................4-34
B
Battery......................8-16
Charge warning light............2-15
Before starting the engine...........5-12
Belt (See drive belt)..............8-18
Block heater
Engine....................5-39
BluetoothThands-free phone system.....4-37
Booster seats..................1-46
Brake
Anti-lock Braking System (ABS)......5-33Brake fluid..................8-14
Brake light (See stop light).........8-30
Brake system................5-32
Brake warning light.............2-15
Brake wear indicators........2-22, 8-23
Parking brake operation..........5-19
Self-adjusting brakes............8-23
Brakes......................8-23
Break-in schedule................5-21
Brightness control
Instrument panel..............2-30
Bulb check/instrument panel..........2-14
Bulb replacement................8-30
C
Capacities and recommended
fuel/lubricants...................9-2
Car phone or CB radio.............4-37
Cargo light switch...............2-32
Cargo (See vehicle loading information) . . .9-13
CD care and cleaning.............4-35
CD changer (See audio system). . . .4-29, 4-33
CD player (See audio system).........4-27
Child restraint with top tether strap......1-24
Child restraints..........1-14, 1-21, 1-23
Precautions on child
restraints............1-21, 1-32, 1-46
Top tether strap anchor point locations . .1-27
Child safety rear door lock............3-6
Chimes, audible reminders...........2-22
ZREVIEW COPYÐ2009 08+ Truck/Frontier(fro)
Owners ManualÐUSA_English(nna)
05/27/08Ðdebbie
X