set clock NISSAN FRONTIER 2010 Owner´s Manual
[x] Cancel search | Manufacturer: NISSAN, Model Year: 2010, Model line: FRONTIER, Model: NISSAN FRONTIER 2010Pages: 373, PDF Size: 6.21 MB
Page 192 of 373

MENU button (BASS, TREBLE, FADE, BAL-
ANCE and CLOCK):
Press the MENU button to change the mode as
follows:
BAS!TRE!FAD!BAL!CLOCK!Audio
!BAS
To adjust Bass, Treble, Fade and Balance, press
the MENU button until the desired mode appears
in the display. Press the SEEK button to adjust
Bass and Treble to the desired level. You can also
use the SEEK button to adjust Fade and Balance
modes. Fade adjusts the sound level between the
front and rear speakers and Balance adjusts the
sound between the right and left speakers.
Once you have adjusted the sound quality to the
desired level, press the MENU button repeatedly
until the radio or CD display reappears. Other-
wise, the radio or CD display will automatically
reappear after about 10 seconds.
NOTE:
If the clock is enabled, pressing the MENU
button will change the mode as follows:
BAS!TRE!FAD!BAL!CLOCK!
Hour adjustment!Minute adjustment!
Audio!BAS
For more information on setting the clock, see
“Clock set” later in this section.Clock operation
Press the MENU button until CLOCK is dis-
played; use the SEEK button to turn the clock
display on (CLK ON) or off (CLK OFF) .
Clock set
If the clock is not displayed with the ignition
switch in the ACC or ON position, you need to
select the CLK ON mode. Press the MENU but-
ton repeatedly until CLOCK is displayed. Use the
SEEK button to enable CLK ON mode.
1. Press the MENU button repeatedly until
CLOCK mode appears; press the SEEK
button until CLK ON appears.
2. Press the MENU button again; the hours will
start flashing.
3. Press the SEEK button
orto
adjust the hour.
4. Press the MENU button again; the display
will switch to the minute adjustment mode.
5. The minutes will start flashing. Press SEEK
button
orto adjust the minutes.
6. Press the MENU button again to exit the
clock set mode.The display will return to the regular clock display
after 10 seconds, or press the MENU button
again to return to the regular clock display.
Resetting the time
Hold the MENU button down and then press the
TUNE/SEEK button; the time will reset as fol-
lows:
cIf the displayed minutes before the reset are
in the range of :00 - :29, the hour displayed
before the reset will stay the same and the
minutes will be reset to :00.
cIf the displayed minutes before the reset are
in the range of :30 - :59, the hour displayed
before the reset will advance by one hour
and the minutes will be reset to :00.
For example, if the MENU button and the
TUNE/SEEK button are pressed while the time
displayed is between 8:00 and 8:29, the display
will be reset to 8:00. If the buttons were pressed
while the time was between 8:30 and 8:59, the
display will be reset to 9:00. At the same time the
display will return to the audio.FM/AM radio operation
FM·AM button:
Press the FM·AM button to change from AMÃ!
FM reception.
4-26Heater, air conditioner, audio and phone systems
Page 195 of 373

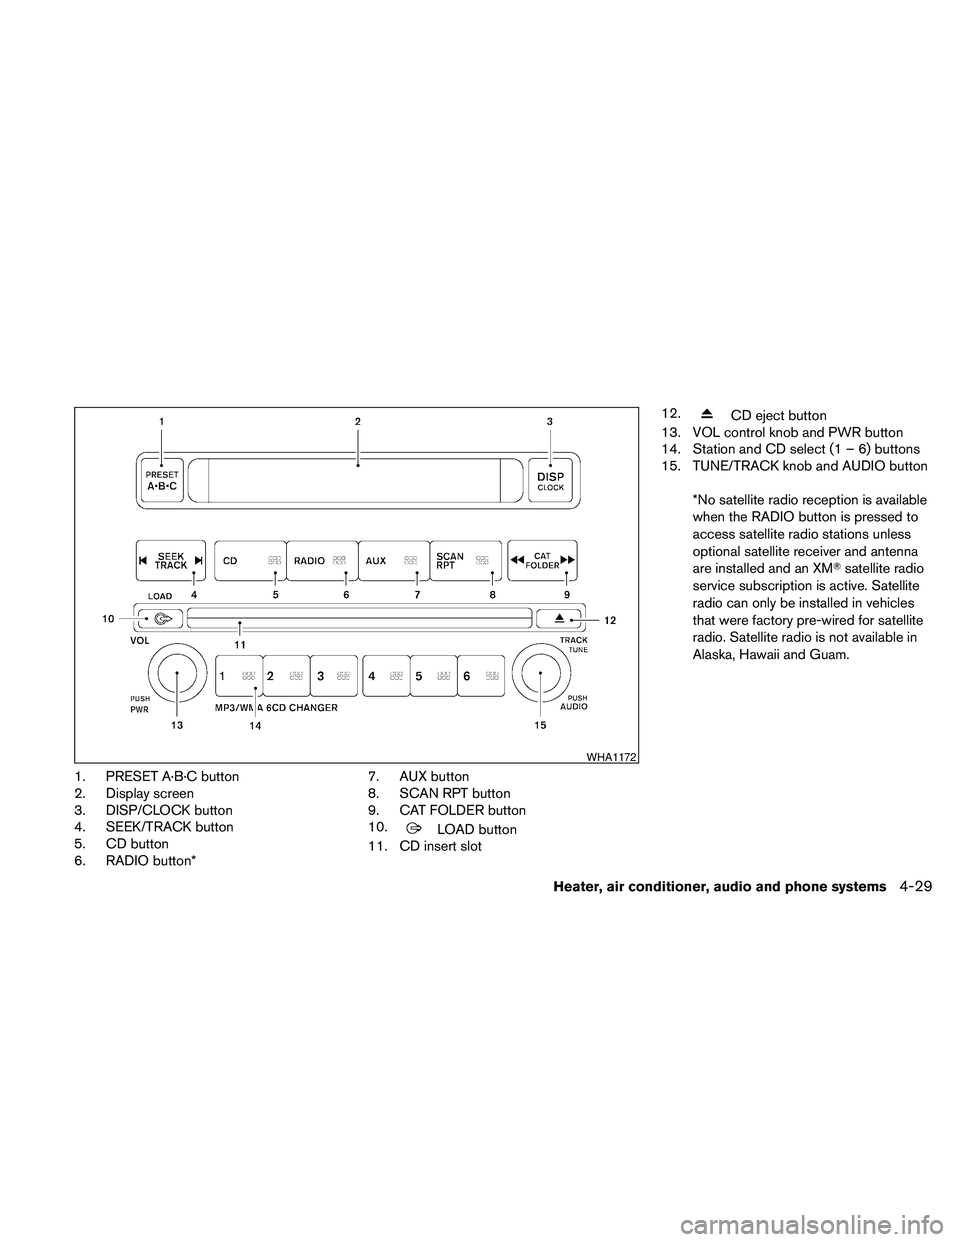
1. PRESET A·B·C button
2. Display screen
3. DISP/CLOCK button
4. SEEK/TRACK button
5. CD button
6. RADIO button*7. AUX button
8. SCAN RPT button
9. CAT FOLDER button
10.
LOAD button
11. CD insert slot12.
CD eject button
13. VOL control knob and PWR button
14. Station and CD select (1 – 6) buttons
15. TUNE/TRACK knob and AUDIO button
*No satellite radio reception is available
when the RADIO button is pressed to
access satellite radio stations unless
optional satellite receiver and antenna
are installed and an XMTsatellite radio
service subscription is active. Satellite
radio can only be installed in vehicles
that were factory pre-wired for satellite
radio. Satellite radio is not available in
Alaska, Hawaii and Guam.
WHA1172
Heater, air conditioner, audio and phone systems4-29
Page 196 of 373

FM/AM/SAT RADIO WITH
COMPACT DISC (CD) CHANGER (if
so equipped)
For all operation precautions, see9Audio opera-
tion precautions9earlier in this section.
No satellite radio reception is available when the
RADIO button is pressed to access satellite radio
stations unless optional satellite receiver and an-
tenna are installed and an XMTsatellite radio
service subscription is active. Satellite radio can
only be installed in vehicles that were factory
pre-wired for satellite radio. Satellite radio is not
available in Alaska, Hawaii and Guam.
Audio main operation
POWER/VOLUME control:
Turn the ignition switch to ACC or ON, and then
press the PWR/VOL control knob while the sys-
tem is off to call up the mode (radio or CD) which
was playing immediately before the system was
turned off.
To turn the system off, press the PWR/VOL con-
trol knob.
Turn the PWR/VOL control knob to adjust the
volume.This vehicle may be equipped with Speed Sen-
sitive Volume (SSV) for audio. The audio volume
changes as the driving speed changes.
AUDIO knob (BASS, MIDRANGE, TREBLE,
FADE, BALANCE and SSV if so equipped):
Press the AUDIO control knob to change the
mode as follows:
BASS!MID!TREBLE!FADE!BALANCE
!SSV (if so equipped)
To adjust Bass, Mid (Midrange) , Treble, Fade and
Balance, press the AUDIO knob until the desired
mode appears in the display. Turn the Tuning
knob to adjust Bass and Treble to the desired
level. You can also use the Tuning knob to adjust
Fade and Balance modes. Fader adjusts the
sound level between the front and rear speakers
and Balance adjusts the sound between the right
and left speakers.
To change the SSV mode to OFF, LOW, MID or
HIGH, turn the Tuning knob to the right or left.
Once you have adjusted the sound quality to the
desired level, press the AUDIO knob repeatedly
until the radio or CD display reappears. Other-
wise, the radio or CD display will automatically
reappear after about 10 seconds.Clock set
1. Press the DISP/CLOCK button until it
beeps (>1.5 seconds) .
2. The hours will start flashing. Press the CAT
FOLDER
orbutton or SEEK
TRACK
orbutton to adjust the
hours.
3. Press the DISP/CLOCK button again to
switch to the minute adjustment.
4. Press the CAT FOLDER
or
button or SEEK TRACKorbutton to adjust the minutes.
5. Press the DISP/CLOCK button again to exit
the clock set mode.
The display will return to the regular clock display
after 7 seconds, or you may press the
DISP/CLOCK button again to return to the regu-
lar clock display.
DISP (display) button:
This DISP (display) button will show text about
MP3, SAT or CD information in the audio display.
4-30Heater, air conditioner, audio and phone systems
Page 202 of 373

MODE select switch
Push the mode select switch to change the
modes:
PRESET A!PRESET B!PRESET C!CD*
!AUX**!PRESET A
*This mode is only available when a CD is loaded.
**This mode is only available when a compatible
auxiliary device is plugged into the AUX jack.
Volume control switch
Push the volume control switch up or down to
increase or decrease the volume.
Tuning
Memory change (radio):
Push the tuning switch (
or) for less
than 1.5 seconds to change to the next or previ-
ous preset.
Seek tuning (radio):
Push the tuning switch (
or) for
more than 1.5 seconds to seek the next or previ-
ous radio station.Next/Previous track (CD):
Push the tuning switch
orfor less
than 1.5 seconds to return to the beginning of the
present track or skip to the next track. Push
several times to skip back or skip through tracks.
Change disc (CD) (if so equipped):
Push the SEEK tuning switch
orfor
more than 1.5 seconds to change the playing
disc up or down.
ANTENNA
The antenna cannot be shortened, but can be
removed. When you need to remove the antenna,
turn the antenna rod counterclockwise.
To install the antenna rod, turn the antenna clock-
wise. Tighten the antenna rod to specification
using a suitable tool such as an open-end
wrench. The antenna rod tightening specification
is 3.4 – 3.6 N·m (30 – 32 in-lb) . Do not use pliers
to tighten the antenna as they can leave marks on
the antenna surface. The antenna rod cannot be
hand tightened to the proper specification.
CAUTION
Always properly tighten the antenna rod
during installation or the antenna rod may
break during vehicle operation.When installing a CB, ham radio or car phone in
your NISSAN, be sure to observe the following
precautions; otherwise, the new equipment may
adversely affect the engine control system and
other electronic parts.
WARNING
cA cellular telephone should not be used
while driving so full attention may be
given to vehicle operation. Some juris-
dictions prohibit the use of cellular tele-
phones while driving.
cIf you must make a call while your ve-
hicle is in motion, the hands free cellu-
lar phone operational mode (if so
equipped) is highly recommended. Ex-
ercise extreme caution at all times so
full attention may be given to vehicle
operation.
cIf you are unable to devote full attention
to vehicle operation while talking on
the phone, pull off the road to a safe
location and stop your vehicle.
CAR PHONE OR CB RADIO
4-36Heater, air conditioner, audio and phone systems