change time NISSAN FRONTIER 2015 D23 / 3.G Quick Reference Guide
[x] Cancel search | Manufacturer: NISSAN, Model Year: 2015, Model line: FRONTIER, Model: NISSAN FRONTIER 2015 D23 / 3.GPages: 24, PDF Size: 1.69 MB
Page 8 of 24
6
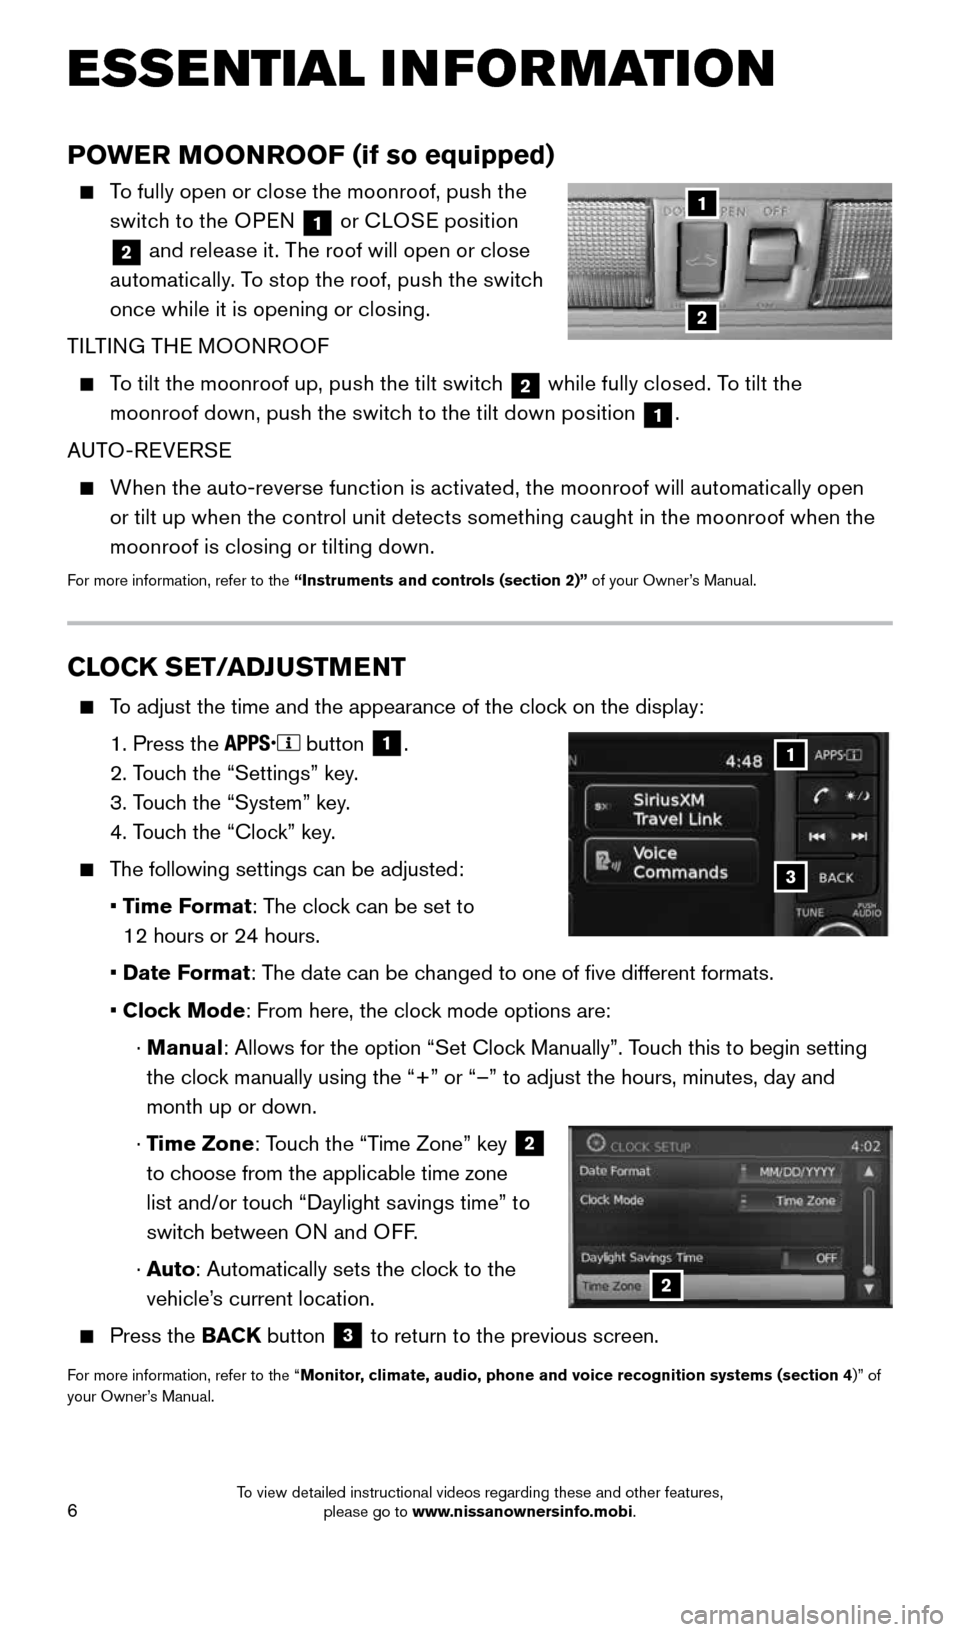
CLOCK SET/ADJUSTMENT
To adjust the time and the appearance of the clock on the display:
1. Press the
button
1.
2. Touch the “Settings” key.
3. Touch the “System” key.
4. Touch the “Clock” key.
The following settings can be adjusted:
• Time Format: The clock can be set to
12 hours or 24 hours.
• Date Format: The date can be changed to one of five different formats.
• Clock Mode: From here, the clock mode options are:
· Manual: Allows for the option “Set Clock Manually”. Touch this to begin setting
the clock manually using the “+” or “–” to adjust the hours, minu\
tes, day and
month up or down.
· Time Zone: Touch the “Time Zone” key
2
to choose from the applicable time zone
list and/or touch “Daylight savings time” to
switch between ON and OFF.
· Auto: Automatically sets the clock to the
vehicle’s current location.
Press the BACK button
3 to return to the previous screen.
For more information, refer to the “Monitor, climate, audio, phone and voice recognition systems (section 4
)” of
your Owner’s Manual.
3
1
2
ESSE NTIAL INFORMATION
POWER MOONROOF (if so equipped)
To fully open or close the moonroof, push the
switch to the OPEN
1 or
CLOSE position
2 and release it. The roof will open or close
automatically. To stop the roof, push the switch
once while it is opening or closing.
TILTING THE MOONROOF
To tilt the moonroof up, push the tilt switch
2 while fully closed. To tilt the
moonroof down, push the switch to the tilt down position 1.
AUTO-REVERSE
When the auto-reverse function is activated, the moonroof will automatically open
or tilt up when the control unit detects something caught in the moonroof when the
moonroof is closing or tilting down.
For more information, refer to the “Instruments and controls (section 2)” of your Owner’s Manual.
2
1
1912900_15c_Frontier_QRG_030215.indd 63/2/15 4:04 PM
To view detailed instructional videos regarding these and other features, please go to www.nissanownersinfo.mobi.
Page 11 of 24
9
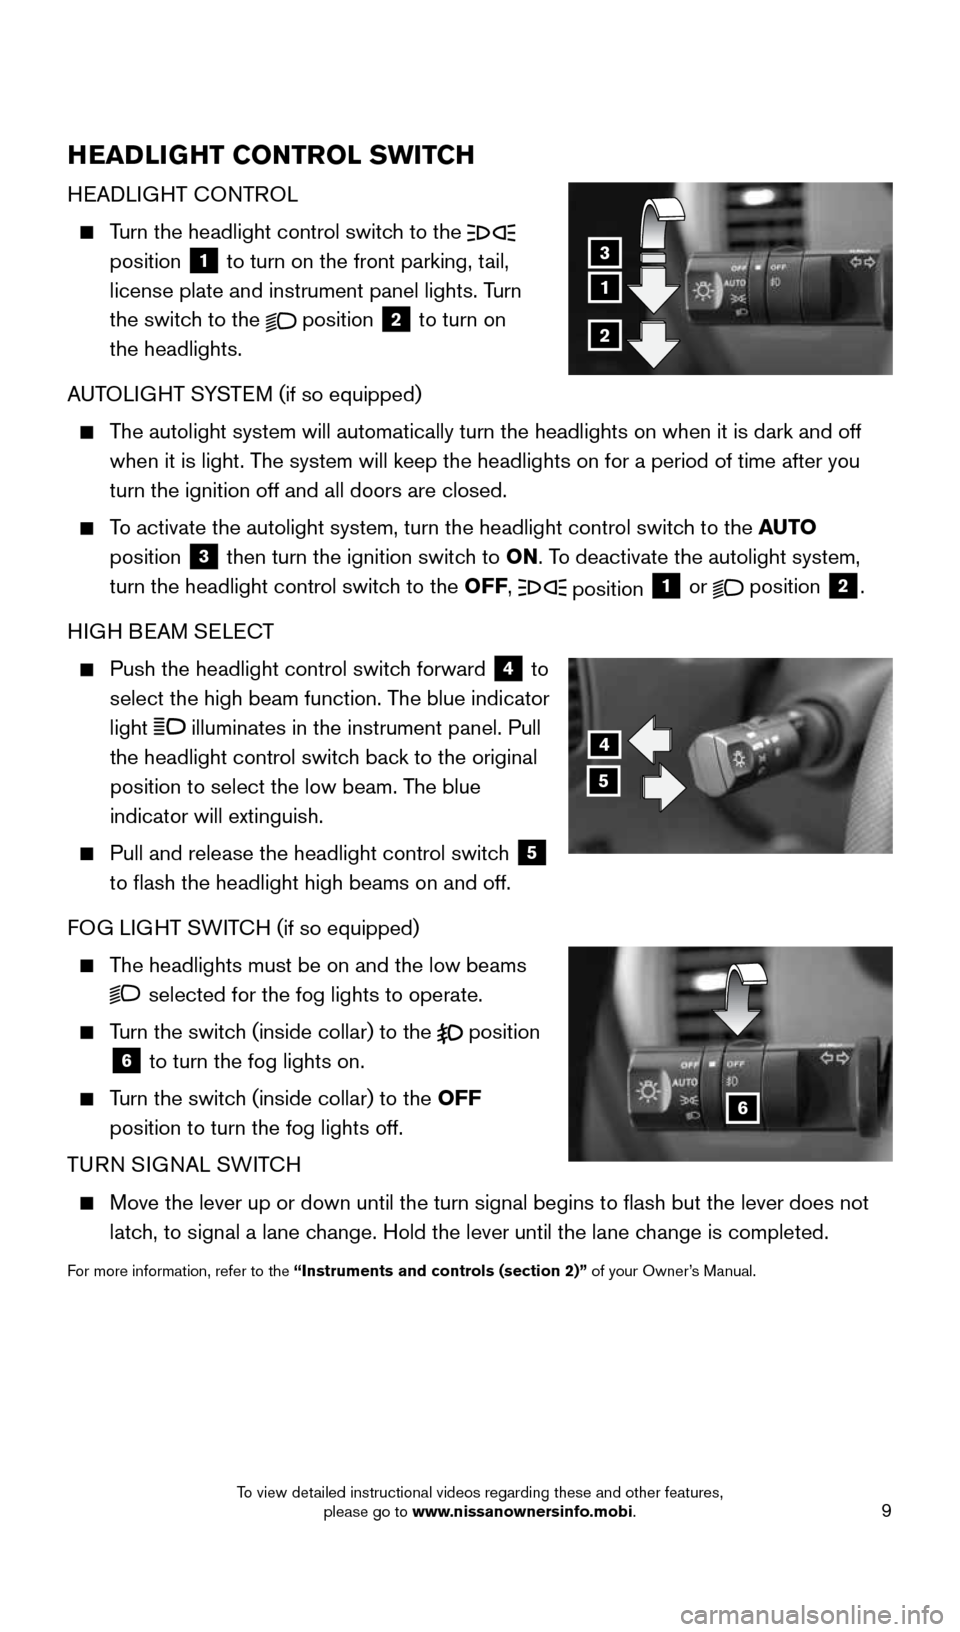
HEADLIGHT CONTROL SWITCH
HEADLIGHT CONTROL
Turn the headlight control switch to the
position 1 to turn on the front parking, tail,
license plate and instrument panel lights. Turn
the switch to the
position
2 to turn on
the headlights.
AUTOLIGHT SYSTEM (if so equipped)
The autolight system will automatically turn the headlights on when it is\
dark and off
when it is light. The system will keep the headlights on for a period of time after you
turn the ignition off and all doors are closed.
To activate the autolight system, turn the headlight control switch to the AUTO
position
3 then turn the ignition switch to ON. To deactivate the autolight system,
turn the headlight control switch to the OFF, position 1 or
position
2.
HIGH BEAM SELECT
Push the headlight control switch forward
4 to
select the high beam function. The blue indicator
light
illuminates in the instrument panel. Pull
the headlight control switch back to the original
position to select the low beam. The blue
indicator will extinguish.
Pull and release the headlight control switch
5
to flash the headlight high beams on and off.
FOG LIGHT SWITCH (if so equipped)
The headlights must be on and the low beams
selected for the fog lights to operate.
Turn the switch (inside collar) to the
position
6 to turn the fog lights on.
Turn the switch (inside collar)
to the OFF
position to turn the fog lights off.
TURN SIGNAL SWITCH
Move the lever up or down until the turn signal begins to flash but th\
e lever does not
latch, to signal a lane change. Hold the lever until the lane change is completed.
For more information, refer to the “Instruments and controls (section 2)” of your Owner’s Manual.
4
5
6
1
3
2
1912900_15c_Frontier_QRG_030215.indd 93/2/15 4:04 PM
To view detailed instructional videos regarding these and other features, please go to www.nissanownersinfo.mobi.
Page 16 of 24
14
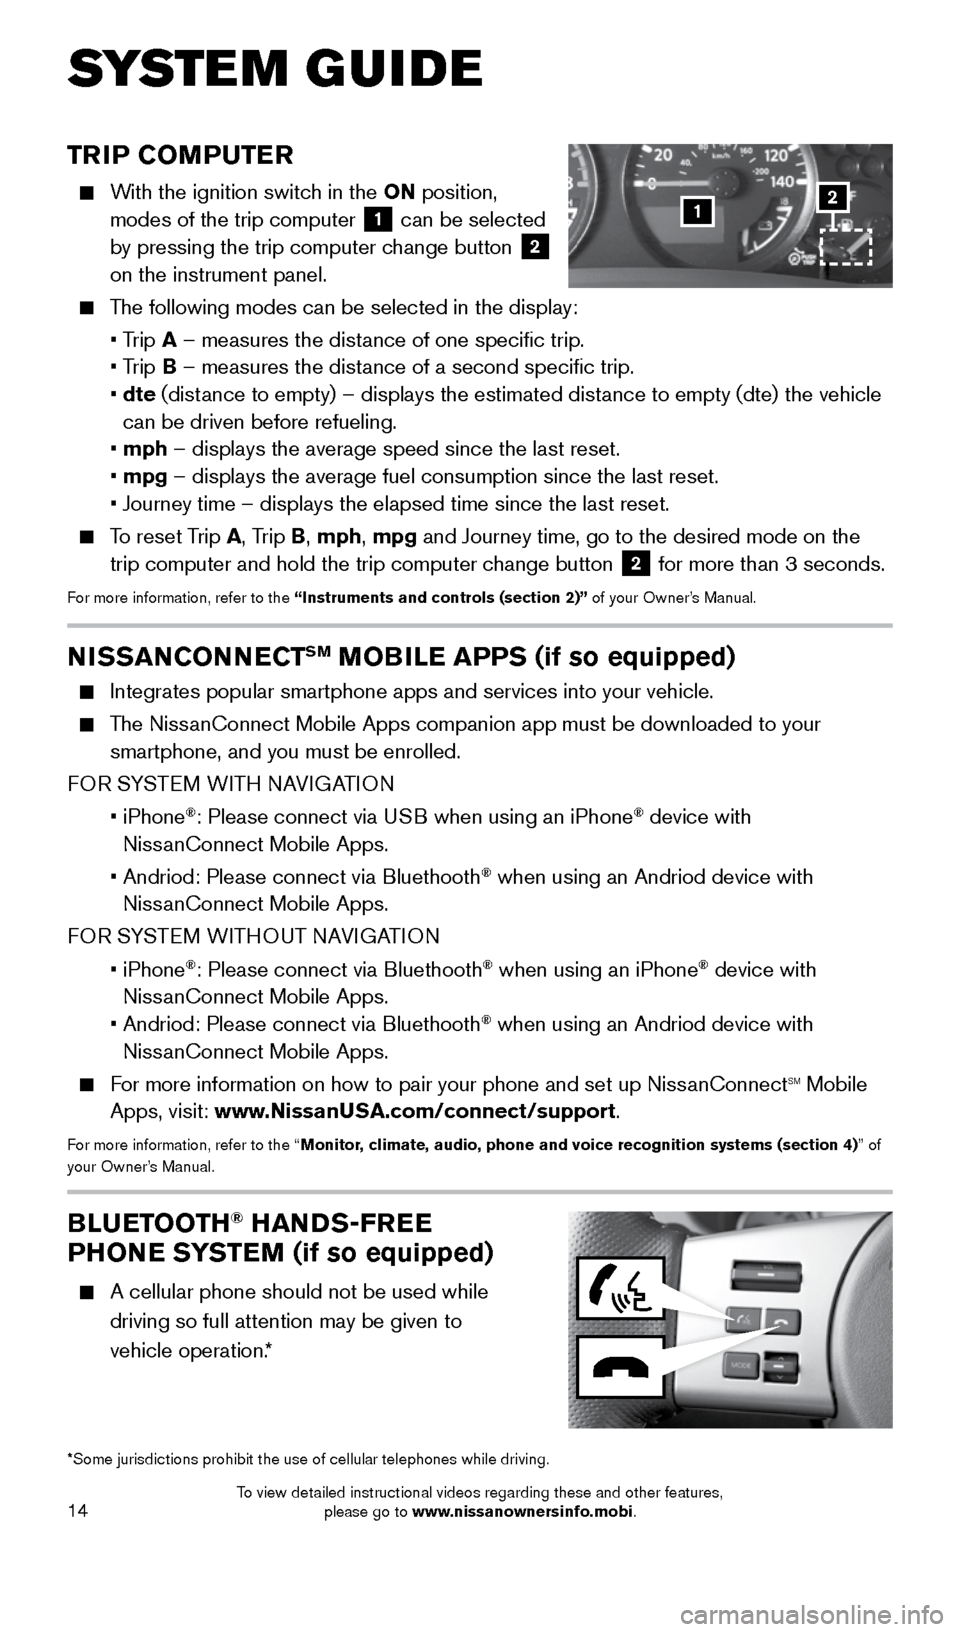
TRIP COMPUTER
With the ignition switch in the ON position,
modes of the trip computer
1 can be selected
by pressing the trip computer change button 2
on the instrument panel.
The following modes can be selected in the display:
• Trip A – measures the distance of one specific trip.
• Trip B – measures the distance of a second specific trip.
• dte (distance to empty) – displays the estimated distance to empty (dte) the vehicle
can be driven before refueling.
• mph – displays the average speed since the last reset.
• mpg – displays the average fuel consumption since the last reset.
• Journey time – displays the elapsed time since the last reset.
To reset Trip A, Trip B, mph, mpg and Journey time, go to the desired mode on the
trip computer and hold the trip computer change button 2 for more than 3 seconds.For more information, refer to the “Instruments and controls (section 2)” of your Owner’s Manual.
1
BLUETOOTH® HANDS-FREE
PHONE SYSTEM (if so equipped)
A cellular phone should not be used while
driving so full attention may be given to
vehicle operation.*
SYS T E M GUIDE
*Some jurisdictions prohibit the use of cellular telephones while drivin\
g.
2
NISSANCONNECTSM MOBILE APPS (if so equipped)
Integrates popular smartphone apps and services into your vehicle.
The NissanConnect Mobile Apps companion app must be downloaded to your
smartphone, and you must be enrolled.
FOR SYSTEM WITH NAVIGATION
• iPhone
®: Please connect via USB when using an iPhone® device with
NissanConnect Mobile Apps.
• Andriod: Please connect via Bluethooth
® when using an Andriod device with
NissanConnect Mobile Apps.
FOR SYSTEM WITHOUT NAVIGATION
• iPhone
®: Please connect via Bluethooth® when using an iPhone® device with
NissanConnect Mobile Apps.
• Andriod: Please connect via Bluethooth
® when using an Andriod device with
NissanConnect Mobile Apps.
For more information on how to pair your phone and set up NissanConnectsm mobile
Apps, visit: www.NissanUSA.com/connect/support.
For more information, refer to the “Monitor, climate, audio, phone and voice recognition systems (section 4) ” of
your Owner’s Manual.
1912900_15c_Frontier_QRG_030215.indd 143/2/15 4:04 PM
To view detailed instructional videos regarding these and other features, please go to www.nissanownersinfo.mobi.
Page 17 of 24
15
SYSTEM OPERATING TIPS
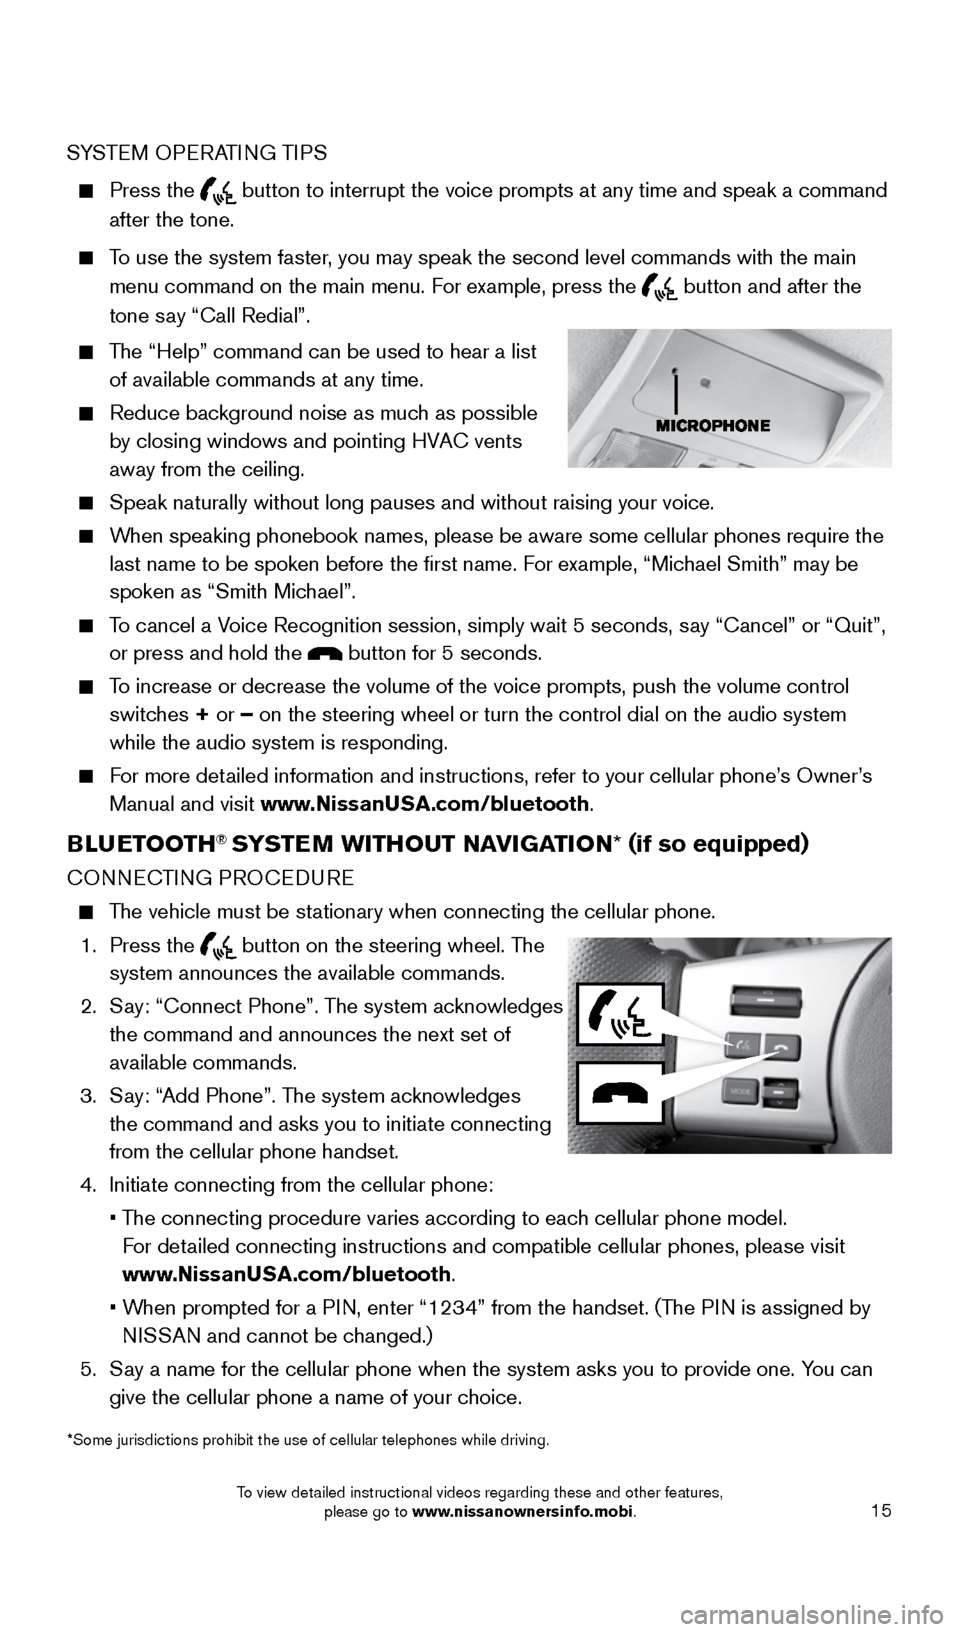
Press the button to interrupt the voice prompts at any time and speak a command
after the tone.
To use the system faster, you may speak the second level commands with the main
menu command on the main menu. For example, press the
button and after the
tone say “Call Redial”.
The “Help” command can be used to hear a list
of available commands at any time.
Reduce background noise as much as possible
by closing windows and pointing HVAC vents
away from the ceiling.
Speak naturally without long pauses and without raising your voice.
When speaking phonebook names, please be aware some cellular phones requi\
re the
last name to be spoken before the first name. For example, “Michael Smith” may be
spoken as “Smith Michael”.
To cancel a Voice Recognition session, simply wait 5 seconds, say “Cancel” or “Quit”,
or press and hold the
button for 5 seconds.
To increase or decrease the volume of the voice prompts, push the volume \
control
switches + or – on the steering wheel or turn the control dial on the audio system
while the audio system is responding.
For more detailed information and instructions, refer to your cellular phone’s Owner’s
Manual and visit www.NissanUSA.com/bluetooth.
BLUETOOTH® SYSTEM WITHOUT NAVIGATION * (if so equipped)
CONNECTING PROCEDURE
The vehicle must be stationary when connecting the cellular phone.
1. Press the
button on the steering wheel. The
system announces the available commands.
2. Say: “Connect Phone”. The system acknowledges
the command and announces the next set of
available commands.
3. Say: “Add Phone”. The system acknowledges
the command and asks you to initiate connecting
from the cellular phone handset.
4. Initiate connecting from the cellular phone:
• The connecting procedure varies according to each cellular phone model.
For detailed connecting instructions and compatible cellular phones, please vis\
it
www.NissanUSA.com/bluetooth.
• When prompted for a PIN, enter “1234” from the handset. (The PIN is assigned by
NISSAN and cannot be changed.)
5. Say a name for the cellular phone when the system asks you to provide one\
. You can
give the cellular phone a name of your choice.
*Some jurisdictions prohibit the use of cellular telephones while drivin\
g.
1912900_15c_Frontier_QRG_030215.indd 153/2/15 4:04 PM
To view detailed instructional videos regarding these and other features, please go to www.nissanownersinfo.mobi.
Page 21 of 24
19
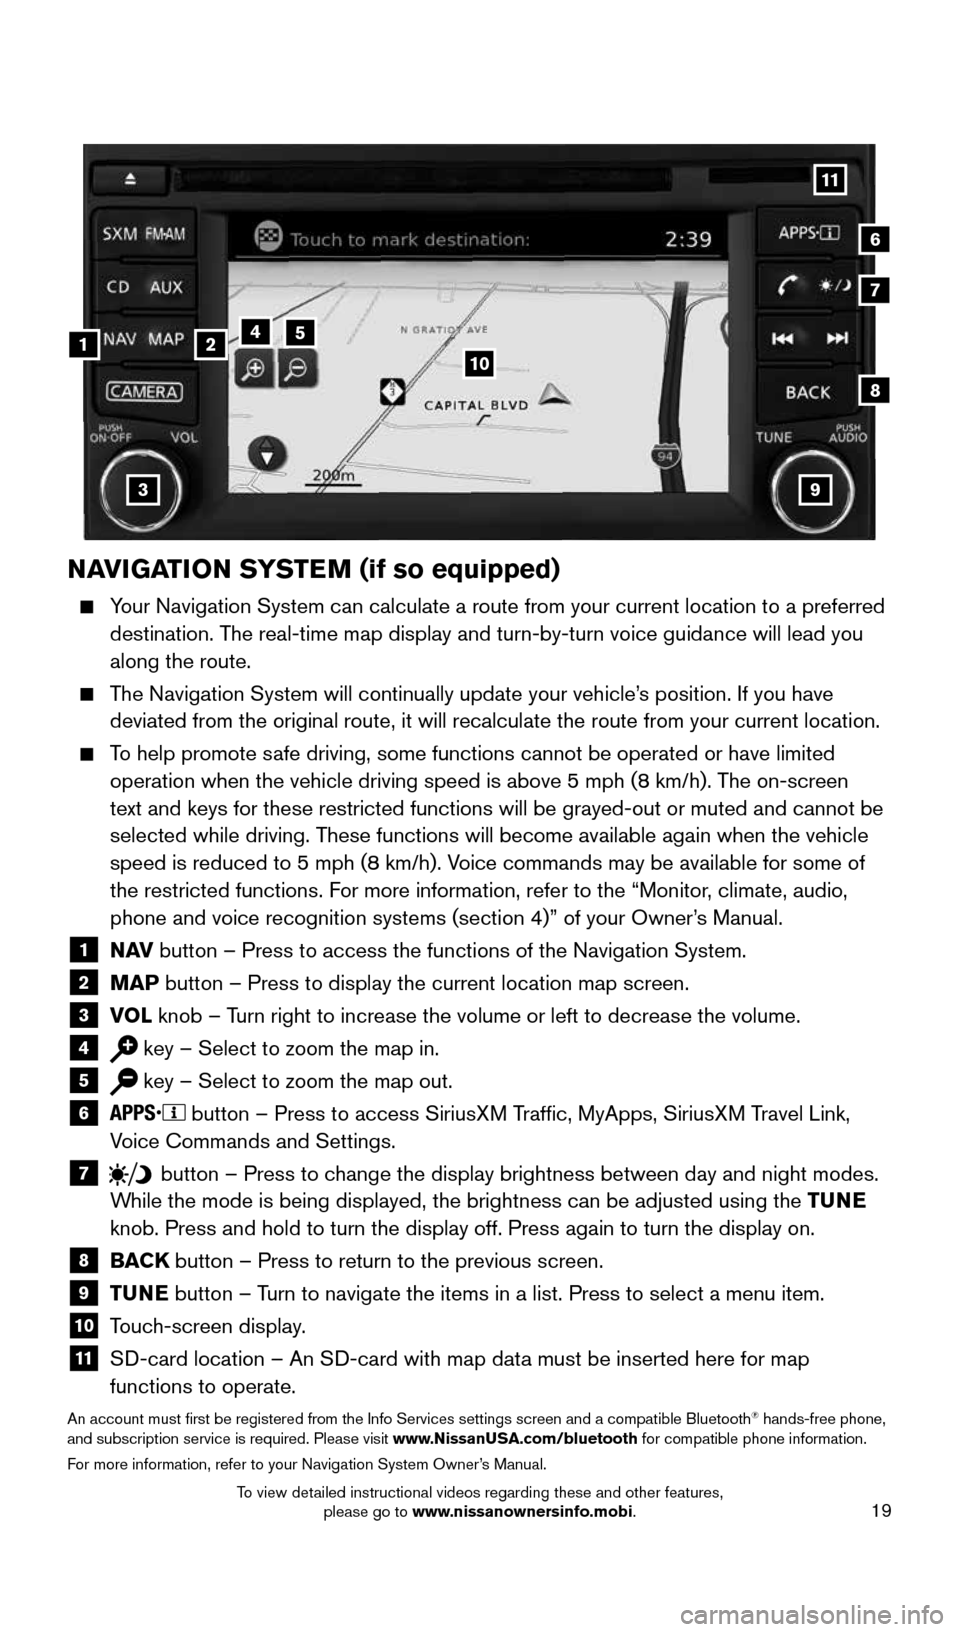
NAVIGATION SYSTEM (if so equipped)
Your Navigation System can calculate a route from your current location t\
o a preferred
destination. The real-time map display and turn-by-turn voice guidance will lead you
along the route.
The Navigation System will continually update your vehicle’s position. If you have
deviated from the original route, it will recalculate the route from you\
r current location.
To help promote safe driving, some functions cannot be operated or have limited
operation when the vehicle driving speed is above 5 mph (8 km/h). The on-screen
text and keys for these restricted functions will be grayed-out or muted\
and cannot be
selected while driving. These functions will become available again when the vehicle
speed is reduced to 5 mph (8 km/h). Voice commands may be available for some of
the restricted functions. For more information, refer to the “Monitor, climate, audio,
phone and voice recognition systems (section 4)” of your Owner’s Manual.
1 N AV
button – Press to access the functions of the Navigation System.2 MAP button – Press to display the current location map screen.3 VOL
knob – Turn right to increase the volume or left to decrease the volume.4 key – Select to zoom the map in.5 key – Select to zoom the map out.6
button – Press to access SiriusXM Traffic, MyApps, SiriusXM Travel Link,
Voice Commands and Settings.
7 button
– Press to change the display brightness between day and night modes.
While the mode is being displayed, the brightness can be adjusted using t\
he TUNE
knob. Press and hold to turn the display off. Press again to turn the di\
splay on.
8
BACK button – Press to return to the previous screen.9 TUNE button – Turn to navigate the items in a list. Press to select a menu item.10 Touch-screen display.11 SD-card location – An SD-card with map data must be inserted here for map
functions to operate.
An account must first be registered from the Info Services settings sc\
reen and a compatible Bluetooth® hands-free phone,
and subscription service is required. Please visit www.NissanUSA.com/bluetooth for compatible phone information.
For more information, refer to your Navigation System Owner’s Manual.
4
3
6
7
512
8
9
10
11
1912900_15c_Frontier_QRG_030215.indd 193/2/15 4:05 PM
To view detailed instructional videos regarding these and other features, please go to www.nissanownersinfo.mobi.
Page 24 of 24

Nissan, the Nissan Brand Symbol, Z and
Nissan model names are Nissan trademarks.
©
2015 Nissan North America, Inc.
QR15E A 0D40U2Printing: April 2015 (2 2)
To view detailed instructional videos,
go to www.nissanownersinfo.mobi/2015/frontier
or snap this barcode with an appropriate barcode reader.
This Quick Reference Guide is intended to provide an overview of some of the unique features of your new vehicle. Please see
your Owner’s Manual for important safety information and system operation limitations. Features and equipment in your vehicle
may vary depending on model, trim level, options selected, order, date of production, region or availability. Therefore, you may find
information about features or equipment that are not included or installed on your vehicle.
All information, specifications and illustrations in this Quick Reference Guide are those in effect at the time of printing. NISSAN
reserves the right to change specifications, performance, design or component suppliers witho\
ut notice and without obligation.
From time to time, NISSAN may update or revise this Quick Reference Guide to provide owners with the most accurate
information currently available. Please carefully read and retain with this Quick Reference Guide all revision updates sent to you
by NISSAN to ensure you have access to accurate and up-to-date information reg\
arding your vehicle. Current versions of vehicle
Quick Reference Guides, Owner’s Manuals and any updates can also be found in the Owner section of the \
NISSAN website at
https://owners.nissanusa.com/nowners/navigation/manualsGuide. If you have questions concerning any information in
the Owner’s Manual, contact NISSAN Consumer Affairs. See the NISSAN CUSTOMER CARE PROGRAM page in the Owner’s
Manual for contact information.
Helpful Resources
Below is a list of helpful resources that can be used to learn
more about the vehicle’s systems and feature operations.
Vehicle Owner’s Manual
Navigation Owner’s Manual (if so equipped)
Printed Quick Reference Guide (this document)
www.NissanUSA.com/bluetooth
www.NissanUSA.com/connect
www.youtube.com/user/NissanUSA
Nissan Consumer Affairs: 1-800-647-7261
Electronic Quick Reference Guide
(Use Quick Response (QR) code or URL below.)
Nissan Quick Guide (available in the iPhone
App Store or Android Google Play Store
for download to your smartphone)
1912900_15c_Frontier_QRG_030215.indd 23/2/15 4:04 PM