reset NISSAN FRONTIER 2015 D23 / 3.G Quick Reference Guide
[x] Cancel search | Manufacturer: NISSAN, Model Year: 2015, Model line: FRONTIER, Model: NISSAN FRONTIER 2015 D23 / 3.GPages: 24, PDF Size: 1.69 MB
Page 7 of 24

5
ESSE NTIAL INFORMATION
TIRE PRESSURE MONITORING SYSTEM (TPMS)
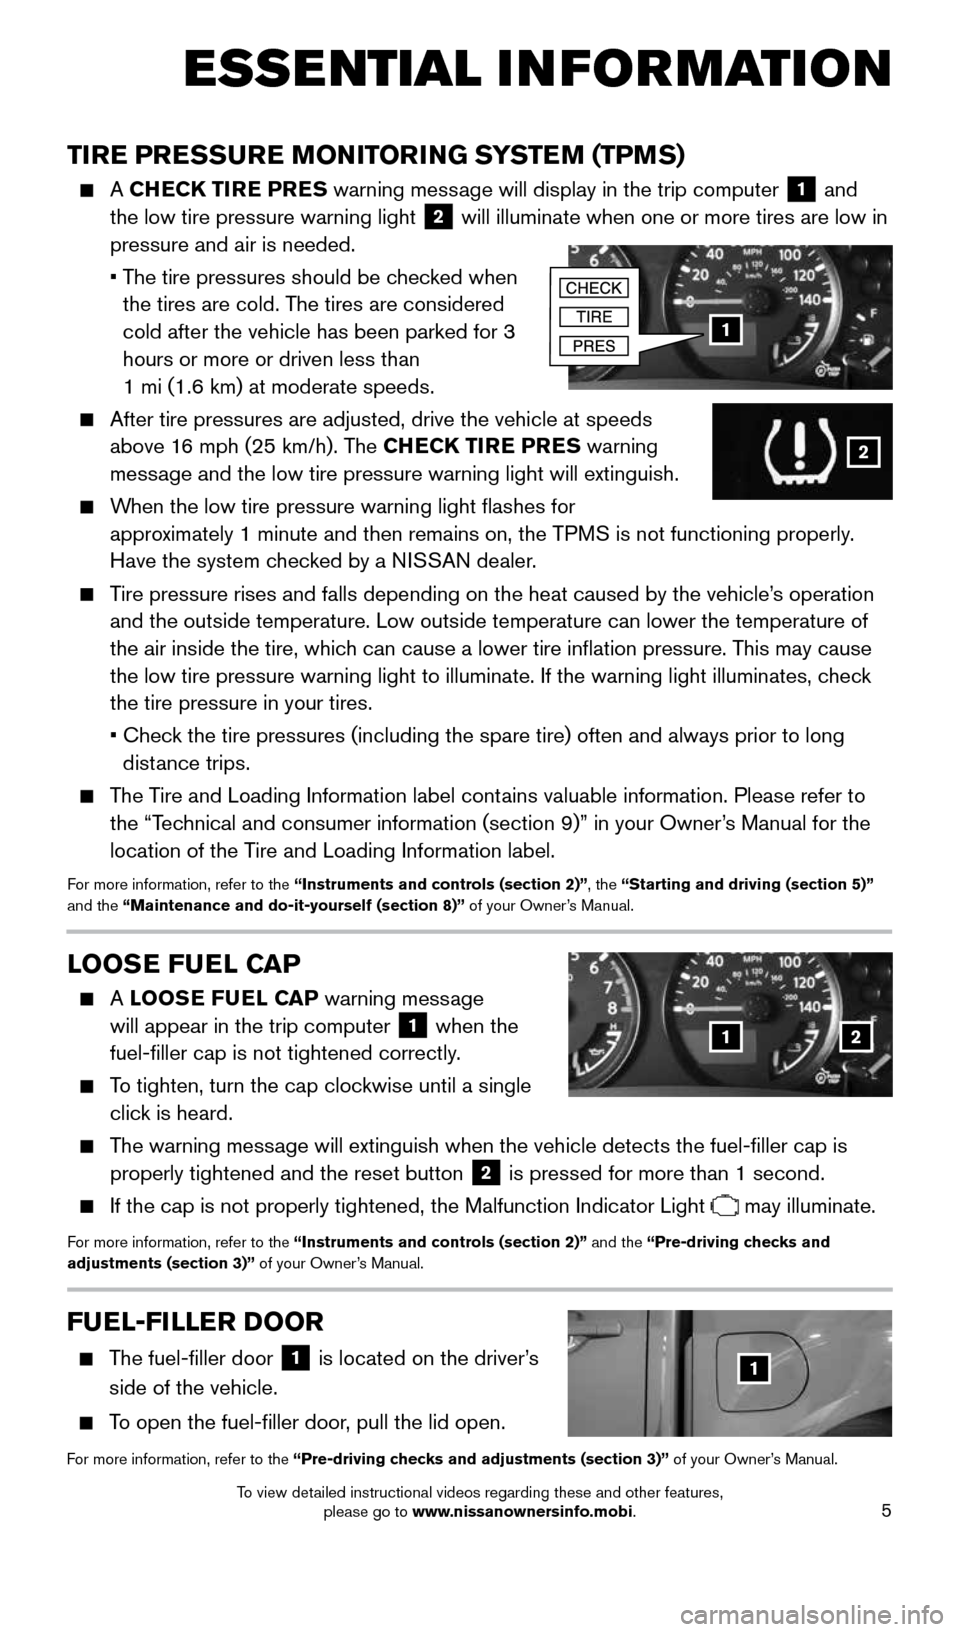
A CHECK TIRE PRES warning message will display in the trip computer 1 and
the low tire pressure warning light 2 will illuminate when one or more tires are low in
pressure and air is needed.
• The tire pressures should be checked when
the tires are cold. The tires are considered
cold after the vehicle has been parked for 3
hours or more or driven less than
1 mi (1.6 km) at moderate speeds.
After tire pressures are adjusted, drive the vehicle at speeds
above 16 mph (25 km/h). The CHECK TIRE PRES warning
message and the low tire pressure warning light will extinguish.
When the low tire pressure warning light flashes for
approximately 1 minute and then remains on, the TPMS is not functioning properly.
Have the system checked by a NISSAN dealer.
Tire pressure rises and falls depending on the heat caused by the vehicle\
’s operation
and the outside temperature. Low outside temperature can lower the tempe\
rature of
the air inside the tire, which can cause a lower tire inflation pressure. This may cause
the low tire pressure warning light to illuminate. If the warning light \
illuminates, check
the tire pressure in your tires.
• Check the tire pressures (including the spare tire) often and always prior\
to long
distance trips.
The Tire and Loading Information label contains valuable information. Please refer to
the “Technical and consumer information (section 9)” in your Owner’s Manual for the
location of the Tire and Loading Information label.
For more information, refer to the “Instruments and controls (section 2)”, the “Starting and driving (section 5)”
and the “Maintenance and do-it-yourself (section 8)” of your Owner’s Manual.
1
2
LOOSE FUEL CAP
A LOOSE FUEL CAP warning message
will appear in the trip computer 1 when the
fuel-filler cap is not tightened correctly.
To tighten, turn the cap clockwise until a single
click is heard.
The warning message will extinguish when the vehicle detects the fuel-filler cap is
properly tightened and the reset button
2 is pressed for more than 1 second.
If the cap is not properly tightened, the Malfunction Indicator Light may illuminate.
For more information, refer to the “Instruments and controls (section 2)” and the “Pre-driving checks and
adjustments (section 3)” of your Owner’s Manual.
12
FUEL-FILLER DOOR
The fuel-filler door
1 is located on the driver’s
side of the vehicle.
To open the fuel-filler door, pull the lid open.
For more information, refer to the “Pre-driving checks and adjustments (section 3)” of your Owner’s Manual.
1
1912900_15c_Frontier_QRG_030215.indd 53/2/15 4:04 PM
To view detailed instructional videos regarding these and other features, please go to www.nissanownersinfo.mobi.
Page 14 of 24

12
FI RST DRIVE FEATURES
56
3
1
4
2
FM/AM/SiriusXM®* SATELLITE RADIO WITH CD PLAYER
(if so equipped)
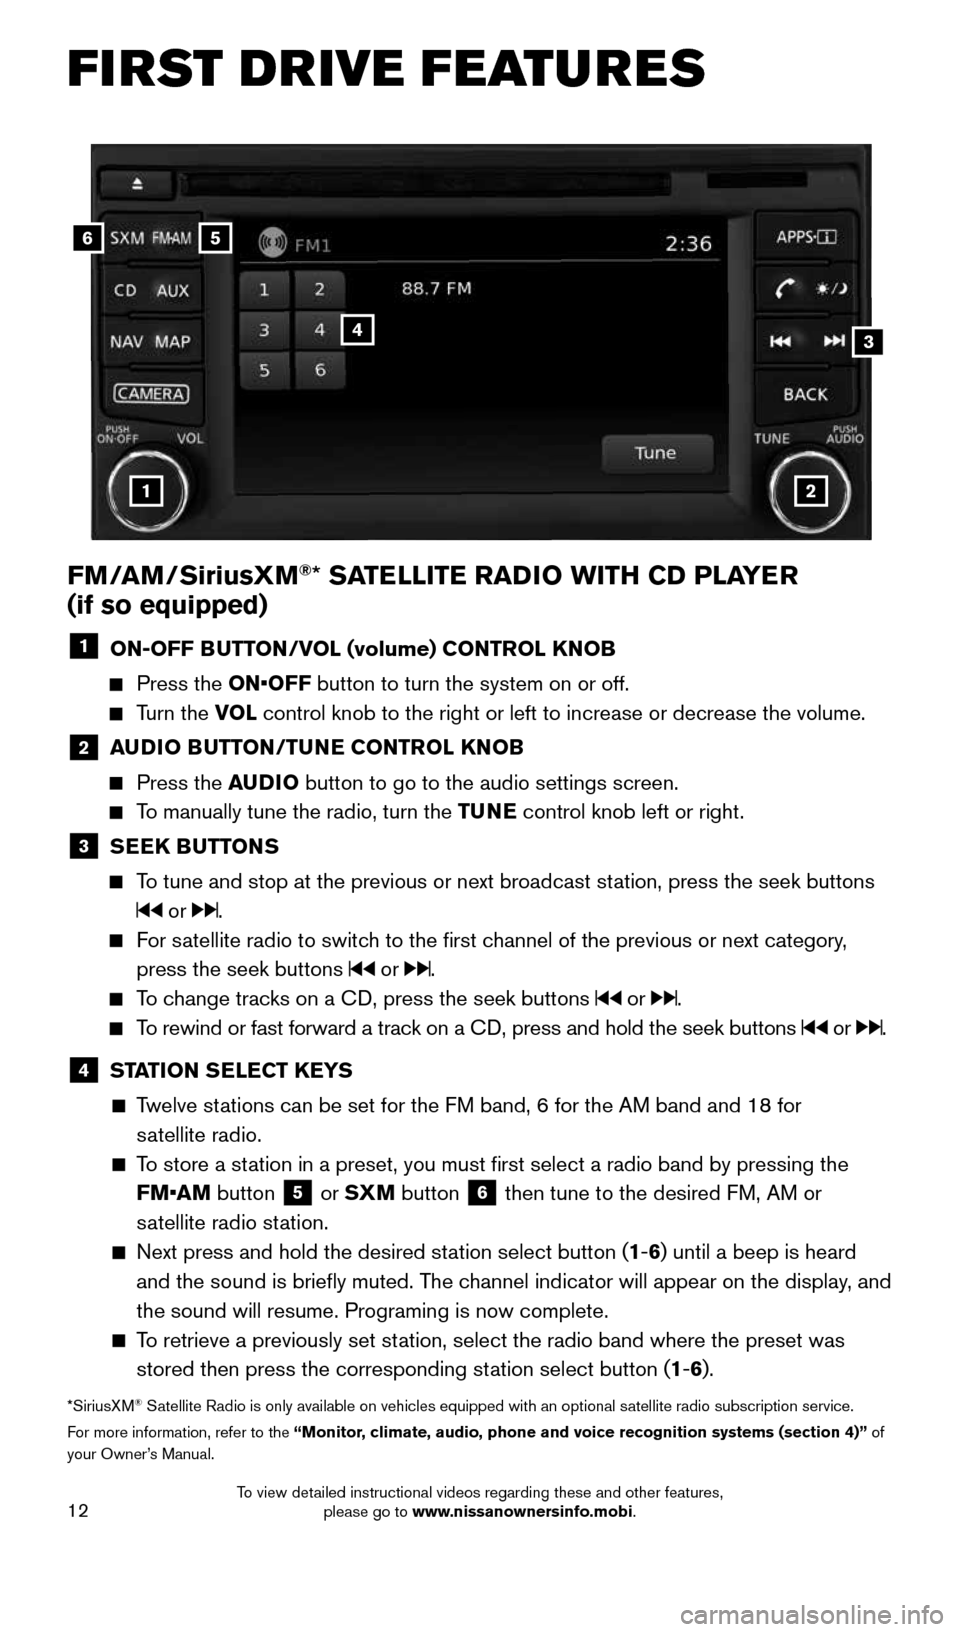
1 ON-OFF BUTTON/VOL (volume) CONTROL KNOB
Press the ON•OFF button to turn the system on or off.
Turn the VOL control knob to the right or left to increase or decrease the volume.
2 AUDIO BUTTON/TUNE CONTROL KNOB
Press the AUDIO button to go to the audio settings screen.
To manually tune the radio, turn the TUNE control knob left or right.
3 SEEK BUTTONS
To tune and stop at the previous or next broadcast station, press the seek buttons
or .
For satellite radio to switch to the first channel of the previous or next category,
press the seek buttons
or .
To change tracks on a CD, press the seek buttons or .
To rewind or fast forward a track on a CD, press and hold the seek buttons or .
4 STATION SELECT KEYS
Twelve stations can be set for the FM band, 6 for the AM band and 18 for
satellite radio.
To store a station in a preset, you must first select a radio band by pressing the \
FM•AM button
5 or SXM button
6 then tune to the desired FM, AM or
satellite radio station.
Next press and hold the desired station select button (1-6) until a beep is heard
and the sound is briefly muted. The channel indicator will appear on the display, and
the sound will resume. Programing is now complete.
To retrieve a previously set station, select the radio band where the preset was
stored then press the corresponding station select button (1-6).
*SiriusXM® Satellite Radio is only available on vehicles equipped with an optional s\
atellite radio subscription service.
For more information, refer to the “Monitor, climate, audio, phone and voice recognition systems (section 4)” of
your Owner’s Manual.
1912900_15c_Frontier_QRG_030215.indd 123/2/15 4:04 PM
To view detailed instructional videos regarding these and other features, please go to www.nissanownersinfo.mobi.
Page 15 of 24

13
CRUISE CONTROL (if so equipped)
The cruise control system enables you to set a
constant cruising speed once the vehicle has
reached 25 mph (40 km/h).
The system will automatically maintain the set
speed until you tap the brake pedal, accelerate,
cancel or turn the system off.
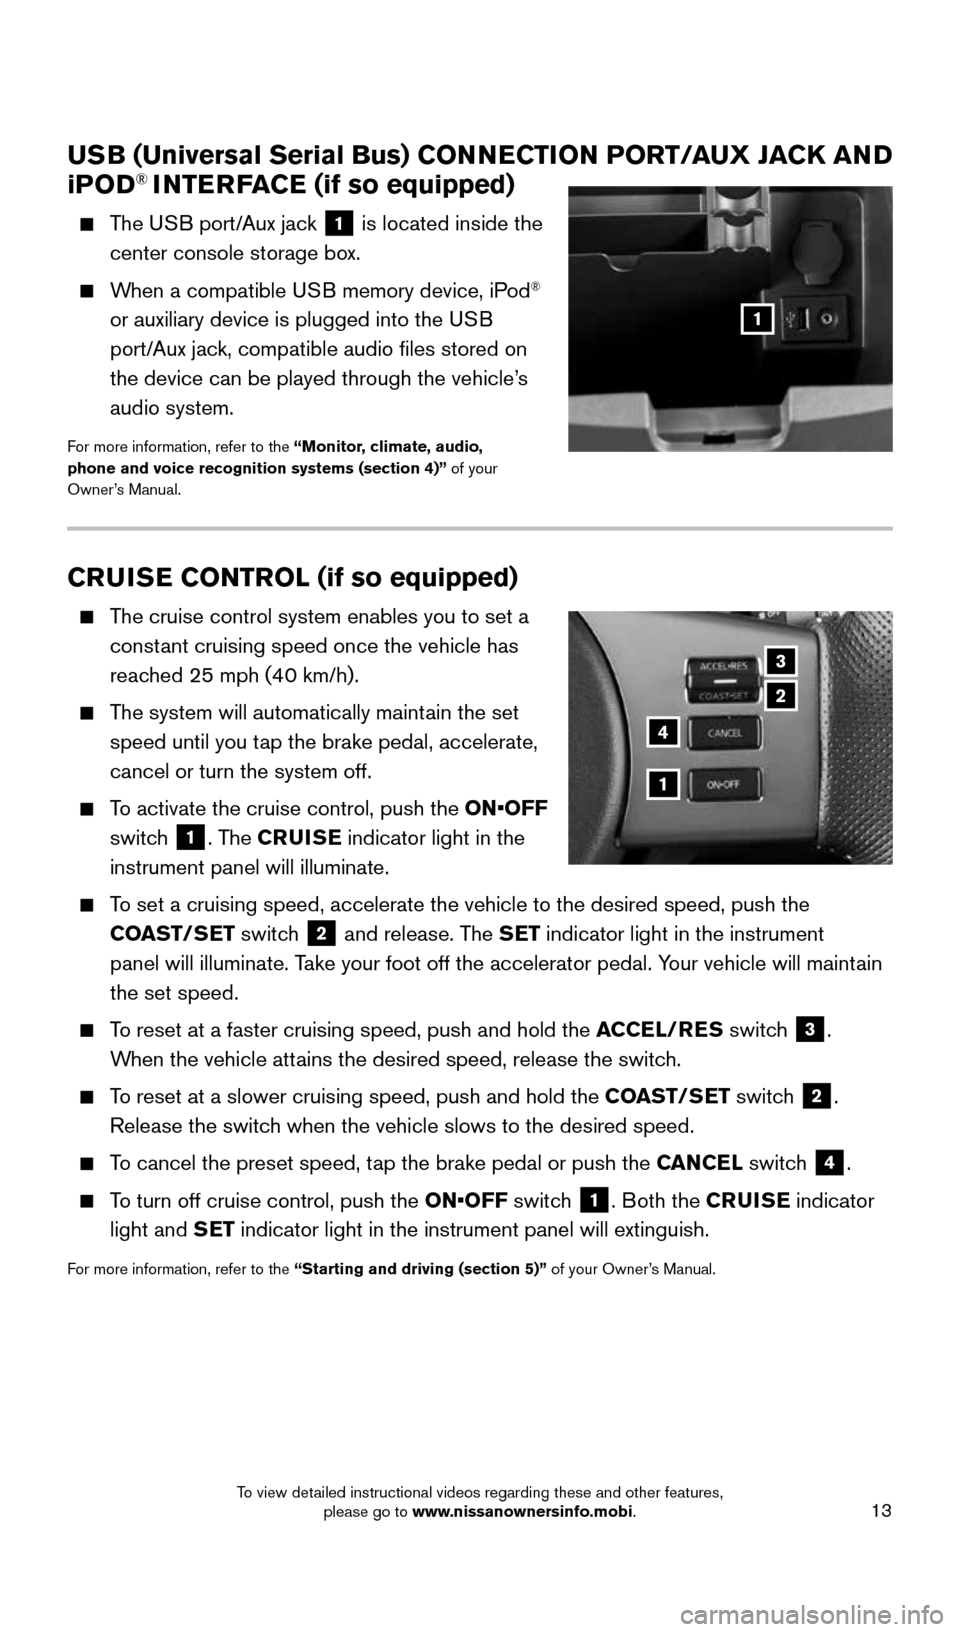
To activate the cruise control, push the ON•OFF
switch
1. The CRUISE indicator light in the
instrument panel will illuminate.
To set a cruising speed, accelerate the vehicle to the desired speed, pus\
h the
COAST/SET switch
2 and release. The SET indicator light in the instrument
panel will illuminate. Take your foot off the accelerator pedal. Your vehicle will maintain
the set speed.
To reset at a faster cruising speed, push and hold the ACCEL/RES switch
3.
When the vehicle attains the desired speed, release the switch.
To reset at a slower cruising speed, push and hold the COAST/SET switch
2.
Release the switch when the vehicle slows to the desired speed.
To cancel the preset speed, tap the brake pedal or push the CANCEL switch
4.
To turn off cruise control, push the ON•OFF switch
1. Both the CRUISE indicator
light and SET indicator light in the instrument panel will extinguish.
For more information, refer to the “Starting and driving (section 5)” of your Owner’s Manual.
3
2
1
4
USB (Universal Serial Bus) CONNECTION PORT/AUX JACK AND
i POD® INTERFACE (if so equipped)
The USB port/Aux jack
1 is located inside the
center console storage box.
When a compatible USB memory device, iPod®
or auxiliary device is plugged into the USB
port/Aux jack, compatible audio files stored on
the device can be played through the vehicle’s
audio system.
For more information, refer to the “Monitor, climate, audio,
phone and voice recognition systems (section 4)” of your
Owner’s Manual.
1
1912900_15c_Frontier_QRG_030215.indd 133/2/15 4:04 PM
To view detailed instructional videos regarding these and other features, please go to www.nissanownersinfo.mobi.
Page 16 of 24

14
TRIP COMPUTER
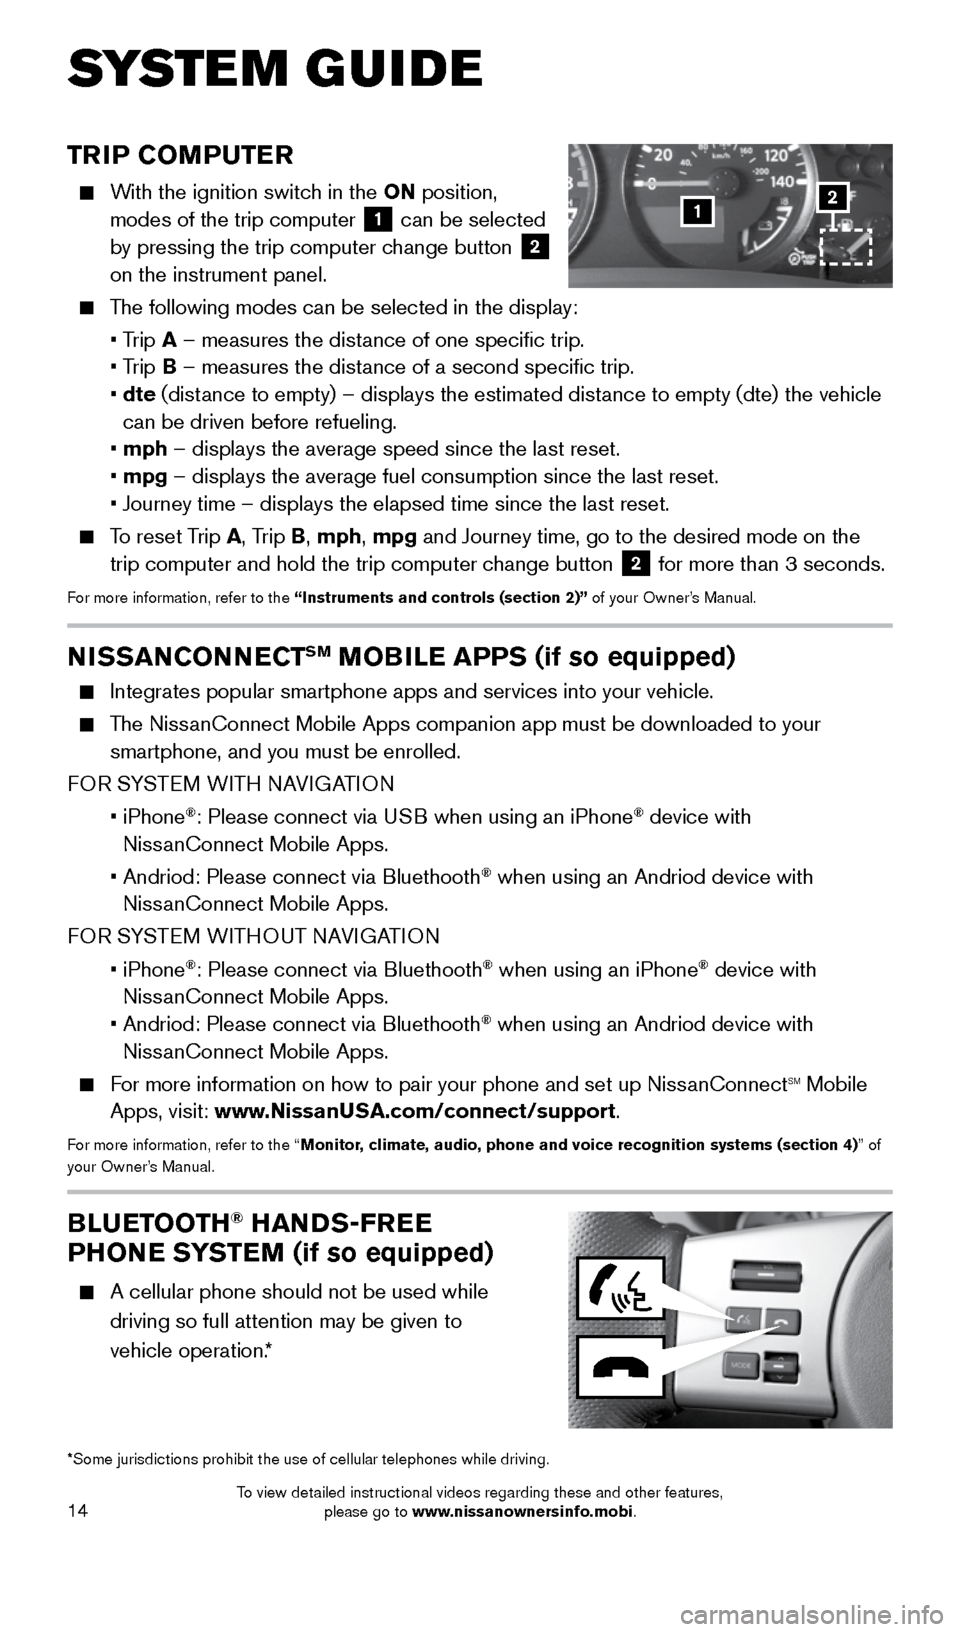
With the ignition switch in the ON position,
modes of the trip computer
1 can be selected
by pressing the trip computer change button 2
on the instrument panel.
The following modes can be selected in the display:
• Trip A – measures the distance of one specific trip.
• Trip B – measures the distance of a second specific trip.
• dte (distance to empty) – displays the estimated distance to empty (dte) the vehicle
can be driven before refueling.
• mph – displays the average speed since the last reset.
• mpg – displays the average fuel consumption since the last reset.
• Journey time – displays the elapsed time since the last reset.
To reset Trip A, Trip B, mph, mpg and Journey time, go to the desired mode on the
trip computer and hold the trip computer change button 2 for more than 3 seconds.For more information, refer to the “Instruments and controls (section 2)” of your Owner’s Manual.
1
BLUETOOTH® HANDS-FREE
PHONE SYSTEM (if so equipped)
A cellular phone should not be used while
driving so full attention may be given to
vehicle operation.*
SYS T E M GUIDE
*Some jurisdictions prohibit the use of cellular telephones while drivin\
g.
2
NISSANCONNECTSM MOBILE APPS (if so equipped)
Integrates popular smartphone apps and services into your vehicle.
The NissanConnect Mobile Apps companion app must be downloaded to your
smartphone, and you must be enrolled.
FOR SYSTEM WITH NAVIGATION
• iPhone
®: Please connect via USB when using an iPhone® device with
NissanConnect Mobile Apps.
• Andriod: Please connect via Bluethooth
® when using an Andriod device with
NissanConnect Mobile Apps.
FOR SYSTEM WITHOUT NAVIGATION
• iPhone
®: Please connect via Bluethooth® when using an iPhone® device with
NissanConnect Mobile Apps.
• Andriod: Please connect via Bluethooth
® when using an Andriod device with
NissanConnect Mobile Apps.
For more information on how to pair your phone and set up NissanConnectsm mobile
Apps, visit: www.NissanUSA.com/connect/support.
For more information, refer to the “Monitor, climate, audio, phone and voice recognition systems (section 4) ” of
your Owner’s Manual.
1912900_15c_Frontier_QRG_030215.indd 143/2/15 4:04 PM
To view detailed instructional videos regarding these and other features, please go to www.nissanownersinfo.mobi.