brake NISSAN GT-R 2014 R35 Multi Function Display Owners Manual
[x] Cancel search | Manufacturer: NISSAN, Model Year: 2014, Model line: GT-R, Model: NISSAN GT-R 2014 R35Pages: 314, PDF Size: 7.33 MB
Page 5 of 314
0-2Introduction
This manual uses special words, symbols and
icons, organized by function.
Please refer to the following items and familiarize
yourself with them.
FOR SAFE OPERATION
WARNING
This is used to indicate a hazard that
could cause death or serious personal
injury. To avoid or reduce the risk,
follow the information and instructions
exactly.
CAUTION
This is used to indicate a hazard that
could cause minor or moderate perso-
nal injury. To avoid or reduce the risk,
follow the information and instructions
carefully.
NOTICE
This is used to indicate a hazard that
could cause damage to your vehicle. To
avoid or reduce the risk, follow the
information and instructions.
REFERENCE SYMBOLS
INFO:
This indicates information that is necessary for
efficient use of your vehicle or accessories.
Reference page:
This indicates the title and page that you should
refer to.
<>:
This indicates a button on the control panel.
[]:
This indicates a key/item displayed on the
screen.
Voice Command:
This indicates an operation by voice command.
This system is primarily designed to help you
reach your destination, and it also performs
other functions as outlined in this manual.
However, you, the driver, must use the system
safely and properly. Information concerning road
conditions, traffic signs and the availability of
services may not always be up-to-date. The
system is not a substitute for safe, proper and
legal driving.
Before using the navigation system, please read
the following safety information. Always use the
system as outlined in this manual.
WARNING
. When the driver wants to operate
the navigation system or use the
center dial, first park the vehicle in a
safe location and set the parking
brake. Operating the system while
driving can distract the driver and
may result in a serious accident.
. Do not rely on route guidance alone.
Always be sure that all driving
maneuvers are legal and safe in
order to avoid accidents.
. Do not disassemble or modify this
system. If you do, it may result in
accidents, fire or electrical shock.
HOW TO USE THIS MANUAL SAFETY INFORMATION
Page 12 of 314
Performance and vehicle informa-
tion
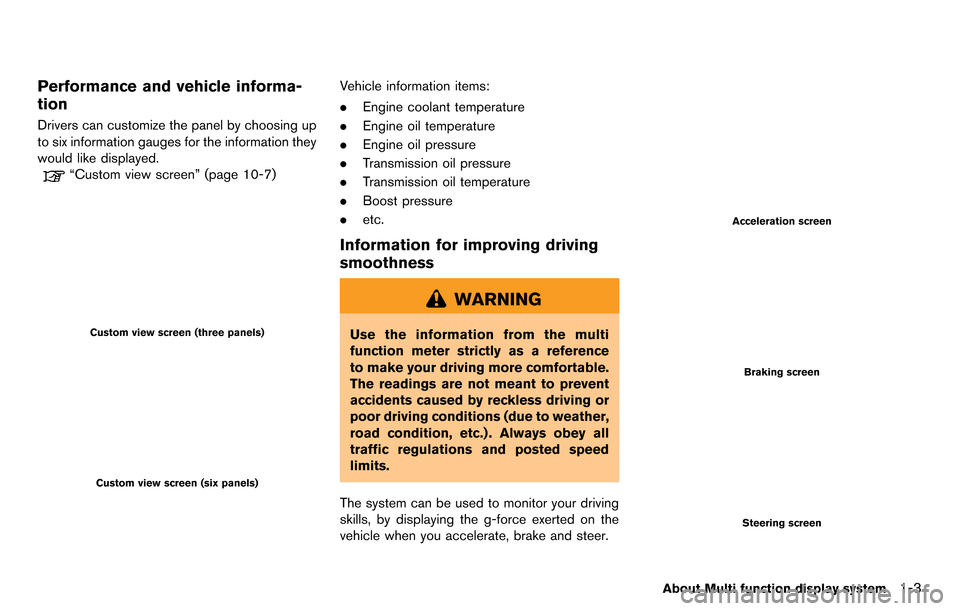
Drivers can customize the panel by choosing up
to six information gauges for the information they
would like displayed.
“Custom view screen” (page 10-7)
Custom view screen (three panels)
Custom view screen (six panels)
Vehicle information items:
.Engine coolant temperature
. Engine oil temperature
. Engine oil pressure
. Transmission oil pressure
. Transmission oil temperature
. Boost pressure
. etc.
Information for improving driving
smoothness
WARNING
Use the information from the multi
function meter strictly as a reference
to make your driving more comfortable.
The readings are not meant to prevent
accidents caused by reckless driving or
poor driving conditions (due to weather,
road condition, etc.) . Always obey all
traffic regulations and posted speed
limits.
The system can be used to monitor your driving
skills, by displaying the g-force exerted on the
vehicle when you accelerate, brake and steer.
Acceleration screen
Braking screen
Steering screen
About Multi function display system1-3
Page 13 of 314
1-4About Multi function display system
Vehicle information items:
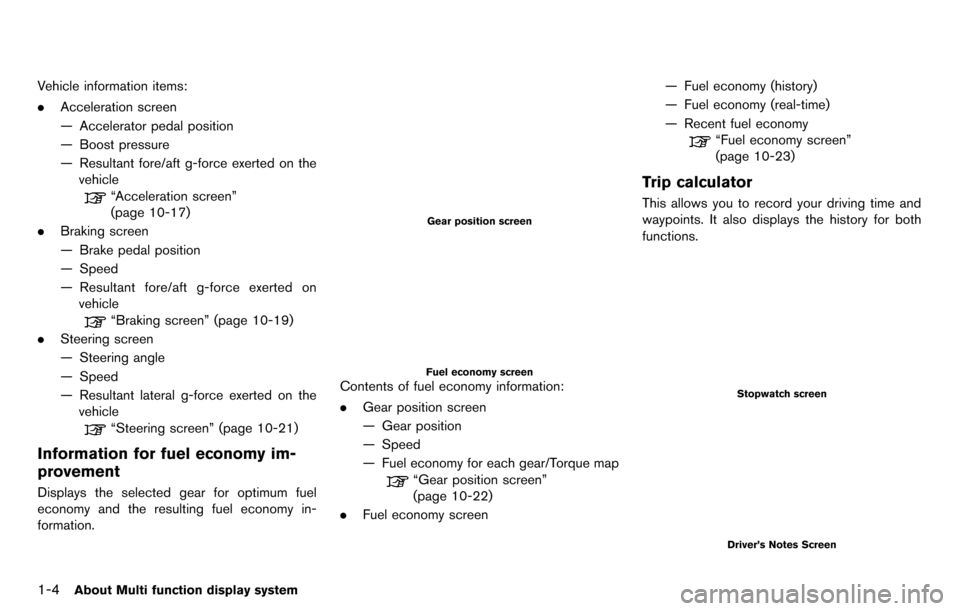
.Acceleration screen
— Accelerator pedal position
— Boost pressure
— Resultant fore/aft g-force exerted on the
vehicle
“Acceleration screen”
(page 10-17)
. Braking screen
— Brake pedal position
— Speed
— Resultant fore/aft g-force exerted on
vehicle
“Braking screen” (page 10-19)
. Steering screen
— Steering angle
— Speed
— Resultant lateral g-force exerted on the
vehicle
“Steering screen” (page 10-21)
Information for fuel economy im-
provement
Displays the selected gear for optimum fuel
economy and the resulting fuel economy in-
formation.
Gear position screen
Fuel economy screenContents of fuel economy information:
. Gear position screen
— Gear position
— Speed
— Fuel economy for each gear/Torque map
“Gear position screen”
(page 10-22)
. Fuel economy screen — Fuel economy (history)
— Fuel economy (real-time)
— Recent fuel economy
“Fuel economy screen”
(page 10-23)
Trip calculator
This allows you to record your driving time and
waypoints. It also displays the history for both
functions.
Stopwatch screen
Driver’s Notes Screen
Page 143 of 314
3-16Audio system
DVD (Digital Versatile Disc) PLAYER
OPERATION
Precautions
Start the engine when using the DVD entertain-
ment system.
Movies will not be shown on the front display
while the vehicle is in any drive position to
reduce driver distraction. Audio is available
when a movie is played. To view movies in the
front display, stop the vehicle in a safe location,
move the shift lever to the P (Park) position and
apply the parking brake.
WARNING
.The driver must not attempt to
operate the DVD system or wear
the headphones while the vehicle is
in motion so that full attention may
be given to vehicle operation.
. Do not attempt to modify the system
to display a movie on the front
screen while the vehicle is being
driven. Doing so may distract the
driver and may cause a collision and
serious personal injury or death.
CAUTION
.Only operate the DVD while the
vehicle engine is running. Operating
the DVD for extended periods of
time with the engine OFF can dis-
charge the vehicle battery.
. Do not allow the system to get wet.
Excessive moisture such as spilled
liquids may cause the system to
malfunction.
. While playing VIDEO-CD media, this
DVD player does not guarantee
complete functionality of all VI-
DEO-CD formats.
Display settings
To adjust the front display mode, push
select [Others] and then select [Display].
To adjust the display ON/OFF, brightness, tint,
color and contrast, select [Display Adjustment]
and then select each key.
Then you can adjust each item using the center
dial. After changes have been made push
Playing a DVD
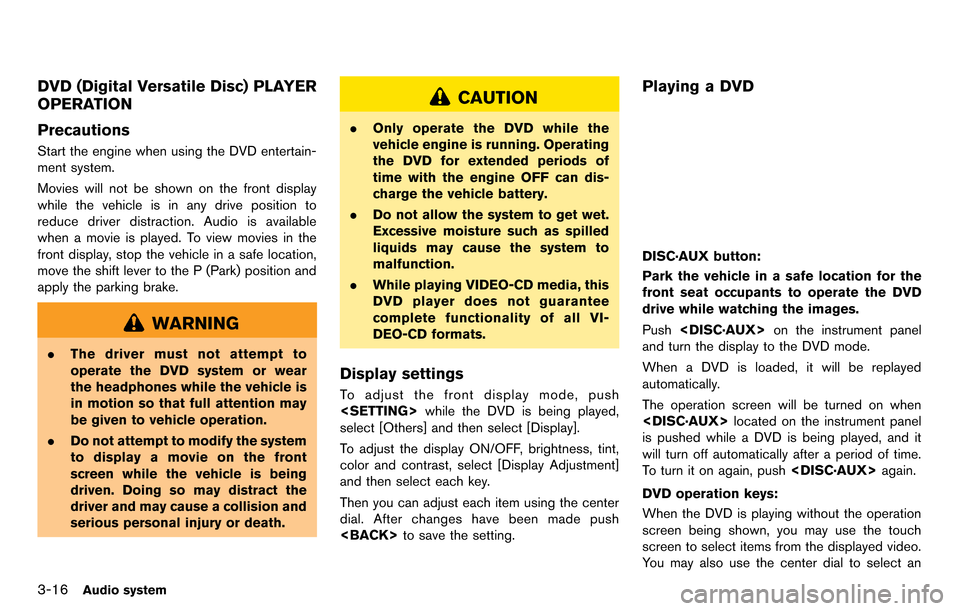
DISC·AUX button:
Park the vehicle in a safe location for the
front seat occupants to operate the DVD
drive while watching the images.
Push
and turn the display to the DVD mode.
When a DVD is loaded, it will be replayed
automatically.
The operation screen will be turned on when
is pushed while a DVD is being played, and it
will turn off automatically after a period of time.
To turn it on again, push
DVD operation keys:
When the DVD is playing without the operation
screen being shown, you may use the touch
screen to select items from the displayed video.
You may also use the center dial to select an
Page 243 of 314
9-6Monitor system
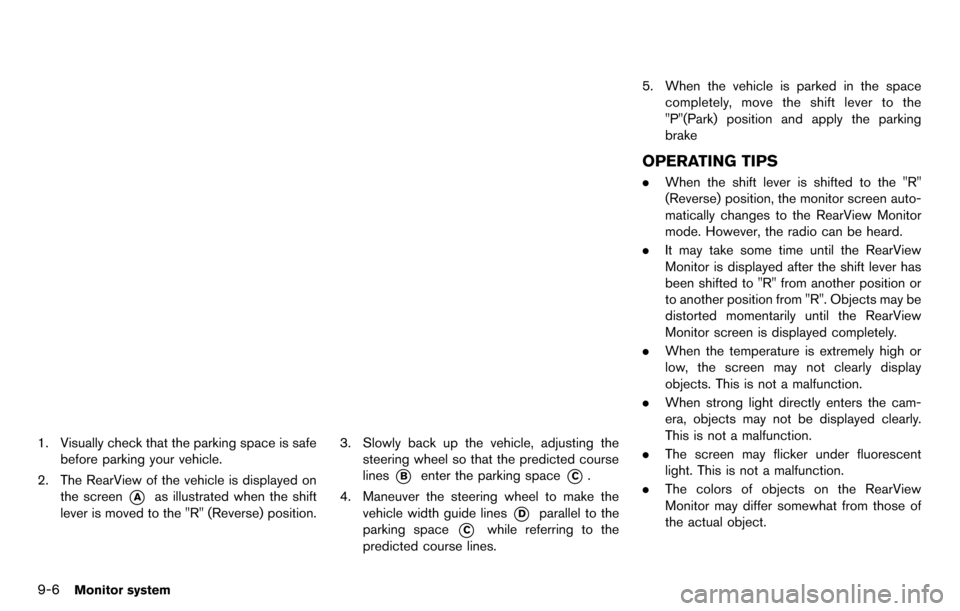
1. Visually check that the parking space is safebefore parking your vehicle.
2. The RearView of the vehicle is displayed on the screen
*Aas illustrated when the shift
lever is moved to the "R" (Reverse) position.
3. Slowly back up the vehicle, adjusting the steering wheel so that the predicted course
lines
*Benter the parking space*C.
4. Maneuver the steering wheel to make the vehicle width guide lines
*Dparallel to the
parking space
*Cwhile referring to the
predicted course lines. 5. When the vehicle is parked in the space
completely, move the shift lever to the
"P"(Park) position and apply the parking
brake
OPERATING TIPS
.When the shift lever is shifted to the "R"
(Reverse) position, the monitor screen auto-
matically changes to the RearView Monitor
mode. However, the radio can be heard.
. It may take some time until the RearView
Monitor is displayed after the shift lever has
been shifted to "R" from another position or
to another position from "R". Objects may be
distorted momentarily until the RearView
Monitor screen is displayed completely.
. When the temperature is extremely high or
low, the screen may not clearly display
objects. This is not a malfunction.
. When strong light directly enters the cam-
era, objects may not be displayed clearly.
This is not a malfunction.
. The screen may flicker under fluorescent
light. This is not a malfunction.
. The colors of objects on the RearView
Monitor may differ somewhat from those of
the actual object.
Page 248 of 314
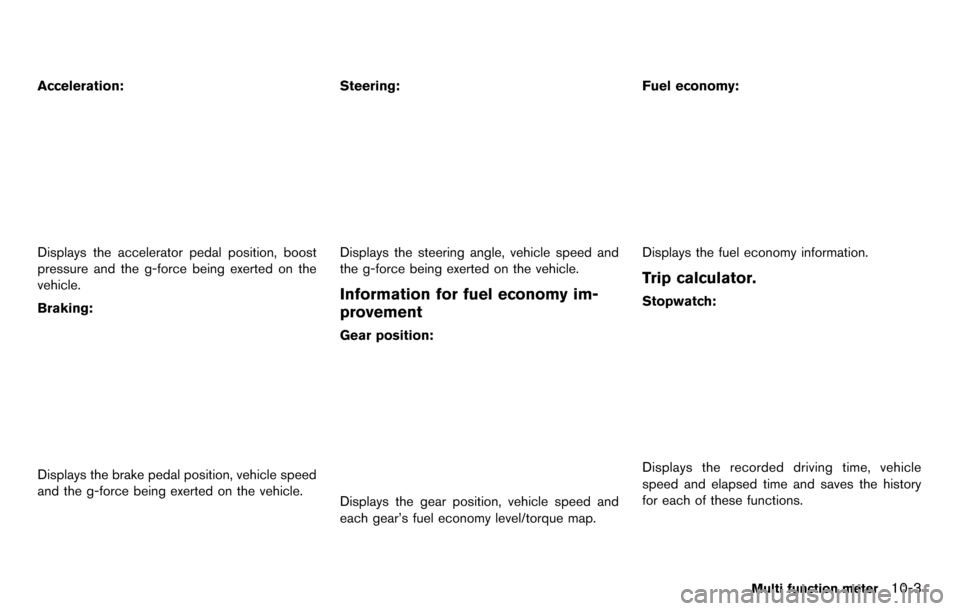
Acceleration:
Displays the accelerator pedal position, boost
pressure and the g-force being exerted on the
vehicle.
Braking:
Displays the brake pedal position, vehicle speed
and the g-force being exerted on the vehicle.Steering:
Displays the steering angle, vehicle speed and
the g-force being exerted on the vehicle.
Information for fuel economy im-
provement
Gear position:
Displays the gear position, vehicle speed and
each gear’s fuel economy level/torque map.Fuel economy:
Displays the fuel economy information.
Trip calculator.
Stopwatch:
Displays the recorded driving time, vehicle
speed and elapsed time and saves the history
for each of these functions.
Multi function meter10-3
Page 254 of 314
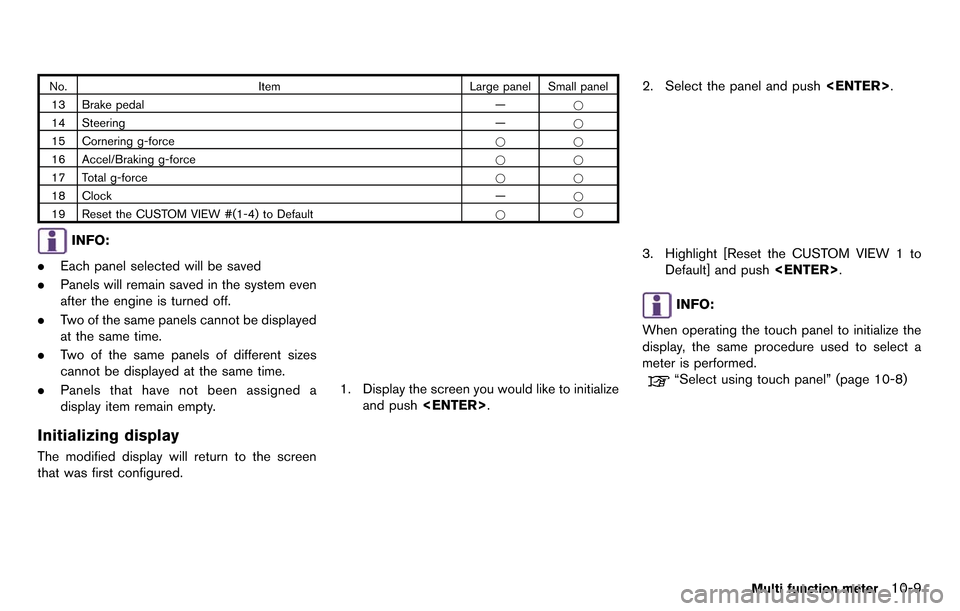
No.Item Large panel Small panel
13 Brake pedal —*
14 Steering —*
15 Cornering g-force **
16 Accel/Braking g-force **
17 Total g-force **
18 Clock —*
19 Reset the CUSTOM VIEW #(1-4) to Default **
INFO:
. Each panel selected will be saved
. Panels will remain saved in the system even
after the engine is turned off.
. Two of the same panels cannot be displayed
at the same time.
. Two of the same panels of different sizes
cannot be displayed at the same time.
. Panels that have not been assigned a
display item remain empty.
Initializing display
The modified display will return to the screen
that was first configured.
1. Display the screen you would like to initialize
and push
2. Select the panel and push
3. Highlight [Reset the CUSTOM VIEW 1 to
Default] and push
INFO:
When operating the touch panel to initialize the
display, the same procedure used to select a
meter is performed.
“Select using touch panel” (page 10-8)
Multi function meter10-9
Page 259 of 314
10-14Multi function meter
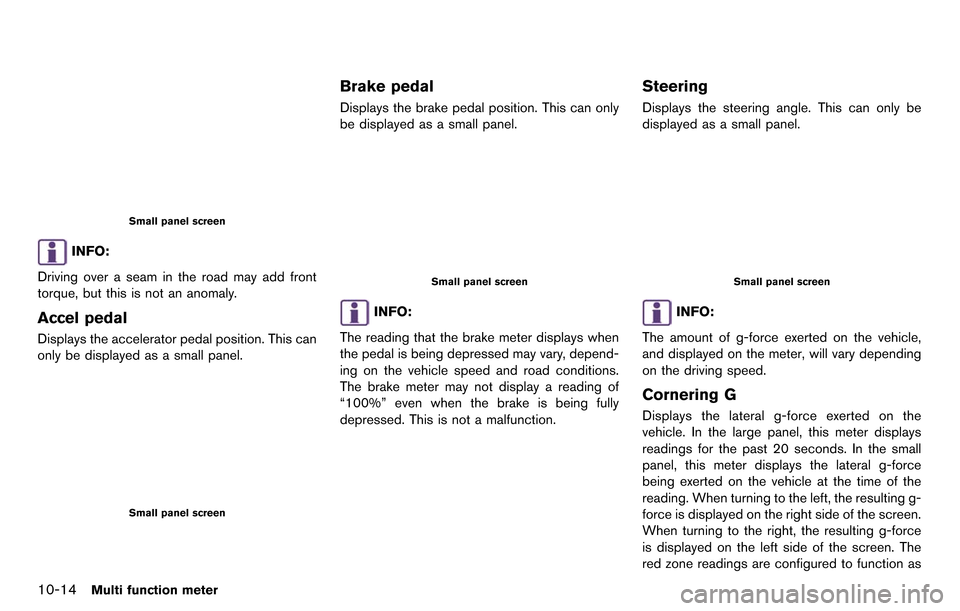
Small panel screen
INFO:
Driving over a seam in the road may add front
torque, but this is not an anomaly.
Accel pedal
Displays the accelerator pedal position. This can
only be displayed as a small panel.
Small panel screen
Brake pedal
Displays the brake pedal position. This can only
be displayed as a small panel.
Small panel screen
INFO:
The reading that the brake meter displays when
the pedal is being depressed may vary, depend-
ing on the vehicle speed and road conditions.
The brake meter may not display a reading of
“100%” even when the brake is being fully
depressed. This is not a malfunction.
Steering
Displays the steering angle. This can only be
displayed as a small panel.
Small panel screen
INFO:
The amount of g-force exerted on the vehicle,
and displayed on the meter, will vary depending
on the driving speed.
Cornering G
Displays the lateral g-force exerted on the
vehicle. In the large panel, this meter displays
readings for the past 20 seconds. In the small
panel, this meter displays the lateral g-force
being exerted on the vehicle at the time of the
reading. When turning to the left, the resulting g-
force is displayed on the right side of the screen.
When turning to the right, the resulting g-force
is displayed on the left side of the screen. The
red zone readings are configured to function as
Page 264 of 314
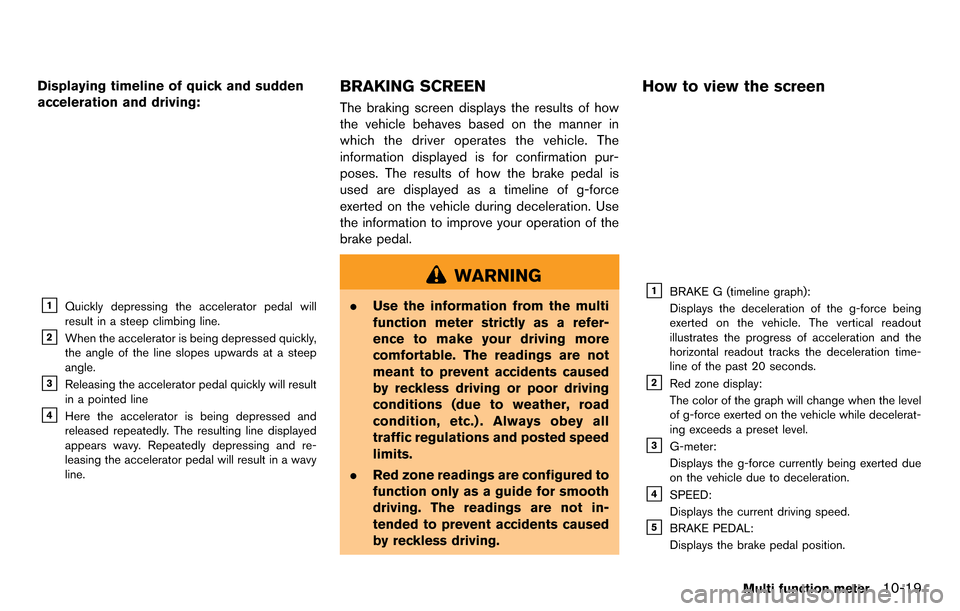
Displaying timeline of quick and sudden
acceleration and driving:
&1Quickly depressing the accelerator pedal will
result in a steep climbing line.
&2When the accelerator is being depressed quickly,
the angle of the line slopes upwards at a steep
angle.
&3Releasing the accelerator pedal quickly will result
in a pointed line
&4Here the accelerator is being depressed and
released repeatedly. The resulting line displayed
appears wavy. Repeatedly depressing and re-
leasing the accelerator pedal will result in a wavy
line.
BRAKING SCREEN
The braking screen displays the results of how
the vehicle behaves based on the manner in
which the driver operates the vehicle. The
information displayed is for confirmation pur-
poses. The results of how the brake pedal is
used are displayed as a timeline of g-force
exerted on the vehicle during deceleration. Use
the information to improve your operation of the
brake pedal.
WARNING
.Use the information from the multi
function meter strictly as a refer-
ence to make your driving more
comfortable. The readings are not
meant to prevent accidents caused
by reckless driving or poor driving
conditions (due to weather, road
condition, etc.) . Always obey all
traffic regulations and posted speed
limits.
. Red zone readings are configured to
function only as a guide for smooth
driving. The readings are not in-
tended to prevent accidents caused
by reckless driving.
How to view the screen
&1BRAKE G (timeline graph):
Displays the deceleration of the g-force being
exerted on the vehicle. The vertical readout
illustrates the progress of acceleration and the
horizontal readout tracks the deceleration time-
line of the past 20 seconds.
&2Red zone display:
The color of the graph will change when the level
of g-force exerted on the vehicle while decelerat-
ing exceeds a preset level.
&3G-meter:
Displays the g-force currently being exerted due
on the vehicle due to deceleration.
&4SPEED:
Displays the current driving speed.
&5BRAKE PEDAL:
Displays the brake pedal position.
Multi function meter10-19
Page 265 of 314
10-20Multi function meter
INFO:
. The reading that the brake meter displays
when the pedal is being depressed may
vary, depending on the vehicle speed and
road conditions. The brake meter may not
display a reading of “100%” even when the
brake is being fully depressed. This is not a
malfunction.
. This panel only displays acceleration infor-
mation when the vehicle is decelerating. It
does not display any acceleration informa-
tion when the vehicle is accelerating.
. Due to the slope of a road, this meter may
register g-force even when the vehicle is
stopped. This is not a malfunction.
. When the VDC or the ABS is activated, a
mark will appear on the far left side of the
panel (large panel only) .
. The scale of the readout is adjusted auto-
matically to accommodate readings that
exceed the upper limit of the meter.Using result screens to improve
driving
INFO:
This section explains how to use the driving
timeline screens. Use this information to make
your driving smoother.
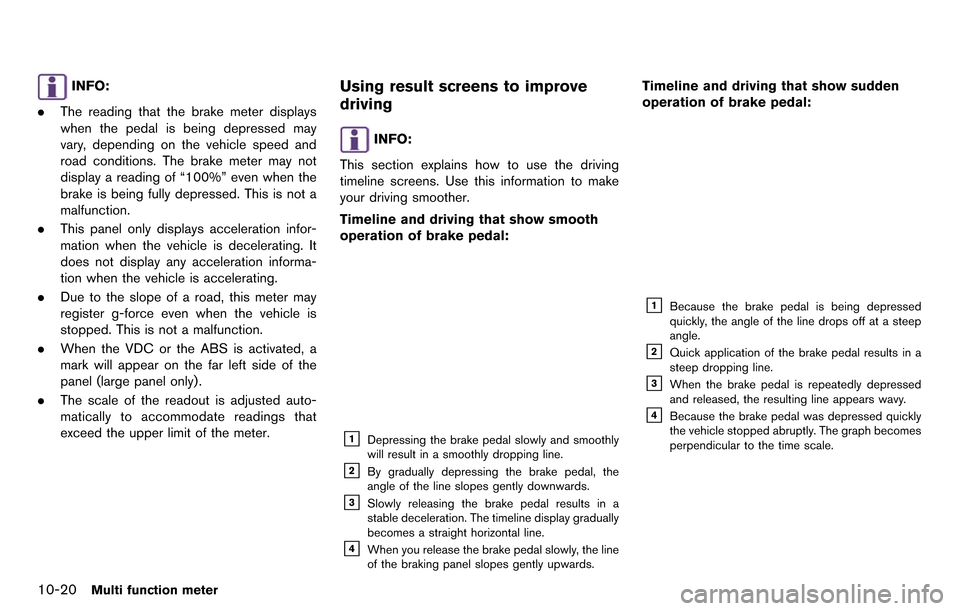
Timeline and driving that show smooth
operation of brake pedal:
&1Depressing the brake pedal slowly and smoothly
will result in a smoothly dropping line.
&2By gradually depressing the brake pedal, the
angle of the line slopes gently downwards.
&3Slowly releasing the brake pedal results in a
stable deceleration. The timeline display gradually
becomes a straight horizontal line.
&4When you release the brake pedal slowly, the line
of the braking panel slopes gently upwards.
Timeline and driving that show sudden
operation of brake pedal:
&1Because the brake pedal is being depressed
quickly, the angle of the line drops off at a steep
angle.
&2Quick application of the brake pedal results in a
steep dropping line.
&3When the brake pedal is repeatedly depressed
and released, the resulting line appears wavy.
&4Because the brake pedal was depressed quickly
the vehicle stopped abruptly. The graph becomes
perpendicular to the time scale.