lock NISSAN JUKE 2014 F15 / 1.G Owner's Manual
[x] Cancel search | Manufacturer: NISSAN, Model Year: 2014, Model line: JUKE, Model: NISSAN JUKE 2014 F15 / 1.GPages: 402, PDF Size: 1.96 MB
Page 54 of 402
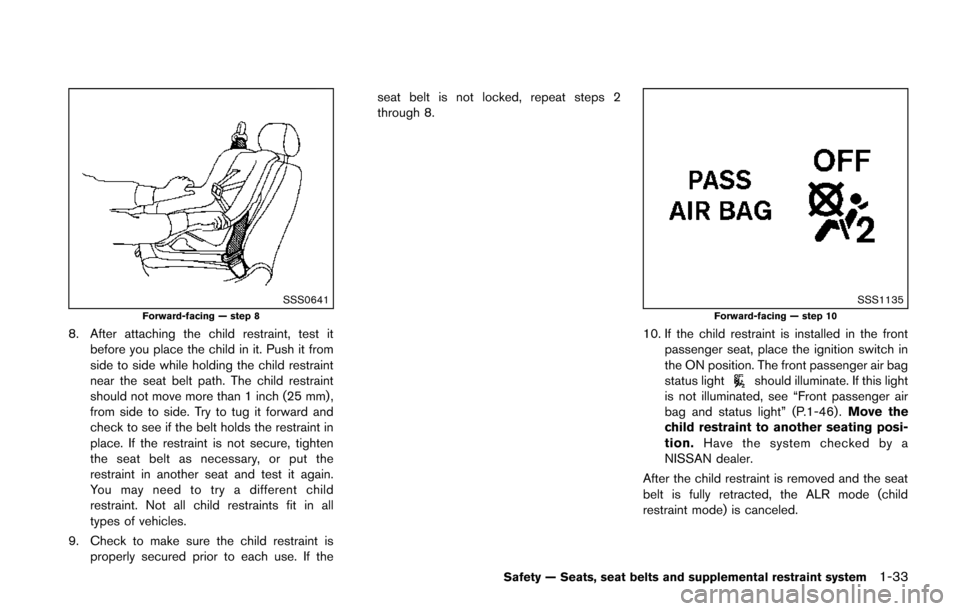
SSS0641Forward-facing — step 8
8. After attaching the child restraint, test itbefore you place the child in it. Push it from
side to side while holding the child restraint
near the seat belt path. The child restraint
should not move more than 1 inch (25 mm) ,
from side to side. Try to tug it forward and
check to see if the belt holds the restraint in
place. If the restraint is not secure, tighten
the seat belt as necessary, or put the
restraint in another seat and test it again.
You may need to try a different child
restraint. Not all child restraints fit in all
types of vehicles.
9. Check to make sure the child restraint is properly secured prior to each use. If the seat belt is not locked, repeat steps 2
through 8.
SSS1135Forward-facing — step 10
10. If the child restraint is installed in the front
passenger seat, place the ignition switch in
the ON position. The front passenger air bag
status light
should illuminate. If this light
is not illuminated, see “Front passenger air
bag and status light” (P.1-46) . Move the
child restraint to another seating posi-
tion. Have the system checked by a
NISSAN dealer.
After the child restraint is removed and the seat
belt is fully retracted, the ALR mode (child
restraint mode) is canceled.
Safety — Seats, seat belts and supplemental restraint system1-33
Page 56 of 402
LRS0455
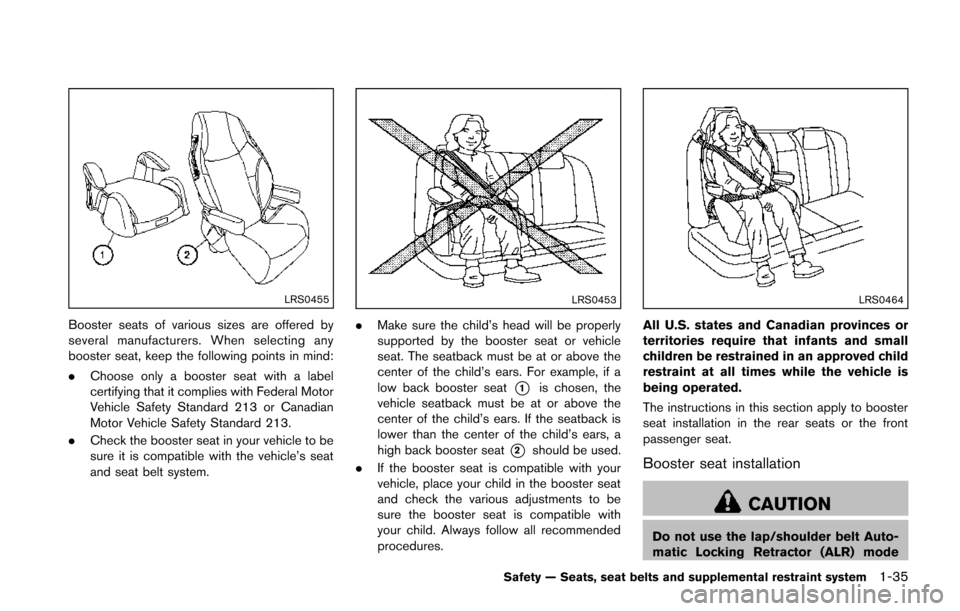
Booster seats of various sizes are offered by
several manufacturers. When selecting any
booster seat, keep the following points in mind:
.Choose only a booster seat with a label
certifying that it complies with Federal Motor
Vehicle Safety Standard 213 or Canadian
Motor Vehicle Safety Standard 213.
. Check the booster seat in your vehicle to be
sure it is compatible with the vehicle’s seat
and seat belt system.
LRS0453
.Make sure the child’s head will be properly
supported by the booster seat or vehicle
seat. The seatback must be at or above the
center of the child’s ears. For example, if a
low back booster seat
*1is chosen, the
vehicle seatback must be at or above the
center of the child’s ears. If the seatback is
lower than the center of the child’s ears, a
high back booster seat
*2should be used.
. If the booster seat is compatible with your
vehicle, place your child in the booster seat
and check the various adjustments to be
sure the booster seat is compatible with
your child. Always follow all recommended
procedures.
LRS0464
All U.S. states and Canadian provinces or
territories require that infants and small
children be restrained in an approved child
restraint at all times while the vehicle is
being operated.
The instructions in this section apply to booster
seat installation in the rear seats or the front
passenger seat.
Booster seat installation
CAUTION
Do not use the lap/shoulder belt Auto-
matic Locking Retractor (ALR) mode
Safety — Seats, seat belts and supplemental restraint system1-35
Page 68 of 402
sensors to turn the air bag OFF. Always be sure
to be seated and wearing the seat belt properly
for the most effective protection by the seat belt
and supplemental air bag.
NISSAN recommends that pre-teens and chil-
dren be properly restrained in a rear seat.
NISSAN also recommends that appropriate
child restraints and booster seats be properly
installed in a rear seat. If this is not possible, the
occupant classification sensors are designed to
operate as described above to turn the front
passenger air bag OFF for specified child
restraints. Failing to properly secure child
restraints and to use the Automatic Locking
Retractor (ALR) mode (child restraint mode)
may allow the restraint to tip or move in an
accident or sudden stop. This can also result in
the passenger air bag inflating in a crash instead
of being OFF. (See “Child restraints” (P.1-18)
for proper use and installation.)
If the front passenger seat is not occupied, the
passenger air bag is designed not to inflate in a
crash. However, heavy objects placed on the
seat could result in air bag inflation, because of
the object being detected by the occupant
classification sensors. Other conditions could
also result in air bag inflation, such as if a child is
standing on the seat, or if two children are on the
seat, contrary to the instructions in this manual.
Always be sure that you and all vehicleoccupants are seated and restrained properly.
Using the passenger air bag status light, you can
monitor when the front passenger air bag is
automatically turned OFF with the seat occu-
pied. The light will not illuminate when the front
passenger seat is unoccupied.
If an adult occupant is in the seat but the
passenger air bag status light is illuminated
(indicating that the air bag is OFF) , it could be
that the person is a small adult, or is not sitting
on the seat properly.
If a child restraint must be used in the front seat,
the passenger air bag status light may or may
not be illuminated, depending on the size of the
child and the type of child restraint being used. If
the air bag status light is not illuminated
(indicating that the air bag might inflate in a
crash) , it could be that the child restraint or seat
belt is not being used properly. Make sure that
the child restraint is installed properly, the seat
belt is used properly and the occupant is
positioned properly. If the air bag status light is
not illuminated, reposition the occupant or child
restraint in a rear seat.
If the passenger air bag status light will not
illuminate even though you believe that the child
restraint, the seat belts and the occupant are
properly positioned, the system may be sensing
an unoccupied seat (in which case the air bag is
OFF). Your NISSAN dealer can check that the
system is OFF by using a special tool. However,
until you have confirmed with your dealer that
your air bag is working properly, reposition the
occupant or child restraint in a rear seat.
The air bag system and passenger air bag status
light will take a few seconds to register a change
in the passenger seat status. However, if the
seat becomes unoccupied, the air bag status
light will remain off.
If a malfunction occurs in the front passenger air
bag system, the supplemental air bag warning
light
, located in the meter and gauges area,
will blink. Have the system checked by a
NISSAN dealer.
Other supplemental front-impact air bag
precautions
WARNING
. Do not place any objects on the
steering wheel pad or on the instru-
ment panel. Also, do not place any
objects between any occupant and
the steering wheel or instrument
panel. Such objects may become
dangerous projectiles and cause
injury if the front air bags inflate.
Safety — Seats, seat belts and supplemental restraint system1-47
Page 74 of 402
curred. Repair and replacement of these sys-
tems should be done only by a NISSAN dealer.
When maintenance work is required on the
vehicle, the front air bags, side air bags, curtain
air bags and pretensioners and related parts
should be pointed out to the person performing
the maintenance. The ignition switch should
always be in the LOCK position when working
under the hood or inside the vehicle.
WARNING
.Once a front air bag, side air bag or
curtain air bag has inflated, the air
bag module will not function again
and must be replaced. Additionally,
the activated pretensioners must
also be replaced. The air bag mod-
ule and pretensioner should be
replaced by a NISSAN dealer. The
air bag modules and pretensioner
system cannot be repaired.
. The front air bag, side air bag and
curtain air bag systems, and preten-
sioner system should be inspected
by a NISSAN dealer if there is any
damage to the front end or side
portion of the vehicle. .
If you need to dispose of a supple-
mental air bag or pretensioner or
scrap the vehicle, contact a NISSAN
dealer. Correct supplemental air
bag and pretensioner system dis-
posal procedures are set forth in the
appropriate NISSAN Service Man-
ual. Incorrect disposal procedures
could cause personal injury.
Safety — Seats, seat belts and supplemental restraint system1-53
Page 76 of 402

2 Instruments and controls
Cockpit ........................................................................\
................ 2-3
Instrument panel ........................................................................\
2-4
Meters and gauges ................................................................... 2-5Speedometer and odometer ............................................ 2-6
Tachometer ........................................................................\
... 2-8
Engine coolant temperature gauge ................................ 2-8
Fuel gauge ........................................................................\
.... 2-9
Vehicle information display ................................................ 2-9
Outside air temperature .................................................. 2-10
Continuously Variable Transmission (CVT) position
indicator (if so equipped) ............................................... 2-10
Trip computer .................................................................... 2-10
Warning/indicator lights and audible reminders ............ 2-12
Checking bulbs ................................................................. 2-13
Warning lights ................................................................... 2-13
Indicator lights ................................................................... 2-17
Audible reminders ............................................................ 2-19
Integrated control system (if so equipped) ..................... 2-21 Drive mode ........................................................................\
. 2-21
Setup function ................................................................... 2-22
Drive information ............................................................... 2-27
Eco information ................................................................. 2-28 Security systems ................................................................... 2-29
Vehicle Security System ............................................... 2-29
NISSAN Vehicle Immobilizer System ........................ 2-31
Windshield wiper and washer switch .............................. 2-32
Rear window wiper and washer switch .......................... 2-34
Rear window and outside mirror defroster switch ....... 2-35
Headlight and turn signal switch ....................................... 2-35 Headlight switch ............................................................ 2-35
Turn signal switch .......................................................... 2-38
Fog light switch (if so equipped) .............................. 2-39
Horn ........................................................................\
.................. 2-39
Vehicle Dynamic Control (VDC) off switch .................... 2-39
Heated seats (if so equipped) ........................................... 2-40
Clock (if so equipped) ......................................................... 2-41 Adjusting the time .......................................................... 2-41
Power outlet ........................................................................\
.... 2-42
Storage ........................................................................\
............ 2-42 Cup holders ..................................................................... 2-42
Cargo floor box ............................................................... 2-43
Glove box ........................................................................\
. 2-44
Coat hook ........................................................................\
2-44
Cargo cover (if so equipped) ..................................... 2-44>
Page 79 of 402
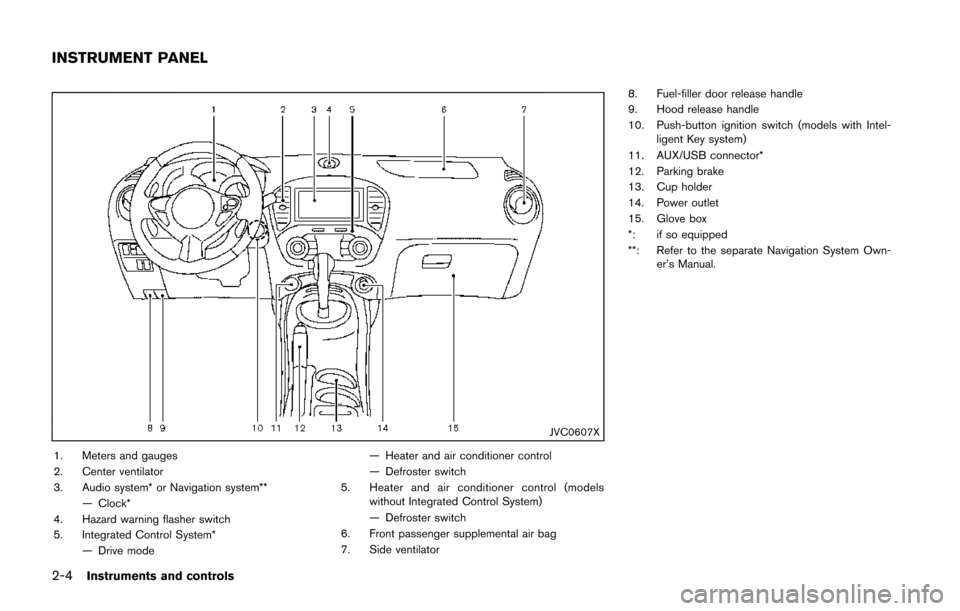
2-4Instruments and controls
JVC0607X
1. Meters and gauges
2. Center ventilator
3. Audio system* or Navigation system**— Clock*
4. Hazard warning flasher switch
5. Integrated Control System* — Drive mode — Heater and air conditioner control
— Defroster switch
5. Heater and air conditioner control (models without Integrated Control System)
— Defroster switch
6. Front passenger supplemental air bag
7. Side ventilator 8. Fuel-filler door release handle
9. Hood release handle
10. Push-button ignition switch (models with Intel-
ligent Key system)
11. AUX/USB connector*
12. Parking brake
13. Cup holder
14. Power outlet
15. Glove box
*: if so equipped
**: Refer to the separate Navigation System Own- er’s Manual.
INSTRUMENT PANEL
Page 80 of 402
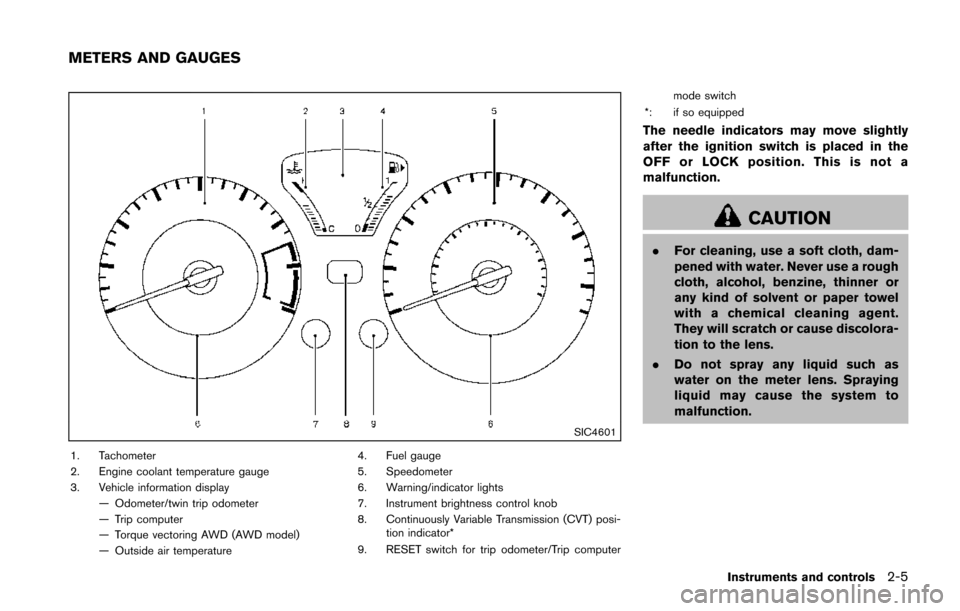
SIC4601
1. Tachometer
2. Engine coolant temperature gauge
3. Vehicle information display— Odometer/twin trip odometer
— Trip computer
— Torque vectoring AWD (AWD model)
— Outside air temperature 4. Fuel gauge
5. Speedometer
6. Warning/indicator lights
7. Instrument brightness control knob
8. Continuously Variable Transmission (CVT) posi-
tion indicator*
9. RESET switch for trip odometer/Trip computer mode switch
*: if so equipped
The needle indicators may move slightly
after the ignition switch is placed in the
OFF or LOCK position. This is not a
malfunction.
CAUTION
. For cleaning, use a soft cloth, dam-
pened with water. Never use a rough
cloth, alcohol, benzine, thinner or
any kind of solvent or paper towel
with a chemical cleaning agent.
They will scratch or cause discolora-
tion to the lens.
. Do not spray any liquid such as
water on the meter lens. Spraying
liquid may cause the system to
malfunction.
Instruments and controls2-5
METERS AND GAUGES
Page 87 of 402
2-12Instruments and controls
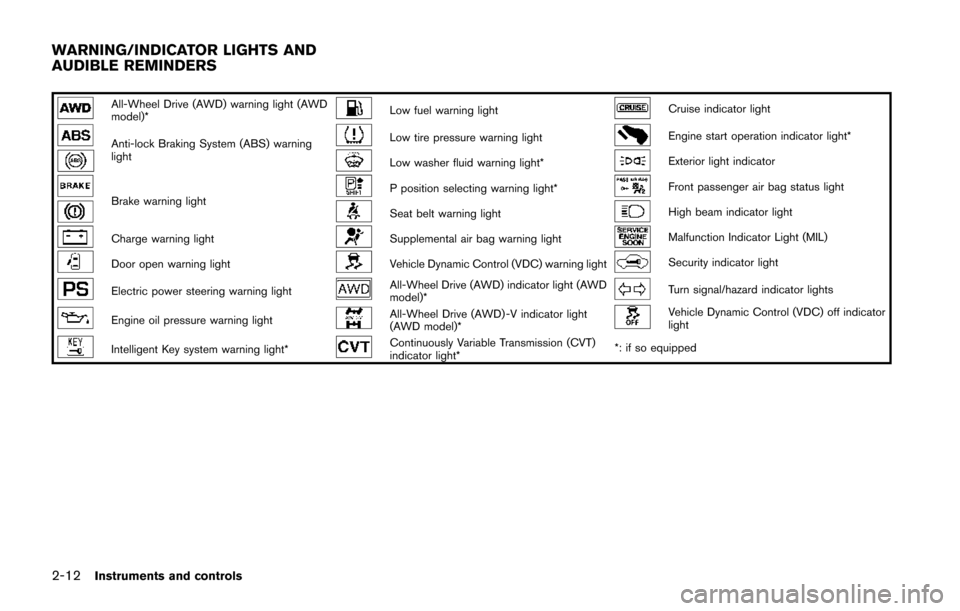
All-Wheel Drive (AWD) warning light (AWD
model)*Low fuel warning lightCruise indicator light
Anti-lock Braking System (ABS) warning
lightLow tire pressure warning lightEngine start operation indicator light*
Low washer fluid warning light*Exterior light indicator
Brake warning lightP position selecting warning light*Front passenger air bag status light
Seat belt warning lightHigh beam indicator light
Charge warning lightSupplemental air bag warning lightMalfunction Indicator Light (MIL)
Door open warning lightVehicle Dynamic Control (VDC) warning lightSecurity indicator light
Electric power steering warning lightAll-Wheel Drive (AWD) indicator light (AWD
model)*Turn signal/hazard indicator lights
Engine oil pressure warning lightAll-Wheel Drive (AWD) -V indicator light
(AWD model)*Vehicle Dynamic Control (VDC) off indicator
light
Intelligent Key system warning light*Continuously Variable Transmission (CVT)
indicator light**: if so equipped
WARNING/INDICATOR LIGHTS AND
AUDIBLE REMINDERS
Page 88 of 402
CHECKING BULBS
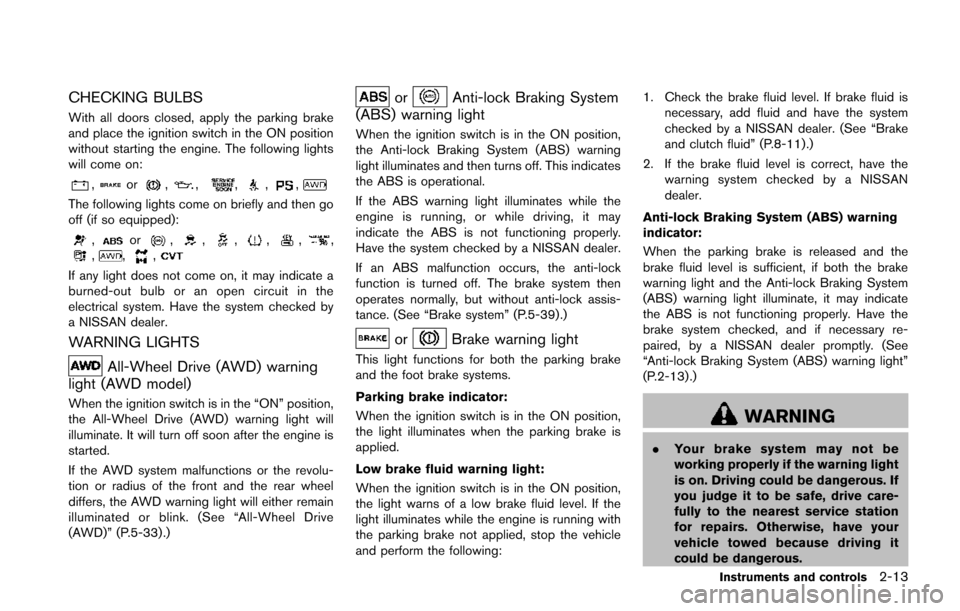
With all doors closed, apply the parking brake
and place the ignition switch in the ON position
without starting the engine. The following lights
will come on:
,or,,,,,
The following lights come on briefly and then go
off (if so equipped):
,or,,,,,,,,,
If any light does not come on, it may indicate a
burned-out bulb or an open circuit in the
electrical system. Have the system checked by
a NISSAN dealer.
WARNING LIGHTS
All-Wheel Drive (AWD) warning
light (AWD model)
When the ignition switch is in the “ON” position,
the All-Wheel Drive (AWD) warning light will
illuminate. It will turn off soon after the engine is
started.
If the AWD system malfunctions or the revolu-
tion or radius of the front and the rear wheel
differs, the AWD warning light will either remain
illuminated or blink. (See “All-Wheel Drive
(AWD)” (P.5-33) .)
orAnti-lock Braking System
(ABS) warning light
When the ignition switch is in the ON position,
the Anti-lock Braking System (ABS) warning
light illuminates and then turns off. This indicates
the ABS is operational.
If the ABS warning light illuminates while the
engine is running, or while driving, it may
indicate the ABS is not functioning properly.
Have the system checked by a NISSAN dealer.
If an ABS malfunction occurs, the anti-lock
function is turned off. The brake system then
operates normally, but without anti-lock assis-
tance. (See “Brake system” (P.5-39).)
orBrake warning light
This light functions for both the parking brake
and the foot brake systems.
Parking brake indicator:
When the ignition switch is in the ON position,
the light illuminates when the parking brake is
applied.
Low brake fluid warning light:
When the ignition switch is in the ON position,
the light warns of a low brake fluid level. If the
light illuminates while the engine is running with
the parking brake not applied, stop the vehicle
and perform the following: 1. Check the brake fluid level. If brake fluid is
necessary, add fluid and have the system
checked by a NISSAN dealer. (See “Brake
and clutch fluid” (P.8-11).)
2. If the brake fluid level is correct, have the warning system checked by a NISSAN
dealer.
Anti-lock Braking System (ABS) warning
indicator:
When the parking brake is released and the
brake fluid level is sufficient, if both the brake
warning light and the Anti-lock Braking System
(ABS) warning light illuminate, it may indicate
the ABS is not functioning properly. Have the
brake system checked, and if necessary re-
paired, by a NISSAN dealer promptly. (See
“Anti-lock Braking System (ABS) warning light”
(P.2-13) .)
WARNING
. Your brake system may not be
working properly if the warning light
is on. Driving could be dangerous. If
you judge it to be safe, drive care-
fully to the nearest service station
for repairs. Otherwise, have your
vehicle towed because driving it
could be dangerous.
Instruments and controls2-13
Page 94 of 402
warning message is displayed on the twin
trip odometer. If the fuel-filler cap is loose or
missing, tighten or install the cap and
continue to drive the vehicle. The
light
should turn off after a few driving trips. If the
light does not turn off after a few driving
trips, have the vehicle inspected by a
NISSAN dealer. You do not need to have
your vehicle towed to the dealer.
. Malfunction indicator light blinking — An
engine misfire has been detected which may
damage the emission control system.
To reduce or avoid emission control system
damage:
1) Do not drive at speeds above 45 MPH
(72 km/h).
2) Avoid hard acceleration or deceleration.
3) Avoid steep uphill grades.
4) If possible, reduce the amount of cargo being hauled or towed.
The malfunction indicator light may stop
blinking and remain on.
Have the vehicle inspected by a NISSAN
dealer. You do not need to have your vehicle
towed to the dealer.
CAUTION
Continued vehicle operation without
having the emission control system
and/or CVT system checked and re-
paired as necessary could lead to poor
driveability, reduced fuel economy, and
possible damage to the emission con-
trol system.
Security indicator light
The light blinks when the ignition switch is in the
ACC, OFF or LOCK position. This function
indicates the security system equipped on the
vehicle is operational.
If the security system is malfunctioning, this light
will remain on while the ignition switch is in the
ON position. For additional information, see
“Security systems” (P.2-29) .
Turn signal/hazard indicator lights
The light flashes when the turn signal switch
lever or hazard switch is turned on.
Vehicle Dynamic Control (VDC) off
indicator light
The light comes on when the Vehicle Dynamic
Control (VDC) off switch is pushed to OFF. This
indicates that the VDC system and traction
control system are not operating.
AUDIBLE REMINDERS
Key reminder chime
Models with Intelligent Key system:
A chime will sound if the driver side door is
opened while the ignition switch is pushed to
the ACC position.
Make sure the ignition switch is pushed to the
OFF position, and take the Intelligent Key with
you when leaving the vehicle.
Models without Intelligent Key system:
The key reminder chime sounds if the driver’s
side door is opened while the key is left in the
ignition switch and the ignition switch is in the
ACC, OFF or LOCK position. Remove the key
and take it with you when leaving the vehicle.
Instruments and controls2-19