fuel NISSAN JUKE 2014 F15 / 1.G Owner's Guide
[x] Cancel search | Manufacturer: NISSAN, Model Year: 2014, Model line: JUKE, Model: NISSAN JUKE 2014 F15 / 1.GPages: 402, PDF Size: 1.96 MB
Page 279 of 402
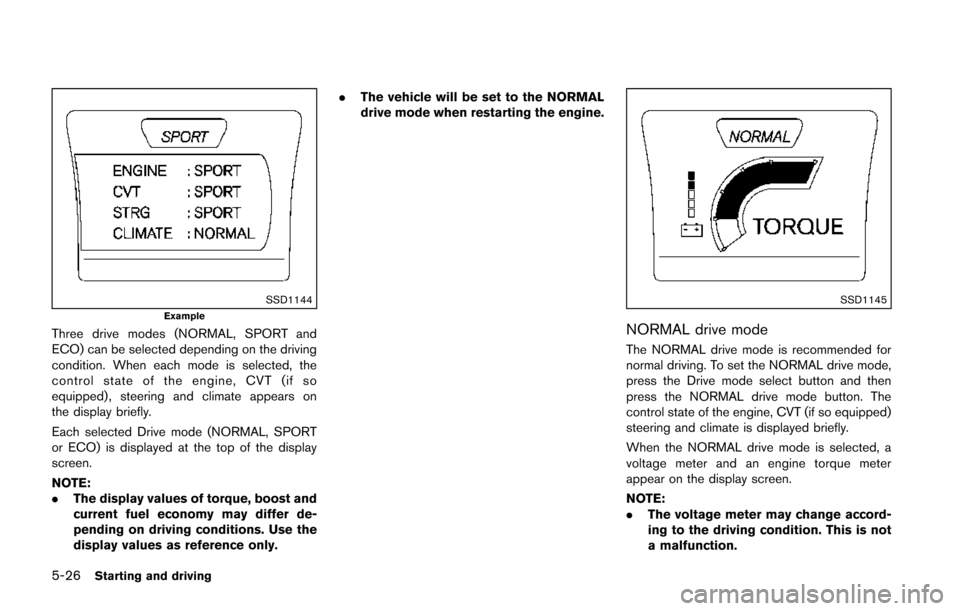
5-26Starting and driving
SSD1144Example
Three drive modes (NORMAL, SPORT and
ECO) can be selected depending on the driving
condition. When each mode is selected, the
control state of the engine, CVT (if so
equipped) , steering and climate appears on
the display briefly.
Each selected Drive mode (NORMAL, SPORT
or ECO) is displayed at the top of the display
screen.
NOTE:
.The display values of torque, boost and
current fuel economy may differ de-
pending on driving conditions. Use the
display values as reference only. .
The vehicle will be set to the NORMAL
drive mode when restarting the engine.
SSD1145
NORMAL drive mode
The NORMAL drive mode is recommended for
normal driving. To set the NORMAL drive mode,
press the Drive mode select button and then
press the NORMAL drive mode button. The
control state of the engine, CVT (if so equipped)
steering and climate is displayed briefly.
When the NORMAL drive mode is selected, a
voltage meter and an engine torque meter
appear on the display screen.
NOTE:
.The voltage meter may change accord-
ing to the driving condition. This is not
a malfunction.
Page 280 of 402
.At start up, the vehicle is automatically
set to the NORMAL drive mode.
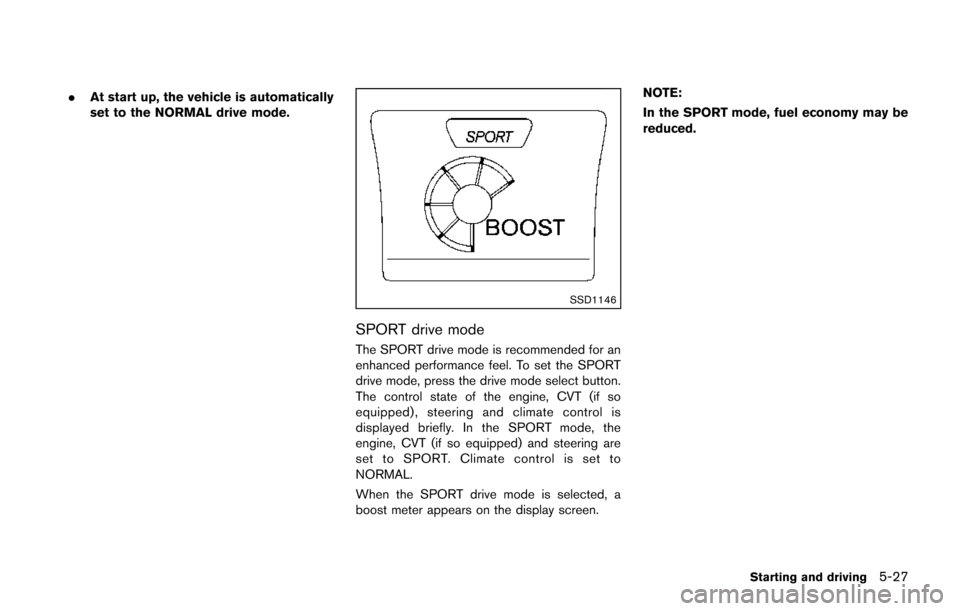
SSD1146
SPORT drive mode
The SPORT drive mode is recommended for an
enhanced performance feel. To set the SPORT
drive mode, press the drive mode select button.
The control state of the engine, CVT (if so
equipped), steering and climate control is
displayed briefly. In the SPORT mode, the
engine, CVT (if so equipped) and steering are
set to SPORT. Climate control is set to
NORMAL.
When the SPORT drive mode is selected, a
boost meter appears on the display screen. NOTE:
In the SPORT mode, fuel economy may be
reduced.
Starting and driving5-27
Page 281 of 402
5-28Starting and driving
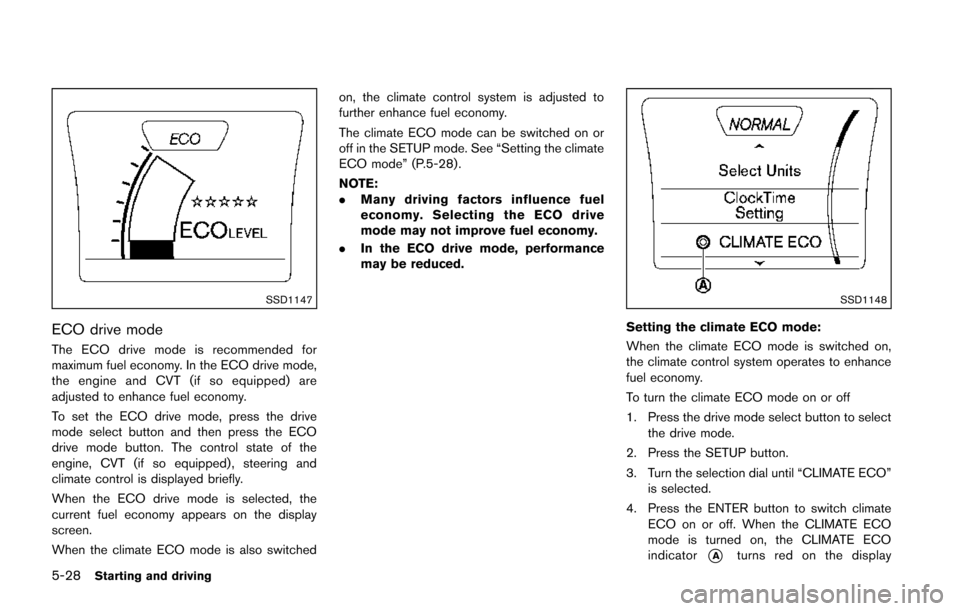
SSD1147
ECO drive mode
The ECO drive mode is recommended for
maximum fuel economy. In the ECO drive mode,
the engine and CVT (if so equipped) are
adjusted to enhance fuel economy.
To set the ECO drive mode, press the drive
mode select button and then press the ECO
drive mode button. The control state of the
engine, CVT (if so equipped) , steering and
climate control is displayed briefly.
When the ECO drive mode is selected, the
current fuel economy appears on the display
screen.
When the climate ECO mode is also switchedon, the climate control system is adjusted to
further enhance fuel economy.
The climate ECO mode can be switched on or
off in the SETUP mode. See “Setting the climate
ECO mode” (P.5-28) .
NOTE:
.
Many driving factors influence fuel
economy. Selecting the ECO drive
mode may not improve fuel economy.
. In the ECO drive mode, performance
may be reduced.
SSD1148
Setting the climate ECO mode:
When the climate ECO mode is switched on,
the climate control system operates to enhance
fuel economy.
To turn the climate ECO mode on or off
1. Press the drive mode select button to select
the drive mode.
2. Press the SETUP button.
3. Turn the selection dial until “CLIMATE ECO” is selected.
4. Press the ENTER button to switch climate ECO on or off. When the CLIMATE ECO
mode is turned on, the CLIMATE ECO
indicator
*Aturns red on the display
Page 285 of 402
5-32Starting and driving
Follow these easy-to-use Fuel Efficient Driving
Tips to help you achieve the most fuel economy
from your vehicle.
1. Use smooth accelerator and brake pedalapplication.
.Avoid rapid starts and stops..Use smooth, gentle accelerator andbrake application whenever possible.
.Maintain constant speed while commut-
ing and coast whenever possible.
2. Maintain constant speed.
.Look ahead to try and anticipate and minimize stops.
.Synchronizing your speed with traffic
lights allows you to reduce your number
of stops.
.Maintaining a steady speed can minimize red light stops and improve fuel effi-
ciency.
3. Use air conditioning (A/C) at higher vehicle speeds.
.Below 40 MPH (64 km/h), it is moreefficient to open windows to cool the
vehicle due to reduced engine load.
.Above 40 MPH (64 km/h) , it is moreefficient to use A/C to cool the vehicle
due to increased aerodynamic drag.
.Recirculating the cool air in the cabinwhen the A/C is on reduces cooling load.
4. Drive at economical speeds and distances.
.Observing the speed limit and not ex- ceeding 60 MPH (97 km/h) (where
legally allowed) can improve fuel effi-
ciency due to reduced aerodynamic
drag.
.Maintaining a safe following distancebehind other vehicles reduces unneces-
sary braking.
.Safely monitoring traffic to anticipatechanges in speed permits reduced brak-
ing and smooth acceleration changes.
.Select a gear range suitable to road conditions.
5. Use cruise control.
.Using cruise control during highway driving helps maintain a steady speed.
.Cruise control is particularly effective in providing fuel savings when driving on
flat terrains.
6. Plan for the shortest route.
.Utilize a map or navigation system to determine the best route to save time.
7. Avoid idling.
.Shutting off your engine when safe for stops exceeding 30-60 seconds saves fuel and reduces emissions.
8. Buy an automated pass for toll roads.
.Automated passes permit drivers to use special lanes to maintain cruising speed
through the toll and avoid stopping and
starting.
9. Winter warm up.
.Limit idling time to minimize impact to fuel economy.
.Vehicles typically need no more than 30seconds of idling at start-up to effectively
circulate the engine oil before driving.
.Your vehicle will reach its ideal operatingtemperature more quickly while driving
versus idling.
10. Keeping your vehicle cool.
.Park your vehicle in a covered parking area or in the shade whenever possible.
.When entering a hot vehicle, opening thewindows will help to reduce the inside
temperature faster, resulting in reduced
demand on your A/C system.
FUEL EFFICIENT DRIVING TIPS
Page 286 of 402
.Keep your engine tuned up.
. Follow the recommended scheduled main-
tenance.
. Keep the tires inflated to the correct
pressure. Low tire pressure increases tire
wear and lowers fuel economy.
. Keep the wheels in correct alignment.
Improper alignment increases tire wear and
lowers fuel economy.
. Use the recommended viscosity engine oil.
(See “Engine oil and oil filter recommenda-
tion” (P.9-6) .)
WARNING
.For AWD equipped vehicles, do not
attempt to raise two wheels off the
ground and shift the transmission to
any drive or reverse position with
the engine running. Doing so may
result in drivetrain damage or un-
expected vehicle movement which
could result in serious vehicle da-
mage or personal injury.
. Do not attempt to test an AWD
equipped vehicle on a 2-wheel dy-
namometer (such as the dynam-
ometers used by some states for
emissions testing) or similar equip-
ment even if the other two wheels
are raised off the ground. Make sure
that you inform the test facility
personnel that your vehicle is
equipped with AWD before it is
placed on a dynamometer. Using
the wrong test equipment may re-
sult in drivetrain damage or unex-
pected vehicle movement which
could result in serious vehicle da-
mage or personal injury.
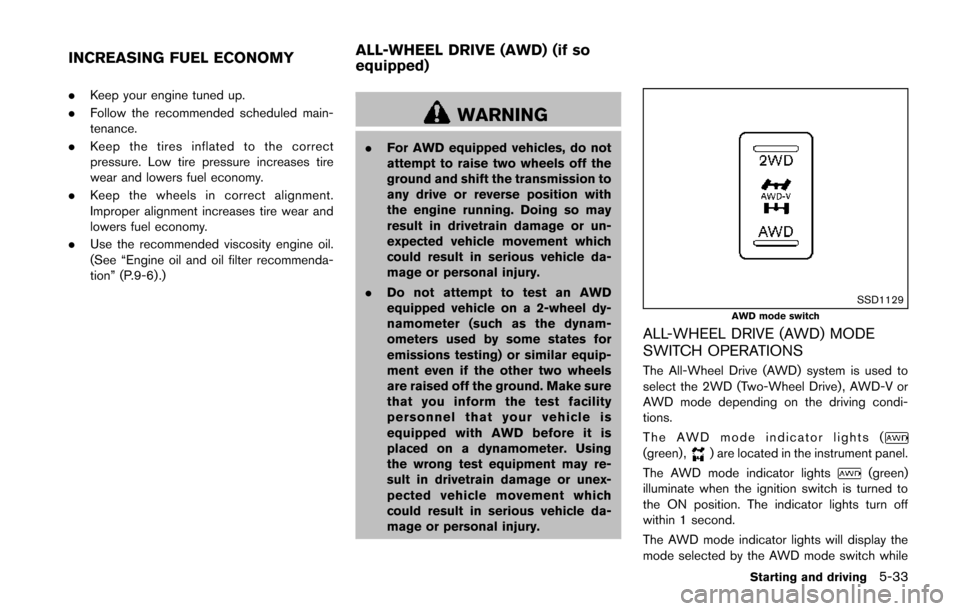
SSD1129AWD mode switch
ALL-WHEEL DRIVE (AWD) MODE
SWITCH OPERATIONS
The All-Wheel Drive (AWD) system is used to
select the 2WD (Two-Wheel Drive) , AWD-V or
AWD mode depending on the driving condi-
tions.
The AWD mode indicator lights (
(green) ,) are located in the instrument panel.
The AWD mode indicator lights
(green)
illuminate when the ignition switch is turned to
the ON position. The indicator lights turn off
within 1 second.
The AWD mode indicator lights will display the
mode selected by the AWD mode switch while
Starting and driving5-33
INCREASING FUEL ECONOMY ALL-WHEEL DRIVE (AWD) (if so
equipped)
Page 321 of 402
7-8Appearance and care
Remove dirt with a vacuum cleaner.
. Never allow water or other liquids to
come in contact with electronic
components inside the vehicle as
this may damage them.
Chemicals used for road surface deicing are
extremely corrosive. They accelerate corrosion
and deterioration of underbody components
such as the exhaust system, fuel and brake
lines, brake cables, floor pan and fenders.
In winter, the underbody must be cleaned
periodically.
For additional protection against rust and
corrosion, which may be required in some areas,
consult a NISSAN dealer.
Page 325 of 402
8-4Maintenance and do-it-yourself
comes out of the defroster outlets properly and
in sufficient quantity when operating the heater
or air conditioner.
Windshield wiper and washer*:Check that
the wipers and washers operate properly and
that the wipers do not streak.
Under the hood and vehicle
The maintenance items listed here should be
checked periodically (for example, each time you
check the engine oil or refuel) .
Battery*: Check the fluid level in each cell.
It should be between the MAX and MIN lines.
Vehicles operated in high temperatures or under
severe condition require frequent checks of the
battery fluid level.
NOTE:
Care should be taken to avoid situations
that can lead to potential battery discharge
and potential no-start conditions such as:
1. Installation or extended use of electro-
nic accessories that consume battery
power when the engine is not running
(Phone chargers, GPS, DVD players,
etc.)
2. Vehicle is not driven regularly and/or
only driven short distances.
In these cases, the battery may need to be charged to maintain battery health.
Brake and clutch fluid level*:
Make sure that
the brake and clutch fluid level is between the
MAX and MIN lines on the reservoir.
Engine coolant level*: Check the coolant level
when the engine is cold.
Engine drive belt*: Make sure that the drive
belt is not frayed, worn, cracked or oily.
Engine oil level*: Check the level after parking
the vehicle on a level surface and turning off the
engine. Wait more than 10 minutes for the oil to
drain back into the oil pan.
Exhaust system: Make sure there are no loose
supports, cracks or holes. If the sound of the
exhaust seems unusual or there is a smell of
exhaust fumes, immediately have the exhaust
system inspected by a NISSAN dealer. (See
“Precautions when starting and driving” (P.5-3)
for exhaust gas (carbon monoxide) .)
Fluid leaks: Check under the vehicle for fuel,
oil, water or other fluid leaks after the vehicle has
been parked for a while. Water dripping from the
air conditioner after use is normal. If you should
notice any leaks or if gasoline fumes are evident,
check for the cause and have it corrected
immediately.
Radiator and hoses: Check the front of the
radiator and clean off any dirt, insects, leaves, etc., that may have accumulated. Make sure the
hoses have no cracks, deformation, rot or loose
connections.
Underbody:
The underbody is frequently ex-
posed to corrosive substances such as those
used on icy roads or to control dust. It is very
important to remove these substances, other-
wise rust will form on the floor pan, frame, fuel
lines and around the exhaust system. At the end
of winter, the underbody should be thoroughly
flushed with plain water, being careful to clean
those areas where mud and dirt may accumu-
late. For additional information, see “Cleaning
exterior” (P.7-2).
Windshield washer fluid*: Check that there is
adequate fluid in the reservoir.
Page 326 of 402
When performing any inspection or mainte-
nance work on your vehicle, always take care
to prevent serious accidental injury to yourself or
damage to the vehicle. The following are general
precautions which should be closely observed.
WARNING
.Park the vehicle on a level surface,
apply the parking brake securely
and block the wheels to prevent
the vehicle from moving. Move the
shift lever to the P (Park) position
(CVT model) or the shift lever to the
N (Neutral) position (MT model) .
. Be sure the ignition switch is in the
OFF or LOCK position when per-
forming any parts replacement or
repairs.
. If you must work with the engine
running, keep your hands, clothing,
hair and tools away from moving
fans, belts and any other moving
parts.
. It is advisable to secure or remove
any loose clothing and remove any
jewelry, such as rings, watches, etc.
before working on your vehicle. .
Always wear eye protection when-
ever you work on your vehicle.
. If you must run the engine in an
enclosed space such as a garage, be
sure there is proper ventilation for
exhaust gases to escape.
. Never get under the vehicle while it
is supported only by a jack. If it is
necessary to work under the vehicle,
support it with safety stands.
. Keep smoking materials, flame and
sparks away from fuel tank and the
battery.
. The fuel filter or fuel lines should be
serviced by a NISSAN dealer be-
cause the fuel lines are under high
pressure even when the engine is
off.
CAUTION
.Do not work under the hood while
the engine is hot. Turn the engine
off and wait until it cools down.
. Avoid direct contact with used en-
gine oil and coolant. Improperly
disposed engine oil, and engine coolant and/or other vehicle fluids
can damage the environment. Al-
ways conform to local regulations
for disposal of vehicle fluid.
. Never leave the engine or the CVT
related component harnesses dis-
connected while the ignition switch
is in the ON position.
. Never connect or disconnect the
battery or any transistorized com-
ponent while the ignition switch is
in the ON position.
. Your vehicle is equipped with an
automatic engine cooling fan. It may
come on at any time without warn-
ing, even if the ignition key is in the
OFF position and the engine is not
running. To avoid injury, always
disconnect the negative battery
cable before working near the fan.
This “8. Maintenance and do-it-yourself” section
gives instructions regarding only those items
which are relatively easy for an owner to perform.
A genuine NISSAN Service Manual is also
available. (See “Owner’s manual/service manual
order information” (P.9-21) .)
You should be aware that incomplete or
Maintenance and do-it-yourself8-5
MAINTENANCE PRECAUTIONS
Page 331 of 402
8-10Maintenance and do-it-yourself
Engine oil and filter1. Oil filler cap
2. Oil drain plug
3. Oil filter
1. Place a large drain pan under the drain plug.
2. Remove the oil filler cap.
3. Remove the drain plug with a wrench andcompletely drain the oil.
CAUTION
Be careful not to burn yourself, as the
engine oil is hot.
.Waste oil must be disposed ofproperly.
.Check your local regulations.
(Perform steps 4 to 7 only when the engine
oil filter change is needed.)
4. Loosen the oil filter with an oil filter wrench. Remove the oil filter by turning it by hand.
5. Wipe the engine oil filter mounting surface with a clean rag.
CAUTION
Be sure to remove any old gasket
material remaining on the mounting
surface of the engine. Failure to do so
could lead to engine damage.
6. Coat the gasket on the new filter with clean engine oil.
7. Screw in the oil filter clockwise until a slight resistance is felt, then tighten additionally
more than 2/3 turn.
Oil filter tightening torque:11 to 15 ft-lb
(14.7 to 20.5 N·m)
8. Clean and re-install the drain plug with a new washer. Securely tighten the drain plug
with a wrench.
Drain plug tightening torque:22 to 29 ft-lb
(29 to 39 N·m)
Do not use excessive force.
9. Refill the engine with the recommended oil through the oil filler opening, and install the
oil filler cap securely.
See “Capacities and recommended fuel/ lubricants” (P.9-2) for drain and refill capa-
city. The drain and refill capacity depends on
the oil temperature and drain time. Use
these specifications for reference only. Al-
ways use the dipstick to determine the
proper amount of oil in the engine.
10. Start the engine and check for leakage around the drain plug and the oil filter.
Correct as required.
11. Turn the engine off and wait more than 10 minutes. Check the oil level with the dipstick.
Add engine oil if necessary.
After the operation
1. Lower the vehicle carefully to the ground.
2. Dispose of waste oil and filter properly.
WARNING
.Prolonged and repeated contact
with used engine oil may cause skin
cancer.
. Try to avoid direct skin contact with
used oil. If skin contact is made,
wash thoroughly with soap or hand
cleaner as soon as possible.
. Keep used engine oil out of reach of
children.
Page 332 of 402
When checking or replacement is required, we
recommend a NISSAN dealer for servicing.
CAUTION
.Use only Genuine NISSAN CVT Fluid
NS-2. Do not mix with other fluids.
. Using transmission fluid other than
Genuine NISSAN CVT Fluid NS-2
will damage the CVT, which is not
covered by the NISSAN new vehicle
limited warranty. For additional brake and clutch fluid information,
see “Capacities and recommended fuel/lubri-
cants” (P.9-2) of this manual.WARNING
.
Use only new fluid from a sealed
container. Old, inferior or contami-
nated fluid may damage the brake
and clutch systems. The use of
improper fluids can damage the
brake and clutch systems, and affect
the vehicle’s stopping ability.
. Clean the filler cap before removing.
. Brake and clutch fluid is poisonous
and should be stored carefully in
marked containers out of the reach
of children.
CAUTION
Do not spill the fluid on any painted
surfaces. This will damage the paint. If
fluid is spilled, immediately wash the
surface with water.
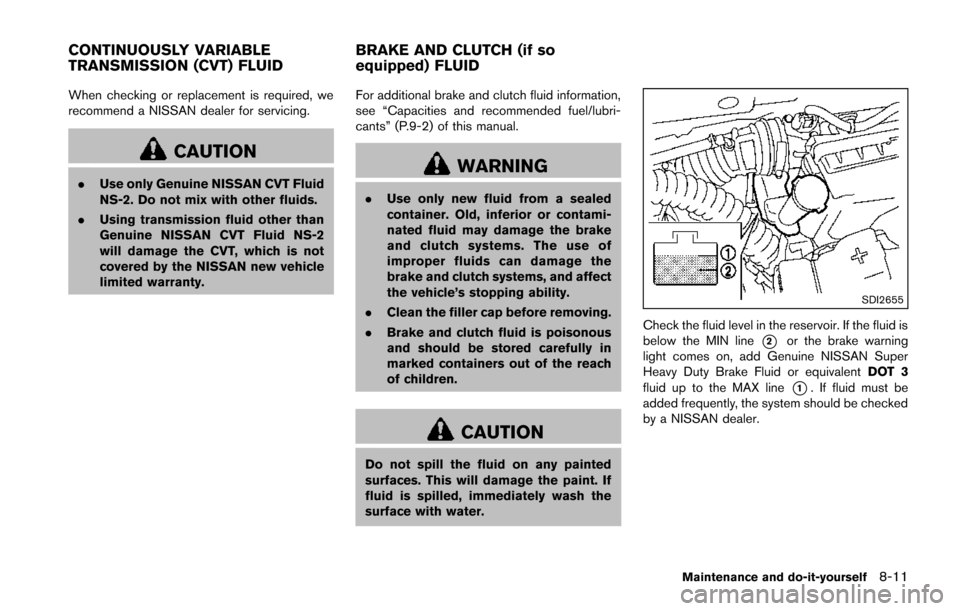
SDI2655
Check the fluid level in the reservoir. If the fluid is
below the MIN line
*2or the brake warning
light comes on, add Genuine NISSAN Super
Heavy Duty Brake Fluid or equivalent DOT 3
fluid up to the MAX line
*1. If fluid must be
added frequently, the system should be checked
by a NISSAN dealer.
Maintenance and do-it-yourself8-11
CONTINUOUSLY VARIABLE
TRANSMISSION (CVT) FLUID BRAKE AND CLUTCH (if so
equipped) FLUID