change wheel NISSAN JUKE 2014 F15 / 1.G Owners Manual
[x] Cancel search | Manufacturer: NISSAN, Model Year: 2014, Model line: JUKE, Model: NISSAN JUKE 2014 F15 / 1.GPages: 402, PDF Size: 1.96 MB
Page 68 of 402
sensors to turn the air bag OFF. Always be sure
to be seated and wearing the seat belt properly
for the most effective protection by the seat belt
and supplemental air bag.
NISSAN recommends that pre-teens and chil-
dren be properly restrained in a rear seat.
NISSAN also recommends that appropriate
child restraints and booster seats be properly
installed in a rear seat. If this is not possible, the
occupant classification sensors are designed to
operate as described above to turn the front
passenger air bag OFF for specified child
restraints. Failing to properly secure child
restraints and to use the Automatic Locking
Retractor (ALR) mode (child restraint mode)
may allow the restraint to tip or move in an
accident or sudden stop. This can also result in
the passenger air bag inflating in a crash instead
of being OFF. (See “Child restraints” (P.1-18)
for proper use and installation.)
If the front passenger seat is not occupied, the
passenger air bag is designed not to inflate in a
crash. However, heavy objects placed on the
seat could result in air bag inflation, because of
the object being detected by the occupant
classification sensors. Other conditions could
also result in air bag inflation, such as if a child is
standing on the seat, or if two children are on the
seat, contrary to the instructions in this manual.
Always be sure that you and all vehicleoccupants are seated and restrained properly.
Using the passenger air bag status light, you can
monitor when the front passenger air bag is
automatically turned OFF with the seat occu-
pied. The light will not illuminate when the front
passenger seat is unoccupied.
If an adult occupant is in the seat but the
passenger air bag status light is illuminated
(indicating that the air bag is OFF) , it could be
that the person is a small adult, or is not sitting
on the seat properly.
If a child restraint must be used in the front seat,
the passenger air bag status light may or may
not be illuminated, depending on the size of the
child and the type of child restraint being used. If
the air bag status light is not illuminated
(indicating that the air bag might inflate in a
crash) , it could be that the child restraint or seat
belt is not being used properly. Make sure that
the child restraint is installed properly, the seat
belt is used properly and the occupant is
positioned properly. If the air bag status light is
not illuminated, reposition the occupant or child
restraint in a rear seat.
If the passenger air bag status light will not
illuminate even though you believe that the child
restraint, the seat belts and the occupant are
properly positioned, the system may be sensing
an unoccupied seat (in which case the air bag is
OFF). Your NISSAN dealer can check that the
system is OFF by using a special tool. However,
until you have confirmed with your dealer that
your air bag is working properly, reposition the
occupant or child restraint in a rear seat.
The air bag system and passenger air bag status
light will take a few seconds to register a change
in the passenger seat status. However, if the
seat becomes unoccupied, the air bag status
light will remain off.
If a malfunction occurs in the front passenger air
bag system, the supplemental air bag warning
light
, located in the meter and gauges area,
will blink. Have the system checked by a
NISSAN dealer.
Other supplemental front-impact air bag
precautions
WARNING
. Do not place any objects on the
steering wheel pad or on the instru-
ment panel. Also, do not place any
objects between any occupant and
the steering wheel or instrument
panel. Such objects may become
dangerous projectiles and cause
injury if the front air bags inflate.
Safety — Seats, seat belts and supplemental restraint system1-47
Page 69 of 402
1-48Safety — Seats, seat belts and supplemental restraint system
.Do not place objects with sharp
edges on the seat. Also, do not
place heavy objects on the seat that
will leave permanent impressions in
the seat. Such objects can damage
the seat or occupant classification
sensors (weight sensors) . This can
affect the operation of the air bag
system and result in serious perso-
nal injury.
. Do not use water or acidic cleaners
(hot steam cleaners) on the seat.
This can damage the seat or occu-
pant classification sensors. This can
also affect the operation of the air
bag system and result in serious
personal injury.
. Immediately after inflation, several
front air bag system components
will be hot. Do not touch them; you
may severely burn yourself.
. No unauthorized changes should be
made to any components or wiring
of the supplemental air bag system.
This is to prevent accidental infla-
tion of the supplemental air bag or
damage to the supplemental air bag
system. .
Do not make unauthorized changes
to your vehicle’s electrical system,
suspension system or front end
structure. This could affect proper
operation of the front air bag sys-
tem.
. Tampering with the front air bag
system may result in serious perso-
nal injury. Tampering includes
changes to the steering wheel and
the instrument panel assembly by
placing material over the steering
wheel pad and above the instrument
panel or by installing additional trim
material around the air bag system.
. Removing or modifying the front
passenger seat may affect the func-
tion of the air bag system and result
in serious personal injury.
. Modifying or tampering with the
front passenger seat may result in
serious personal injury. For exam-
ple, do not change the front seats by
placing material on the seat cushion
or by installing additional trim ma-
terial, such as seat covers, on the
seat that is not specifically designed
to assure proper air bag operation.
Additionally, do not stow any ob- jects under the front passenger seat
or the seat cushion and seatback.
Such objects may interfere with the
proper operation of the occupant
classification sensors.
. No unauthorized changes should be
made to any components or wiring
of the seat belt system. This may
affect the front air bag system.
Tampering with the seat belt system
may result in serious personal in-
jury.
. Work on and around the front air
bag system should be done by a
NISSAN dealer. Installation of elec-
trical equipment should also be
done by a NISSAN dealer. The
Supplemental Restraint System
(SRS) wiring harnesses* should not
be modified or disconnected. Un-
authorized electrical test equipment
and probing devices should not be
used on the air bag system.
. A cracked windshield should be
replaced immediately by a qualified
repair facility. A cracked windshield
could affect the function of the
supplemental air bag system.
Page 224 of 402
.A new disc may be rough on the inner and
outer edges. Remove the rough edges by
rubbing the inner and outer edges with the
side of a pen or pencil as illustrated.
USB memory
.Do not touch the terminal portion of the USB
memory.
. Do not place heavy objects on the USB
memory.
. Do not store the USB memory in very humid
locations.
. Do not expose the USB memory to direct
sunlight.
. Do not spill any liquids on the USB memory.
Refer to the USB memory Owner’s Manual for
the details.
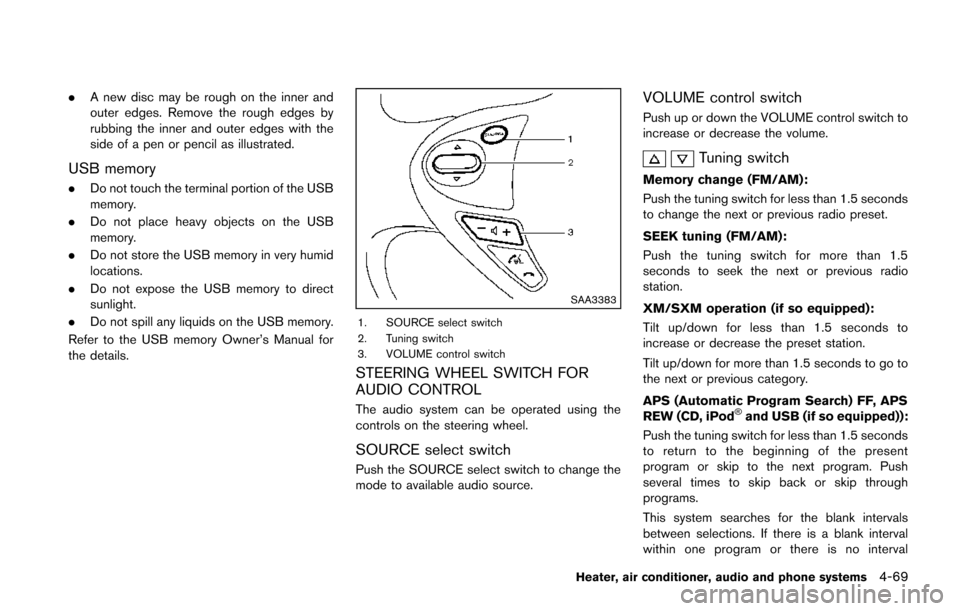
SAA3383
1. SOURCE select switch
2. Tuning switch
3. VOLUME control switch
STEERING WHEEL SWITCH FOR
AUDIO CONTROL
The audio system can be operated using the
controls on the steering wheel.
SOURCE select switch
Push the SOURCE select switch to change the
mode to available audio source.
VOLUME control switch
Push up or down the VOLUME control switch to
increase or decrease the volume.
Tuning switch
Memory change (FM/AM):
Push the tuning switch for less than 1.5 seconds
to change the next or previous radio preset.
SEEK tuning (FM/AM):
Push the tuning switch for more than 1.5
seconds to seek the next or previous radio
station.
XM/SXM operation (if so equipped):
Tilt up/down for less than 1.5 seconds to
increase or decrease the preset station.
Tilt up/down for more than 1.5 seconds to go to
the next or previous category.
APS (Automatic Program Search) FF, APS
REW (CD, iPod
®and USB (if so equipped)):
Push the tuning switch for less than 1.5 seconds
to return to the beginning of the present
program or skip to the next program. Push
several times to skip back or skip through
programs.
This system searches for the blank intervals
between selections. If there is a blank interval
within one program or there is no interval
Heater, air conditioner, audio and phone systems4-69
Page 231 of 402
4-76Heater, air conditioner, audio and phone systems
INFO
.If you are controlling the telephone system
by voice command for the first time or do not
know the appropriate voice command,
speak “Help”. The system announces the
available commands.
. When you speak numbers, you can speak
both “zero” or “oh” for “0”.
Manual command selection
Commands can be selected manually. While the
commands are displayed on the audio screen,
select a command by operating the audio tuning
switch, and then push the
switch. Once a
command is manually selected, the voice
command function is cancelled. To return to
voice command mode, push the
switch to
cancel the current operation, and then perform
the first procedure of voice command.
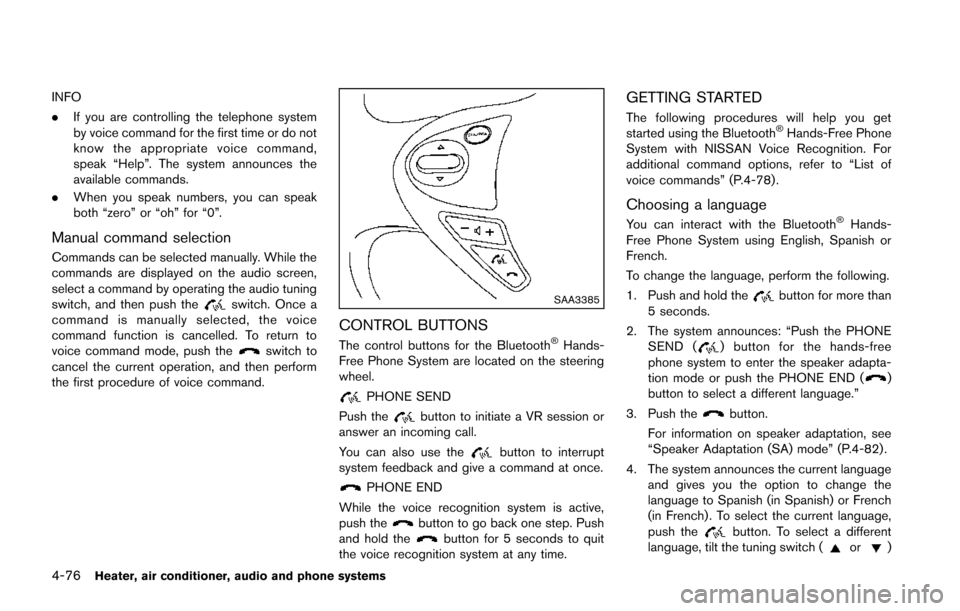
SAA3385
CONTROL BUTTONS
The control buttons for the Bluetooth®Hands-
Free Phone System are located on the steering
wheel.
PHONE SEND
Push the
button to initiate a VR session or
answer an incoming call.
You can also use the
button to interrupt
system feedback and give a command at once.
PHONE END
While the voice recognition system is active,
push the
button to go back one step. Push
and hold thebutton for 5 seconds to quit
the voice recognition system at any time.
GETTING STARTED
The following procedures will help you get
started using the Bluetooth®Hands-Free Phone
System with NISSAN Voice Recognition. For
additional command options, refer to “List of
voice commands” (P.4-78) .
Choosing a language
You can interact with the Bluetooth®Hands-
Free Phone System using English, Spanish or
French.
To change the language, perform the following.
1. Push and hold the
button for more than
5 seconds.
2. The system announces: “Push the PHONE SEND (
) button for the hands-free
phone system to enter the speaker adapta-
tion mode or push the PHONE END (
)
button to select a different language.”
3. Push the
button.
For information on speaker adaptation, see
“Speaker Adaptation (SA) mode” (P.4-82) .
4. The system announces the current language and gives you the option to change the
language to Spanish (in Spanish) or French
(in French) . To select the current language,
push the
button. To select a different
language, tilt the tuning switch (or)
Page 232 of 402
up or down.
NOTE:
You must push the
button within 5
seconds to change the language.
5. If you decide not to change the language, do not push either button. After 5 seconds, the
VR session will end, and the language will
not be changed.
Connecting procedure
NOTE:
The connecting procedure must be per-
formed when the vehicle is stationary. If
the vehicle starts moving during the pro-
cedure, the procedure will be cancelled.
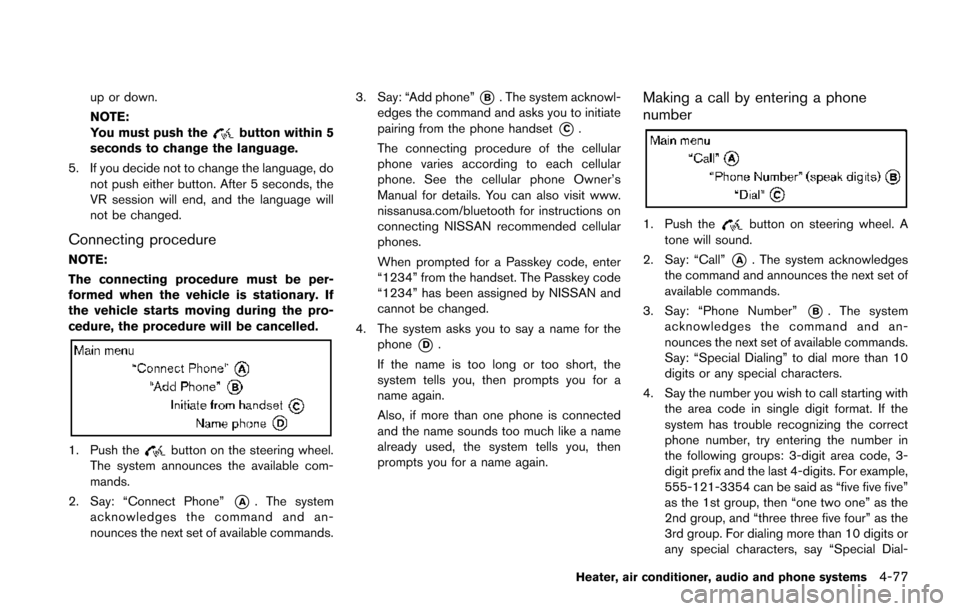
1. Push thebutton on the steering wheel.
The system announces the available com-
mands.
2. Say: “Connect Phone”
*A. The system
acknowledges the command and an-
nounces the next set of available commands. 3. Say: “Add phone”
*B. The system acknowl-
edges the command and asks you to initiate
pairing from the phone handset
*C.
The connecting procedure of the cellular
phone varies according to each cellular
phone. See the cellular phone Owner’s
Manual for details. You can also visit www.
nissanusa.com/bluetooth for instructions on
connecting NISSAN recommended cellular
phones.
When prompted for a Passkey code, enter
“1234” from the handset. The Passkey code
“1234” has been assigned by NISSAN and
cannot be changed.
4. The system asks you to say a name for the phone
*D.
If the name is too long or too short, the
system tells you, then prompts you for a
name again.
Also, if more than one phone is connected
and the name sounds too much like a name
already used, the system tells you, then
prompts you for a name again.
Making a call by entering a phone
number
1. Push thebutton on steering wheel. A
tone will sound.
2. Say: “Call”
*A. The system acknowledges
the command and announces the next set of
available commands.
3. Say: “Phone Number”
*B. The system
acknowledges the command and an-
nounces the next set of available commands.
Say: “Special Dialing” to dial more than 10
digits or any special characters.
4. Say the number you wish to call starting with the area code in single digit format. If the
system has trouble recognizing the correct
phone number, try entering the number in
the following groups: 3-digit area code, 3-
digit prefix and the last 4-digits. For example,
555-121-3354 can be said as “five five five”
as the 1st group, then “one two one” as the
2nd group, and “three three five four” as the
3rd group. For dialing more than 10 digits or
any special characters, say “Special Dial-
Heater, air conditioner, audio and phone systems4-77
Page 243 of 402
4-88Heater, air conditioner, audio and phone systems
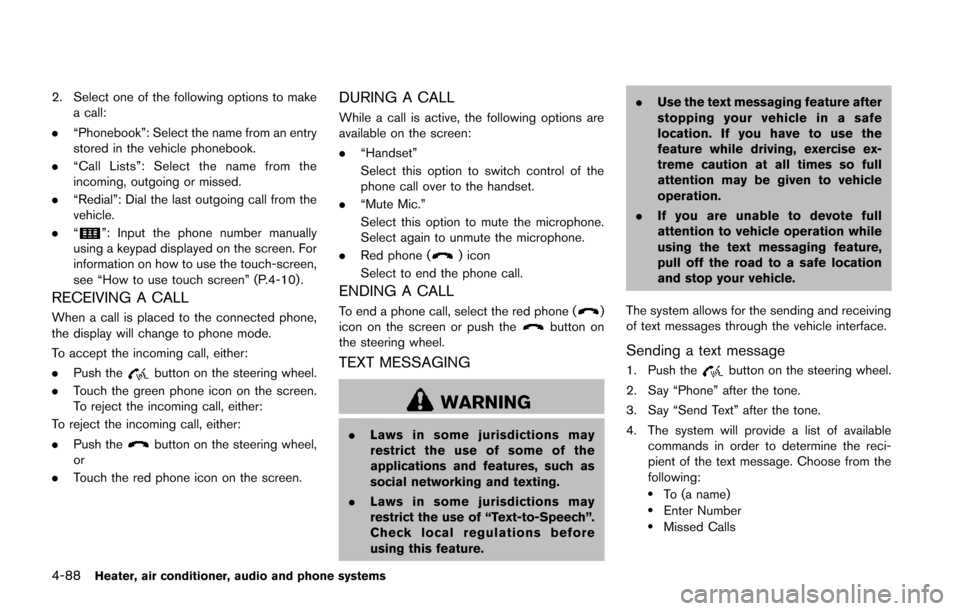
2. Select one of the following options to makea call:
. “Phonebook”: Select the name from an entry
stored in the vehicle phonebook.
. “Call Lists”: Select the name from the
incoming, outgoing or missed.
. “Redial”: Dial the last outgoing call from the
vehicle.
. “
”: Input the phone number manually
using a keypad displayed on the screen. For
information on how to use the touch-screen,
see “How to use touch screen” (P.4-10) .
RECEIVING A CALL
When a call is placed to the connected phone,
the display will change to phone mode.
To accept the incoming call, either:
. Push the
button on the steering wheel.
. Touch the green phone icon on the screen.
To reject the incoming call, either:
To reject the incoming call, either:
. Push the
button on the steering wheel,
or
. Touch the red phone icon on the screen.
DURING A CALL
While a call is active, the following options are
available on the screen:
.“Handset”
Select this option to switch control of the
phone call over to the handset.
. “Mute Mic.”
Select this option to mute the microphone.
Select again to unmute the microphone.
. Red phone (
) icon
Select to end the phone call.
ENDING A CALL
To end a phone call, select the red phone ()
icon on the screen or push thebutton on
the steering wheel.
TEXT MESSAGING
WARNING
. Laws in some jurisdictions may
restrict the use of some of the
applications and features, such as
social networking and texting.
. Laws in some jurisdictions may
restrict the use of “Text-to-Speech”.
Check local regulations before
using this feature. .
Use the text messaging feature after
stopping your vehicle in a safe
location. If you have to use the
feature while driving, exercise ex-
treme caution at all times so full
attention may be given to vehicle
operation.
. If you are unable to devote full
attention to vehicle operation while
using the text messaging feature,
pull off the road to a safe location
and stop your vehicle.
The system allows for the sending and receiving
of text messages through the vehicle interface.
Sending a text message
1. Push thebutton on the steering wheel.
2. Say “Phone” after the tone.
3. Say “Send Text” after the tone.
4. The system will provide a list of available commands in order to determine the reci-
pient of the text message. Choose from the
following:
.To (a name).Enter Number.Missed Calls
Page 248 of 402
USING THE SYSTEM
Initialization
When the ignition switch is in the ON position,
NISSAN Voice Recognition is initialized, which
takes a few seconds. When completed, the
system is ready to accept voice commands. If
the
button is pushed before the initialization
completes, the system will announce: “Voice
Recognition System not ready. Please wait.”
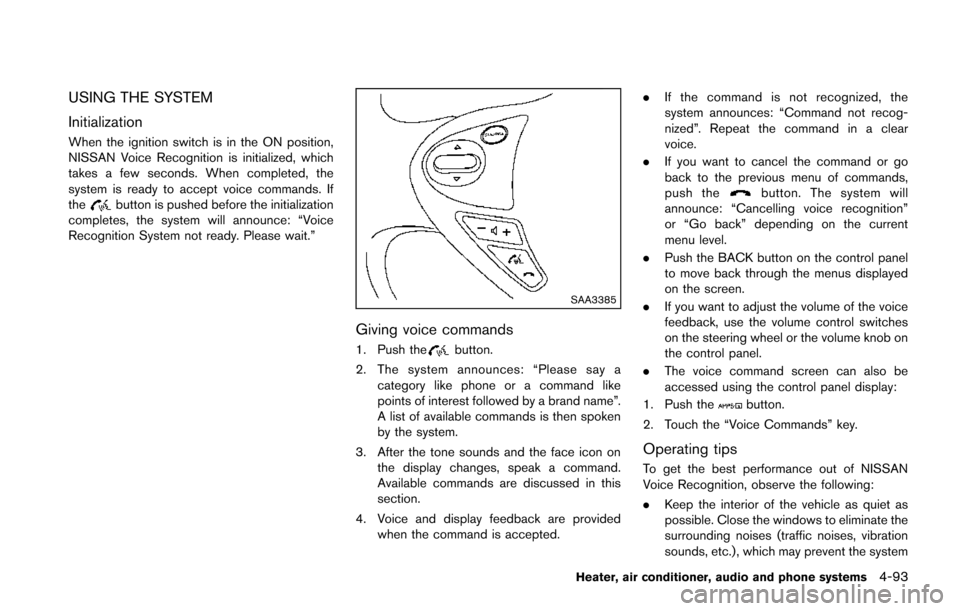
SAA3385
Giving voice commands
1. Push thebutton.
2. The system announces: “Please say a category like phone or a command like
points of interest followed by a brand name”.
A list of available commands is then spoken
by the system.
3. After the tone sounds and the face icon on the display changes, speak a command.
Available commands are discussed in this
section.
4. Voice and display feedback are provided when the command is accepted. .
If the command is not recognized, the
system announces: “Command not recog-
nized”. Repeat the command in a clear
voice.
. If you want to cancel the command or go
back to the previous menu of commands,
push the
button. The system will
announce: “Cancelling voice recognition”
or “Go back” depending on the current
menu level.
. Push the BACK button on the control panel
to move back through the menus displayed
on the screen.
. If you want to adjust the volume of the voice
feedback, use the volume control switches
on the steering wheel or the volume knob on
the control panel.
. The voice command screen can also be
accessed using the control panel display:
1. Push the
button.
2. Touch the “Voice Commands” key.
Operating tips
To get the best performance out of NISSAN
Voice Recognition, observe the following:
. Keep the interior of the vehicle as quiet as
possible. Close the windows to eliminate the
surrounding noises (traffic noises, vibration
sounds, etc.), which may prevent the system
Heater, air conditioner, audio and phone systems4-93
Page 259 of 402
5-6Starting and driving
sure for all four tires. Adjust the tire
pressure to the recommended COLD
tire pressure shown on the Tire and
Loading Information label to turn
the low tire pressure warning light
OFF. If you have a flat tire, replace it
with a spare tire as soon as possi-
ble. (See “Flat tire” (P.6-3) for chan-
ging a flat tire.)
. When a spare tire is mounted or a
wheel is replaced, the TPMS will not
function and the low tire pressure
warning light will flash for approxi-
mately 1 minute. The light will
remain on after 1 minute. Contact
your NISSAN dealer as soon as
possible for tire replacement and/
or system resetting.
. Replacing tires with those not ori-
ginally specified by NISSAN could
affect the proper operation of the
TPMS.
. Do not inject any tire liquid or
aerosol tire sealant into the tires,
as this may cause a malfunction of
the tire pressure sensors.CAUTION
.The TPMS may not function properly
when the wheels are equipped with
tire chains or the wheels are buried
in snow.
. Do not place metalized film or any
metal parts (antenna, etc.) on the
windows. This may cause poor re-
ception of the signals from the tire
pressure sensors, and the TPMS will
not function properly.
Some devices and transmitters may temporarily
interfere with the operation of the TPMS and
cause the low tire pressure warning light to
illuminate. Some examples are:
. Facilities or electric devices using similar
radio frequencies are near the vehicle.
. If a transmitter set to similar frequencies is
being used in or near the vehicle.
. If a computer (or similar equipment) or a DC/
AC converter is being used in or near the
vehicle. FCC Notice:
For USA:
This device complies with Part 15 of the
FCC Rules. Operation is subject to the
following two conditions: (1) This device
may not cause harmful interference, and
(2) this device must accept any interfer-
ence received, including interference that
may cause undesired operation.
Note: Changes or modifications not ex-
pressly approved by the party responsible
for compliance could void the user’s
authority to operate the equipment.
For Canada:
This device complies with RSS-210 of
Industry Canada. Operation is subject to
the following two conditions: (1) this
device may not cause interference, and
(2) this device must accept any interfer-
ence, including interference that may
cause undesired operation of the device.
Page 261 of 402
5-8Starting and driving
WARNING
The following actions can increase the
chance of losing control of the vehicle if
there is a sudden loss of tire air
pressure. Losing control of the vehicle
may cause a collision and result in
personal injury.
.The vehicle generally moves or pulls
in the direction of the flat tire.
. Do not rapidly apply the brakes.
. Do not rapidly release the accelera-
tor pedal.
. Do not rapidly turn the steering
wheel.
1. Remain calm and do not overreact.
2. Maintain a firm grip on the steering wheel with both hands and try to hold a straight
course.
3. When appropriate, slowly release the accel- erator pedal to gradually slow the vehicle.
4. Gradually steer the vehicle to a safe location off the road and away from traffic if possible.
5. Lightly apply the brake pedal to gradually stop the vehicle. 6. Turn on the hazard warning flashers and
either contact a roadside emergency service
to change the tire or see “Changing a flat
tire” (P.6-3) of this Owner’s Manual.
DRINKING ALCOHOL/DRUGS AND
DRIVING
WARNING
Never drive under the influence of
alcohol or drugs. Alcohol in the blood-
stream reduces coordination, delays
reaction time and impairs judgement.
Driving after drinking alcohol increases
the likelihood of being involved in an
accident injuring yourself and others.
Additionally, if you are injured in an
accident, alcohol can increase the se-
verity of the injury.
NISSAN is committed to safe driving. However,
you must choose not to drive under the influence
of alcohol. Every year thousands of people are
injured or killed in alcohol-related accidents.
Although the local laws vary on what is
considered to be legally intoxicated, the fact is
that alcohol affects all people differently and
most people underestimate the effects of
alcohol. Remember, drinking and driving don’t mix! And
that is true for drugs, too (over-the-counter,
prescription, and illegal drugs) . Don’t drive if
your ability to operate your vehicle is impaired by
alcohol, drugs, or some other physical condition.
DRIVING SAFETY PRECAUTIONS
Your NISSAN is designed for both normal and
off-road use. However, avoid driving in deep
water or mud as your NISSAN is mainly
designed for leisure use, unlike a conventional
off-road vehicle.
Remember that Two-Wheel Drive (2WD) mod-
els are less capable than All-Wheel Drive
(AWD) models for rough road driving and
extrication when stuck in deep snow, mud, or
the like.
Please observe the following precautions:
WARNING
.
Drive carefully when off the road
and avoid dangerous areas. Every
person who drives or rides in this
vehicle should be seated with their
seat belt fastened. This will keep
you and your passengers in position
when driving over rough terrain.
Page 287 of 402
5-34Starting and driving
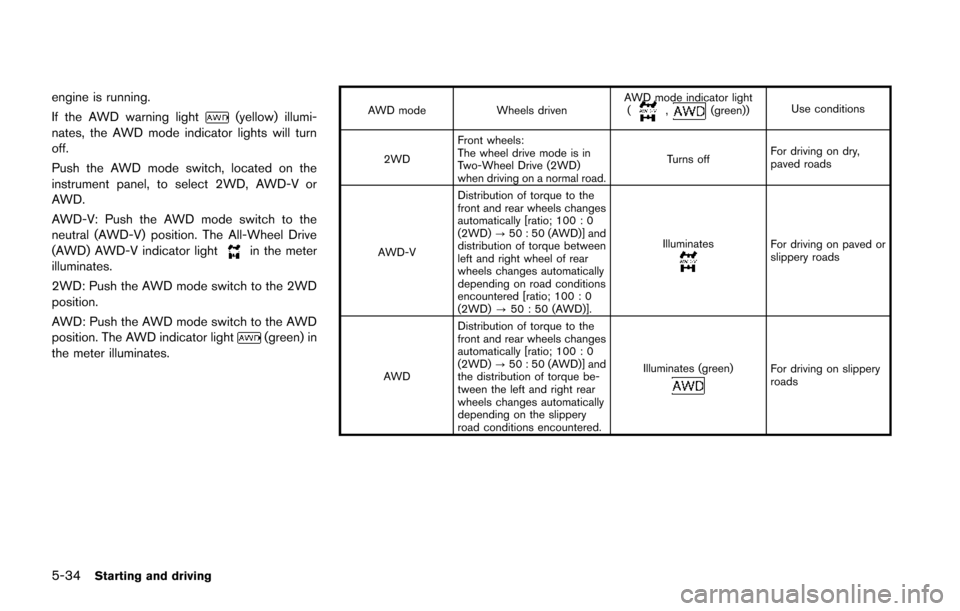
engine is running.
If the AWD warning light
(yellow) illumi-
nates, the AWD mode indicator lights will turn
off.
Push the AWD mode switch, located on the
instrument panel, to select 2WD, AWD-V or
AWD.
AWD-V: Push the AWD mode switch to the
neutral (AWD-V) position. The All-Wheel Drive
(AWD) AWD-V indicator light
in the meter
illuminates.
2WD: Push the AWD mode switch to the 2WD
position.
AWD: Push the AWD mode switch to the AWD
position. The AWD indicator light
(green) in
the meter illuminates.
AWD mode Wheels drivenAWD mode indicator light
(,(green)) Use conditions
2WD Front wheels:
The wheel drive mode is in
Two-Wheel Drive (2WD)
when driving on a normal road. Turns off
For driving on dry,
paved roads
AWD-V Distribution of torque to the
front and rear wheels changes
automatically [ratio; 100 : 0
(2WD)
?50 : 50 (AWD)] and
distribution of torque between
left and right wheel of rear
wheels changes automatically
depending on road conditions
encountered [ratio; 100 : 0
(2WD) ?50 : 50 (AWD)]. Illuminates
For driving on paved or
slippery roads
AWD Distribution of torque to the
front and rear wheels changes
automatically [ratio; 100 : 0
(2WD)
?50 : 50 (AWD)] and
the distribution of torque be-
tween the left and right rear
wheels changes automatically
depending on the slippery
road conditions encountered. Illuminates (green)
For driving on slippery
roads