light NISSAN JUKE 2015 F15 / 1.G Quick Reference Guide
[x] Cancel search | Manufacturer: NISSAN, Model Year: 2015, Model line: JUKE, Model: NISSAN JUKE 2015 F15 / 1.GPages: 28, PDF Size: 1.9 MB
Page 2 of 28

2
3
14
5
9
15
12
1617
18
19
20
13
14
11
10
7
6
8
*See your Owner’s Manual for information.1 Vehicle Information Display*2 Headlight and Turn Signal Switch3 Low Tire Pressure Warning Light4 Instrument Brightness
Control Switch*5 Twin Trip Odometer Reset Switch* /
Trip Computer Mode Switch
6 Windshield Wiper and
Washer Switch7 Steering Wheel Switches for
Audio* / Bluetooth
®
8 Cruise Control9 Outside Mirror Control Switch10 Tilt Steering Adjustment*
11 Vehicle Dynamic Control (VDC)
Off Switch*12 All-wheel Drive (AWD) Switch*13 Fuel-filler Door Release14 Hood Release*15 Hazard Warning Flasher Switch*16 Audio and Navigation System
17 Integrated Control System18 Auxiliary Jack*19 USB Connection Port20 Power Outlet*
1705381_15a_Juke_QRG_091814.indd 49/18/14 4:45 PM
Page 3 of 28
NEW SYSTEM FEATURES
Around View® Monitor with Moving Object Detection (MOD) (if so equipped) ..............................2
SiriusXM Travel Link and SiriusXM Traffic (if so equipped) ................................................................. 4
Text Messaging ........................................................................\
........................................................................ 4
ESSENTIAL INFORMATION
Fuel Efficient Driving........................................................................\
............................................................... 5
Tire Pressure Monitoring System (TPMS) ........................................................................\
........................ 5
Loose Fuel Cap ........................................................................\
....................................................................... 6
Fuel-filler Door ........................................................................\
......................................................................... 6
Towing Your Vehicle ........................................................................\
.............................................................. 6
Clock Set/Adjustment (Type B – if so equipped) ........................................................................\
............ 7
FIRST DRIVE FEATURES
NISSAN Intelligent Key® System ........................................................................\
........................................8
Liftgate Release ........................................................................\
....................................................................... 9
Seat Adjustments ........................................................................\
.................................................................... 9
Heated Seats (if so equipped) ........................................................................\
............................................. 9
Outside Mirror Control Switch ........................................................................\
.......................................... 10
Starting/Stopping the Engine ........................................................................\
........................................... 10
Headlight Control Switch ........................................................................\
................................................... 11
Windshield Wiper and Washer Switch ........................................................................\
........................... 12
Automatic Climate Controls (with Integrated Control System) (if so eq\
uipped) .......................... 13
Drive Mode (with Integrated Control System) (if so equipped) ........................................................ 14
FM/AM/SiriusXM
® Satellite Radio with CD Player (if so equipped) ............................................... 15
USB (Universal Serial Bus) Connection Port/Aux Jack and iPod® Interface ................................. 16
Cruise Control ........................................................................\
...................................................................... 16
SYSTEM GUIDE
Trip Computer ........................................................................\
....................................................................... 17
NissanConnectsm mobile Apps ........................................................................\
......................................... 17
Bluetooth
Page 7 of 28
5
ESSE NTIAL I N FOR MATION
FUEL EFFICIENT DRIVING
Fuel Efficient Driving Tips can be found in your Owner’s Manual. These tips are intended
to help you achieve the most fuel economy from your vehicle.
For more information, refer to the “Starting and driving (section 5)” of your Owner’s Manual.
TIRE PRESSURE MONITORING SYSTEM (TPMS)
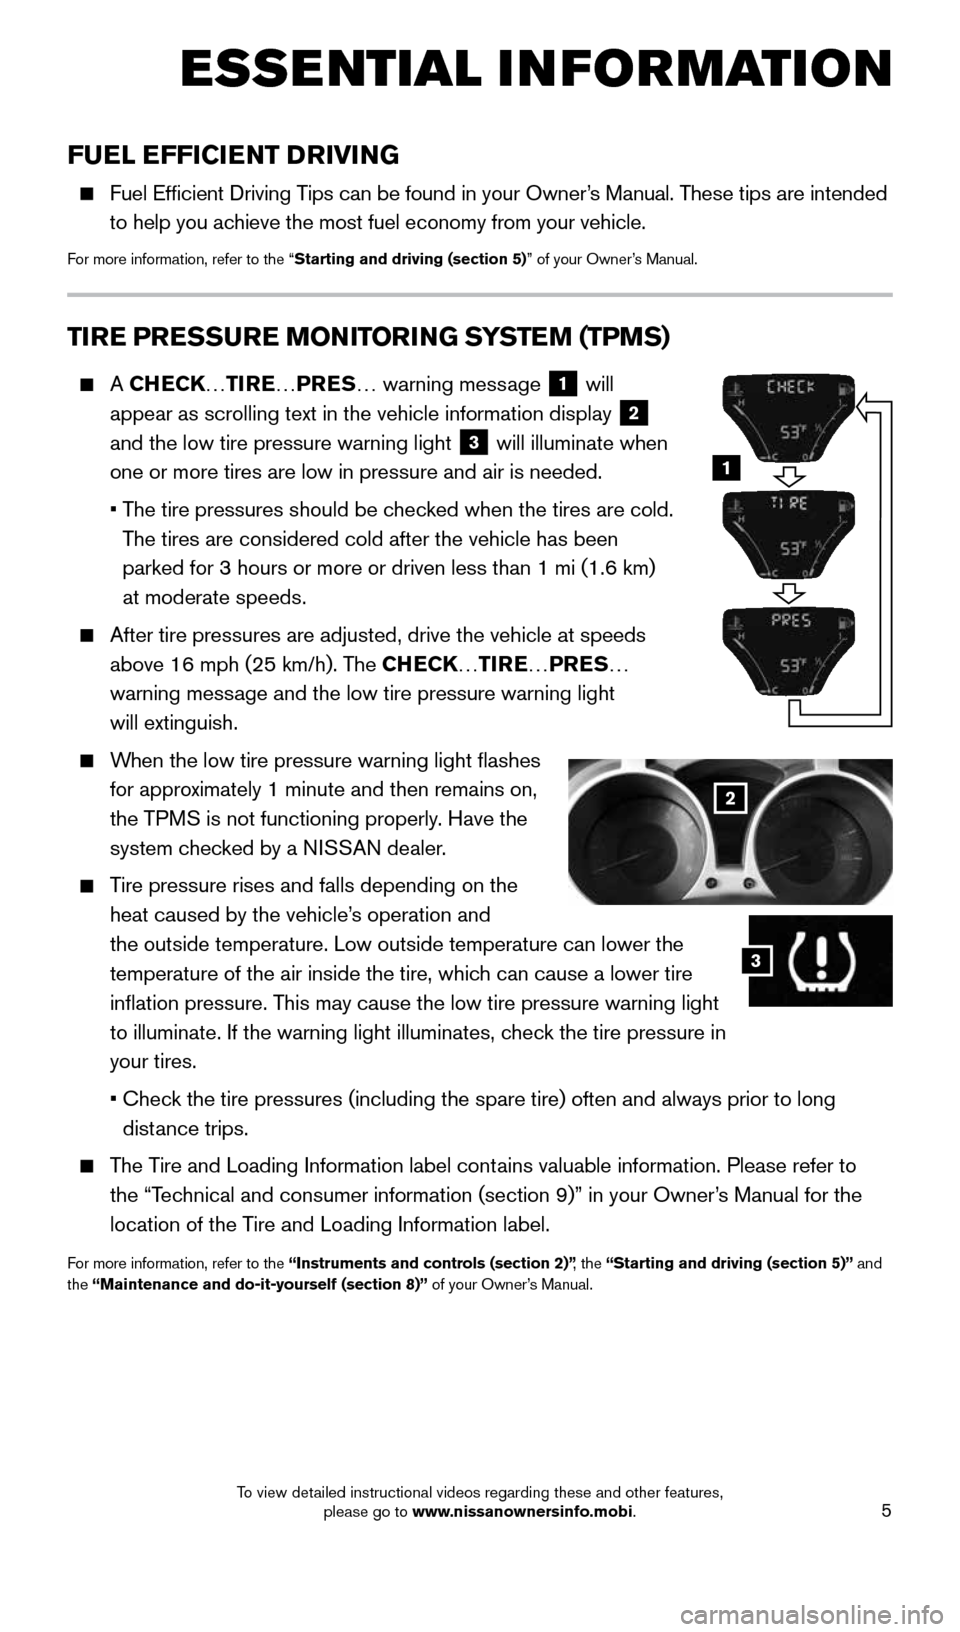
A CHECK… TIRE…PRES … warning message 1 will
appear as scrolling text in the vehicle information display 2
and the low tire pressure warning light 3 will illuminate when
one or more tires are low in pressure and air is needed.
• The tire pressures should be checked when the tires are cold.
The tires are considered cold after the vehicle has been
parked for 3 hours or more or driven less than 1 mi (1.6 km)
at moderate speeds.
After tire pressures are adjusted, drive the vehicle at speeds
above 16 mph (25 km/h). The CHECK… TIRE…PRES …
warning message and the low tire pressure warning light
will extinguish.
When the low tire pressure warning light
flashes
for approximately 1 minute and then remains on,
the TPMS is not functioning properly. Have the
system checked by a NISSAN dealer.
Tire pressure rises and falls depending on the
heat caused by the vehicle’s operation and
the outside temperature. Low outside temperature can lower the
temperature of the air inside the tire, which can cause a lower tire
inflation pressure. This may cause the low tire pressure warning light
to illuminate. If the warning light illuminates, check the tire pressure in
your tires.
• Check the tire pressures (including the spare tire) often and always prior\
to long
distance trips.
The Tire and Loading Information label contains valuable information. Please refer to
the “Technical and consumer information (section 9)” in your Owner’s Manual for the
location of the Tire and Loading Information label.
For more information, refer to the “Instruments and controls (section 2)” , the “Starting and driving (section 5)” and
the “Maintenance and do-it-yourself (section 8)” of your Owner’s Manual.
2
3
1
1705381_15a_Juke_QRG_091814.indd 59/18/14 4:45 PM
To view detailed instructional videos regarding these and other features, please go to www.nissanownersinfo.mobi.
Page 8 of 28
6
ESSE NTIAL I N FOR MATION
TOWI NG YOUR VEHICLE
ALL-WHEEL DRIVE (AWD) VEHICLE
An all-wheel drive vehicle must be towed with all wheels off the ground \
even if the
vehicle is in the 2WD mode.
For proper towing and to avoid accidental damage to your vehicle, NISSAN recommends that
a service operator tow your vehicle after carefully reading the Owner’s Manual precautions.
For more information, refer to the “In case of emergency (section 6)” of your Owner’s Manual.
LOOSE FUEL CAP
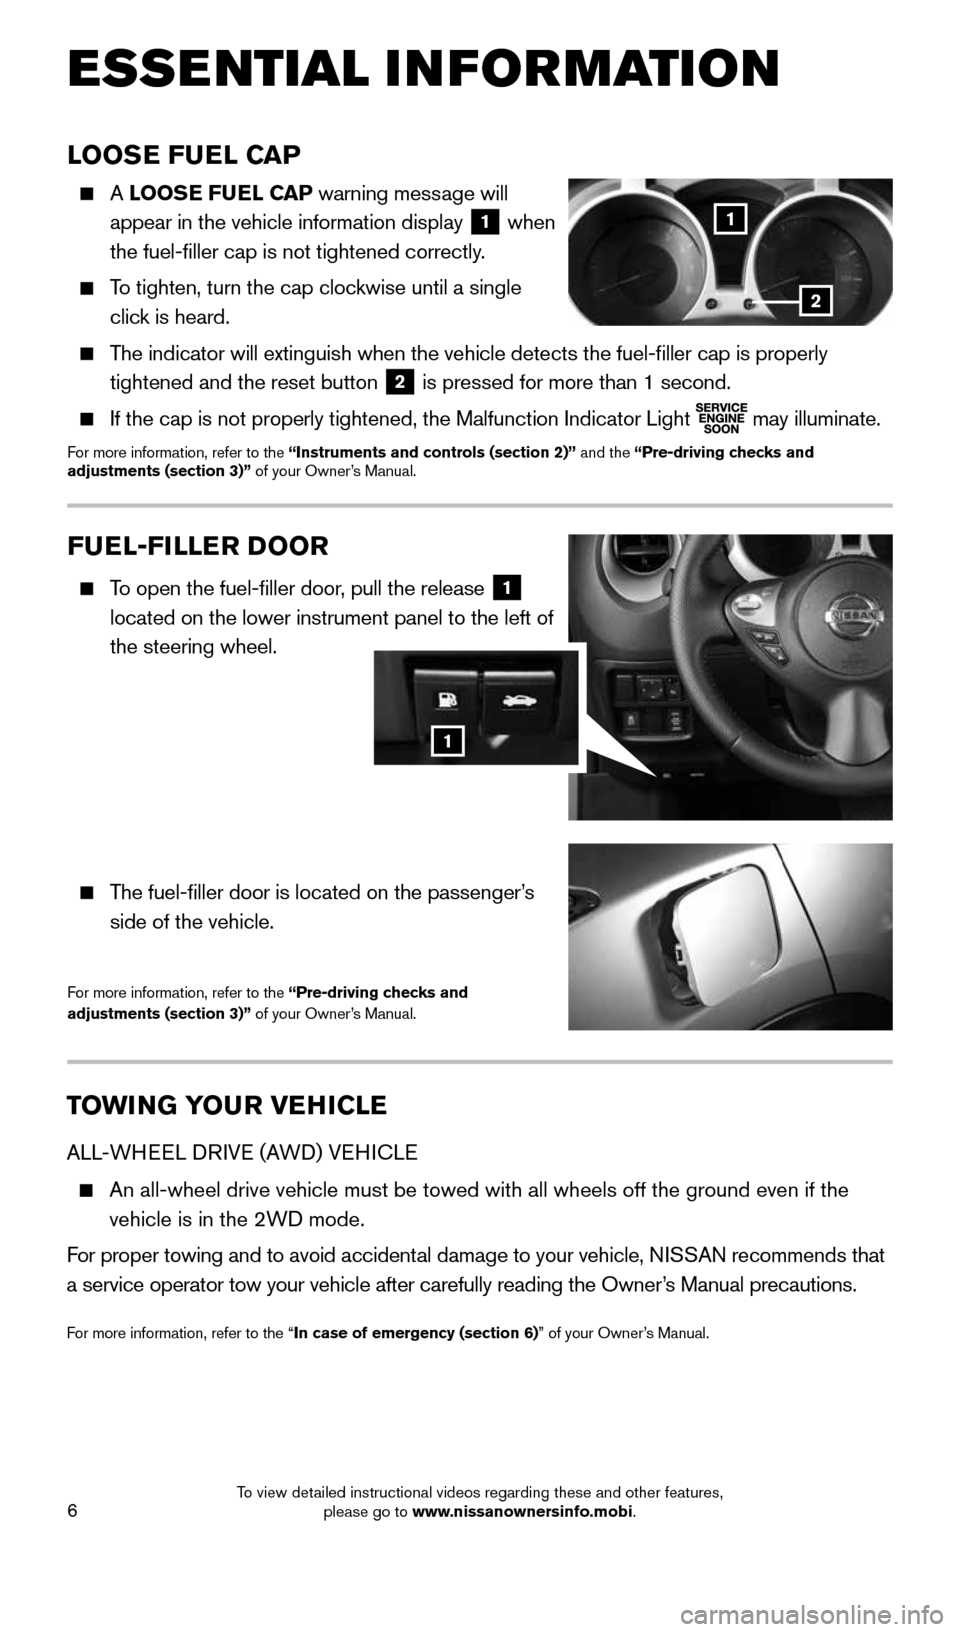
A LOOSE FUEL CAP warning message will
appear in the vehicle information display
1 when
the fuel-filler cap is not tightened correctly.
To tighten, turn the cap clockwise until a single
click is heard.
The indicator will extinguish when the vehicle detects the fuel-filler \
cap is properly
tightened and the reset button
2 is pressed for more than 1 second.
If the cap is not properly tightened, the Malfunction Indicator Light
may illuminate.For more information, refer to the “Instruments and controls (section 2)” and the “Pre-driving checks and
adjustments (section 3)” of your Owner’s Manual.
1
2
FUEL-FILLER DOOR
To open the fuel-filler door, pull the release 1
located on the lower instrument panel to the left of
the steering wheel.
The fuel-filler door is located on the passenger’s
side of the vehicle.
For more information, refer to the “Pre-driving checks and
adjustments (section 3)” of your Owner’s Manual.
1
1705381_15a_Juke_QRG_091814.indd 69/18/14 4:45 PM
To view detailed instructional videos regarding these and other features, please go to www.nissanownersinfo.mobi.
Page 9 of 28
7
CLOCK SET/ADJUSTMENT (Type B – if so equipped)
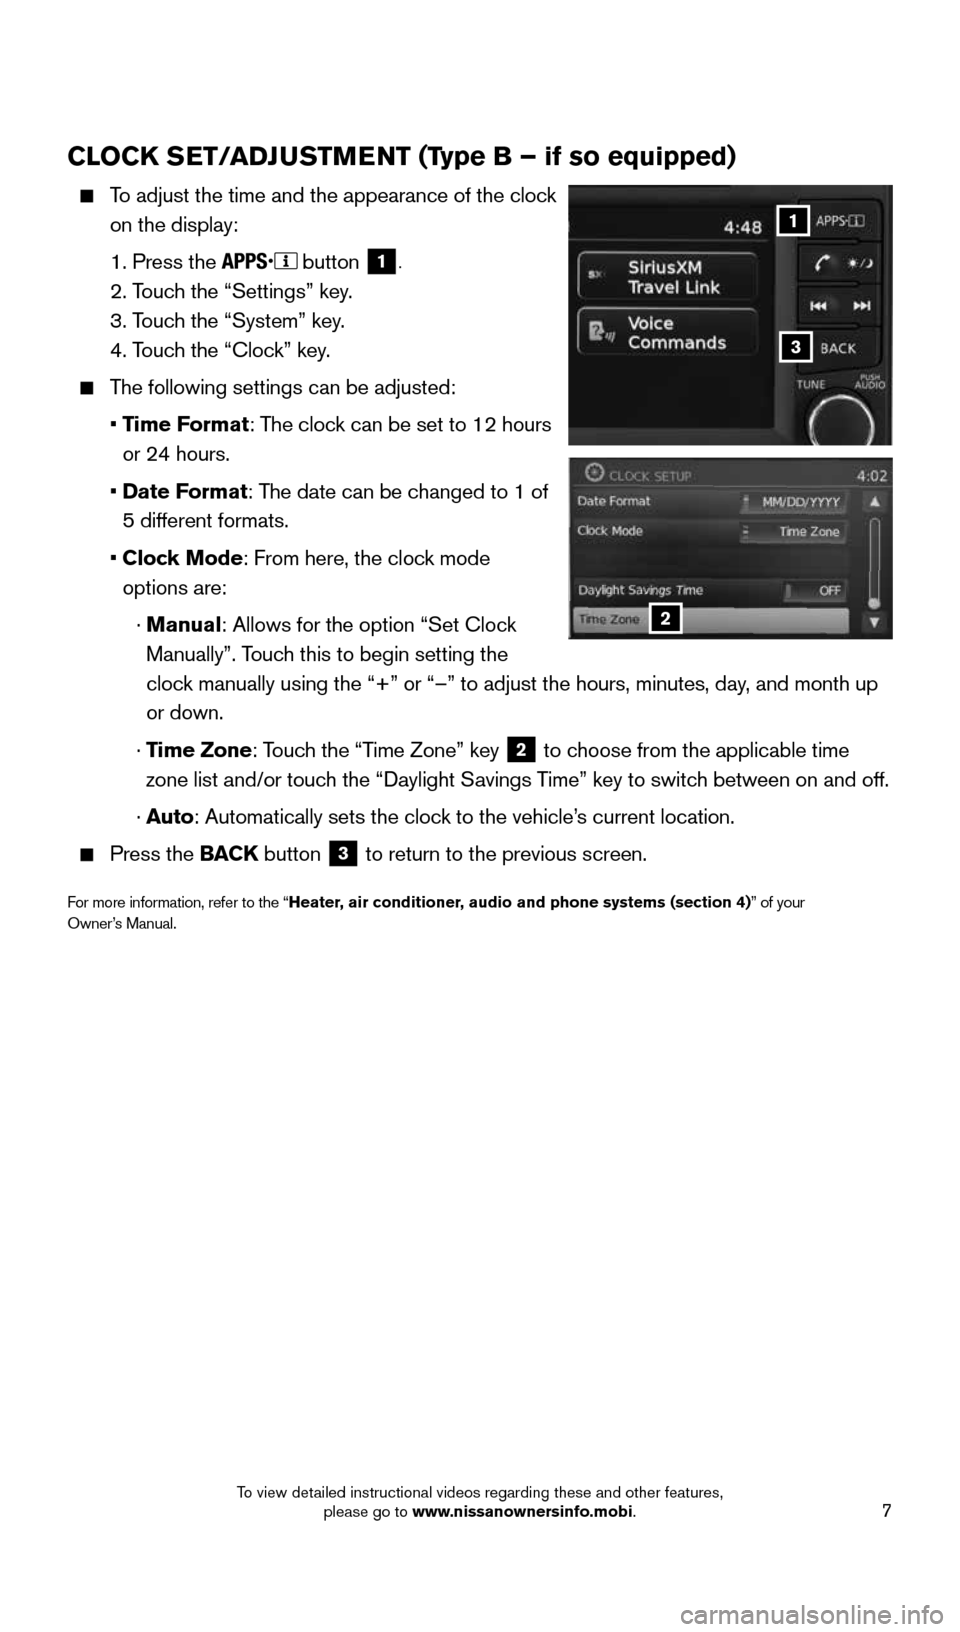
To adjust the time and the appearance of the clock
on the display:
1. Press the
button 1.
2. Touch the “Settings” key.
3. Touch the “System” key.
4. Touch the “Clock” key.
The following settings can be adjusted:
• Time Format: The clock can be set to 12 hours
or 24 hours.
• Date Format: The date can be changed to 1 of
5 different formats.
• Clock Mode: From here, the clock mode
options are:
· Manual: Allows for the option “Set Clock
Manually”. Touch this to begin setting the
clock manually using the “+” or “–” to adjust the hours, minu\
tes, day, and month up
or down.
· Time Zone: Touch the “Time Zone” key
2 to choose from the applicable time
zone list and/or touch the “Daylight Savings Time” key to switch between on and off.
· Auto: Automatically sets the clock to the vehicle’s current location.
Press the BACK button 3 to return to the previous screen.
For more information, refer to the “Heater, air conditioner, audio and phone systems (section 4)” of your Owner’s Manual.
1
2
3
1705381_15a_Juke_QRG_091814.indd 79/18/14 4:46 PM
To view detailed instructional videos regarding these and other features, please go to www.nissanownersinfo.mobi.
Page 10 of 28
8
FIRST DRIVE FEATURES
NISSAN INTELLIGENT KEY® SYSTE M
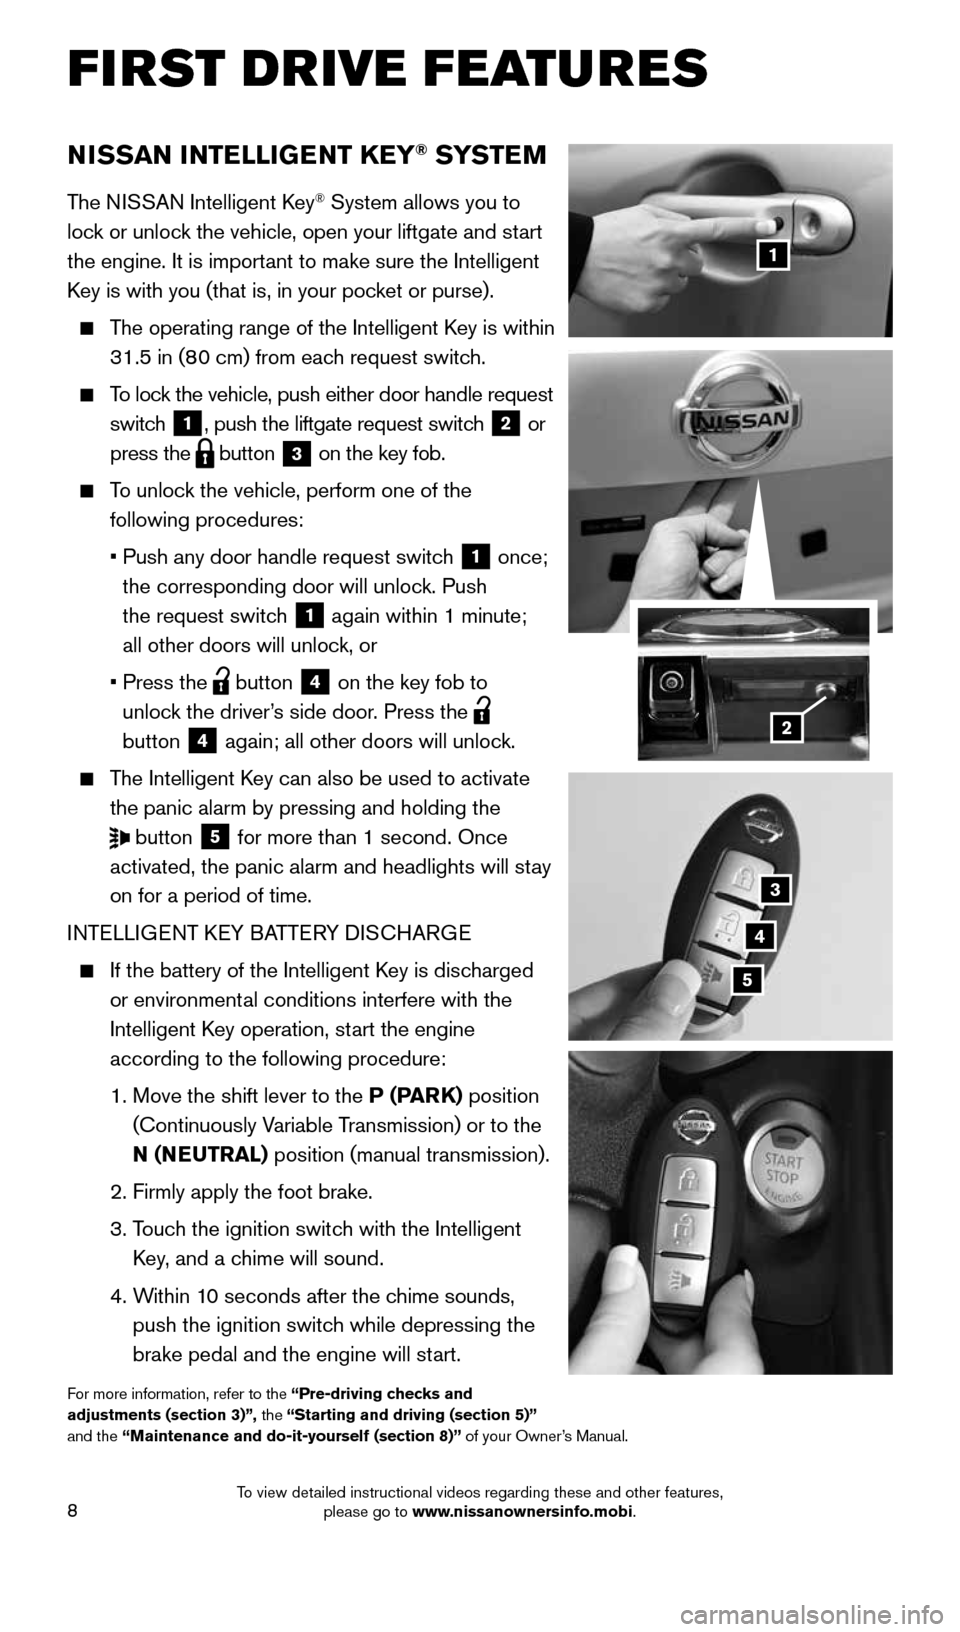
The NISSAN Intelligent Key® System allows you to
lock or unlock the vehicle, open your liftgate and start
the engine. It is important to make sure the Intelligent
Key is with you (that is, in your pocket or purse).
The operating range of the Intelligent Key is within
31.5 in (80 cm) from each request switch.
To lock the vehicle, push either door handle request
switch
1, push the liftgate request switch 2 or
press the
button
3 on the key fob.
To unlock the vehicle, perform one of the
following procedures:
• Push any door handle request switch
1 once;
the corresponding door will unlock. Push
the request switch
1 again within 1 minute;
all other doors will unlock, or
• Press the
button
4 on the key fob to
unlock the driver’s side door. Press the
button 4 again; all other doors will unlock.
The Intelligent Key can also be used to activate
the panic alarm by pressing and holding the
button
5 for more than 1 second. Once
activated, the panic alarm and headlights will stay
on for a period of time.
INTELLIGENT KEY BATTERY DISCHARGE
If the battery of the Intelligent Key is discharged
or environmental conditions interfere with the
Intelligent Key operation, start the engine
according to the following procedure:
1. Move the shift lever to the P (PARK) position
(Continuously Variable Transmission) or to the
N (NEUTRAL) position (manual transmission).
2. Firmly apply the foot brake.
3. Touch the ignition switch with the Intelligent
Key, and a chime will sound.
4. Within 10 seconds after the chime sounds,
push the ignition switch while depressing the
brake pedal and the engine will start.
For more information, refer to the “Pre-driving checks and
adjustments (section 3)”, the “Starting and driving (section 5)”
and the “Maintenance and do-it-yourself (section 8)” of your Owner’s Manual.
1
3
4
5
2
1705381_15a_Juke_QRG_091814.indd 89/18/14 4:46 PM
To view detailed instructional videos regarding these and other features, please go to www.nissanownersinfo.mobi.
Page 11 of 28
9
LIFTGATE RELEASE
It is important to make sure the Intelligent Key is
with you (that is, in your pocket or purse).
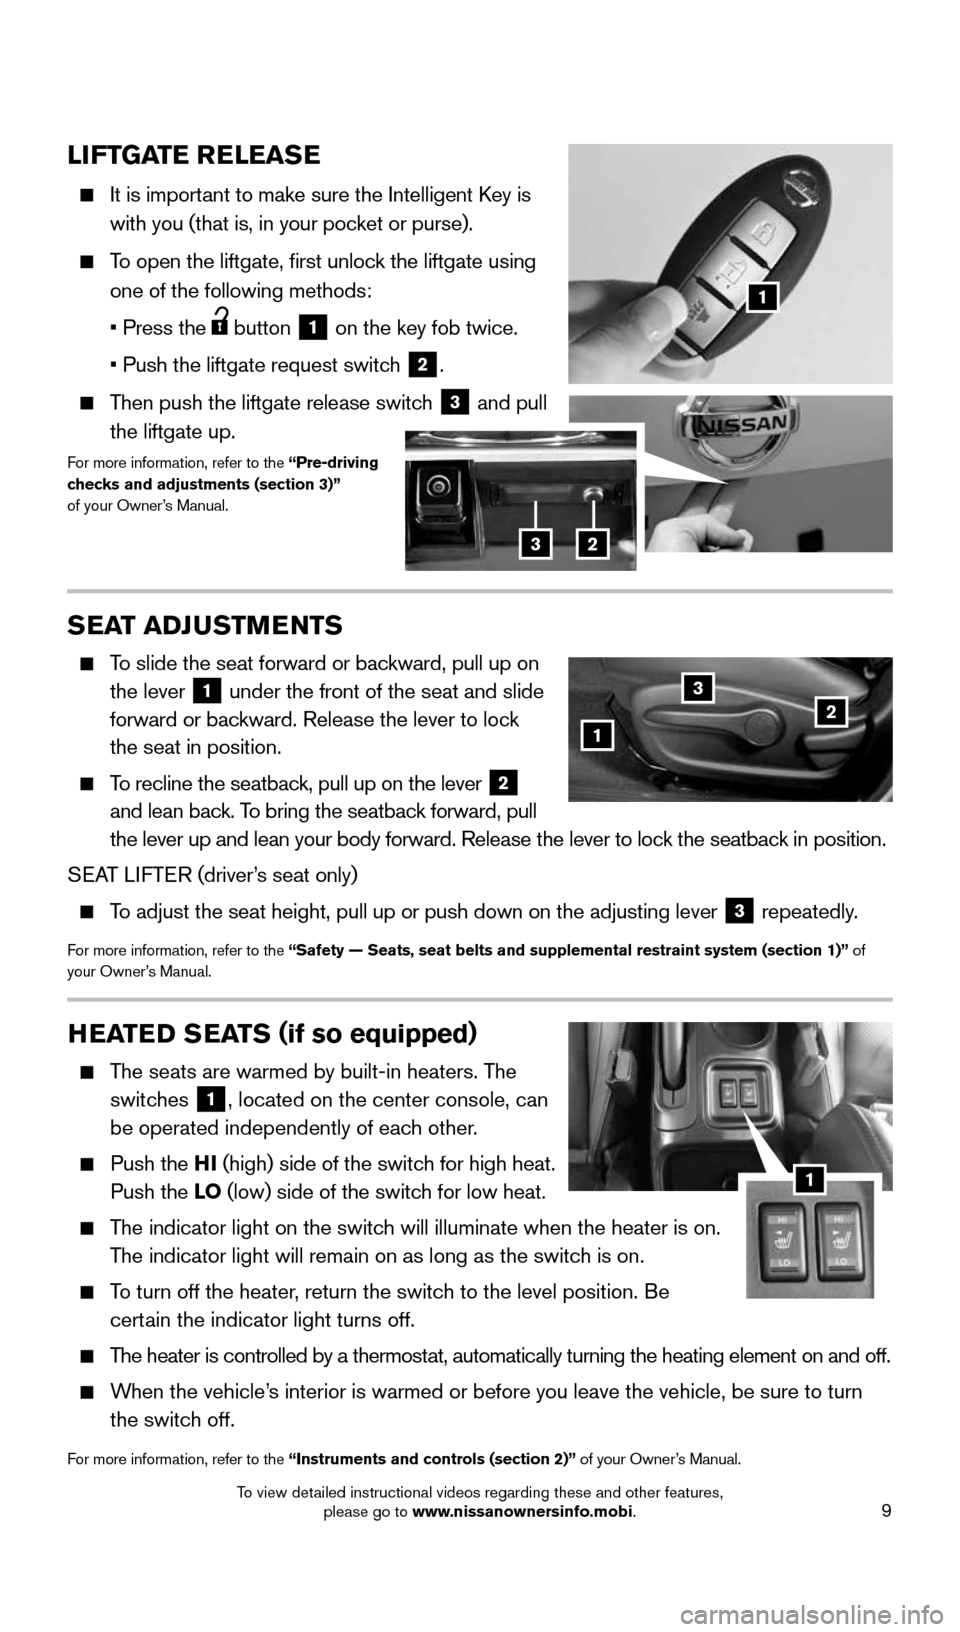
To open the liftgate, first unlock the liftgate using
one of the following methods:
• Press the
button 1 on the key fob twice.
• Push the liftgate request switch
2.
Then push the liftgate release switch 3 and pull
the liftgate up.
For more information, refer to the “Pre-driving
checks and adjustments (section 3)”
of your Owner’s Manual.
HEATED SEATS ( if so equipped)
The seats are warmed by built-in heaters. The
switches
1, located on the center console, can
be operated independently of each other.
Push the HI (high) side of the switch for high heat.
Push the LO (low) side of the switch for low heat.
The indicator light on the switch will illuminate when the heater is on.
The indicator light will remain on as long as the switch is on.
To turn off the heater, return the switch to the level position. Be
certain the indicator light turns off.
The heater is controlled by a thermostat, automatically turning the heating element on and off.
When the vehicle’s interior is warmed or before you leave the vehicle, be sure to turn
the switch off.
For more information, refer to the “Instruments and controls (section 2)” of your Owner’s Manual.
1
SEAT ADJUSTMENTS
To slide the seat forward or backward, pull up on
the lever
1 under the front of the seat and slide
forward or backward. Release the lever to lock
the seat in position.
To recline the seatback, pull up on the lever 2
and lean back. To bring the seatback forward, pull
the lever up and lean your body forward. Release the lever to lock the seatback in position.
SEAT LIFTER (driver’s seat only)
To adjust the seat height, pull up or push down on the adjusting lever 3 repeatedly.
For more information, refer to the “Safety — Seats, seat belts and supplemental restraint system (se\
ction 1)” of
your Owner’s Manual.
123
1
23
1705381_15a_Juke_QRG_091814.indd 99/18/14 4:46 PM
To view detailed instructional videos regarding these and other features, please go to www.nissanownersinfo.mobi.
Page 13 of 28
11
HEADLIGHT CONTROL SWITCH
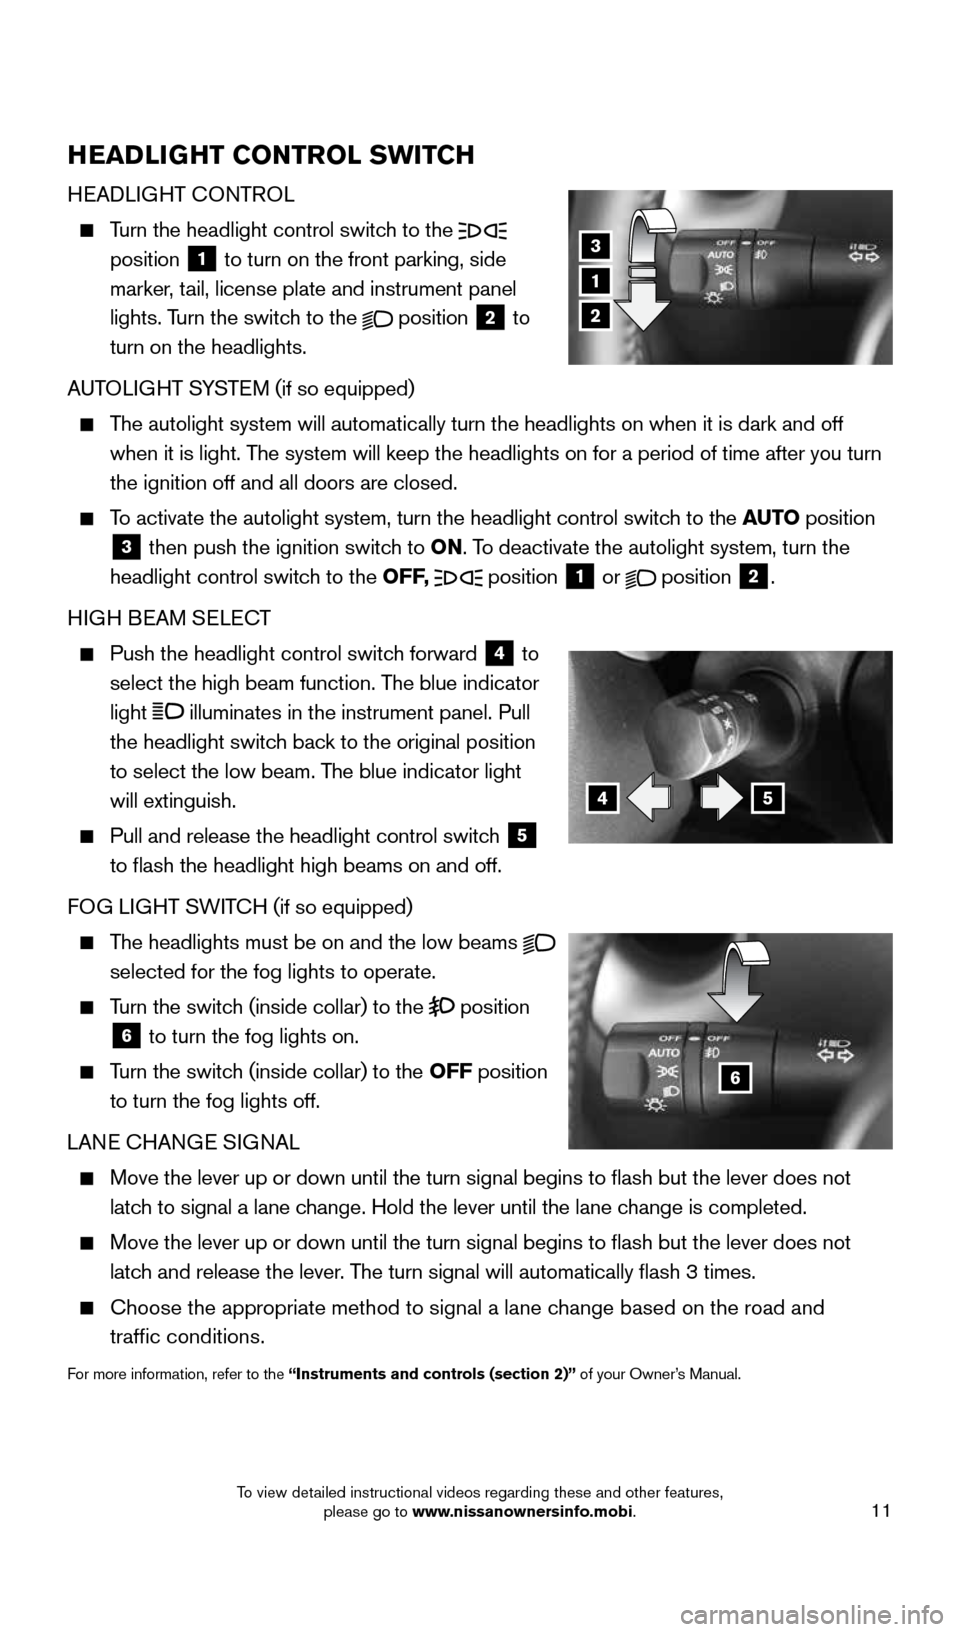
HEADLIGHT CONTROL
Turn the headlight control switch to the
position 1 to turn on the front parking, side
marker, tail, license plate and instrument panel
lights. Turn the switch to the
position
2 to
turn on the headlights.
AUTOLIGHT SYSTEM (if so equipped)
The autolight system will automatically turn the headlights on when it is\
dark and off
when it is light. The system will keep the headlights on for a period of time after you tur\
n
the ignition off and all doors are closed.
To activate the autolight system, turn the headlight control switch to the AUTO position
3 then push the ignition switch to ON. To deactivate the autolight system, turn the
headlight control switch to the OFF, position
1 or
position
2.
HIGH BEAM SELECT
Push the headlight control switch forward
4 to
select the high beam function. The blue indicator
light
illuminates in the instrument panel. Pull
the headlight switch back to the original position
to select the low beam. The blue indicator light
will extinguish.
Pull and release the headlight control switch
5
to flash the headlight high beams on and off.
FOG LIGHT SWITCH (if so equipped)
The headlights must be on and the low beams
selected for the fog lights to operate.
Turn the switch (inside collar) to the position
6 to turn the fog lights on.
Turn the switch (inside collar)
to the OFF position
to turn the fog lights off.
LANE CHANGE SIGNAL
Move the lever up or down until the turn signal begins to flash but th\
e lever does not
latch to signal a lane change. Hold the lever until the lane change is completed.
Move the lever up or down until the turn signal begins to flash but th\
e lever does not
latch and release the lever. The turn signal will automatically flash 3 times.
Choose the appropriate method to signal a lane change based on the road and
traffic conditions.
For more information, refer to the “Instruments and controls (section 2)” of your Owner’s Manual.
3
1
2
45
6
1705381_15a_Juke_QRG_091814.indd 119/18/14 4:46 PM
To view detailed instructional videos regarding these and other features, please go to www.nissanownersinfo.mobi.
Page 16 of 28
14
FIRST DRIVE FEATURES
2
1
3
4
DRIVE MODE (with Integrated Control System) (if so equipped)
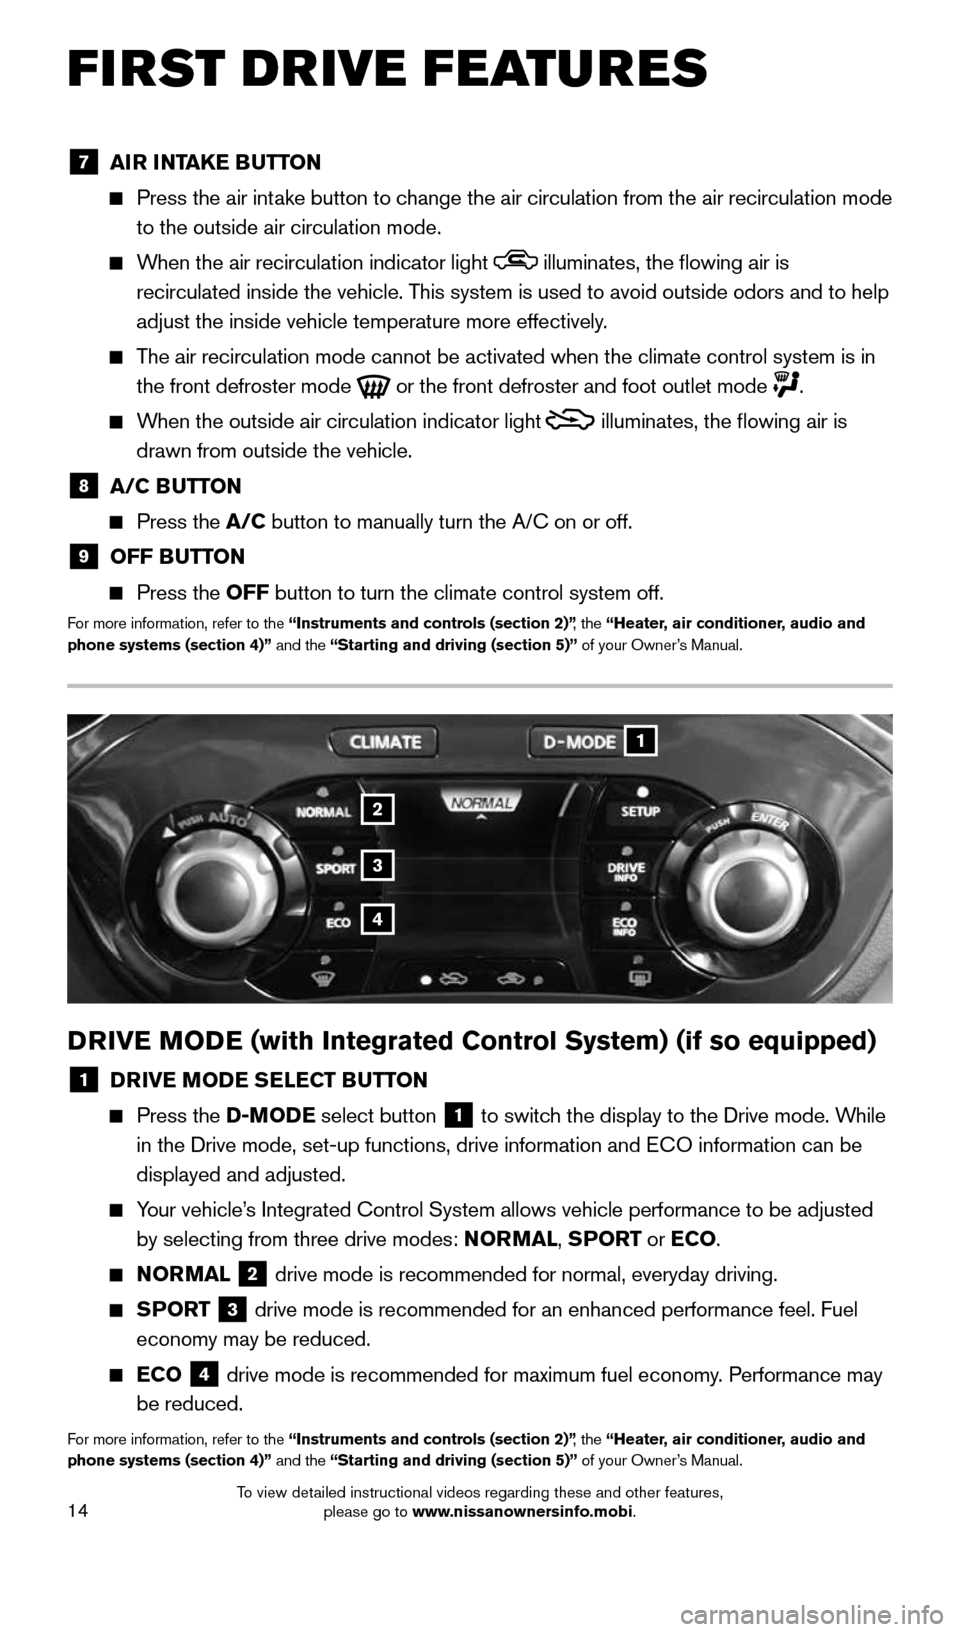
1 DRIVE MODE SELECT BUTTON
Press the D-MODE select button 1 to switch the display to the Drive mode. While
in the Drive mode, set-up functions, drive information and ECO information can be
displayed and adjusted.
Your vehicle’s Integrated Control System allows vehicle performance to be adjusted
by selecting from three drive modes: NORMAL, SPORT or ECO.
NORMAL
2 drive mode is recommended for normal, everyday driving.
SPORT
3 drive mode is recommended for an enhanced performance feel. Fuel
economy may be reduced.
ECO
4 drive mode is recommended for maximum fuel economy. Performance may
be reduced.
For more information, refer to the “Instruments and controls (section 2)” , the “Heater, air conditioner, audio and
phone systems (section 4)” and the “Starting and driving (section 5)” of your Owner’s Manual.
7 AIR INTAKE BUTTON
Press the air intake button to change the air circulation from the air recirculation mode
to the outside air circulation mode.
When the air recirculation indicator light illuminates, the flowing air is
recirculated inside the vehicle. This system is used to avoid outside odors and to help
adjust the inside vehicle temperature more effectively.
The air recirculation mode cannot be activated when the climate control s\
ystem is in
the front defroster mode
or the front defroster and foot outlet mode .
When the outside air circulation indicator light
illuminates, the flowing air is
drawn from outside the vehicle.
8 A/C BUTTON
Press the A/C button to manually turn the A/C on or off.
9 OFF BUTTON
Press the OFF button to turn the climate control system off.
For more information, refer to the “Instruments and controls (section 2)” , the “Heater, air conditioner, audio and
phone systems (section 4)” and the “Starting and driving (section 5)” of your Owner’s Manual.
1705381_15a_Juke_QRG_091814.indd 149/18/14 4:46 PM
To view detailed instructional videos regarding these and other features, please go to www.nissanownersinfo.mobi.
Page 18 of 28
16
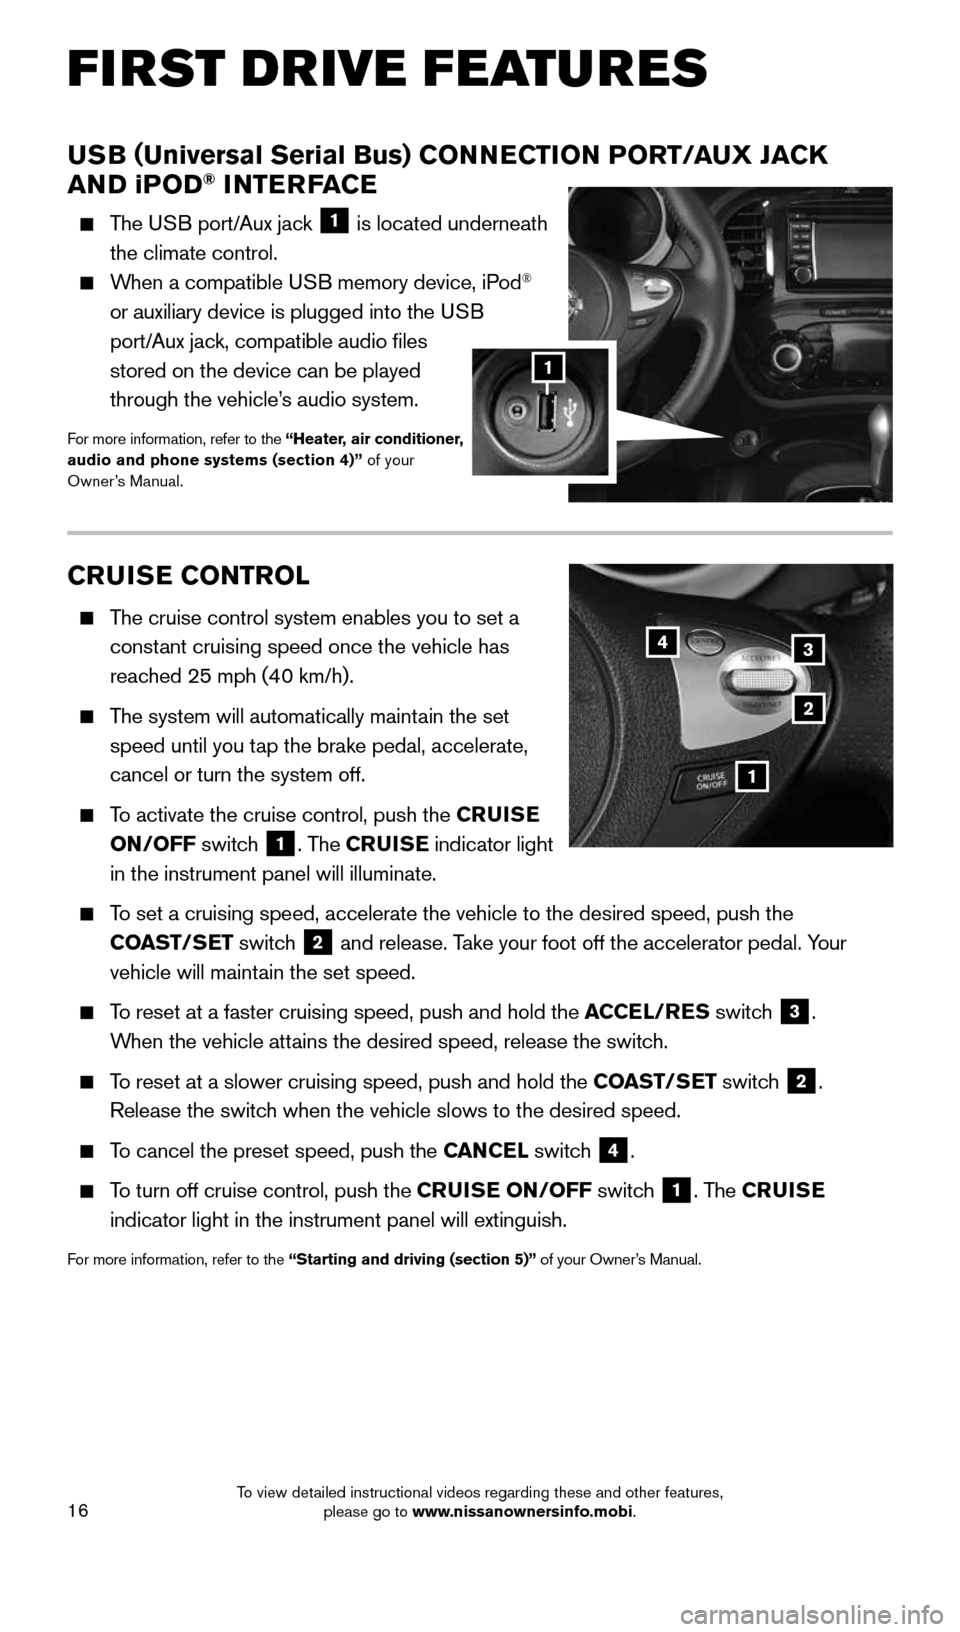
CRUISE CONTROL
The cruise control system enables you to set a
constant cruising speed once the vehicle has
reached 25 mph (40 km/h).
The system will automatically maintain the set
speed until you tap the brake pedal, accelerate,
cancel or turn the system off.
To activate the cruise control, push the CRUISE
ON/OFF switch
1. The CRUISE indicator light
in the instrument panel will illuminate.
To set a cruising speed, accelerate the vehicle to the desired speed, pus\
h the
COAST/SET switch
2 and release. Take your foot off the accelerator pedal. Your
vehicle will maintain the set speed.
To reset at a faster cruising speed, push and hold the ACCEL/RES switch
3.
When the vehicle attains the desired speed, release the switch.
To reset at a slower cruising speed, push and hold the COAST/SET switch
2.
Release the switch when the vehicle slows to the desired speed.
To cancel the preset speed, push the CANCEL switch
4.
To turn off cruise control, push the CRUISE ON/OFF switch
1. The CRUISE
indicator light in the instrument panel will extinguish.
For more information, refer to the “Starting and driving (section 5)” of your Owner’s Manual.
43
2
1
USB (Universal Serial Bus) CONNECTION PORT/AUX JACK
AND i POD® INTERFACE
The USB port/Aux jack
1 is located underneath
the climate control.
When a compatible USB memory device, iPod®
or auxiliary device is plugged into the USB
port/Aux jack, compatible audio files
stored on the device can be played
through the vehicle’s audio system.
For more information, refer to the “Heater, air conditioner,
audio and phone systems (section 4)” of your
Owner’s Manual.
1
FIRST DRIVE FEATURES
1705381_15a_Juke_QRG_091814.indd 169/18/14 4:46 PM
To view detailed instructional videos regarding these and other features, please go to www.nissanownersinfo.mobi.