check engine light NISSAN JUKE 2017 F15 / 1.G User Guide
[x] Cancel search | Manufacturer: NISSAN, Model Year: 2017, Model line: JUKE, Model: NISSAN JUKE 2017 F15 / 1.GPages: 416, PDF Size: 2.62 MB
Page 133 of 416
2-54Instruments and controls
If the moonroof does not operate
If the moonroof does not operate properly,
perform the following procedure to initialize the
moonroof operation system.
1. If the moonroof is open, close it fully byrepeatedly pushing the switch toward
*2.
2. Push and hold the switch toward
*2to
tilt the moonroof up.
3. Release the moonroof switch after the moonroof moves slightly up and down.
4. Push and hold the switch toward
*1to
fully tilt the moonroof down.
5. Check if the moonroof switch operates normally.
If the moonroof does not operate properly after
performing the procedure above, have your
moonroof checked and repaired. It is recom-
mended you visit a NISSAN dealer for this
service.
CAUTION
Do not use for extended periods of time
with the engine stopped. This could
result in a discharged battery.
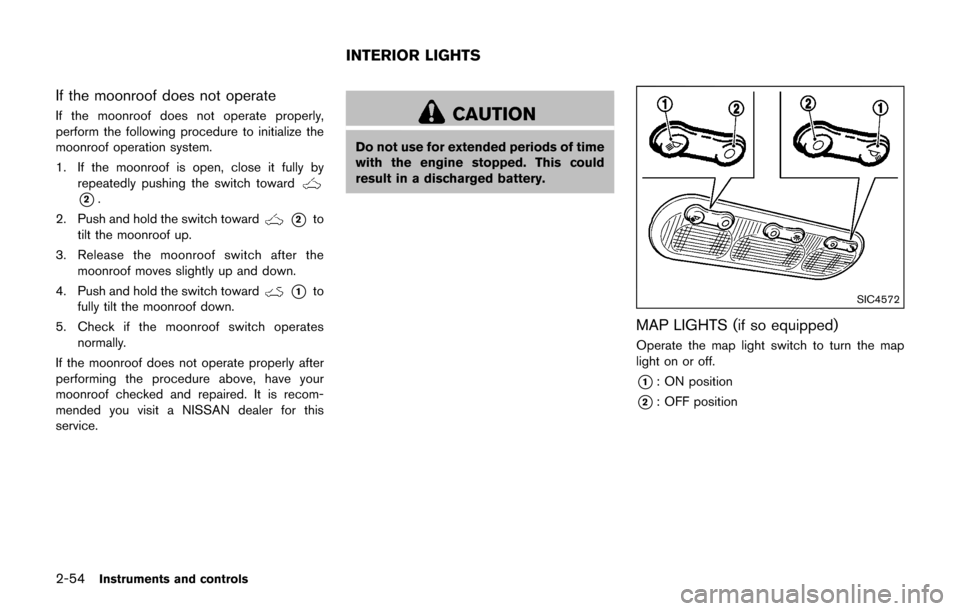
SIC4572
MAP LIGHTS (if so equipped)
Operate the map light switch to turn the map
light on or off.
*1: ON position
*2: OFF position
INTERIOR LIGHTS
Page 146 of 416
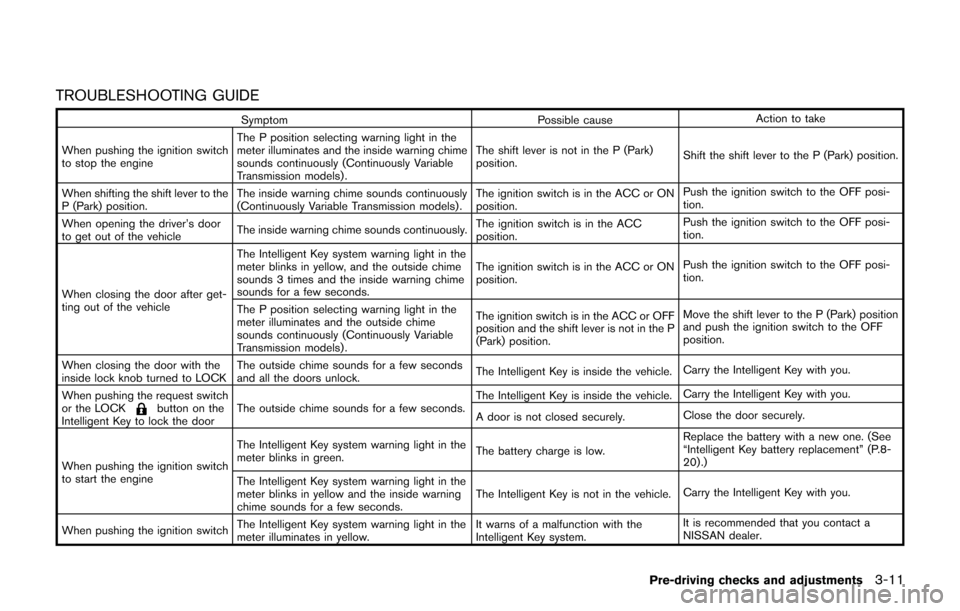
TROUBLESHOOTING GUIDE
SymptomPossible causeAction to take
When pushing the ignition switch
to stop the engine The P position selecting warning light in the
meter illuminates and the inside warning chime
sounds continuously (Continuously Variable
Transmission models) . The shift lever is not in the P (Park)
position.
Shift the shift lever to the P (Park) position.
When shifting the shift lever to the
P (Park) position. The inside warning chime sounds continuously
(Continuously Variable Transmission models) . The ignition switch is in the ACC or ON
position.Push the ignition switch to the OFF posi-
tion.
When opening the driver’s door
to get out of the vehicle The inside warning chime sounds continuously. The ignition switch is in the ACC
position.Push the ignition switch to the OFF posi-
tion.
When closing the door after get-
ting out of the vehicle The Intelligent Key system warning light in the
meter blinks in yellow, and the outside chime
sounds 3 times and the inside warning chime
sounds for a few seconds.
The ignition switch is in the ACC or ON
position.
Push the ignition switch to the OFF posi-
tion.
The P position selecting warning light in the
meter illuminates and the outside chime
sounds continuously (Continuously Variable
Transmission models) . The ignition switch is in the ACC or OFF
position and the shift lever is not in the P
(Park) position.
Move the shift lever to the P (Park) position
and push the ignition switch to the OFF
position.
When closing the door with the
inside lock knob turned to LOCK The outside chime sounds for a few seconds
and all the doors unlock.
The Intelligent Key is inside the vehicle.
Carry the Intelligent Key with you.
When pushing the request switch
or the LOCK
button on the
Intelligent Key to lock the door The outside chime sounds for a few seconds. The Intelligent Key is inside the vehicle.
Carry the Intelligent Key with you.
A door is not closed securely. Close the door securely.
When pushing the ignition switch
to start the engine The Intelligent Key system warning light in the
meter blinks in green.
The battery charge is low.Replace the battery with a new one. (See
“Intelligent Key battery replacement” (P.8-
20) .)
The Intelligent Key system warning light in the
meter blinks in yellow and the inside warning
chime sounds for a few seconds. The Intelligent Key is not in the vehicle.
Carry the Intelligent Key with you.
When pushing the ignition switch The Intelligent Key system warning light in the
meter illuminates in yellow. It warns of a malfunction with the
Intelligent Key system.It is recommended that you contact a
NISSAN dealer.
Pre-driving checks and adjustments3-11
Page 151 of 416
3-16Pre-driving checks and adjustments
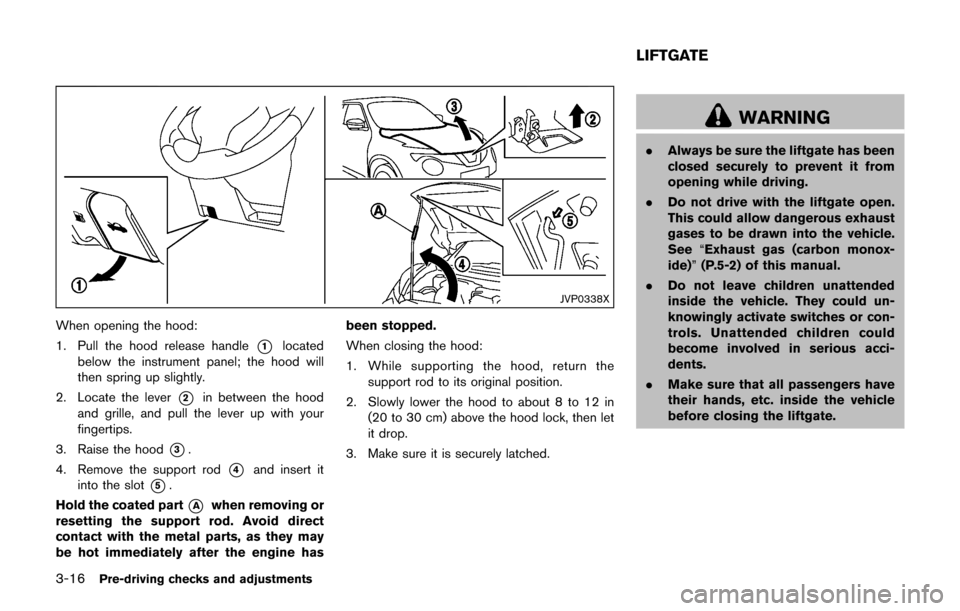
JVP0338X
When opening the hood:
1. Pull the hood release handle
*1located
below the instrument panel; the hood will
then spring up slightly.
2. Locate the lever
*2in between the hood
and grille, and pull the lever up with your
fingertips.
3. Raise the hood
*3.
4. Remove the support rod
*4and insert it
into the slot
*5.
Hold the coated part
*Awhen removing or
resetting the support rod. Avoid direct
contact with the metal parts, as they may
be hot immediately after the engine has been stopped.
When closing the hood:
1. While supporting the hood, return the
support rod to its original position.
2. Slowly lower the hood to about 8 to 12 in (20 to 30 cm) above the hood lock, then let
it drop.
3. Make sure it is securely latched.
WARNING
. Always be sure the liftgate has been
closed securely to prevent it from
opening while driving.
. Do not drive with the liftgate open.
This could allow dangerous exhaust
gases to be drawn into the vehicle.
See “Exhaust gas (carbon monox-
ide)” (P.5-2) of this manual.
. Do not leave children unattended
inside the vehicle. They could un-
knowingly activate switches or con-
trols. Unattended children could
become involved in serious acci-
dents.
. Make sure that all passengers have
their hands, etc. inside the vehicle
before closing the liftgate.
LIFTGATE
Page 153 of 416
3-18Pre-driving checks and adjustments
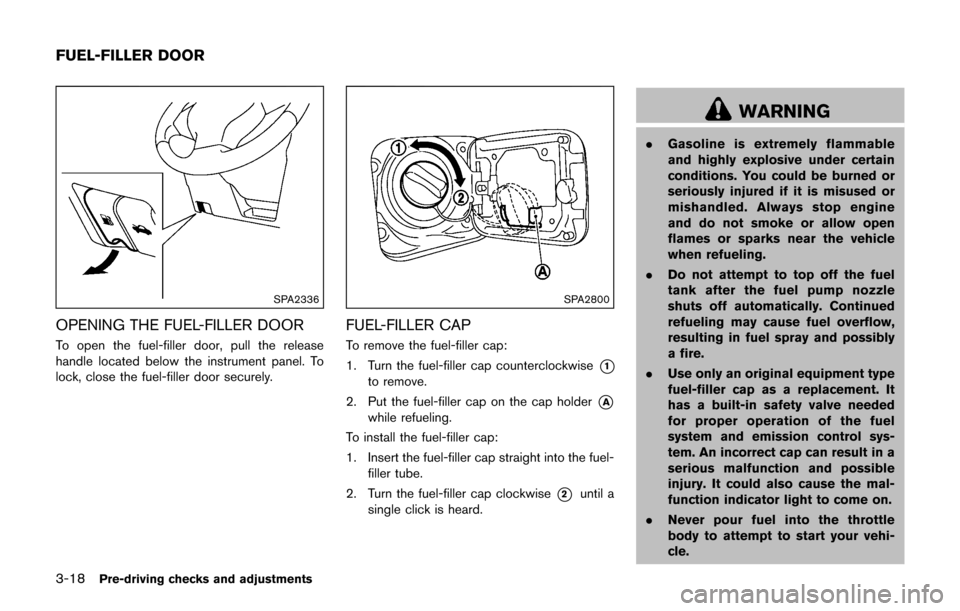
SPA2336
OPENING THE FUEL-FILLER DOOR
To open the fuel-filler door, pull the release
handle located below the instrument panel. To
lock, close the fuel-filler door securely.
SPA2800
FUEL-FILLER CAP
To remove the fuel-filler cap:
1. Turn the fuel-filler cap counterclockwise
*1
to remove.
2. Put the fuel-filler cap on the cap holder
*A
while refueling.
To install the fuel-filler cap:
1. Insert the fuel-filler cap straight into the fuel- filler tube.
2. Turn the fuel-filler cap clockwise
*2until a
single click is heard.
WARNING
. Gasoline is extremely flammable
and highly explosive under certain
conditions. You could be burned or
seriously injured if it is misused or
mishandled. Always stop engine
and do not smoke or allow open
flames or sparks near the vehicle
when refueling.
. Do not attempt to top off the fuel
tank after the fuel pump nozzle
shuts off automatically. Continued
refueling may cause fuel overflow,
resulting in fuel spray and possibly
a fire.
. Use only an original equipment type
fuel-filler cap as a replacement. It
has a built-in safety valve needed
for proper operation of the fuel
system and emission control sys-
tem. An incorrect cap can result in a
serious malfunction and possible
injury. It could also cause the mal-
function indicator light to come on.
. Never pour fuel into the throttle
body to attempt to start your vehi-
cle.
FUEL-FILLER DOOR
Page 270 of 416
ment even if the other two wheels
are raised off the ground. Make sure
you inform test facility personnel
that your vehicle is equipped with
AWD before it is placed on a
dynamometer. Using the wrong test
equipment may result in drivetrain
damage or unexpected vehicle
movement which could result in
serious vehicle damage or personal
injury.
. When a wheel is off the ground due
to an unlevel surface, do not spin
the wheel excessively (AWD model) .
. Accelerating quickly, sharp steering
maneuvers or sudden braking may
cause loss of control.
. If at all possible, avoid sharp turning
maneuvers, particularly at high
speeds. Your vehicle has a higher
center of gravity than a conventional
passenger car. The vehicle is not
designed for cornering at the same
speeds as conventional passenger
cars. Failure to operate this vehicle
correctly could result in loss of
control and/or a rollover accident.
. Always use tires of the same type,
size, brand, construction (bias, bias- belted or radial) , and tread pattern
on all four wheels. Install traction
devices on the front wheels when
driving on slippery roads and drive
carefully.
. Be sure to check the brakes imme-
diately after driving in mud or water.
See “Brake system” (P.5-35) for wet
brakes.
. Avoid parking your vehicle on steep
hills. If you get out of the vehicle
and it rolls forward, backward or
sideways, you could be injured.
. Whenever you drive off-road
through sand, mud or water as deep
as the wheel hub, more frequent
maintenance may be required. See
the maintenance schedule shown in
the “9. Maintenance and schedules”
section.
. Spinning the front wheels on slip-
pery surfaces may cause the AWD
warning light to flash and the AWD
system to automatically switch from
the AWD mode to the 2WD mode.
This could reduce traction.WARNING
Do not operate the push-button ignition
switch while driving the vehicle except
in an emergency. (The engine will stop
when the ignition switch is pushed 3
consecutive times or the ignition switch
is pushed and held for more than 2
seconds.) If the engine stops while the
vehicle is being driven, this could lead
to a crash and serious injury.
Before operating the push-button ignition
switch, be sure to move the shift lever to the P
(Park) position (for Continuously Variable Trans-
mission models) or the shift lever to the N
(Neutral) position (for manual transmission
models) .
Starting and driving5-9
PUSH-BUTTON IGNITION SWITCH
Page 273 of 416
5-12Starting and driving
SSD0860
INTELLIGENT KEY BATTERY DIS-
CHARGE
If the battery of the Intelligent Key is discharged,
or environmental conditions interfere with the
Intelligent Key operation, start the engine
according to the following procedure:
1. Move the shift lever to the P (Park) position(for Continuously Variable Transmission
models) or the shift lever to the N (Neutral)
position (for manual transmission models) .
2. Firmly apply the foot brake.
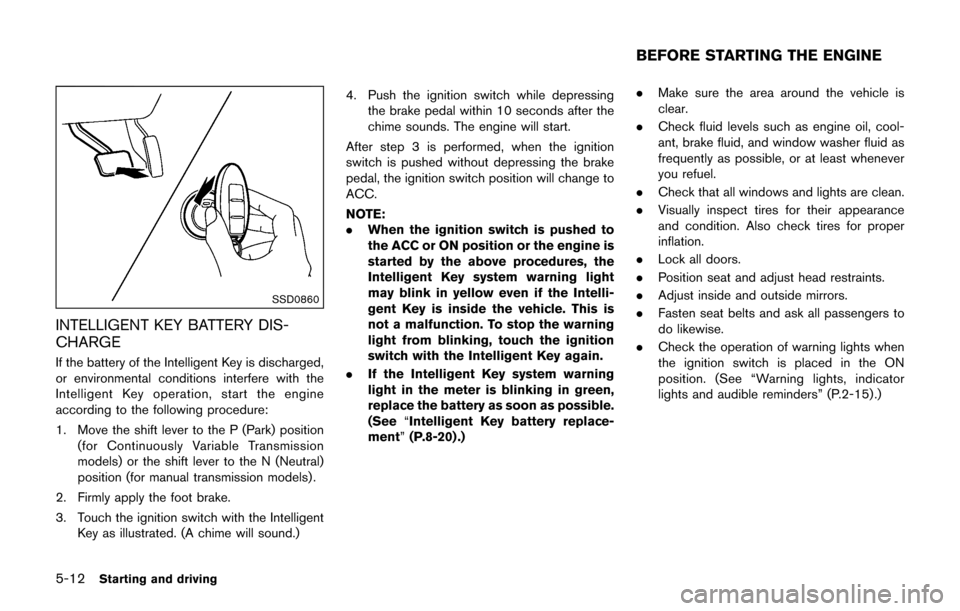
3. Touch the ignition switch with the Intelligent Key as illustrated. (A chime will sound.) 4. Push the ignition switch while depressing
the brake pedal within 10 seconds after the
chime sounds. The engine will start.
After step 3 is performed, when the ignition
switch is pushed without depressing the brake
pedal, the ignition switch position will change to
ACC.
NOTE:
. When the ignition switch is pushed to
the ACC or ON position or the engine is
started by the above procedures, the
Intelligent Key system warning light
may blink in yellow even if the Intelli-
gent Key is inside the vehicle. This is
not a malfunction. To stop the warning
light from blinking, touch the ignition
switch with the Intelligent Key again.
. If the Intelligent Key system warning
light in the meter is blinking in green,
replace the battery as soon as possible.
(See “Intelligent Key battery replace-
ment” (P.8-20) .) .
Make sure the area around the vehicle is
clear.
. Check fluid levels such as engine oil, cool-
ant, brake fluid, and window washer fluid as
frequently as possible, or at least whenever
you refuel.
. Check that all windows and lights are clean.
. Visually inspect tires for their appearance
and condition. Also check tires for proper
inflation.
. Lock all doors.
. Position seat and adjust head restraints.
. Adjust inside and outside mirrors.
. Fasten seat belts and ask all passengers to
do likewise.
. Check the operation of warning lights when
the ignition switch is placed in the ON
position. (See “Warning lights, indicator
lights and audible reminders” (P.2-15) .)
BEFORE STARTING THE ENGINE
Page 279 of 416
5-18Starting and driving
back to the ON position. The vehicle
should return to its normal operating
condition. If it does not return to its normal
operating condition, have the transmission
checked and repaired, if necessary. It is
recommended you visit a NISSAN dealer
for this service.
WARNING
When the high fluid temperature pro-
tection mode or fail-safe operation
occurs, vehicle speed may be gradually
reduced. The reduced speed may be
lower than other traffic, which could
increase the chance of a collision. Be
especially careful when driving. If ne-
cessary, pull to the side of the road at a
safe place and allow the transmission
to return to normal operation, or have it
repaired if necessary.
SSD1142
Shift lock release
If the battery charge is low or discharged, the
shift lever may not be moved from the P (Park)
position even with the brake pedal depressed
and the shift lever button pushed.
To move the shift lever, perform the following
procedure:
1. Place the ignition switch in the OFF orLOCK position.
2. Apply the parking brake.
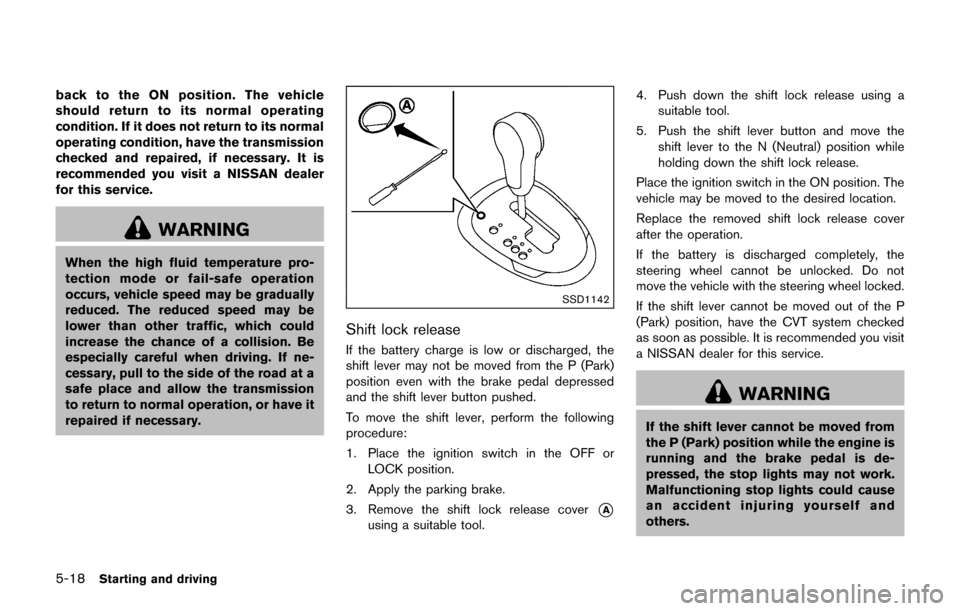
3. Remove the shift lock release cover
*A
using a suitable tool. 4. Push down the shift lock release using a
suitable tool.
5. Push the shift lever button and move the shift lever to the N (Neutral) position while
holding down the shift lock release.
Place the ignition switch in the ON position. The
vehicle may be moved to the desired location.
Replace the removed shift lock release cover
after the operation.
If the battery is discharged completely, the
steering wheel cannot be unlocked. Do not
move the vehicle with the steering wheel locked.
If the shift lever cannot be moved out of the P
(Park) position, have the CVT system checked
as soon as possible. It is recommended you visit
a NISSAN dealer for this service.
WARNING
If the shift lever cannot be moved from
the P (Park) position while the engine is
running and the brake pedal is de-
pressed, the stop lights may not work.
Malfunctioning stop lights could cause
an accident injuring yourself and
others.
Page 287 of 416

5-26Starting and driving
PRECAUTIONS ON CRUISE CON-
TROL
.If the cruise control system malfunctions, it
will cancel automatically. The CRUISE in-
dicator light on the meter panel will then
blink to warn the driver.
. If the engine coolant temperature becomes
excessively high, the cruise control system
will cancel automatically.
. If the CRUISE indicator light blinks, turn the
cruise control MAIN switch off and have the
system checked. It is recommended you visit
a NISSAN dealer for this service.
. The CRUISE indicator light may blink when
the cruise control MAIN switch is turned ON
while pushing the ACCEL/RES, COAST/
SET or CANCEL switch. To properly set the
cruise control system, perform the following
procedures.
WARNING
Do not use the cruise control when
driving under the following conditions:
.when it is not possible to keep the
vehicle at a set speed
. in heavy traffic or in traffic that
varies in speed .
on winding or hilly roads
. on slippery roads (rain, snow, ice,
etc.)
. in very windy areas
Doing so could cause a loss of vehicle
control and result in an accident.
CAUTION
On Manual Transmission (MT) models,
do not shift into N (Neutral) without
depressing the clutch pedal when the
cruise control is set. Should this occur,
depress the clutch pedal and turn the
MAIN switch off immediately. Failure to
do so may cause engine damage.
SSD1128
1. ACCEL/RES switch
2. COAST/SET switch
3. CANCEL switch
4. MAIN (ON·OFF) switch
CRUISE CONTROL OPERATIONS
The cruise control allows driving at a speed
between 25 to 89 MPH (40 to 144 km/h)
without keeping your foot on the accelerator
pedal.
To turn on the cruise control, push the MAIN
switch on. The CRUISE indicator light will
illuminate.
To set cruising speed, accelerate the vehicle
to the desired speed, push the COAST/SET
switch and release it. Take your foot off the
CRUISE CONTROL
Page 293 of 416

5-32Starting and driving
warning light will either remain illuminated or
blink.
High-temperature power train oil due to con-
tinuous operation of the vehicle to free a stuck
vehicle makes the warning light blink rapidly
(about twice per second) . The driving mode may
change to the 2WD mode. If the warning light
blinks rapidly during operation, stop the vehicle
with the engine idling in a safe place immedi-
ately. Then if the light goes off after a while, you
can continue driving.
A large difference between the diameters of
front and rear wheels will make the warning light
blink slowly (about once per 2 seconds) . Pull off
the road in a safe area, and idle the engine.
Check that all tire sizes are the same, tire
pressure is correct and tires are not worn.
Change the AWD mode switch to the 2WD
mode and do not drive fast.
CAUTION
.If the warning light illuminates while
driving, AWD mode will be changed
to 2WD mode. Reduce the vehicle
speed and have your vehicle
checked as soon as possible. It is
recommended you visit a NISSAN
dealer for this service. Be especially careful when driving.
. The power train may be damaged if
you continue driving with the AWD
warning light blinking rapidly.
Page 295 of 416

5-34Starting and driving
the vehicle forward until the curb side
wheel gently touches the curb.
.HEADED UPHILL WITH CURB:*2
Turn the wheels away from the curb and
move the vehicle back until the curb side
wheel gently touches the curb.
.HEADED UPHILL OR DOWNHILL, NOCURB:
*3
Turn the wheels toward the side of the
road so the vehicle will move away from
the center of the road if it moves.
4. Place the ignition switch in the OFF position.
WARNING
. If the engine is not running or is
turned off while driving, the power
assist for the steering will not work.
Steering will be harder to operate.
. When the electric power steering
warning light illuminates with the
engine running, the power assist for
the steering will cease operation.
You will still have control of the
vehicle but the steering will be
harder to operate.
The electric power steering is designed to
provide power assist while driving to operate
the steering wheel with light force.
When the steering wheel is operated repeatedly
or continuously while parking or driving at a very
low speed, the power assist for the steering
wheel will be reduced. This is to prevent
overheating of the electric power steering and
protect it from getting damaged. While the
power assist is reduced, steering wheel opera-
tion will become heavy. When the temperature
of the electric power steering goes down, the
power assist level will return to normal. Avoid
repeating such steering wheel operations that could cause the electric power steering to
overheat.
You may hear a sound when the steering wheel
is operated quickly. However, this is not a
malfunction.
If the electric power steering warning light
illuminates while the engine is running, it may
indicate the electric power steering is not
functioning properly and may need servicing. It
is recommended you have the electric power
steering checked by a NISSAN dealer. (See
“Electric power steering warning light” (P.2-
17) .)
When the electric power steering warning light
illuminates with the engine running, the power
assist for the steering will cease operation. You
will still have control of the vehicle. However,
greater steering effort is needed, especially in
sharp turns and at low speeds.
ELECTRIC POWER STEERING