check engine light NISSAN KICKS 2020 Owner´s Manual
[x] Cancel search | Manufacturer: NISSAN, Model Year: 2020, Model line: KICKS, Model: NISSAN KICKS 2020Pages: 500, PDF Size: 3.43 MB
Page 117 of 500
No Key Detected
This warning appears when the Intelligent
Key is lef t outside the vehicle with the igni-
tion switch in the ON position. Make sure
the Intelligent Key is inside the vehicle.
For additional information, refer to “NISSAN
Intelligent Key®” in the “Pre-driving checks
and adjustments” section of this manual.
Key Battery Low
This indicator illuminates when the Intelli-
gent Key battery is running out of power.
If this indicator illuminates, replace the bat-
tery with a new one. For additional infor-
mation, refer to “Battery replacement” in
the “Do-it-yourself ” section of this manual.
I-Key System Error: See Owner’s
Manual
Af ter the ignition switch is pushed to the
ON position, this light comes on for a period
of time and then turns off.
The I-Key System Error message warns of
a malfunction with the Intelligent Key sys-
tem. If the light comes on while the engine
is stopped, it may be impossible to start
the engine.If the light comes on while the engine is
running, you can drive the vehicle. However,
in these cases, have the system checked. It
is recommended that you visit a NISSAN
dealer for this service.
Shif t to Park
This warning illuminates when the ignition
switch is in the OFF position and the shif t
lever is not in the P (Park) position. Also, a
chime sounds when the ignition switch is
in the OFF position.
If this warning illuminates, move the shif t
lever to the P (Park) position and start the
engine.
Push brake and start switch to drive
This indicator appears when the shif t lever
is in the P (Park) position.
This indicator also appears when the ve-
hicle has been started using the Remote
Engine Start (if so equipped) function.
This indicator means that the engine will
start by pushing the ignition switch with
the brake pedal depressed. You can start
the engine from any position of the ignition
switch.
Engine start operation for Intelligent
Key system (if I-Key battery level is
low)
This indicator appears when the battery of
the Intelligent Key is low and when the In-
telligent Key system and the vehicle are not
communicating normally.
If this appears, touch the ignition switch
with the Intelligent Key while depressing
the brake pedal. For additional information,
refer to “NISSAN Intelligent Key® battery dis-
charge” in the “Starting and driving” section
of this manual.
Release Parking Brake
This warning illuminates in the message
area of the vehicle information display
when the parking brake is set and the ve-
hicle is driven.
Low Fuel
This warning illuminates when the fuel level
in the fuel tank is getting low. Refuel as
soon as it is convenient, preferably before
the fuel gauge reaches 0 (Empty).
There
will be a small reserve of fuel in the tank
when the fuel gauge needle reaches 0
(Empty).
Instruments and controls2-33
Page 119 of 500
• Blind Spot Warning (BSW)
• Rear Cross Traffic Alert (RCTA)
If one or more of these warning appears,
have the system checked. It is recom-
mended that you visit a NISSAN dealer for
this service.
Shipping Mode On Push Storage Fuse
This warning may appear if the extended
storage switch is not pushed in. When this
warning appears, push in the extended
storage switch to turn off the warning. For
additional information, refer to “Extended
storage switch” in this section.
CVT Error: See Owner's Manual
This warning illuminates when there is a
problem with the CVT system. If this warn-
ing comes on, have the system checked. It
is recommended that you visit a NISSAN
dealer for this service.
Steering lock release malfunction
indicator (if so equipped)
This indicator appears when the steering
lock cannot be released.
If this indicator appears, push the ignition
switch while lightly turning the steering
wheel right and lef t.
Illumination indicator
This indicator shows the illumination ad-
justment of the instrument panel. For addi-
tional information, refer to “Instrument
brightness control” in this section.
Transmission Shif t Position indicator
(if so equipped)
This indicator shows the transmission shif t
position.
High Coolant Temp: See Owner’s
Manual
This warning appears when the tempera-
ture of the engine coolant is too high. Stop
the vehicle in a safe location as soon as
possible. Avoid quick starting or abrupt ac-
celeration. When the warning turns off, the
vehicle can be driven.
If the warning appears again soon af ter it
turns off, have the vehicle checked. It is rec-
ommended that you visit a NISSAN dealer
for this service.
Outside Temperature Display
The outside temperature display appears
in the center region of the vehicle informa-
tion display.
Low Outside Temperature
This warning appears if the outside tem-
perature is below 37°F (3°C). The tempera-
ture can be changed to display in Celsius or
Fahrenheit. For additional information, re-
fer to “Settings” in this section.
Oil and Filter
This indicator appears when the customer
set distance comes for changing the en-
gine oil and filter. You can set or reset the
distance for checking or replacing these
items. For scheduled maintenance items
and intervals, refer to the “Maintenance and
schedules” section of this manual.
Tire
This indicator appears when the customer
set distance is reached for replacing tires.
You can set or reset the distance for replac-
ing tires.
Instruments and controls2-35
Page 123 of 500
The system helps deter vehicle thef t but
cannot prevent it, nor can it prevent the
thef t of interior or exterior vehicle compo-
nents in all situations. Always secure your
vehicle even if parking for a brief period.
Never leave your keys in the vehicle, and
always lock the vehicle when unattended.
Be aware of your surroundings, and park in
secure, well-lit areas whenever possible.
Many devices offering additional protec-
tion, such as component locks, identifica-
tion markers, and tracking systems, are
available at auto supply stores and spe-
cialty shops. A NISSAN dealer may also offer
such equipment. Check with your insur-
ance company to see if you may be eligible
for discounts for various thef t protection
features.
How to arm the vehicle security
system
1. Close all windows.(The system can be
armed even if the windows are open.)
2. Remove the keys from the vehicle.
3. Close all doors, hood and lif tgate. Lock all doors. The doors can be locked with
the key fob, Intelligent Key, mechanical
key, or door handle request switch (if so
equipped). 4. Confirm that the
security indicator
light stays on for about 30 seconds. The
vehicle security system is now pre-
armed. The vehicle security system will
automatically shif t into the armed
phase. The
security light begins to
flash once every three seconds. If during
the pre-armed phase one of the follow-
ing occurs, the system will not arm:
• Any door is unlocked with the key fob, the Intelligent Key, mechanical key, or door
request switch (if so equipped).
•
Ignition switch is placed in the ON position.
• Even when the driver and/or passen-
gers are in the vehicle, the system will
activate with all the doors, hood and
lif tgate locked with the ignition switch
placed in the LOCK position. When plac-
ing the ignition switch in the ON posi-
tion, the system will be released.
Vehicle security system activation
The vehicle security system will give the
following alarm:
• The headlights or turn lamps blink and the horn sounds intermittently but syn-
chronously.
•
The alarm automatically turns off af ter a
period of time. However, the alarm reacti-
vates if the vehicle is tampered with again.
The alarm is activated by:
• opening any door, hood or the lif tgate without using the key or Intelligent Key
(even if the door is unlocked by releasing
the door inside lock knob).
How to stop an activated alarm
The alarm stops only by unlocking a door
or the lif tgate with the key fob, pressing the
button on the Intelligent Key, or push-
ing the request switch (if so equipped) on
the driver's or passenger's door with the
Intelligent Key in range of the door handle.
NISSAN ANTI-THEFT SYSTEM
(NATS) (if so equipped)
The NISSAN Anti-Thef t System will not al-
low the engine to start without the use of a
registered NATS key.
If the engine does not start using the reg-
istered NATS key, it may be due to interfer-
ence caused by:
• Another NATS key
• Automated toll road device
• Automated payment device
•
Other devices that transmit similar signals
Instruments and controls2-39
Page 139 of 500
WARNING
The Rear Sonar System is a conve-
nience but it is not a substitute for
proper backing. Always turn and check
that it is safe to do so before backing
up. Always back up slowly.
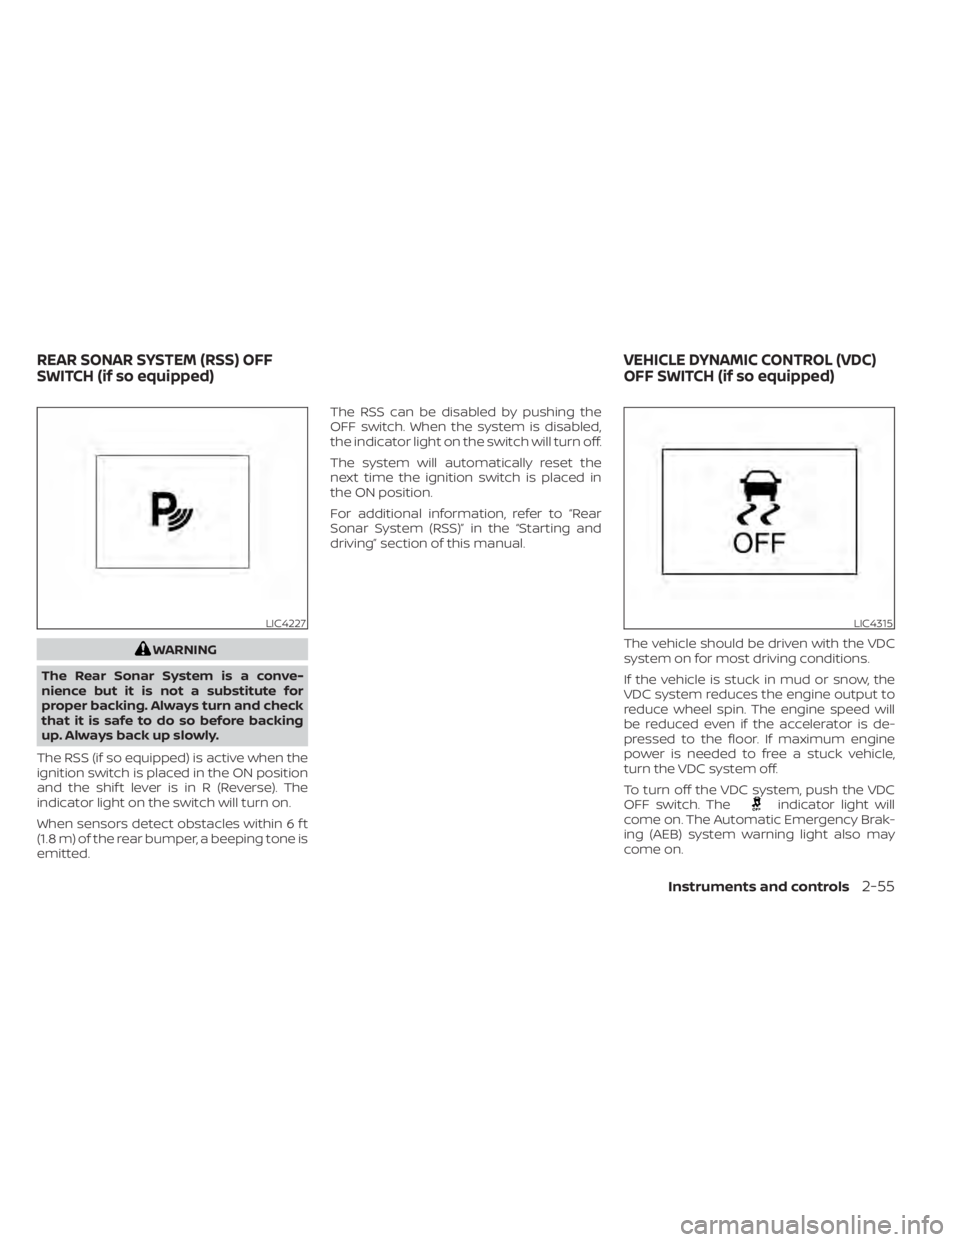
The RSS (if so equipped) is active when the
ignition switch is placed in the ON position
and the shif t lever is in R (Reverse). The
indicator light on the switch will turn on.
When sensors detect obstacles within 6 f t
(1.8 m) of the rear bumper, a beeping tone is
emitted. The RSS can be disabled by pushing the
OFF switch. When the system is disabled,
the indicator light on the switch will turn off.
The system will automatically reset the
next time the ignition switch is placed in
the ON position.
For additional information, refer to “Rear
Sonar System (RSS)” in the “Starting and
driving” section of this manual.
The vehicle should be driven with the VDC
system on for most driving conditions.
If the vehicle is stuck in mud or snow, the
VDC system reduces the engine output to
reduce wheel spin. The engine speed will
be reduced even if the accelerator is de-
pressed to the floor. If maximum engine
power is needed to free a stuck vehicle,
turn the VDC system off.
To turn off the VDC system, push the VDC
OFF switch. The
indicator light will
come on. The Automatic Emergency Brak-
ing (AEB) system warning light also may
come on.
LIC4227LIC4315
REAR SONAR SYSTEM (RSS) OFF
SWITCH (if so equipped) VEHICLE DYNAMIC CONTROL (VDC)
OFF SWITCH (if so equipped)
Instruments and controls2-55
Page 171 of 500
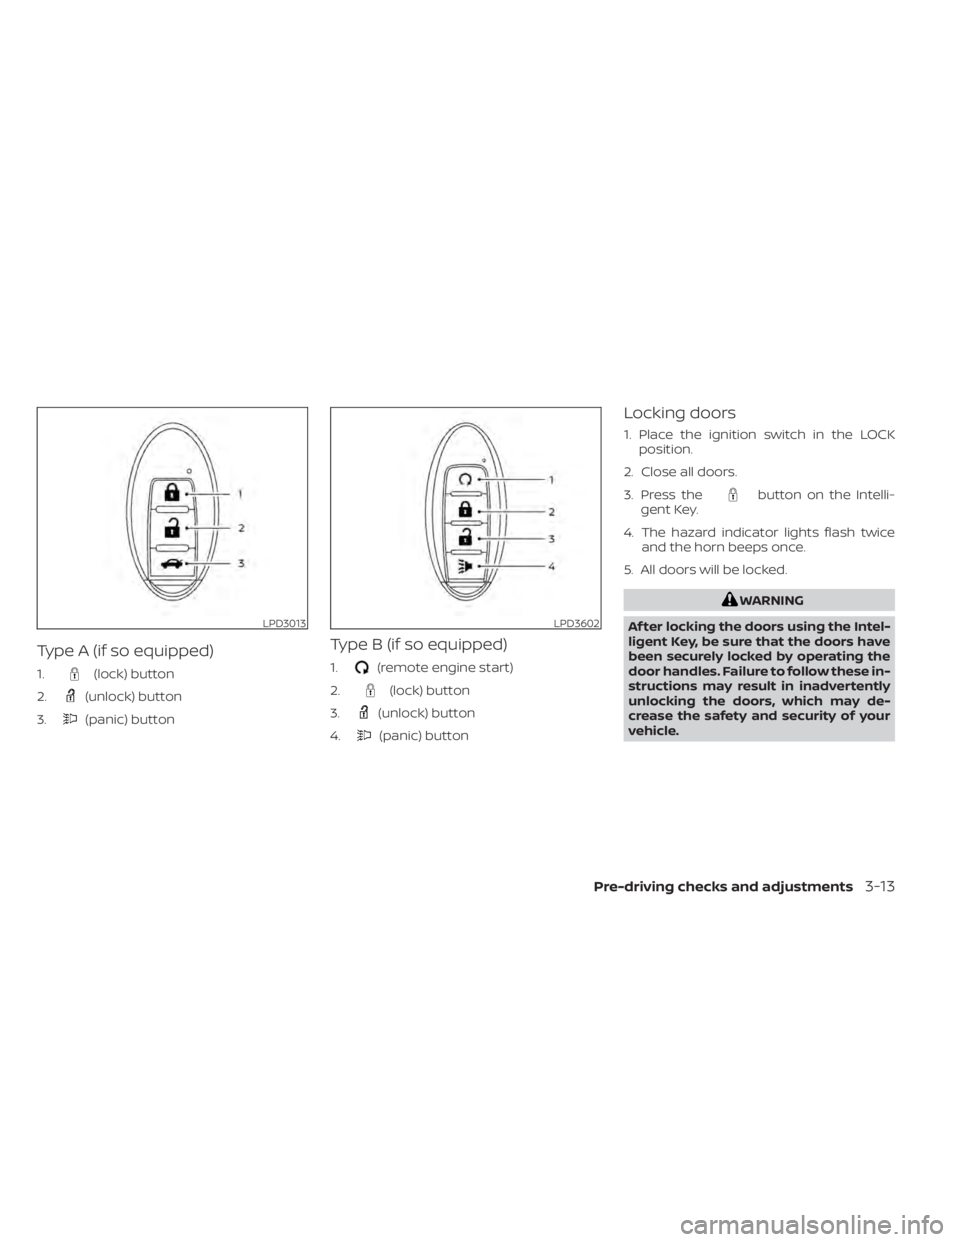
Type A (if so equipped)
1.(lock) button
2.
(unlock) button
3.
(panic) button
Type B (if so equipped)
1.(remote engine start)
2.
(lock) button
3.
(unlock) button
4.
(panic) button
Locking doors
1. Place the ignition switch in the LOCK position.
2. Close all doors.
3. Press the
button on the Intelli-
gent Key.
4. The hazard indicator lights flash twice and the horn beeps once.
5. All doors will be locked.
WARNING
Af ter locking the doors using the Intel-
ligent Key, be sure that the doors have
been securely locked by operating the
door handles. Failure to follow these in-
structions may result in inadvertently
unlocking the doors, which may de-
crease the safety and security of your
vehicle.
LPD3013LPD3602
Pre-driving checks and adjustments3-13
Page 176 of 500
Thebutton will be on the NISSAN
Intelligent Key® if the vehicle has Remote
Engine Start. This feature allows the engine
to start from outside the vehicle.
The following features may be affected
when the Remote Engine Start feature is
used:
• Vehicles with a manual climate control system (if so equipped) will default to the
last used heating or cooling mode. •
Vehicles with an automatic climate control
system (if so equipped) will default to either
heating or cooling mode. For additional in-
formation, refer to “Remote Engine Start with
Intelligent Climate Control” in the “Monitor,
climate, audio, phone and voice recognition
systems” section of this manual.
Laws in some local communities may re-
strict the use of remote starters. For ex-
ample, some laws require a person using
Remote Engine Start to have the vehicle in
view. Check local regulations for any re-
quirements.
Other conditions may affect the function of
the Remote Engine Start feature. For addi-
tional information, refer to “Conditions the
Remote Engine Start will not work” in this
section.
Other conditions can affect the perfor-
mance of the Intelligent Key transmitter.
For additional information, refer to “NISSAN
Intelligent Key®” in this section.
CONDITIONS THE REMOTE ENGINE
START WILL NOT WORK
The Remote Engine Start will not operate if
any of the following conditions are present:
• The ignition switch is placed in the ON position. • The hood is not securely closed.
• The hazard indicator lights are on.
• The engine is still running. The engine
must be completely stopped. Wait at
least 6 seconds if the engine goes from
running to off. This is not applicable when
extending engine run time.
• The
button is not pressed and held
for at least 2 seconds.
• The
button is not pressed and held
within 5 seconds of pressing the lock but-
ton.
• The brake is pressed.
• The doors are not closed and locked.
• The lif tgate is open.
• The I–Key System Error warning shows in the vehicle information display (if so
equipped).
• The alarm sounds due to illegal entry into the vehicle.
• Two Remote Engine Starts, or a single Remote Engine Start with an extension,
have already been used.
• The vehicle is not in P (Park).
• There is a detected registered key already inside of the vehicle.
LPD2995
REMOTE ENGINE START (if so
equipped)
3-18Pre-driving checks and adjustments
Page 177 of 500
• The Remote Engine Start function hasbeen switched to the OFF position in “Ve-
hicle Settings” of the vehicle information
display (if so equipped). For additional in-
formation, refer to “Vehicle information
display” in the “Instruments and controls”
section of this manual.
The Remote Engine Start may display a
warning or indicator in the vehicle informa-
tion display (if so equipped). For additional
information, refer to “Vehicle information
display” in the “Instruments and controls”
section of this manual.
REMOTE ENGINE START
OPERATING RANGE
WARNING
To help avoid risk of injury or death
through unintended operation of the
vehicle and/or its systems, including
entrapment in windows or inadvertent
door lock activation, do not leave chil-
dren, people who require the assis-
tance of others or pets unattended in
your vehicle. Additionally, the tempera-
ture inside a closed vehicle on a warm
day can quickly become high enough
to cause a significant risk of injury or
death to people and pets.
CAUTION
When the Intelligent Key battery is dis-
charged or other strong radio wave
sources are present near the operating
location, the Intelligent Key operating
range becomes narrower, and the Intel-
ligent Key may not function properly.
The Remote Engine Start function can only
be used when the Intelligent Key is within
the specified operating range from the ve-
hicle.
The Remote Engine Start operating range
is approximately 197 f t (60 m) from the ve-
hicle.
REMOTE STARTING THE VEHICLE
To use the Remote Engine Start feature
perform the following:
1. Aim the Intelligent Key at the vehicle.
2. Press the
button to lock all doors.
3. Within 5 seconds press and hold the
button until the turn signal lights
flash and the tail lamps turn on. If the
vehicle is not within view press and hold
the
button for at least 2 seconds. The following events will occur when the
engine starts:
• The parking lights will turn on and remain
on as long as the engine is running.
• The doors will be locked and the climate control system may come on.
• The engine will continue to run for 10 min- utes. Repeat the steps to extend the time
for an additional 10 minutes. For addi-
tional information, refer to “Extending en-
gine run time” in this section.
Press and hold the brake pedal while
switching the ignition to the ON position
before driving. For additional information,
refer to “Driving the vehicle” in the “Starting
and driving” section of this manual.
EXTENDING ENGINE RUN TIME
The Remote Engine Start feature can be
extended one time by performing the
steps listed in “Remote starting the vehicle”
in this section. Run time will be calculated
as follows:
• The first 10 minute run time will start when the Remote Engine Start function is
performed.
Pre-driving checks and adjustments3-19
Page 178 of 500
• The second 10 minutes will start immedi-ately when the Remote Engine Start
function is performed again. For example,
if the engine has been running for 5 min-
utes, and 10 minutes are added, the en-
gine will run for a total of 15 minutes.
• Extending engine run time will bring you to the two Remote Engine Start limit.
A maximum of two Remote Engine Starts,
or a single Remote Engine Start with an
extension, are allowed between ignition
cycles. The ignition switch must be cycled
to the ON position and then back to the
OFF position before the Remote Engine
Start procedure can be used again.
CANCELING A REMOTE ENGINE
START
To cancel a Remote Engine Start, perform
one of the following:
• Aim the Intelligent Key at the vehicle and press
until the parking lights turn off.
• Turn on the hazard warning flashers.
• Cycle the ignition switch on and then off.
• The extended engine run time has ex- pired.
• The first 10 minute timer has expired.
• Opening the engine hood.
• Shif ting the vehicle out of P (Park). • The alarm sounds due to illegal entry into
the vehicle.
• Pushing the ignition switch without the Intelligent Key in the vehicle.
• Not pressing the brake pedal while press- ing the ignition switch with the Intelligent
Key in the vehicle.
CONDITIONS THE REMOTE ENGINE
START WILL NOT WORK
The Remote Engine Start will not operate if
any of the following conditions are present:
• The ignition switch is placed in the ONposition.
• The hood is not securely closed.
• The hazard indicator lights are on.
• The engine is still running. The engine must be completely stopped. Wait at
least 6 seconds if the engine goes from
running to off. This is not applicable when
extending engine run time.
• The
button is not pressed and held
for at least 2 seconds.
• The
button is not pressed and held
within 5 seconds of pressing the lock but-
ton.
• The brake is pressed.
• The doors are not closed and locked. • The lif tgate is open.
• The I–Key System Error warning shows in
the vehicle information display (if so
equipped).
• The alarm sounds due to illegal entry into the vehicle.
• Two Remote Engine Starts, or a single Remote Engine Start with an extension,
have already been used.
• The vehicle is not in P (Park).
• There is a detected registered key already inside of the vehicle.
• The Remote Engine Start function has been switched to the OFF position in “Ve-
hicle Settings” of the vehicle information
display (if so equipped). For additional in-
formation, refer to “Vehicle information
display” in the “Instruments and controls”
section of this manual.
The Remote Engine Start may display a
warning or indicator in the vehicle informa-
tion display (if so equipped). For additional
information, refer to “Vehicle information
display” in the “Instruments and controls”
section of this manual.
3-20Pre-driving checks and adjustments
Page 179 of 500
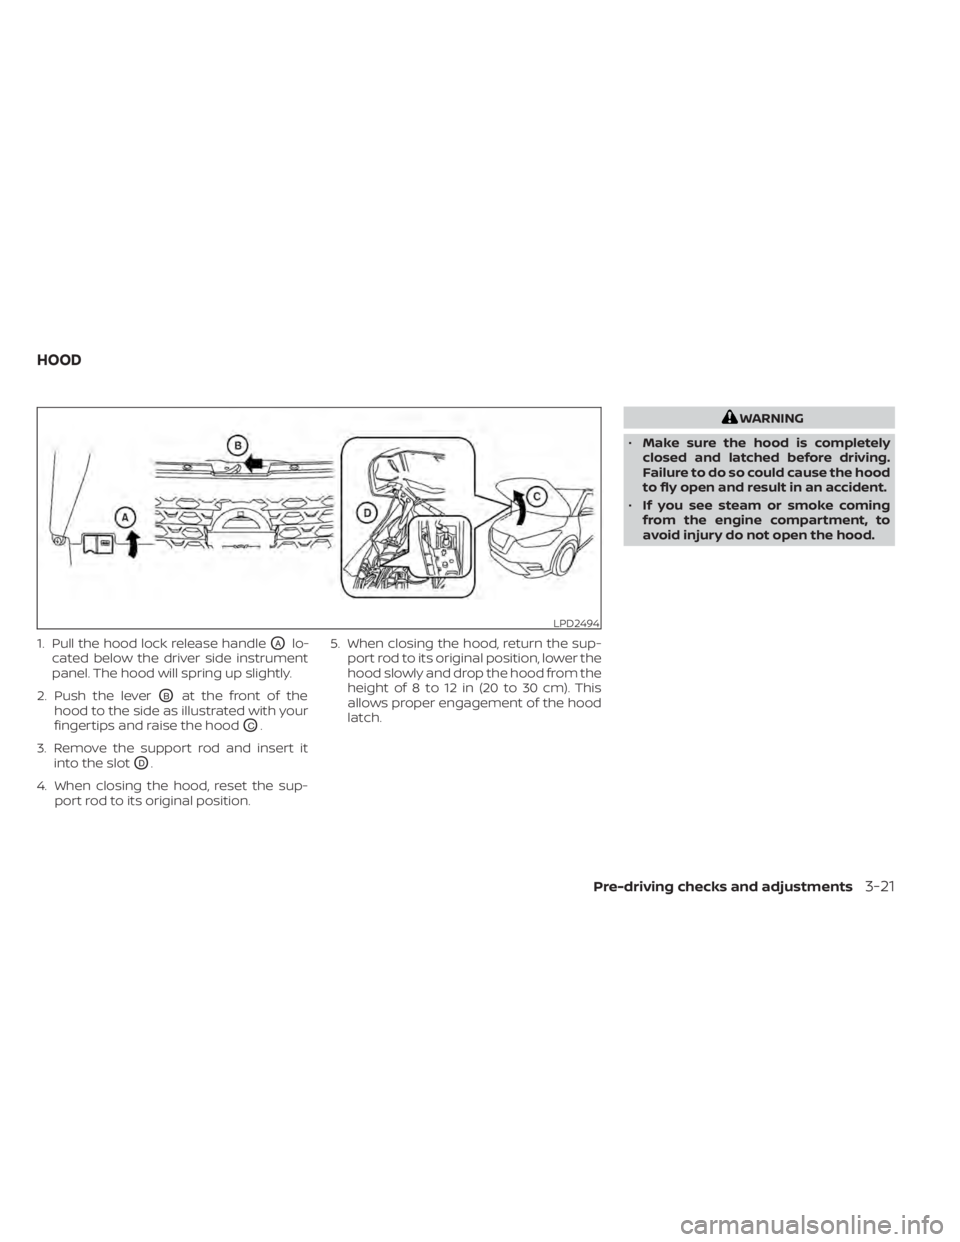
1. Pull the hood lock release handleOAlo-
cated below the driver side instrument
panel. The hood will spring up slightly.
2. Push the lever
OBat the front of the
hood to the side as illustrated with your
fingertips and raise the hood
OC.
3. Remove the support rod and insert it into the slot
OD.
4. When closing the hood, reset the sup- port rod to its original position. 5. When closing the hood, return the sup-
port rod to its original position, lower the
hood slowly and drop the hood from the
height of 8 to 12 in (20 to 30 cm). This
allows proper engagement of the hood
latch.
WARNING
• Make sure the hood is completely
closed and latched before driving.
Failure to do so could cause the hood
to fly open and result in an accident.
• If you see steam or smoke coming
from the engine compartment, to
avoid injury do not open the hood.
LPD2494
HOOD
Pre-driving checks and adjustments3-21
Page 183 of 500
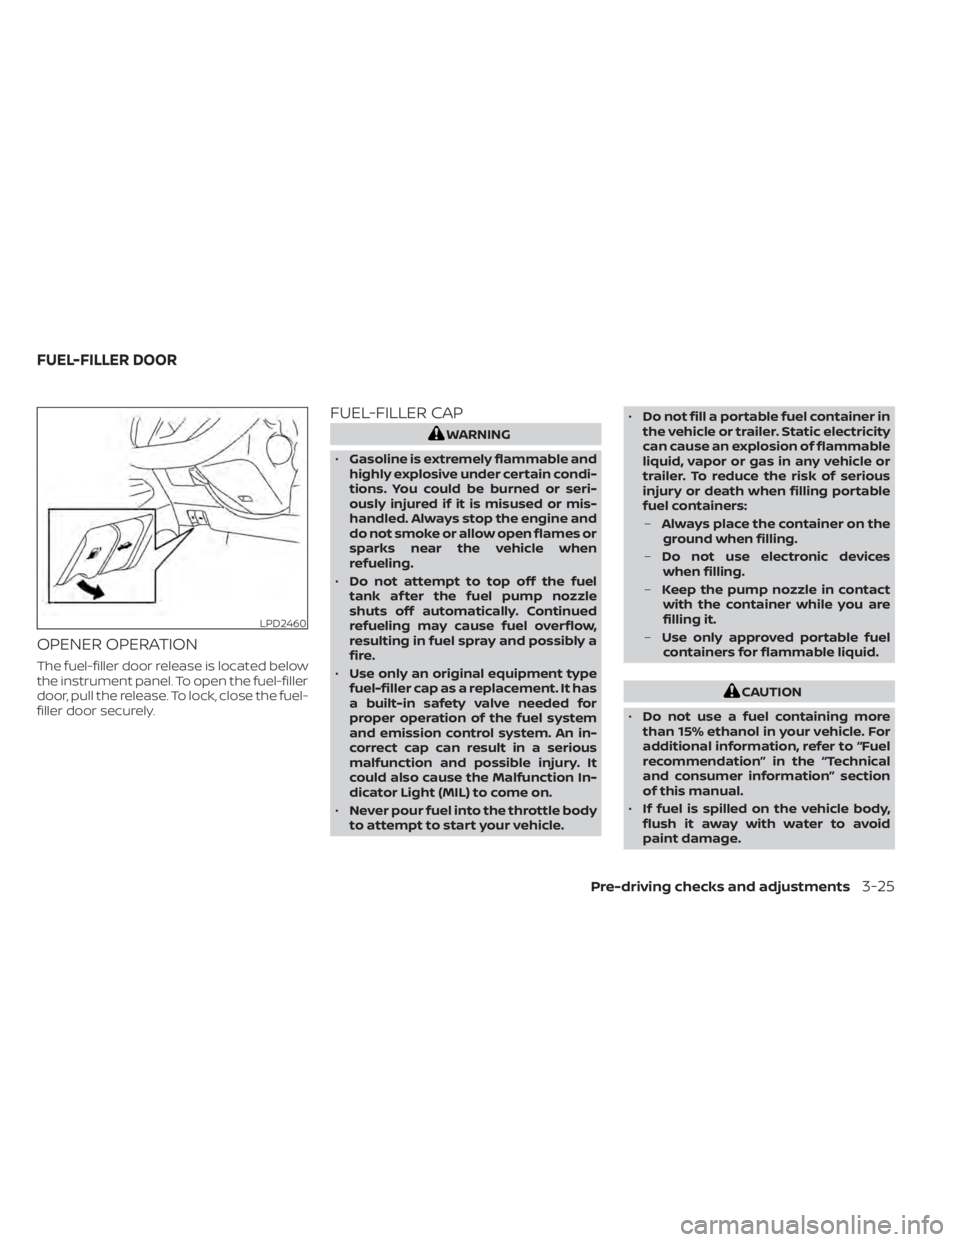
OPENER OPERATION
The fuel-filler door release is located below
the instrument panel. To open the fuel-filler
door, pull the release. To lock, close the fuel-
filler door securely.
FUEL-FILLER CAP
WARNING
• Gasoline is extremely flammable and
highly explosive under certain condi-
tions. You could be burned or seri-
ously injured if it is misused or mis-
handled. Always stop the engine and
do not smoke or allow open flames or
sparks near the vehicle when
refueling.
• Do not attempt to top off the fuel
tank af ter the fuel pump nozzle
shuts off automatically. Continued
refueling may cause fuel overflow,
resulting in fuel spray and possibly a
fire.
• Use only an original equipment type
fuel-filler cap as a replacement. It has
a built-in safety valve needed for
proper operation of the fuel system
and emission control system. An in-
correct cap can result in a serious
malfunction and possible injury. It
could also cause the Malfunction In-
dicator Light (MIL) to come on.
• Never pour fuel into the throttle body
to attempt to start your vehicle. •
Do not fill a portable fuel container in
the vehicle or trailer. Static electricity
can cause an explosion of flammable
liquid, vapor or gas in any vehicle or
trailer. To reduce the risk of serious
injury or death when filling portable
fuel containers:
– Always place the container on the
ground when filling.
– Do not use electronic devices
when filling.
– Keep the pump nozzle in contact
with the container while you are
filling it.
– Use only approved portable fuel
containers for flammable liquid.
CAUTION
• Do not use a fuel containing more
than 15% ethanol in your vehicle. For
additional information, refer to “Fuel
recommendation” in the “Technical
and consumer information” section
of this manual.
• If fuel is spilled on the vehicle body,
flush it away with water to avoid
paint damage.
LPD2460
FUEL-FILLER DOOR
Pre-driving checks and adjustments3-25