door lock NISSAN KICKS 2020 Owner´s Manual
[x] Cancel search | Manufacturer: NISSAN, Model Year: 2020, Model line: KICKS, Model: NISSAN KICKS 2020Pages: 500, PDF Size: 3.43 MB
Page 111 of 500
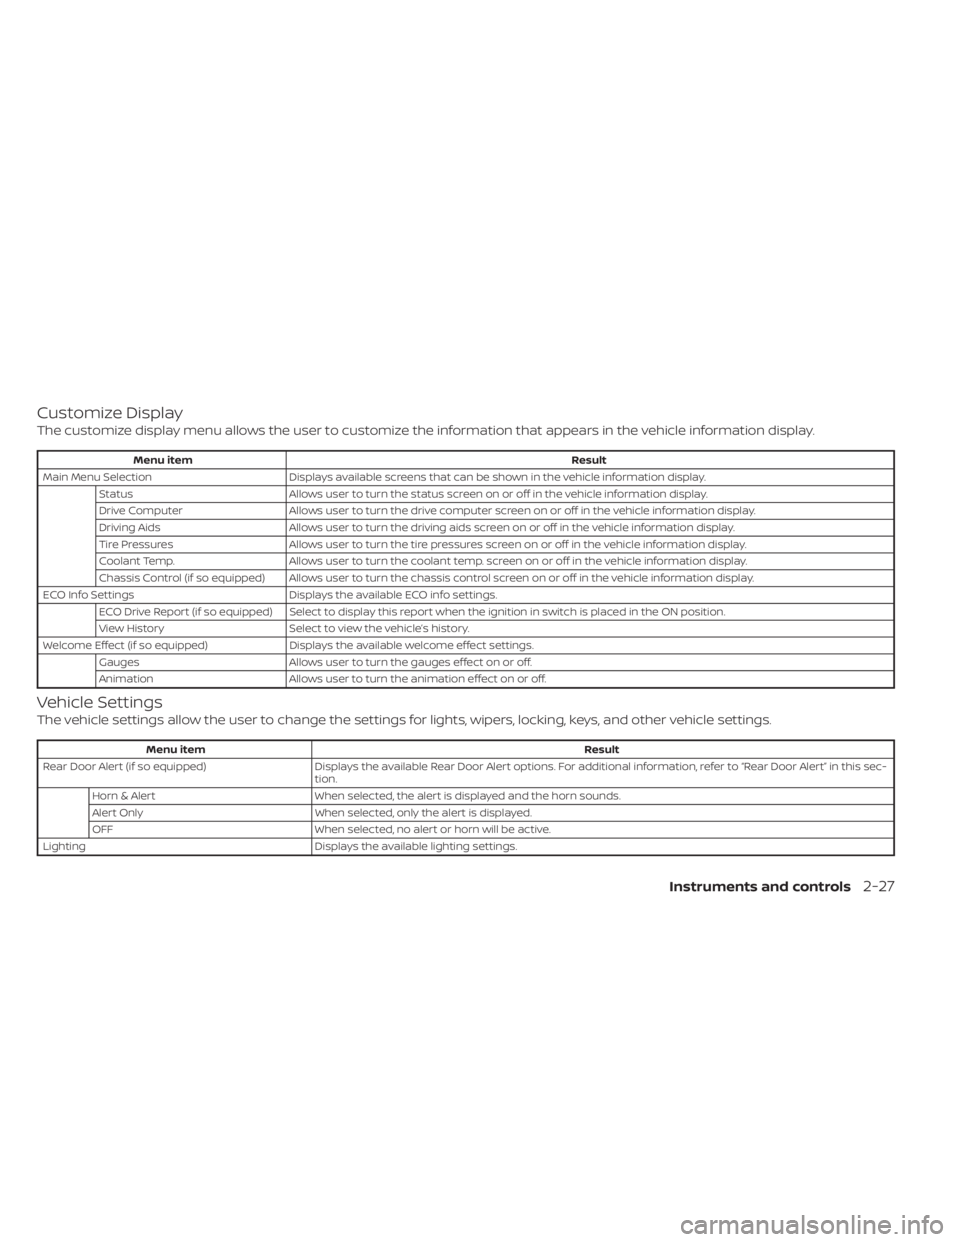
Customize Display
The customize display menu allows the user to customize the information that appears in the vehicle information display.
Menu itemResult
Main Menu Selection Displays available screens that can be shown in the vehicle information display.
Status Allows user to turn the status screen on or off in the vehicle information display.
Drive Computer Allows user to turn the drive computer screen on or off in the vehicle information display.
Driving Aids Allows user to turn the driving aids screen on or off in the vehicle information display.
Tire Pressures Allows user to turn the tire pressures screen on or off in the vehicle information display.
Coolant Temp. Allows user to turn the coolant temp. screen on or off in the vehicle information display.
Chassis Control (if so equipped) Allows user to turn the chassis control screen on or off in the vehicle information display.
ECO Info Settings Displays the available ECO info settings.
ECO Drive Report (if so equipped) Select to display this report when the ignition in switch is placed in the ON position.
View History Select to view the vehicle’s history.
Welcome Effect (if so equipped) Displays the available welcome effect settings.
Gauges Allows user to turn the gauges effect on or off.
Animation Allows user to turn the animation effect on or off.
Vehicle Settings
The vehicle settings allow the user to change the settings for lights, wipers, locking, keys, and other vehicle settings.
Menu item Result
Rear Door Alert (if so equipped) Displays the available Rear Door Alert options. For additional information, refer to “Rear Door Alert” in this sec-
tion.
Horn & Alert When selected, the alert is displayed and the horn sounds.
Alert Only When selected, only the alert is displayed.
OFF When selected, no alert or horn will be active.
Lighting Displays the available lighting settings.
Instruments and controls2-27
Page 112 of 500
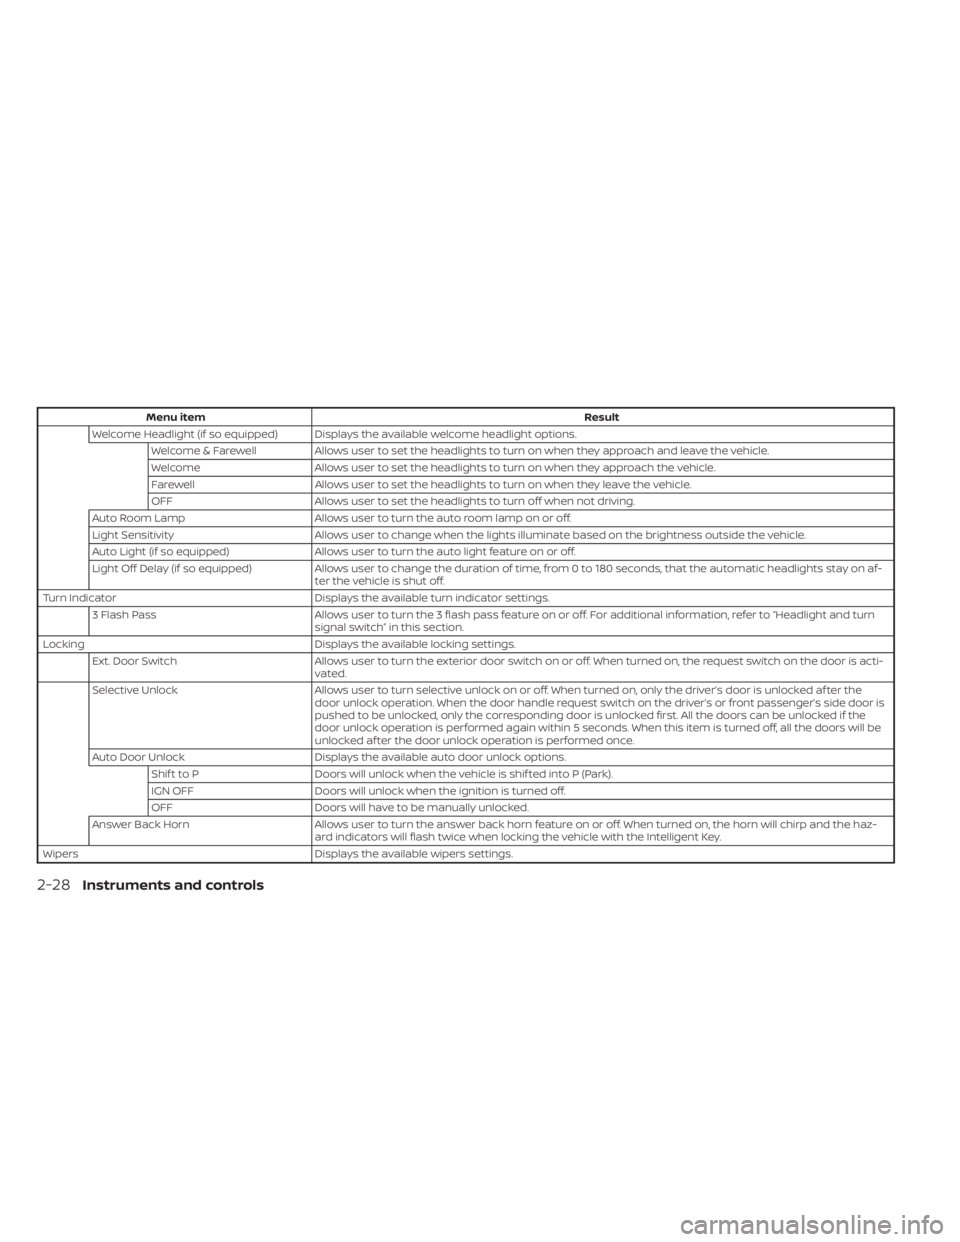
Menu itemResult
Welcome Headlight (if so equipped) Displays the available welcome headlight options. Welcome & Farewell Allows user to set the headlights to turn on when they approach and leave the vehicle.
Welcome Allows user to set the headlights to turn on when they approach the vehicle.
Farewell Allows user to set the headlights to turn on when they leave the vehicle.
OFF Allows user to set the headlights to turn off when not driving.
Auto Room Lamp Allows user to turn the auto room lamp on or off.
Light Sensitivity Allows user to change when the lights illuminate based on the brightness outside the vehicle.
Auto Light (if so equipped) Allows user to turn the auto light feature on or off.
Light Off Delay (if so equipped) Allows user to change the duration of time, from 0 to 180 seconds, that the automatic headlights stay on af-
ter the vehicle is shut off.
Turn Indicator Displays the available turn indicator settings.
3 Flash Pass Allows user to turn the 3 flash pass feature on or off. For additional information, refer to “Headlight and turn
signal switch” in this section.
Locking Displays the available locking settings.
Ext. Door Switch Allows user to turn the exterior door switch on or off. When turned on, the request switch on the door is acti-
vated.
Selective Unlock Allows user to turn selective unlock on or off. When turned on, only the driver’s door is unlocked af ter the
door unlock operation. When the door handle request switch on the driver’s or front passenger’s side door is
pushed to be unlocked, only the corresponding door is unlocked first. All the doors can be unlocked if the
door unlock operation is performed again within 5 seconds. When this item is turned off, all the doors will be
unlocked af ter the door unlock operation is performed once.
Auto Door Unlock Displays the available auto door unlock options.
Shif t to P Doors will unlock when the vehicle is shif ted into P (Park).
IGN OFF Doors will unlock when the ignition is turned off.
OFF Doors will have to be manually unlocked.
Answer Back Horn Allows user to turn the answer back horn feature on or off. When turned on, the horn will chirp and the haz-
ard indicators will flash twice when locking the vehicle with the Intelligent Key.
Wipers Displays the available wipers settings.
2-28Instruments and controls
Page 116 of 500
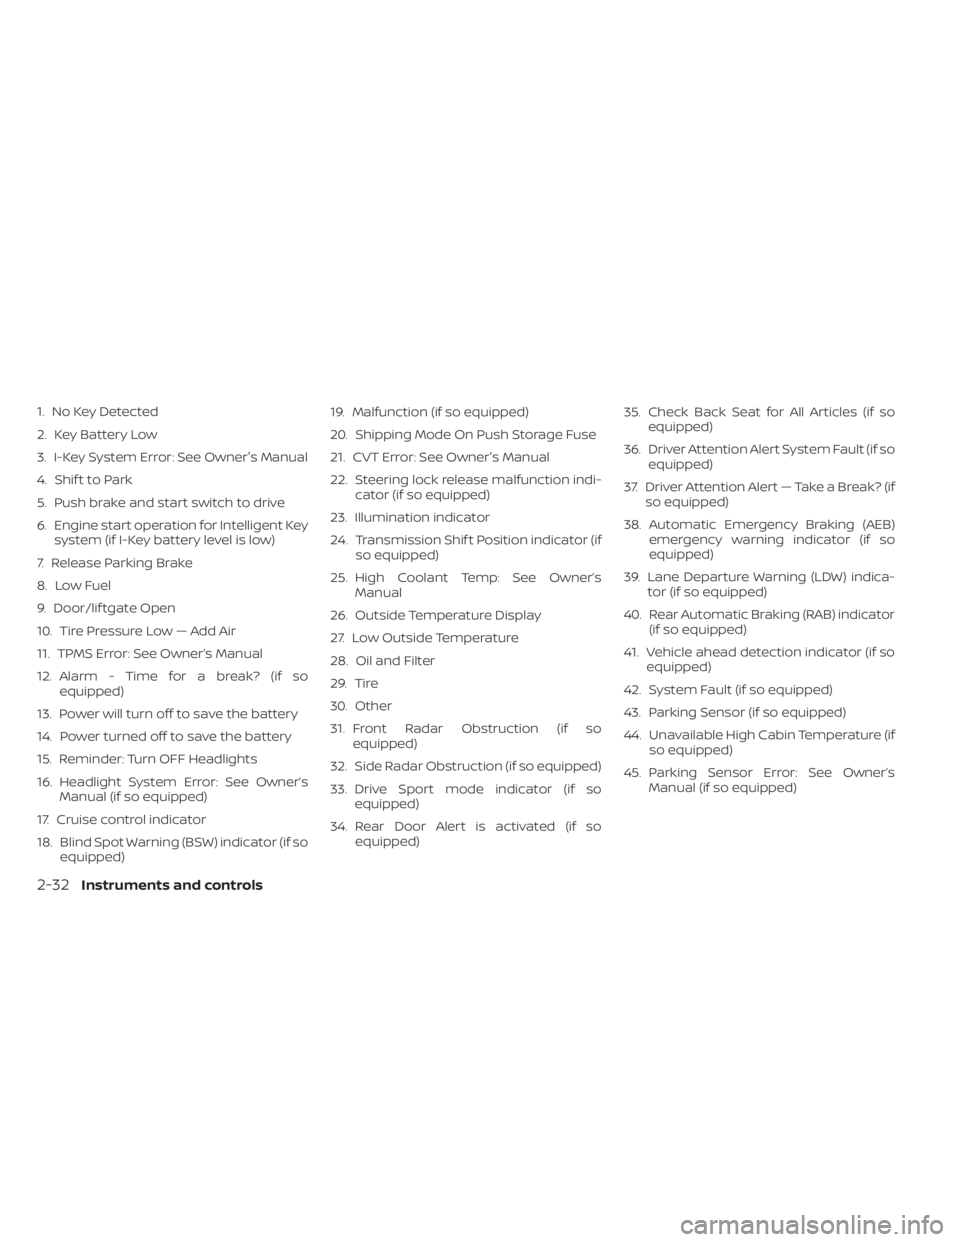
1. No Key Detected
2. Key Battery Low
3. I-Key System Error: See Owner's Manual
4. Shif t to Park
5. Push brake and start switch to drive
6. Engine start operation for Intelligent Keysystem (if I-Key battery level is low)
7. Release Parking Brake
8. Low Fuel
9. Door/lif tgate Open
10. Tire Pressure Low — Add Air
11. TPMS Error: See Owner’s Manual
12. Alarm - Time for a break? (if so equipped)
13. Power will turn off to save the battery
14. Power turned off to save the battery
15. Reminder: Turn OFF Headlights
16. Headlight System Error: See Owner’s Manual (if so equipped)
17. Cruise control indicator
18. Blind Spot Warning (BSW) indicator (if so equipped) 19. Malfunction (if so equipped)
20. Shipping Mode On Push Storage Fuse
21. CVT Error: See Owner's Manual
22. Steering lock release malfunction indi-
cator (if so equipped)
23. Illumination indicator
24. Transmission Shif t Position indicator (if so equipped)
25. High Coolant Temp: See Owner’s Manual
26. Outside Temperature Display
27. Low Outside Temperature
28. Oil and Filter
29. Tire
30. Other
31. Front Radar Obstruction (if so equipped)
32. Side Radar Obstruction (if so equipped)
33. Drive Sport mode indicator (if so equipped)
34. Rear Door Alert is activated (if so equipped) 35. Check Back Seat for All Articles (if so
equipped)
36. Driver Attention Alert System Fault (if so equipped)
37. Driver Attention Alert — Take a Break? (if so equipped)
38. Automatic Emergency Braking (AEB) emergency warning indicator (if so
equipped)
39. Lane Departure Warning (LDW) indica- tor (if so equipped)
40. Rear Automatic Braking (RAB) indicator (if so equipped)
41. Vehicle ahead detection indicator (if so equipped)
42. System Fault (if so equipped)
43. Parking Sensor (if so equipped)
44. Unavailable High Cabin Temperature (if so equipped)
45. Parking Sensor Error: See Owner’s Manual (if so equipped)
2-32Instruments and controls
Page 120 of 500
WARNING
The tire replacement indicator is not a
substitute for regular tire checks, in-
cluding tire pressure checks. For addi-
tional information, refer to “Changing
wheels and tires” in the “Do-it-yourself ”
section of this manual. Many factors in-
cluding tire inflation, alignment, driving
habits and road conditions affect tire
wear and when tires should be re-
placed. Setting the tire replacement in-
dicator for a certain driving distance
does not mean your tires will last that
long. Use the tire replacement indicator
as a guide only and always perform
regular tire checks. Failure to perform
regular tire checks, including tire pres-
sure checks could result in tire failure.
Serious vehicle damage could occur
and may lead to a collision, which could
result in serious personal injury or
death.
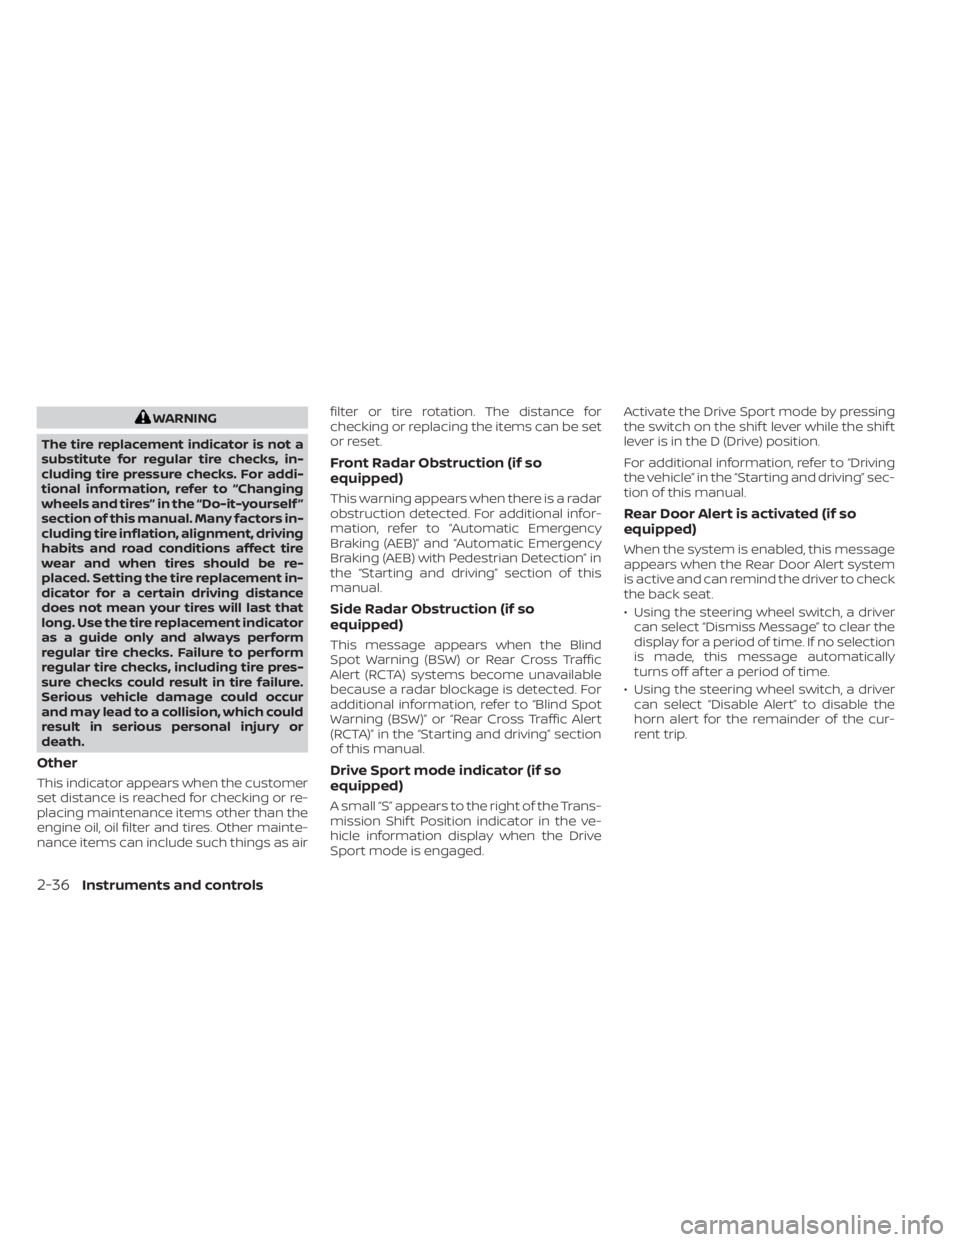
Other
This indicator appears when the customer
set distance is reached for checking or re-
placing maintenance items other than the
engine oil, oil filter and tires. Other mainte-
nance items can include such things as air filter or tire rotation. The distance for
checking or replacing the items can be set
or reset.
Front Radar Obstruction (if so
equipped)
This warning appears when there is a radar
obstruction detected. For additional infor-
mation, refer to “Automatic Emergency
Braking (AEB)” and “Automatic Emergency
Braking (AEB) with Pedestrian Detection” in
the “Starting and driving” section of this
manual.
Side Radar Obstruction (if so
equipped)
This message appears when the Blind
Spot Warning (BSW) or Rear Cross Traffic
Alert (RCTA) systems become unavailable
because a radar blockage is detected. For
additional information, refer to “Blind Spot
Warning (BSW)” or “Rear Cross Traffic Alert
(RCTA)” in the “Starting and driving” section
of this manual.
Drive Sport mode indicator (if so
equipped)
A small “S” appears to the right of the Trans-
mission Shif t Position indicator in the ve-
hicle information display when the Drive
Sport mode is engaged.Activate the Drive Sport mode by pressing
the switch on the shif t lever while the shif t
lever is in the D (Drive) position.
For additional information, refer to “Driving
the vehicle” in the “Starting and driving” sec-
tion of this manual.
Rear Door Alert is activated (if so
equipped)
When the system is enabled, this message
appears when the Rear Door Alert system
is active and can remind the driver to check
the back seat.
• Using the steering wheel switch, a driver
can select “Dismiss Message” to clear the
display for a period of time. If no selection
is made, this message automatically
turns off af ter a period of time.
• Using the steering wheel switch, a driver can select “Disable Alert” to disable the
horn alert for the remainder of the cur-
rent trip.
2-36Instruments and controls
Page 123 of 500
The system helps deter vehicle thef t but
cannot prevent it, nor can it prevent the
thef t of interior or exterior vehicle compo-
nents in all situations. Always secure your
vehicle even if parking for a brief period.
Never leave your keys in the vehicle, and
always lock the vehicle when unattended.
Be aware of your surroundings, and park in
secure, well-lit areas whenever possible.
Many devices offering additional protec-
tion, such as component locks, identifica-
tion markers, and tracking systems, are
available at auto supply stores and spe-
cialty shops. A NISSAN dealer may also offer
such equipment. Check with your insur-
ance company to see if you may be eligible
for discounts for various thef t protection
features.
How to arm the vehicle security
system
1. Close all windows.(The system can be
armed even if the windows are open.)
2. Remove the keys from the vehicle.
3. Close all doors, hood and lif tgate. Lock all doors. The doors can be locked with
the key fob, Intelligent Key, mechanical
key, or door handle request switch (if so
equipped). 4. Confirm that the
security indicator
light stays on for about 30 seconds. The
vehicle security system is now pre-
armed. The vehicle security system will
automatically shif t into the armed
phase. The
security light begins to
flash once every three seconds. If during
the pre-armed phase one of the follow-
ing occurs, the system will not arm:
• Any door is unlocked with the key fob, the Intelligent Key, mechanical key, or door
request switch (if so equipped).
•
Ignition switch is placed in the ON position.
• Even when the driver and/or passen-
gers are in the vehicle, the system will
activate with all the doors, hood and
lif tgate locked with the ignition switch
placed in the LOCK position. When plac-
ing the ignition switch in the ON posi-
tion, the system will be released.
Vehicle security system activation
The vehicle security system will give the
following alarm:
• The headlights or turn lamps blink and the horn sounds intermittently but syn-
chronously.
•
The alarm automatically turns off af ter a
period of time. However, the alarm reacti-
vates if the vehicle is tampered with again.
The alarm is activated by:
• opening any door, hood or the lif tgate without using the key or Intelligent Key
(even if the door is unlocked by releasing
the door inside lock knob).
How to stop an activated alarm
The alarm stops only by unlocking a door
or the lif tgate with the key fob, pressing the
button on the Intelligent Key, or push-
ing the request switch (if so equipped) on
the driver's or passenger's door with the
Intelligent Key in range of the door handle.
NISSAN ANTI-THEFT SYSTEM
(NATS) (if so equipped)
The NISSAN Anti-Thef t System will not al-
low the engine to start without the use of a
registered NATS key.
If the engine does not start using the reg-
istered NATS key, it may be due to interfer-
ence caused by:
• Another NATS key
• Automated toll road device
• Automated payment device
•
Other devices that transmit similar signals
Instruments and controls2-39
Page 140 of 500
Push the VDC OFF switch again or restart
the engine to turn on the system. For addi-
tional information, refer to “Vehicle Dy-
namic Control (VDC) system” in the “Start-
ing and driving” section of this manual.The Rear Door Alert system functions un-
der certain conditions to indicate there
may be an object or passenger in the rear
seat(s). Check the seat(s) before exiting the
vehicle.
The Rear Door Alert system is initially dis-
abled. The driver can enable the system
using the vehicle information display. For
additional information, refer to “Vehicle in-
formation display warnings and indicators”
in this section.
When the system is enabled:
• The system is activated when a rear door
is opened and closed within 10 minutes of
the vehicle being driven. When the driver
door is closed and the system is acti-
vated, a visual message appears in the
vehicle information display. For additional
information, refer to “Rear Door Alert is
activated” in this section.
• If a rear door is opened and closed but the vehicle is not driven within approxi-
mately 10 minutes, the system will not be
activated. A rear door must be opened
and closed and the car driven within 10
minutes for the system to activate.
When the Rear Door Alert system is acti-
vated: • When the driver puts the vehicle in the P
(Park) position, a notification message
appears in the vehicle information dis-
play with the options to “Dismiss Mes-
sage” or “Disable Alert” if desired.– Select “Disable Alert” to temporarily disable for that stop.
– No selection or ‘Dismiss Message” will keep the alert enabled for that stop.
• If the alert is enabled when a driver exits the vehicle, a message will appear in the
vehicle information display that states
“Check Back Seat For All Articles.”
If “Horn & Alert” setting is selected:
– – An audible horn sound will occur af ter
a short time unless a rear door is
opened and closed within a short time
to deactivate the alert.
–– If the doors are locked before the alert is deactivated by opening a rear door,
the horn will sound.
–– If the trunk is opened before a rear door is opened, the horn will be delayed until
af ter the trunk is closed.
NOTE:
If “Alert Only ” setting is selected, the
message alert will still be shown in the
vehicle information display but the horn
will not sound.
REAR DOOR ALERT (if so equipped)
2-56Instruments and controls
Page 152 of 500
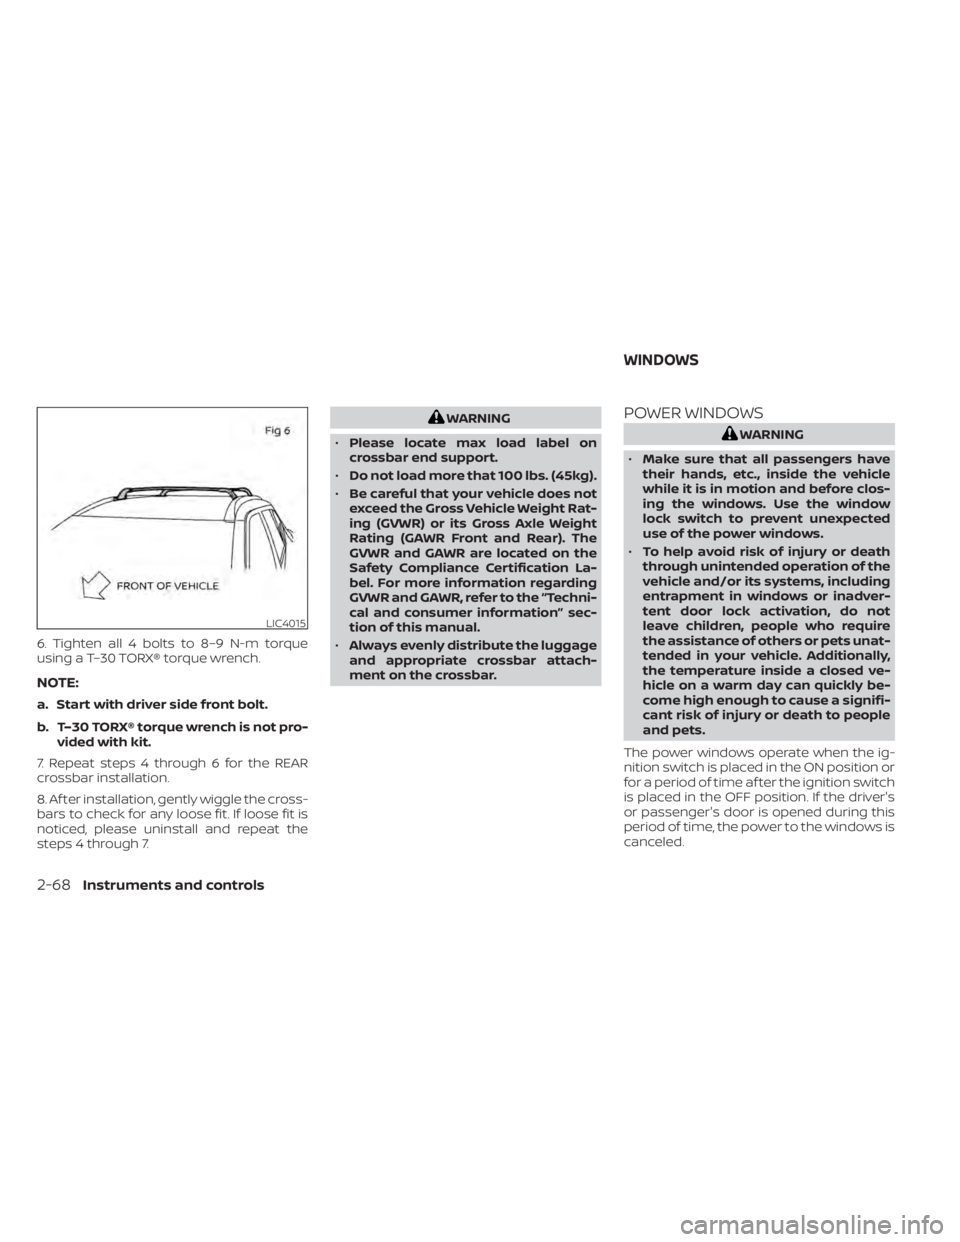
6. Tighten all 4 bolts to 8–9 N-m torque
using a T–30 TORX® torque wrench.
NOTE:
a. Start with driver side front bolt.
b. T–30 TORX® torque wrench is not pro-vided with kit.
7. Repeat steps 4 through 6 for the REAR
crossbar installation.
8. Af ter installation, gently wiggle the cross-
bars to check for any loose fit. If loose fit is
noticed, please uninstall and repeat the
steps 4 through 7.
WARNING
• Please locate max load label on
crossbar end support.
• Do not load more that 100 lbs. (45kg).
• Be careful that your vehicle does not
exceed the Gross Vehicle Weight Rat-
ing (GVWR) or its Gross Axle Weight
Rating (GAWR Front and Rear). The
GVWR and GAWR are located on the
Safety Compliance Certification La-
bel. For more information regarding
GVWR and GAWR, refer to the “Techni-
cal and consumer information” sec-
tion of this manual.
• Always evenly distribute the luggage
and appropriate crossbar attach-
ment on the crossbar.POWER WINDOWS
WARNING
• Make sure that all passengers have
their hands, etc., inside the vehicle
while it is in motion and before clos-
ing the windows. Use the window
lock switch to prevent unexpected
use of the power windows.
• To help avoid risk of injury or death
through unintended operation of the
vehicle and/or its systems, including
entrapment in windows or inadver-
tent door lock activation, do not
leave children, people who require
the assistance of others or pets unat-
tended in your vehicle. Additionally,
the temperature inside a closed ve-
hicle on a warm day can quickly be-
come high enough to cause a signifi-
cant risk of injury or death to people
and pets.
The power windows operate when the ig-
nition switch is placed in the ON position or
for a period of time af ter the ignition switch
is placed in the OFF position. If the driver's
or passenger's door is opened during this
period of time, the power to the windows is
canceled.
LIC4015
WINDOWS
2-68Instruments and controls
Page 153 of 500
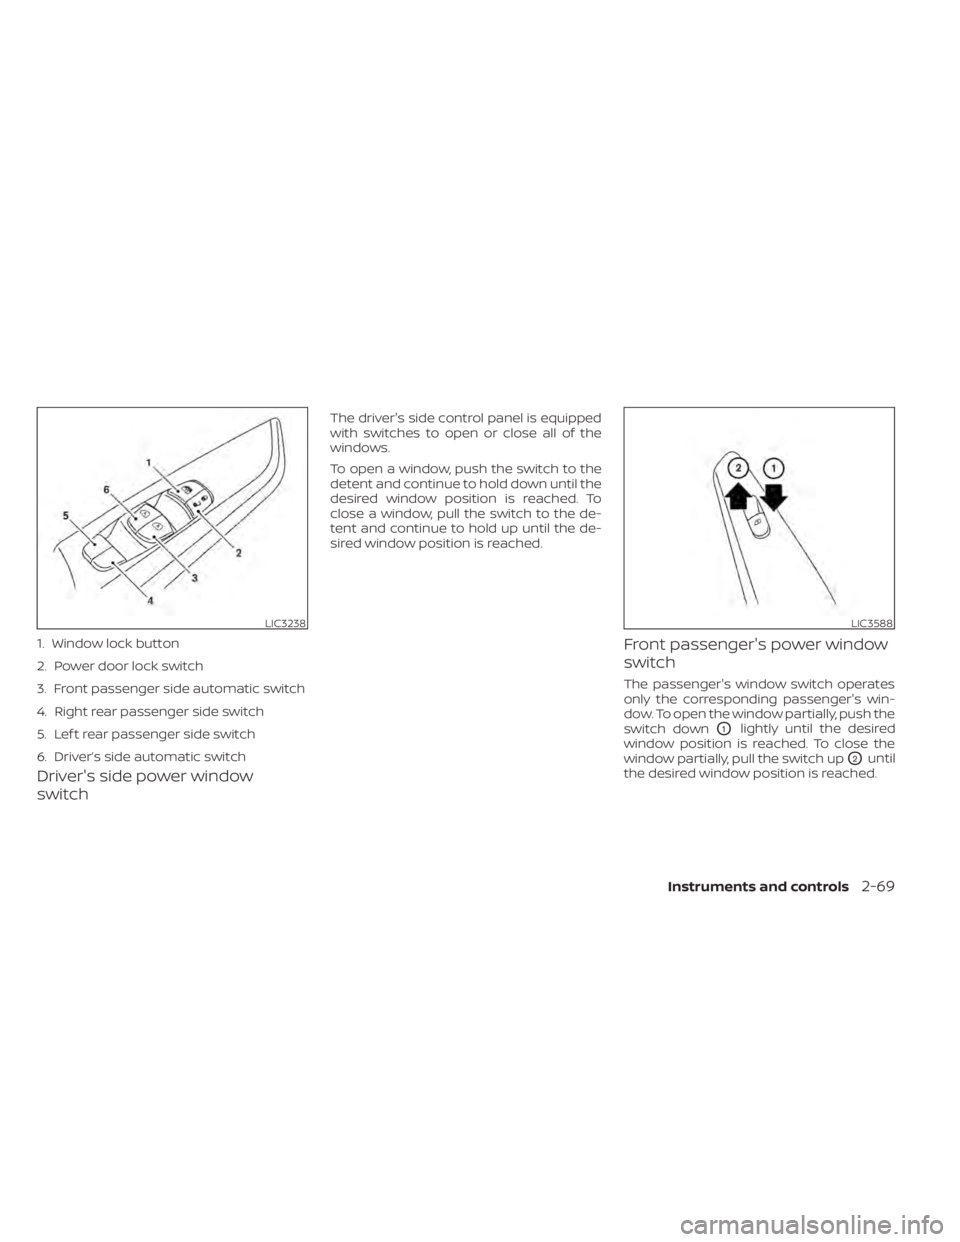
Driver's side power window
switch
The driver's side control panel is equipped
with switches to open or close all of the
windows.
To open a window, push the switch to the
detent and continue to hold down until the
desired window position is reached. To
close a window, pull the switch to the de-
tent and continue to hold up until the de-
sired window position is reached.
Front passenger's power window
switch
The passenger's window switch operates
only the corresponding passenger's win-
dow. To open the window partially, push the
switch down
O1lightly until the desired
window position is reached. To close the
window partially, pull the switch up
O2until
the desired window position is reached.
LIC3238
1. Window lock button
2. Power door lock switch
3. Front passenger side automatic switch
4. Right rear passenger side switch
5. Lef t rear passenger side switch
6. Driver’s side automatic switch
LIC3588
Instruments and controls2-69
Page 156 of 500
• The doors are unlocked by the key or thepower door lock switch while all doors are
closed and the ignition switch is placed in
the OFF position.
• The driver’s door is opened and then closed while the key is removed from the
ignition switch.
• The key is removed from the ignition switch while all doors are closed.
The light will turn off while the timer is acti-
vated when:
• The driver’s door is locked by the key, or the power door lock switch.
• The ignition switch is placed in the ON position.
When the switch is in the OFF position
O1,
the interior lights do not illuminate, regard-
less of door position.
The lights will turn off automatically af ter a
period of time while doors are open to pre-
vent the battery from becoming dis-
charged.
CAUTION
Do not use for extended periods of time
with the engine stopped. This could re-
sult in a discharged battery.
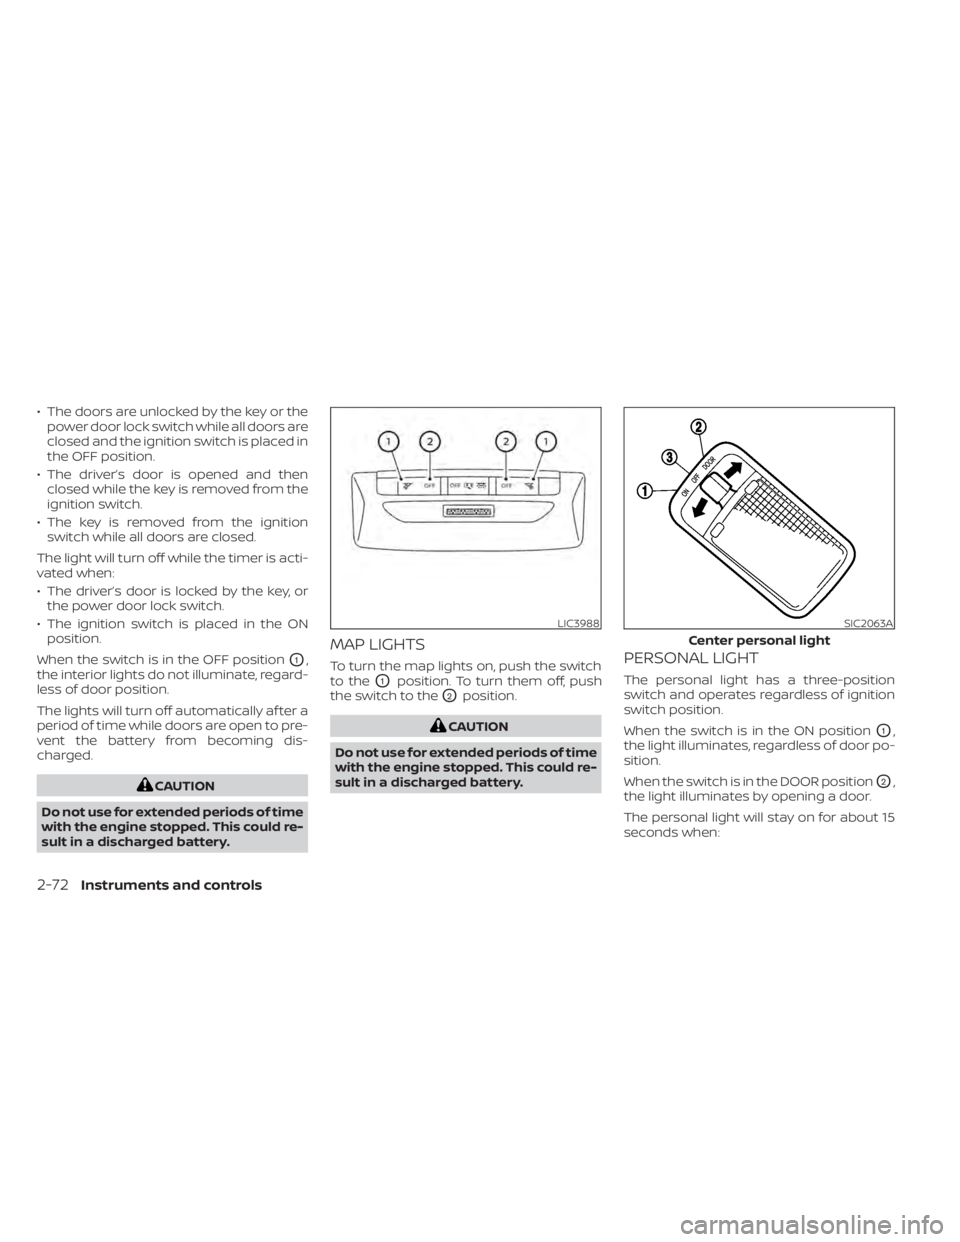
MAP LIGHTS
To turn the map lights on, push the switch
to the
O1position. To turn them off, push
the switch to the
O2position.
CAUTION
Do not use for extended periods of time
with the engine stopped. This could re-
sult in a discharged battery.
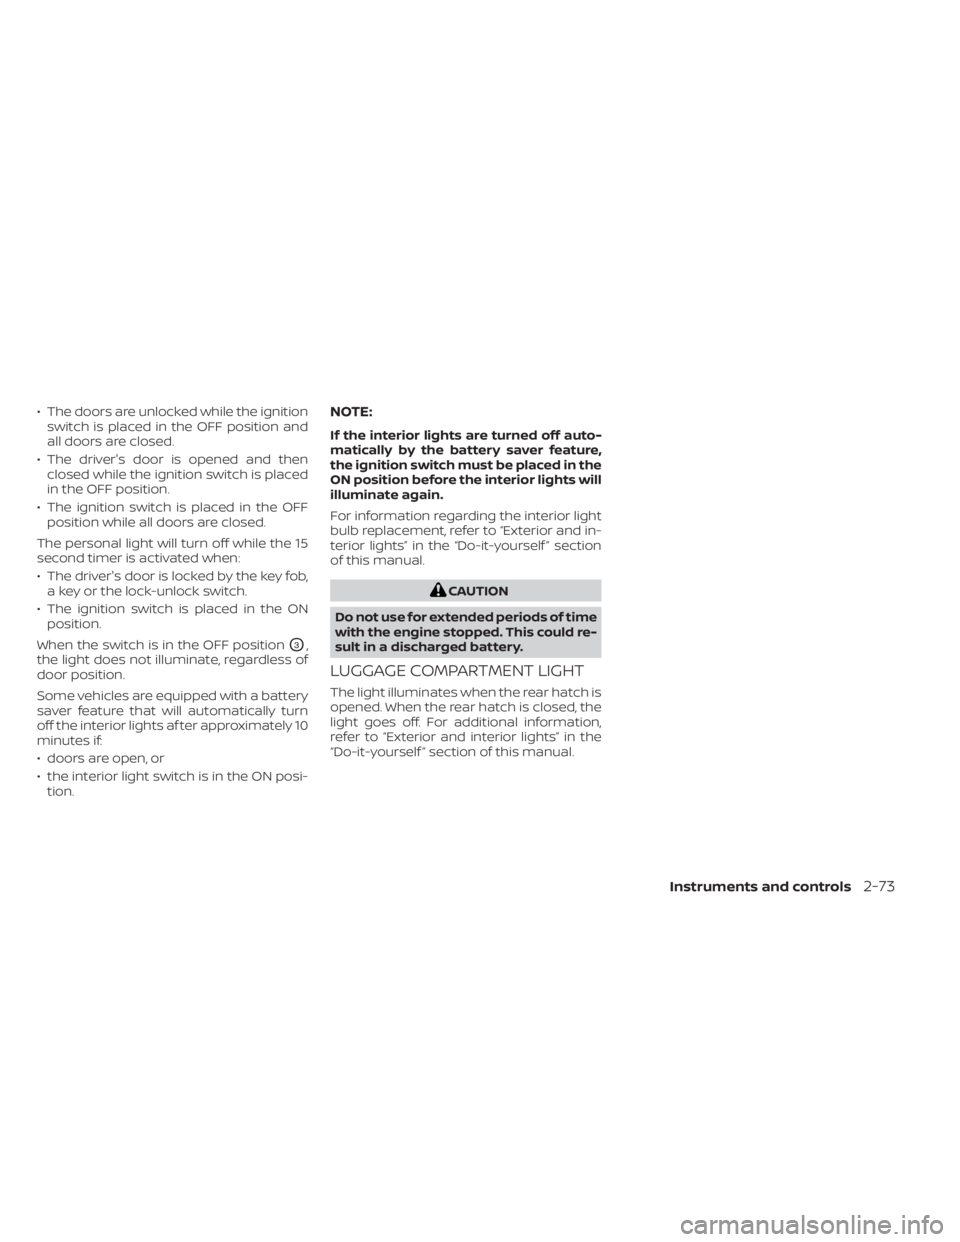
PERSONAL LIGHT
The personal light has a three-position
switch and operates regardless of ignition
switch position.
When the switch is in the ON position
O1,
the light illuminates, regardless of door po-
sition.
When the switch is in the DOOR position
O2,
the light illuminates by opening a door.
The personal light will stay on for about 15
seconds when:
LIC3988SIC2063A
Center personal light
2-72Instruments and controls
Page 157 of 500
• The doors are unlocked while the ignitionswitch is placed in the OFF position and
all doors are closed.
• The driver's door is opened and then closed while the ignition switch is placed
in the OFF position.
• The ignition switch is placed in the OFF position while all doors are closed.
The personal light will turn off while the 15
second timer is activated when:
• The driver's door is locked by the key fob, a key or the lock-unlock switch.
• The ignition switch is placed in the ON position.
When the switch is in the OFF position
O3,
the light does not illuminate, regardless of
door position.
Some vehicles are equipped with a battery
saver feature that will automatically turn
off the interior lights af ter approximately 10
minutes if:
• doors are open, or
• the interior light switch is in the ON posi- tion.
NOTE:
If the interior lights are turned off auto-
matically by the battery saver feature,
the ignition switch must be placed in the
ON position before the interior lights will
illuminate again.
For information regarding the interior light
bulb replacement, refer to “Exterior and in-
terior lights” in the “Do-it-yourself ” section
of this manual.
CAUTION
Do not use for extended periods of time
with the engine stopped. This could re-
sult in a discharged battery.
LUGGAGE COMPARTMENT LIGHT
The light illuminates when the rear hatch is
opened. When the rear hatch is closed, the
light goes off. For additional information,
refer to “Exterior and interior lights” in the
“Do-it-yourself ” section of this manual.
Instruments and controls2-73