center console NISSAN KICKS 2020 Owner´s Manual
[x] Cancel search | Manufacturer: NISSAN, Model Year: 2020, Model line: KICKS, Model: NISSAN KICKS 2020Pages: 500, PDF Size: 3.43 MB
Page 13 of 500
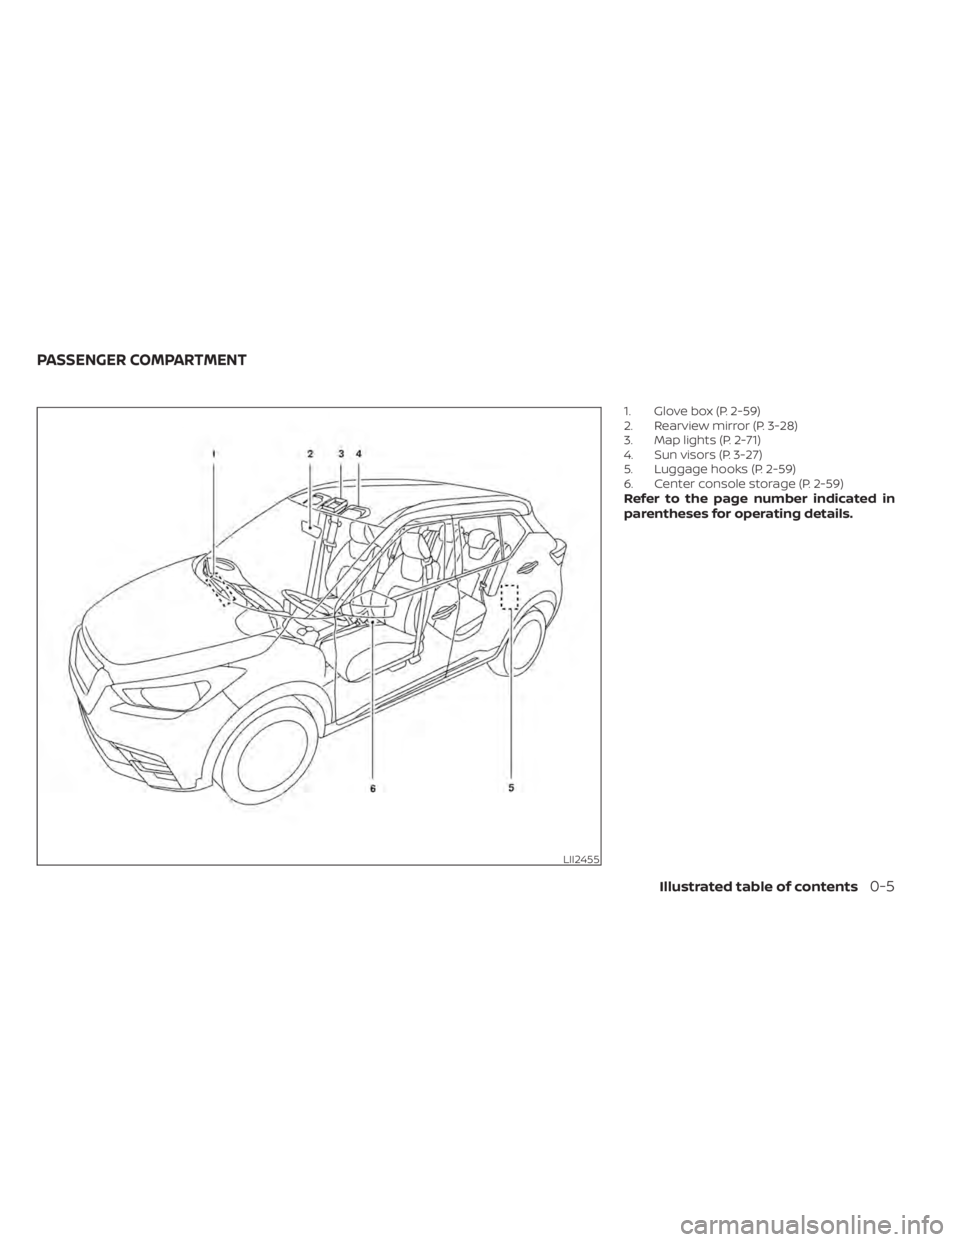
1. Glove box (P. 2-59)
2. Rearview mirror (P. 3-28)
3. Map lights (P. 2-71)
4. Sun visors (P. 3-27)
5. Luggage hooks (P. 2-59)
6. Center console storage (P. 2-59)
Refer to the page number indicated in
parentheses for operating details.
LII2455
PASSENGER COMPARTMENT
Illustrated table of contents0-5
Page 69 of 500
WARNING
To ensure proper operation of the pas-
senger’s NISSAN Advanced Air Bag Sys-
tem, please observe the following
items.
• Do not allow a passenger in the rear
seat to push or pull on the seatback
pocket.
• Do not place heavy loads heavier
than 9.1 lbs. (4 kg) on the seatback,
head restraint/headrest or in the
seatback pocket.
• Make sure that there is nothing
pressing against the rear of the seat-
back, such as a child restraint in-
stalled in the rear seat or an object
stored on the floor.
• Make sure that there is no object
placed under the front passenger
seat.
• Make sure that there is no object
placed between the seat cushion and
center console or between the seat
cushion and the door. •
If a forward-facing child restraint is
installed in the front passenger seat,
do not position the front passenger
seat so the child restraint contacts
the instrument panel. If the child re-
straint does contact the instrument
panel, the system may determine the
seat is occupied and the passenger
air bag may deploy in a collision. Also
the front passenger air bag status
light may not illuminate. For addi-
tional information, refer to “Child re-
straints” in this section.
• Confirm the operating condition with
the front passenger air bag status
light.
• If you notice that the front passenger
air bag status light is not operating
as described later in this section, get
the occupant classification system
checked. It is recommended that you
visit a NISSAN dealer for this service.
• Until you have confirmed with a
dealer that your front passenger seat
occupant classification system is
working properly, position the occu-
pants in the rear seating positions. •
Do not position the front passenger
seat so it contacts the rear seat. If the
front seat does contact the rear seat,
the air bag system may determine a
sensor malfunction has occurred
and the front passenger air bag sta-
tus light may illuminate and the
supplemental air bag warning light
may flash.
This vehicle is equipped with the NISSAN
Advanced Air Bag System for the driver and
front passenger seats. This system is de-
signed to meet certification requirements
under U.S. regulations. It is also permitted in
Canada. All of the information, cautions
and warnings in this manual still apply
and must be followed.
The driver supplemental front-impact air
bag is located in the center of the steering
wheel. The front passenger supplemental
front-impact air bag is mounted in the dash-
board above the glove box. The front air bags
are designed to inflate in higher severity
frontal collisions, although they may inflate if
the forces in another type of collision are
similar to those of a higher severity frontal
impact. They may not inflate in certain fron-
tal collisions. Vehicle damage (or lack of it) is
not always an indication of proper front air
bag system operation.
Safety-Seats, seat belts and supplemental restraint system1-49
Page 74 of 500
NOTE:
This vehicle’s occupant classification sen-
sor system generally keeps the classifica-
tion locked during driving, so it is impor-
tant that you confirm that the front
passenger is properly classified prior to
driving. However, the occupant classifica-
tion sensor may recalculate the weight of
the occupant under some conditions (both
while driving and when stopped), so front
passenger seat occupants should con-
tinue to remain seated as outlined above.
Troubleshooting
If you think the front passenger air bag
status light is incorrect:
1. If the light is ON with an adult occupyingthe front passenger seat:
• Occupant is a small adult — the air bag light is functioning as intended. The front
passenger air bag and passenger knee
air bag are suppressed.
However, if the occupant is not a small
adult, then this may be due to the following
conditions that may be interfering with the
weight sensors:
• Occupant is not sitting upright, leaning against the seatback, and centered on
the seat cushion with his/her feet com-
fortably extended to the floor. • A child restraint or other object pressing
against the rear of the seatback.
• A rear passenger pushing or pulling on the back of the front passenger seat.
• Forcing the front seat or seatback against an object on the seat or floor be-
hind it.
• An object placed under the front passen- ger seat.
• An object placed between the seat cush- ion and center console or between the
seat cushion and the door.
If the vehicle is moving, please come to a
stop when it is safe to do so. Check and
correct any of the above conditions. Re-
start the vehicle and wait 1 minute.
NOTE:
A system check will be performed during
which the front passenger air bag status
light will remain lit for about 7 seconds
initially.
If the light is still ON af ter this, the person
should be advised not to ride in the front
passenger seat and the vehicle should be
checked as soon as possible. It is recom-
mended that you visit a NISSAN dealer for
this service. 2. If the light is OFF with a small adult, child
or child restraint occupying the front
passenger seat.
This may be due to the following condi-
tions that may be interfering with the
weight sensors:
• Small adult or child is not sitting upright, leaning against the seatback, and cen-
tered on the seat cushion with his/her
feet comfortably extended to the floor.
• The child restraint is not properly in- stalled, as outlined in the “Child restraints”
section of this manual.
• An object weighing over 9.1 lbs. (4 kg) hanging on the seat or placed in the seat-
back pocket.
• A child restraint or other object pressing against the rear of the seatback.
• A rear passenger pushing or pulling on the back of the front passenger seat.
• Forcing the front seat or seatback against an object on the seat or floor be-
hind it.
• An object placed under the front passen- ger seat.
• An object placed between the seat cush- ion and center console.
1-54Safety-Seats, seat belts and supplemental restraint system
Page 145 of 500
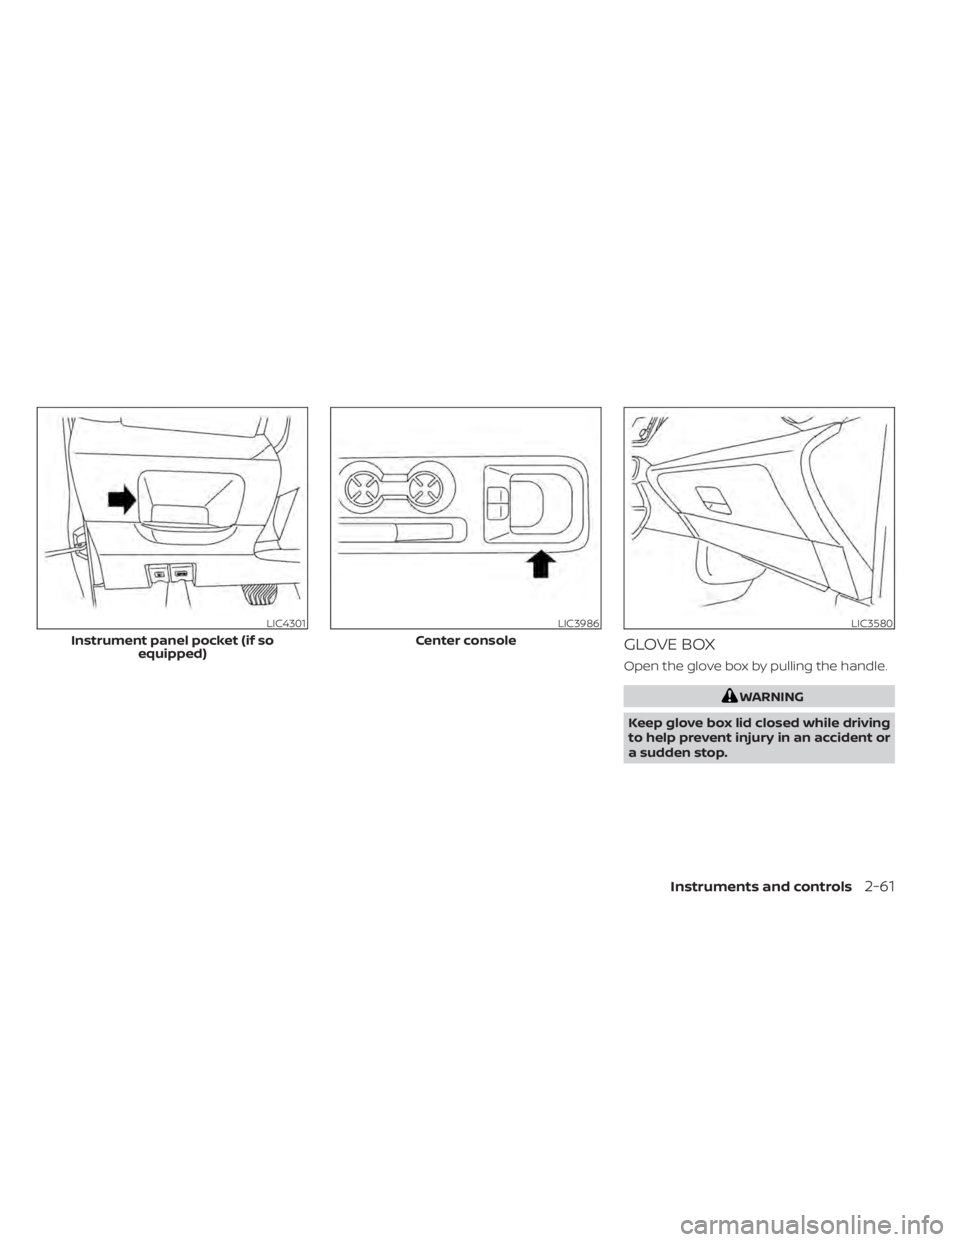
GLOVE BOX
Open the glove box by pulling the handle.
WARNING
Keep glove box lid closed while driving
to help prevent injury in an accident or
a sudden stop.
LIC4301
Instrument panel pocket (if so equipped)
LIC3986
Center console
LIC3580
Instruments and controls2-61
Page 235 of 500
General notes for USB use
• For additional information, refer to yourdevice manufacturer's owner informa-
tion regarding the proper use and care of
the device.
Notes for iPod® use
iPod® is a trademark of Apple Inc., regis-
tered in the U.S. and other countries.
• Improperly plugging in the iPod® may cause a checkmark to be displayed on
and off (flickering). Always make sure that
the iPod® is connected properly.
• An iPod® nano (1st Generation) may re- main in fast forward or rewind mode if it is
connected during a seek operation. In
this case, please manually reset the
iPod®.
• An iPod® nano (2nd Generation) will con- tinue to fast-forward or rewind if it is dis-
connected during a seek operation.
• An incorrect song title may appear when the Play Mode is changed while using an
iPod® nano (2nd Generation).
• Audiobooks may not play in the same order as they appear on an iPod®.
• Large video files cause slow responses in an iPod®. The vehicle center display may
momentarily black out, but will soon re-
cover. • If an iPod® automatically selects large
video files while in the shuffle mode, the
vehicle center display may momentarily
black out, but will soon recover.
iPod®* player
• Some characters used in other lan-guages (Chinese, Japanese, etc.) are not
displayed properly on the vehicle center
screen. We recommend using English or
Spanish language characters with an
iPod®.
• Large video podcast files cause slow re- sponses in the iPod®. The vehicle center
display may momentarily black out, but it
will soon recover.
• If the iPod® automatically selects large video podcast files while in the shuffle
mode, the vehicle center display may
momentarily black out, but it will soon
recover.
• Improperly plugging in the iPod® may cause a checkmark to be displayed on
and off (flickering). Always make sure that
the iPod® is connected properly.
• The iPod® nano (2nd Generation) will con- tinue to fast forward or rewind if it is dis-
connected during a seek operation. • An incorrect song title may appear when
the Play Mode is changed while using the
iPod® nano (2nd Generation).
• Audiobooks may not play in the same order as they appear on the iPod®.
• The iPod® nano (1st Generation) may re- main in fast forward or rewind mode if it is
connected during a seek operation. In
this case, please manually reset the
iPod®.
• If you are using an iPod® (3rd Generation with Dock connector), do not use very
long names for the song title, album
name or artist name to prevent the iPod®
from resetting itself.
• Be careful not to do the following, or the cable could be damaged and a loss of
function may occur:– Bend the cable excessively (1.6 in (40 mm) radius maximum).
– Twist the cable excessively (more than 180 degrees).
– Pull or drop the cable.
– Do not force the iPod® cable connector into the device port.
– Close the center console lid on the cable or connectors.
– Store objects with sharp edges in the storage where the cable is stored.
Monitor, climate, audio, phone and voice recognition systems4-47
Page 241 of 500
Auxiliary (AUX) devices operation
Connecting auxiliary devices
Connect an AUX device into the AUX input
jack located on the center console below
the heater and air conditioner controls.
The AUX input jack accepts any standard
analog audio input such as from a portable
cassette player, CD player, MP3 player or
phone.
Insert a 1/8 in (3.5 mm) stereo mini plug in
the audio input jack. If a cable with a mono
plug is used, the audio output may not
function normally.
Activation and playing
Turn on the AUX device. Connect an AUX
cable to the AUX device and the AUX input
jack. Select AUX mode from the audio
source menu screen or by pressing the
Source button on the steering wheel.
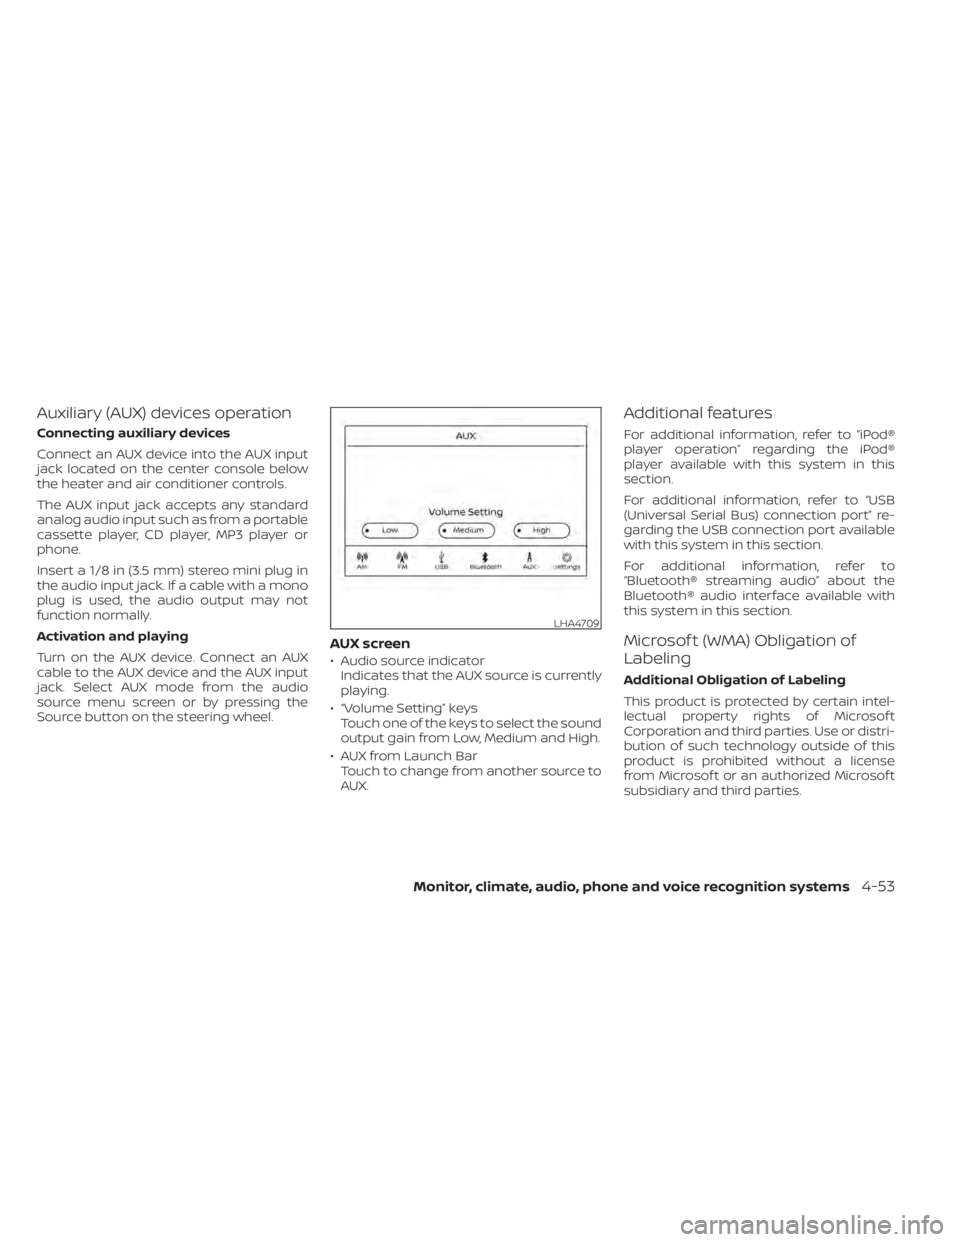
AUX screen
• Audio source indicatorIndicates that the AUX source is currently
playing.
• “Volume Setting” keys Touch one of the keys to select the sound
output gain from Low, Medium and High.
• AUX from Launch Bar Touch to change from another source to
AUX.
Additional features
For additional information, refer to “iPod®
player operation” regarding the iPod®
player available with this system in this
section.
For additional information, refer to “USB
(Universal Serial Bus) connection port” re-
garding the USB connection port available
with this system in this section.
For additional information, refer to
“Bluetooth® streaming audio” about the
Bluetooth® audio interface available with
this system in this section.
Microsof t (WMA) Obligation of
Labeling
Additional Obligation of Labeling
This product is protected by certain intel-
lectual property rights of Microsof t
Corporation and third parties. Use or distri-
bution of such technology outside of this
product is prohibited without a license
from Microsof t or an authorized Microsof t
subsidiary and third parties.
LHA4709
Monitor, climate, audio, phone and voice recognition systems4-53
Page 245 of 500
iPod®* PLAYER OPERATION
Connecting iPod®
WARNING
Do not connect, disconnect, or operate
the USB device while driving. Doing so
can be a distraction. If distracted you
could lose control of your vehicle and
cause an accident or serious injury.
CAUTION
• Do not force the USB device into the
USB port. Inserting the USB device
tilted or up-side-down into the port
may damage the port. Make sure
that the USB device is connected cor-
rectly into the USB port.
• Do not grab the USB port cover (if so
equipped) when pulling the USB de-
vice out of the port. This could dam-
age the port and the cover.
• Do not leave the USB cable in a place
where it can be pulled unintention-
ally. Pulling the cable may damage
the port.
For additional information, refer to your de-
vice manufacturer’s owner information re-
garding the proper use and care of the
device.
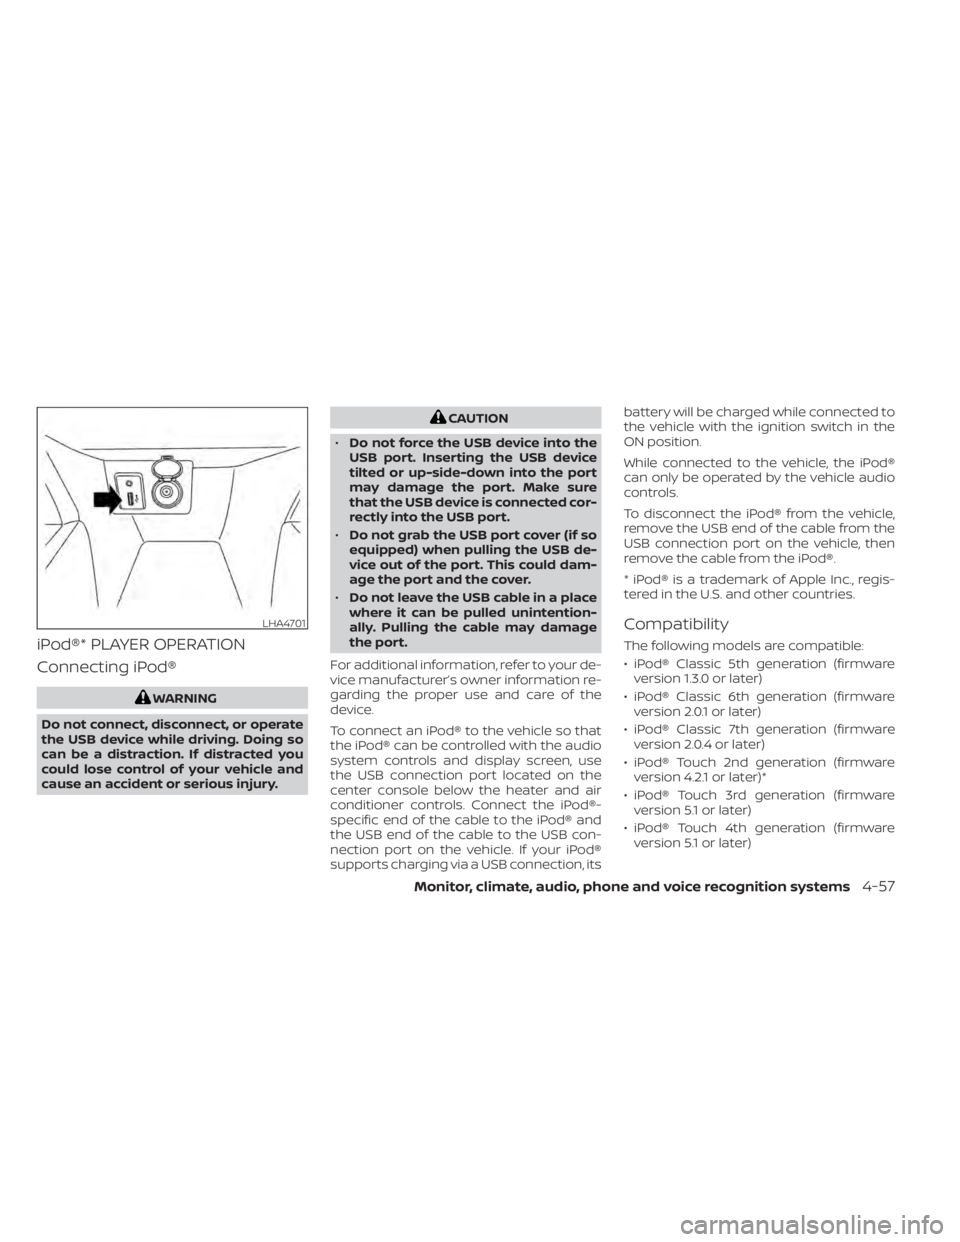
To connect an iPod® to the vehicle so that
the iPod® can be controlled with the audio
system controls and display screen, use
the USB connection port located on the
center console below the heater and air
conditioner controls. Connect the iPod®-
specific end of the cable to the iPod® and
the USB end of the cable to the USB con-
nection port on the vehicle. If your iPod®
supports charging via a USB connection, its battery will be charged while connected to
the vehicle with the ignition switch in the
ON position.
While connected to the vehicle, the iPod®
can only be operated by the vehicle audio
controls.
To disconnect the iPod® from the vehicle,
remove the USB end of the cable from the
USB connection port on the vehicle, then
remove the cable from the iPod®.
* iPod® is a trademark of Apple Inc., regis-
tered in the U.S. and other countries.
Compatibility
The following models are compatible:
• iPod® Classic 5th generation (firmware
version 1.3.0 or later)
• iPod® Classic 6th generation (firmware version 2.0.1 or later)
• iPod® Classic 7th generation (firmware version 2.0.4 or later)
• iPod® Touch 2nd generation (firmware version 4.2.1 or later)*
• iPod® Touch 3rd generation (firmware version 5.1 or later)
• iPod® Touch 4th generation (firmware version 5.1 or later)
LHA4701
Monitor, climate, audio, phone and voice recognition systems4-57
Page 251 of 500
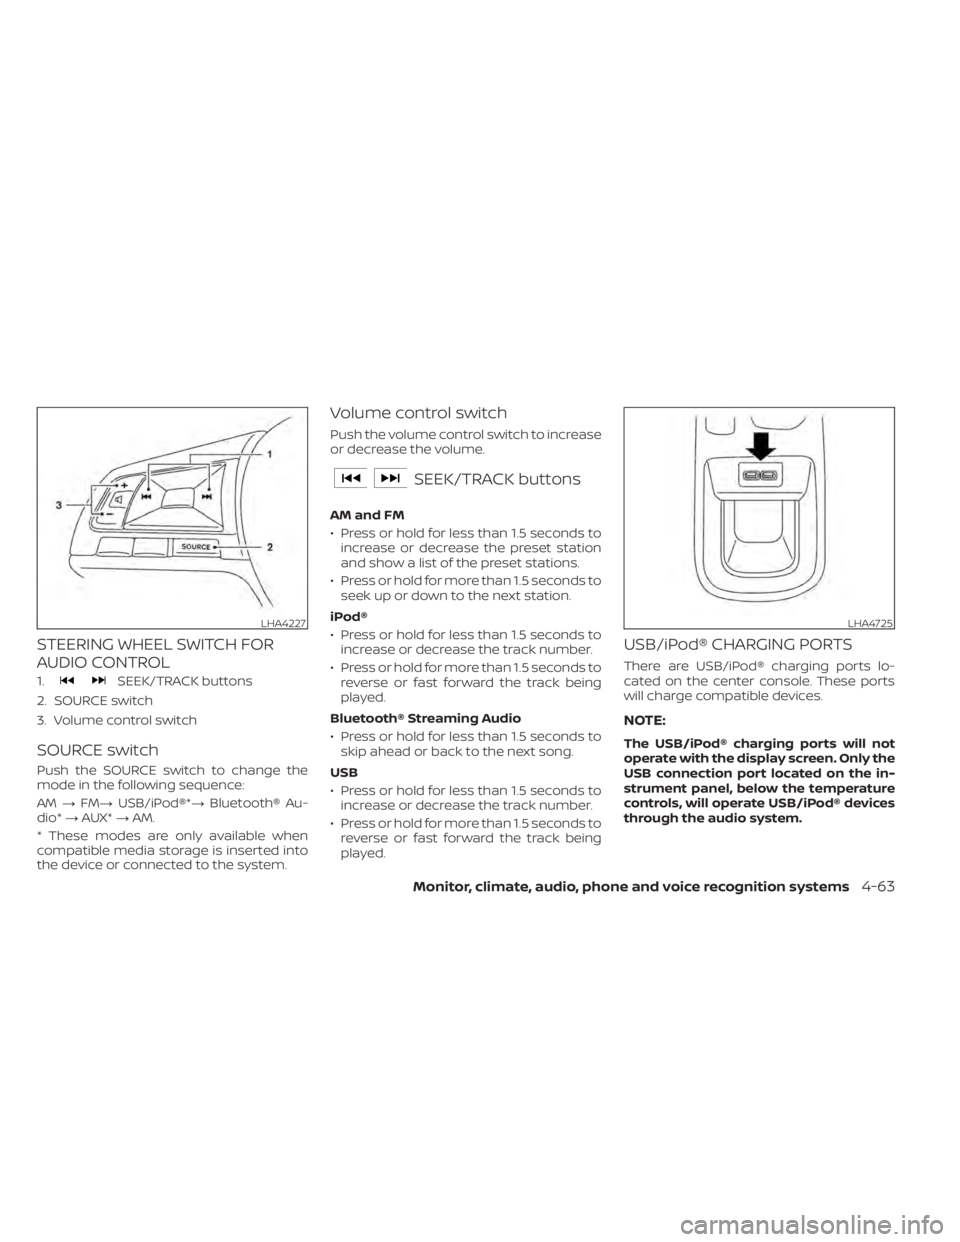
STEERING WHEEL SWITCH FOR
AUDIO CONTROL
1.SEEK/TRACK buttons
2. SOURCE switch
3. Volume control switch
SOURCE switch
Push the SOURCE switch to change the
mode in the following sequence:
AM →FM→ USB/iPod®*→ Bluetooth® Au-
dio* →AUX* →AM.
* These modes are only available when
compatible media storage is inserted into
the device or connected to the system.
Volume control switch
Push the volume control switch to increase
or decrease the volume.
SEEK/TRACK buttons
AM and FM
• Press or hold for less than 1.5 seconds to increase or decrease the preset station
and show a list of the preset stations.
• Press or hold for more than 1.5 seconds to seek up or down to the next station.
iPod®
• Press or hold for less than 1.5 seconds to increase or decrease the track number.
• Press or hold for more than 1.5 seconds to reverse or fast forward the track being
played.
Bluetooth® Streaming Audio
• Press or hold for less than 1.5 seconds to skip ahead or back to the next song.
USB
• Press or hold for less than 1.5 seconds to increase or decrease the track number.
• Press or hold for more than 1.5 seconds to reverse or fast forward the track being
played.
USB/iPod® CHARGING PORTS
There are USB/iPod® charging ports lo-
cated on the center console. These ports
will charge compatible devices.
NOTE:
The USB/iPod® charging ports will not
operate with the display screen. Only the
USB connection port located on the in-
strument panel, below the temperature
controls, will operate USB/iPod® devices
through the audio system.
LHA4227LHA4725
Monitor, climate, audio, phone and voice recognition systems4-63