hood release NISSAN KICKS 2020 Owner´s Manual
[x] Cancel search | Manufacturer: NISSAN, Model Year: 2020, Model line: KICKS, Model: NISSAN KICKS 2020Pages: 500, PDF Size: 3.43 MB
Page 15 of 500
17. Bluetooth® Hands-Free Phone System(P. 4-2, 4-67)
Cruise control switches (P. 5-52)
18. Driver supplemental knee air bag
(P. 1-42)
19. Tilt and telescopic steering wheel lock
lever (P. 3-26)
20. Hood release (P. 3-21) Fuel-filler door release (P. 3-25)
21. Steering wheel switches for audio
control (P. 4-2, 4-63)
Control panel and vehicle information
display switches (if so equipped)
(P. 2-23)
22. Blind Spot Warning (BSW) switch
(if so equipped) (P. 2-53)
Drive Systems OFF switch
(if so equipped) (P. 2-53)
Lane Departure Warning (LDW) switch
(if so equipped) (P. 2-54)
Rear Sonar System (RSS) OFF switch
(if so equipped) (P. 2-55)
Vehicle Dynamic Control (VDC) OFF
switch (if so equipped) (P. 2-55)
Instrument panel pocket (if so
equipped) (P. 2-59)
Enter/select switch for trip computer
(if so equipped) (P. 2-9)
* Refer to the separate NissanConnect®
Owner's Manual (if so equipped). Refer to the page number indicated in
parentheses for operating details.
Illustrated table of contents0-7
Page 87 of 500
17. Bluetooth® Hands-Free Phone System(P. 4-2, 4-67)
Cruise control switches (P. 5-52)
18. Driver supplemental knee air bag
(P. 1-42)
19. Tilt and telescopic steering wheel lock
lever (P. 3-26)
20. Hood release (P. 3-21) Fuel-filler door release (P. 3-25)
21. Steering wheel switches for audio con-
trol (P. 4-2, 4-63)
Control panel and vehicle information
display switches (if so equipped)
(P. 2-23)
22. Blind Spot Warning (BSW) switch
(if so equipped) (P. 2-53)
Drive Systems OFF switch
(if so equipped) (P. 2-53)
Lane Departure Warning (LDW) switch
(if so equipped) (P. 2-54)
Rear Sonar System (RSS) OFF switch
(if so equipped) (P. 2-55)
Vehicle Dynamic Control (VDC) OFF
switch (if so equipped) (P. 2-55)
Instrument panel pocket (if so
equipped) (P. 2-59)
Enter/select switch for trip computer (if
so equipped) (P. 2-9)
* Refer to the separate NissanConnect®
Owner's Manual (if so equipped). Refer to the page number indicated in
parentheses for operating details.
Instruments and controls2-3
Page 100 of 500
WARNING
• Radio waves could adversely affect
electric medical equipment. Those
who use a pacemaker should contact
the electric medical equipment
manufacturer for the possible influ-
ences before use.
• If the light does not illuminate with
the ignition switch placed in the ON
position, have the vehicle checked as
soon as possible. It is recommended
that you visit a NISSAN dealer for this
service.
• If the light illuminates while driving,
avoid sudden steering maneuvers or
abrupt braking, reduce vehicle
speed, pull off the road to a safe loca-
tion and stop the vehicle as soon as
possible. Driving with under-inflated
tires may permanently damage the
tires and increase the likelihood of
tire failure. Serious vehicle damage
could occur and may lead to an acci-
dent and could result in serious per-
sonal injury or death. Check the tire
pressure for all four tires. Adjust the
tire pressure to the recommended COLD tire pressure show on the Tire
and Loading Information label lo-
cated in the driver’s door opening to
turn the low tire pressure warning
light off. If the light still illuminates
while driving af ter adjusting the tire
pressure, a tire may be flat or the
TPMS may be malfunctioning. If you
have a flat tire, replace it with a spare
tire as soon as possible. If no tire is
flat and all tires are properly inflated,
have the vehicle checked. It is recom-
mended that you visit a NISSAN
dealer for this service.
• When replacing a wheel without the
TPMS such as the spare tire, the TPMS
will not function and the low tire
pressure warning light will flash for
approximately 1 minute. The light will
remain on af ter 1 minute. Have your
tires replaced and/or TPMS system
reset as soon as possible. It is recom-
mended that you visit a NISSAN
dealer for these services.
• Replacing tires with those not origi-
nally specified by NISSAN could af-
fect the proper operation of the
TPMS.CAUTION
• The TPMS is not a substitute for the
regular tire pressure check. Be sure
to check the tire pressure regularly.
• If the vehicle is being driven at
speeds of less than 16 mph (25 km/h),
the TPMS may not operate correctly.
• Be sure to install the specified size of
tires to the four wheels correctly.
Low windshield-washer
fluid warning light (if so
equipped)
This light comes on when the windshield-
washer fluid is at a low level. Add windshield-
washer fluid as necessary. For additional in-
formation, refer to “Windshield-washer fluid”
in the “Do-it-yourself ” section of this manual.
Master warning light (if so
equipped)
This light illuminates when various vehicle
information display warnings appear.
•Nokey
• I-Key system warning
• Low washer fluid
• Door open
• Parking brake release
2-16Instruments and controls
Page 123 of 500
The system helps deter vehicle thef t but
cannot prevent it, nor can it prevent the
thef t of interior or exterior vehicle compo-
nents in all situations. Always secure your
vehicle even if parking for a brief period.
Never leave your keys in the vehicle, and
always lock the vehicle when unattended.
Be aware of your surroundings, and park in
secure, well-lit areas whenever possible.
Many devices offering additional protec-
tion, such as component locks, identifica-
tion markers, and tracking systems, are
available at auto supply stores and spe-
cialty shops. A NISSAN dealer may also offer
such equipment. Check with your insur-
ance company to see if you may be eligible
for discounts for various thef t protection
features.
How to arm the vehicle security
system
1. Close all windows.(The system can be
armed even if the windows are open.)
2. Remove the keys from the vehicle.
3. Close all doors, hood and lif tgate. Lock all doors. The doors can be locked with
the key fob, Intelligent Key, mechanical
key, or door handle request switch (if so
equipped). 4. Confirm that the
security indicator
light stays on for about 30 seconds. The
vehicle security system is now pre-
armed. The vehicle security system will
automatically shif t into the armed
phase. The
security light begins to
flash once every three seconds. If during
the pre-armed phase one of the follow-
ing occurs, the system will not arm:
• Any door is unlocked with the key fob, the Intelligent Key, mechanical key, or door
request switch (if so equipped).
•
Ignition switch is placed in the ON position.
• Even when the driver and/or passen-
gers are in the vehicle, the system will
activate with all the doors, hood and
lif tgate locked with the ignition switch
placed in the LOCK position. When plac-
ing the ignition switch in the ON posi-
tion, the system will be released.
Vehicle security system activation
The vehicle security system will give the
following alarm:
• The headlights or turn lamps blink and the horn sounds intermittently but syn-
chronously.
•
The alarm automatically turns off af ter a
period of time. However, the alarm reacti-
vates if the vehicle is tampered with again.
The alarm is activated by:
• opening any door, hood or the lif tgate without using the key or Intelligent Key
(even if the door is unlocked by releasing
the door inside lock knob).
How to stop an activated alarm
The alarm stops only by unlocking a door
or the lif tgate with the key fob, pressing the
button on the Intelligent Key, or push-
ing the request switch (if so equipped) on
the driver's or passenger's door with the
Intelligent Key in range of the door handle.
NISSAN ANTI-THEFT SYSTEM
(NATS) (if so equipped)
The NISSAN Anti-Thef t System will not al-
low the engine to start without the use of a
registered NATS key.
If the engine does not start using the reg-
istered NATS key, it may be due to interfer-
ence caused by:
• Another NATS key
• Automated toll road device
• Automated payment device
•
Other devices that transmit similar signals
Instruments and controls2-39
Page 179 of 500
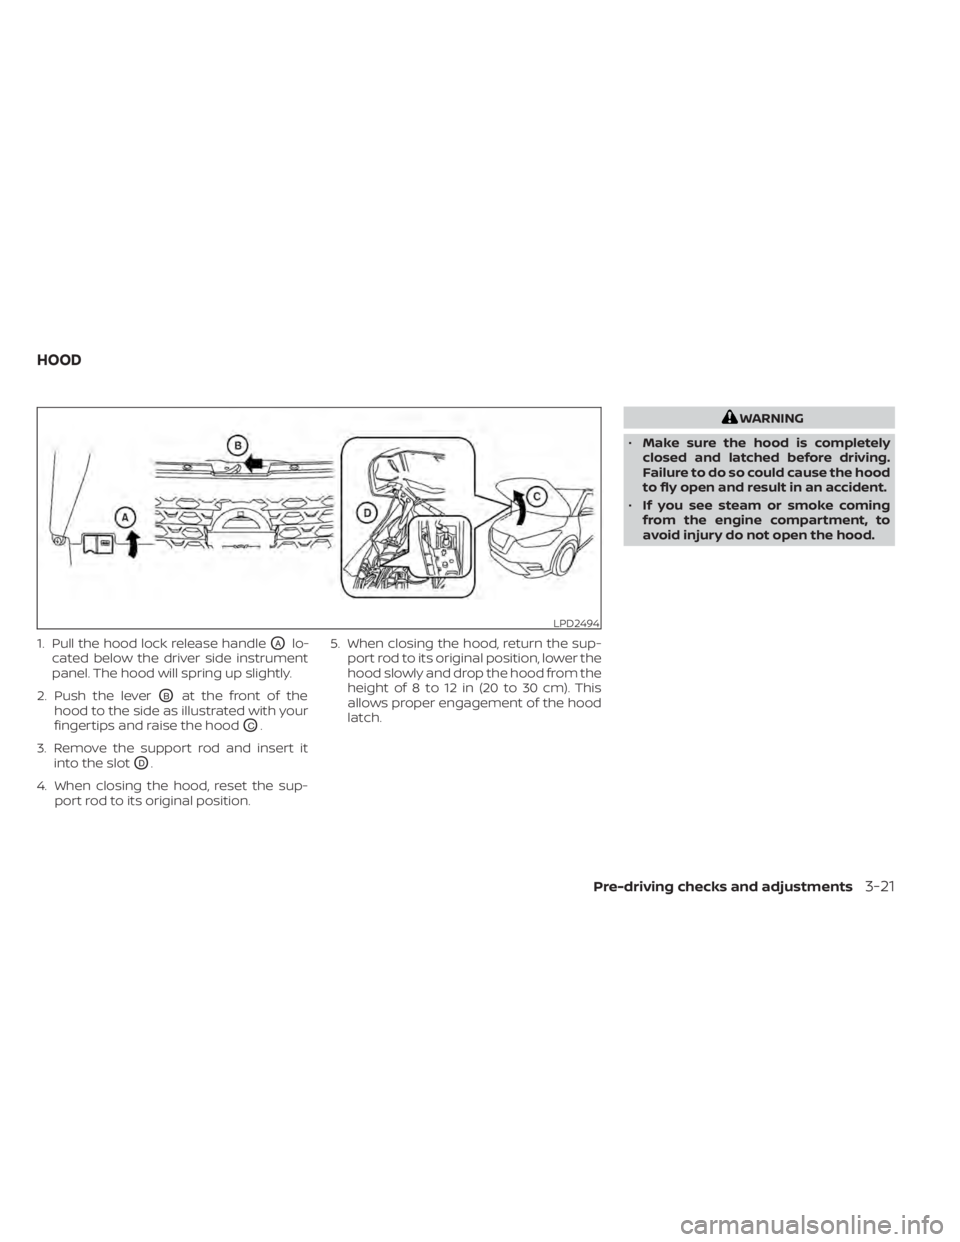
1. Pull the hood lock release handleOAlo-
cated below the driver side instrument
panel. The hood will spring up slightly.
2. Push the lever
OBat the front of the
hood to the side as illustrated with your
fingertips and raise the hood
OC.
3. Remove the support rod and insert it into the slot
OD.
4. When closing the hood, reset the sup- port rod to its original position. 5. When closing the hood, return the sup-
port rod to its original position, lower the
hood slowly and drop the hood from the
height of 8 to 12 in (20 to 30 cm). This
allows proper engagement of the hood
latch.
WARNING
• Make sure the hood is completely
closed and latched before driving.
Failure to do so could cause the hood
to fly open and result in an accident.
• If you see steam or smoke coming
from the engine compartment, to
avoid injury do not open the hood.
LPD2494
HOOD
Pre-driving checks and adjustments3-21
Page 282 of 500
6. When it is safe to do so, gradually turnthe steering wheel until both tires return
to the road surface. When all tires are on
the road surface, steer the vehicle to
stay in the appropriate driving lane.
• If you decide that it is not safe to return the vehicle to the road surface based
on vehicle, road or traffic conditions,
gradually slow the vehicle to a stop in
a safe place off the road.
RAPID AIR PRESSURE LOSS
Rapid air pressure loss or a “blow-out” can
occur if the tire is punctured or is damaged
due to hitting a curb or pothole. Rapid air
pressure loss can also be caused by driving
on under-inflated tires.
Rapid air pressure loss can affect the han-
dling and stability of the vehicle, especially
at highway speeds.
Help prevent rapid air pressure loss by
maintaining the correct air pressure and
visually inspecting the tires for wear and
damage. For additional information, refer
to “Wheels and tires” in the “Do-it-yourself ”
section of this manual. If a tire rapidly loses
air pressure or “blows-out” while driving,
maintain control of the vehicle by following
the procedure below. Please note that this
procedure is only a general guide. The ve- hicle must be driven as appropriate based
on the conditions of the vehicle, road and
traffic.
WARNING
If there is a sudden loss of tire air pres-
sure, the vehicle will generally move or
pull in the direction of the flat tire. In
this situation, losing control of the ve-
hicle may cause a collision and result in
personal injury.
To help avoid loss of control:
• Do not rapidly apply the brakes.
• Do not rapidly release the accelerator
pedal.
• Do not rapidly turn the steering
wheel.
1. Remain calm and do not overreact.
2. Maintain a firm grip on the steering wheel with both hands and try to hold a
straight course.
3. When appropriate, slowly release the ac- celerator pedal to gradually slow the
vehicle.
4. Gradually steer the vehicle to a safe lo- cation off the road and away from traffic
if possible. 5. Lightly apply the brake pedal to gradu-
ally stop the vehicle.
6. Turn on the hazard warning flashers and contact a roadside emergency service
to change the tire. For additional infor-
mation, refer to “Changing a flat tire” in
the “In case of emergency” section of
this manual.
DRINKING ALCOHOL/DRUGS AND
DRIVING
WARNING
Never drive under the influence of alco-
hol or drugs. Alcohol in the blood-
stream reduces coordination, delays
reaction time and impairs judgement.
Driving af ter drinking alcohol increases
the likelihood of being involved in an
accident injuring yourself and others.
Additionally, if you are injured in an ac-
cident, alcohol can increase the sever-
ity of the injury.
5-10Starting and driving
Page 372 of 500
instrument panel. The brake system then
operates normally but without anti-lock
assistance.
If the ABS warning light illuminates during
the self-test or while driving, have the ve-
hicle checked. It is recommended that you
visit a NISSAN dealer for this service.
Normal operation
The Anti-lock Braking System (ABS) oper-
ates at speeds above3-6mph(5-10
km/h). The speed varies according to road
conditions.
When the ABS senses that one or more
wheels are close to locking up, the actuator
rapidly applies and releases hydraulic pres-
sure. This action is similar to pumping the
brakes very quickly. You may feel a pulsa-
tion in the brake pedal and hear a noise
from under the hood or feel a vibration
from the actuator when it is operating. This
is normal and indicates that the ABS is op-
erating properly. However, the pulsation
may indicate that road conditions are haz-
ardous and extra care is required while
driving.
BRAKE ASSIST
When the force applied to the brake pedal
exceeds a certain level, the Brake Assist is
activated generating greater braking force
than a conventional brake booster even
with light pedal force.
WARNING
The Brake Assist is only an aid to assist
braking operation and is not a collision
warning or avoidance device. It is the
driver’s responsibility to stay alert,
drive safely and be in control of the ve-
hicle at all times. The VDC system uses various sensors to
monitor driver inputs and vehicle motion.
Under certain driving conditions, the VDC
system helps to perform the following
functions:
• Controls brake pressure to reduce wheel
slip on one slipping drive wheel so power
is transferred to a non-slipping drive
wheel on the same axle.
• Controls brake pressure and engine out- put to reduce drive wheel slip based on
vehicle speed (traction control function).
• Controls brake pressure at individual wheels and engine output to help the
driver maintain control of the vehicle in
the following conditions:– Understeer (vehicle tends to not follow the steered path despite increased
steering input)
– Oversteer (vehicle tends to spin due to certain road or driving conditions)
The VDC system can help the driver to
maintain control of the vehicle, but it can-
not prevent loss of vehicle control in all driv-
ing situations.
VEHICLE DYNAMIC CONTROL (VDC)
SYSTEM
5-100Starting and driving
Page 425 of 500
CLEANING
If your windshield is not clear af ter using
the windshield–washer or if a wiper blade
chatters when running, wax or other mate-
rial may be on the blade or windshield.
Clean the outside of the windshield with a
washer fluid or a mild detergent. Your wind-
shield is clean if beads do not form when
rinsing with clear water.
Clean each blade by wiping it with a cloth
soaked in a washer fluid or a mild deter-
gent. Then rinse the blades with clear wa-
ter. If your windshield is still not clear af ter
cleaning the blades and using the wiper,
install new windshield wiper blades.
CAUTION
Worn windshield wiper blades can
damage the windshield and impair
driver vision.
REPLACING
Replace the wiper blades if they are worn.
To replace the windshield wiper blades, fol-
low the procedure below:
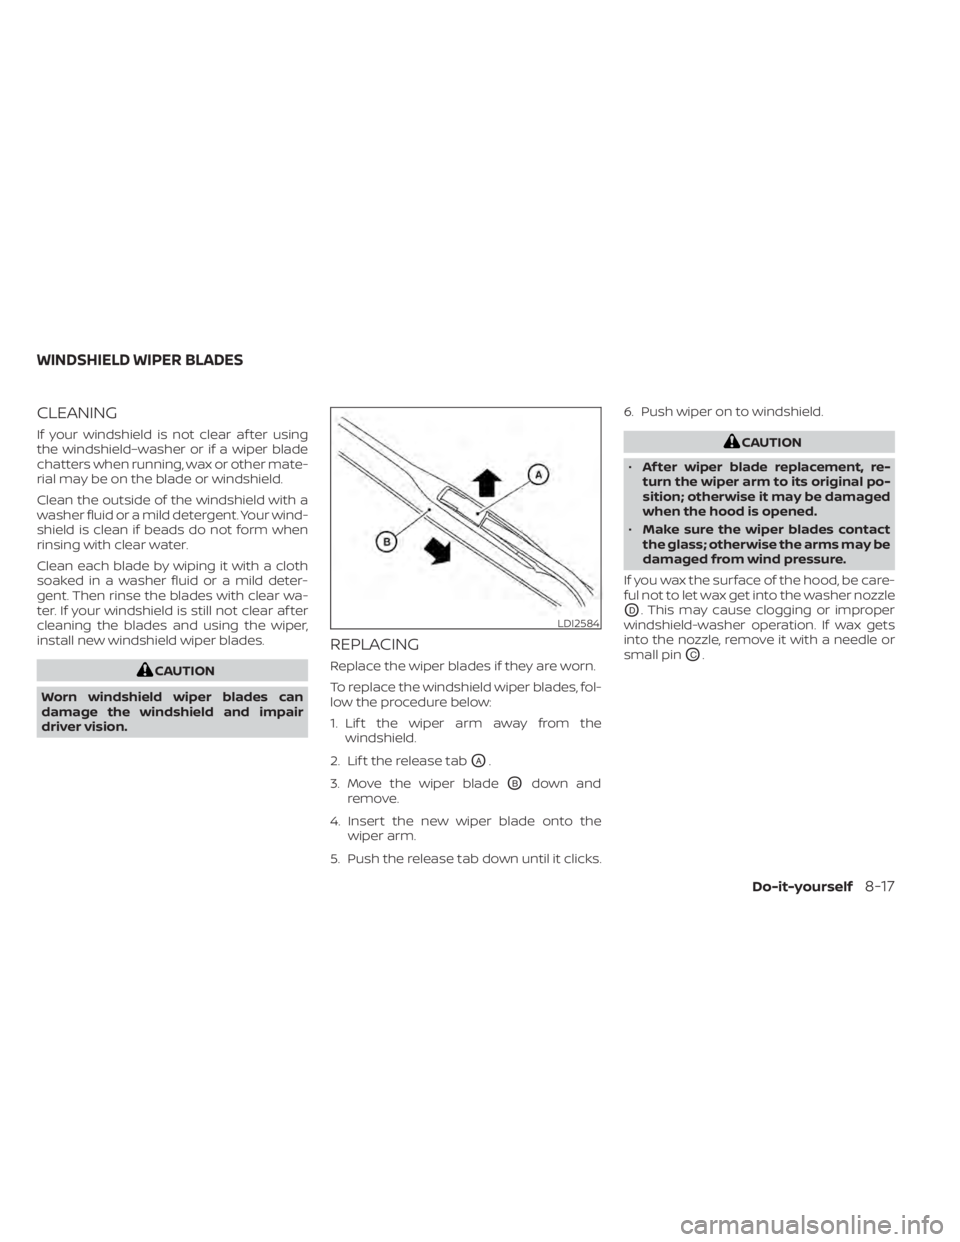
1. Lif t the wiper arm away from the windshield.
2. Lif t the release tab
OA.
3. Move the wiper blade
OBdown and
remove.
4. Insert the new wiper blade onto the wiper arm.
5. Push the release tab down until it clicks. 6. Push wiper on to windshield.
CAUTION
• Af ter wiper blade replacement, re-
turn the wiper arm to its original po-
sition; otherwise it may be damaged
when the hood is opened.
• Make sure the wiper blades contact
the glass; otherwise the arms may be
damaged from wind pressure.
If you wax the surface of the hood, be care-
ful not to let wax get into the washer nozzle
OD. This may cause clogging or improper
windshield-washer operation. If wax gets
into the nozzle, remove it with a needle or
small pin
OC.
LDI2584
WINDSHIELD WIPER BLADES
Do-it-yourself8-17
Page 429 of 500
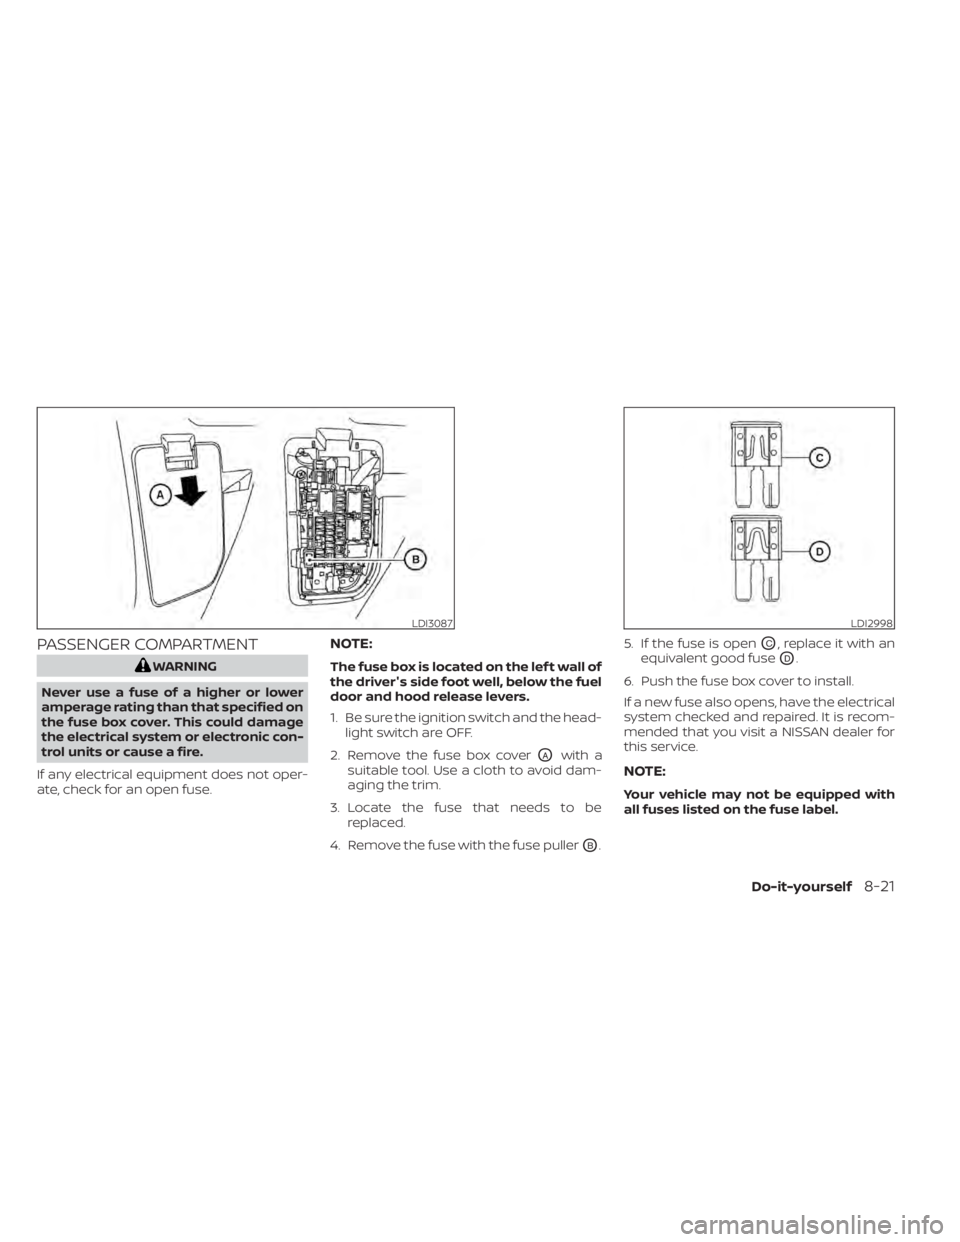
PASSENGER COMPARTMENT
WARNING
Never use a fuse of a higher or lower
amperage rating than that specified on
the fuse box cover. This could damage
the electrical system or electronic con-
trol units or cause a fire.
If any electrical equipment does not oper-
ate, check for an open fuse.
NOTE:
The fuse box is located on the lef t wall of
the driver's side foot well, below the fuel
door and hood release levers.
1. Be sure the ignition switch and the head- light switch are OFF.
2. Remove the fuse box cover
OAwith a
suitable tool. Use a cloth to avoid dam-
aging the trim.
3. Locate the fuse that needs to be replaced.
4. Remove the fuse with the fuse puller
OB. 5. If the fuse is open
OC, replace it with an
equivalent good fuse
OD.
6. Push the fuse box cover to install.
If a new fuse also opens, have the electrical
system checked and repaired. It is recom-
mended that you visit a NISSAN dealer for
this service.
NOTE:
Your vehicle may not be equipped with
all fuses listed on the fuse label.
LDI3087LDI2998
Do-it-yourself8-21