Fan NISSAN KICKS 2022 Owners Manual
[x] Cancel search | Manufacturer: NISSAN, Model Year: 2022, Model line: KICKS, Model: NISSAN KICKS 2022Pages: 500, PDF Size: 3.24 MB
Page 39 of 500
All U.S. states and Canadian provinces or
territories require the use of approved child
restraints for infants and small children. For
additional information, refer to “Child re-
straints” in this section.
A child restraint may be secured in the ve-
hicle by using either the LATCH (Lower An-
chors and Tethers for CHildren) system or
with the vehicle seat belt. For additional
information, refer to “Child restraints” in this
section.
NISSAN recommends that all pre-teens
and children be restrained in the rear
seat. Studies show that children are
safer when properly restrained in the
rear seat than in the front seat.
This is especially important because
your vehicle has a supplemental re-
straint system (air bag system) for the
front passenger. For additional informa-
tion, refer to “Supplemental Restraint
System (SRS)” in this section.
INFANTS
Infants up to at least 1 year old should be
placed in a rear-facing child restraint.
NISSAN recommends that infants be
placed in child restraints that comply with
Federal Motor Vehicle Safety Standards or
Canadian Motor Vehicle Safety Standards.You should choose a child restraint that fits
your vehicle and always follow the manu-
facturer's instructions for installation and
use.
SMALL CHILDREN
Children that are over 1 year old and weigh
at least 20 lbs. (9 kg) should remain in a
rear-facing child restraint as long as pos-
sible up to the height or weight limit of the
child restraint. Children who outgrow the
height or weight limit of the rear-facing
child restraint and are at least 1 year old
should be secured in a forward-facing child
restraint with a harness. Refer to the manu-
facturer’s instructions for minimum and
maximum weight and height recommen-
dations. NISSAN recommends that small
children be placed in child restraints that
comply with Federal Motor Vehicle Safety
Standards or Canadian Motor Vehicle
Safety Standards. You should choose a
child restraint that fits your vehicle and al-
ways follow the manufacturer’s instruc-
tions for installation and use.
LARGER CHILDREN
Children should remain in a forward-facing
child restraint with a harness until they
reach the maximum height or weight limit
allowed by the child restraint manufac-
turer.
Once a child outgrows the height or weight
limit of the harness-equipped forward-
facing child restraint, NISSAN recommends
that the child be placed in a commercially
available booster seat to obtain proper
seat belt fit. For a seat belt to fit properly, the
booster seat should raise the child so that
the shoulder belt is properly positioned
across the chest and the top, middle por-
tion of the shoulder. The shoulder belt
should not cross the neck or face and
should not fall off the shoulder. The lap belt
should lie snugly across the lower hips or
upper thighs, not the abdomen. A booster
seat can only be used in seating positions
that have a three-point type seat belt. The
booster seat should fit the vehicle seat and
have a label certif ying that it complies with
Federal Motor Vehicle Safety Standards or
Canadian Motor Vehicle Safety Standards.
Safety-Seats, seat belts and supplemental restraint system1-19
Page 42 of 500
–A child restraint with a top tether
strap should not be used in the
front passenger seat.
– Keep seatbacks as upright as pos-
sible af ter fitting the child
restraint.
– Infants and children should al-
ways be placed in an appropriate
child restraint while in the vehicle.
• When the child restraint is not in use,
keep it secured with the LATCH sys-
tem or a seat belt. In a sudden stop or
collision, loose objects can injure oc-
cupants or damage the vehicle.
CAUTION
A child restraint in a closed vehicle can
become very hot. Check the seating
surface and buckles before placing a
child in the child restraint. This vehicle is equipped with a universal
child restraint anchor system, referred to
as the LATCH (Lower Anchors and Tethers
for CHildren) system. Some child restraints
include rigid or webbing-mounted attach-
ments that can be connected to these an-
chors. For additional information, refer to
“LATCH (Lower Anchors and Tethers for
CHildren) system” in this section.
If you do not have a LATCH compatible
child restraint, the vehicle seat belts can be
used.
Several manufacturers offer child re-
straints for infants and children of various
sizes. When selecting any child restraint,
keep the following points in mind:
• Choose only a restraint with a label certi-
f ying that it complies with Federal Motor
Vehicle Safety Standard 213 or Canadian
Motor Vehicle Safety Standard 213.
• Check the child restraint in your vehicle to be sure it is compatible with the vehicle's
seat and seat belt system. • If the child restraint is compatible with
your vehicle, place your child in the child
restraint and check the various adjust-
ments to be sure the child restraint is
compatible with your child. Choose a
child restraint that is designed for your
child's height and weight. Always follow
all recommended procedures.
• If the combined weight of the child and child restraint is less than 65 lbs. (29.5 kg),
you may use the LATCH anchors to install
the child restraint (not both at the same
time).
• If the combined weight of the child and child restraint is greater than 65 lbs. (29.5
kg), use the vehicle's seat belt (not the
lower anchors) to install the child re-
straint.
• Be sure to follow the child restraint manufacturer's instructions for installa-
tion.
All U.S. states and Canadian provinces or
territories require that infants and small
children be restrained in an approved
child restraint at all times while the ve-
hicle is being operated. Canadian law re-
quires the top tether strap on forward-
facing child restraints be secured to the
designated anchor point on the vehicle.
1-22Safety-Seats, seat belts and supplemental restraint system
Page 48 of 500
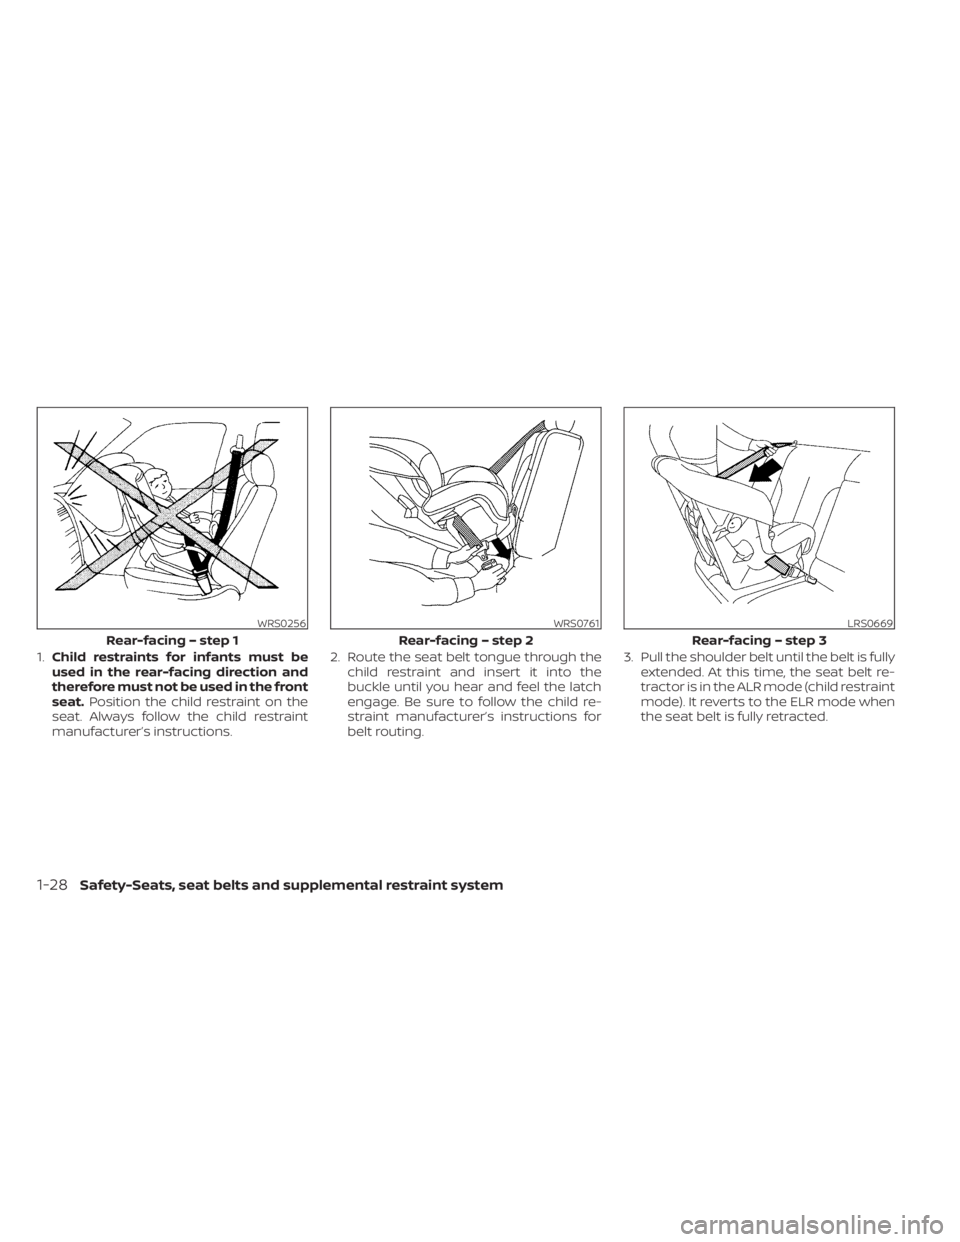
1.Child restraints for infants must be
used in the rear-facing direction and
therefore must not be used in the front
seat. Position the child restraint on the
seat. Always follow the child restraint
manufacturer’s instructions. 2. Route the seat belt tongue through the
child restraint and insert it into the
buckle until you hear and feel the latch
engage. Be sure to follow the child re-
straint manufacturer’s instructions for
belt routing. 3. Pull the shoulder belt until the belt is fully
extended. At this time, the seat belt re-
tractor is in the ALR mode (child restraint
mode). It reverts to the ELR mode when
the seat belt is fully retracted.
WRS0256
Rear-facing – step 1
Page 54 of 500
Follow these steps to install a forward-
facing child restraint using the vehicle seat
belt in the rear seats or in the front passen-
ger seat:
1.If you must install a child restraint in
the front seat, it should be placed in a
forward-facing direction only. Move
the seat to the rearmost position.
Child restraints for infants must be
used in the rear-facing direction and,
therefore, must not be used in the
front seat.
2. Position the child restraint on the seat. Always follow the child restraint manu-
facturer’s instructions.
The back of the child restraint should be
secured against the vehicle seatback.
If necessary, adjust or remove the head
restraint/headrest to obtain the correct
child restraint fit. If the head restraint/
headrest is removed, store it in a secure
place. Be sure to reinstall the head
restraint/headrest when the child re-
straint is removed. For additional infor-
mation, refer to “Head restraints/
headrests” in this section for head
restraint/headrest adjustment, removal
and installation information. If the seating position does not have an
adjustable head restraint/headrest and
it is interfering with the proper child re-
straint fit, try another seating position or
a different child restraint.
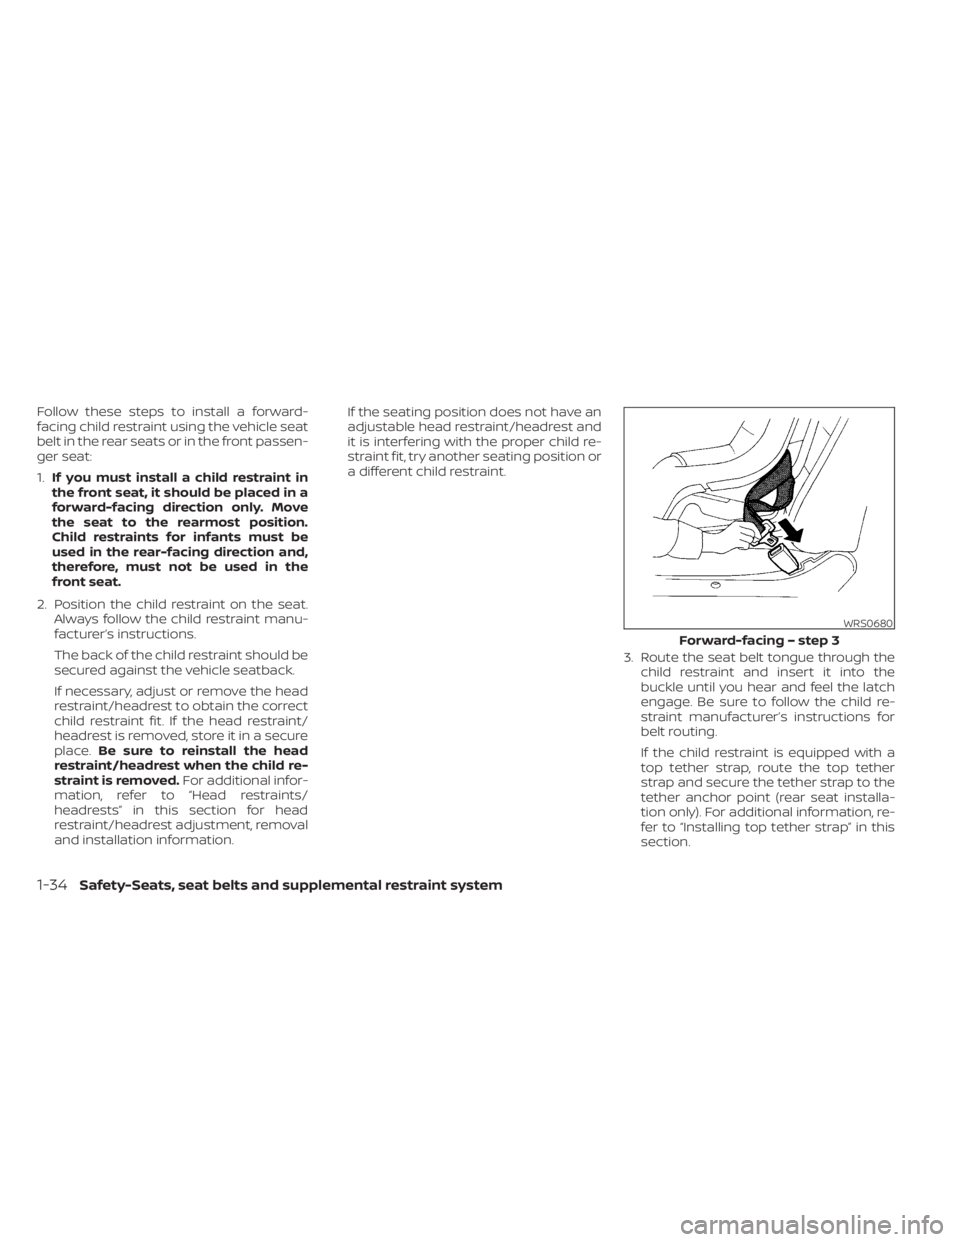
3. Route the seat belt tongue through thechild restraint and insert it into the
buckle until you hear and feel the latch
engage. Be sure to follow the child re-
straint manufacturer’s instructions for
belt routing.
If the child restraint is equipped with a
top tether strap, route the top tether
strap and secure the tether strap to the
tether anchor point (rear seat installa-
tion only). For additional information, re-
fer to “Installing top tether strap” in this
section.
WRS0680
Forward-facing – step 3
Page 59 of 500
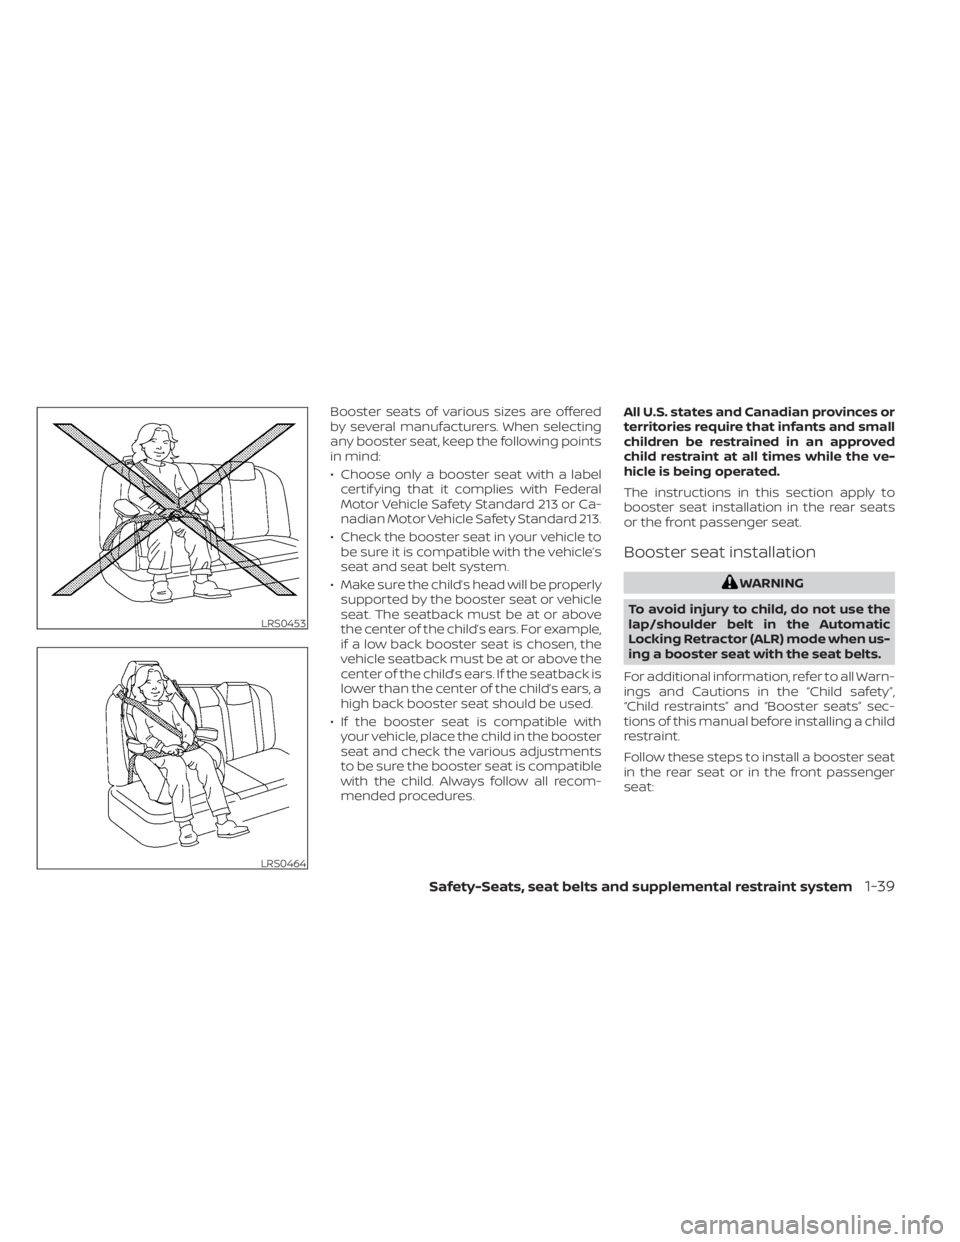
Booster seats of various sizes are offered
by several manufacturers. When selecting
any booster seat, keep the following points
in mind:
• Choose only a booster seat with a labelcertif ying that it complies with Federal
Motor Vehicle Safety Standard 213 or Ca-
nadian Motor Vehicle Safety Standard 213.
• Check the booster seat in your vehicle to be sure it is compatible with the vehicle’s
seat and seat belt system.
• Make sure the child’s head will be properly supported by the booster seat or vehicle
seat. The seatback must be at or above
the center of the child’s ears. For example,
if a low back booster seat is chosen, the
vehicle seatback must be at or above the
center of the child’s ears. If the seatback is
lower than the center of the child’s ears, a
high back booster seat should be used.
• If the booster seat is compatible with your vehicle, place the child in the booster
seat and check the various adjustments
to be sure the booster seat is compatible
with the child. Always follow all recom-
mended procedures. All U.S. states and Canadian provinces or
territories require that infants and small
children be restrained in an approved
child restraint at all times while the ve-
hicle is being operated.
The instructions in this section apply to
booster seat installation in the rear seats
or the front passenger seat.
Booster seat installation
LRS0453
LRS0464
Page 222 of 500
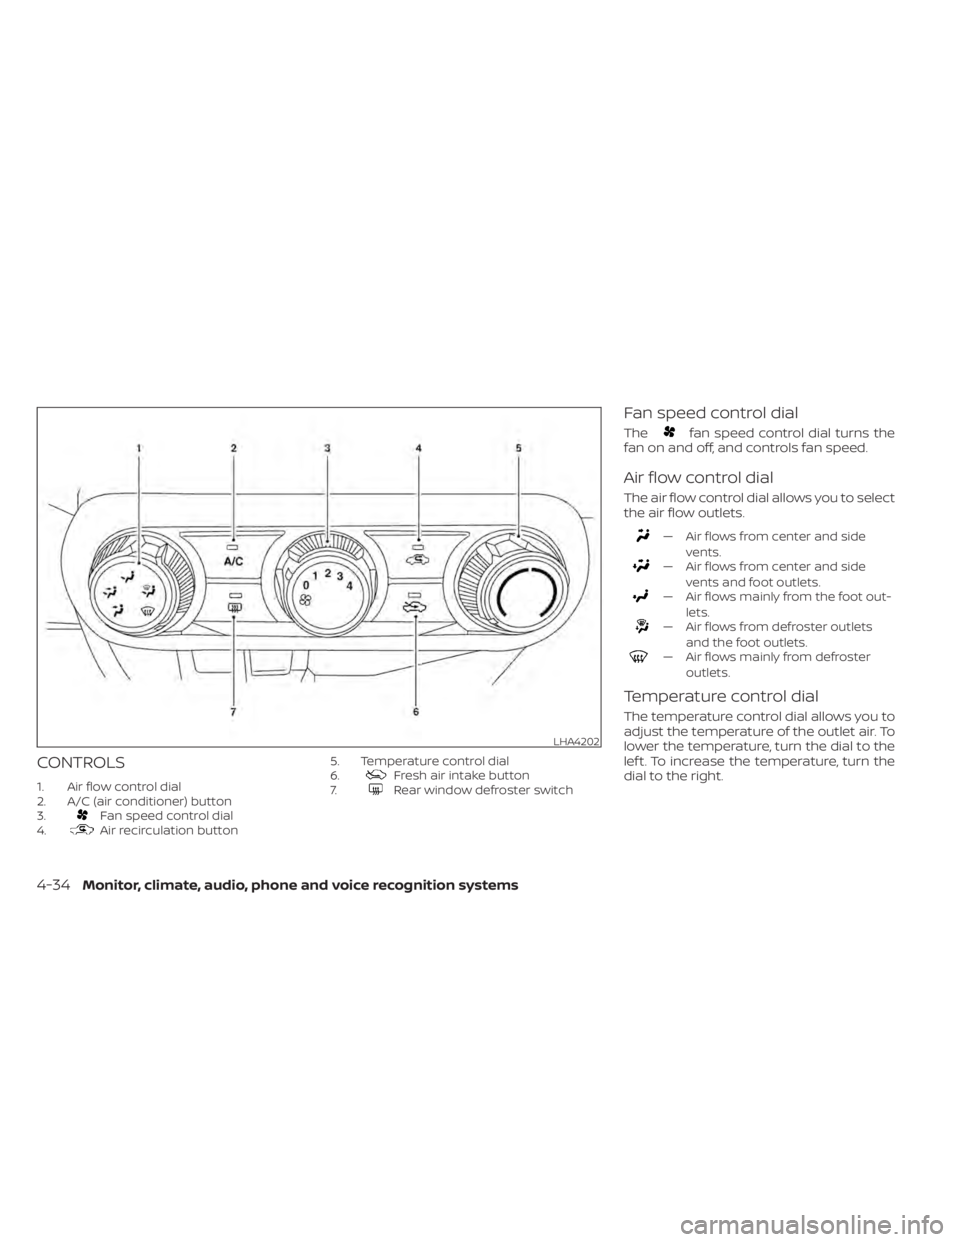
CONTROLS
1. Air flow control dial
2. A/C (air conditioner) button
3.
Fan speed control dial
4.Air recirculation button 5. Temperature control dial
6.
Fresh air intake button
7.Rear window defroster switch
Fan speed control dial
Thefan speed control dial turns the
fan on and off, and controls fan speed.
Air flow control dial
The air flow control dial allows you to select
the air flow outlets.
— Air flows from center and side
vents.
— Air flows from center and sidevents and foot outlets.
— Air flows mainly from the foot out-lets.
— Air flows from defroster outletsand the foot outlets.
— Air flows mainly from defrosteroutlets.
Temperature control dial
The temperature control dial allows you to
adjust the temperature of the outlet air. To
lower the temperature, turn the dial to the
lef t. To increase the temperature, turn the
dial to the right.
LHA4202
4-34Monitor, climate, audio, phone and voice recognition systems
Page 223 of 500
Fresh air intake
Press thefresh air intake button to
draw outside air into the passenger com-
partment.
Air recirculation
Press theair recirculation button to
recirculate interior air inside the vehicle.
The air recirculation cannot be activated
when the air conditioner is in the
front
defrosting mode.
A/C (air conditioner) button
Start the engine, turn thefan speed
control dial to the desired position and
press the
button to turn on the air
conditioner. To turn off the air conditioner,
press the
button again.
The air conditioner cooling function op-
erates only when the engine is running.
Rear window defroster switch
For additional information, refer to “Rear
window and/or outside mirror defroster
switch (if so equipped)” in the “Instruments
and controls” section of this manual.
HEATER OPERATION
Heating
This mode is used to direct heated air to
the foot outlets. Some air also flows from
the defrost outlets.
1. Press the
button for normal heat-
ing. The indicator light on thebut-
ton will go off.
2. Turn the airflow control dial to the
position.
3. Turn the
fan speed control dial to
the desired position.
4. Turn the temperature control dial to the desired position between the middle
and the hot position.
Ventilation
This mode directs outside air to the side
and center vents.
1. Press the
button. The indicator light
on thebutton will go off.
2. Turn the air flow control dial to the
position.
3. Turn the
fan speed control dial to
the desired position. 4. Turn the temperature control dial to the
desired position.
Defrosting or defogging
This mode directs the air to the defrost
outlets to defrost/defog the windows.
1. Turn the air flow control dial to the
position.
2. Turn the
fan speed control dial to
the desired position.
3. Turn the temperature control dial to the desired position between the middle
and the hot position.
• To quickly remove ice or fog from the win- dows, turn the
fan speed control dial
to the right and the temperature control
to the full HOT position.
Bi-level heating
The bi-level mode directs warmed air to
the side and center vents and to the foot
outlets.
1. Press the
button. The indicator light
on thebutton will go off.
2. Turn the airflow control dial to the
position.
Monitor, climate, audio, phone and voice recognition systems4-35
Page 224 of 500
3. Turn thefan speed control dial to
the desired position.
4. Turn the temperature control dial to the desired position.
Heating and defogging
This mode heats the interior and defogs
the windshield.
1. Turn the air flow control dial to the
position.
2. Turn the
fan speed control dial to
the desired position.
3. Turn the temperature control dial to the desired position between the middle
and the hot position.
•Ifinthe
mode for more than 1
minute, the air conditioning system will
continue to operate until the vehicle is
shut off. This dehumidifies the air which
helps defog the windshield. The
mode automatically turns off, allowing
outside air to be drawn into the passen-
ger compartment to further improve the
defogging performance.
Operating tips
Clear snow and ice from the wiper blades
and air inlet in front of the windshield.
This improves heater operation.
AIR CONDITIONER OPERATION
Start the engine, turn thefan speed
control dial to the desired position, and
press the
button to activate the air
conditioner. When the air conditioner is on,
cooling and dehumidif ying functions are
added to the heater operation.
The air conditioner cooling function op-
erates only when the engine is running.
Cooling
This mode is used to cool and dehumidif y
the air.
1. Press the
button.
2. Turn the air flow control dial to the
position.
3. Turn the
fan speed control dial to
the desired position. 4. Press the
button.
5. Turn the temperature control dial to the desired position.
• For quick cooling when the outside tem- perature is high, press the
button.
The indicator light on thebutton will
come on. Press thebutton for nor-
mal cooling. The indicator light on the
button will go off.
Dehumidified heating
This mode is used to heat and dehumidif y
the air.
1. Press the
button. The indicator light
on thebutton will go off.
2. Turn the air flow control dial to the
position.
3. Turn the
fan speed control dial to
the desired position.
4. Press the
button on.
5. Turn the temperature control dial to the desired position.
4-36Monitor, climate, audio, phone and voice recognition systems
Page 225 of 500
Dehumidified defogging
This mode is used to defog the windows
and dehumidif y the air.
1. Turn the air flow control dial to the
position.
2. Turn the
fan speed control dial to
the desired position.
3. Press the
button. The indicator
light comes on.
When the
,or positions in be-
tween are selected, the air conditioner au-
tomatically turns on. The air conditioning
system will continue to operate until the
fan speed control dial is turned to OFF or
the vehicle is shut off, even if the air flow
control dial is turned to a position other
than the
position. This dehumidifies
the air which helps defog the windshield.
The
mode automatically turns off, al-
lowing outside air to be drawn into the pas-
senger compartment to further improve
the defogging performance.
4. Turn the temperature control dial to the desired position.
Operating tips
• Keep the windows closed while the airconditioner is in operation.
• Af ter parking in the sun, drive for two or three minutes with the windows open to
vent hot air from the passenger com-
partment. Then, close the windows. This
allows the air conditioner to cool the inte-
rior more quickly.
• The air conditioning system should be
operated for approximately ten min-
utes at least once a month. This helps
prevent damage to the system due to
lack of lubrication.
• A visible mist may be seen coming from the ventilators in hot, humid conditions
as the air is cooled rapidly. This does not
indicate a malfunction.
• If the high temperature warning light
illuminates in red indicating en-
gine coolant temperature is over the
normal range, turn the air conditioner
off. For additional information, refer to
“If your vehicle overheats” in the “In
case of emergency ” section of this
manual.
AIR FLOW CHARTS
The following charts show the button and
dial positions for MAXIMUM AND QUICK
heating, cooling or defrosting. The
air
recirculation button should always be in
the OFF position for heating and defrost-
ing.
Monitor, climate, audio, phone and voice recognition systems4-37
Page 229 of 500
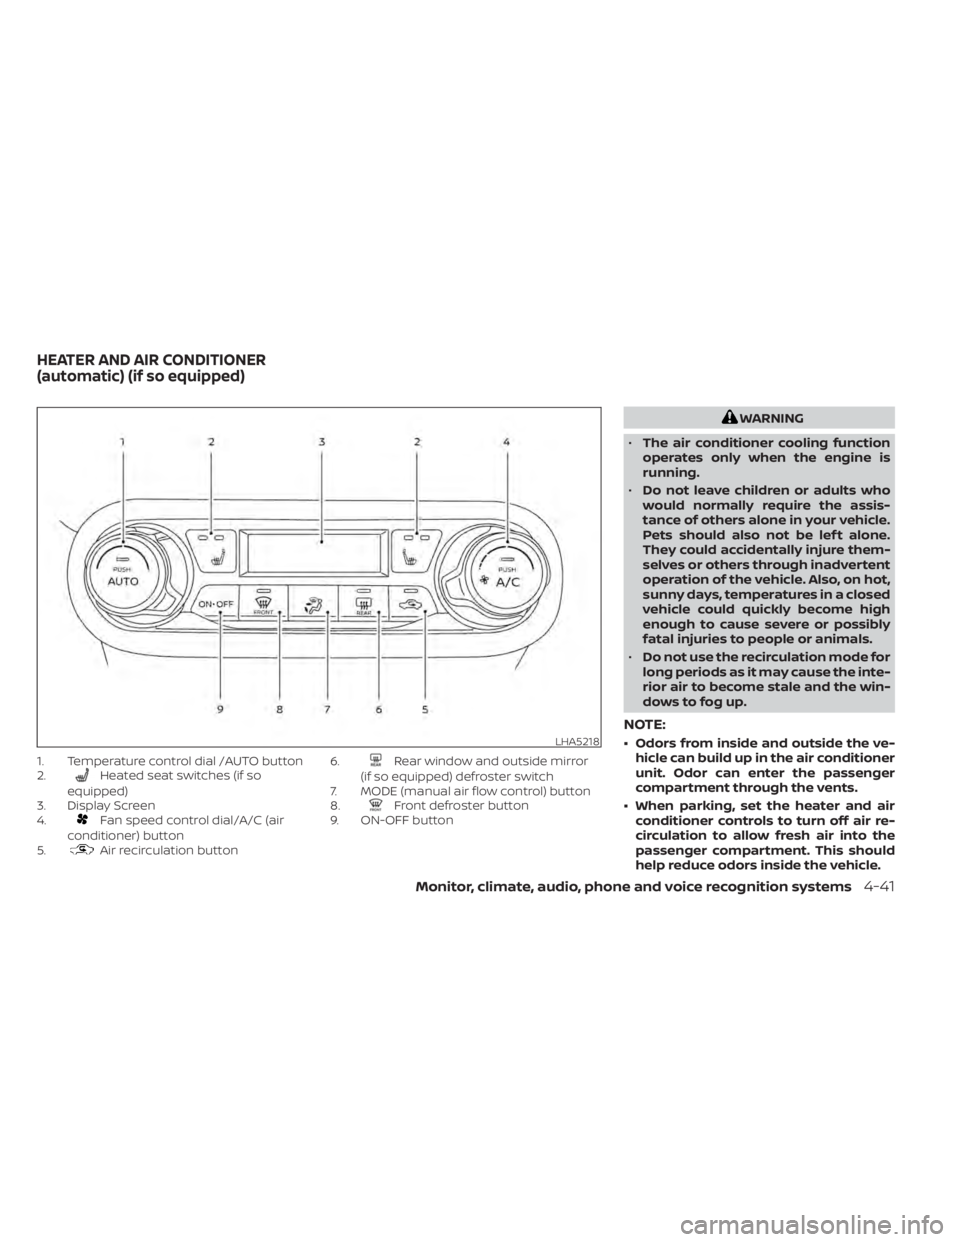
1. Temperature control dial /AUTO button
2.Heated seat switches (if so
equipped)
3. Display Screen
4.
Fan speed control dial/A/C (air
conditioner) button
5.
Air recirculation button 6.
Rear window and outside mirror
(if so equipped) defroster switch
7. MODE (manual air flow control) button
8.
Front defroster button
9. ON-OFF button
Monitor, climate, audio, phone and voice recognition systems4-41