relay NISSAN LATIO 2010 Service Manual Online
[x] Cancel search | Manufacturer: NISSAN, Model Year: 2010, Model line: LATIO, Model: NISSAN LATIO 2010Pages: 3745, PDF Size: 73.67 MB
Page 2219 of 3745
![NISSAN LATIO 2010 Service Manual Online EC-954
< SERVICE INFORMATION >[MR18DE]
DTC P2101 ELECTRIC THROTTLE CONTROL FUNCTION
Do not use ECM ground terminals when measuring input/output voltage. Doi
ng so may result in dam-
age to the ECMs t NISSAN LATIO 2010 Service Manual Online EC-954
< SERVICE INFORMATION >[MR18DE]
DTC P2101 ELECTRIC THROTTLE CONTROL FUNCTION
Do not use ECM ground terminals when measuring input/output voltage. Doi
ng so may result in dam-
age to the ECMs t](/img/5/57358/w960_57358-2218.png)
EC-954
< SERVICE INFORMATION >[MR18DE]
DTC P2101 ELECTRIC THROTTLE CONTROL FUNCTION
Do not use ECM ground terminals when measuring input/output voltage. Doi
ng so may result in dam-
age to the ECM's transistor. Use a ground ot her than ECM terminals, such as the ground.
: Average voltage for pulse signal (Actual pulse signal can be confirmed by oscilloscope.)
Diagnosis ProcedureINFOID:0000000005532840
1.CHECK GROUND CONNECTIONS
1. Turn ignition switch OFF.
2. Loosen and retighten ground screw on the body. Refer to EC-638, "
Ground Inspection".
OK or NG
OK >> GO TO 2.
NG >> Repair or replace ground connections.
2.CHECK THROTTLE CONTROL MOTOR RELAY INPUT SIGNAL CIRCUIT-I
TERMI- NAL
NO. WIRE
COLOR ITEM
CONDITION DATA (DC Voltage)
1L Throttle control motor
(Open) [Ignition switch: ON]
• Engine stopped
• Shift lever: D (A/T, CVT), 1st (M/T)
• Accelerator pedal: Fully depressed Approximately 3.2 V
2SB Throttle contro
l motor power
supply [Ignition switch: ON] BATTERY VOLTAGE
(11 - 14 V)
4 P Throttle contro l motor (Close)[Ignition switch: ON]
• Engine stopped
• Shift lever: D (A/T, CVT), 1st (M/T)
• Accelerator pedal: Fully released Approximately 1.8 V
15 Y Throttle control motor relay [Ignition switch: OFF]
BATTERY VOLTAGE
(11 - 14 V)
[Ignition switch: ON] 0 - 1.0 V
PBIA8150J
PBIA8149J
:Vehicle front
1. Body ground E24 2. Engine ground F93. Engine ground F16
4. Body ground E15
BBIA0698E
Revision: January 20102010 Versa
Page 2220 of 3745
![NISSAN LATIO 2010 Service Manual Online DTC P2101 ELECTRIC THROTTLE CONTROL FUNCTIONEC-955
< SERVICE INFORMATION > [MR18DE]
C
D
E
F
G H
I
J
K L
M A
EC
NP
O
Check voltage between ECM terminal 2 and ground under the fol-
lowing conditions wit NISSAN LATIO 2010 Service Manual Online DTC P2101 ELECTRIC THROTTLE CONTROL FUNCTIONEC-955
< SERVICE INFORMATION > [MR18DE]
C
D
E
F
G H
I
J
K L
M A
EC
NP
O
Check voltage between ECM terminal 2 and ground under the fol-
lowing conditions wit](/img/5/57358/w960_57358-2219.png)
DTC P2101 ELECTRIC THROTTLE CONTROL FUNCTIONEC-955
< SERVICE INFORMATION > [MR18DE]
C
D
E
F
G H
I
J
K L
M A
EC
NP
O
Check voltage between ECM terminal 2 and ground under the fol-
lowing conditions with CONSULT-III or tester.
OK or NG
OK >> GO TO 10.
NG >> GO TO 3.
3.CHECK THROTTLE CONTROL MOTOR
RELAY INPUT SIGNAL CIRCUIT-II
1. Turn ignition switch OFF.
2. Disconnect ECM harness connector.
3. Disconnect IPDM E/R harness connector E43.
4. Check continuity between ECM terminal 2 and IPDM E/R terminal 8. Refer to Wiring Diagram.
5. Also check harness for short to ground and short to power.
OK or NG
OK >> GO TO 5.
NG >> GO TO 4.
4.DETECT MALFUNCTIONING PART
Check the following.
• Harness connectors E8, F8
• Harness for open or short between ECM and IPDM E/R
>> Repair open circuit or short to ground or short to power in harness or connectors.
5.CHECK THROTTLE CONTROL MOTOR RELAY POWER SUPPLY CIRCUIT-I
1. Reconnect all harness connectors disconnected.
2. Check voltage between ECM terminal 15 and ground with CON- SULT-III or tester.
OK or NG
OK >> GO TO 9.
NG >> GO TO 6.
6.CHECK THROTTLE CONTROL MOTOR RELAY POWER SUPPLY CIRCUIT-II
1. Disconnect ECM harness connector.
2. Disconnect IPDM E/R harness connector E46.
3. Check harness continuity between ECM terminal 15 and IPDM E/R terminal 46. Refer to Wiring Diagram.
4. Also check harness for short to ground and short to power.
OK or NG
OK >> GO TO 8.
NG >> GO TO 7.
Ignition switch Voltage
OFF Approximately 0 V
ON Battery voltage
(11 - 14 V)
PBIA9568J
Continuity should exist.
Voltage: Battery voltage
PBIA9569J
Continuity should exist.
Revision: January 20102010 Versa
Page 2225 of 3745
![NISSAN LATIO 2010 Service Manual Online EC-960
< SERVICE INFORMATION >[MR18DE]
DTC P2118 THROTTLE CONTROL MOTOR
Do not use ECM ground terminals when measuring input/output voltage. Doi
ng so may result in dam-
age to the ECMs transistor. U NISSAN LATIO 2010 Service Manual Online EC-960
< SERVICE INFORMATION >[MR18DE]
DTC P2118 THROTTLE CONTROL MOTOR
Do not use ECM ground terminals when measuring input/output voltage. Doi
ng so may result in dam-
age to the ECMs transistor. U](/img/5/57358/w960_57358-2224.png)
EC-960
< SERVICE INFORMATION >[MR18DE]
DTC P2118 THROTTLE CONTROL MOTOR
Do not use ECM ground terminals when measuring input/output voltage. Doi
ng so may result in dam-
age to the ECM's transistor. Use a ground ot her than ECM terminals, such as the ground.
: Average voltage for pulse signal (Actual pulse signal can be confirmed by oscilloscope.)
Diagnosis ProcedureINFOID:0000000005532847
1.CHECK GROUND CONNECTIONS
1. Turn ignition switch OFF.
2. Loosen and retighten engine screw on the body. Refer to EC-638, "
Ground Inspection".
OK or NG
OK >> GO TO 2.
NG >> Repair or replace ground connections.
2.CHECK THROTTLE CONTROL MOTOR OUTPUT SIGNAL CIRCUIT FOR OPEN OR SHORT
TERMI-
NAL
NO. WIRE
COLOR ITEM
CONDITION DATA (DC Voltage)
1L Throttle control motor
(Open) [Ignition switch: ON]
• Engine stopped
• Shift lever: D (A/T, CVT), 1st (M/T)
• Accelerator pedal: Fully depressed Approximately 3.2 V
2SB Throttle contro
l motor power
supply [Ignition switch: ON] BATTERY VOLTAGE
(11 - 14 V)
4 P Throttle contro l motor (Close)[Ignition switch: ON]
• Engine stopped
• Shift lever: D (A/T, CVT), 1st (M/T)
• Accelerator pedal: Fully released Approximately 1.8 V
15 Y Throttle control motor relay [Ignition switch: OFF]
BATTERY VOLTAGE
(11 - 14 V)
[Ignition switch: ON] 0 - 1.0 V
PBIA8150J
PBIA8149J
:Vehicle front
1. Body ground E24 2. Engine ground F9 3. Engine ground F16
4. Body ground E15
BBIA0698E
Revision: January 20102010 Versa
Page 2279 of 3745
![NISSAN LATIO 2010 Service Manual Online EC-1014
< SERVICE INFORMATION >[MR18DE]
FUEL PUMP
FUEL PUMP
DescriptionINFOID:0000000005532910
SYSTEM DESCRIPTION
*: ECM determines the start signal status by the signals of engine speed and battery v NISSAN LATIO 2010 Service Manual Online EC-1014
< SERVICE INFORMATION >[MR18DE]
FUEL PUMP
FUEL PUMP
DescriptionINFOID:0000000005532910
SYSTEM DESCRIPTION
*: ECM determines the start signal status by the signals of engine speed and battery v](/img/5/57358/w960_57358-2278.png)
EC-1014
< SERVICE INFORMATION >[MR18DE]
FUEL PUMP
FUEL PUMP
DescriptionINFOID:0000000005532910
SYSTEM DESCRIPTION
*: ECM determines the start signal status by the signals of engine speed and battery voltage.
The ECM activates the fuel pump for several seconds after the ignition switch is turned ON to improve engine
start ability. If the ECM receives a engine speed signal
from the crankshaft position sensor (POS) and cam-
shaft position sensor (PHASE), it knows that the engine is rotating, and causes the pump to operate. If the
engine speed signal is not received when the ignition switch is ON, the engine stalls. The ECM stops pump
operation and prevents battery discharging, thereby improving safety. The ECM does not directly drive the fuel
pump. It controls the ON/OFF fuel pump relay, which in turn controls the fuel pump.
COMPONENT DESCRIPTION
A turbine type design fuel pump is used in the fuel tank.
• Fuel level sensor unit and fuel pump (1)
• Fuel pressure regulator (2)
• Fuel level sensor (3)
• Fuel tank temperature sensor (4)
CONSULT-III Reference Value in Data Monitor ModeINFOID:0000000005532911
Specification data are reference values.
Sensor Input Signal to ECM ECM Function Actuator
Crankshaft position sensor (POS)
Camshaft position sensor (PHASE) Engine speed*
Fuel pump control Fuel pump relay
Battery Battery voltage*
Condition Fuel pump operation
Ignition switch is turned to ON Operates for 1 second
Engine running and cranking Operates
Engine: Stopped Stops in 1.5 seconds
Except as shown above St ops
BBIA0704E
Monitor itemCondition Specification
FUEL PUMP RLY • For 1 second after turning ignition switch ON
• Engine running or cranking
ON
• Except above conditions OFF
Revision: January 20102010 Versa
Page 2281 of 3745
![NISSAN LATIO 2010 Service Manual Online EC-1016
< SERVICE INFORMATION >[MR18DE]
FUEL PUMP
Diagnosis Procedure
INFOID:0000000005532913
1.CHECK OVERALL FUNCTION
1. Turn ignition switch ON.
2. Pinch fuel feed hose (1) with two fingers.
- Illus NISSAN LATIO 2010 Service Manual Online EC-1016
< SERVICE INFORMATION >[MR18DE]
FUEL PUMP
Diagnosis Procedure
INFOID:0000000005532913
1.CHECK OVERALL FUNCTION
1. Turn ignition switch ON.
2. Pinch fuel feed hose (1) with two fingers.
- Illus](/img/5/57358/w960_57358-2280.png)
EC-1016
< SERVICE INFORMATION >[MR18DE]
FUEL PUMP
Diagnosis Procedure
INFOID:0000000005532913
1.CHECK OVERALL FUNCTION
1. Turn ignition switch ON.
2. Pinch fuel feed hose (1) with two fingers.
- Illustration shows the view with intake air duct removed.
OK or NG
OK >> INSPECTION END
NG >> GO TO 2.
2.CHECK FUEL PUMP POWER SUPPLY CIRCUIT-I
1. Turn ignition switch OFF.
2. Disconnect ECM harness connector.
3. Turn ignition switch ON.
4. Check voltage between ECM terminal 23 and ground with CON- SULT-III or tester.
OK or NG
OK >> GO TO 5.
NG >> GO TO 3.
3.CHECK FUEL PUMP POWER SUPPLY CIRCUIT-II
1. Turn ignition switch OFF.
2. Disconnect IPDM E/R harness connector E46.
3. Turn ignition switch ON.
4. Check voltage between IPDM E/R terminal 47 and ground with CONSULT-III or tester.
OK or NG
OK >> GO TO 4.
NG >> GO TO 11.
TERMI- NAL NO. WIRE
COLOR ITEM
CONDITION DATA (DC Voltage)
23 GR Fuel pump relay [Ignition switch: ON]
• For 1 second after turning ignition switch ON
[Engine is running]
0 - 1.0 V
[Ignition switch: ON]
• More than 1 second after turning ignition switch ON BATTERY VOLTAGE
(11 - 14 V)
Fuel pressure pulsation should be felt on the fuel feed
hose for 1 second after ignition switch is turned ON.
BBIA0712E
Voltage: Battery voltage
PBIA9573J
Voltage: Battery voltage
PBIB3319E
Revision: January 20102010 Versa
Page 2286 of 3745
![NISSAN LATIO 2010 Service Manual Online IGNITION SIGNALEC-1021
< SERVICE INFORMATION > [MR18DE]
C
D
E
F
G H
I
J
K L
M A
EC
NP
O
TER-
MI-
NAL
NO. WIRE
COLOR ITEM
CONDITION DATA (DC Voltage)
32 P ECM relay
(Self shut-off) [Engine is running NISSAN LATIO 2010 Service Manual Online IGNITION SIGNALEC-1021
< SERVICE INFORMATION > [MR18DE]
C
D
E
F
G H
I
J
K L
M A
EC
NP
O
TER-
MI-
NAL
NO. WIRE
COLOR ITEM
CONDITION DATA (DC Voltage)
32 P ECM relay
(Self shut-off) [Engine is running](/img/5/57358/w960_57358-2285.png)
IGNITION SIGNALEC-1021
< SERVICE INFORMATION > [MR18DE]
C
D
E
F
G H
I
J
K L
M A
EC
NP
O
TER-
MI-
NAL
NO. WIRE
COLOR ITEM
CONDITION DATA (DC Voltage)
32 P ECM relay
(Self shut-off) [Engine is running]
[Ignition switch: OFF]
• For a few seconds after turning ignition
switch OFF 0 - 1.0 V
[Ignition switch: OFF]
• More than a few seconds after turning igni- tion switch OFF BATTERY VOLTAGE
(11 - 14 V)
105 G Power supply for ECM [Ignition switch: ON] BATTERY VOLTAGE
(11 - 14 V)
Revision: January 20102010 Versa
Page 2682 of 3745

GI-16
< SERVICE INFORMATION >
HOW TO USE THIS MANUAL
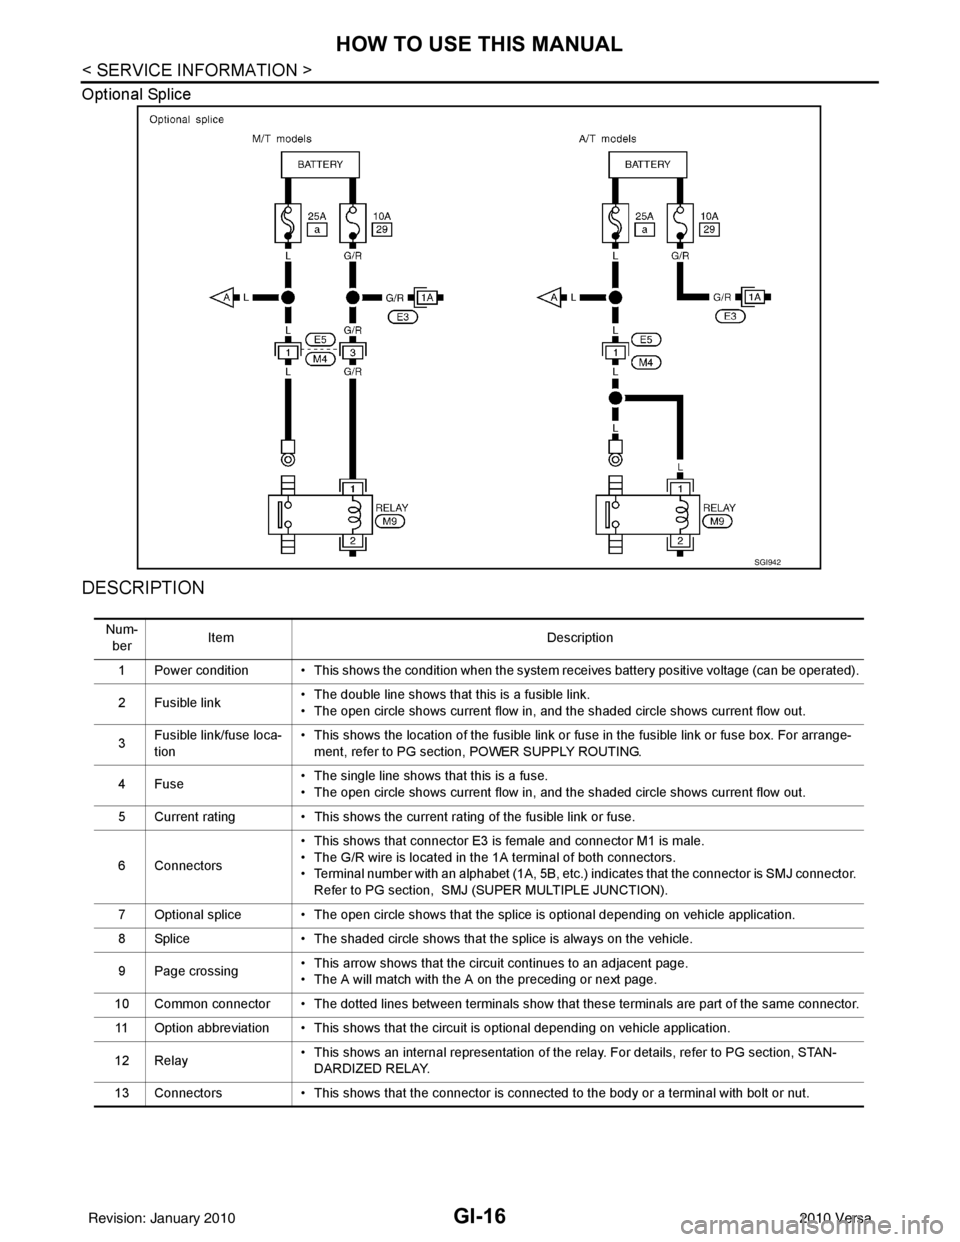
Optional Splice
DESCRIPTION
SGI942
Num-ber Item
Description
1 Power condition • This shows the condition when the system receives battery positive voltage (can be operated).
2 Fusible link • The double line shows that this is a fusible link.
• The open circle shows current flow in, and the shaded circle shows current flow out.
3 Fusible link/fuse loca-
tion • This shows the location of the fusible link or fuse in the fusible link or fuse box. For arrange-
ment, refer to PG section, POWER SUPPLY ROUTING.
4Fuse • The single line shows that this is a fuse.
• The open circle shows current flow in, and the shaded circle shows current flow out.
5 Current rating • This shows the current rating of the fusible link or fuse.
6 Connectors • This shows that connector E3 is female and connector M1 is male.
• The G/R wire is located in the 1A terminal of both connectors.
• Terminal number with an alphabet (1A, 5B, etc.) indicates that the connector is SMJ connector.
Refer to PG section, SMJ (SUPER MULTIPLE JUNCTION).
7 Optional splice • The open circle shows that the splice is optional depending on vehicle application.
8 Splice • The shaded circle shows that the splice is always on the vehicle.
9 Page crossing • This arrow shows that the circuit continues to an adjacent page.
• The A will match with the A on the preceding or next page.
10 Common connector • The dotted lines between terminals show that these terminals are part of the same connector. 11 Option abbreviation • This shows that the circuit is optional depending on vehicle application.
12 Relay • This shows an internal representation of the relay. For details, refer to PG section, STAN-
DARDIZED RELAY.
13 Connectors • This shows that the connector is connected to the body or a terminal with bolt or nut.
Revision: January 20102010 Versa
Page 2692 of 3745

GI-26
< SERVICE INFORMATION >
SERVICE INFORMATION FOR ELECTRICAL INCIDENT
• Cold or hot start up
Get a thorough description of the incident from the customer. It is important for simulating the conditions of the
problem.
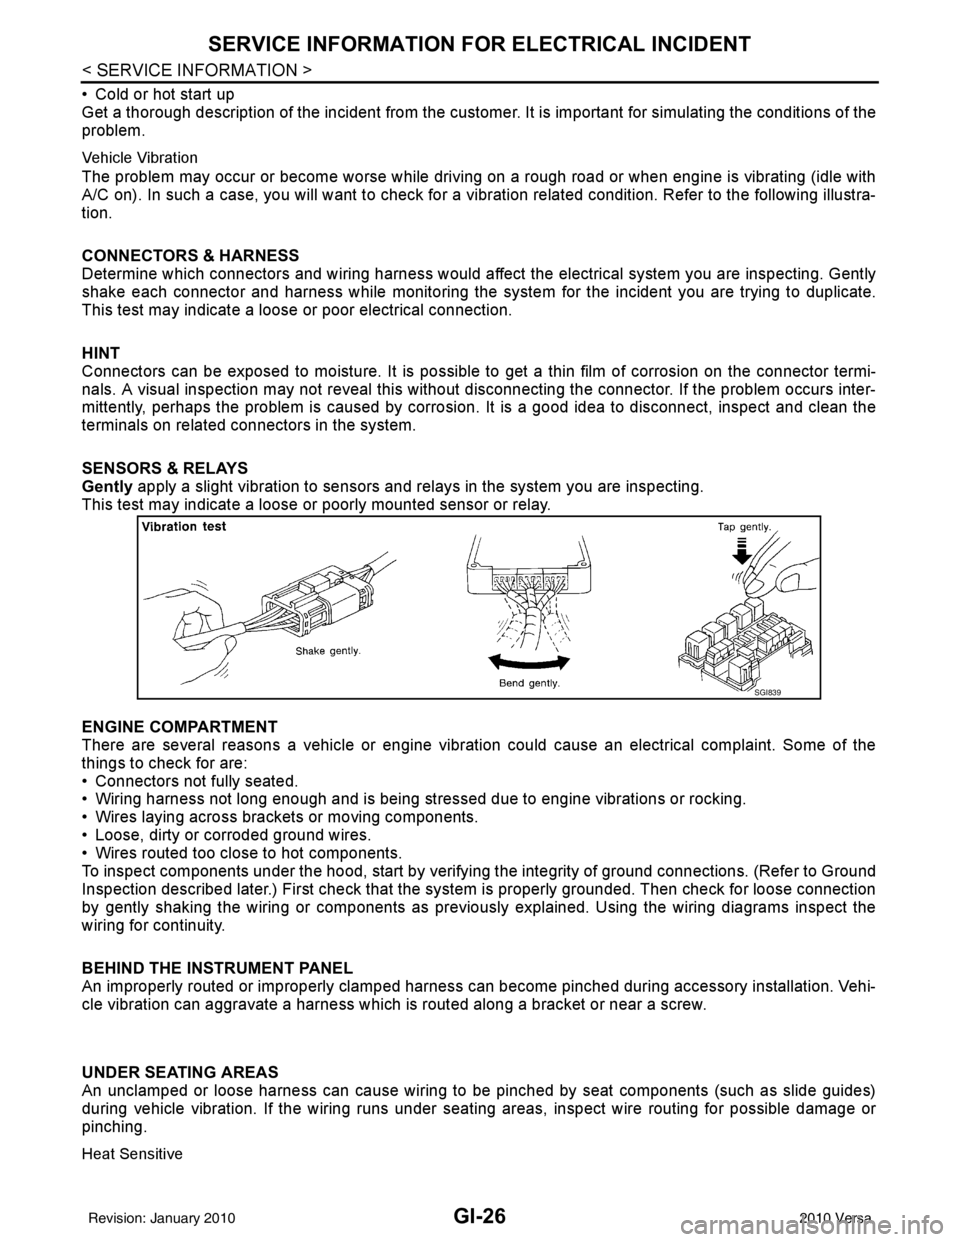
Vehicle Vibration
The problem may occur or become worse while driving on a rough road or when engine is vibrating (idle with
A/C on). In such a case, you will want to check for a vibration related condition. Refer to the following illustra-
tion.
CONNECTORS & HARNESS
Determine which connectors and wiring harness would affect the electrical system you are inspecting. Gently
shake each connector and harness while monitoring the sy stem for the incident you are trying to duplicate.
This test may indicate a loose or poor electrical connection.
HINT
Connectors can be exposed to moisture. It is possible to get a thin film of corrosion on the connector termi-
nals. A visual inspection may not reveal this without disconnecting the connector. If the problem occurs inter-
mittently, perhaps the problem is caused by corrosion. It is a good idea to disconnect, inspect and clean the
terminals on related connectors in the system.
SENSORS & RELAYS
Gently apply a slight vibration to sensors and relays in the system you are inspecting.
This test may indicate a loose or poorly mounted sensor or relay.
ENGINE COMPARTMENT
There are several reasons a vehicle or engine vibration could cause an e\
lectrical complaint. Some of the
things to check for are:
• Connectors not fully seated.
• Wiring harness not long enough and is being stressed due to engine vibrations or rocking.
• Wires laying across brackets or moving components.
• Loose, dirty or corroded ground wires.
• Wires routed too close to hot components.
To inspect components under the hood, start by verifyi ng the integrity of ground connections. (Refer to Ground
Inspection described later.) First check that the system is properly grounded. Then check for loose connection
by gently shaking the wiring or components as previous ly explained. Using the wiring diagrams inspect the
wiring for continuity.
BEHIND THE INSTRUMENT PANEL
An improperly routed or improperly clamped harness can become pinched during accessory installation. Vehi-
cle vibration can aggravate a harness which is routed along a bracket or near a screw.
UNDER SEATING AREAS
An unclamped or loose harness can cause wiring to be pinched by seat components (such as slide guides)
during vehicle vibration. If the wiring runs under s eating areas, inspect wire routing for possible damage or
pinching.
Heat Sensitive
SGI839
Revision: January 20102010 Versa
Page 2694 of 3745

GI-28
< SERVICE INFORMATION >
SERVICE INFORMATION FOR ELECTRICAL INCIDENT
ough understanding of system operation. Then you will be able to use the appropriate equipment and follow
the correct test procedure.
You may have to simulate vehicle vibrations while testing electrical components. Gently shake the wiring har-
ness or electrical component to do this.
NOTE:
Refer to “How to Check Terminal” to probe or check terminal.
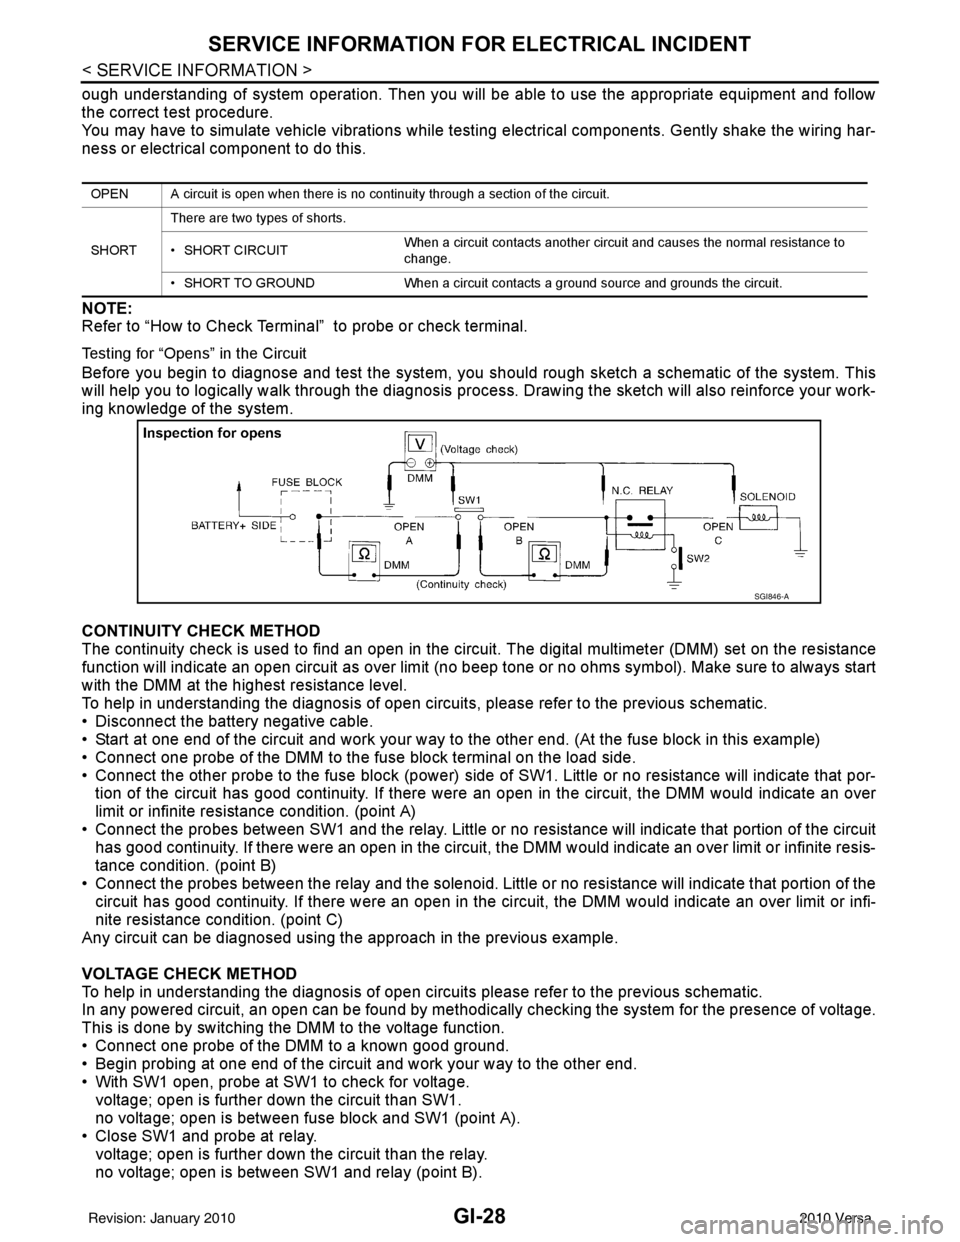
Testing for “Opens” in the Circuit
Before you begin to diagnose and test the system, you should rough sketch a schematic of the system. This
will help you to logically walk through the diagnosis process. Drawing the sketch will also reinforce your work-
ing knowledge of the system.
CONTINUITY CHECK METHOD
The continuity check is used to find an open in the circuit. The digital multimeter (DMM) set on the resistance
function will indicate an open circuit as over limit (no beep tone or no ohms symbo\
l). Make sure to always start
with the DMM at the highest resistance level.
To help in understanding the diagnosis of open circui ts, please refer to the previous schematic.
• Disconnect the battery negative cable.
• Start at one end of the circuit and work your way to the other end. (At the fuse block in this example)
• Connect one probe of the DMM to the fuse block terminal on the load side.
• Connect the other probe to the fuse block (power) side of SW1. Little or no resistance will indicate that por-
tion of the circuit has good continuity. If there were an open in the circuit, the DMM would indicate an over
limit or infinite resistance condition. (point A)
• Connect the probes between SW1 and the relay. Little or no resistance will indicate that portion of the circuit
has good continuity. If there were an open in the circuit, t he DMM would indicate an over limit or infinite resis-
tance condition. (point B)
• Connect the probes between the relay and the solenoid. Little or no resistance will indicate that portion of the circuit has good continuity. If there were an open in the ci rcuit, the DMM would indicate an over limit or infi-
nite resistance condition. (point C)
Any circuit can be diagnosed using the approach in the previous example.
VOLTAGE CHECK METHOD
To help in understanding the diagnosis of open circui ts please refer to the previous schematic.
In any powered circuit, an open can be found by methodica lly checking the system for the presence of voltage.
This is done by switching the DMM to the voltage function.
• Connect one probe of the DMM to a known good ground.
• Begin probing at one end of the circuit and work your way to the other end.
• With SW1 open, probe at SW1 to check for voltage. voltage; open is further down the circuit than SW1.
no voltage; open is between fuse block and SW1 (point A).
• Close SW1 and probe at relay.
voltage; open is further down the circuit than the relay.
no voltage; open is between SW1 and relay (point B).
OPEN A circuit is open when there is no continuity through a section of the circuit.
SHORT There are two types of shorts.
• SHORT CIRCUIT
When a circuit contacts another circuit and causes the normal resistance to
change.
• SHORT TO GROUND When a circuit contacts a ground source and grounds the circuit.
SGI846-A
Revision: January 20102010 Versa
Page 2695 of 3745

SERVICE INFORMATION FOR ELECTRICAL INCIDENTGI-29
< SERVICE INFORMATION >
C
DE
F
G H
I
J
K L
M B
GI
N
O P
• Close the relay and probe at the solenoid. voltage; open is further down the circuit than the solenoid.
no voltage; open is between relay and solenoid (point C).
Any powered circuit can be diagnosed using the approach in the previous example.
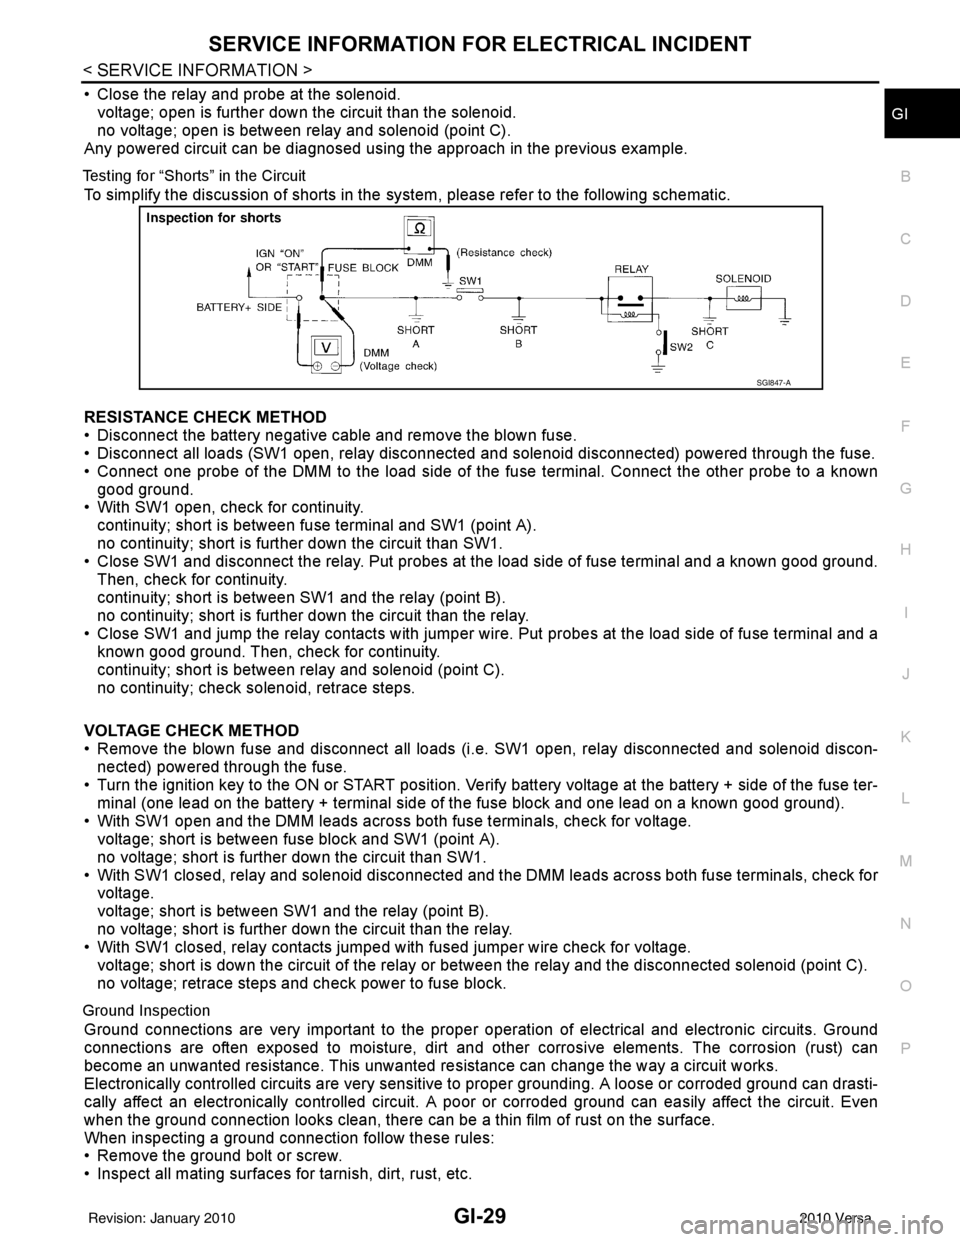
Testing for “Shorts” in the Circuit
To simplify the discussion of shorts in the system, please refer to the following schematic.
RESISTANCE CHECK METHOD
• Disconnect the battery negative cable and remove the blown fuse.
• Disconnect all loads (SW1 open, relay disconnected and solenoid disconnected) powered through the fuse.
• Connect one probe of the DMM to the load side of the fuse terminal. Connect the other probe to a known
good ground.
• With SW1 open, check for continuity.
continuity; short is between fuse terminal and SW1 (point A).
no continuity; short is further down the circuit than SW1.
• Close SW1 and disconnect the relay. Put probes at the load side of fuse terminal and a known good ground.
Then, check for continuity.
continuity; short is between SW1 and the relay (point B).
no continuity; short is further down the circuit than the relay.
• Close SW1 and jump the relay contacts with jumper wir e. Put probes at the load side of fuse terminal and a
known good ground. Then, check for continuity.
continuity; short is between relay and solenoid (point C).
no continuity; check solenoid, retrace steps.
VOLTAGE CHECK METHOD
• Remove the blown fuse and disconnect all loads (i .e. SW1 open, relay disconnected and solenoid discon-
nected) powered through the fuse.
• Turn the ignition key to the ON or START position. Veri fy battery voltage at the battery + side of the fuse ter-
minal (one lead on the battery + terminal side of the fuse block and one lead on a known good ground).
• With SW1 open and the DMM leads across both fuse terminals, check for voltage.
voltage; short is between fuse block and SW1 (point A).
no voltage; short is further down the circuit than SW1.
• With SW1 closed, relay and solenoid disconnected and the DMM leads across both fuse terminals, check for voltage.
voltage; short is between SW1 and the relay (point B).
no voltage; short is further down the circuit than the relay.
• With SW1 closed, relay contacts jumped with fused jumper wire check for voltage.
voltage; short is down the circuit of the relay or between the relay and the disconnected solenoid (point C).
no voltage; retrace steps and check power to fuse block.
Ground Inspection
Ground connections are very important to the proper oper ation of electrical and electronic circuits. Ground
connections are often exposed to moisture, dirt and other corrosive elements. The corrosion (rust) can
become an unwanted resistance. This unwanted resistance can change the way a circuit works.
Electronically controlled circuits are very sensitive to proper grounding. A loose or corroded ground can drasti-
cally affect an electronically controlled circuit. A poor or corroded ground can easily affect the circuit. Even
when the ground connection looks clean, there can be a thin film of rust on the surface.
When inspecting a ground connection follow these rules:
• Remove the ground bolt or screw.
• Inspect all mating surfaces for tarnish, dirt, rust, etc.
SGI847-A
Revision: January 20102010 Versa