relay NISSAN LATIO 2011 Service User Guide
[x] Cancel search | Manufacturer: NISSAN, Model Year: 2011, Model line: LATIO, Model: NISSAN LATIO 2011Pages: 3787, PDF Size: 78.35 MB
Page 590 of 3787
BL-80
< SERVICE INFORMATION >
REMOTE KEYLESS ENTRY SYSTEM
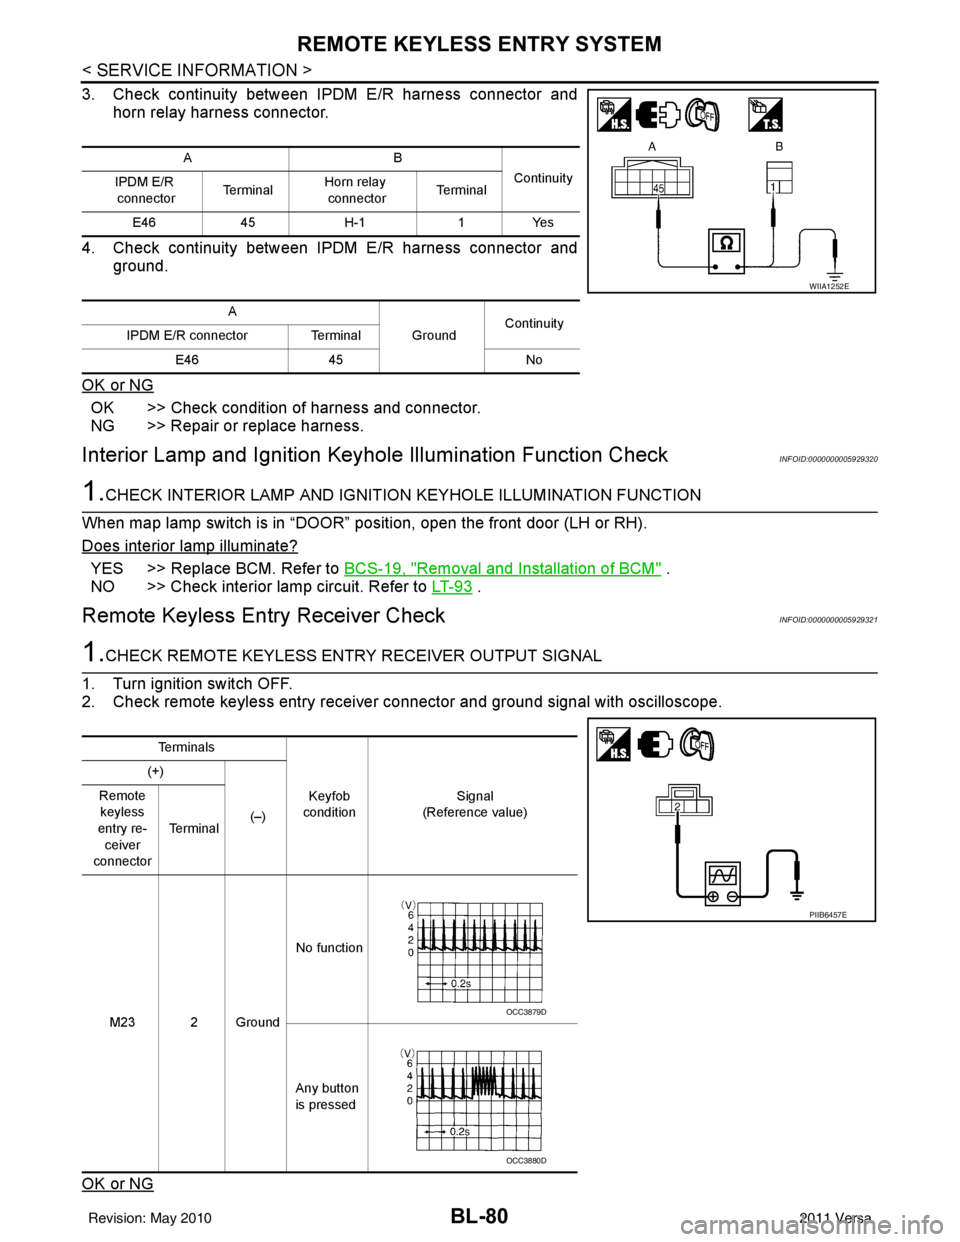
3. Check continuity between IPDM E/R harness connector andhorn relay harness connector.
4. Check continuity between IPDM E/R harness connector and ground.
OK or NG
OK >> Check condition of harness and connector.
NG >> Repair or replace harness.
Interior Lamp and Ignition Keyhole Illumination Function CheckINFOID:0000000005929320
1.CHECK INTERIOR LAMP AND IGNITION KEYHOLE ILLUMINATION FUNCTION
When map lamp switch is in “DOOR” position, open the front door (LH or RH).
Does interior lamp illuminate?
YES >> Replace BCM. Refer to BCS-19, "Removal and Installation of BCM" .
NO >> Check interior lamp circuit. Refer to LT- 9 3
.
Remote Keyless Entry Receiver CheckINFOID:0000000005929321
1.CHECK REMOTE KEYLESS ENTRY RECEIVER OUTPUT SIGNAL
1. Turn ignition switch OFF.
2. Check remote keyless entry receiver connector and ground signal with oscilloscope.
OK or NG
AB Continuity
IPDM E/R
connector Te r m i n a lHorn relay
connector Te r m i n a l
E46 45H-1 1Yes
A GroundContinuity
IPDM E/R connector Terminal
E46 45 No
WIIA1252E
Te r m i n a l s
Keyfob
condition Signal
(Reference value)
(+)
(–)
Remote
keyless
entry re- ceiver
connector Te r m i n a l
M23 2 Ground No function
Any button
is pressed
PIIB6457E
OCC3879D
OCC3880D
Revision: May 2010 2011 Versa
Page 597 of 3787
INTELLIGENT KEY SYSTEMBL-87
< SERVICE INFORMATION >
C
DE
F
G H
J
K L
M A
B
BL
N
O P
ALKIA1775ZZ
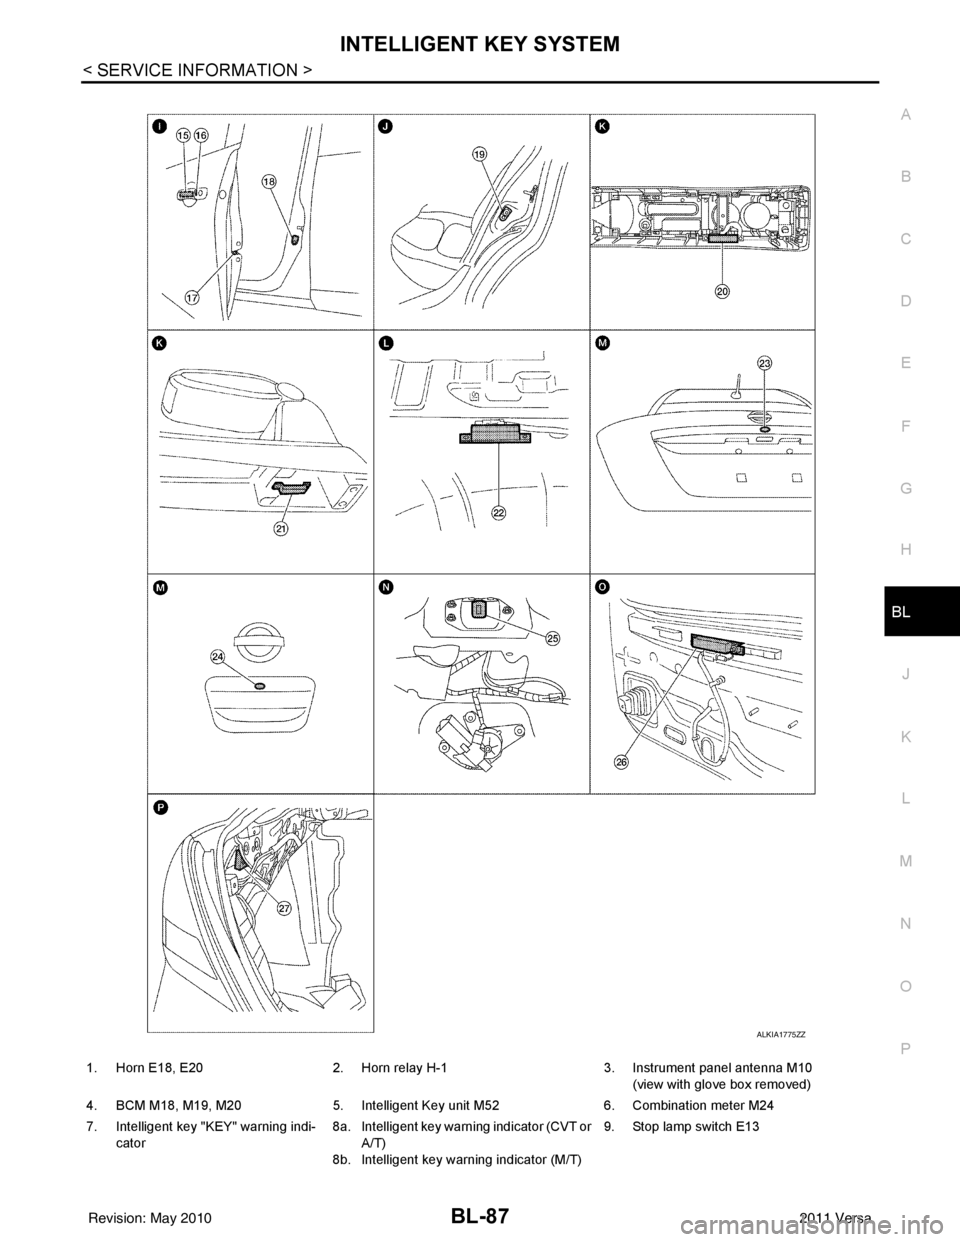
1. Horn E18, E20 2. Horn relay H-1 3. Instrument panel antenna M10
(view with glove box removed)
4. BCM M18, M19, M20 5. Intelligent Key unit M52 6. Combination meter M24
7. Intelligent key "KEY" warning indi- cator 8a.
8b.Intelligent key warning indicator (CVT or
A/T)
Intelligent key warning indicator (M/T) 9. Stop lamp switch E13
Revision: May 2010
2011 Versa
Page 667 of 3787
INTELLIGENT KEY SYSTEMBL-157
< SERVICE INFORMATION >
C
DE
F
G H
J
K L
M A
B
BL
N
O P
Horn Function CheckINFOID:0000000005929368
First perform the “SELF-DIAG RESULTS” of “BCM” with CONSULT-III, then perform the trouble diag-
nosis of malfunction system indicated in “SELF-DIAG RESULTS” of “BCM”. Refer to BCS-18, "
CAN
Communication Inspection Using CONSULT-III (Self-Diagnosis)".
1.CHECK HORN OPERATION
Check if horn sounds with horn switch.
Does horn operate?
Yes >> GO TO 2
No >> Check horn circuit. Refer to WW-40
.
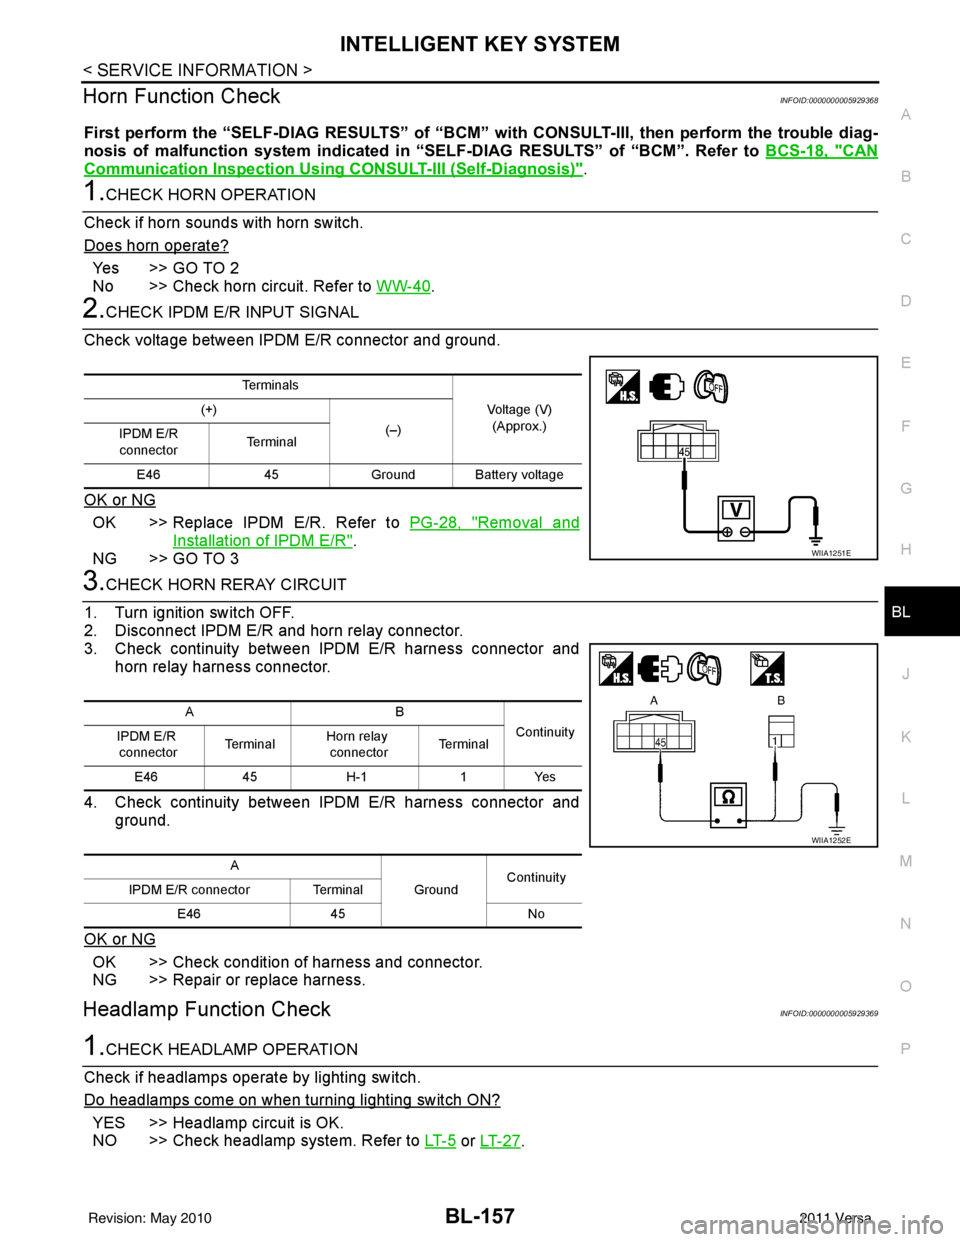
2.CHECK IPDM E/R INPUT SIGNAL
Check voltage between IPDM E/R connector and ground.
OK or NG
OK >> Replace IPDM E/R. Refer to PG-28, "Removal and
Installation of IPDM E/R".
NG >> GO TO 3
3.CHECK HORN RERAY CIRCUIT
1. Turn ignition switch OFF.
2. Disconnect IPDM E/R and horn relay connector.
3. Check continuity between IPDM E/R harness connector and horn relay harness connector.
4. Check continuity between IPDM E/R harness connector and ground.
OK or NG
OK >> Check condition of harness and connector.
NG >> Repair or replace harness.
Headlamp Function CheckINFOID:0000000005929369
1.CHECK HEADLAMP OPERATION
Check if headlamps operate by lighting switch.
Do headlamps come on when turning lighting switch ON?
YES >> Headlamp circuit is OK.
NO >> Check headlamp system. Refer to LT- 5
or LT- 2 7.
Te r m i n a l s
Voltage (V)(Approx.)
(+)
(–)
IPDM E/R
connector Te r m i n a l
E46 45Ground Ba ttery voltage
WIIA1251E
AB
Continuity
IPDM E/R
connector Te r m i n a l
Horn relay
connector Te r m i n a l
E46 45H-1 1Yes
A GroundContinuity
IPDM E/R connector Terminal
E46 45 No
WIIA1252E
Revision: May 2010 2011 Versa
Page 727 of 3787
VEHICLE SECURITY (THEFT WARNING) SYSTEMBL-217
< SERVICE INFORMATION >
C
DE
F
G H
J
K L
M A
B
BL
N
O P
VEHICLE SECURITY (THE FT WARNING) SYSTEM
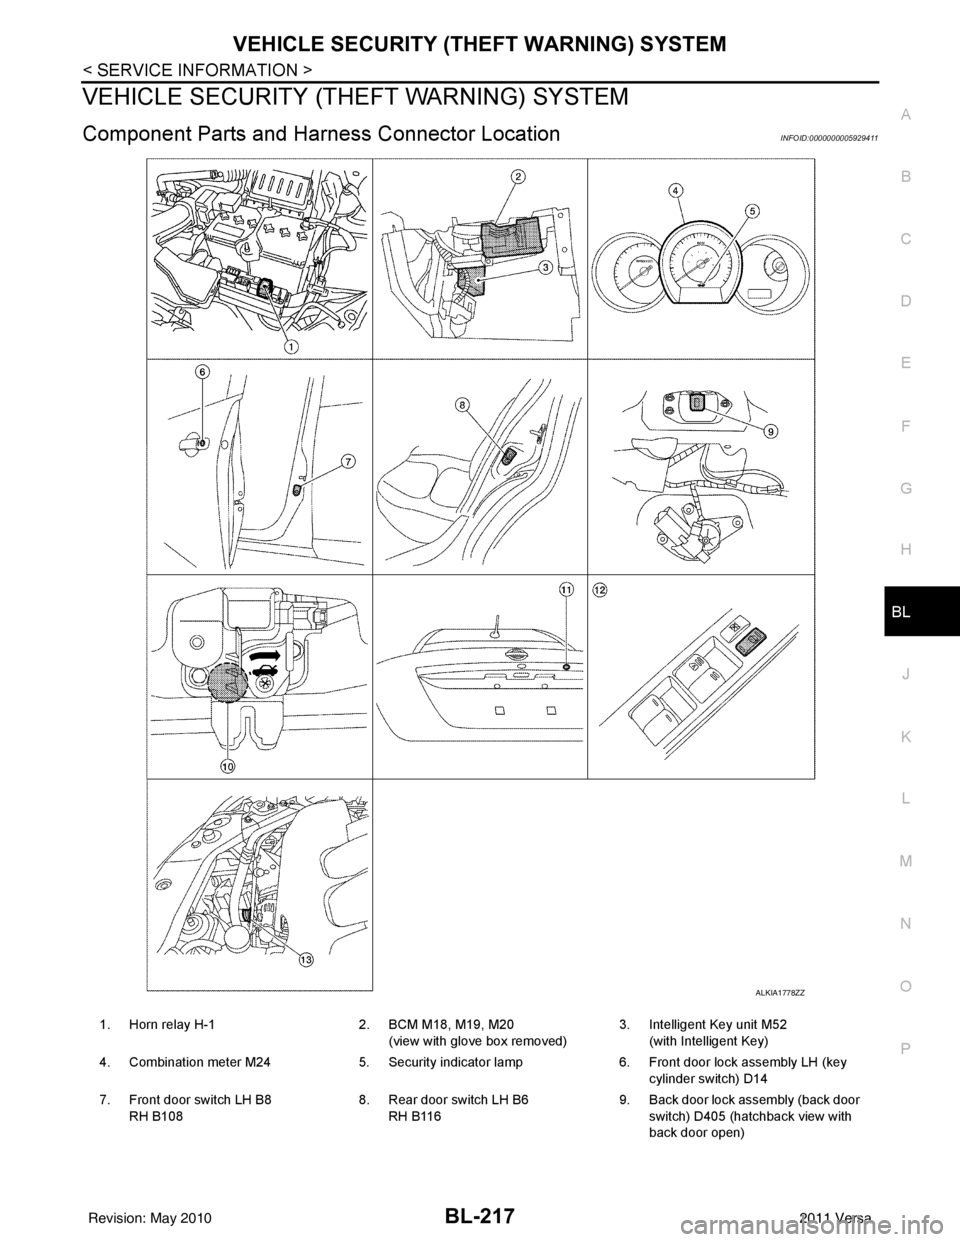
Component Parts and Harness Connector LocationINFOID:0000000005929411
ALKIA1778ZZ
1. Horn relay H-1 2. BCM M18, M19, M20
(view with glove box removed) 3. Intelligent Key unit M52
(with Intelligent Key)
4. Combination meter M24 5. Security indicator lamp 6. Front door lock assembly LH (key
cylinder switch) D14
7. Front door switch LH B8 RH B108 8. Rear door switch LH B6
RH B116 9. Back door lock assembly (back door
switch) D405 (hatchback view with
back door open)
Revision: May 2010 2011 Versa
Page 729 of 3787

VEHICLE SECURITY (THEFT WARNING) SYSTEMBL-219
< SERVICE INFORMATION >
C
DE
F
G H
J
K L
M A
B
BL
N
O P
• to combination meter terminal 27 (security indicator lamp)
• through 40A fusible link (letter g, located in the fuse and fusible link box)
• to BCM terminal 70
• through 10A fuse [No. 8, located in the fuse block (J/B)]
• to BCM terminal 57
• through 10A fuse (No. 28, located in the fuse and fusible link box)
• to horn relay terminal 2
• through 15A fuse (No. 52, located in the IPDM E/R)
• to IPDM E/R internal CPU.
• through 20A fuse (No. 53, located in the IPDM E/R)
• to IPDM E/R internal CPU.
With the ignition switch in the ACC or ON position, power is supplied• through 10A fuse [No. 20, located in the fuse block (J/B)]
• to BCM terminal 11.
With the ignition switch in the ON or START position, power is supplied• through 10A fuse [No. 6, located in the fuse block (J/B)]
• to BCM terminal 38.
Ground is supplied• to BCM terminal 67
• through body grounds M57 and M61.
INITIAL CONDITION TO ACTIVATE THE SYSTEM
The operation of the vehicle security system is controlled by the doors and trunk (sedan).
To activate the vehicle security system, BCM must receive signals indicating the ignition switch is OFF, doors
and trunk (sedan) are closed and locked.
When a door or trunk (sedan) is open, BCM terminal 12, 13, 42, 43, 47 or 48 receives a ground signal from
each door or trunk switch. In addition to BCM, when back door is open, the Intelligent Key unit terminal 23
receives a ground signal from back door or trunk (sedan) through BCM terminal 30.
When front door LH is unlocked, BCM terminal 46 receives a signal from terminal 6 of main power window and
door lock/unlock switch.
When front door RH is unlocked, BCM terminal 46 receives a signal from terminal 2 of power window and door
lock/unlock switch RH.
VEHICLE SECURITY SYSTEM ALARM OPERATION
The vehicle security system is triggered by
• Opening a door without using the key, keyfob or Intelligent Key.
• Opening trunk without using the key, keyfob or Intelligent Key (sedan).
The vehicle security system will be triggered once the system is in armed phase,
• when BCM receives a ground signal at terminals 12, 13, 47, 48 (front or rear door switch), terminal 42 (sedan, trunk switch) or terminal 43 (hatchback, back door switch).
When the vehicle security system is triggered, ground is supplied intermittently
• from IPDM E/R terminal 45
• to horn relay terminal 1.
The headlamps flash and the hor n sounds intermittently.
The alarm automatically turns off after 50 seconds, but will reactivate if the vehicle is tampered with again.
VEHICLE SECURITY SYSTEM DEACTIVATION
To deactivate the vehicle security system, a door or trunk (sedan) must be unlocked with the key, keyfob or
Intelligent Key.
When the key is used to unlock the driver door, BCM terminal 7 receives signal
• from terminal 3 of the front door lock assembly LH (key cylinder switch).
When the key is used to open the trunk (sedan), BCM terminal 41 receives signal
• from terminal 1 of the trunk key cylinder switch.
When the BCM receives an unlock signal from keyfob, Intelligent Key, front door key cylinder switch LH or
trunk key cylinder switch (sedan), the vehicle security system is deactivated (Disarmed phase).
PANIC ALARM OPERATION
Intelligent Key and remote keyless entry system may or may not operate vehicle security system (horn and
headlamps) as required.
When the vehicle security system is triggered, ground is supplied intermittently
Revision: May 2010 2011 Versa
Page 730 of 3787

BL-220
< SERVICE INFORMATION >
VEHICLE SECURITY (THEFT WARNING) SYSTEM
• from IPDM E/R terminal 45
• to horn relay terminal 1.
The headlamp flashes and the horn sounds intermittently.
The alarm automatically turns off after 25 seconds or when BCM receives any signal from keyfob or Intelligent
Key.
CAN Communication System DescriptionINFOID:0000000005929413
Refer to LAN-7.
Revision: May 2010 2011 Versa
Page 750 of 3787
BL-240
< SERVICE INFORMATION >
VEHICLE SECURITY (THEFT WARNING) SYSTEM
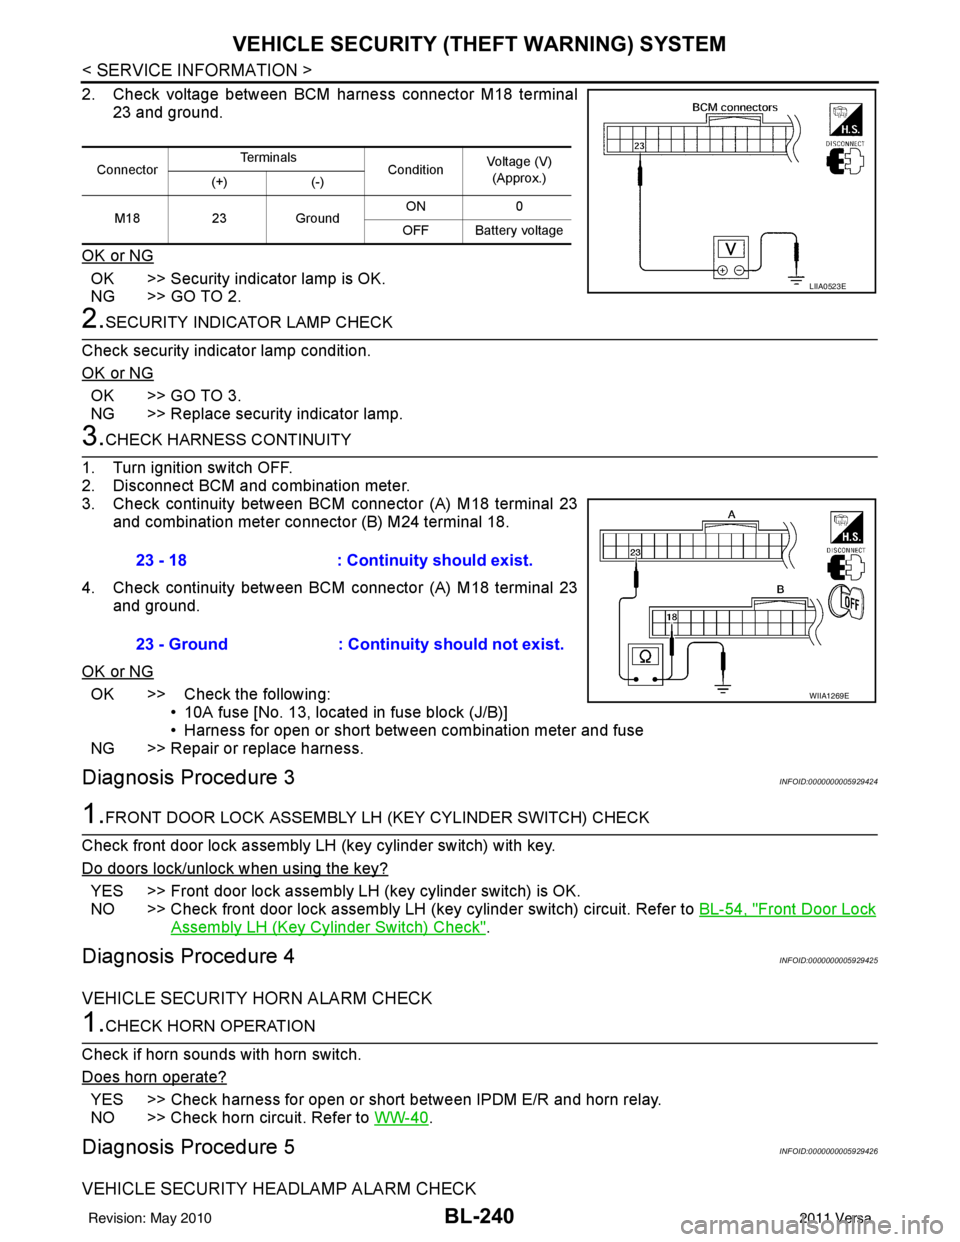
2. Check voltage between BCM harness connector M18 terminal
23 and ground.
OK or NG
OK >> Security indicator lamp is OK.
NG >> GO TO 2.
2.SECURITY INDICATOR LAMP CHECK
Check security indicator lamp condition.
OK or NG
OK >> GO TO 3.
NG >> Replace security indicator lamp.
3.CHECK HARNESS CONTINUITY
1. Turn ignition switch OFF.
2. Disconnect BCM and combination meter.
3. Check continuity between BCM connector (A) M18 terminal 23 and combination meter connector (B) M24 terminal 18.
4. Check continuity between BCM connector (A) M18 terminal 23 and ground.
OK or NG
OK >> Check the following: • 10A fuse [No. 13, located in fuse block (J/B)]
• Harness for open or short between combination meter and fuse
NG >> Repair or replace harness.
Diagnosis Procedure 3INFOID:0000000005929424
1.FRONT DOOR LOCK ASSEMBLY LH (KEY CYLINDER SWITCH) CHECK
Check front door lock assembly LH (key cylinder switch) with key.
Do doors lock/unlock when using the key?
YES >> Front door lock assembly LH (key cylinder switch) is OK.
NO >> Check front door lock assembly LH (key cylinder switch) circuit. Refer to BL-54, "
Front Door Lock
Assembly LH (Key Cylinder Switch) Check".
Diagnosis Procedure 4INFOID:0000000005929425
VEHICLE SECURITY HORN ALARM CHECK
1.CHECK HORN OPERATION
Check if horn sounds with horn switch.
Does horn operate?
YES >> Check harness for open or short between IPDM E/R and horn relay.
NO >> Check horn circuit. Refer to WW-40
.
Diagnosis Procedure 5INFOID:0000000005929426
VEHICLE SECURITY HEADLAMP ALARM CHECK
ConnectorTe r m i n a l s
ConditionVoltage (V)
(Approx.)
(+) (-)
M18 23Ground ON
0
OFF Battery voltage
LIIA0523E
23 - 18 : Continuity should exist.
23 - Ground : Continuity should not exist.
WIIA1269E
Revision: May 2010 2011 Versa
Page 890 of 3787

BRC-1
BRAKES
C
DE
G H
I
J
K L
M
SECTION BRC
A
B
BRC
N
O P
CONTENTS
BRAKE CONTROL SYSTEM
ABS
SERVICE INFORMATION .. ..........................
3
PRECAUTIONS .............................................. .....3
Precaution for Supplemental Restraint System
(SRS) "AIR BAG" and "SEAT BELT PRE-TEN-
SIONER" ............................................................. ......
3
Precaution for Brake System ....................................3
Precaution for Brake Control .....................................4
Precaution for CAN System ................................ ......4
PREPARATION ...................................................5
Special Service Tool ........................................... ......5
Commercial Service Tool ..........................................5
SYSTEM DESCRIPTION .....................................6
System Component ............................................. ......6
ABS Function ............................................................6
EBD Function ............................................................6
Fail-Safe Function .....................................................6
Hydraulic Circuit Diagram .........................................7
CAN COMMUNICATION ................................ .....8
System Description ............................................. ......8
TROUBLE DIAGNOSIS ......................................9
How to Perform Trouble Diagnosis for Quick and
Accurate Repair ........................................................
9
Component Parts and Harness Connector Loca-
tion ...................................................................... ....
12
Schematic ...............................................................13
Wiring Diagram - ABS - ...........................................14
Basic Inspection .................................................. ....17
Warning Lamp and Indicator Timing .......................18
Control Unit Input/Output Signal Standard ..............18
CONSULT-III Function (ABS) .................................19
TROUBLE DIAGNOSIS FOR SELF-DIAG-
NOSTIC ITEMS ..................................................
25
Wheel Sensor System .............................................25
ABS Control Unit Inspection ....................................26
Solenoid Valve System Inspection ...................... ....26
Actuator Motor, Motor Relay, and Circuit Inspec-
tion ....................................................................... ....
27
ABS Control Unit Power and Ground Systems In-
spection ...................................................................
28
CAN Communication System Inspection .................29
TROUBLE DIAGNOSES FOR SYMPTOMS .....30
ABS Works Frequently ............................................30
Unexpected Pedal Action ........................................30
Long Stopping Distance ..........................................31
ABS Does Not Work ................................................31
Pedal Vibration or ABS Operation Noise .................31
WHEEL SENSORS ...........................................33
Removal and Installation ..................................... ....33
SENSOR ROTOR ..............................................35
Removal and Installation .........................................35
ACTUATOR AND ELECTRIC UNIT (ASSEM-
BLY) ..................................................................
36
Removal and Installation .........................................36
VDC/TCS/ABS
SERVICE INFORMATION .. .........................
38
PRECAUTIONS .................................................38
Precaution for Supplemental Restraint System
(SRS) "AIR BAG" and "SEAT BELT PRE-TEN-
SIONER" ............................................................. ....
38
Precautions Necessary for Steering Wheel Rota-
tion after Battery Disconnect ...................................
38
Precaution for Brake System ...................................39
Precaution for Brake Control ...................................39
Precaution for CAN System .....................................40
PREPARATION .................................................41
Special Service Tool ................................................41
Commercial Service Tool ........................................41
SYSTEM DESCRIPTION ..................................42
Revision: May 2010 2011 Versa
Page 891 of 3787

BRC-2
System Component ................................................42
ABS Function ....................................... ...................42
EBD Function ...................................................... ...42
TCS Function ..........................................................43
VDC Function .........................................................43
Wheel Sensors .......................................................43
Fail-Safe Function ..................................................43
Hydraulic Circuit Diagram .......................................44
CAN COMMUNICATION ...................................45
System Description .................................................45
TROUBLE DIAGNOSIS .....................................46
How to Perform Trouble Diagnosis for Quick and
Accurate Repair ................................................... ...
46
Component Parts and Harness Connector Loca-
tion ..........................................................................
49
Schematic ...............................................................51
Wiring Diagram - VDC - ..........................................52
Basic Inspection .....................................................56
Warning Lamp and Indicator Timing .......................57
Control Unit Input/Output Signal Standard .............57
CONSULT-III Function (ABS) .................................60
TROUBLE DIAGNOSIS FOR SELF-DIAG-
NOSTIC ITEMS ............................................... ...
67
Wheel Sensor System Inspection ...........................67
Engine System Inspection ................................... ...68
ABS/TCS/VDC Control Unit Inspection ..................68
Steering Angle Sensor System Inspection .......... ...69
Yaw Rate/Side/Decel G Sensor System Inspec-
tion ....................................................................... ...
70
Solenoid and VDC Change-Over Valve System
Inspection ...............................................................
72
Actuator Motor, Motor Relay, and Circuit Inspec-
tion ....................................................................... ...
73
Stop Lamp Switch System Inspection ....................74
ABS/TCS/VDC Control Unit Power and Ground
Systems Inspection .............................................. ...
75
Brake Fluid Level Switch System Inspection ..........76
Pressure Sensor System Inspection .......................77
Transmission Range Switch System Inspection .. ...78
CAN Communication System Inspection ................79
Component Inspection ............................................79
TROUBLE DIAGNOSES FOR SYMPTOMS .....81
ABS Works Frequently ............................................81
Unexpected Pedal Action ..................................... ...81
Long Stopping Distance ..........................................82
ABS Does Not Work ...............................................82
Pedal Vibration or ABS Op eration Noise ................82
ABS Warning Lamp Does Not Come On When Ig-
nition Switch Is Turned On ................................... ...
83
ABS Warning Lamp Stays On When Ignition
Switch Is Turned On ............................................ ...
83
Vehicle Jerks During TCS/VDC Activation ..............84
ON-VEHICLE SERVICE ....................................85
Adjustment of Steering Angle Sensor Neutral Po-
sition ..................................................................... ...
85
WHEEL SENSORS ............................................86
Removal and Installation .........................................86
SENSOR ROTOR ........................................... ...88
Removal and Installation .........................................88
ACTUATOR AND ELECTRIC UNIT (ASSEM-
BLY) ................................................................ ...
89
Removal and Installation .........................................89
STEERING ANGLE SENSOR ........................ ...91
Removal and Installation .........................................91
G SENSOR ........................................................92
Removal and Installation .........................................92
Revision: May 2010 2011 Versa
Page 908 of 3787
![NISSAN LATIO 2011 Service User Guide TROUBLE DIAGNOSISBRC-19
< SERVICE INFORMATION > [ABS]
C
D
E
G H
I
J
K L
M A
B
BRC
N
O P
Note 1: Confirm tire pressure is normal.
Note 2: ON/OFF timing of ABS warning lamp
ON: For approximately 2 secon NISSAN LATIO 2011 Service User Guide TROUBLE DIAGNOSISBRC-19
< SERVICE INFORMATION > [ABS]
C
D
E
G H
I
J
K L
M A
B
BRC
N
O P
Note 1: Confirm tire pressure is normal.
Note 2: ON/OFF timing of ABS warning lamp
ON: For approximately 2 secon](/img/5/57357/w960_57357-907.png)
TROUBLE DIAGNOSISBRC-19
< SERVICE INFORMATION > [ABS]
C
D
E
G H
I
J
K L
M A
B
BRC
N
O P
Note 1: Confirm tire pressure is normal.
Note 2: ON/OFF timing of ABS warning lamp
ON: For approximately 2 seconds after ignition switch is turned ON, or when a malfunction is detected.
OFF: Approximately 2 seconds after ignition switch is turned ON (when system is in normal operation).
CONSULT-III Function (ABS)INFOID:0000000005928445
CONSULT-III can display each diagnostic item using the diagnostic test modes shown following.
Monitor item Display content Data monitor
Note: Error inspection
checklist
Condition Reference value in
normal operation
FR RH SENSOR
FR LH SENSOR
RR RH SENSOR
RR LH SENSOR Wheel speedVehicle stopped
0 [km/h (MPH)]
BRC-25, "
Wheel Sensor
System"Vehicle running (Note 1) Almost in accor-
dance with speed-
ometer display
(within
±10%)
BATTERY VOLT Battery voltage sup-
plied to ABS actuator
and electric unit (con-
trol unit)Ignition switch ON
10 to 16VBRC-28, "
ABS Control
Unit Power and Ground
Systems Inspection"
STOP LAMP SW
Stop lamp switch oper-
ationBrake pedal depressed ON
—
Brake pedal not depressed OFF
ABS WARN LAMP ABS warning lamp ON
condition (Note 2)ABS warning lamp ON ON
BRC-17, "
Basic Inspec-
tion"ABS warning lamp OFF OFF
MOTOR RELAY Operation status of mo-
tor and motor relayIgnition switch ON or running
(ABS not activated)
OFF
BRC-27, "
Actuator Motor,
Motor Relay, and Circuit
Inspection"Ignition switch ON or engine
running (ABS activated) ON
ACTUATOR RLY Actuator relay opera-
tion statusVehicle stopped (Ignition
switch ON)
OFF
BRC-27, "
Actuator Motor,
Motor Relay, and Circuit
Inspection"Vehicle stopped (Engine run-
ning) ON
FR LH IN SOL
FR LH OUT SOL
FR RH IN SOL
FR RH OUT SOL
RR RH IN SOL
RR RH OUT SOL
RR LH IN SOL
RR LH OUT SOL Solenoid valve opera-
tionActuator (solenoid) is active
(“ACTIVE TEST” with CON-
SULT-III) or actuator relay is in-
active (in fail-safe mode).
ON
BRC-26, "
Solenoid Valve
System Inspection"When actuator (solenoid) is not
active and actuator relay is ac-
tive (ignition switch ON). OFF
ABS SIGNAL
EBD SIGNAL Signal statusABS active
EBD active
ON
ABS system
EBD system
ABS not active
EBD not active OFF
ABS FAIL SIG
EBD FAIL SIG Fail signal statusABS fail
EBD fail
ON
ABS system
EBD system
ABS normal
EBD normal OFF
Diagnostic mode
Description
SELF DIAGNOSTIC RESULT Displays ABS actuator and electric unit (control unit) self-diagnosis results. DATA MONITOR Displays ABS actuator and electric unit (control unit) input/output data in real time.
CAN DIAG SUPPORT MNTR The result of transmit/receive diagnosis of CAN communication can be read. ACTIVE TEST Operation of electrical loads can be checked by sending drive signal to them.
Revision: May 2010 2011 Versa