CD player NISSAN LEAF 2013 1.G Navigation Manual
[x] Cancel search | Manufacturer: NISSAN, Model Year: 2013, Model line: LEAF, Model: NISSAN LEAF 2013 1.GPages: 275, PDF Size: 6.66 MB
Page 150 of 275

4-16Audio system
iPod®PLAYER OPERATION
Connecting iPod
®
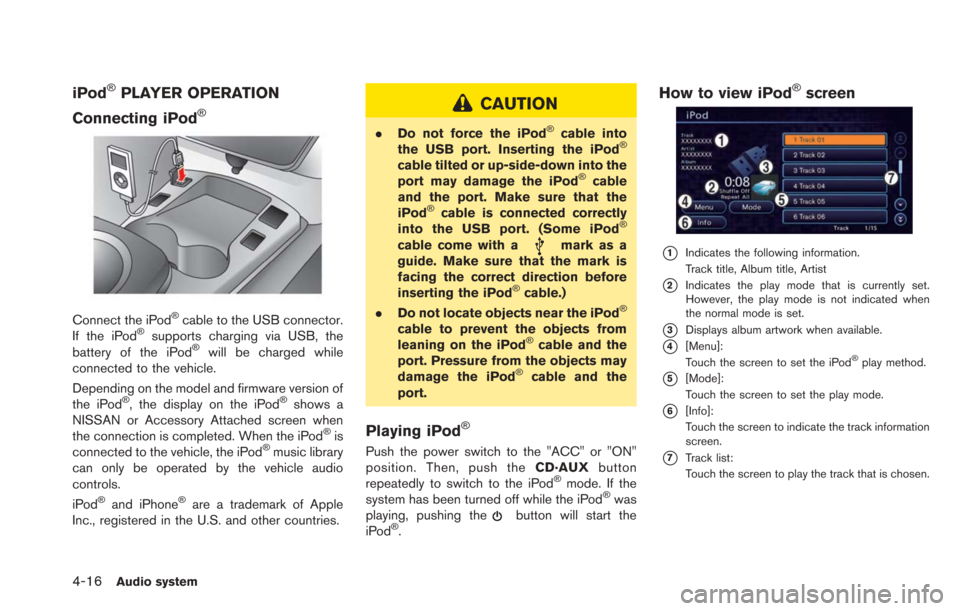
Connect the iPod®cable to the USB connector.
If the iPod®supports charging via USB, the
battery of the iPod®will be charged while
connected to the vehicle.
Depending on the model and firmware version of
the iPod
®, the display on the iPod®shows a
NISSAN or Accessory Attached screen when
the connection is completed. When the iPod
®is
connected to the vehicle, the iPod®music library
can only be operated by the vehicle audio
controls.
iPod
®and iPhone®are a trademark of Apple
Inc., registered in the U.S. and other countries.
CAUTION
. Do not force the iPod®cable into
the USB port. Inserting the iPod®
cable tilted or up-side-down into the
port may damage the iPod®cable
and the port. Make sure that the
iPod
®cable is connected correctly
into the USB port. (Some iPod®
cable come with amark as a
guide. Make sure that the mark is
facing the correct direction before
inserting the iPod
®cable.)
. Do not locate objects near the iPod®
cable to prevent the objects from
leaning on the iPod®cable and the
port. Pressure from the objects may
damage the iPod
®cable and the
port.
Playing iPod®
Push the power switch to the "ACC" or "ON"
position. Then, push the CD·AUXbutton
repeatedly to switch to the iPod
®mode. If the
system has been turned off while the iPod®was
playing, pushing thebutton will start the
iPod®.
How to view iPod®screen
*1Indicates the following information.
Track title, Album title, Artist
*2Indicates the play mode that is currently set.
However, the play mode is not indicated when
the normal mode is set.
*3Displays album artwork when available.
*4[Menu]:
Touch the screen to set the iPod®play method.
*5[Mode]:
Touch the screen to set the play mode.
*6[Info]:
Touch the screen to indicate the track information
screen.
*7Track list:
Touch the screen to play the track that is chosen.
Page 155 of 275
![NISSAN LEAF 2013 1.G Navigation Manual Bluetooth®trademark:
Bluetooth®is a trademark owned
by Bluetooth®SIG, Inc., and
licensed to Clarion.
Connecting procedure
1. Push the MENUand touch [Settings].
2. Touch [Bluetooth].
3. Touch [Conne NISSAN LEAF 2013 1.G Navigation Manual Bluetooth®trademark:
Bluetooth®is a trademark owned
by Bluetooth®SIG, Inc., and
licensed to Clarion.
Connecting procedure
1. Push the MENUand touch [Settings].
2. Touch [Bluetooth].
3. Touch [Conne](/img/5/324/w960_324-154.png)
Bluetooth®trademark:
Bluetooth®is a trademark owned
by Bluetooth®SIG, Inc., and
licensed to Clarion.
Connecting procedure
1. Push the MENUand touch [Settings].
2. Touch [Bluetooth].
3. Touch [Connect Bluetooth]. A confirmation
message is displayed.
4. Confirm the contents of the message, thentouch [No].
INFO:
Selecting [Yes] will only connect the hands-
free phone portion of a Bluetooth
®device.
5. Choose a PIN code to use with the compatible Bluetooth®audio device using
the number input screen. The PIN code will
need to be entered into the Bluetooth
®
audio device after step 6.
6. Touch [OK]. The standby message screen will appear. Operate the compatible Blue-
tooth
®audio device. Please refer to the
device’s Owners Manual for the Bluetooth®
audio connection instructions for your spe-
cific device. When the connection is com-
pleted, the screen will return to the
Bluetooth
®setup display.
INFO:
It may not be possible to connect to a Blue-
tooth
®audio profile from the system. In this
case, perform connection operation from the
Bluetooth
®audio player, after connecting the
system and the Bluetooth®audio. For details of
how to perform connection, refer to the Owner’s
Manual of the Bluetooth
®audio player that is
being used.
Audio system4-21
Page 157 of 275

.Repeat
Choose "Repeat 1 Track", "Repeat All
Tracks" or "Repeat Group".
Bluetooth®settings
The Bluetooth®settings can be set in detail to
according to the user’s preference.
1. Push the MENUbutton and touch [Set-
tings].
2. Touch [Bluetooth Connections].
3. Touch the item you would like to set.
Available settings
. [Bluetooth]:
If this setting is turned off, the connection
between the Bluetooth
®devices and the in-
vehicle Bluetooth®module will be canceled.
. [Connect Bluetooth]:
Connects to the Bluetooth
®device. Up to 5
devices can be registered. .
[Connected Devices]:
Registered devices are shown on the list.
Select a Bluetooth
®device from the list. The
following options are available.
. [Edit Bluetooth Info]:
Change the name broadcasted by this
system over Bluetooth
®. Change the PIN
code that is entered when connecting a
hands-free device to this system.
AUXILIARY INPUT JACK
The auxiliary input jack is located on the center
console.
The auxiliary input jack accepts any standard
analog audio input such as from a portable
cassette player, CD player or MP3 player.
Before connecting a device to the jack, turn off
the power of the portable device. When the
CD·AUXbutton is pushed with the
system off and a compatible device connected,
the system will turn on. If another audio source is
playing and a compatible device is connected,
push the CD·AUXbutton repeatedly until the
center display changes to the AUX mode.
INFO:
Insert a 1/4 inch (3.5 mm) stereo mini plug in the
auxiliary input jack. If a cable with a mono plug is
used, the audio output may not function
normally.
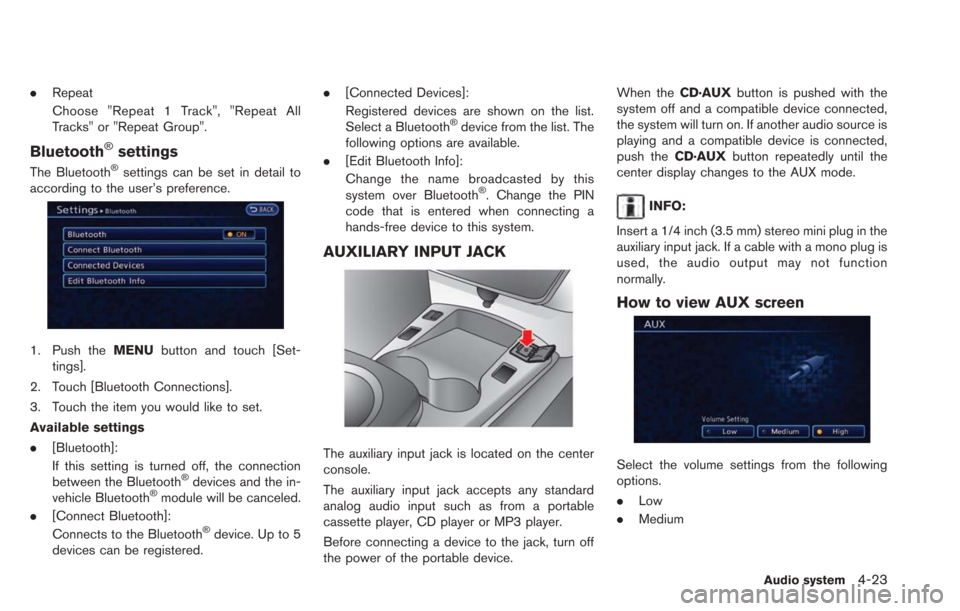
How to view AUX screen
Select the volume settings from the following
options.
. Low
. Medium
Audio system4-23
Page 243 of 275

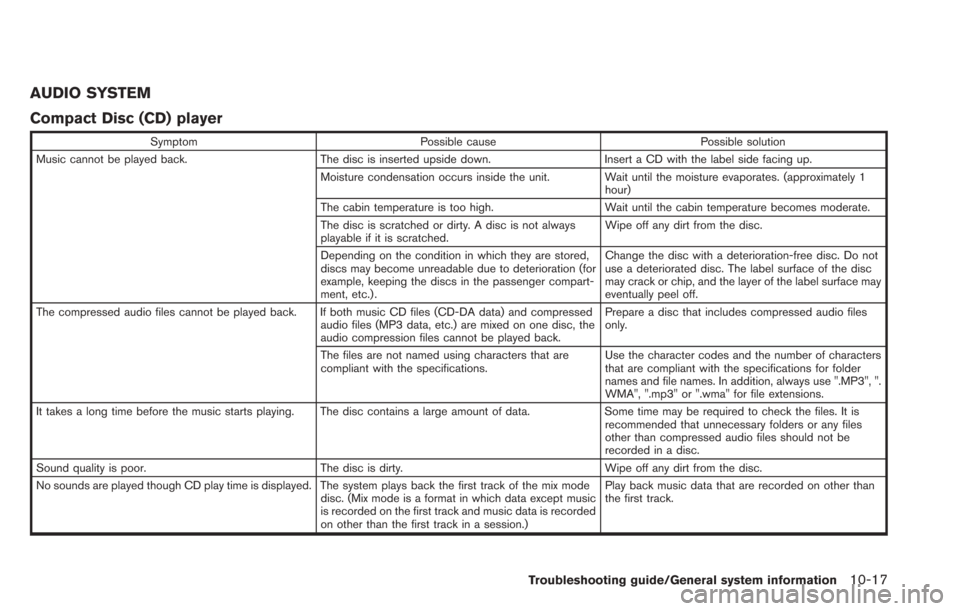
AUDIO SYSTEM
Compact Disc (CD) player
SymptomPossible cause Possible solution
Music cannot be played back. The disc is inserted upside down.Insert a CD with the label side facing up.
Moisture condensation occurs inside the unit. Wait until the moisture evaporates. (approximately 1 hour)
The cabin temperature is too high. Wait until the cabin temperature becomes moderate.
The disc is scratched or dirty. A disc is not always
playable if it is scratched. Wipe off any dirt from the disc.
Depending on the condition in which they are stored,
discs may become unreadable due to deterioration (for
example, keeping the discs in the passenger compart-
ment, etc.) . Change the disc with a deterioration-free disc. Do not
use a deteriorated disc. The label surface of the disc
may crack or chip, and the layer of the label surface may
eventually peel off.
The compressed audio files cannot be played back. If both music CD files (CD-DA data) and compressed audio files (MP3 data, etc.) are mixed on one disc, the
audio compression files cannot be played back.Prepare a disc that includes compressed audio files
only.
The files are not named using characters that are
compliant with the specifications. Use the character codes and the number of characters
that are compliant with the specifications for folder
names and file names. In addition, always use ".MP3", ".
WMA", ".mp3" or ".wma" for file extensions.
It takes a long time before the music starts playing. The disc contains a large amount of data. Some time may be required to check the files. It is
recommended that unnecessary folders or any files
other than compressed audio files should not be
recorded in a disc.
Sound quality is poor. The disc is dirty. Wipe off any dirt from the disc.
No sounds are played though CD play time is displayed. The system plays back the first track of the mix mode disc. (Mix mode is a format in which data except music
is recorded on the first track and music data is recorded
on other than the first track in a session.)Play back music data that are recorded on other than
the first track.
Troubleshooting guide/General system information10-17
Page 245 of 275

iPod®player
SymptomPossible cause Possible solution
The system does not recognize an iPod®. A connector cable is not correctly connected, or the
iPod®does not correctly operate. Connect the connector cable again. If the system does
not recognize the iPod®after performing this procedure
above, reset the iPod®.
The iPod®that is to be connected is not compatible
with the system. Check the iPod®model and firmware versions available
for the system.
A USB extension cable is not correctly connected. Do not use a USB extension cable.
The cable is rapidly connected to or disconnected from
the USB connector. Slowly connect or disconnect the USB cable.
An iPod
®cannot be operated. The iPod®is connected to the in-vehicle audio system
while headsets, etc. are connected to the iPod®. Remove all equipment from the iPod
®after discon-
necting the iPod®from the system, and then connect it
to the system again.
The iPod
®is not operating normally. Disconnect the iPod®from the in-vehicle audio system,
and then connect it to the system again.
The system plays back an album/track that includes a
particular album art. Disconnect the iPod
®from the in-vehicle audio system,
and then reset the iPod®. Disable the album art, and
then connect the iPod®to the system.
An iPod®does not respond. There are too many tracks in a category. Decrease the number of tracks in a category (less than
3,000 tracks).
The shuffle function is turned on. Turn off the shuffle function if many tracks are stored on
the iPod
®.
Music cannot be played back. A connector is not connected to the iPod®. Firmly connect the connector until it clicks.
Playback cuts out. The sound cuts due to vibration resulting from unstable
location of the iPod
®. Place the iPod
®on a stable location where it does not
roll over.
Distorted sound occurs. The EQ (equalizer) function of the iPod
®is turned on. Turn off the EQ (equalizer) function.
Battery charge of an iPod®takes longer. Battery charge of the iPod®may take longer while an
iPod®is playing back. If the iPod
®is requires charging, it is recommended to
stop play back.
Battery charge of an iPod
®is unavailable. The cable that is connected to the iPod®may
deteriorate (cable disconnection, etc.). Check the cable currently in use.
Troubleshooting guide/General system information10-19
Page 248 of 275

10-22Troubleshooting guide/General system information
Bluetooth®streaming audio
SymptomPossible cause Possible solution
Registration cannot be performed. The Bluetooth®audio device is not compatible with the
in-vehicle audio system. Check the Owner’s Manual for the Bluetooth®audio
device.
The PIN code is incorrect. Check the PIN code for the Bluetooth
®audio device that
is to be registered.
Check that the PIN code for the Bluetooth
®audio device
is consistent with that for the in-vehicle audio system.
Another Bluetooth
®device is used in the vehicle. Turn off another Bluetooth®device until the registration
is completed.
Music cannot be played back. The Bluetooth
®audio device is not compatible with the
in-vehicle audio system. Check the Owner’s Manual for the Bluetooth®audio
device.
The system is not set to the Bluetooth
®audio mode. Push the CD·AUXbutton to select the Bluetooth®audio
mode.
A Bluetooth
®adapter is turned off. Turn on a Bluetooth®adapter when it is used for a
Bluetooth®audio device.
Playback stops. The Bluetooth®audio device is not compatible with the
in-vehicle audio system. Check the Owner’s Manual for the Bluetooth®audio
device.
A cellular phone is connected. This is not a malfunction.
Sound may cut out when a Bluetooth
®audio device is
operated. Push the
CD·AUX button to select the Bluetooth®audio
mode, and then operate a function on the vehicle’s
display screen.
Audio operation cannot be performed. Bluetooth
®audio device that does not support audio
operations is in use. This is not a malfunction.
Refer to the Owner’s Manual of the Bluetooth®audio
device.
An error occurs when connecting to a Bluetooth
®
audio profile. Turn the power source of the Bluetooth
®audio player off
and on, and then resume connection with the system.
Bluetooth
®audio does not play automatically when the
vehicle power supply is turned ON the last source was
a Bluetooth
®audio device. Depending on the specifications of the Bluetooth
®
audio device, Bluetooth®audio may not play auto-
matically. Select Bluetooth
®audio as the audio source and
perform play back.
Page 271 of 275

11 Index
A
About route guidance ................................................ 3-41
Adjusting volume and others...................................... 1-7
Audio operation precautions...................................... 4-2
Auxiliary input jack....................................................... 4-23
B
Basic operation.............................................................. 1-7
Battery and power information ................................ 2-16
Bluetooth
®Hands-Free Phone System .................. 7-2
Bluetooth®streaming audio ..................................... 4-11
Bluetooth®streaming audio operation .................. 4-20
C
Camera settings ............................................................ 9-9
Canceling/reactivating route .................................... 3-47
Car phone or CB radio ............................................. 7-10
CARWINGS
TMoverview............................................. 5-4
CARWINGSTMsettings............................................. 5-12
CD·AUX screen ........................................................... 1-10
Changing map view...................................................... 3-8
Changing region.......................................................... 3-18
Changing scale of map ............................................... 3-7
Character (letters and numbers) input screen ...... 1-7
Charge recommendation guidance ........................ 2-16
Charging station information...................................... IT-2
Clock settings.............................................................. 1-16
Comfort & convenience settings............................... 6-4
Compact Disc (CD) player......................................... 4-3
Compact Disc (CD) player operation.................... 4-14
Compressed Audio Files (MP3/WMA) ................... 4-7
Confirming route.......................................................... 3-52
Connecting cellular phone........................................ 1-13 Connecting procedure................................................. 7-4
Control button and microphone................................ 7-3
Control buttons and functions................................... 1-2
Control panel.................................................................. 1-2
Current vehicle location.......................................... 10-28
Customer assistance.................................................. 10-2
D
Data communication settings................................... 5-20
Deleting phone information......................................... 7-9
Deleting stored item................................................... 3-68
Destination screen...................................................... 3-17
Display adjustment...................................................... 1-14
Display urgent traffic information .............................. 6-8
Displaying CARWINGS
TMinformation screen...... 5-7
Displaying charging station icons on map ............. 2-5
Displaying command list ............................................. 8-6
Displaying current vehicle location........................... 3-5
Displaying estimated driving range........................... 2-3
Displaying unit ID information .................................. 5-18
Downloading phonebook memory ............................ 7-8
Driving range.................................................................. IT-2
During a call ................................................................... 7-6
E
Editing address book................................................. 3-62
Editing route................................................................. 3-48
Energy information display................................. IT-3, 2-8
Error message on communication.......................... 5-19
F
Features of LEAF Navigation ..................................... IT-2
Finding address........................................................... 3-20
Finding charging station............................................ 3-25
Finding nearby Points of Interest ............................ 3-29
Finding points of interest .......................................... 3-21
FM·AM radio screen................................................... 1-10
FM-AM-SAT radio operation .................................... 4-12
Functions disabled while driving............................... 1-6
G
Giving voice commands.............................................. 8-2
Guidance screen settings......................................... 3-43
H
How to handle CD and USB memory................ 10-42
How to handle display............................................ 10-41
How to handle the Map SD card ........................ 10-37
How to handle the SD card.................................. 10-42
How to set Climate Ctrl. Timer ............................... 2-12
How to set Climate Ctrl. Timer and remote
climate control temperature...................................... 2-14
How to view information screen................................ 5-8
I
Info on route................................................................... 6-7
Information feed setting............................................. 5-15
Information screen ........................................................ 6-2
Inputting user ID and password.............................. 1-11
iPod
®player and iPhone®........................................... 4-6
iPod®player operation............................................... 4-16