warning NISSAN LEAF 2013 1.G Navigation Manual
[x] Cancel search | Manufacturer: NISSAN, Model Year: 2013, Model line: LEAF, Model: NISSAN LEAF 2013 1.GPages: 275, PDF Size: 6.66 MB
Page 196 of 275
7-2Bluetooth®Hands-Free Phone System
WARNING
.Use a phone after stopping your
vehicle in a safe location. If you
have to use a phone while driving,
exercise extreme caution at all
times so full attention may be given
to vehicle operation.
. If you find yourself unable to devote
full attention to vehicle operation
while talking on the phone, pull off
the road to a safe location and stop
your vehicle before doing so.
CAUTION
To avoid draining the vehicle battery,
use a phone after the READY to drive
indicator light is ON.
Your vehicle is equipped with Bluetooth
®
Hands-Free Phone System. If you are an owner
of a compatible Bluetooth®enabled cellular
phone, you can set up the wireless connection
between your cellular phone and the in-vehicle
phone module. With Bluetooth
®wireless tech-
nology, you can make or receive a telephone call
with your cellular phone in your pocket. Once a cellular phone is connected to the in-
vehicle phone module, the procedure for con-
necting the phone does not need to be
performed again. Your phone is automatically
selected with the in-vehicle phone module when
the power switch is pushed to the "ON" position
with the selected cellular phone turned on and
carried in the vehicle.
You can register up to 3 different Bluetooth
®
cellular phones in the in-vehicle phone module.
However, you can talk on only one cellular phone
at a time.
The NISSAN Voice Recognition system sup-
ports phone commands, so dialing a phone
number using your voice is possible.
“8. Voice recognition”
Before using the Bluetooth®Hands-Free Phone
System, refer to the following notes.
. Wireless LAN (Wi-Fi) and the Bluetooth
®
functions share the same frequency band
(2.4 GHz) . Using the Bluetooth®and the
wireless LAN functions at the same time may
slow down or disconnect the communica-
tion and cause undesired noise. It is
recommended that you turn off the wireless
LAN (Wi-Fi) when using the Bluetooth
®
functions. .
Set up the wireless connection between a
compatible cellular phone and the in-vehicle
phone module before using the Bluetooth
®
Hands-Free Phone System.
. Some Bluetooth®enabled cellular phones
may not be recognized by the in-vehicle
phone module.
Please visit www.nissanusa.com/bluetooth
for a recommended phone list.
. You will not be able to use a hands-free
phone under the following conditions:
— Your vehicle is outside of the telephone
service area.
— Your vehicle is in an area where it is difficult to receive radio waves; such as in
a tunnel, in an underground parking
garage, behind a tall building or in a
mountainous area.
— Your cellular phone is locked in order to prevent dialing.
. When the radio wave condition is not ideal
or ambient sound is too loud, it may be
difficult to hear the other person’s voice
during a call.
. Immediately after the power switch is
pushed to the "ON" position, it may be
impossible to receive a call for a short period
of time.
BLUETOOTH®HANDS-FREE PHONE
SYSTEM
Page 204 of 275
![NISSAN LEAF 2013 1.G Navigation Manual 7-10Bluetooth®Hands-Free Phone System
6. Confirm the contents of the message, thentouch [Yes].
Phone volume settings
1. Push the MENUbutton and touch [Set-
tings].
2. Touch [Phone & CARWINGS].
3. Tou NISSAN LEAF 2013 1.G Navigation Manual 7-10Bluetooth®Hands-Free Phone System
6. Confirm the contents of the message, thentouch [Yes].
Phone volume settings
1. Push the MENUbutton and touch [Set-
tings].
2. Touch [Phone & CARWINGS].
3. Tou](/img/5/324/w960_324-203.png)
7-10Bluetooth®Hands-Free Phone System
6. Confirm the contents of the message, thentouch [Yes].
Phone volume settings
1. Push the MENUbutton and touch [Set-
tings].
2. Touch [Phone & CARWINGS].
3. Touch [Phone].
4. Touch [Volume & Ringtone]. 5. Touch the item you would like to set.
Available settings
.
[Ringtone]:
Adjust the volume level of the ringtone by
touching [+] or [-].
. [Incoming Call]:
Adjust the incoming call volume by touching
[+] or [-].
. [Outgoing Call]:
Adjust the outgoing call volume by touching
[+] or [-].
. [Automatic Hold]:
When this function is activated, an incoming
phone call is automatically held.
. [Vehicle Ringtone]:
When this function is activated, a specific
ringtone that is different from that of the
cellular phone will sound when receiving a
call.
When installing a car phone or a CB radio in
your vehicle, be sure to observe the following
cautions, otherwise the new equipment may
adversely affect the electronic control modules
and electronic control system harness.
WARNING
.A cellular phone should not be used
for any purpose while driving so full
attention may be given to vehicle
operation. Some jurisdictions prohi-
bit the use of cellular phones while
driving.
. If you must make a call while your
vehicle is in motion, the hands-free
cellular phone operational mode is
highly recommended. Exercise ex-
treme caution at all times so full
attention may be given to vehicle
operation.
. If a conversation in a moving vehicle
requires you to take notes, pull off
the road to a safe location and stop
your vehicle before doing so.
CAR PHONE or CB RADIO
Page 218 of 275
9-2Monitor system (if so equipped)
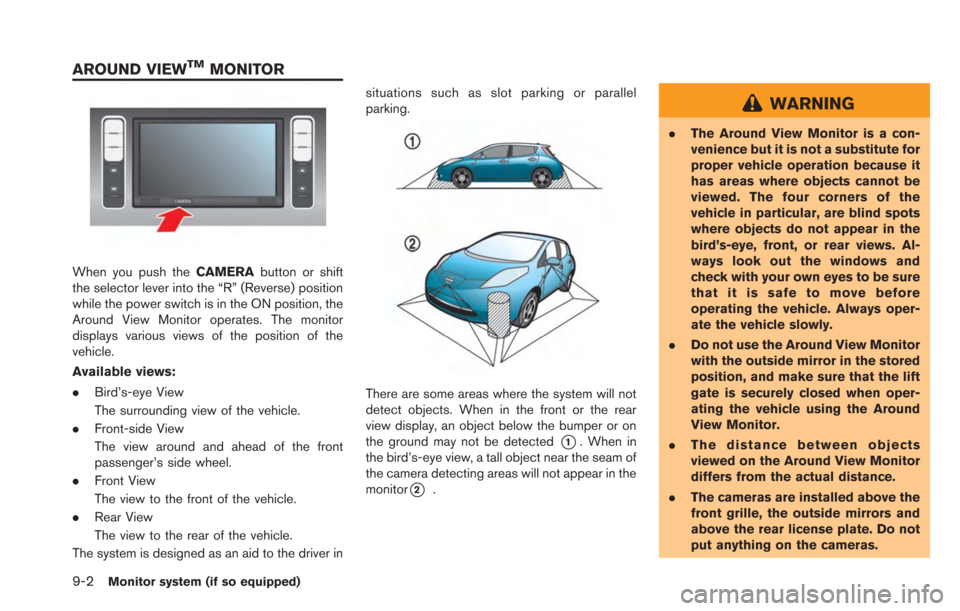
When you push theCAMERAbutton or shift
the selector lever into the “R” (Reverse) position
while the power switch is in the ON position, the
Around View Monitor operates. The monitor
displays various views of the position of the
vehicle.
Available views:
. Bird’s-eye View
The surrounding view of the vehicle.
. Front-side View
The view around and ahead of the front
passenger’s side wheel.
. Front View
The view to the front of the vehicle.
. Rear View
The view to the rear of the vehicle.
The system is designed as an aid to the driver in situations such as slot parking or parallel
parking.
There are some areas where the system will not
detect objects. When in the front or the rear
view display, an object below the bumper or on
the ground may not be detected
*1. When in
the bird’s-eye view, a tall object near the seam of
the camera detecting areas will not appear in the
monitor
*2.
WARNING
. The Around View Monitor is a con-
venience but it is not a substitute for
proper vehicle operation because it
has areas where objects cannot be
viewed. The four corners of the
vehicle in particular, are blind spots
where objects do not appear in the
bird’s-eye, front, or rear views. Al-
ways look out the windows and
check with your own eyes to be sure
that it is safe to move before
operating the vehicle. Always oper-
ate the vehicle slowly.
. Do not use the Around View Monitor
with the outside mirror in the stored
position, and make sure that the lift
gate is securely closed when oper-
ating the vehicle using the Around
View Monitor.
. The distance between objects
viewed on the Around View Monitor
differs from the actual distance.
. The cameras are installed above the
front grille, the outside mirrors and
above the rear license plate. Do not
put anything on the cameras.
AROUND VIEWTMMONITOR
Page 220 of 275
9-4Monitor system (if so equipped)
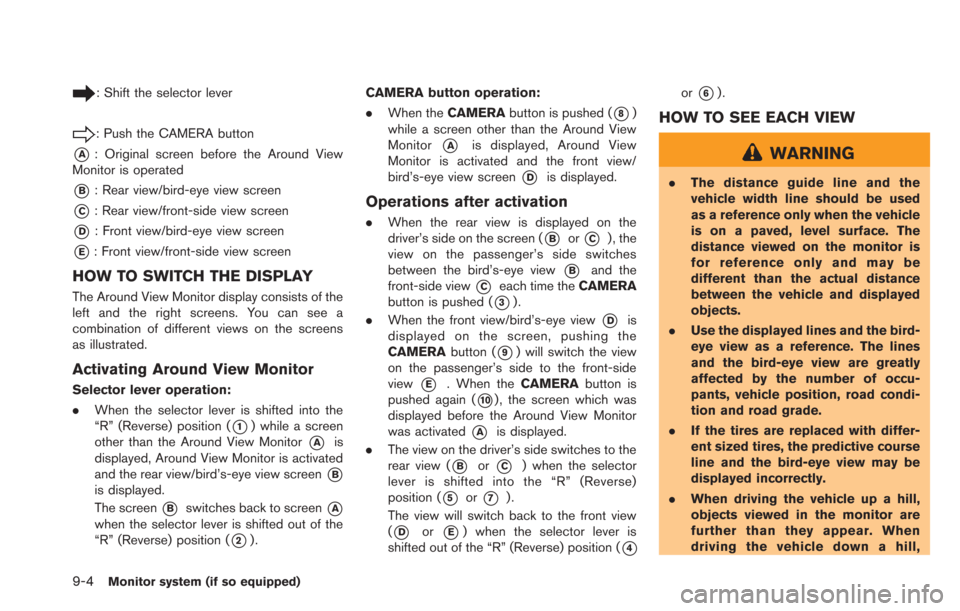
: Shift the selector lever
: Push the CAMERA button
*A: Original screen before the Around View
Monitor is operated
*B: Rear view/bird-eye view screen
*C: Rear view/front-side view screen
*D: Front view/bird-eye view screen
*E: Front view/front-side view screen
HOW TO SWITCH THE DISPLAY
The Around View Monitor display consists of the
left and the right screens. You can see a
combination of different views on the screens
as illustrated.
Activating Around View Monitor
Selector lever operation:
. When the selector lever is shifted into the
“R” (Reverse) position (
*1) while a screen
other than the Around View Monitor
*Ais
displayed, Around View Monitor is activated
and the rear view/bird’s-eye view screen
*B
is displayed.
The screen
*Bswitches back to screen*A
when the selector lever is shifted out of the
“R” (Reverse) position (
*2). CAMERA button operation:
.
When the CAMERA button is pushed (
*8)
while a screen other than the Around View
Monitor
*Ais displayed, Around View
Monitor is activated and the front view/
bird’s-eye view screen
*Dis displayed.
Operations after activation
. When the rear view is displayed on the
driver’s side on the screen (
*Bor*C) , the
view on the passenger’s side switches
between the bird’s-eye view
*Band the
front-side view
*Ceach time the CAMERA
button is pushed (
*3).
. When the front view/bird’s-eye view
*Dis
displayed on the screen, pushing the
CAMERA button (
*9) will switch the view
on the passenger’s side to the front-side
view
*E. When the CAMERAbutton is
pushed again (
*10) , the screen which was
displayed before the Around View Monitor
was activated
*Ais displayed.
. The view on the driver’s side switches to the
rear view (
*Bor*C) when the selector
lever is shifted into the “R” (Reverse)
position (
*5or*7).
The view will switch back to the front view
(
*Dor*E) when the selector lever is
shifted out of the “R” (Reverse) position (
*4
or*6).
HOW TO SEE EACH VIEW
WARNING
. The distance guide line and the
vehicle width line should be used
as a reference only when the vehicle
is on a paved, level surface. The
distance viewed on the monitor is
for reference only and may be
different than the actual distance
between the vehicle and displayed
objects.
. Use the displayed lines and the bird-
eye view as a reference. The lines
and the bird-eye view are greatly
affected by the number of occu-
pants, vehicle position, road condi-
tion and road grade.
. If the tires are replaced with differ-
ent sized tires, the predictive course
line and the bird-eye view may be
displayed incorrectly.
. When driving the vehicle up a hill,
objects viewed in the monitor are
further than they appear. When
driving the vehicle down a hill,
Page 221 of 275
objects viewed in the monitor are
closer than they appear. Use the
mirrors or actually look to properly
judge distances to other objects.
The vehicle width and predictive course lines are
wider than the actual width and course.
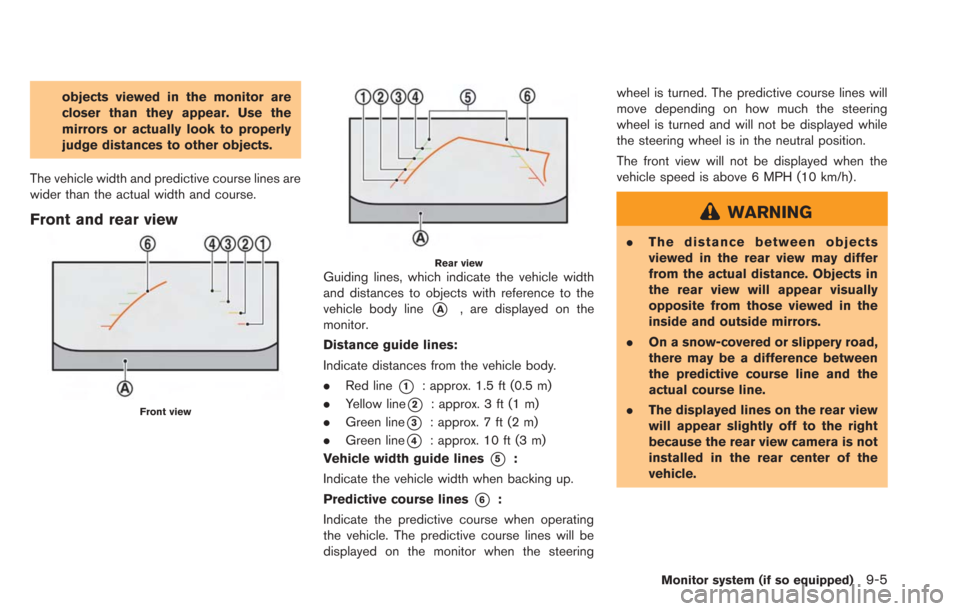
Front and rear view
Front view
Rear viewGuiding lines, which indicate the vehicle width
and distances to objects with reference to the
vehicle body line
*A, are displayed on the
monitor.
Distance guide lines:
Indicate distances from the vehicle body.
. Red line
*1: approx. 1.5 ft (0.5 m)
. Yellow line
*2: approx. 3 ft (1 m)
. Green line
*3: approx. 7 ft (2 m)
. Green line
*4: approx. 10 ft (3 m)
Vehicle width guide lines
*5:
Indicate the vehicle width when backing up.
Predictive course lines
*6:
Indicate the predictive course when operating
the vehicle. The predictive course lines will be
displayed on the monitor when the steering wheel is turned. The predictive course lines will
move depending on how much the steering
wheel is turned and will not be displayed while
the steering wheel is in the neutral position.
The front view will not be displayed when the
vehicle speed is above 6 MPH (10 km/h).
WARNING
.
The distance between objects
viewed in the rear view may differ
from the actual distance. Objects in
the rear view will appear visually
opposite from those viewed in the
inside and outside mirrors.
. On a snow-covered or slippery road,
there may be a difference between
the predictive course line and the
actual course line.
. The displayed lines on the rear view
will appear slightly off to the right
because the rear view camera is not
installed in the rear center of the
vehicle.
Monitor system (if so equipped)9-5
Page 222 of 275
9-6Monitor system (if so equipped)
CAUTION
When the monitor displays the front
view and the steering wheel turns about
90 degrees or less from the neutral
position, both the right and left pre-
dictive course lines
*6are displayed.
When the steering wheel turns about 90
degrees or more, a predictive course
line is displayed only on the opposite
side of the turn.
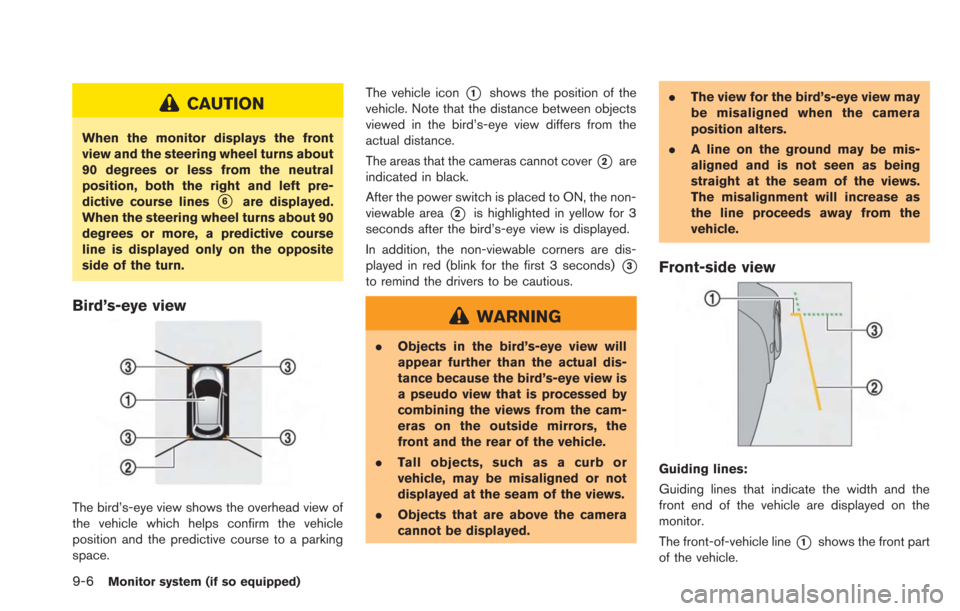
Bird’s-eye view
The bird’s-eye view shows the overhead view of
the vehicle which helps confirm the vehicle
position and the predictive course to a parking
space. The vehicle icon
*1shows the position of the
vehicle. Note that the distance between objects
viewed in the bird’s-eye view differs from the
actual distance.
The areas that the cameras cannot cover
*2are
indicated in black.
After the power switch is placed to ON, the non-
viewable area
*2is highlighted in yellow for 3
seconds after the bird’s-eye view is displayed.
In addition, the non-viewable corners are dis-
played in red (blink for the first 3 seconds)
*3
to remind the drivers to be cautious.
WARNING
. Objects in the bird’s-eye view will
appear further than the actual dis-
tance because the bird’s-eye view is
a pseudo view that is processed by
combining the views from the cam-
eras on the outside mirrors, the
front and the rear of the vehicle.
. Tall objects, such as a curb or
vehicle, may be misaligned or not
displayed at the seam of the views.
. Objects that are above the camera
cannot be displayed. .
The view for the bird’s-eye view may
be misaligned when the camera
position alters.
. A line on the ground may be mis-
aligned and is not seen as being
straight at the seam of the views.
The misalignment will increase as
the line proceeds away from the
vehicle.
Front-side view
Guiding lines:
Guiding lines that indicate the width and the
front end of the vehicle are displayed on the
monitor.
The front-of-vehicle line
*1shows the front part
of the vehicle.
Page 231 of 275

Charging stations
SymptomPossible cause Possible solution
The charging station icon display setting is off but icons
are still displayed on the map. The charging station displayed has been set as a stored
location.This is not a malfunction.
I searched for charging stations because charge
recommendation guidance and the low battery warning
were displayed, but I could not find any. In an area where the number of charging stations is low,
it may not be possible to find a charging station located
near the vehicle.This is not a malfunction.
Charging station information is not displayed. Information is not provided for all charging stations, so there may be cases when information is not displayed.This is not a malfunction.
Contact charging stations beforehand by phone to
confirm whether they can be used.
Quick charging stations are not displayed. [Quick Charge] may be set to OFF in the [Charging Port
Types to Include in Station Searches] setting. Set [Quick Charge] to ON.
“Unique EV function settings” (page 2-15)
The charging station information displayed is incorrect. The map data is old. Connect to the NISSAN CARWINGS Data Center and update charging station information.
Alternatively, purchase new map data and update the
system.
I went to the charging station that I searched for but the
information was incorrect and I could not charge the
battery. The map data is old.
Connect to the NISSAN CARWINGS Data Center and
update charging station information.
Alternatively, purchase new map data and update the
system.
Charging station facilities have changed, or the EVSE
(Electric Vehicle Supply Equipment) equipped cannot
be used. Contact the charging station by phone beforehand to
check whether facilities can be used.
Troubleshooting guide/General system information10-5
Page 264 of 275
10-38Troubleshooting guide/General system information
.The SDHC card that is exclusively used for
this device does not work properly even if it
is inserted in another device.
. The map data cannot be used even if it is
copied to another SDHC card.
. Do not remove the SDHC card containing
map data from the system. Using the system
with the SDHC card containing map data
removed will prevent some functions from
operating.
NOTE:
Do not remove the SD card containing map
data that is inserted in the right-hand slot.
When this SD card containing map data is
removed the navigation system will not
operate. If the SD card containing map
data is accidentally removed, after rein-
serting the SD card containing map data
into the right-hand slot, place the power
switch in the OFF position and then place
back in the ON position again.
How to order map data updates
To order updated map data, contact the
NISSAN NAVIGATION SYSTEM HELPDESK.
See the contact information on the inside front
cover of this manual.
About map data
1. This map data has been prepared by HITACHI AUTOMOTIVE SYSTEMS, LTD.
(HITACHI) , under license from NAVTEQ.
has added, processed and digitized data
based on the digital road map data of
NAVTEQ. Due to the production timing of
the map data, some new roads may not be
included in this map data or some of the
names or roads may be different from those
at the time you use this map data.
2. Traffic control and regulation data used in this map data may be different from those at
the time you use this map data due to the
data production timing. When driving your
vehicle, follow the actual traffic control signs
and notices on the roads.
3. Reproducing or copying this map software is strictly prohibited by law.
Published by Nissan North America, Inc.
Omaha, NE, Copyright
*C1993-2010 NAVTEQ. All Rights Reserved.
*C2010, All Rights Reserved.
WARNING
. This navigation system should not
be used to replace your own judge-
ment. No itinerary suggested by this
navigation system should ever over-
ride any highway regulations, your
own judgement, or a knowledge of
safe driving practices. Do not follow
the navigation system’s suggested
itinerary if it would cause you to
perform a dangerous or illegal act,
place you in a dangerous situation,
or take you into an area you con-
sider unsafe.
. The advice provided by the naviga-
tion system is to be regarded as a
suggestion only. There may be
times when the navigation system
displays the vehicle’s location in-
correctly, fails to suggest the short-
est route, or fails to direct you to the
your desired destination. In such
instances, rely on your own driving
judgement, taking into account the
driving conditions at the time.
. Do not use the navigation system to
locate emergency services. The da-
tabase does not contain a complete
Page 266 of 275
10-40Troubleshooting guide/General system information
Terms and conditions:
Personal Use Only.You agree to use this Data
together with Nissan Automotive Products for
the solely personal, non-commercial purposes
for which you were licensed, and not for service
bureau, timesharing or other similar purposes.
Accordingly, but subject to the restrictions set
forth in the following paragraphs, you may copy
this Data only as necessary for your personal
use to (i) view it, and (ii) save it, provided that
you do not remove any copyright notices that
appear and do not modify the Data in any way.
You agree not to otherwise reproduce, copy,
modify, decompile, disassemble, create any
derivative works of, or reverse engineer any
portion of this Data, and may not transfer or
distribute it in any form, for any purpose, except
to the extent permitted by mandatory laws.
Restrictions. Except where you have been
specifically licensed to do so by HITACHI, and
without limiting the preceding paragraph, you
may not (a) use this Data with any products,
systems, or applications installed or otherwise
connected to or in communication with vehicles,
capable of vehicle navigation, positioning, dis-
patch, real time route guidance, fleet manage-
ment or similar applications; or (b) with or in
communication with any positioning devices or
any mobile or wireless-connected electronic or computer devices, including without limitation
cellular phones, palmtop and handheld compu-
ters, pagers, and personal digital assistants or
PDAs.
Warning.
The Data may contain inaccurate or
incomplete information due to the passage of
time, changing circumstances, sources used
and the nature of collecting comprehensive
geographic data, any of which may lead to
incorrect results.
No Warranty. This Data is provided to you “as
is,” and you agree to use it at your own risk.
HITACHI and its licensors (and their licensors
and suppliers) make no guarantees, representa-
tions or warranties of any kind, express or
implied, arising by law or otherwise, including
but not limited to, content, quality, accuracy,
completeness, effectiveness, reliability, fitness
for a particular purpose, usefulness, use or
results to be obtained from this Data, or that the
Data or server will be uninterrupted or error-free.
Disclaimer of Warranty: HITACHI AND ITS
LICENSORS (INCLUDING THEIR LICENSORS
AND SUPPLIERS) DISCLAIM ANY WARRAN-
TIES, EXPRESS OR IMPLIED, OF QUALITY,
PERFORMANCE, MERCHANTABILITY, FIT-
NESS FOR A PARTICULAR PURPOSE OR
NONINFRINGEMENT. Some States, Territories
and Countries do not allow certain warranty exclusions, so to that extent the above exclusion
may not apply to you.
Disclaimer of Liability:
HITACHI AND ITS
LICENSORS (INCLUDING THEIR LICENSORS
AND SUPPLIERS) SHALL NOT BE LIABLE TO
YOU: IN RESPECT OF ANY CLAIM, DEMAND
OR ACTION, IRRESPECTIVE OF THE NATURE
OF THE CAUSE OF THE CLAIM, DEMAND OR
ACTION ALLEGING ANY LOSS, INJURY OR
DAMAGES, DIRECT OR INDIRECT, WHICH
MAY RESULT FROM THE USE OR POSSES-
SION OF THE INFORMATION; OR FOR ANY
LOSS OF PROFIT, REVENUE, CONTRACTS
OR SAVINGS, OR ANY OTHER DIRECT,
INDIRECT, INCIDENTAL, SPECIAL OR CON-
SEQUENTIAL DAMAGES ARISING OUT OF
YOUR USE OF OR INABILITY TO USE THIS
INFORMATION, ANY DEFECT IN THE INFOR-
MATION, OR THE BREACH OF THESE
TERMS OR CONDITIONS, WHETHER IN AN
ACTION IN CONTRACT OR TORT OR BASED
ON A WARRANTY, EVEN IF HITACHI OR ITS
LICENSORS HAVE BEEN ADVISED OF THE
POSSIBILITY OF SUCH DAMAGES. Some
States, Territories and Countries do not allow
certain liability exclusions or damages limita-
tions, so to that extent the above may not apply
to you.
Page 267 of 275
Export Control.You agree not to export from
anywhere any part of the Data provided to you or
any direct product thereof except in compliance
with, and with all licenses and approvals
required under, applicable export laws, rules
and regulations.
Entire Agreement. These terms and condi-
tions constitute the entire agreement between
HITACHI (and its licensors, including their
licensors and suppliers) and you pertaining to
the subject matter hereof, and supersedes in
their entirety any and all written or oral agree-
ments previously existing between us with
respect to such subject matter.
Governing Law. The above terms and condi-
tions shall be governed by the laws of the State
of Illinois, without giving effect to (i) its conflict of
laws provisions, or (ii) the United Nations
Convention for Contracts for the International
Sale of Goods, which is explicitly excluded. You
agree to submit to the jurisdiction of the State of
Illinois for any and all disputes, claims and
actions arising from or in connection with the
Data provided to you hereunder.
Government End Users. Government End
Users. If the Data is being acquired by or on
behalf of the United States government or any
other entity seeking or applying rights similar to
those customarily claimed by the United States government, this Data is a “commercial item” as
that term is defined at 48 C.F.R. (“FAR”) 2.101,
is licensed in accordance with these End-User
Terms, and each copy of Data delivered or
otherwise furnished shall be marked and em-
bedded as appropriate with the following
“Notice of Use,” and shall be treated in
accordance with such Notice:
NOTICE OF USE
CONTRACTOR (MANUFACTURER/SUPPLIER) NAME: NAVTEQ
CONTRACTOR (MANUFACTURER/SUPPLIER) ADDRESS: 425 West Randolph St., Chicago, Illinois 60606
This Data is a commercial item as defined in FAR
2.101 and is subject to these End-User Terms under which this Data was provided.
*C2010 NAVTEQ - All rights reserved.
If the Contracting Officer, federal government
agency, or any federal official refuses to use the
legend provided herein, the Contracting Officer,
federal government agency, or any federal
official must notify NAVTEQ prior to seeking
additional or alternative rights in the Data.
HOW TO HANDLE DISPLAY
The display is a liquid crystal display and should
be handled with care.
WARNING
Never disassemble the display. Some
parts utilize extremely high voltage.
Touching them may result in serious
personal injury.
Characteristics of liquid crystal dis-
play
.If the temperature inside the vehicle is
especially low, the display will stay relatively
dim or the movement of the images may be
slow. These conditions are normal. The
display will function normally when the
interior of the vehicle has warmed up.
. Some pixels in the display are darker or
brighter than others. This condition is an
inherent characteristic of liquid crystal dis-
plays, and it is not a malfunction.
. A remnant of the previous display image may
remain on the screen. This screen burn is
inherent in displays, and it is not a malfunc-
tion.
Troubleshooting guide/General system information10-41