navigation NISSAN LEAF 2013 1.G Navigation Manual
[x] Cancel search | Manufacturer: NISSAN, Model Year: 2013, Model line: LEAF, Model: NISSAN LEAF 2013 1.GPages: 275, PDF Size: 6.66 MB
Page 55 of 275
![NISSAN LEAF 2013 1.G Navigation Manual 2. The system displays a message screen andannounces the contents of the message to
recommend battery charging. Check the
message displayed on the screen.
Touch [Nearby Charging Station] to search
all NISSAN LEAF 2013 1.G Navigation Manual 2. The system displays a message screen andannounces the contents of the message to
recommend battery charging. Check the
message displayed on the screen.
Touch [Nearby Charging Station] to search
all](/img/5/324/w960_324-54.png)
2. The system displays a message screen andannounces the contents of the message to
recommend battery charging. Check the
message displayed on the screen.
Touch [Nearby Charging Station] to search
all charging stations that are located near
the current vehicle position.
“Finding charging station” (page 3-25)
3. Touch [BACK] or push the MAPbutton to
return to the current location map screen.
INFO:
. The charge recommendation guidance can
be set to off.
“Setting messages that are displayed
on screen” (page 2-16)
. When the route is changed to avoid a traffic
jam or the possible driving distance indi-
cated in the meter is changed, the charge
recommendation guidance is displayed again.
Low Battery
When the Low battery charge warning lightand the master warning light (yellow)illuminate, the system displays a message on
the navigation screen that notices the driver that
the Li-ion battery charge is low.
1. The notification is displayed on the upper left
side of the screen. Touch [Show] to display
the detailed information screen.
2. The system displays a message screen andannounces the contents of the message to
warn that the Li-ion battery charge is low.
Check the message displayed on the
screen.
Touch [Nearby Charging Station] to search
all charging stations that are located near
the current vehicle position.
“Finding charging station” (page 3-25)
3. Touch [BACK] or push the MAPbutton to
return to the vehicle location screen.
INFO:
. The Low Battery message display can be
set to off.
“Setting messages that are displayed
on screen” (page 2-16)
. When the Li-ion battery charge is low, the
system automatically obtains charging sta-
tion information.
Limited Power Notice
When the power limitation indicatorand the
master warning light (yellow)illuminate, the
system displays a message on the navigation
screen that notices the driver that power output
is restricted for various reasons. See LEAF
Owner’s Manual for details of the indicator/
Unique EV functions2-17
Page 57 of 275
3 Navigation
Map settings ........................................................................\
....... 3-3Map types ........................................................................\
...... 3-3
Displaying current vehicle location .................................. 3-5
Moving map ........................................................................\
... 3-5
Changing scale of map ...................................................... 3-7
Changing map view............................................................. 3-8
Map view settings ................................................................ 3-9
Looking at information on map ...................................... 3-12
Map menu screen ............................................................. 3-14
Map symbols ...................................................................... 3-16
Setting destination.................................................................. 3-17 Destination screen ............................................................ 3-17
Changing region................................................................ 3-18
Finding address ................................................................. 3-20
Finding points of interest ................................................ 3-21
Setting home as destination .......................................... 3-24
Finding charging station .................................................. 3-25
Searching from address book ....................................... 3-28
Searching from history..................................................... 3-28
Finding nearby Points of Interest .................................. 3-29
Using Google Map ........................................................... 3-30
Using route planner .......................................................... 3-31
Setting from stored routes ............................................. 3-31 Setting by phone number ............................................. 3-32
Setting intersection ........................................................ 3-32
Setting city center .......................................................... 3-34
Setting freeway entrance/exit ...................................... 3-35
Setting point on map ..................................................... 3-36
Operations after setting destination .......................... 3-36
Route guidance ...................................................................... 3-39 Procedures after setting route .................................... 3-39
About route guidance .................................................... 3-41
Guidance screen settings ............................................ 3-43
Route screen ................................................................... 3-46
Canceling/reactivating route ........................................ 3-47
Editing route ..................................................................... 3-48
Confirming route ............................................................. 3-52
Voice guidance settings ................................................ 3-53
Recalculating route ........................................................ 3-53
Setting detour route ....................................................... 3-54
Searching for detour route using
traffic information ............................................................ 3-54
Setting conditions for route calculation .................... 3-55
Route guidance settings ............................................... 3-57
Storing a location/route ........................................................ 3-58
Storing location ............................................................... 3-58
Page 58 of 275
Storing route...................................................................... 3-60
Storing avoid area ............................................................ 3-61
Editing address book ....................................................... 3-62
Deleting stored item ......................................................... 3-68
Transferring information to/from address book ......... 3-70 Navigation settings ................................................................ 3-72
Speed limit indication on map..................................... 3-73
Other navigation settings.............................................. 3-73
Resetting all navigation settings to default .............. 3-76
Page 59 of 275
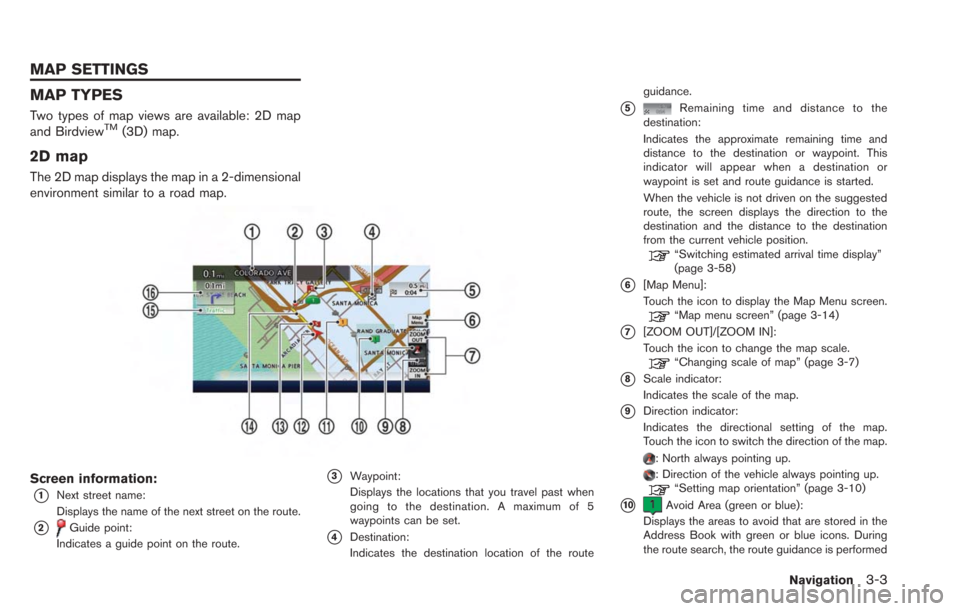
MAP TYPES
Two types of map views are available: 2D map
and BirdviewTM(3D) map.
2D map
The 2D map displays the map in a 2-dimensional
environment similar to a road map.
Screen information:
*1Next street name:
Displays the name of the next street on the route.
*2Guide point:
Indicates a guide point on the route.
*3Waypoint:
Displays the locations that you travel past when
going to the destination. A maximum of 5
waypoints can be set.
*4Destination:
Indicates the destination location of the route guidance.
*5Remaining time and distance to the
destination:
Indicates the approximate remaining time and
distance to the destination or waypoint. This
indicator will appear when a destination or
waypoint is set and route guidance is started.
When the vehicle is not driven on the suggested
route, the screen displays the direction to the
destination and the distance to the destination
from the current vehicle position.
“Switching estimated arrival time display”
(page 3-58)
*6[Map Menu]:
Touch the icon to display the Map Menu screen.
“Map menu screen” (page 3-14)
*7[ZOOM OUT]/[ZOOM IN]:
Touch the icon to change the map scale.
“Changing scale of map” (page 3-7)
*8Scale indicator:
Indicates the scale of the map.
*9Direction indicator:
Indicates the directional setting of the map.
Touch the icon to switch the direction of the map.
: North always pointing up.: Direction of the vehicle always pointing up.“Setting map orientation” (page 3-10)
*10Avoid Area (green or blue):
Displays the areas to avoid that are stored in the
Address Book with green or blue icons. During
the route search, the route guidance is performed
Navigation3-3
MAP SETTINGS
Page 60 of 275
3-4Navigation
by searching for a route that avoids those areas.“Storing avoid area” (page 3-61)
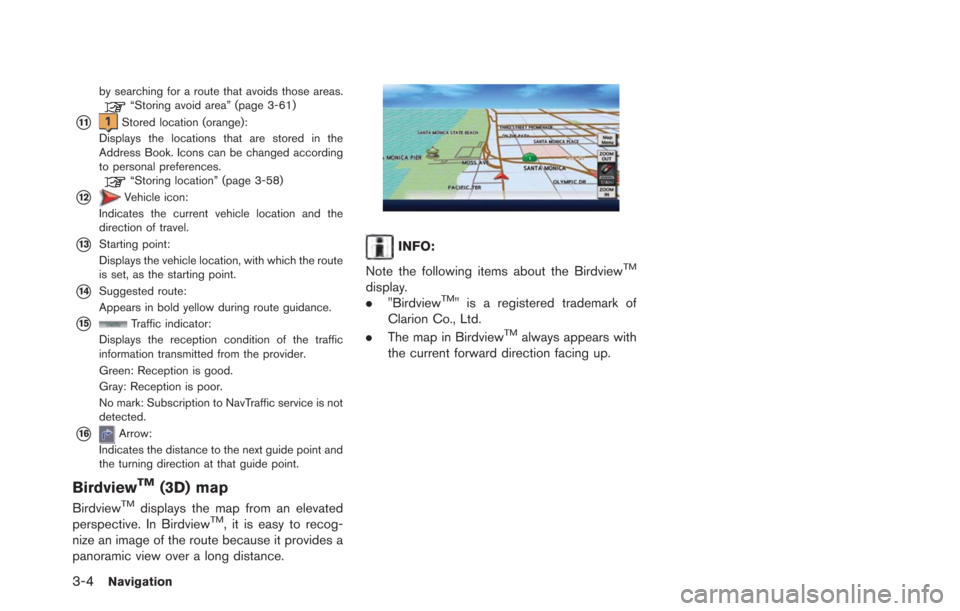
*11Stored location (orange):
Displays the locations that are stored in the
Address Book. Icons can be changed according
to personal preferences.
“Storing location” (page 3-58)
*12Vehicle icon:
Indicates the current vehicle location and the
direction of travel.
*13Starting point:
Displays the vehicle location, with which the route
is set, as the starting point.
*14Suggested route:
Appears in bold yellow during route guidance.
*15Traffic indicator:
Displays the reception condition of the traffic
information transmitted from the provider.
Green: Reception is good.
Gray: Reception is poor.
No mark: Subscription to NavTraffic service is not
detected.
*16Arrow:
Indicates the distance to the next guide point and
the turning direction at that guide point.
BirdviewTM(3D) map
BirdviewTMdisplays the map from an elevated
perspective. In BirdviewTM, it is easy to recog-
nize an image of the route because it provides a
panoramic view over a long distance.
INFO:
Note the following items about the Birdview
TM
display.
. "BirdviewTM" is a registered trademark of
Clarion Co., Ltd.
. The map in Birdview
TMalways appears with
the current forward direction facing up.
Page 61 of 275
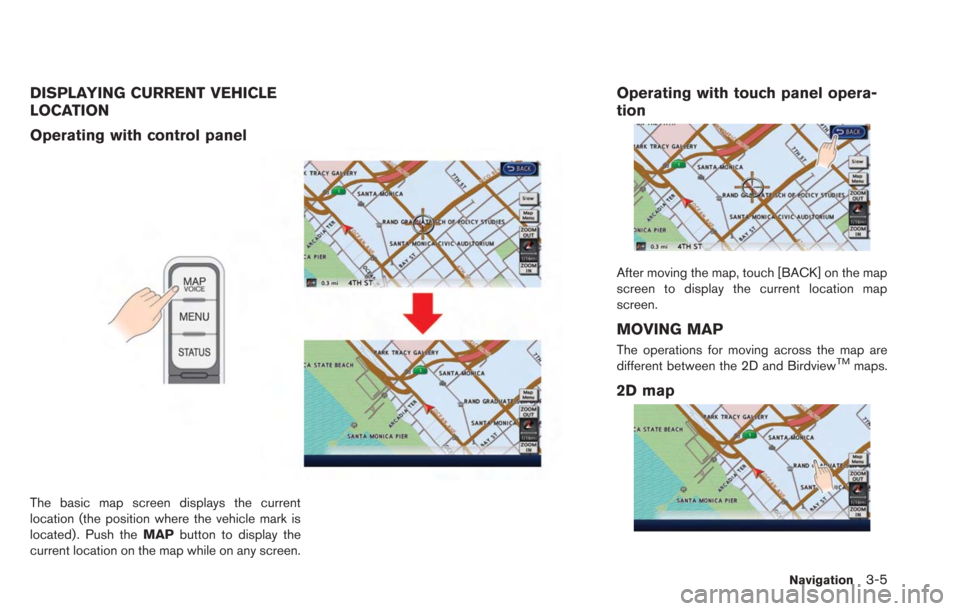
DISPLAYING CURRENT VEHICLE
LOCATION
Operating with control panel
The basic map screen displays the current
location (the position where the vehicle mark is
located) . Push theMAPbutton to display the
current location on the map while on any screen.
Operating with touch panel opera-
tion
After moving the map, touch [BACK] on the map
screen to display the current location map
screen.
MOVING MAP
The operations for moving across the map are
different between the 2D and BirdviewTMmaps.
2D map
Navigation3-5
Page 62 of 275
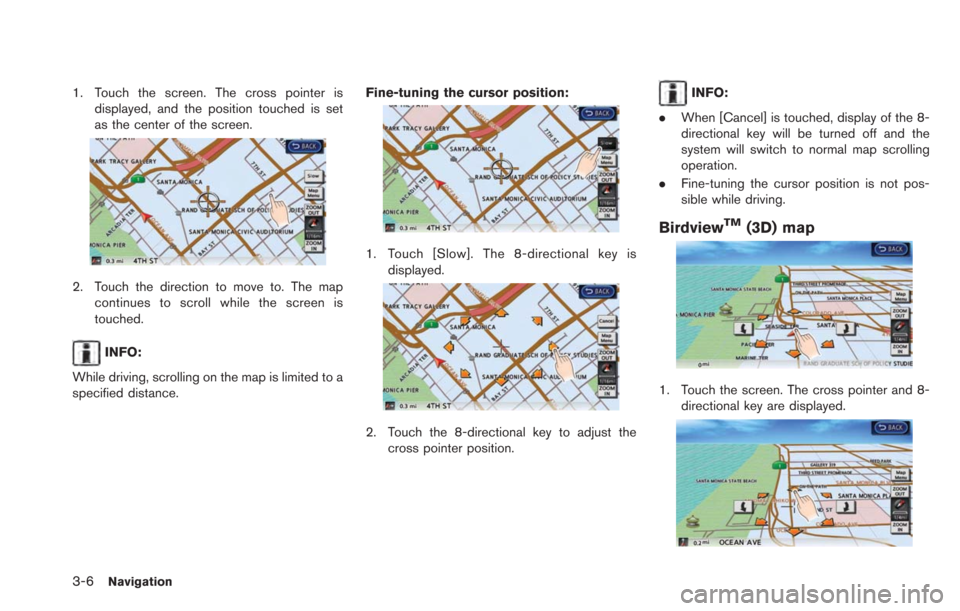
3-6Navigation
1. Touch the screen. The cross pointer isdisplayed, and the position touched is set
as the center of the screen.
2. Touch the direction to move to. The mapcontinues to scroll while the screen is
touched.
INFO:
While driving, scrolling on the map is limited to a
specified distance. Fine-tuning the cursor position:
1. Touch [Slow]. The 8-directional key is
displayed.
2. Touch the 8-directional key to adjust thecross pointer position.
INFO:
. When [Cancel] is touched, display of the 8-
directional key will be turned off and the
system will switch to normal map scrolling
operation.
. Fine-tuning the cursor position is not pos-
sible while driving.
BirdviewTM(3D) map
1. Touch the screen. The cross pointer and 8-
directional key are displayed.
Page 63 of 275
![NISSAN LEAF 2013 1.G Navigation Manual 2. Touch the direction to move to. The mapcontinues to scroll while the screen is
touched.
3. Touch []or[] to change the direction of
the map.
: Rotates the map clockwise.
: Rotates the map counterclo NISSAN LEAF 2013 1.G Navigation Manual 2. Touch the direction to move to. The mapcontinues to scroll while the screen is
touched.
3. Touch []or[] to change the direction of
the map.
: Rotates the map clockwise.
: Rotates the map counterclo](/img/5/324/w960_324-62.png)
2. Touch the direction to move to. The mapcontinues to scroll while the screen is
touched.
3. Touch []or[] to change the direction of
the map.
: Rotates the map clockwise.
: Rotates the map counterclockwise.
INFO:
While driving, scrolling on the map is limited to a
specified distance.
CHANGING SCALE OF MAP
1. Touch [ZOOM IN] or [ZOOM OUT] to change the scale.
INFO:
Free zoom:
The scale can be changed in smaller steps when
[ZOOM IN] or [ZOOM OUT] is touched and held
than when either key is briefly touched.
If briefly touched, the operation returns to
normal.
Map scale
Any required map scale (map coverage) be-
tween 400 miles (640 km) and 1/32 mile (50 m)
can be selected. Scale level for 2D map and Birdview
TMmap
(3D) display:
Normal Map US Units Metric Units
320 miles 640 km
80 miles 160 km
32 miles 64 km8 miles 16 km
5 miles 10 km
2 miles 4 km
1 mile 2 km
1/2 mile 1 km
1/4 mile 500 m
1/8 mile 200 m
1/16 mile 100 m
Shows build- ing footprint graphics 1/32 mile 50 m
1/64 mile 25 m
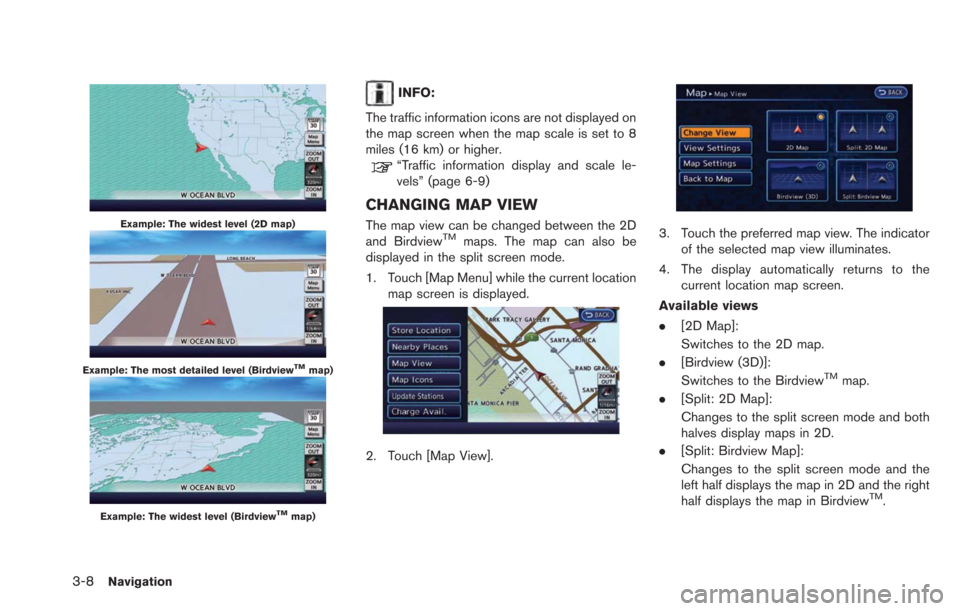
Example: The most detailed level (2D map)
Navigation3-7
Page 64 of 275
3-8Navigation
Example: The widest level (2D map)
Example: The most detailed level (BirdviewTMmap)
Example: The widest level (BirdviewTMmap)
INFO:
The traffic information icons are not displayed on
the map screen when the map scale is set to 8
miles (16 km) or higher.
“Traffic information display and scale le-
vels” (page 6-9)
CHANGING MAP VIEW
The map view can be changed between the 2D
and BirdviewTMmaps. The map can also be
displayed in the split screen mode.
1. Touch [Map Menu] while the current location
map screen is displayed.
2. Touch [Map View].
3. Touch the preferred map view. The indicatorof the selected map view illuminates.
4. The display automatically returns to the current location map screen.
Available views
. [2D Map]:
Switches to the 2D map.
. [Birdview (3D)]:
Switches to the Birdview
TMmap.
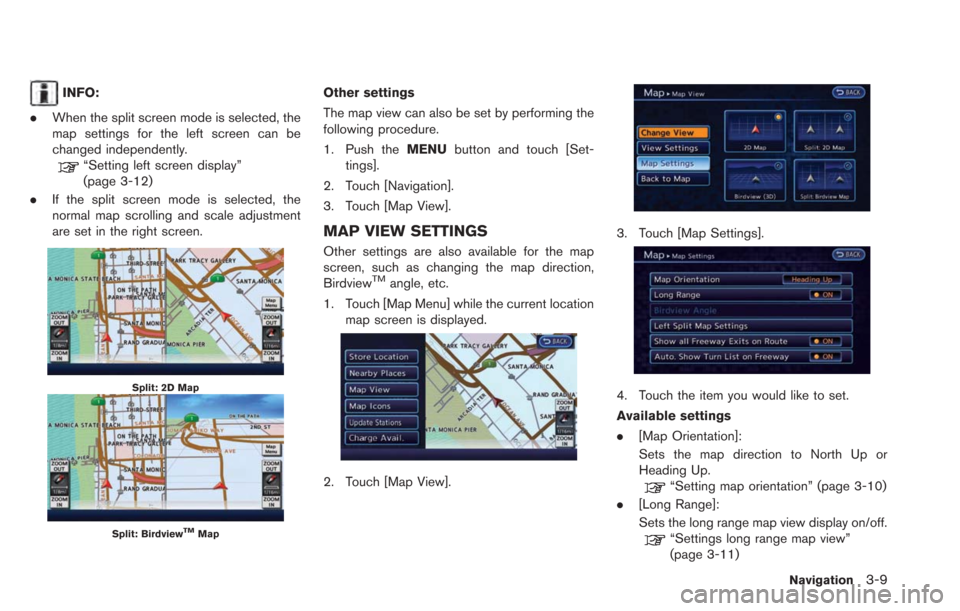
. [Split: 2D Map]:
Changes to the split screen mode and both
halves display maps in 2D.
. [Split: Birdview Map]:
Changes to the split screen mode and the
left half displays the map in 2D and the right
half displays the map in Birdview
TM.
Page 65 of 275
INFO:
. When the split screen mode is selected, the
map settings for the left screen can be
changed independently.
“Setting left screen display”
(page 3-12)
. If the split screen mode is selected, the
normal map scrolling and scale adjustment
are set in the right screen.
Split: 2D Map
Split: BirdviewTMMap
Other settings
The map view can also be set by performing the
following procedure.
1. Push the MENUbutton and touch [Set-
tings].
2. Touch [Navigation].
3. Touch [Map View].
MAP VIEW SETTINGS
Other settings are also available for the map
screen, such as changing the map direction,
Birdview
TMangle, etc.
1. Touch [Map Menu] while the current location map screen is displayed.
2. Touch [Map View].
3. Touch [Map Settings].
4. Touch the item you would like to set.
Available settings
.[Map Orientation]:
Sets the map direction to North Up or
Heading Up.
“Setting map orientation” (page 3-10)
. [Long Range]:
Sets the long range map view display on/off.
“Settings long range map view”
(page 3-11)
Navigation3-9