audio NISSAN LEAF 2016 1.G Quick Reference Guide
[x] Cancel search | Manufacturer: NISSAN, Model Year: 2016, Model line: LEAF, Model: NISSAN LEAF 2016 1.GPages: 35, PDF Size: 2.98 MB
Page 2 of 35
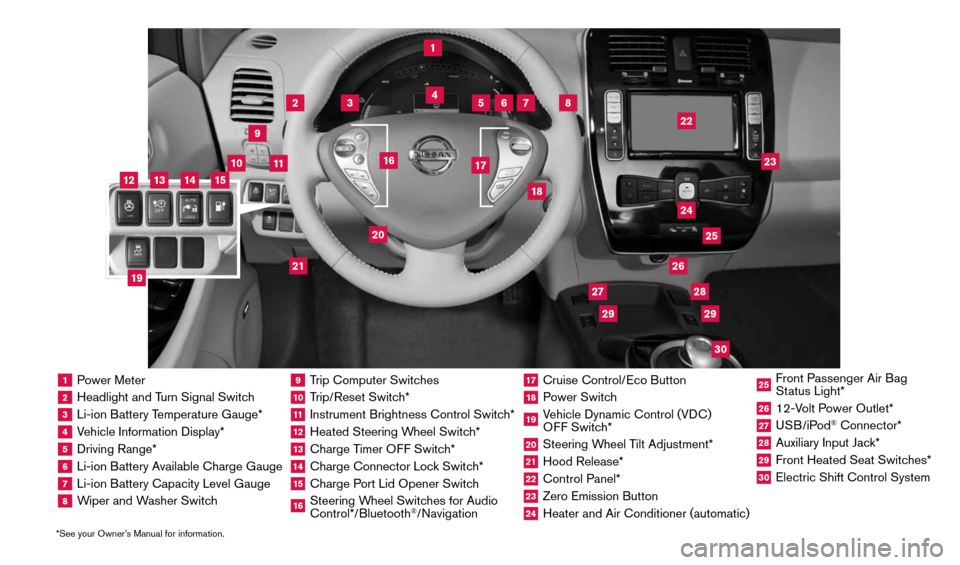
1 Power Meter2 Headlight and Turn Signal Switch3 Li-ion Battery Temperature Gauge*4 Vehicle Information Display*5 Driving Range*6 Li-ion Battery Available Charge Gauge7 Li-ion Battery Capacity Level Gauge8 Wiper and Washer Switch
9 Trip Computer Switches10 Trip/Reset Switch*11 Instrument Brightness Control Switch*12 Heated Steering Wheel Switch*13 Charge Timer OFF Switch*14 Charge Connector Lock Switch*15 Charge Port Lid Opener Switch16 Steering Wheel Switches for Audio
Control*/Bluetooth
®/Navigation
17 Cruise Control/Eco Button18 Power Switch19 Vehicle Dynamic Control (VDC)
OFF Switch*20 Steering Wheel Tilt Adjustment*21 Hood Release*22 Control Panel*23 Zero Emission Button24 Heater and Air Conditioner (automatic)
25 Front Passenger Air Bag
Status Light*26 12-Volt Power Outlet*27 USB/iPod
® Connector*
28 Auxiliary Input Jack*29 Front Heated Seat Switches*30 Electric Shift Control System
1
3
4
2
5
10
6
7
22
2528
26
2930
23
24
21
9
11
8
20
18
16
17
2729
12
14
19
13
15
*See your Owner’s Manual for information.
1996737_16a_Leaf_QRG_071015.indd 37/10/15 11:28 AM
Page 7 of 35
5
2
3
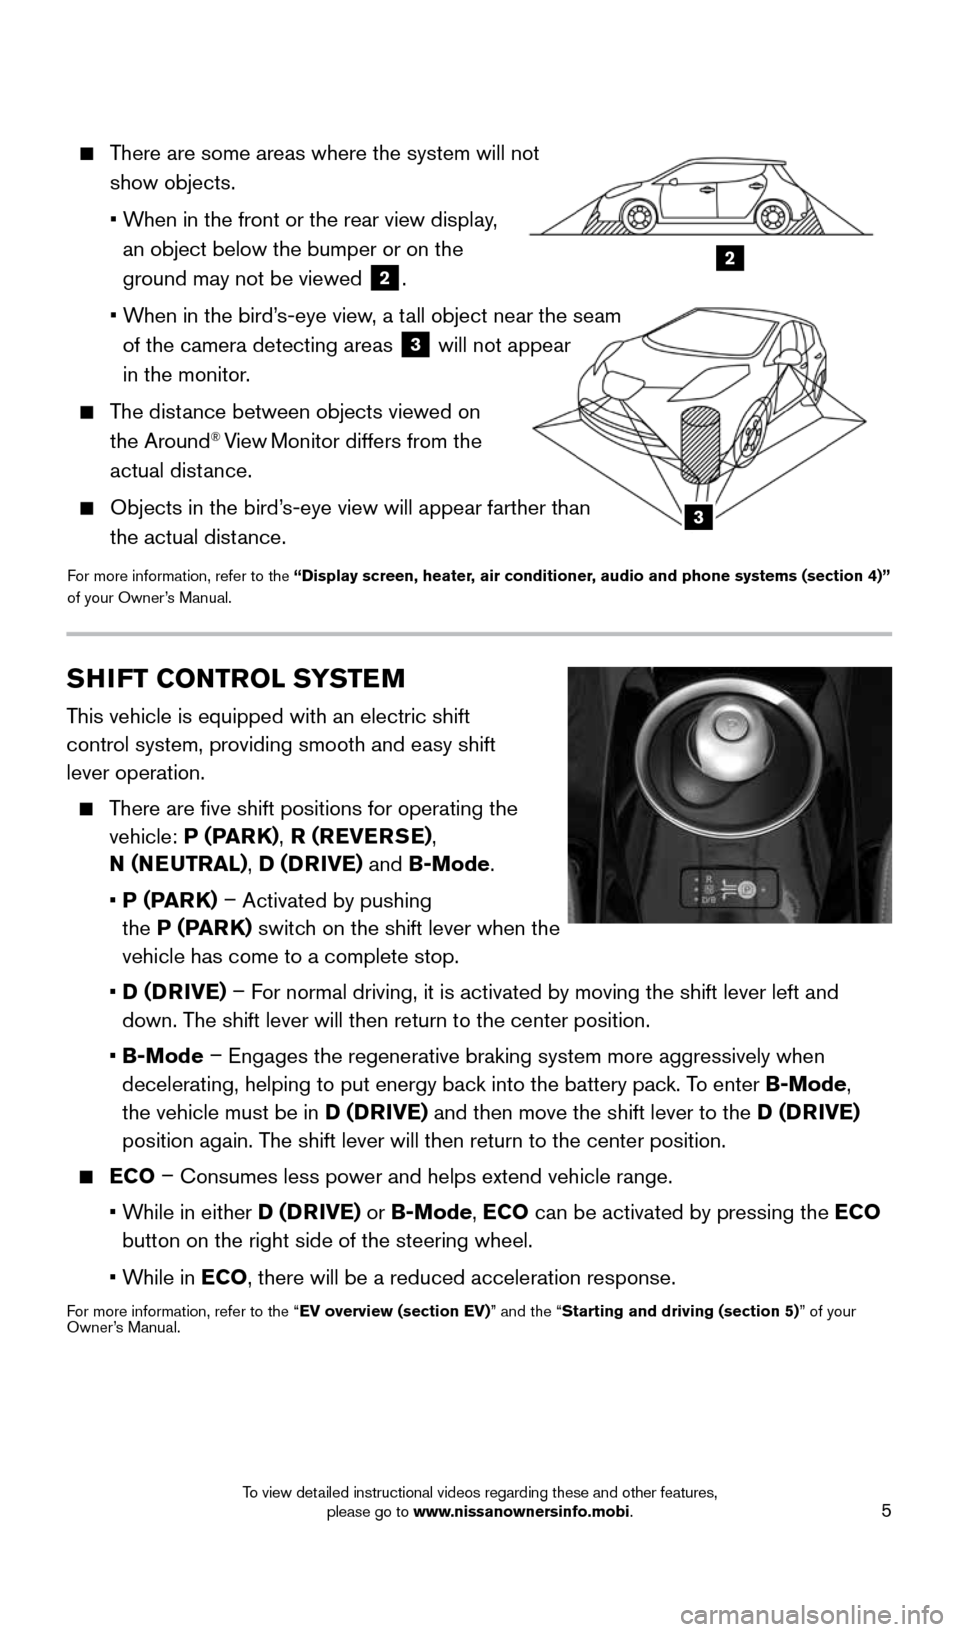
There are some areas where the system will not
show objects.
• When in the front or the rear view display,
an object below the bumper or on the
ground may not be viewed
2.
• When in the bird’s-eye view, a tall object near the seam
of the camera detecting areas
3 will not appear
in the monitor.
The distance between objects viewed on
the Around® View Monitor differs from the
actual distance.
Objects in the bird’s-eye view will appear farther than
the actual distance.
For more information, refer to the “Display screen, heater, air conditioner, audio and phone systems (section 4)”
of your Owner’s Manual.
SHIFT CONTROL SYSTEM
This vehicle is equipped with an electric shift
control system, providing smooth and easy shift
lever operation.
There are five shift positions for operating the
vehicle: P (PARK) , R (REVERSE) ,
N (NEUTRAL) , D (DRIVE) and B-Mode.
• P (PARK) – Activated by pushing
the P (PARK) switch on the shift lever when the
vehicle has come to a complete stop.
• D (DRIVE) – For normal driving, it is activated by moving the shift lever left and
down. The shift lever will then return to the center position.
• B-Mode – Engages the regenerative braking system more aggressively when
decelerating, helping to put energy back into the battery pack. To enter B-Mode,
the vehicle must be in D (DRIVE) and then move the shift lever to the D (DRIVE)
position again. The shift lever will then return to the center position.
ECO – Consumes less power and helps extend vehicle range.
• While in either D (DRIVE) or B-Mode, ECO can be activated by pressing the ECO
button on the right side of the steering wheel.
• While in ECO, there will be a reduced acceleration response.
For more information, refer to the “EV overview (section EV)” and the “Starting and driving (section 5)” of your
Owner’s Manual.
1996737_16a_Leaf_QRG_071015.indd 57/10/15 11:28 AM
To view detailed instructional videos regarding these and other features, please go to www.nissanownersinfo.mobi.
Page 15 of 35
13
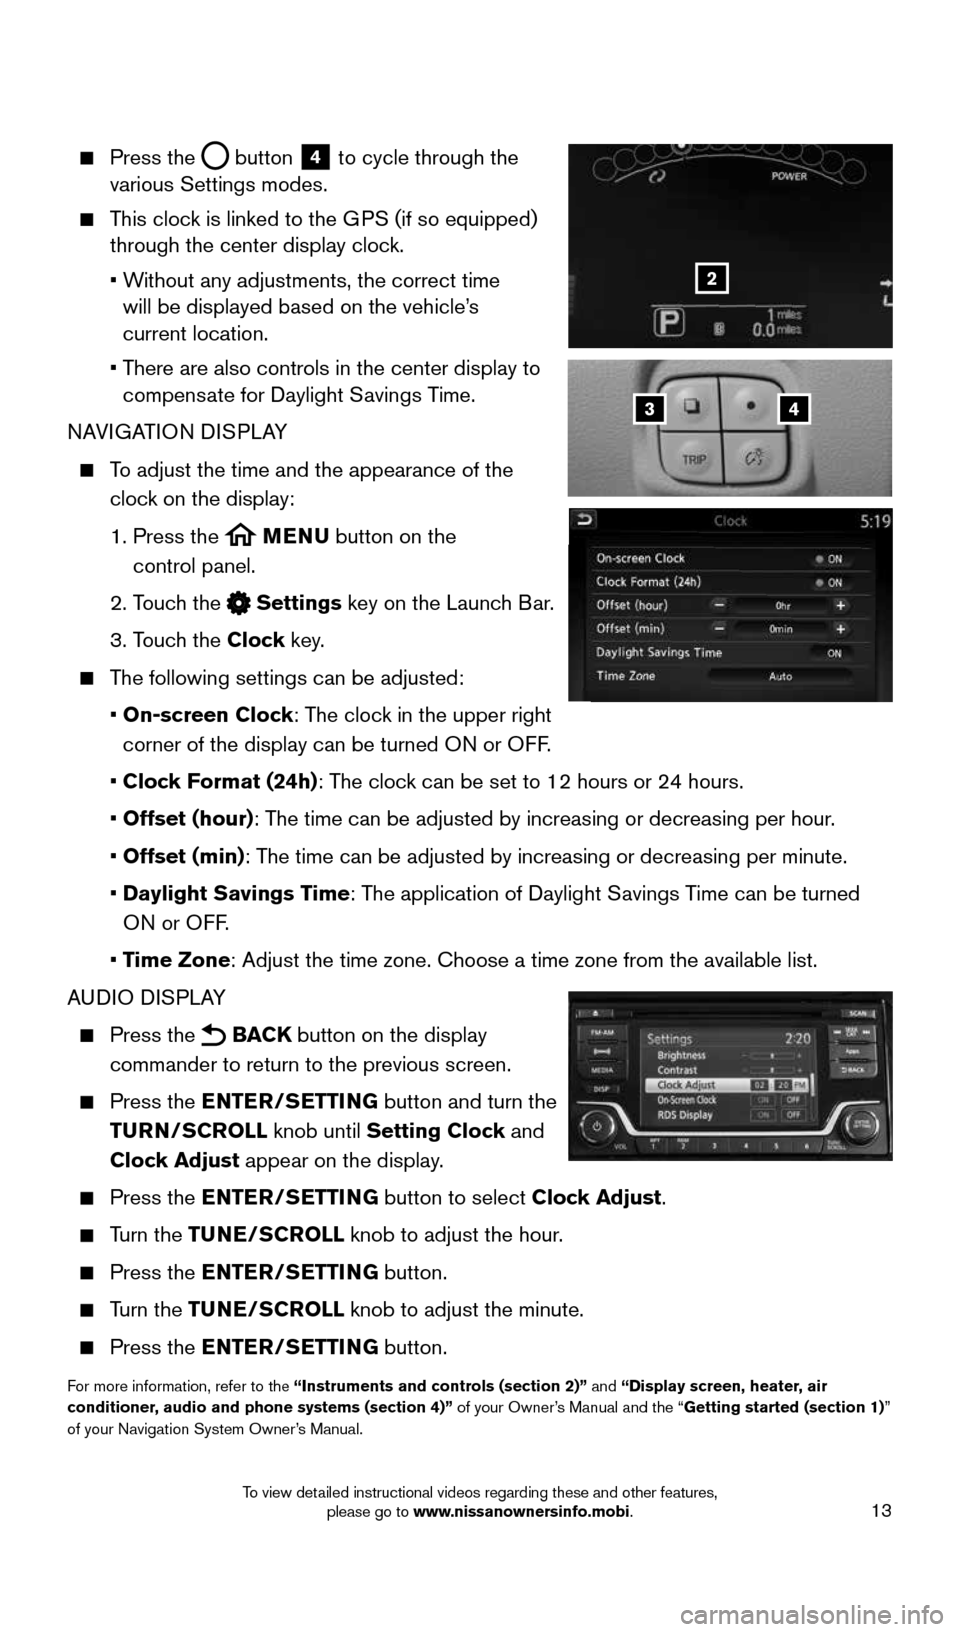
Press the button
4 to cycle through the
various Settings modes.
This clock is linked to the GPS (if so equipped)
through the center display clock.
• Without any adjustments, the correct time
will be displayed based on the vehicle’s
current location.
• There are also controls in the center display to
compensate for Daylight Savings Time.
NAVIGATION DISPLAY
To adjust the time and the appearance of the
clock on the display:
1. Press the
MENU button on the
control panel.
2. Touch the
Settings key on the Launch Bar.
3. Touch the Clock key.
The following settings can be adjusted:
• On-screen Clock: The clock in the upper right
corner of the display can be turned ON or OFF.
• Clock Format (24h): The clock can be set to 12 hours or 24 hours.
• Offset (hour): The time can be adjusted by increasing or decreasing per hour.
• Offset (min): The time can be adjusted by increasing or decreasing per minute.
• Daylight Savings Time: The application of Daylight Savings Time can be turned
ON or OFF.
• Time Zone: Adjust the time zone. Choose a time zone from the available list.
AUDIO DISPLAY
Press the BACK button on the display
commander to return to the previous screen.
Press the ENTER/SETTING button and turn the
TURN/SCROLL knob until Setting Clock and
Clock Adjust appear on the display.
Press the ENTER/SETTING button to select Clock Adjust.
Turn the TUNE/SCROLL knob to adjust the hour.
Press the ENTER/SETTING button.
Turn the TUNE/SCROLL knob to adjust the minute.
Press the ENTER/SETTING button.
For more information, refer to the “Instruments and controls (section 2)” and “Display screen, heater, air
conditioner, audio and phone systems (section 4)” of your Owner’s Manual and the “Getting started (section 1)”
of your Navigation System Owner’s Manual.
43
2
1996737_16a_Leaf_QRG_071015.indd 137/10/15 11:28 AM
To view detailed instructional videos regarding these and other features, please go to www.nissanownersinfo.mobi.
Page 22 of 35
20
FM/AM/SiriusXM®* SATELLITE RADIO
WITH CD PLAYER (if so equipped)
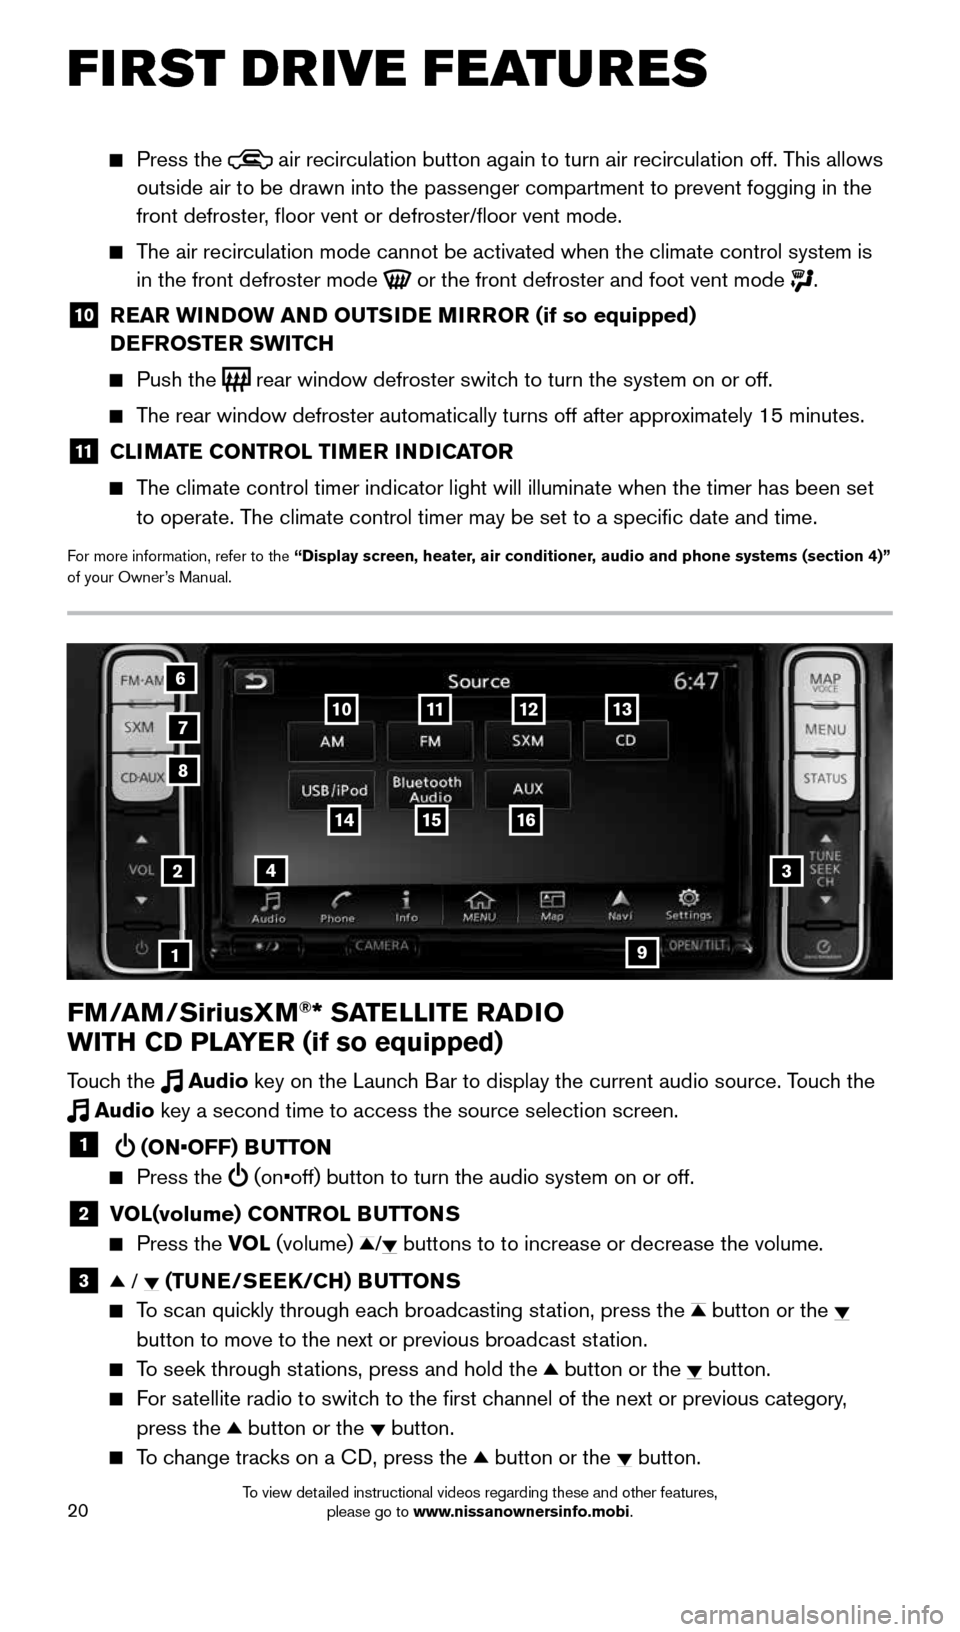
Touch the Audio key on the Launch Bar to display the current audio source. Touch the
Audio key a second time to access the source selection screen.
1 (ON•OFF) BUTTON
Press the (on•off) button to turn the audio system on or off.
2 VOL(volume) CONTROL BUTTONS
Press the VOL (volume) / buttons to to increase or decrease the volume.
3 / (TUNE/SEEK/CH) BUTTONS
To scan quickly through each broadcasting station, press the button or the
button to move to the next or previous broadcast station.
To seek through stations, press and hold the button or the button.
For satellite radio to switch to the first channel of the next or previous category,
press the
button or the button.
To change tracks on a CD, press the button or the button.
2
1
3
8
6
7
4
12
Press the air recirculation button again to turn air recirculation off. This allows
outside air to be drawn into the passenger compartment to prevent foggin\
g in the
front defroster, floor vent or defroster/floor vent mode.
The air recirculation mode cannot be activated when the climate control s\
ystem is
in the front defroster mode
or the front defroster and foot vent mode .
10 REAR WINDOW AND OUTSIDE MIRROR (if so equipped)
DEFROSTER SWITCH
Push the rear window defroster switch to turn the system on or off.
The rear window defroster automatically turns off after approximately 15 minutes.
11 CLIMATE CONTROL TIMER INDICATOR
The climate control timer indicator light will illuminate when the timer \
has been set
to operate. The climate control timer may be set to a specific date and time.
For more information, refer to the “Display screen, heater, air conditioner, audio and phone systems (section 4)”
of your Owner’s Manual.
13
16
9
1514
1110
FIRST DRIVE FEATURES
1996737_16a_Leaf_QRG_071015.indd 207/10/15 11:28 AM
To view detailed instructional videos regarding these and other features, please go to www.nissanownersinfo.mobi.
Page 23 of 35
21
To fast forward or rewind a track on a CD, press and hold the button
or the
button.
4 AUDIO KEY
Touch the Audio key on the Launch Bar to
bring up the current source’s control screen.
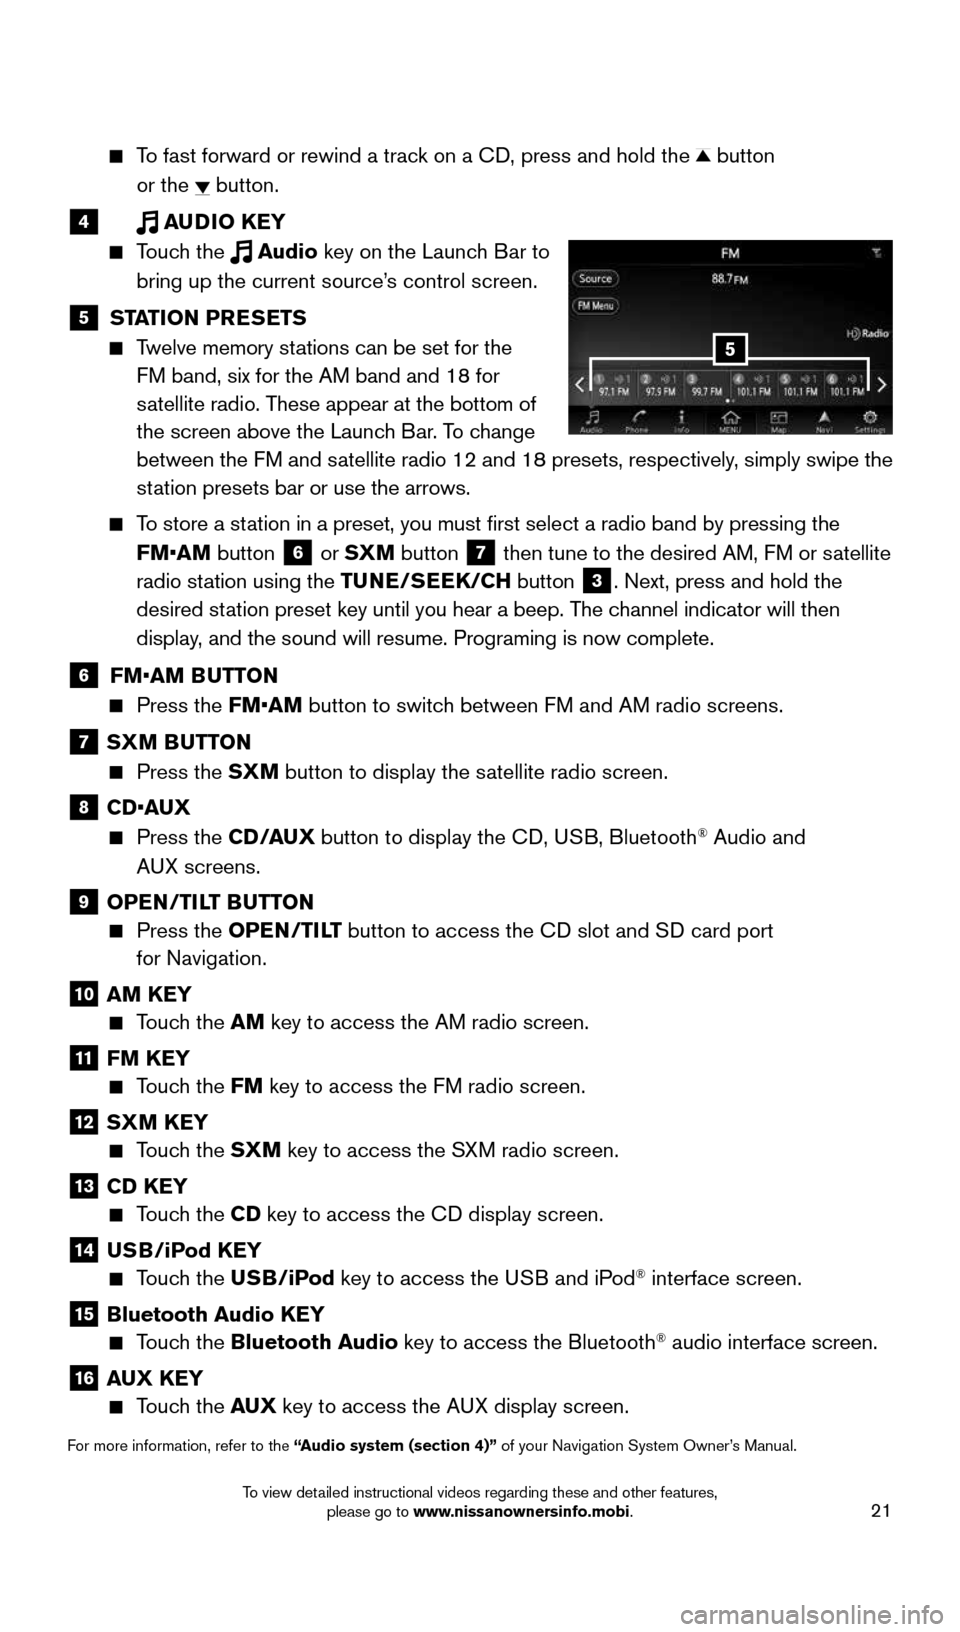
5 STATION PRESETS
Twelve memory stations can be set for the
FM band, six for the AM band and 18 for
satellite radio. These appear at the bottom of
the screen above the Launch Bar. To change
between the FM and satellite radio 12 and 18 presets, respectively, simply swipe the
station presets bar or use the arrows.
To store a station in a preset, you must first select a radio band by pressing the
FM•AM button
6 or SXM button
7 then tune to the desired AM, FM or satellite
radio station using the TUNE/SEEK/CH button
3. Next, press and hold the
desired station preset key until you hear a beep. The channel indicator will then
display, and the sound will resume. Programing is now complete.
6 FM•AM BUTTON
Press the FM•AM button to switch between FM and AM radio screens.
7 SXM BUTTON
Press the SXM button to display the satellite radio screen.
8 CD•AUX
Press the CD /AUX button to display the CD, USB, Bluetooth® Audio and
AUX screens.
9 OPEN/TILT BUTTON
Press the OPEN/TILT button to access the CD slot and SD card port
for Navigation.
10 AM KEY
Touch the AM key to access the AM radio screen.
11 FM KEY
Touch the FM key to access the FM radio screen.
12 SXM KEY
Touch the SXM key to access the SXM radio screen.
13 CD KEY
Touch the CD key to access the CD display screen.
14 USB/iPod KEY
Touch the USB/iPod key to access the USB and iPod® interface screen.
15 Bluetooth Audio KEY
Touch the Bluetooth Audio key to access the Bluetooth® audio interface screen.
16 AUX KEY
Touch the AUX key to access the AUX display screen.
For more information, refer to the “Audio system (section 4)” of your Navigation System Owner’s Manual.
5
1996737_16a_Leaf_QRG_071015.indd 217/10/15 11:28 AM
To view detailed instructional videos regarding these and other features, please go to www.nissanownersinfo.mobi.
Page 24 of 35
22
CRUISE CONTROL
The cruise control system enables you to set a
constant cruising speed once the vehicle has
reached 25 mph (40 km/h).
The system will automatically maintain the set
speed until you tap the brake pedal, accelerate,
cancel or turn the system off.
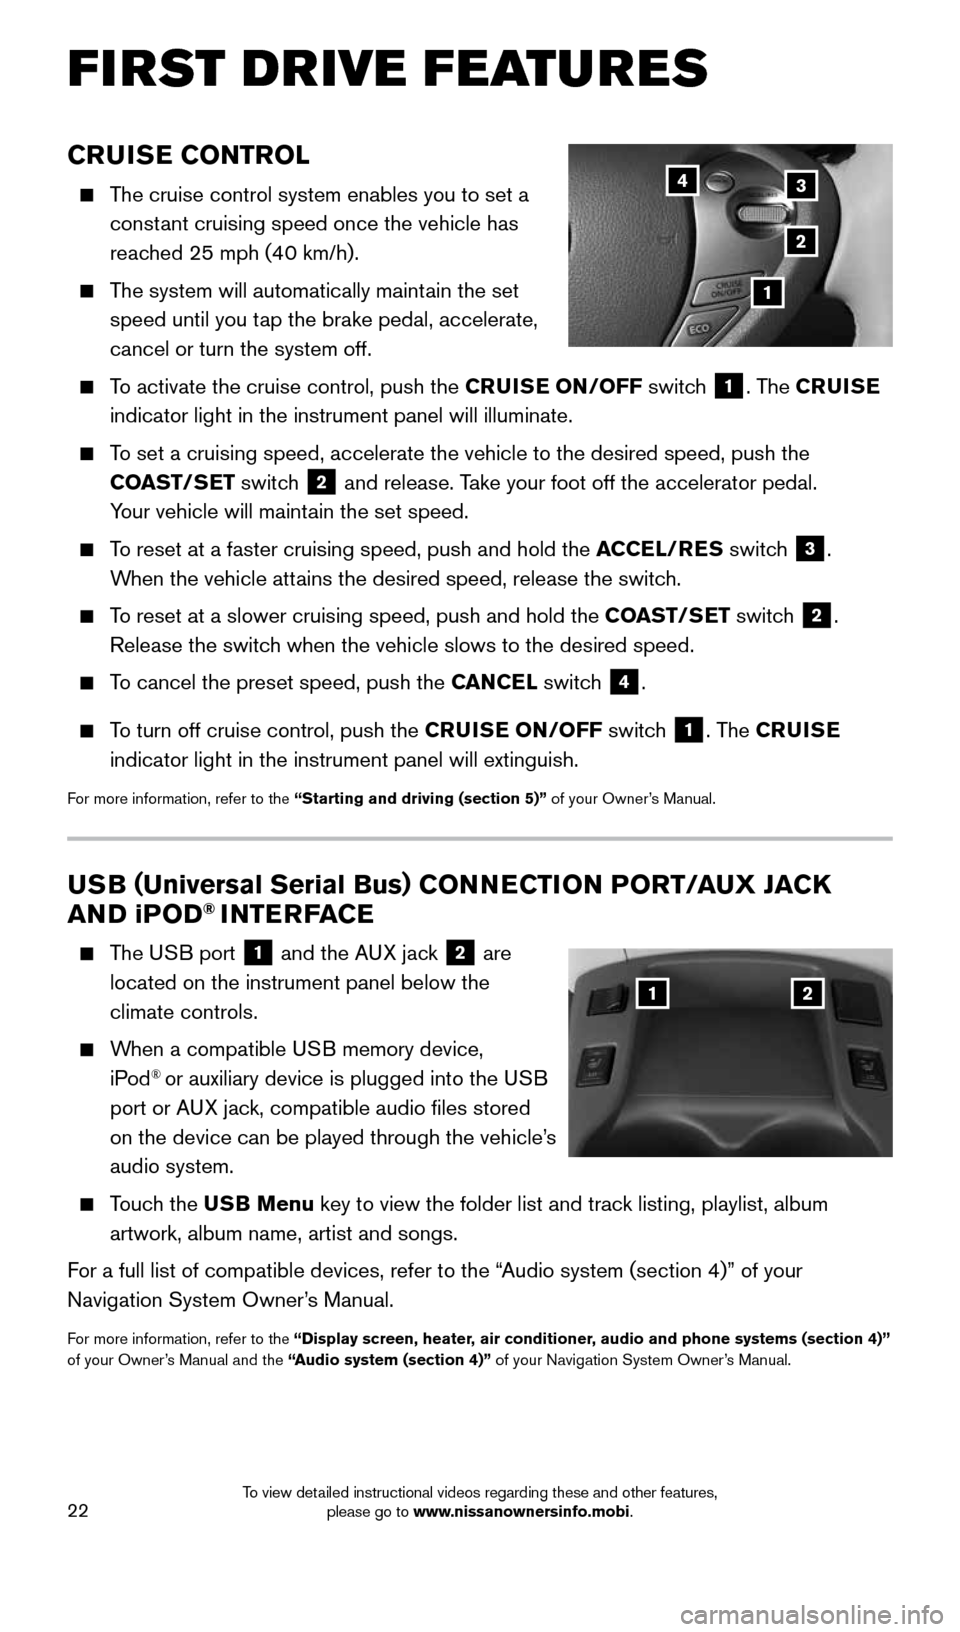
To activate the cruise control, push the CRUISE ON/OFF switch
1. The CRUISE
indicator light in the instrument panel will illuminate.
To set a cruising speed, accelerate the vehicle to the desired speed, pus\
h the
COAST/SET switch
2 and release. Take your foot off the accelerator pedal.
Your vehicle will maintain the set speed.
To reset at a faster cruising speed, push and hold the ACCEL/RES switch
3.
When the vehicle attains the desired speed, release the switch.
To reset at a slower cruising speed, push and hold the COAST/SET switch
2.
Release the switch when the vehicle slows to the desired speed.
To cancel the preset speed, push the CANCEL switch
4.
To turn off cruise control, push the CRUISE ON/OFF switch
1. The CRUISE
indicator light in the instrument panel will extinguish.
For more information, refer to the “Starting and driving (section 5)” of your Owner’s Manual.
FIRST DRIVE FEATURES
3
2
1
4
USB ( Universal Serial Bus) CONNECTION PORT/AUX JACK
AND i POD® INTERFACE
The USB port
1 and the AUX jack 2 are
located on the instrument panel below the
climate controls.
When a compatible USB memory device,
iPod® or auxiliary device is plugged into the USB
port or AUX jack, compatible audio files stored
on the device can be played through the vehicle’s
audio system.
Touch the USB Menu key to view the folder list and track listing, playlist, album
artwork, album name, artist and songs.
For a full list of compatible devices, refer to the “Audio system (section 4)” of your
Navigation System Owner’s Manual.
For more information, refer to the “Display screen, heater, air conditioner, audio and phone systems (section 4)”
of your Owner’s Manual and the “Audio system (section 4)” of your Navigation System Owner’s Manual.
12
1996737_16a_Leaf_QRG_071015.indd 227/10/15 11:28 AM
To view detailed instructional videos regarding these and other features, please go to www.nissanownersinfo.mobi.
Page 26 of 35

24
SYSTEM GUIDE
Once enabled, the text message, sender and delivery time are shown on the control
panel display when the vehicle speed is less than 5 mph (8km/h).
Text messages have the option of being read aloud at all speeds.
Once the vehicle is in motion, text messages can only be replied to using the Voice
Recognition
button on the steering wheel.
Text messages can be created manually when the vehicle is not in motion.
Custom text messages must be created in advance.
Many cellular phones may require special permission to enable text messaging. Check
the cellular phone’s screen during Bluetooth® pairing. For some cellular phones, you
may need to enable “Notifications” in the cellular phone’s Bluetooth® menu for text
messages to appear on the touch-screen display. For more detailed information and
instructions, refer to your cellular phone’s Owner’s Manual.
Text message integration requires that the cellular phone support Message
Access Profile (MAP) for both receiving and sending text messages. Some
cellular phones may not support all text messaging features. Please see
www.NissanUSA.com/bluetooth for compatibility information as well as your
device’s Owner’s Manual.
For more information, refer to the “Hands-Free Phone (section 7)” of your Navigation System Owner’s Manual.
NissanConnectSM MOBILE APPS ( if so equipped)
Press the MENU button on the control panel, touch the Info key on the Launch Bar
and then touch the NissanConnect Mobile Apps key.
Integrates popular smartphone apps and services into your vehicle.
The NissanConnect Mobile Apps companion app must be downloaded to your
smartphone, and you must be enrolled in a NissanConnect account.
FOR SYSTEM WITH NAVIGATION
• iPhone
®: Please connect via USB when using an iPhone® with NissanConnect
Mobile Apps.
• Android
®: Please connect via Bluetooth® when using an Android® device with
NissanConnect Mobile Apps.
FOR SYSTEM WITHOUT NAVIGATION
• iPhone
®: Please connect via Bluetooth® when using an iPhone® with NissanConnect
Mobile Apps.
• Android
®: Please connect via Bluetooth® when using an Android® device with
NissanConnect Mobile Apps.
For more information on how to pair your cellular phone and set up NissanConnect Mobile
Apps, visit: www.NissanUSA.com/connect/support.
For more information, refer to the “Display screen, heater, air conditioner, audio and phone systems (section 4)”
of your Owner’s Manual and the “Viewing information (section 6)” of your Navigation System Owner’s Manual.
1996737_16a_Leaf_QRG_071015.indd 247/10/15 11:28 AM
To view detailed instructional videos regarding these and other features, please go to www.nissanownersinfo.mobi.
Page 28 of 35
26
BLUETOOTH® SYSTEM WITH
NAVIGATION (if so equipped)
CONNECTING PROCEDURE
The vehicle must be stationary when connecting
the cellular phone.
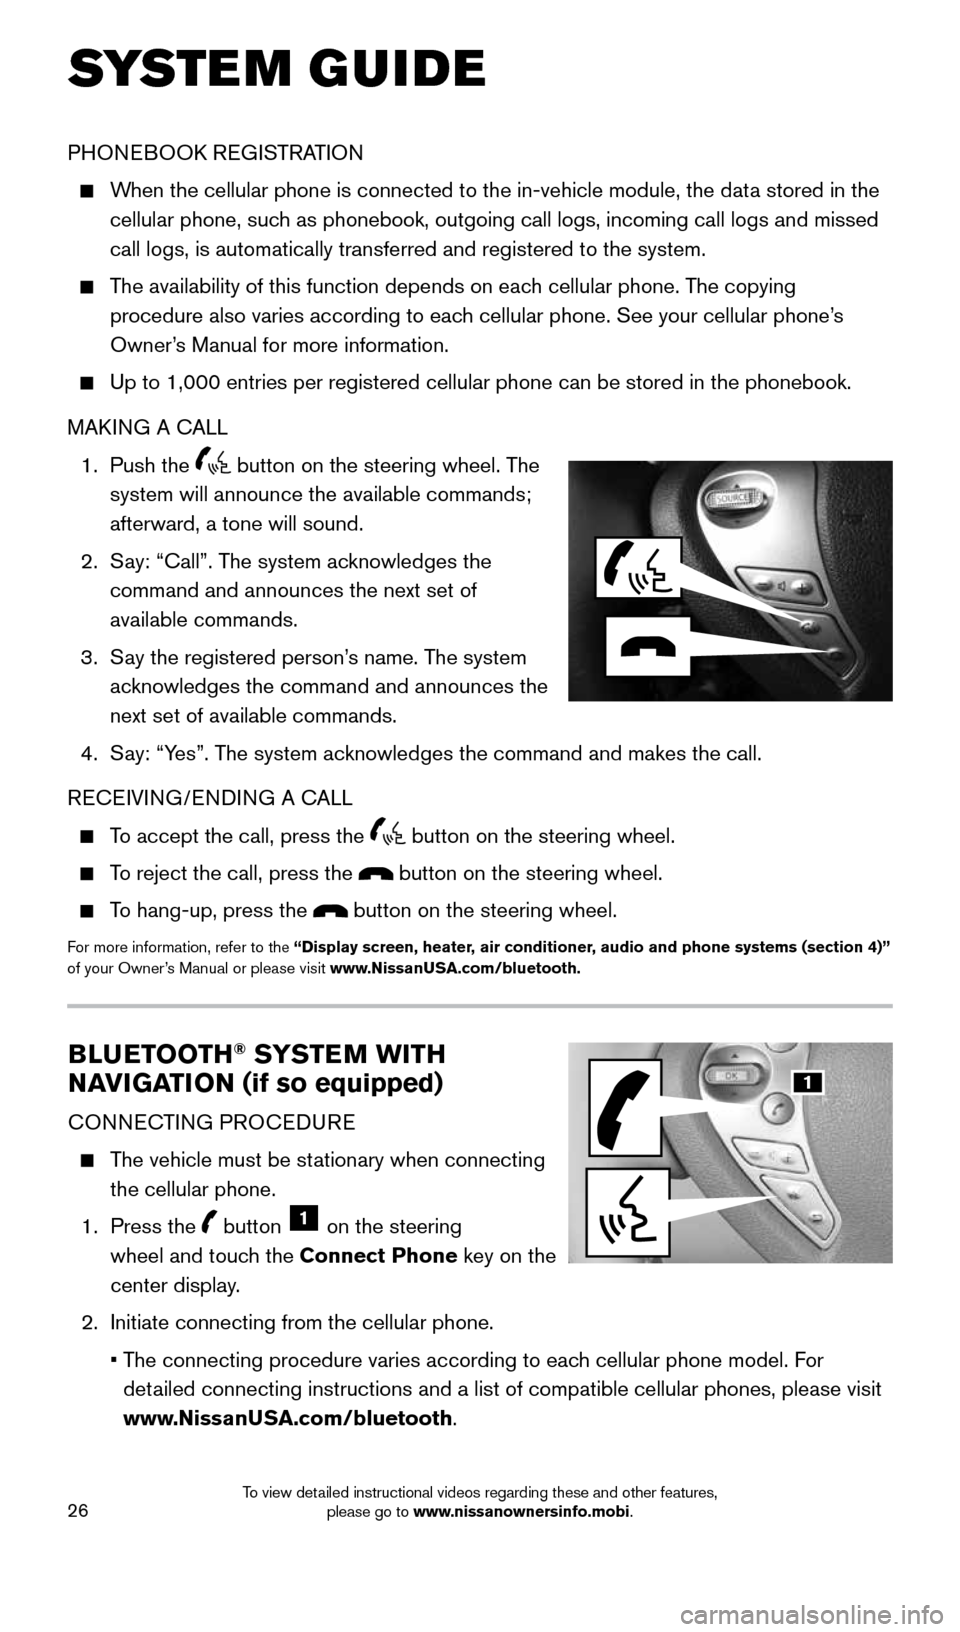
1. Press the
button 1 on the steering
wheel and touch the Connect Phone key on the
center display.
2. Initiate connecting from the cellular phone.
• The connecting procedure varies according to each cellular phone model. For
detailed connecting instructions and a list of compatible cellular phones, \
please visit
www.NissanUSA.com/bluetooth.
PHONEBOOK REGISTRATION
When the cellular phone is connected to the in-vehicle module, the data stored in the
cellular phone, such as phonebook, outgoing call logs, incoming call logs and missed
call logs, is automatically transferred and registered to the system.
The availability of this function depends on each cellular phone. The copying
procedure also varies according to each cellular phone. See your cellular phone’s
Owner’s Manual for more information.
Up to 1,000 entries per registered cellular phone can be stored in the p\
honebook.
MAKING A CALL
1. Push the
button on the steering wheel. The
system will announce the available commands;
afterward, a tone will sound.
2. Say: “Call”. The system acknowledges the
command and announces the next set of
available commands.
3. Say the registered person’s name. The system
acknowledges the command and announces the
next set of available commands.
4. Say: “Yes”. The system acknowledges the command and makes the call.
RECEIVING/ENDING A CALL
To accept the call, press the button on the steering wheel.
To reject the call, press the button on the steering wheel.
To hang-up, press the button on the steering wheel.
For more information, refer to the “Display screen, heater, air conditioner, audio and phone systems (section 4)”
of your Owner’s Manual or please visit www.NissanUSA.com/bluetooth.
SYSTEM GUIDE
1
1996737_16a_Leaf_QRG_071015.indd 267/10/15 11:28 AM
To view detailed instructional videos regarding these and other features, please go to www.nissanownersinfo.mobi.
Page 30 of 35
28
SYSTEM GUIDE
BLUETOOTH® STREAMING AUDIO
If you have a compatible Bluetooth® device with streaming audio (A2DP profile), you
can set up the wireless connection between your Bluetooth® device and your vehicle’s
audio system. This connection allows you to listen to audio from the Bluetooth® device
using your vehicle’s speakers.
A cellular phone should not be used while driving so full attention may \
be given to
vehicle operation.*
CONNECTING PROCEDURE WITH NAVIGATION SYSTEM (if so equipped)
1. Press the
Audio key and touch the Bluetooth Audio key.
2. A prompt to connect your device will display.
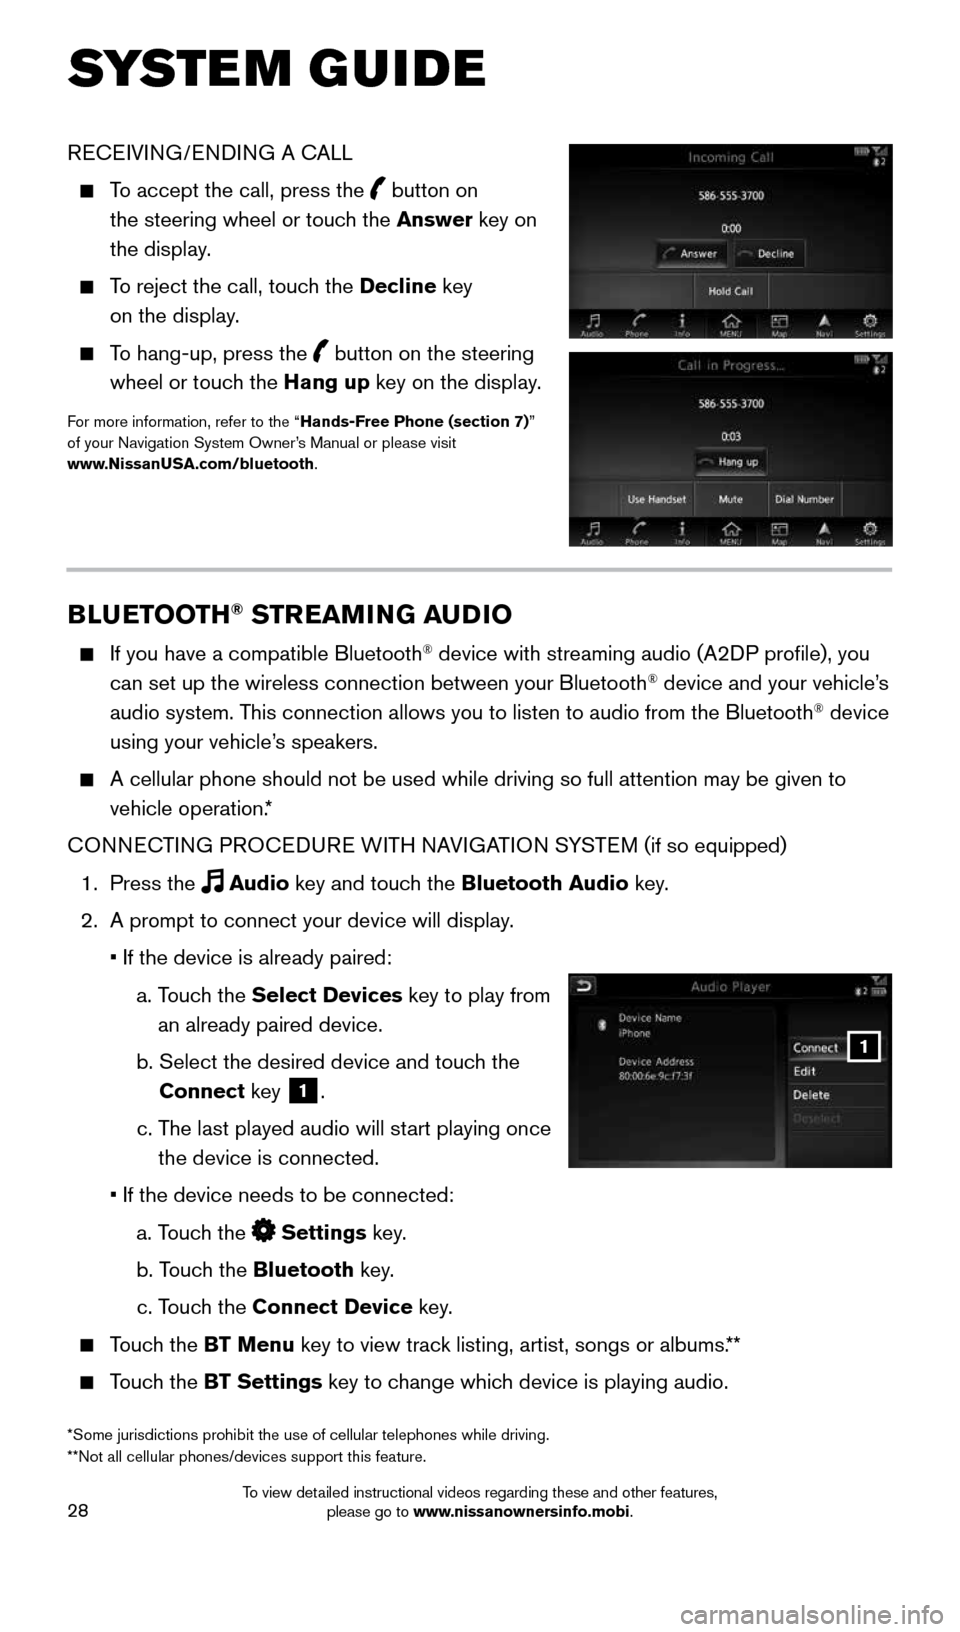
• If the device is already paired:
a. Touch the Select Devices key to play from
an already paired device.
b. Select the desired device and touch the
Connect key
1.
c. The last played audio will start playing once
the device is connected.
• If the device needs to be connected:
a. Touch the
Settings key.
b. Touch the Bluetooth key.
c. Touch the Connect Device key.
Touch the BT Menu key to view track listing, artist, songs or albums.**
Touch the BT Settings key to change which device is playing audio.
1
RECEIVING/ENDING A CALL
To accept the call, press the button on
the steering wheel or touch the Answer key on
the display.
To reject the call, touch the Decline key
on the display.
To hang-up, press the button on the steering
wheel or touch the Hang up key on the display.
For more information, refer to the “Hands-Free Phone (section 7)”
of your Navigation System Owner’s Manual or please visit
www.NissanUSA.com/bluetooth.
*Some jurisdictions prohibit the use of cellular telephones while drivin\
g.
**Not all cellular phones/devices support this feature.
1996737_16a_Leaf_QRG_071015.indd 287/10/15 11:28 AM
To view detailed instructional videos regarding these and other features, please go to www.nissanownersinfo.mobi.
Page 31 of 35
29
CONNECTING PROCEDURE WITHOUT NAVIGATION SYSTEM (if so equipped)
To connect your Bluetooth
® audio device to the vehicle, follow the procedure below:
1. Press the ENTER/SETTING button.
2. Select the Bluetooth key.
3. Select the Add Phone key. This same screen can be accessed to remove, replace or
select a different Bluetooth
® device.
4. The system acknowledges the command and asks you to initiate connecting from
the phone handset. The connecting procedure of the cellular phone varies according
to each cellular phone model. For additional information, refer to the cellular phone’s
Owner’s Manual for details. You can also visit www.NissanUSA.com/bluetooth for
instructions on connecting NISSAN-recommended cellular phones.
To switch to the Bluetooth® audio mode, press the MEDIA button repeatedly until the
Bluetooth® audio mode is displayed on the screen.
The controls for the Bluetooth
® audio are displayed on the screen. Use the preset 3 button
for play and the preset 4 button for pause.
For more information, refer to the “Display screen, heater, air conditioner, audio and phone systems (section 4)”
of your Owner’s Manual and the “Audio system (section 4)” of your Navigation System Owner’s Manual or
please visit www.NissanUSA.com/bluetooth.
1
2
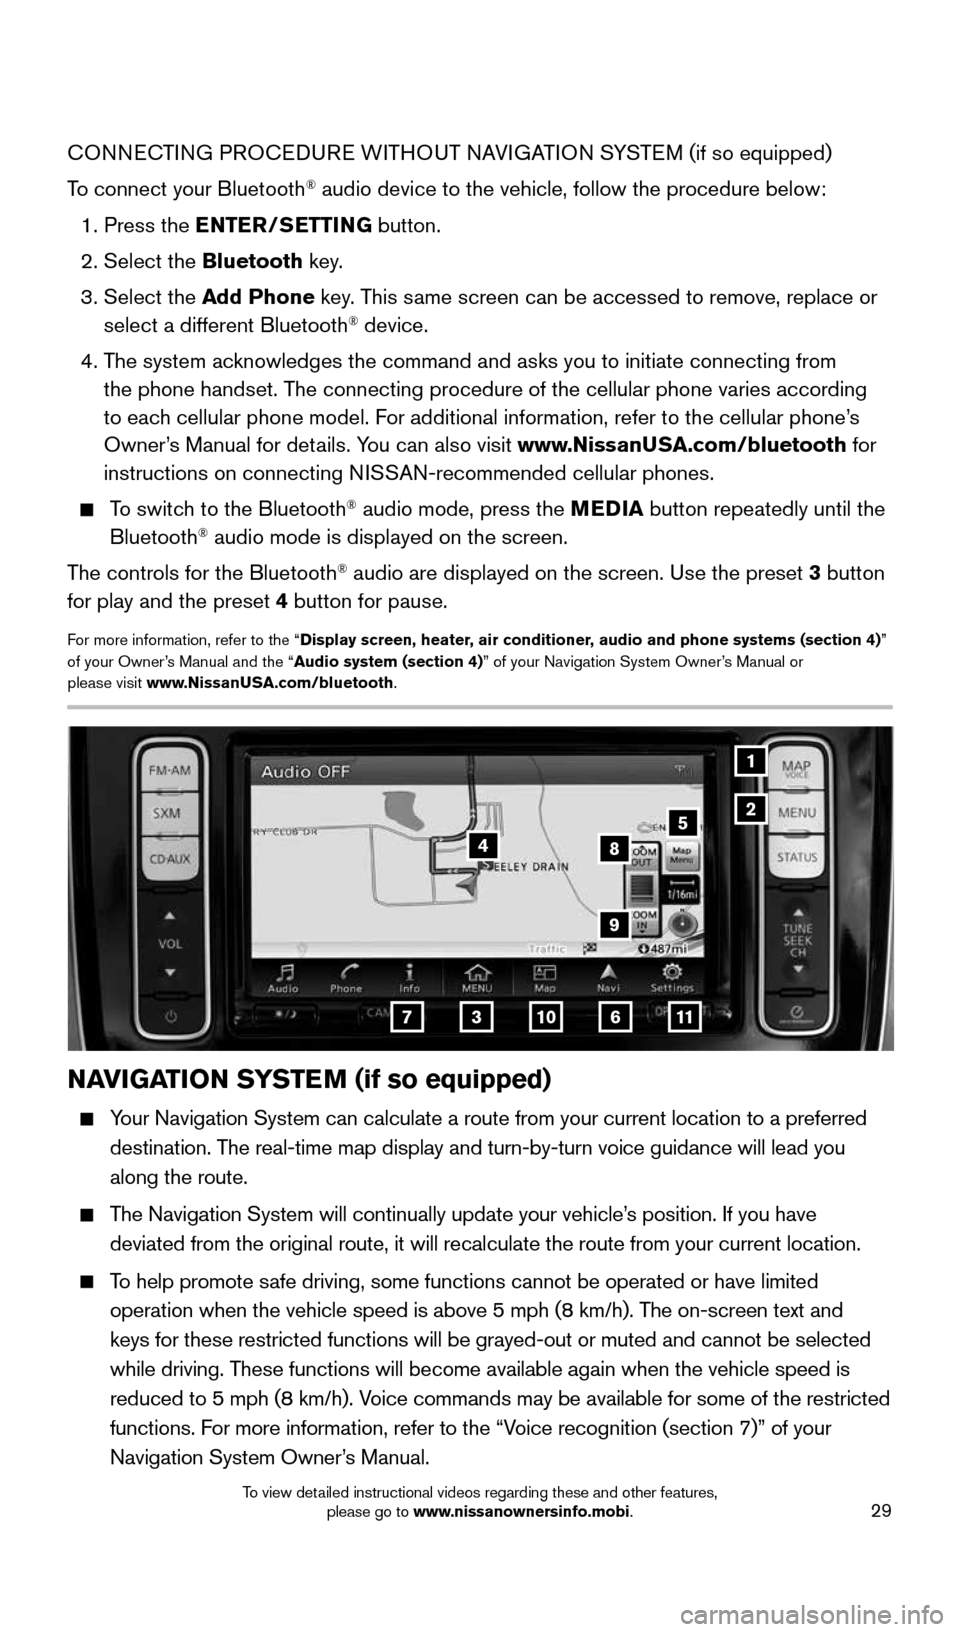
NAVIGATION SYSTEM (if so equipped)
Your Navigation System can calculate a route from your current location t\
o a preferred
destination. The real-time map display and turn-by-turn voice guidance will lead you
along the route.
The Navigation System will continually update your vehicle’s position. If you have
deviated from the original route, it will recalculate the route from you\
r current location.
To help promote safe driving, some functions cannot be operated or have limited
operation when the vehicle speed is above 5 mph (8 km/h). The on-screen text and
keys for these restricted functions will be grayed-out or muted and cann\
ot be selected
while driving. These functions will become available again when the vehicle speed is
reduced to 5 mph (8 km/h). Voice commands may be available for some of the restricted
functions. For more information, refer to the “Voice recognition (section 7)” of your
Navigation System Owner’s Manual.
37
5
6
4
11
8
10
9
1996737_16a_Leaf_QRG_071015.indd 297/10/15 11:28 AM
To view detailed instructional videos regarding these and other features, please go to www.nissanownersinfo.mobi.