sat nav NISSAN LEAF 2016 1.G Quick Reference Guide
[x] Cancel search | Manufacturer: NISSAN, Model Year: 2016, Model line: LEAF, Model: NISSAN LEAF 2016 1.GPages: 35, PDF Size: 2.98 MB
Page 8 of 35

6
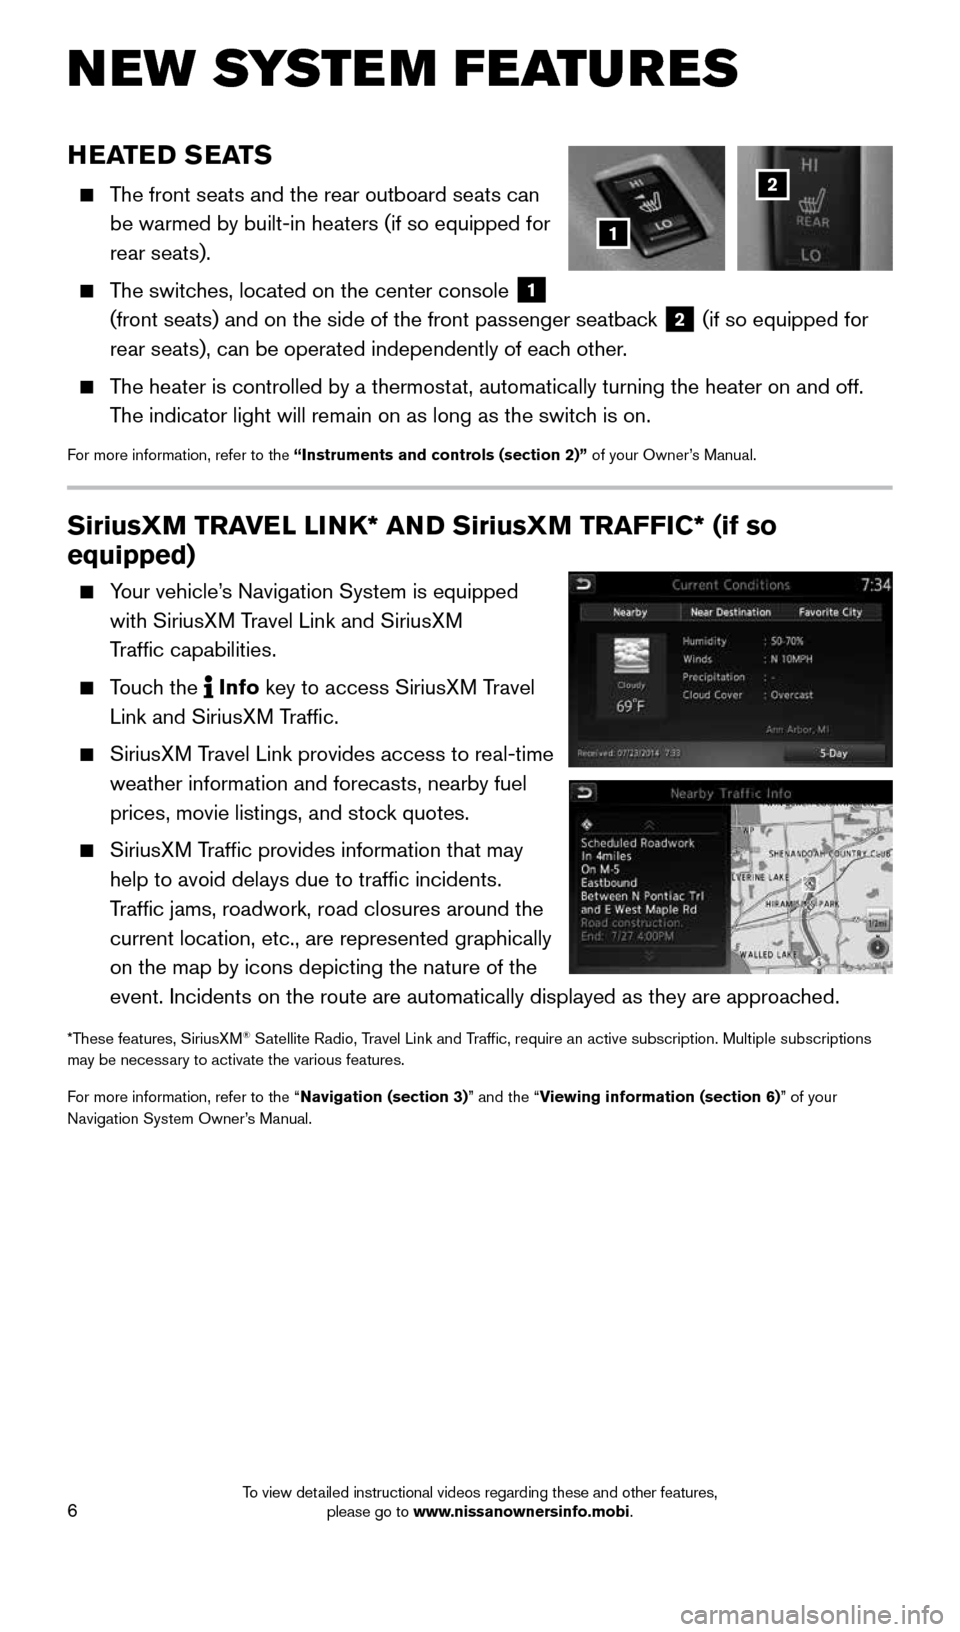
SiriusXM TRAVEL LINK* AND SiriusXM TRAFFIC* (if so
equipped)
Your vehicle’s Navigation System is equipped
with SiriusXM Travel Link and SiriusXM
Traffic capabilities.
Touch the Info
key
to access SiriusXM Travel
Link and SiriusXM Traffic.
SiriusXM Travel Link provides access to real-time
weather information and forecasts, nearby fuel
prices, movie listings, and stock quotes.
SiriusXM Traffic provides information that may
help to avoid delays due to traffic incidents.
Traffic jams, roadwork, road closures around the
current location, etc., are represented graphically
on the map by icons depicting the nature of the
event. Incidents on the route are automatically displayed as they are ap\
proached.
*These features, SiriusXM® Satellite Radio, Travel Link and Traffic, require an active subscription. Multiple subscriptions
may be necessary to activate the various features.
For more information, refer to the “Navigation (section 3)” and the “Viewing information (section 6)” of your
Navigation System Owner’s Manual.
NEW SYSTEM FEATURES
HEATED SEATS
The front seats and the rear outboard seats can
be warmed by built-in heaters (if so equipped for
rear seats).
The switches, located on the center console
1
(front seats) and on the side of the front passenger seatback 2 (if so equipped for
rear seats), can be operated independently of each other.
The heater is controlled by a thermostat, automatically turning the heater on and off.
The indicator light will remain on as long as the switch is on.
For more information, refer to the “Instruments and controls (section 2)” of your Owner’s Manual.
1
2
1996737_16a_Leaf_QRG_071015.indd 67/10/15 11:28 AM
To view detailed instructional videos regarding these and other features, please go to www.nissanownersinfo.mobi.
Page 15 of 35

13
Press the button
4 to cycle through the
various Settings modes.
This clock is linked to the GPS (if so equipped)
through the center display clock.
• Without any adjustments, the correct time
will be displayed based on the vehicle’s
current location.
• There are also controls in the center display to
compensate for Daylight Savings Time.
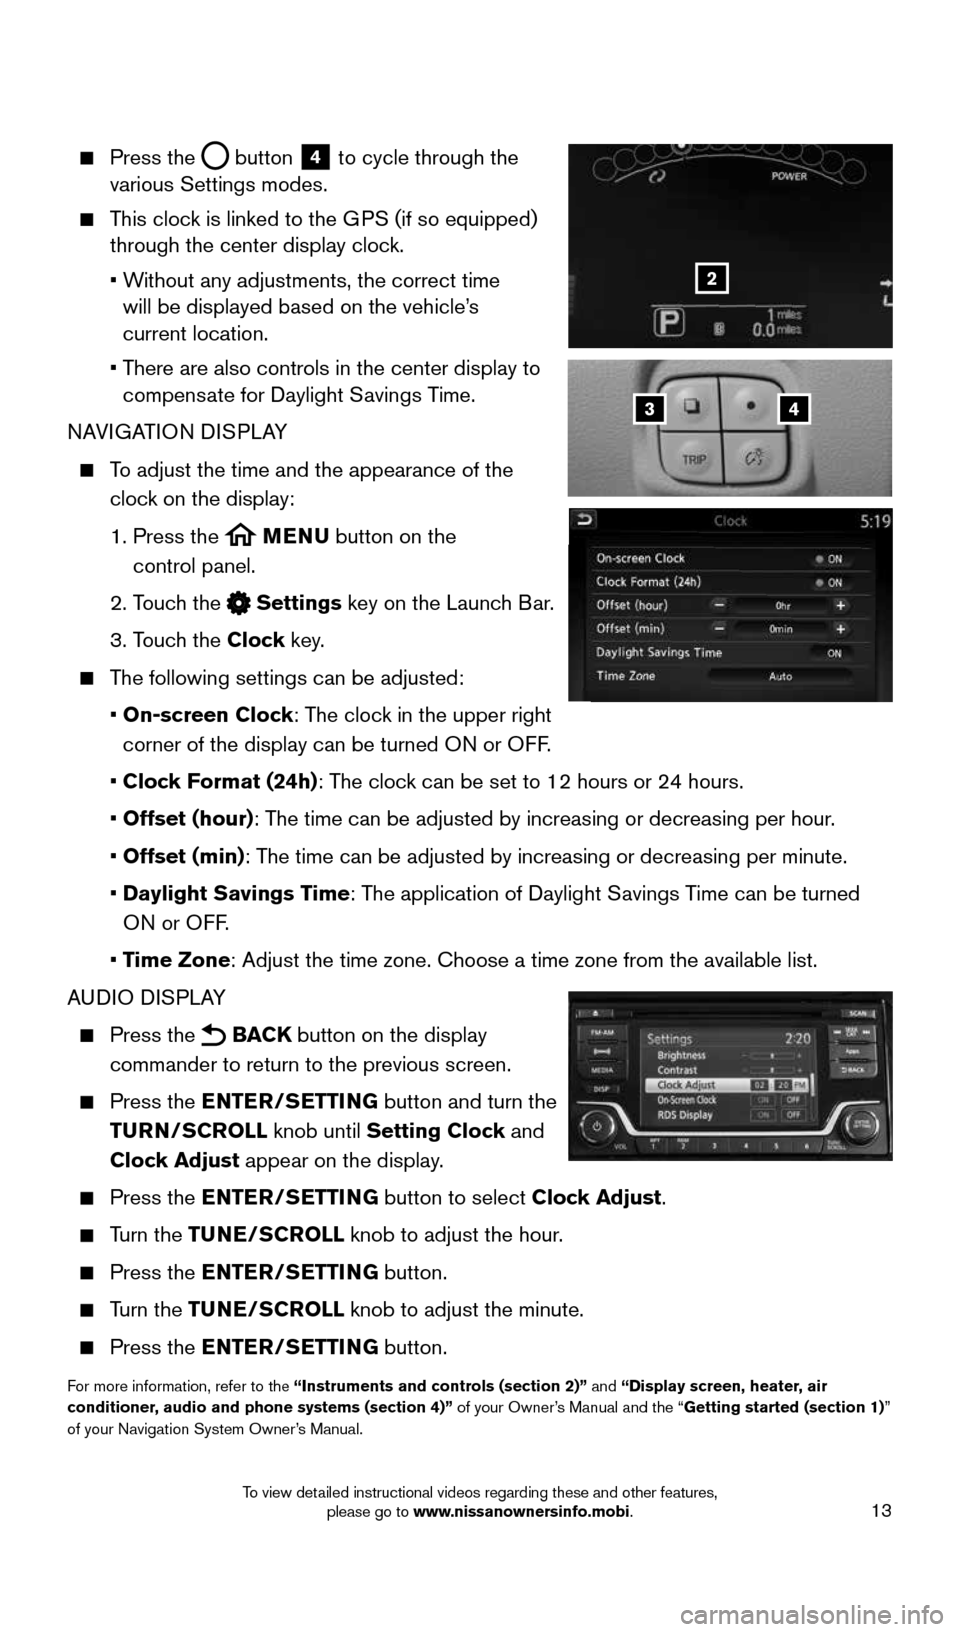
NAVIGATION DISPLAY
To adjust the time and the appearance of the
clock on the display:
1. Press the
MENU button on the
control panel.
2. Touch the
Settings key on the Launch Bar.
3. Touch the Clock key.
The following settings can be adjusted:
• On-screen Clock: The clock in the upper right
corner of the display can be turned ON or OFF.
• Clock Format (24h): The clock can be set to 12 hours or 24 hours.
• Offset (hour): The time can be adjusted by increasing or decreasing per hour.
• Offset (min): The time can be adjusted by increasing or decreasing per minute.
• Daylight Savings Time: The application of Daylight Savings Time can be turned
ON or OFF.
• Time Zone: Adjust the time zone. Choose a time zone from the available list.
AUDIO DISPLAY
Press the BACK button on the display
commander to return to the previous screen.
Press the ENTER/SETTING button and turn the
TURN/SCROLL knob until Setting Clock and
Clock Adjust appear on the display.
Press the ENTER/SETTING button to select Clock Adjust.
Turn the TUNE/SCROLL knob to adjust the hour.
Press the ENTER/SETTING button.
Turn the TUNE/SCROLL knob to adjust the minute.
Press the ENTER/SETTING button.
For more information, refer to the “Instruments and controls (section 2)” and “Display screen, heater, air
conditioner, audio and phone systems (section 4)” of your Owner’s Manual and the “Getting started (section 1)”
of your Navigation System Owner’s Manual.
43
2
1996737_16a_Leaf_QRG_071015.indd 137/10/15 11:28 AM
To view detailed instructional videos regarding these and other features, please go to www.nissanownersinfo.mobi.
Page 23 of 35

21
To fast forward or rewind a track on a CD, press and hold the button
or the
button.
4 AUDIO KEY
Touch the Audio key on the Launch Bar to
bring up the current source’s control screen.
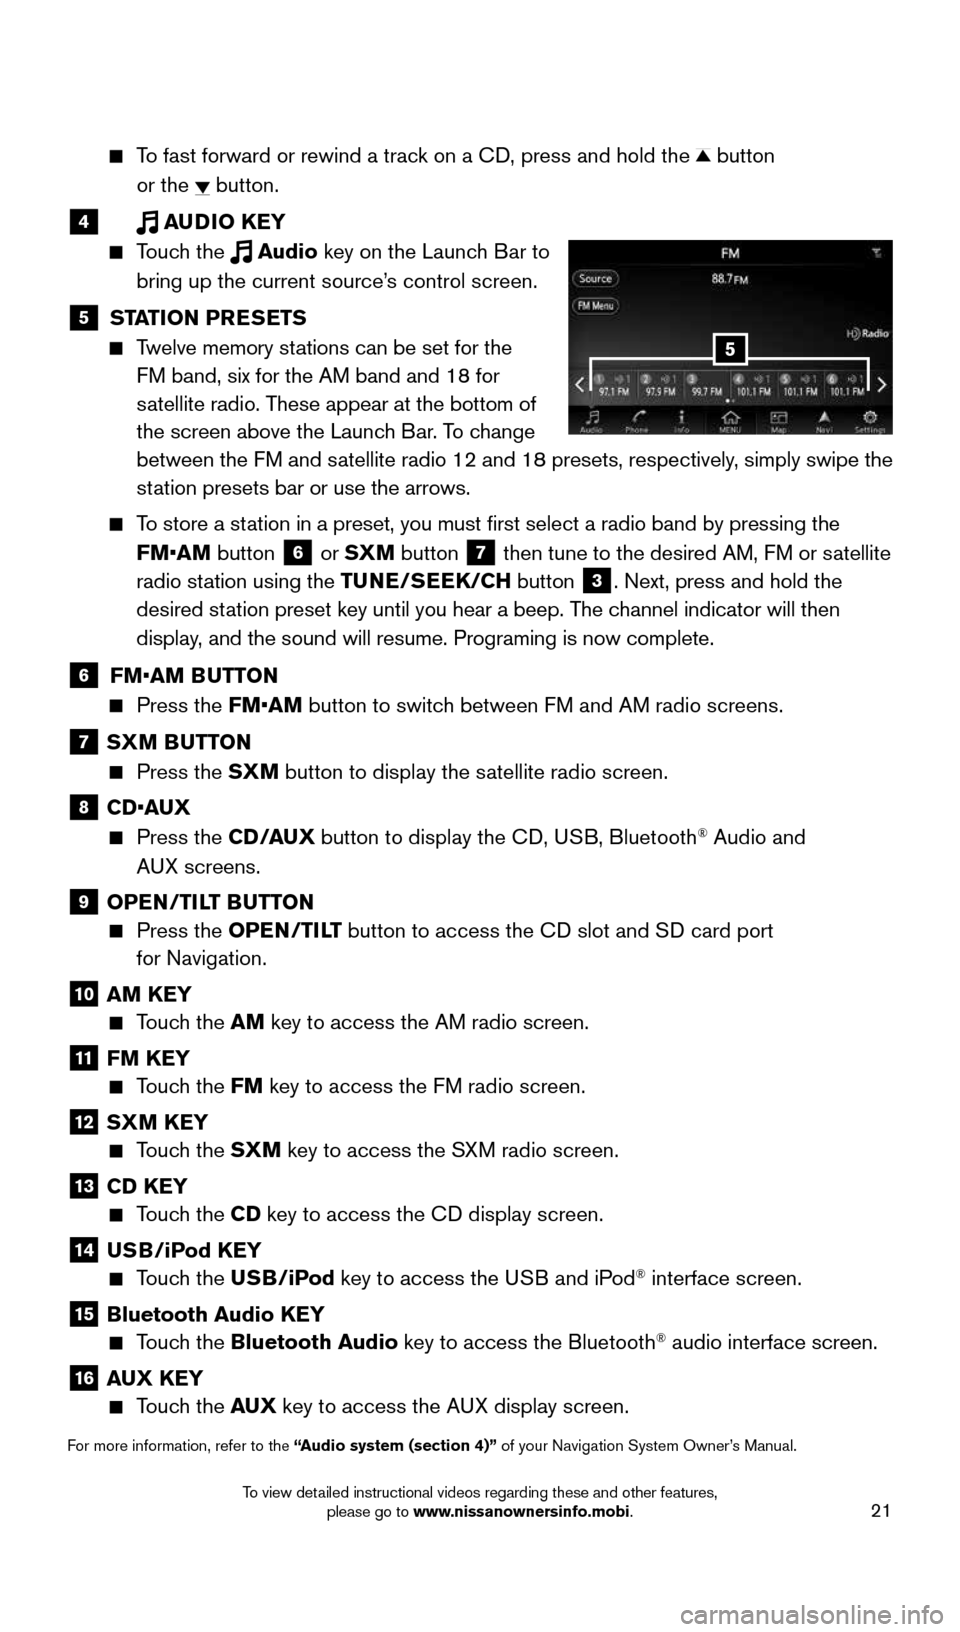
5 STATION PRESETS
Twelve memory stations can be set for the
FM band, six for the AM band and 18 for
satellite radio. These appear at the bottom of
the screen above the Launch Bar. To change
between the FM and satellite radio 12 and 18 presets, respectively, simply swipe the
station presets bar or use the arrows.
To store a station in a preset, you must first select a radio band by pressing the
FM•AM button
6 or SXM button
7 then tune to the desired AM, FM or satellite
radio station using the TUNE/SEEK/CH button
3. Next, press and hold the
desired station preset key until you hear a beep. The channel indicator will then
display, and the sound will resume. Programing is now complete.
6 FM•AM BUTTON
Press the FM•AM button to switch between FM and AM radio screens.
7 SXM BUTTON
Press the SXM button to display the satellite radio screen.
8 CD•AUX
Press the CD /AUX button to display the CD, USB, Bluetooth® Audio and
AUX screens.
9 OPEN/TILT BUTTON
Press the OPEN/TILT button to access the CD slot and SD card port
for Navigation.
10 AM KEY
Touch the AM key to access the AM radio screen.
11 FM KEY
Touch the FM key to access the FM radio screen.
12 SXM KEY
Touch the SXM key to access the SXM radio screen.
13 CD KEY
Touch the CD key to access the CD display screen.
14 USB/iPod KEY
Touch the USB/iPod key to access the USB and iPod® interface screen.
15 Bluetooth Audio KEY
Touch the Bluetooth Audio key to access the Bluetooth® audio interface screen.
16 AUX KEY
Touch the AUX key to access the AUX display screen.
For more information, refer to the “Audio system (section 4)” of your Navigation System Owner’s Manual.
5
1996737_16a_Leaf_QRG_071015.indd 217/10/15 11:28 AM
To view detailed instructional videos regarding these and other features, please go to www.nissanownersinfo.mobi.