ECO mode NISSAN LEAF 2016 1.G Roadside Assistance Guide
[x] Cancel search | Manufacturer: NISSAN, Model Year: 2016, Model line: LEAF, Model: NISSAN LEAF 2016 1.GPages: 36, PDF Size: 1.15 MB
Page 17 of 36

4-1.1 Jump Starting Procedures
1. If the booster battery is in another vehicle (B) , position the two vehicles (A and B) to bring their
12-volt batteries into close proximity to each other.
DO NOT allow the two vehicles to touch.
2. Apply the parking brake.
3. Push the P (Park) position switch to place the vehicle in the P (Park) position.
4. Switch off all unnecessary electrical systems (headlights, heater, air conditioner, etc.) .
5. Place the power switch in the OFF position (if possible) .
If the 12-volt battery is discharged, the power switch cannot be moved from the OFF
position. Connect the jumper cables to the booster vehicle (B) before pushing the
power switch.
6. Remove the vent caps on the 12-volt battery (if so equipped) . Cover the battery with a firmly wrung out moist cloth to reduce the hazard of an explosion.
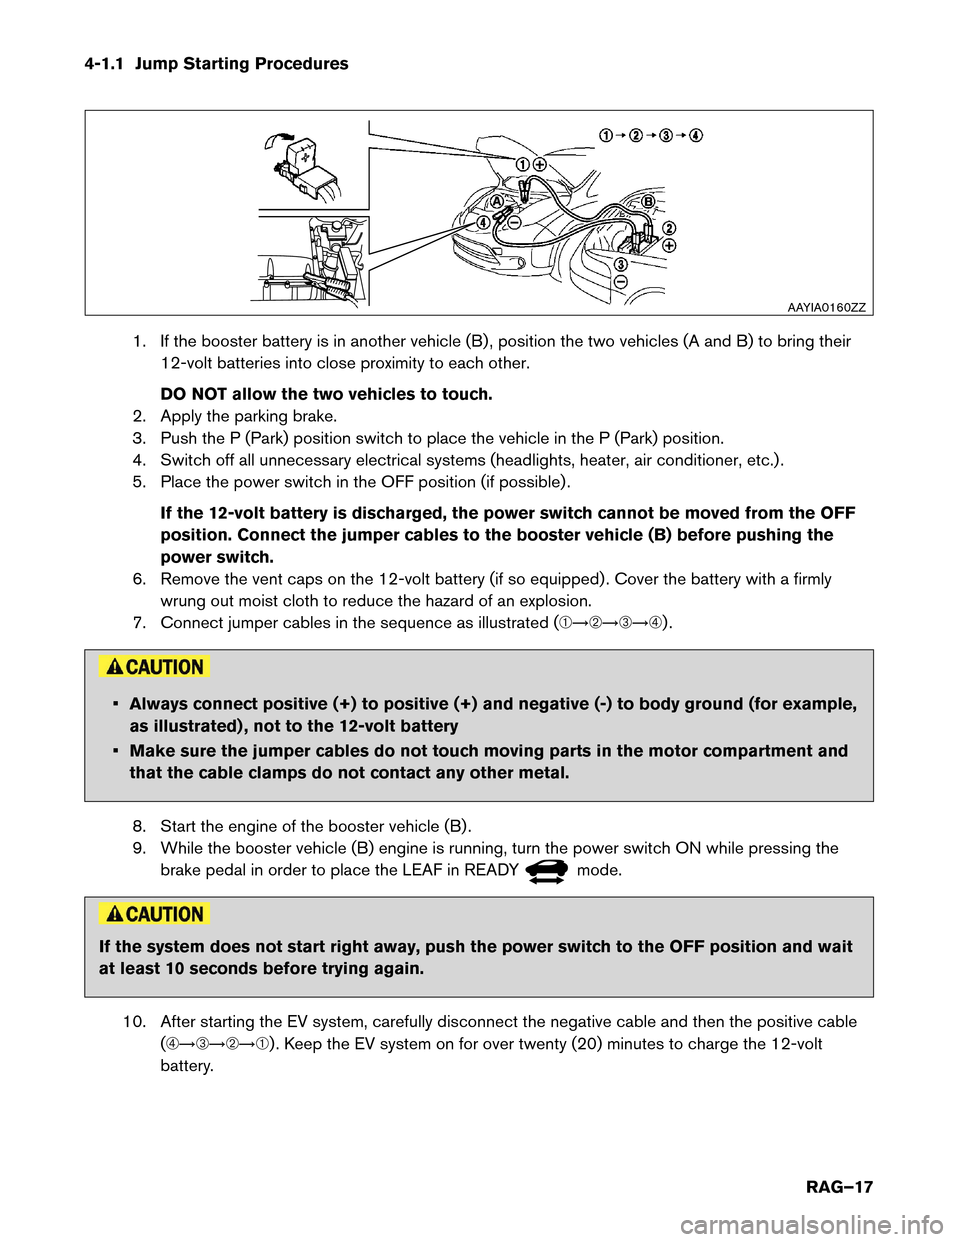
7. Connect jumper cables in the sequence as illustrated (�������) . • Always connect positive (+) to positive (+) and negative (-) to body ground (for example,
as
illustrated) , not to the 12-volt battery
• Make sure the jumper cables do not touch moving parts in the motor compartment and that the cable clamps do not contact any other metal.
8. Start the engine of the booster vehicle (B) .
9. While the booster vehicle (B) engine is running, turn the power switch ON while pressing the brake pedal in order to place the LEAF in READY mode.
If the system does not start right away, push the power switch to the OFF position and wait
at
least 10 seconds before trying again.
10. After starting the EV system, carefully disconnect the negative cable and then the positive cable (�������) . Keep the EV system on for over twenty (20) minutes to charge the 12-volt
battery. AAYIA0160ZZ
RAG–17
Page 26 of 36

• To avoid the Emergency Tire Puncture Repair Kit from being damaged during storage
or use:
– Only use the Emergency Tire Puncture Repair Kit on the LEAF vehicle. Do not use it on other vehicles.
–
Only use the kit to inflate the tires of the LEAF and to check the vehicle’s tire pressure.
– Only plug the compressor into a 12V DC car power point.
– Keep the kit free of dirt and water.
– Do not disassemble or modify the kit.
– Do not drop the kit or allow hard impacts to the kit.
• Do not use the Emergency Tire Puncture Repair Kit under the following conditions. It is recommended you contact a NISSAN certified LEAF dealer or professional road
assistance:
– when the sealant has passed its expiration date (shown on the label attached to the
bottle) .
– when the cut or the puncture in the tire is approximately 0.25 in (6 mm) or longer.
– when the tire sidewall is damaged.
– when the vehicle has been driven with extremely low tire pressure.
– when the tire has come off the inside or the outside of the wheel.
– when the wheel is damaged.
– when two (2) or more tires are flat.
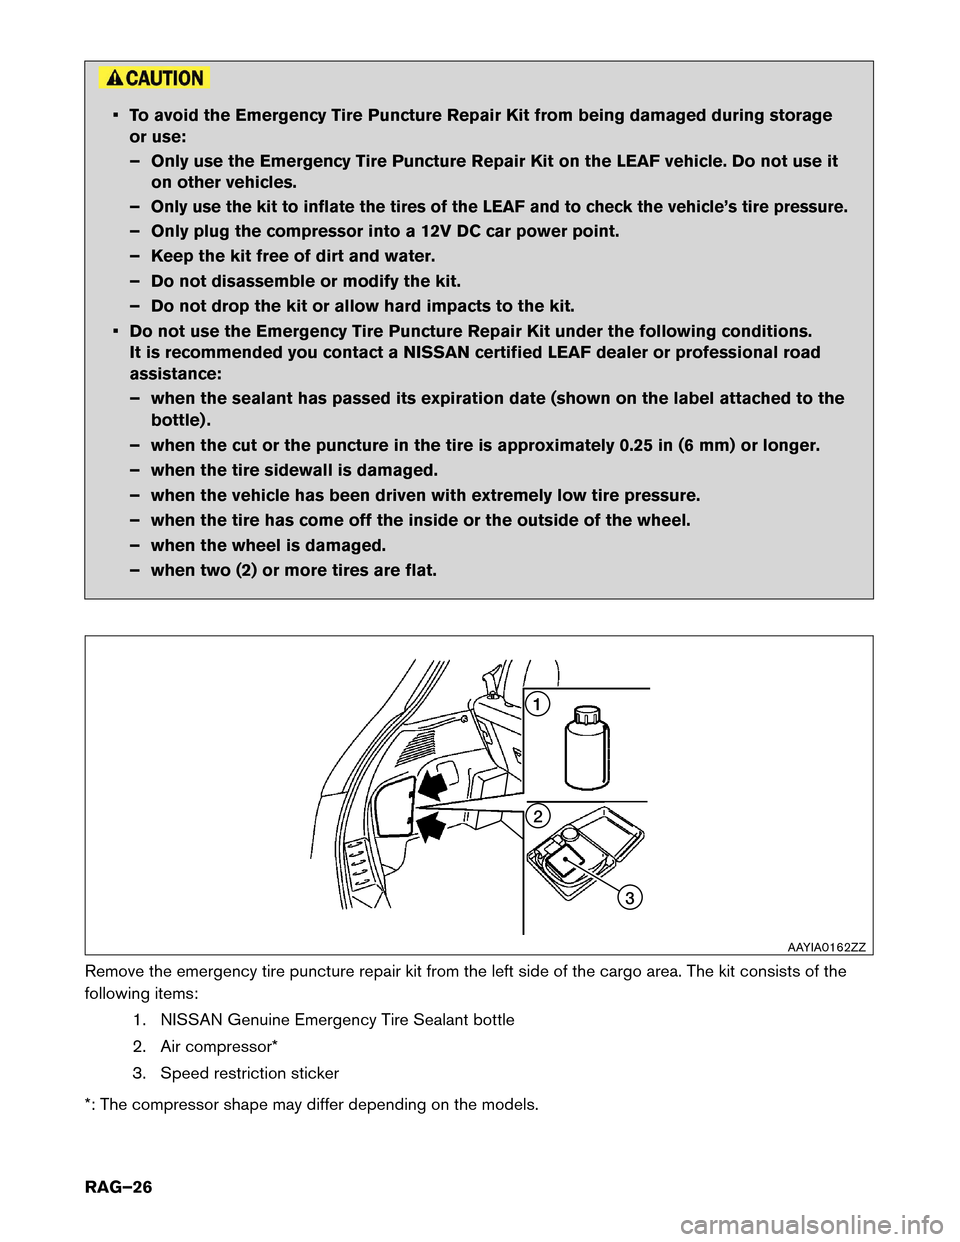
Remove the emergency tire puncture repair kit from the left side of the cargo area. The kit consists of the
following items: 1. NISSAN Genuine Emergency Tire Sealant bottle
2. Air compressor*
3. Speed restriction sticker
*: The compressor shape may differ depending on the models. 321
AAYIA0162ZZ
RAG–26