parking brake NISSAN LEAF 2020 Owner´s Manual
[x] Cancel search | Manufacturer: NISSAN, Model Year: 2020, Model line: LEAF, Model: NISSAN LEAF 2020Pages: 596, PDF Size: 4.33 MB
Page 16 of 596

9. Parking brake (switch type)(if so equipped) (P. 5-19)
10. Tilt and telescopic steering wheel
lever(P. 3-23)
11. Lower instrument panel switches
(P. 3-21)
—Charge port lid switch (P. 3-21)
—Immediate charge switch (P. 2-58)
—Heated steering wheel switch
(if so equipped) (P. 2-57)
—Steering Assist switch (if so equipped)
(P. 5-92)
—Dynamic driver assistance switch
(if so equipped) (P. 5-92, 5-31, 5-47)
12. Fuse box cover (P. 8-18)
*For additional information, refer to the
NissanConnect® manual (for Leaf )
Illustrated table of contents0-7
Page 20 of 596
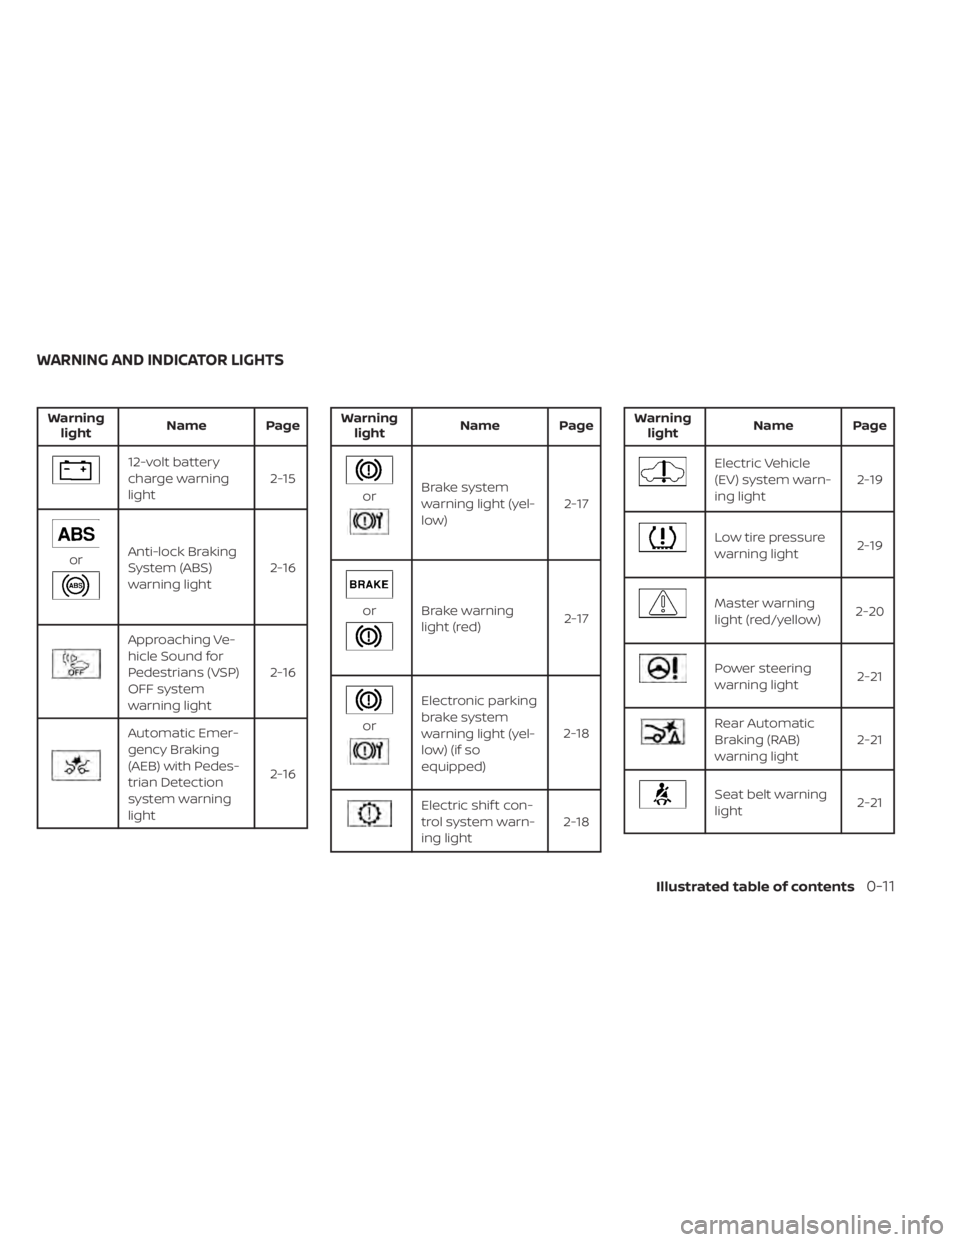
Warninglight Name Page
12-volt battery
charge warning
light 2-15
orAnti-lock Braking
System (ABS)
warning light2-16
Approaching Ve-
hicle Sound for
Pedestrians (VSP)
OFF system
warning light2-16
Automatic Emer-
gency Braking
(AEB) with Pedes-
trian Detection
system warning
light2-16
Warning
light Name Page
orBrake system
warning light (yel-
low) 2-17
orBrake warning
light (red)
2-17
or
Electronic parking
brake system
warning light (yel-
low) (if so
equipped)2-18
Electric shif t con-
trol system warn-
ing light
2-18
Warning
light Name Page
Electric Vehicle
(EV) system warn-
ing light 2-19
Low tire pressure
warning light
2-19
Master warning
light (red/yellow)2-20
Power steering
warning light 2-21
Rear Automatic
Braking (RAB)
warning light2-21
Seat belt warning
light
2-21
WARNING AND INDICATOR LIGHTS
Illustrated table of contents0-11
Page 21 of 596
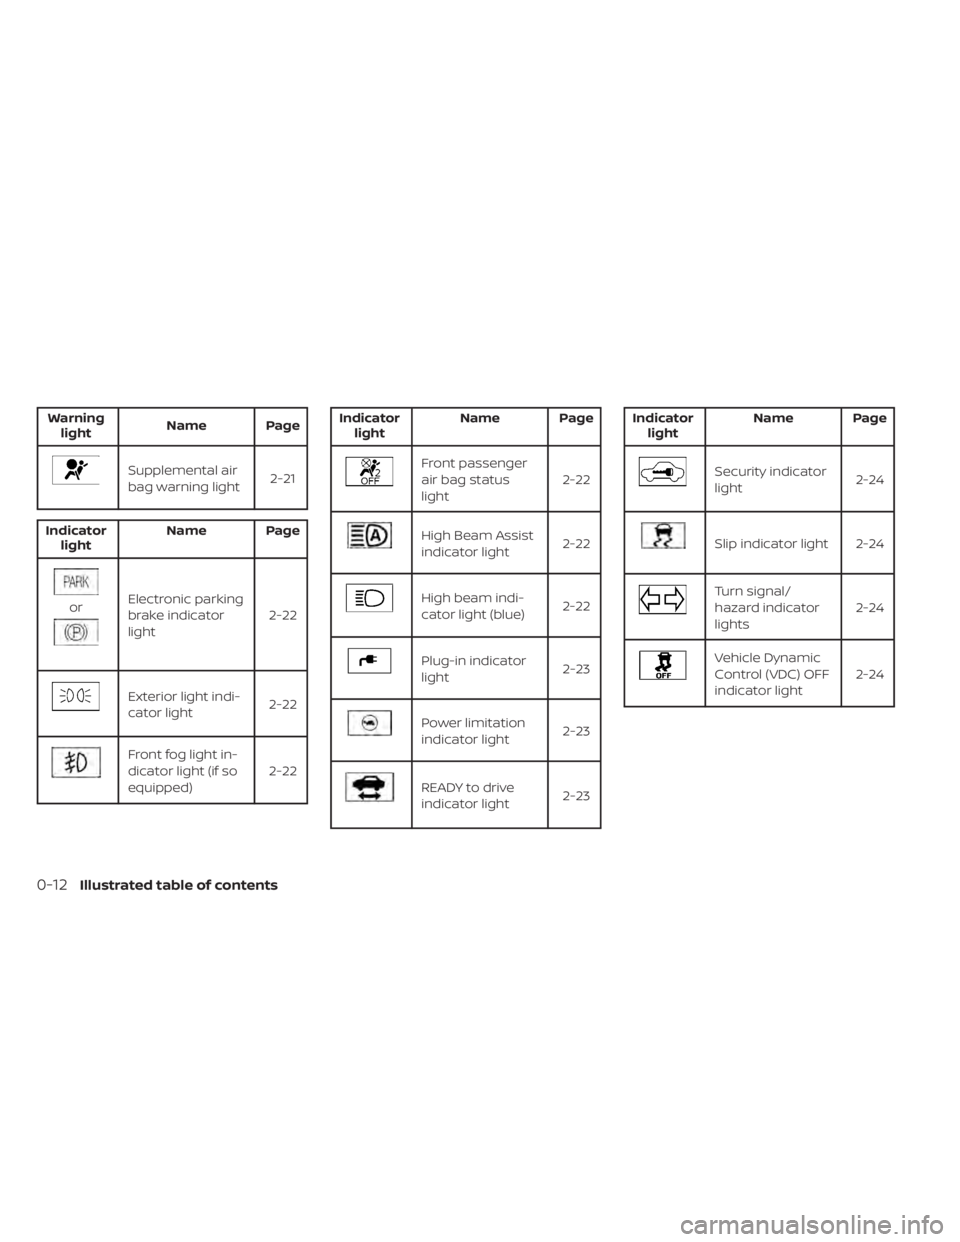
Warninglight Name Page
Supplemental air
bag warning light 2-21
Indicator
light Name Page
orElectronic parking
brake indicator
light 2-22
Exterior light indi-
cator light
2-22
Front fog light in-
dicator light (if so
equipped)2-22
Indicator
light Name Page
Front passenger
air bag status
light 2-22
High Beam Assist
indicator light
2-22
High beam indi-
cator light (blue)2-22
Plug-in indicator
light 2-23
Power limitation
indicator light2-23
READY to drive
indicator light2-23
Indicator
light Name Page
Security indicator
light
2-24
Slip indicator light 2-24
Turn signal/
hazard indicator
lights2-24
Vehicle Dynamic
Control (VDC) OFF
indicator light2-24
0-12Illustrated table of contents
Page 30 of 596
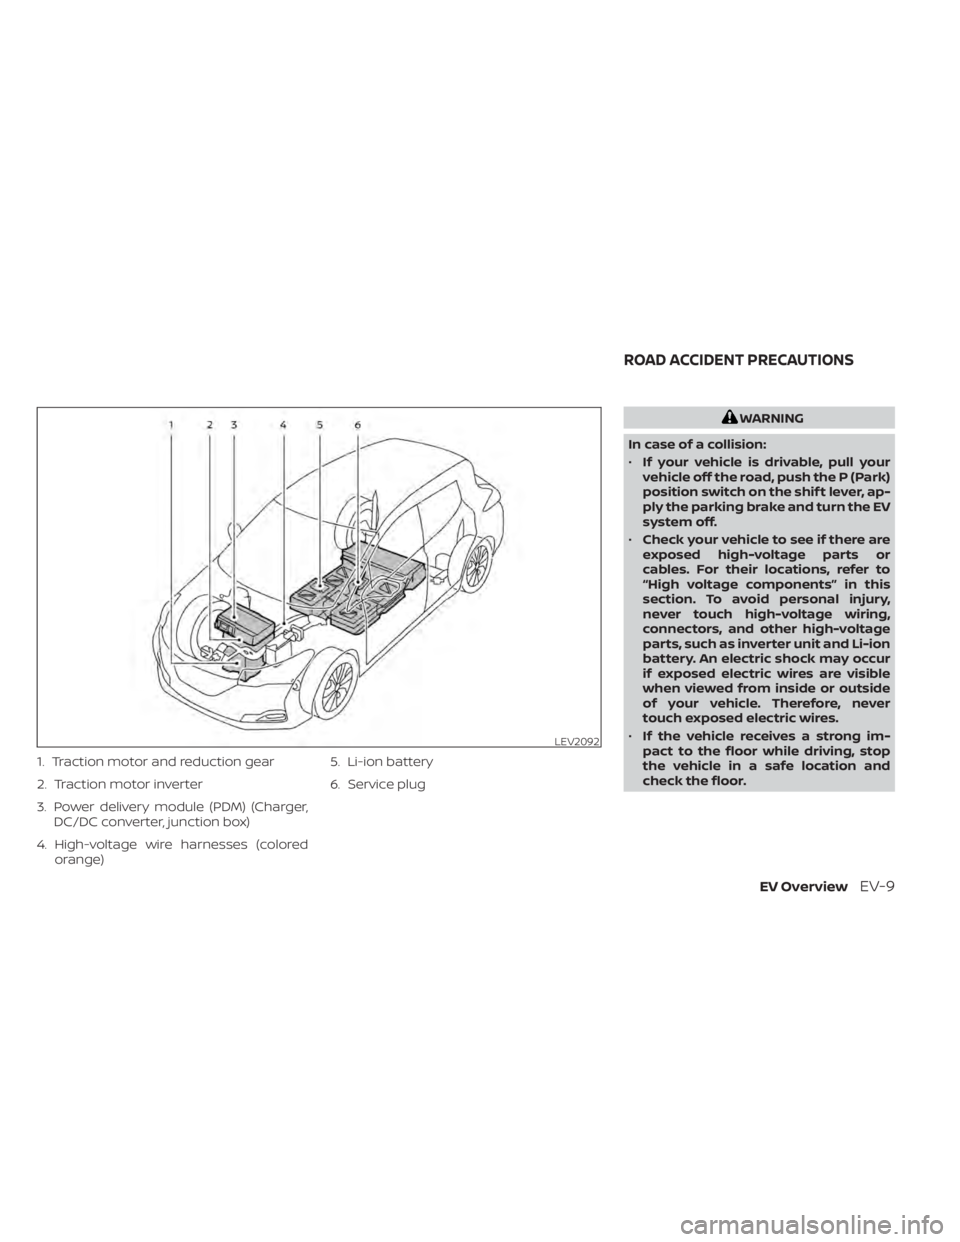
1. Traction motor and reduction gear
2. Traction motor inverter
3. Power delivery module (PDM) (Charger,DC/DC converter, junction box)
4. High-voltage wire harnesses (colored orange) 5. Li-ion battery
6. Service plug
WARNING
In case of a collision:
• If your vehicle is drivable, pull your
vehicle off the road, push the P (Park)
position switch on the shif t lever, ap-
ply the parking brake and turn the EV
system off.
• Check your vehicle to see if there are
exposed high-voltage parts or
cables. For their locations, refer to
“High voltage components” in this
section. To avoid personal injury,
never touch high-voltage wiring,
connectors, and other high-voltage
parts, such as inverter unit and Li-ion
battery. An electric shock may occur
if exposed electric wires are visible
when viewed from inside or outside
of your vehicle. Therefore, never
touch exposed electric wires.
• If the vehicle receives a strong im-
pact to the floor while driving, stop
the vehicle in a safe location and
check the floor.
LEV2092
ROAD ACCIDENT PRECAUTIONS
EV OverviewEV-9
Page 32 of 596
WARNING
• Pay special attention to pedestrians.
Because there is no engine noise, pe-
destrians may not know the vehicle
is approaching, moving or about to
move, and may step into the path of
vehicle travel.
• When leaving the vehicle, be sure to
turn off the EV system.
• Be sure to push the P (Park) position
switch on the shif t lever and apply
the parking brake when parking be-
cause the vehicle can move when the
READY to drive indicator light is ON.
When the READY to drive indicator
light is ON, do not leave your vehicle
in a shif t position other than the P
(Park) position.
• Keep the brake pedal depressed until
you are ready to drive. When the ve-
hicle is in the D (Drive) position, B or R
(Reverse) position, if you release the
brake pedal and do not depress the
accelerator, the vehicle will creep and
may start abruptly. This may cause
serious injury or death.NOTE:
• The vehicle cannot run with a dis- charged Li-ion battery. Repeated ac-
celeration consumes more power from
the Li-ion battery than driving at a
steady speed.
• This vehicle is equipped with a regen- erative brake system. The primary pur-
pose of the regenerative brake system
is to provide some power to recharge
the Li-ion battery and extend driving
range. A secondary benefit is “engine
braking” that operates based on Li-ion
battery conditions.
• In the D (Drive) position, when the ac- celerator pedal is released, the regen-
erative brake system provides some
deceleration.
• When you put the shif t lever in the B mode and take your foot off the accel-
erator pedal, more regenerative brake
is applied than in the D (Drive) position. • Less deceleration is provided by the re-
generative brake system when the Li-
ion battery is fully charged. The regen-
erative brake is automatically reduced
when the Li-ion battery is fully charged
to prevent the Li-ion battery from be-
coming overcharged. The regenerative
brake is also automatically reduced
when the battery temperature is high/
low (indicated by the red/blue zones
on the Li-ion battery temperature
gauge) to prevent Li-ion battery dam-
age.
• The brake pedal should be used to slow or stop the vehicle depending on traffic
or road conditions. The vehicle brakes
are not affected by the regenerative
brake system operation.
NOISE AND VIBRATION
You might experience the following noise
or vibration as a normal characteristic of
this vehicle:
• Traction motor noise from the motorcompartment.
• Water pump and radiator fan noise while charging.
EV CHARACTERISTICS
EV OverviewEV-11
Page 39 of 596
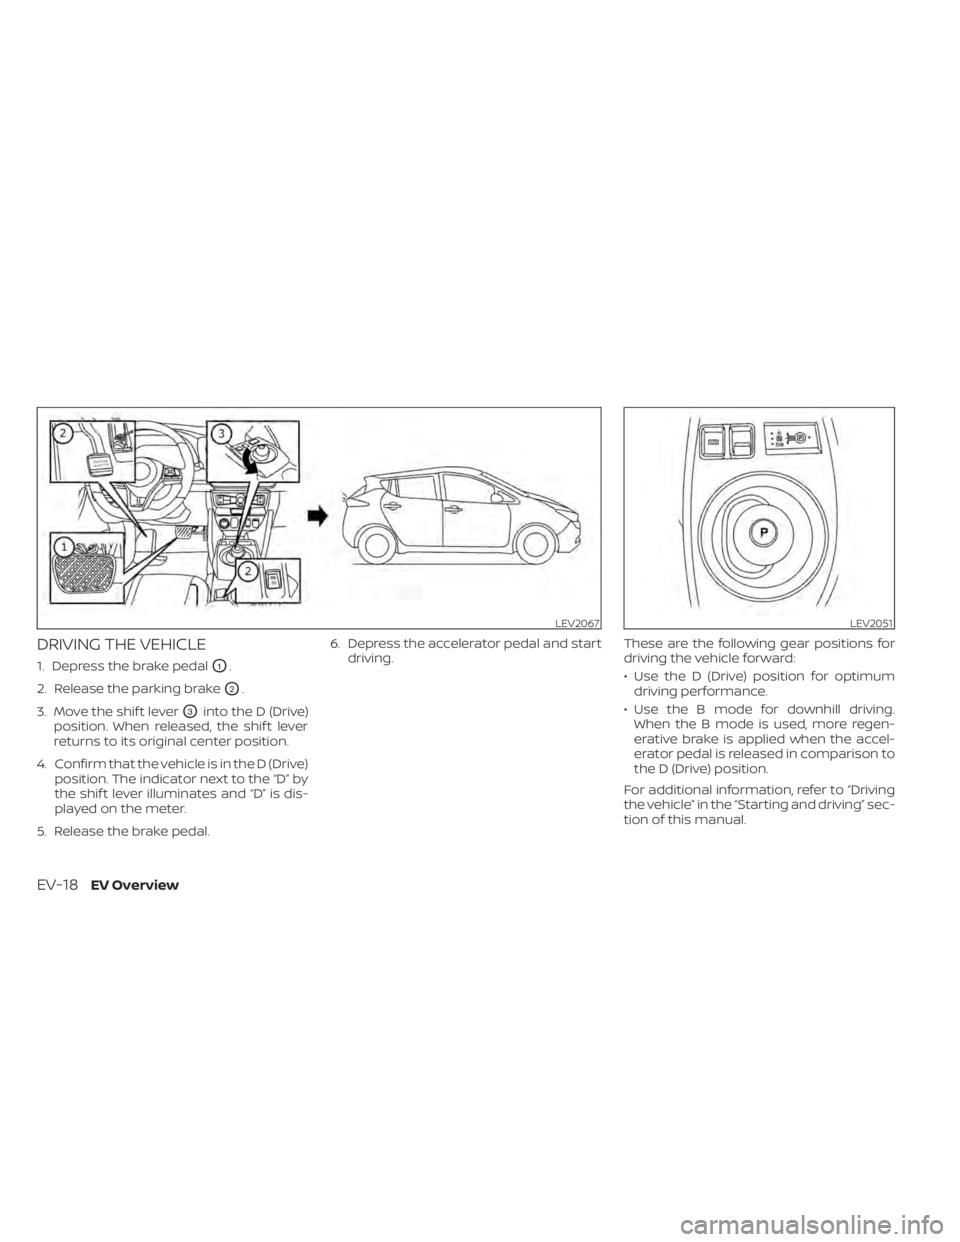
DRIVING THE VEHICLE
1. Depress the brake pedalO1.
2. Release the parking brake
O2.
3. Move the shif t lever
O3into the D (Drive)
position. When released, the shif t lever
returns to its original center position.
4. Confirm that the vehicle is in the D (Drive) position. The indicator next to the “D” by
the shif t lever illuminates and “D” is dis-
played on the meter.
5. Release the brake pedal. 6. Depress the accelerator pedal and start
driving. These are the following gear positions for
driving the vehicle forward:
• Use the D (Drive) position for optimum
driving performance.
• Use the B mode for downhill driving. When the B mode is used, more regen-
erative brake is applied when the accel-
erator pedal is released in comparison to
the D (Drive) position.
For additional information, refer to “Driving
the vehicle” in the “Starting and driving” sec-
tion of this manual.
LEV2067LEV2051
EV-18EV Overview
Page 41 of 596
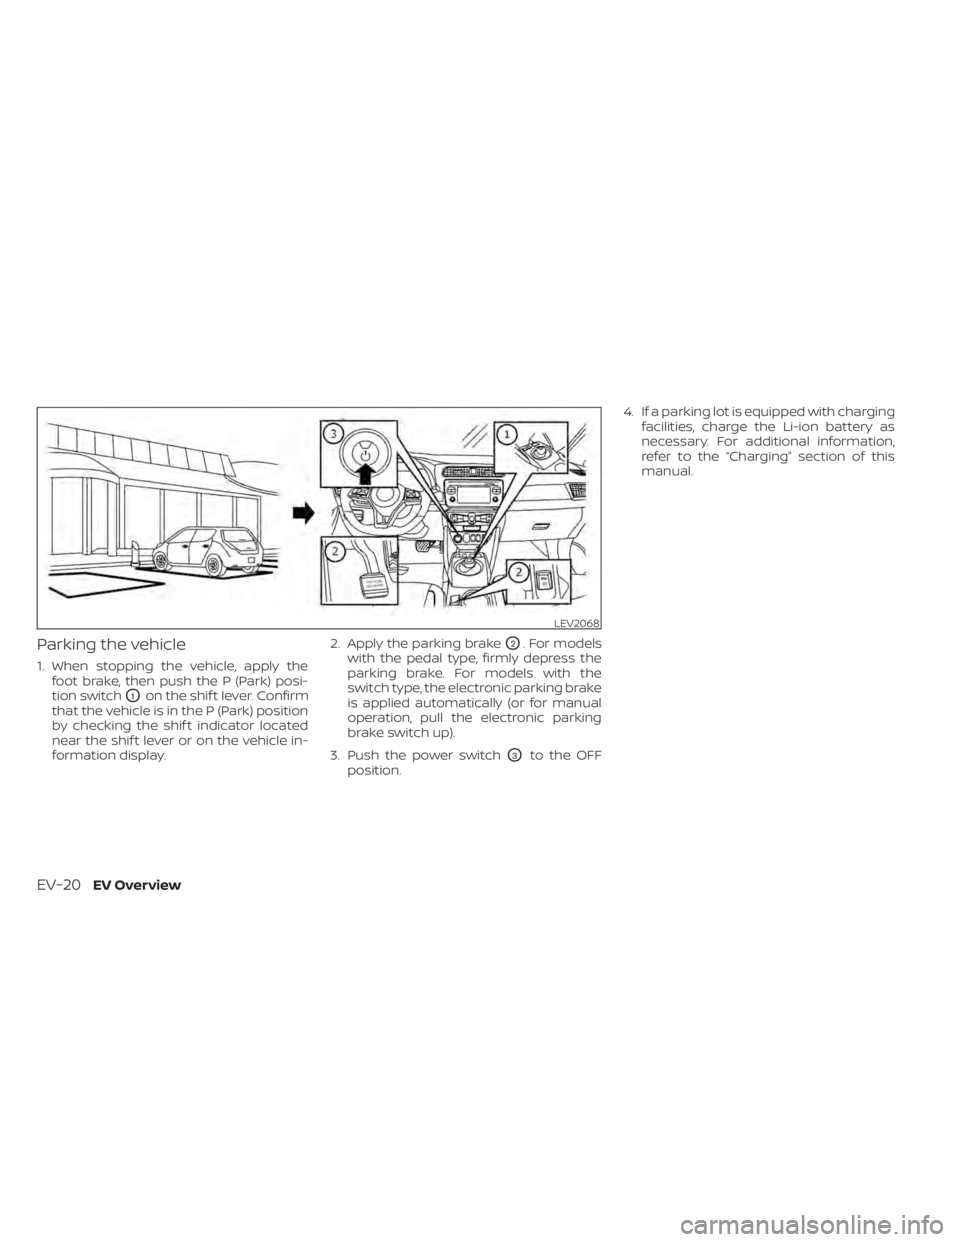
Parking the vehicle
1. When stopping the vehicle, apply thefoot brake, then push the P (Park) posi-
tion switch
O1on the shif t lever. Confirm
that the vehicle is in the P (Park) position
by checking the shif t indicator located
near the shif t lever or on the vehicle in-
formation display. 2. Apply the parking brake
O2. For models
with the pedal type, firmly depress the
parking brake. For models with the
switch type, the electronic parking brake
is applied automatically (or for manual
operation, pull the electronic parking
brake switch up).
3. Push the power switch
O3to the OFF
position. 4. If a parking lot is equipped with charging
facilities, charge the Li-ion battery as
necessary. For additional information,
refer to the “Charging” section of this
manual.
LEV2068
EV-20EV Overview
Page 59 of 596

• Normal charge uses the charging device(AC 220 - 240 volt, 16A or 32A) that can be
installed in your home to charge the Li-
ion battery.
• Immediate charge, charging timer and remote charge (models with Navigation
System) can be performed in the normal
charge mode. For additional information,
refer to “Charging methods” in this sec-
tion.
• The charging equipment communicates with the vehicle before Li-ion battery
charging starts. If this communication
does not occur because other equip-
ment is used, the Li-ion battery will not
charge.
• NISSAN recommends that you connect the charging device when getting out of
the vehicle, even if it is not going to be
used. By doing this, you can get the most
out of the remote climate control (mod-
els with Navigation System) and Climate
Ctrl. Timer functions the next time you
use the vehicle.To start normal charge:
1. Push the P (Park) position switch to place the vehicle in the P (Park) position and
apply the parking brake.
2. When charging the Li-ion battery, place the power switch in the OFF position.
When the power switch is in the ON po-
sition, the Li-ion battery will not start
charging.
3. Open the charge port lid and charge port cap. For additional information, re-
fer to “Charge port lid” and “Charge port
cap” in the “Pre-driving checks and ad-
justments” section of this manual.
4. Connect the charge connector to thecharge port. If it is connected normally, a
beep will sound once.
5. If charging has started or if the battery is waiting for the charging timer, a beep
will sound twice and the charging status
indicator light display will change. For
additional information, refer to “Charg-
ing status indicator lights” in this section.
LCH2104
CH-10Charging
Page 63 of 596

To start trickle charging:
NOTE:
Charging timer, remote charge (models
with navigation system) and immediate
charge can be performed in the trickle
charge mode. For additional informa-
tion, refer to “Charging methods” in this
section.
1. Push the P (Park) position switch to placethe vehicle in the P (Park) position and
apply the parking brake. 2. When charging the Li-ion battery, place
the power switch in the OFF position.
When the power switch is in the ON po-
sition, the Li-ion battery will not start
charging.
3. Open the charge port lid. For additional information, refer to “Charge port lid” in
the “Pre-driving checks and adjust-
ments” section of this manual.
4. Take out the EVSE from the rear hatch. 5. Connect the electrical plug to the AC 110
- 120 volt, 15A dedicated electrical outlet.
If it is connected normally, the green light
on the EVSE control box indicator light
illuminates.
NOTE:You can pass a rope through the holes
OAin the control box in order to hang it
up while the Li-ion battery is charging.
Use the EVSE with the plug in an up-
right position (the cord should extend
down from the outlet).
6. Open the charge port cap. For additional information, refer to “Charge port cap” in
the “Pre-driving checks and adjust-
ments” section of this manual.
LCH2106
CH-14Charging
Page 70 of 596

To start trickle charging:
NOTE:
Charging timer, remote charge (models
with navigation system) and immediate
charge can be performed in the trickle
charge mode. For additional informa-
tion, refer to “Charging methods” in this
section.
1. Push the P (Park) position switch to placethe vehicle in the P (Park) position and
apply the parking brake. 2. When charging the Li-ion battery, place
the power switch in the OFF position.
When the power switch is in the ON po-
sition, the Li-ion battery will not start
charging.
3. Open the charge port lid. For additional information, refer to “Charge port lid” in
the “Pre-driving checks and adjust-
ments” section of this manual.
4. Take out the EVSE from the rear hatch. 5. Connect the electrical plug to the AC 110
- 120 volt, 15A dedicated electrical outlet
using a Genuine NISSAN Adapter. If it is
connected normally, the green light on
the EVSE control box indicator light
illuminates.
LCH2201
ChargingCH-21