hood release NISSAN LEAF 2021 Owner´s Manual
[x] Cancel search | Manufacturer: NISSAN, Model Year: 2021, Model line: LEAF, Model: NISSAN LEAF 2021Pages: 602, PDF Size: 4.22 MB
Page 15 of 602
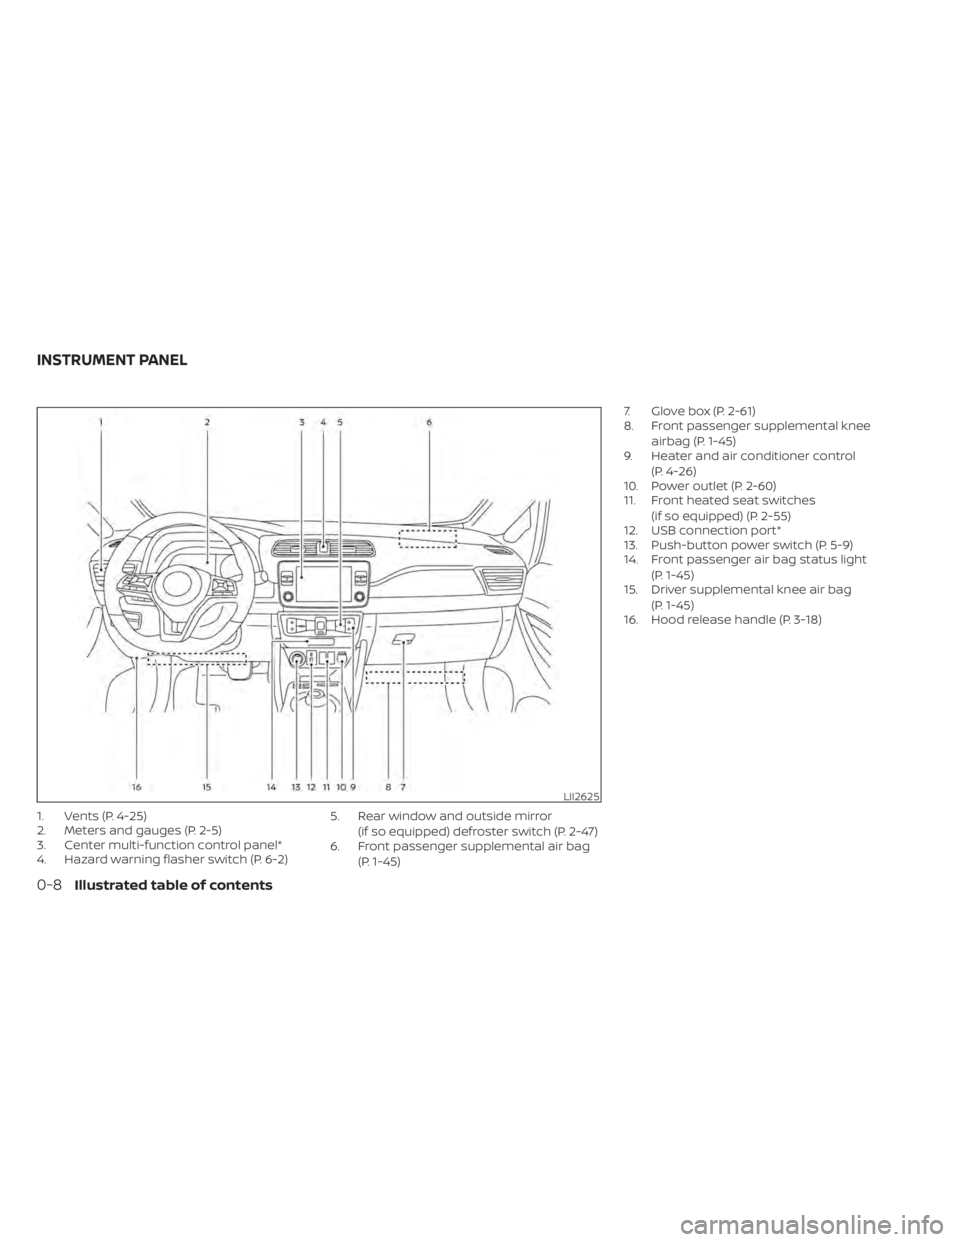
1. Vents (P. 4-25)
2. Meters and gauges (P. 2-5)
3. Center multi-function control panel*
4. Hazard warning flasher switch (P. 6-2)5. Rear window and outside mirror
(if so equipped) defroster switch (P. 2-47)
6. Front passenger supplemental air bag
(P. 1-45) 7. Glove box (P. 2-61)
8. Front passenger supplemental knee
airbag (P. 1-45)
9. Heater and air conditioner control
(P. 4-26)
10. Power outlet (P. 2-60)
11. Front heated seat switches
(if so equipped) (P. 2-55)
12. USB connection port*
13. Push-button power switch (P. 5-9)
14. Front passenger air bag status light
(P. 1-45)
15. Driver supplemental knee air bag
(P. 1-45)
16. Hood release handle (P. 3-18)
LII2625
INSTRUMENT PANEL
0-8Illustrated table of contents
Page 60 of 602
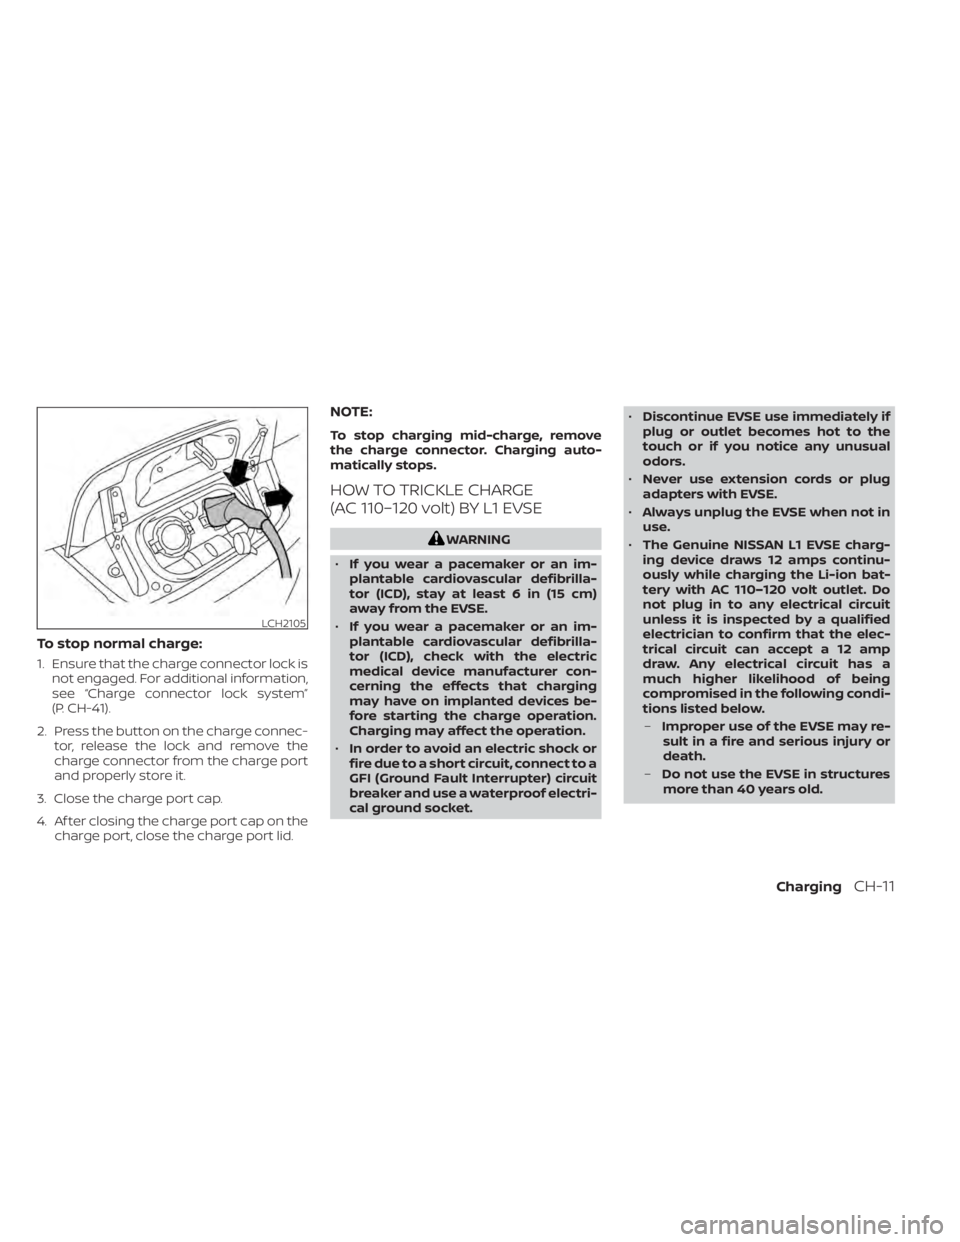
To stop normal charge:
1. Ensure that the charge connector lock isnot engaged. For additional information,
see “Charge connector lock system”
(P. CH-41).
2. Press the button on the charge connec- tor, release the lock and remove the
charge connector from the charge port
and properly store it.
3. Close the charge port cap.
4. Af ter closing the charge port cap on the charge port, close the charge port lid.
NOTE:
To stop charging mid-charge, remove
the charge connector. Charging auto-
matically stops.
HOW TO TRICKLE CHARGE
(AC 110–120 volt) BY L1 EVSE
WARNING
• If you wear a pacemaker or an im-
plantable cardiovascular defibrilla-
tor (ICD), stay at least 6 in (15 cm)
away from the EVSE.
• If you wear a pacemaker or an im-
plantable cardiovascular defibrilla-
tor (ICD), check with the electric
medical device manufacturer con-
cerning the effects that charging
may have on implanted devices be-
fore starting the charge operation.
Charging may affect the operation.
• In order to avoid an electric shock or
fire due to a short circuit, connect to a
GFI (Ground Fault Interrupter) circuit
breaker and use a waterproof electri-
cal ground socket. •
Discontinue EVSE use immediately if
plug or outlet becomes hot to the
touch or if you notice any unusual
odors.
• Never use extension cords or plug
adapters with EVSE.
• Always unplug the EVSE when not in
use.
• The Genuine NISSAN L1 EVSE charg-
ing device draws 12 amps continu-
ously while charging the Li-ion bat-
tery with AC 110–120 volt outlet. Do
not plug in to any electrical circuit
unless it is inspected by a qualified
electrician to confirm that the elec-
trical circuit can accept a 12 amp
draw. Any electrical circuit has a
much higher likelihood of being
compromised in the following condi-
tions listed below.
– Improper use of the EVSE may re-
sult in a fire and serious injury or
death.
– Do not use the EVSE in structures
more than 40 years old.
LCH2105
ChargingCH-11
Page 92 of 602
NOTE:
• Depending on the charging station, thelock mechanism established by local
standards may not be compatible with
your vehicle. It may not be possible for
the charge connector to lock to your
vehicle.
• When the power source is cut off while charging in AUTO mode, the connector
will be continuously locked for 5 min-
utes, then it will be released.
• When timer charging is set with AUTO mode, the connector will not lock until
charging is started.
• When the following system(s) are oper- ated individually or the 12-volt battery
is being charged, the charging connec-
tor lock will not lock:– Climate Ctrl. Timer
– Remote climate control (if so equipped)
– Li-ion battery warmer (if so equipped)
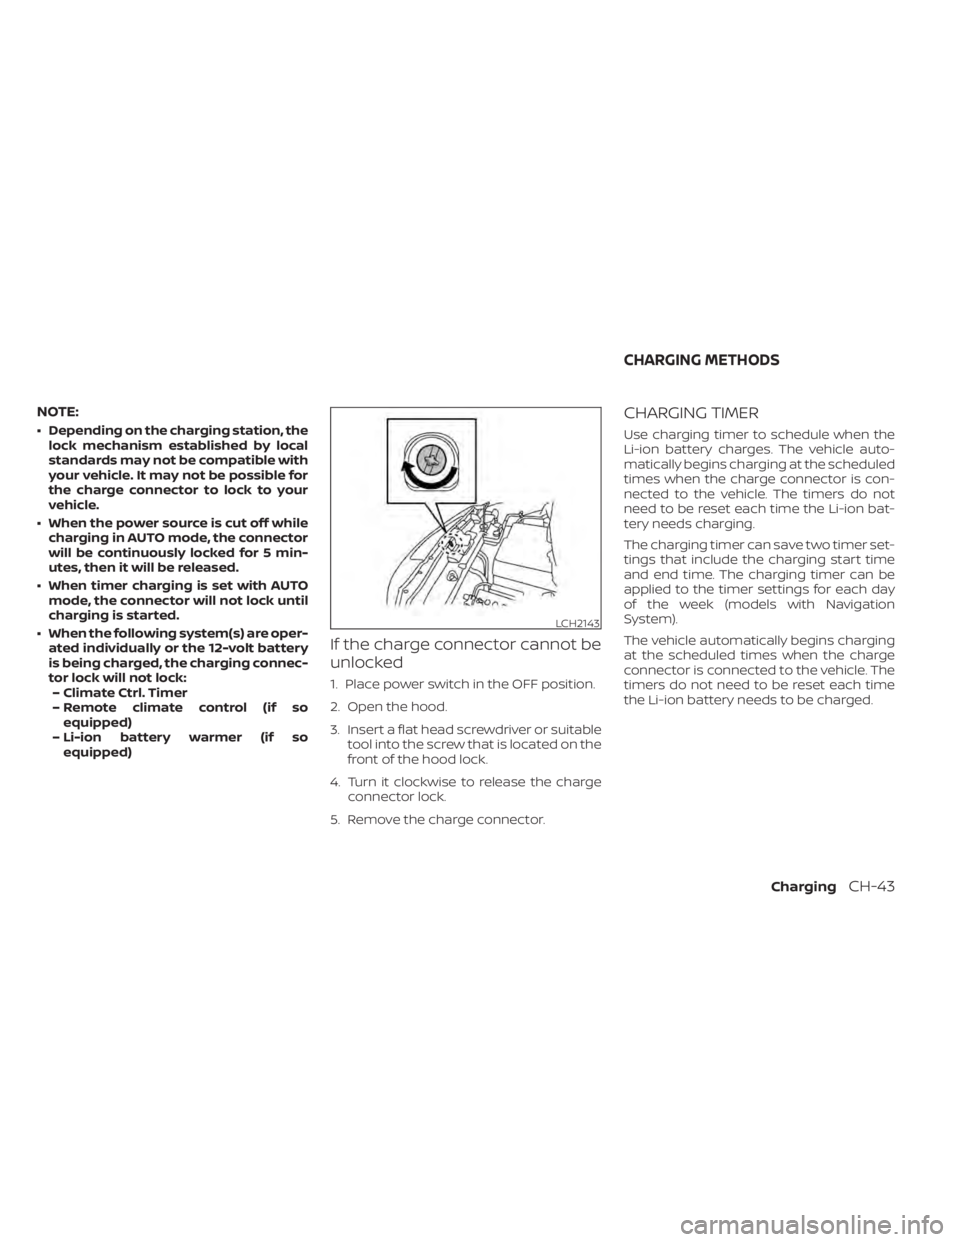
If the charge connector cannot be
unlocked
1. Place power switch in the OFF position.
2. Open the hood.
3. Insert a flat head screwdriver or suitable tool into the screw that is located on the
front of the hood lock.
4. Turn it clockwise to release the charge connector lock.
5. Remove the charge connector.
CHARGING TIMER
Use charging timer to schedule when the
Li-ion battery charges. The vehicle auto-
matically begins charging at the scheduled
times when the charge connector is con-
nected to the vehicle. The timers do not
need to be reset each time the Li-ion bat-
tery needs charging.
The charging timer can save two timer set-
tings that include the charging start time
and end time. The charging timer can be
applied to the timer settings for each day
of the week (models with Navigation
System).
The vehicle automatically begins charging
at the scheduled times when the charge
connector is connected to the vehicle. The
timers do not need to be reset each time
the Li-ion battery needs to be charged.
LCH2143
CHARGING METHODS
ChargingCH-43
Page 181 of 602
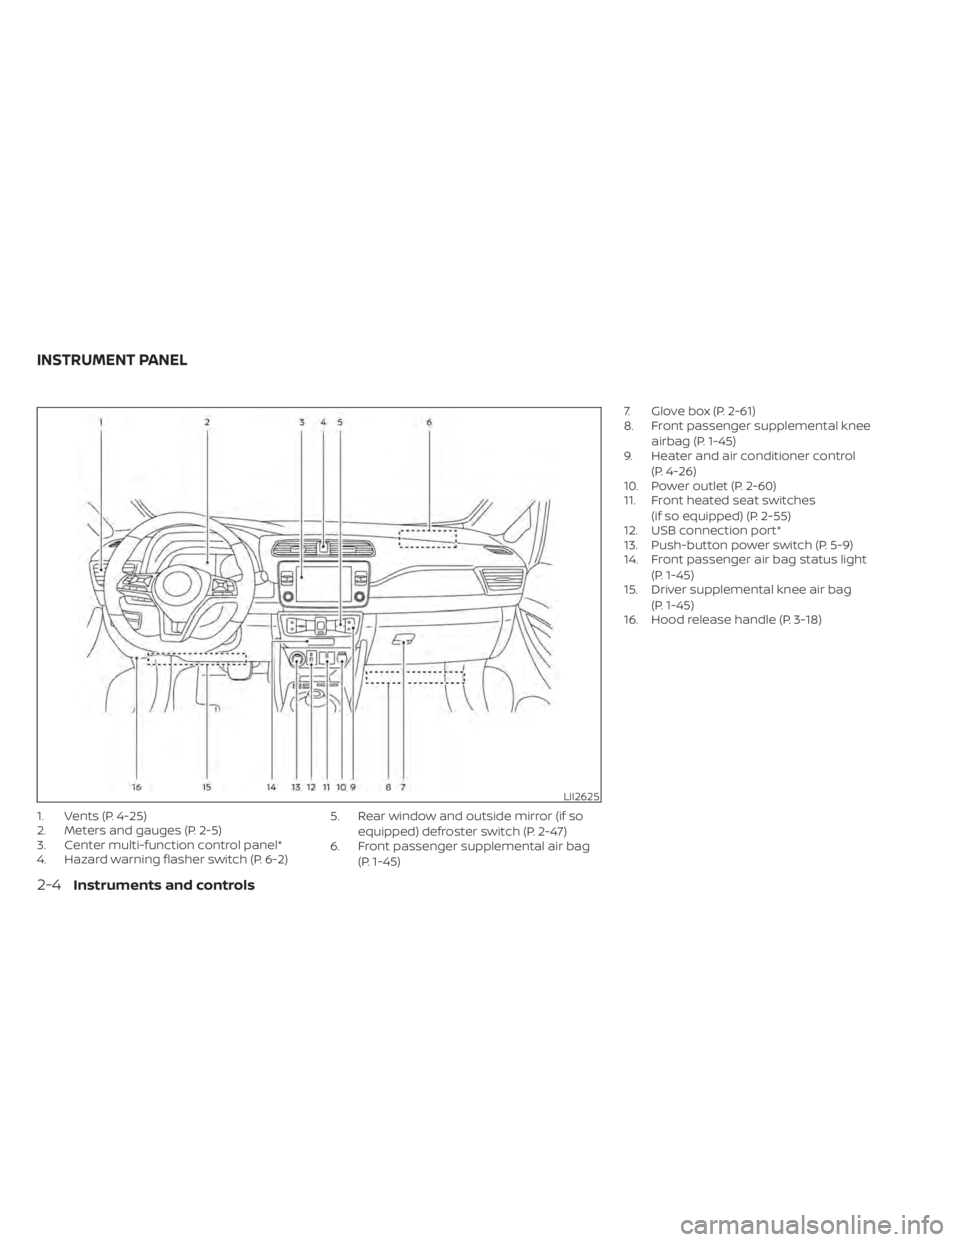
1. Vents (P. 4-25)
2. Meters and gauges (P. 2-5)
3. Center multi-function control panel*
4. Hazard warning flasher switch (P. 6-2)5. Rear window and outside mirror (if so
equipped) defroster switch (P. 2-47)
6. Front passenger supplemental air bag
(P. 1-45) 7. Glove box (P. 2-61)
8. Front passenger supplemental knee
airbag (P. 1-45)
9. Heater and air conditioner control
(P. 4-26)
10. Power outlet (P. 2-60)
11. Front heated seat switches
(if so equipped) (P. 2-55)
12. USB connection port*
13. Push-button power switch (P. 5-9)
14. Front passenger air bag status light
(P. 1-45)
15. Driver supplemental knee air bag
(P. 1-45)
16. Hood release handle (P. 3-18)
LII2625
INSTRUMENT PANEL
2-4Instruments and controls
Page 220 of 602

3. Close all doors. Lock all doors. The doorscan be locked with:
• the LOCK
button on the Intelli-
gent Key
• any request switch
• the power door lock switch
4. Confirm that the security indicator light illuminates. The security indicator light
stays on for about 30 seconds. The ve-
hicle security system is now pre-armed.
Af ter about 30 seconds the vehicle se-
curity system automatically shif ts into
the armed phase. The security light be-
gins to flash once every approximately 3
seconds. If, during this 30-second pre-
arm time period, the door is unlocked, or
the power switch is placed in the ACC or
ON position, the system will not arm.
Even when the driver and/or passengers
are in the vehicle, the system will acti-
vate with all doors locked and the power
switch in the OFF position. When placing
the power switch to the ACC or ON posi-
tion, the system will be released.
Vehicle security system activation
The vehicle security system will give the
following alarm:
• The headlights blink and the horn sounds intermittently.
• The alarm automatically turns off af ter approximately 50 seconds. However, the
alarm reactivates if the vehicle is tam-
pered with again.
The alarm is activated by:
• Unlocking the door without using the In- telligent Key or the request switch. (Even if
the door is opened by releasing the door
inside lock knob, the alarm will activate.)
• Opening the hood.
How to stop an activated alarm
The alarm will stop when a door is un-
locked by pushing the UNLOCKbut-
ton on the Intelligent Key, door handle re-
quest switch, or when the power switch is
pushed in the ACC or ON position.
If the system does not operate as de-
scribed above, have it checked. It is rec-
ommended that you visit a NISSAN certi-
fied LEAF dealer for this service.
NISSAN VEHICLE IMMOBILIZER
SYSTEM
The NISSAN Vehicle Immobilizer System
will not allow the power switch to be placed
in the READY to drive position without the
use of the registered key.
If the power switch fails to place the vehicle
into the READY to drive position using the
registered key, it may be due to interfer-
ence caused by another registered key, an
automated toll road device or automated
payment device on the key ring. Restart the
EV system using the following procedure:
1. Leave the power switch in the ON posi- tion for approximately 5 seconds.
2. Place the power switch in the OFF posi- tion and wait approximately 10 seconds.
3. Repeat step 1 and 2 again.
4. Place the power switch in the READY to drive position while holding the device
(which may have caused the interfer-
ence) separate from the registered key.
If this procedure allows the power
switch to be placed in the READY to drive
mode, NISSAN recommends placing the
registered key on a separate key ring to
avoid interference from other devices.
Instruments and controls2-43
Page 252 of 602
3 Pre-driving checks and adjustments
Keys.............................................3-2NISSAN Intelligent Key® .......................3-2
NISSAN Vehicle Immobilizer System
keys..........................................3-3
Doors ...........................................3-4
Locking with key .............................3-5
Locking with inside lock knob ................3-5
Locking with power door lock switch .........3-6
Automatic door locks ........................3-6
Child safety rear door lock ....................3-6
NISSAN Intelligent Key® system .................. 3-7
Operating range .............................3-8
Door locks/unlocks precaution ...............3-9
NISSAN Intelligent Key® Operation ............3-9
How to use the remote keyless entry
function ..................................... 3-12
12-volt battery saver system ................3-16
Warning signals ............................. 3-16Troubleshooting guide
......................3-16
Hood ........................................... 3-18
Rear hatch ..................................... 3-19
Secondary rear hatch release ...............3-19
Charge port lid ................................. 3-20
Opening charge port lid .....................3-20
Charge port cap ............................ 3-22
Steering wheel ................................. 3-22
Tilt and telescopic operation ................3-23
Sun visors ...................................... 3-23
Vanity mirrors ............................... 3-24
Mirrors ......................................... 3-24
Manual anti-glare rearview mirror
(if so equipped) .............................. 3-24
Automatic anti-glare rearview mirror
(if so equipped) .............................. 3-24
Outside mirrors ............................. 3-25
Page 269 of 602
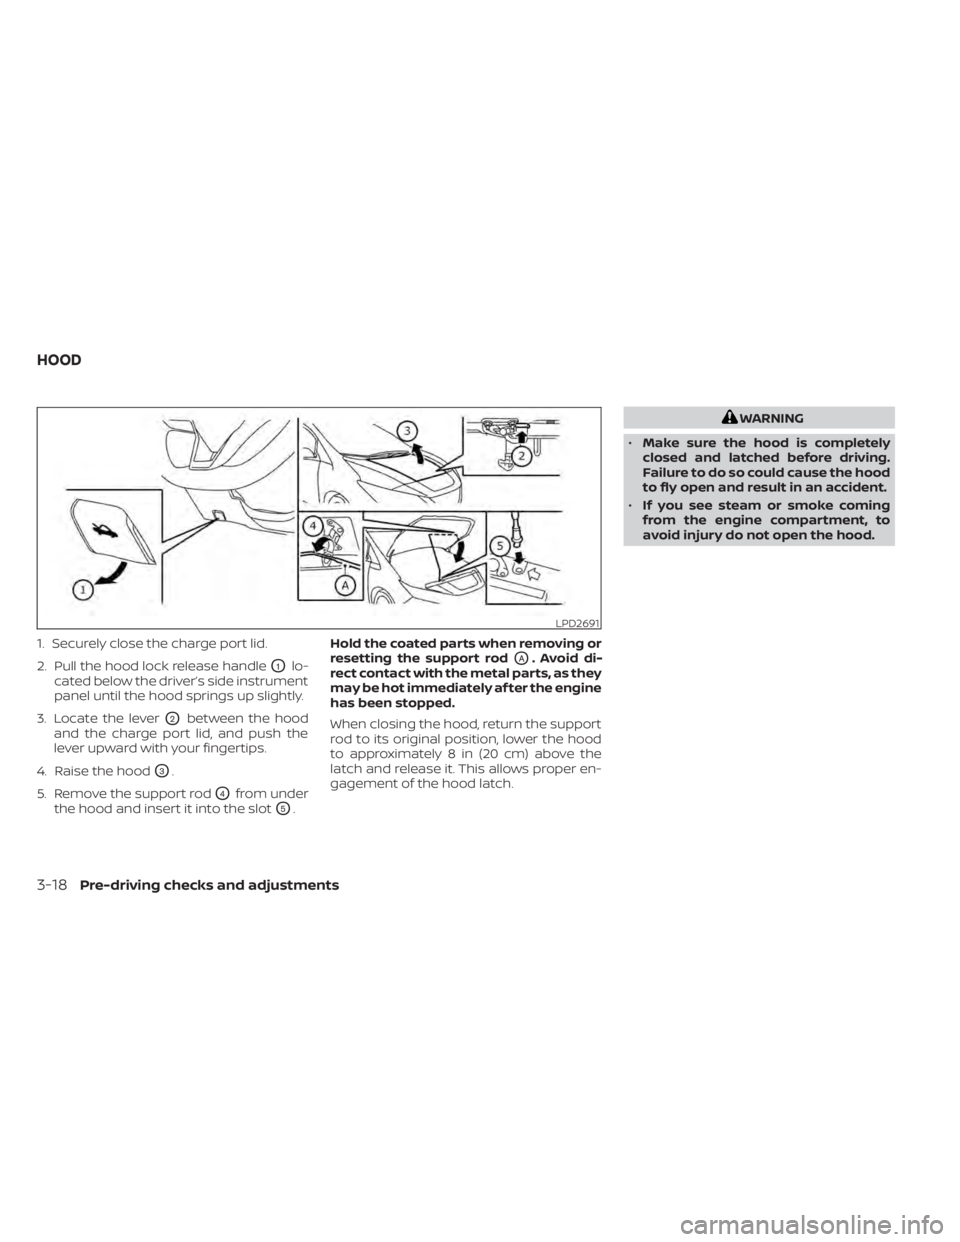
1. Securely close the charge port lid.
2. Pull the hood lock release handle
O1lo-
cated below the driver’s side instrument
panel until the hood springs up slightly.
3. Locate the lever
O2between the hood
and the charge port lid, and push the
lever upward with your fingertips.
4. Raise the hood
O3.
5. Remove the support rod
O4from under
the hood and insert it into the slot
O5. Hold the coated parts when removing or
resetting the support rod
OA. Avoid di-
rect contact with the metal parts, as they
may be hot immediately af ter the engine
has been stopped.
When closing the hood, return the support
rod to its original position, lower the hood
to approximately 8 in (20 cm) above the
latch and release it. This allows proper en-
gagement of the hood latch.
WARNING
• Make sure the hood is completely
closed and latched before driving.
Failure to do so could cause the hood
to fly open and result in an accident.
• If you see steam or smoke coming
from the engine compartment, to
avoid injury do not open the hood.
LPD2691
HOOD
3-18Pre-driving checks and adjustments
Page 478 of 602
Self-test feature
The Anti-lock Braking System (ABS) in-
cludes electronic sensors, electric pumps,
hydraulic solenoids and a computer. The
computer has a built-in diagnostic feature
that tests the system each time you place
the power switch in the READY to drive po-
sition and move the vehicle at a low speed
in forward or reverse. When the self-test
occurs, you may hear a “clunk” noise
and/or feel a pulsation in the brake pedal.
This is normal and does not indicate a mal-
function. If the computer senses a mal-
function, it switches the ABS off and illumi-
nates the ABS warning light on the
instrument panel. The brake system then
operates normally, but without anti-lock
assistance.
If the ABS warning light illuminates during
the self-test or while driving, have the ve-
hicle checked. It is recommended that you
visit a NISSAN certified LEAF dealer for this
service.
Normal operation
The Anti-lock Braking System (ABS) oper-
ates at speeds above 3 to 6 mph (5 to 10
km/h). The speed varies according to road
conditions.When the ABS senses that one or more
wheels are close to locking up, the actuator
rapidly applies and releases hydraulic pres-
sure. This action is similar to pumping the
brakes very quickly. You may feel a pulsa-
tion in the brake pedal and hear a noise
from under the hood or feel a vibration
from the actuator when it is operating. This
is normal and indicates that the ABS is op-
erating properly. However, the pulsation
may indicate that road conditions are haz-
ardous and extra care is required while
driving.
BRAKE ASSIST
When the force applied to the brake pedal
exceeds a certain level, the Brake Assist is
activated generating greater braking force
than a conventional brake booster even
with light pedal force.
WARNING
The Brake Assist is only an aid to assist
braking operation and is not a collision
warning or avoidance device. It is the
drivers responsibility to stay alert, drive
safely and be in control of the vehicle at
all times. The VDC system uses various sensors to
monitor driver inputs and vehicle motion.
Under certain driving conditions, the VDC
system helps to perform the following
functions.
• Controls brake pressure to reduce wheel
slip on one slipping drive wheel so power
is transferred to a drive wheel on the
same axle that is not slipping.
• Controls brake pressure and traction motor output to reduce drive wheel slip
based on vehicle speed (traction control
function).
• Controls brake pressure at individual wheels and traction motor output to help
the driver maintain control of the vehicle
in the following conditions:– Understeer (vehicle tends to not follow the steered path despite increased
steering input).
– Oversteer (vehicle tends to spin due to certain road or driving conditions).
The VDC system can help the driver main-
tain control of the vehicle, but it cannot
prevent loss of vehicle control in all driving
situations.
VEHICLE DYNAMIC CONTROL (VDC)
SYSTEM
Starting and driving5-159
Page 526 of 602
Replacing
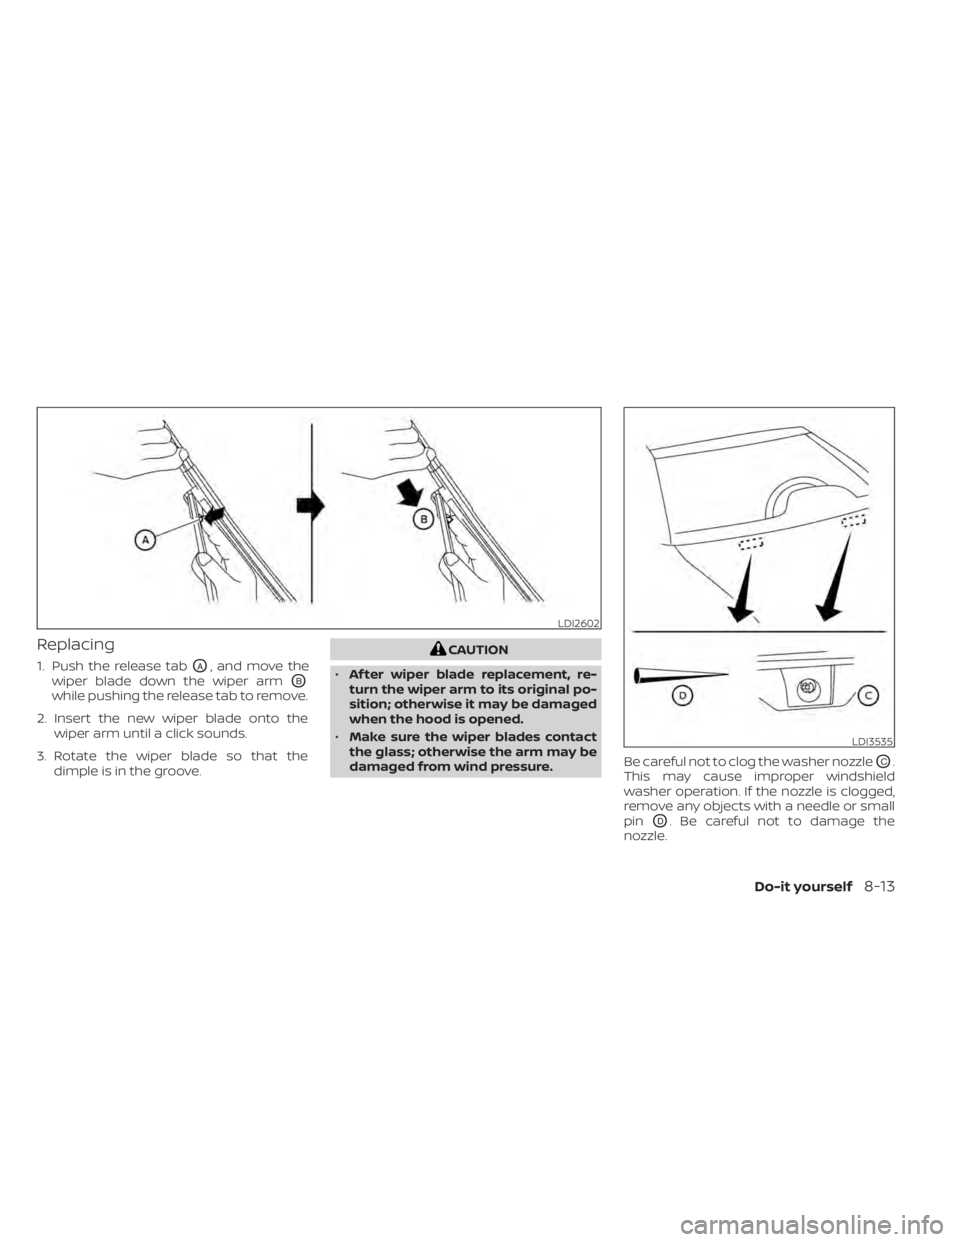
1. Push the release tabOA, and move the
wiper blade down the wiper arm
OB
while pushing the release tab to remove.
2. Insert the new wiper blade onto the wiper arm until a click sounds.
3. Rotate the wiper blade so that the dimple is in the groove.
CAUTION
• Af ter wiper blade replacement, re-
turn the wiper arm to its original po-
sition; otherwise it may be damaged
when the hood is opened.
• Make sure the wiper blades contact
the glass; otherwise the arm may be
damaged from wind pressure. Be careful not to clog the washer nozzle
OC.
This may cause improper windshield
washer operation. If the nozzle is clogged,
remove any objects with a needle or small
pin
OD. Be careful not to damage the
nozzle.
LDI2602
LDI3535
Do-it yourself8-13
Page 554 of 602

Outside the vehicle
The maintenance items listed here should
be performed from time to time, unless
otherwise specified.
Doors and motor hood:
Check that the
doors and motor hood operate properly.
Also ensure that all latches lock securely. Lu-
bricate hinges, latches, latch pins, rollers and
links if necessary. Make sure that the sec-
ondary latch keeps the motor hood from
opening when the primary latch is released.
When driving in areas using road salt or
other corrosive materials, check lubrica-
tion frequently.
Check that the gas stays or struts properly
and securely hold the hood, trunk, or rear
hatch fully open. If the hood, trunk, or rear
hatch is not held open, have the gas stays
or struts replaced.
Lights*: Clean the headlights on a regular
basis. Make sure that the headlights, stop
lights, tail lights, turn signal lights, and other
lights are all operating properly and in-
stalled securely. Also check headlight aim.
Road wheel nuts (lug nuts)*: When check-
ing the tires, make sure no wheel nuts are
missing, and check for any loose wheel
nuts. Tighten if necessary. Tire rotation*:
Rotate tires at the specified
interval shown in the maintenance
schedule.
Tires*: Check the pressure with a gauge
of ten and always prior to long distance
trips. If necessary, adjust the pressure in all
tires, to the pressure specified. Check care-
fully for damage, cuts or excessive wear.
Tire Pressure Monitoring System (TPMS)
transmitter components: Replace the
TPMS transmitter grommet seal, valve core
and cap when the tires are replaced due to
wear or age.
Wheel alignment and balance: If the ve-
hicle pulls to either side while driving on a
straight and level road, or if you detect un-
even or abnormal tire wear, there may be a
need for wheel alignment.
If the steering wheel or seat vibrates at
normal highway speeds, wheel balancing
may be needed.
For additional information regarding tires,
refer to “Important Tire Safety Information”
(US) or “Tire Safety Information” (Canada) in
the Warranty Information Booklet.
Windshield: Clean the windshield on a
regular basis. Check the windshield at least
every six months for cracks or other dam- age. Have a damaged windshield repaired
by a qualified repair facility. It is recom-
mended that you have a damaged wind-
shield repaired by a NISSAN certified LEAF
dealer, or a NISSAN Certified Collision Cen-
ter. To locate a collision center in your area,
refer to http://collision.nissanusa.com.
Windshield wiper blades*:
Check for
cracks or wear if they do not wipe properly.
Inside the vehicle
The maintenance items listed here should
be checked on a regular basis, such as
when performing scheduled maintenance,
cleaning the vehicle, etc.
Accelerator pedal: Check the pedal for
smooth operation and make sure the
pedal does not catch or require uneven
effort. Keep the floor mat away from the
pedal.
Brake pedal: Check the pedal for smooth
operation. If the brake pedal suddenly goes
down further than normal, the pedal feels
spongy or the vehicle seems to take longer
to stop, it is recommended that you visit a
NISSAN certified LEAF dealer immediately.
Keep the floor mat away from the pedal.
Brakes: Check that the brakes do not pull
the vehicle to one side when applied.
Maintenance and schedules9-3