wheel nut NISSAN LEAF 2023 Owners Manual
[x] Cancel search | Manufacturer: NISSAN, Model Year: 2023, Model line: LEAF, Model: NISSAN LEAF 2023Pages: 612, PDF Size: 7.42 MB
Page 98 of 612
For additional information, see “Charge
connector lock system” (P. CH-41).
When the OK button on the steering wheel
is pressed, the display will be switched to
the “EV Settings” menu. In the EV Settings,
the setting of the charging timer, Climate
Ctrl. timer and charge connector lock
mode can be changed. For additional infor-
mation, see “Vehicle information display”
(P. 2-26).
When the
button on the steering
wheel is pressed while the timer display is
shown, the display is switched to the ECO
Drive Report (if the vehicle was driven).
Either display will continue to be displayed
for another 30 seconds when the button is
operated. If the doors are locked af ter the
power switch was placed in the OFF posi-
tion, the display will turn off before the pre-
set time.
For models with Navigation System, the
day of the week is displayed with the time
(hour and minute) in each information
O1–
O3.
In addition to the above, note the following
conditions for the charging time
O1infor-
mation: • The charging time is displayed by the 10
minutes. If the estimated charging time is
longer than 24 hours, “Over 24h” is
displayed.
• When the charging is set to start imme- diately af ter connecting the charge con-
nector to the vehicle, the start time is
displayed as “Charge Now”.
• While being charged, the time when the charging has actually started is displayed
as the start time. The end time is dis-
played according to the estimated
charging time that was calculated based
on the electrical power being supplied.
• For models with Li-ion battery warmer, the charging system calculates the elec-
trical power used by the battery warmer
when the Li-ion battery temperature is
low, and longer charging time will be
displayed.
• When “Chg. Timer Only at HOME” is set to ON (models with Navigation System) in
the EV Settings, the start time is displayed
only when the power switch is placed in
the OFF position at home. If the power
switch is placed in the OFF position other
than at home, the immediate charge
mode is selected and “Charge Now” will
appear as the start time. • When “Full charge has priority” is set to ON
in the EV Settings and the Li-ion battery
cannot be charged to a full level within
the hours between the scheduled start
time and end time of the charging timer,
the charging time shows the time that
exceeds the scheduled hours in the
charging timer.
• If you need to confirm the estimated charging time depending on the avail-
able electrical power (supplied to the
charger), see the Estimated Charge Time
display. For additional information, see
“Meters and gauges” (P. 2-5).
NOTE:
• The displayed end time of charging is an estimation. The Li-ion battery may
not be charged to a full level by the
estimated end time.
• If the charging timer and the Climate Ctrl. timer are set to operate at the
same time, longer charging time will be
displayed or the Li-ion battery may not
be charged to a full level at the sched-
uled end time.
ChargingCH-47
Page 168 of 612
• The child restraint is not properly in-stalled, as outlined in the “Child re-
straints” (P. 1-22) section of this
manual.
• An object weighting over 9.1 lbs. (4 kg) hanging on the seat or placed in the
seatback pocket (if so equipped).
• A child restraint or other object press- ing against the rear or the seatback.
• A rear passenger pushing or pulling on the back of the front passenger seat.
pushing or pulling on the seatback of
the front passenger seat.
• Forcing the front seat or seatback against an object on the seat or floor
behind it.
• An object placed under the front pas- senger seat.
• An object placed between the seat cushion and center console.
If the vehicle is moving, please come to a
stop when it is safe to do so. Check and
correct any of the above conditions. Re-
start the vehicle and wait 1 minute.NOTE:
A system check will be performed during
which the front passenger air bag status
light will remain lit for about 7 seconds
initially.
If the light is still OFF af ter this, the small
adult, child or child restraint should be re-
positioned in the rear seat and the vehicle
should be checked as soon as possible. It is
recommended that you visit a NISSAN cer-
tified LEAF dealer for this service.
3. If the light is OFF with no front passenger and no objects on the front passenger
seat the vehicle should be checked as
soon as possible. It is recommended
that you visit a NISSAN certified LEAF
dealer for this service.
Other supplemental front-impact air
bag precautions
WARNING
• Do not place any objects on the
steering wheel pad or on the instru-
ment panel. Also, do not place any
objects between any occupant and
the steering wheel or instrument
panel. Such objects may become
dangerous projectiles and cause in-
jury if the front air bags inflate.
• Do not place objects with sharp
edges on the seat. Also, do not place
heavy objects on the seat that will
leave permanent impressions in the
seat. Such objects can damage the
seat or occupant classification sen-
sor (weight sensor). This can affect
the operation of the air bag system
and result in serious personal injury.
• Do not use water or acidic cleaners
(hot steam cleaners) on the seat. This
can damage the seat or occupant
classification sensor. This can also
affect the operation of the air bag
system and result in serious personal
injury.
Safety–Seats, seat belts and supplemental restraint system1-59
Page 199 of 612
WARNING
• Radio waves could adversely affect
electric medical equipment. Those
who use a pacemaker should contact
the electric medical equipment
manufacturer for the possible influ-
ences before use.
• If the light does not illuminate when
the power switch is placed in the ON
position, have the vehicle checked. It
is recommended that you visit a
NISSAN certified LEAF dealer as soon
as possible for this service.
• If the light illuminates while driving,
avoid sudden steering maneuvers or
abrupt braking, reduce vehicle
speed, pull off the road to a safe loca-
tion and stop the vehicle as soon as
possible. Driving with under-inflated
tires may permanently damage the
tires and increase the likelihood of
tire failure. Serious vehicle damage
could occur and may lead to an acci-
dent and could result in serious per-
sonal injury or death. Check the tire
pressure for all four tires. Adjust the
tire pressure to the recommended
COLD tire pressure shown on the Tire
and Loading Information label to
turn the low tire pressure warning light OFF. If the light still illuminates
while driving af ter adjusting the tire
pressure, a tire may be flat or the
TPMS may be malfunctioning. If you
have a flat tire, replace it with a re-
placement tire as soon as possible. If
no tire is flat and all tires are properly
inflated, have the vehicle checked. It
is recommended that you visit a
NISSAN certified LEAF dealer for this
service.
• When using a wheel without the
TPMS such as a spare tire, the TPMS
will not function and the low tire
pressure warning light will flash for
approximately 1 minute. The light will
remain on af ter 1 minute. Have the
system checked. It is recommended
that you visit a NISSAN certified LEAF
dealer as soon as possible for tire re-
placement and/or system resetting.
• Replacing tires with those not origi-
nally specified by NISSAN could af-
fect the proper operation of the
TPMS.CAUTION
• The TPMS is not a substitute for the
regular tire pressure check. Be sure
to check the tire pressure regularly.
• If the vehicle is being driven at
speeds of less than 16 mph (25 km/h),
the TPMS may not operate correctly.
• Be sure to install the specified size of
tires to the four wheels correctly.
Master warning light
There are two types of master warning
lights: yellow and red. These lights illumi-
nate if any warning lights or indicator lights
are illuminated or if various vehicle infor-
mation warnings appear in the vehicle in-
formation display.
This light illuminates when a yellow
warning light within the vehicle information
display is illuminated or when a message is
displayed on the vehicle information
display.
2-22Instruments and controls
Page 237 of 612
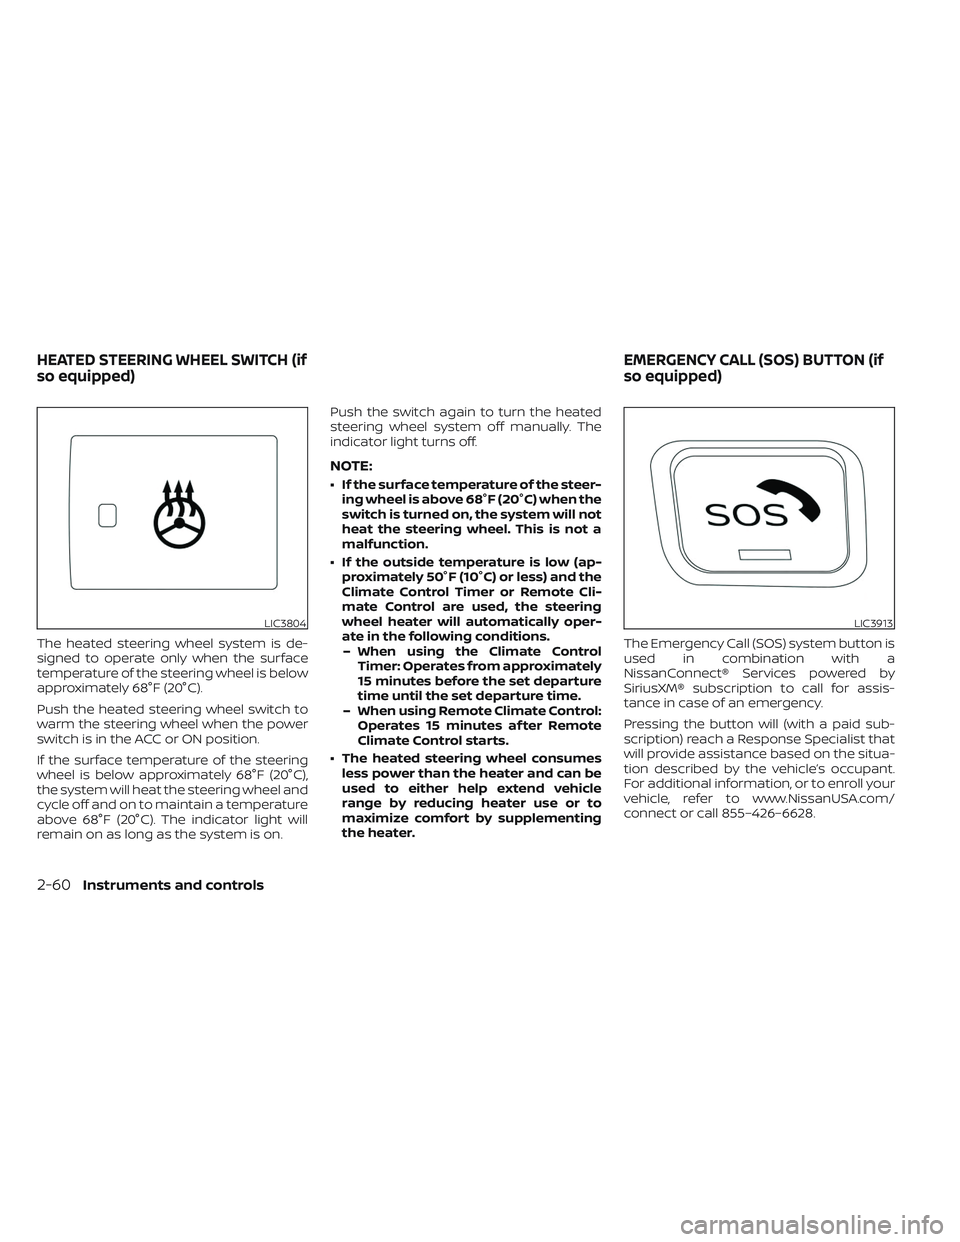
The heated steering wheel system is de-
signed to operate only when the surface
temperature of the steering wheel is below
approximately 68°F (20°C).
Push the heated steering wheel switch to
warm the steering wheel when the power
switch is in the ACC or ON position.
If the surface temperature of the steering
wheel is below approximately 68°F (20°C),
the system will heat the steering wheel and
cycle off and on to maintain a temperature
above 68°F (20°C). The indicator light will
remain on as long as the system is on.Push the switch again to turn the heated
steering wheel system off manually. The
indicator light turns off.
NOTE:
• If the surface temperature of the steer-
ing wheel is above 68°F (20°C) when the
switch is turned on, the system will not
heat the steering wheel. This is not a
malfunction.
• If the outside temperature is low (ap- proximately 50°F (10°C) or less) and the
Climate Control Timer or Remote Cli-
mate Control are used, the steering
wheel heater will automatically oper-
ate in the following conditions.– When using the Climate Control Timer: Operates from approximately
15 minutes before the set departure
time until the set departure time.
– When using Remote Climate Control: Operates 15 minutes af ter Remote
Climate Control starts.
• The heated steering wheel consumes less power than the heater and can be
used to either help extend vehicle
range by reducing heater use or to
maximize comfort by supplementing
the heater. The Emergency Call (SOS) system button is
used in combination with a
NissanConnect® Services powered by
SiriusXM® subscription to call for assis-
tance in case of an emergency.
Pressing the button will (with a paid sub-
scription) reach a Response Specialist that
will provide assistance based on the situa-
tion described by the vehicle’s occupant.
For additional information, or to enroll your
vehicle, refer to www.NissanUSA.com/
connect or call 855–426–6628.
LIC3804LIC3913
HEATED STEERING WHEEL SWITCH (if
so equipped)
EMERGENCY CALL (SOS) BUTTON (if
so equipped)
2-60Instruments and controls
Page 239 of 612
The I-LI system warns the driver with a
warning and a chime, and helps assist the
driver to return the vehicle to the center of
the traveling lane by applying the brakes to
the lef t or right wheels individually (for a
short period of time). For additional infor-
mation, see “Intelligent Lane Intervention
(I-LI)” (P. 5-30) and “Vehicle information dis-
play” (P. 2-26).
The I-BSI system helps alert the driver of
other vehicles in adjacent lanes when
changing lanes, and helps assist the driver
to return the vehicle to the center of the
traveling lane. For additional information,
see “Intelligent Blind Spot Intervention (I-
BSI)” (P. 5-36).The Steering Assist switch is used to en-
able and disable the Steering Assist sys-
tem that is activated using the settings
menu of the vehicle information display.
The Steering Assist system controls the
steering system, when ProPILOT Assist is
engaged, to help keep your vehicle near
the center of the lane when driving. For
additional information, see “ProPILOT As-
sist” (P. 5-92) and “Intelligent Lane Interven-
tion (I-LI)” (P. 5-30).The Rear Door Alert system functions un-
der certain conditions to indicate there
may be an object or passenger in the rear
seat(s). Check the seat(s) before exiting the
vehicle.
The Rear Door Alert system is initially dis-
abled. The driver can enable the system
using the vehicle information display. For
additional information, see “Vehicle infor-
mation display warnings and indicators”
(P. 2-36).
When the system is enabled:
• The system is activated when a rear door
is opened and closed within 10 minutes of
the vehicle being driven. When the driver
door is closed and the system is acti-
vated, a visual message appears in the
vehicle information display. For additional
information, see “Rear Door Alert is acti-
vated” (P. 2-37).
• If a rear door is opened and closed but the vehicle is not driven within approxi-
mately 10 minutes, the system will not be
activated. A rear door must be opened
and closed and the car driven within 10
minutes for the system to activate.
LIC3932
STEERING ASSIST SWITCH (for
models with ProPILOT Assist) (if so
equipped) REAR DOOR ALERT
2-62Instruments and controls
Page 284 of 612
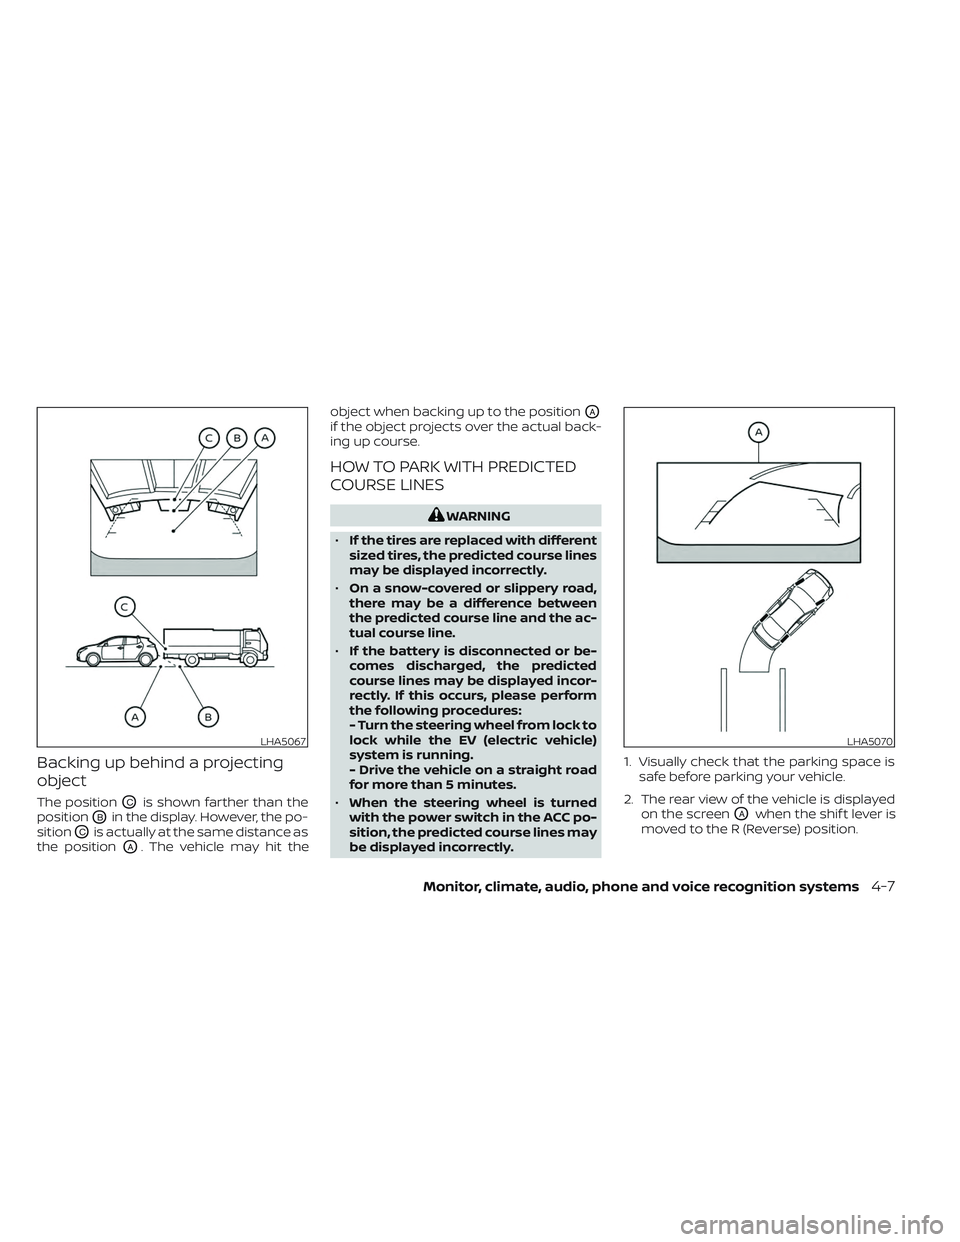
Backing up behind a projecting
object
The positionOCis shown farther than the
position
OBin the display. However, the po-
sition
OCis actually at the same distance as
the position
OA. The vehicle may hit the object when backing up to the position
OA
if the object projects over the actual back-
ing up course.
HOW TO PARK WITH PREDICTED
COURSE LINES
WARNING
• If the tires are replaced with different
sized tires, the predicted course lines
may be displayed incorrectly.
• On a snow-covered or slippery road,
there may be a difference between
the predicted course line and the ac-
tual course line.
• If the battery is disconnected or be-
comes discharged, the predicted
course lines may be displayed incor-
rectly. If this occurs, please perform
the following procedures:
- Turn the steering wheel from lock to
lock while the EV (electric vehicle)
system is running.
- Drive the vehicle on a straight road
for more than 5 minutes.
• When the steering wheel is turned
with the power switch in the ACC po-
sition, the predicted course lines may
be displayed incorrectly. 1. Visually check that the parking space is
safe before parking your vehicle.
2. The rear view of the vehicle is displayed on the screen
OAwhen the shif t lever is
moved to the R (Reverse) position.
LHA5067LHA5070
Monitor, climate, audio, phone and voice recognition systems4-7
Page 294 of 612
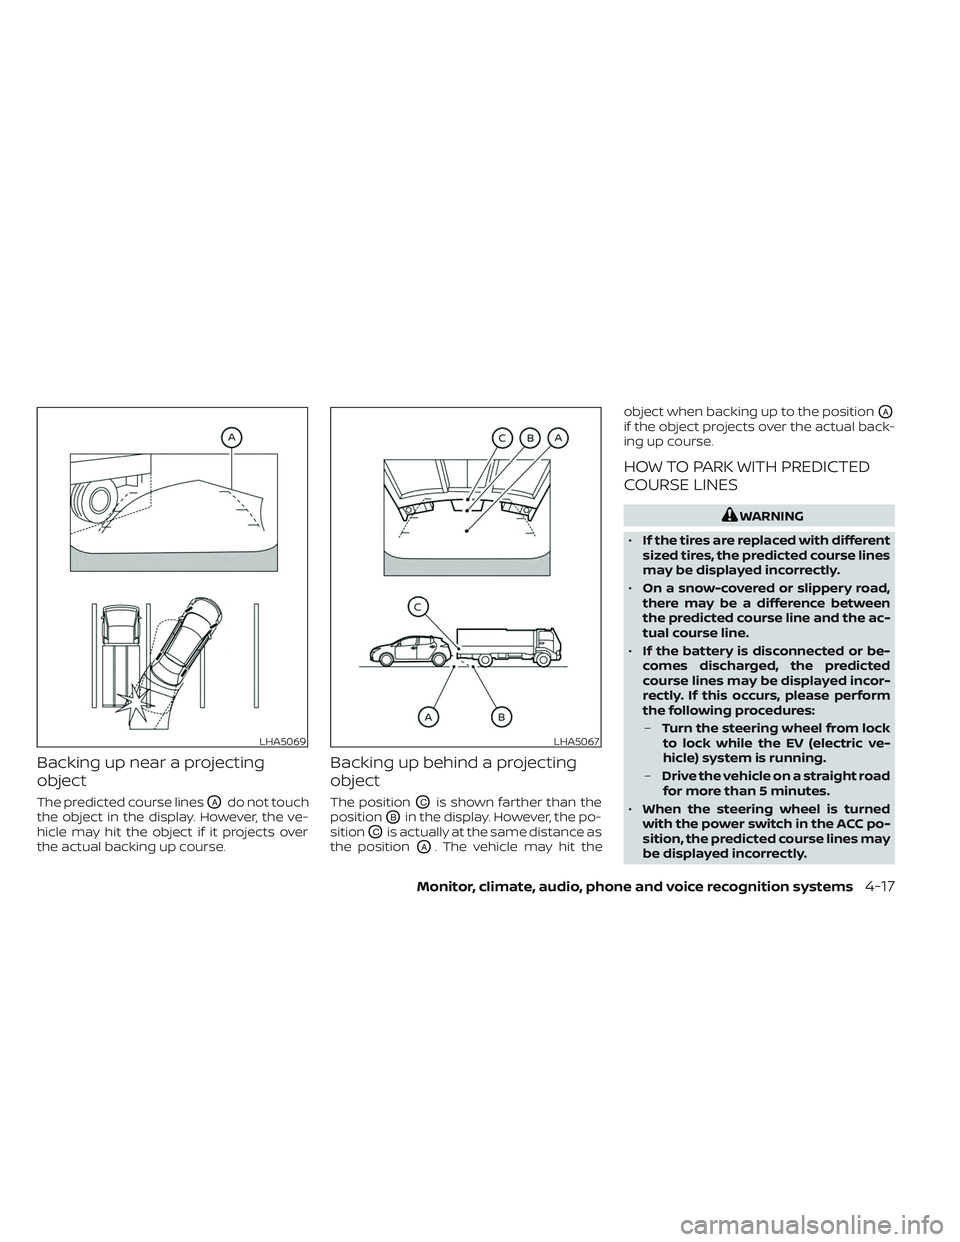
Backing up near a projecting
object
The predicted course linesOAdo not touch
the object in the display. However, the ve-
hicle may hit the object if it projects over
the actual backing up course.
Backing up behind a projecting
object
The positionOCis shown farther than the
position
OBin the display. However, the po-
sition
OCis actually at the same distance as
the position
OA. The vehicle may hit the object when backing up to the position
OA
if the object projects over the actual back-
ing up course.
HOW TO PARK WITH PREDICTED
COURSE LINES
WARNING
• If the tires are replaced with different
sized tires, the predicted course lines
may be displayed incorrectly.
• On a snow-covered or slippery road,
there may be a difference between
the predicted course line and the ac-
tual course line.
• If the battery is disconnected or be-
comes discharged, the predicted
course lines may be displayed incor-
rectly. If this occurs, please perform
the following procedures:
– Turn the steering wheel from lock
to lock while the EV (electric ve-
hicle) system is running.
– Drive the vehicle on a straight road
for more than 5 minutes.
• When the steering wheel is turned
with the power switch in the ACC po-
sition, the predicted course lines may
be displayed incorrectly.
LHA5069LHA5067
Monitor, climate, audio, phone and voice recognition systems4-17
Page 317 of 612
5. Press thebutton to select “De-
parture time” and then press the OK
button.
6. Press the
button to set “Hour”
and then press the OK button.
7. Press the
button to set “Minute”
and then press the OK button. The set-
ting can be changed with an increment
step of 10 minutes.
8. Press the
button to select
“Climate Temperature” and then press
the OK button.
9. Press the
button to set Cli-
mate Temperature and then press the
OK button.
10. * Press the
button to select
"Days" and then press the OK button.
The current day of the week is dis-
played with an underline.
Press the
button to select the
days of the week you wish to activate
the Climate Control system and then
press the OK button. The indicator light
of the selected button will turn on. 11. * Af ter setting the day of the week, press
the Back button and return to the pre-
vious screen.
The set day of the week is lit in white.
12. Af ter the setting is complete, place the power switch in the OFF position, and
then connect the charge connector to
the vehicle.
* models with Navigation System
Info
The Climate Ctrl. Timer does not activate if
the charge connector is not connected to
the vehicle. When the “Battery Operation
OK” is turned on and the charging connec-
tor is not connected to the vehicle, the Cli-
mate Ctrl. Timer will activate for 15 minutes.
When the outside temperature is high, the
interior temperature may not reach the set
temperature within the 15 minutes.
Turn "Battery Operation OK" to OFF when it
is not necessary to operate air condition-
ing timer in order to prevent Li-ion battery
from discharging.
For models without Navigation System, the
Climate Ctrl. Timer operates repeatedly ev-
ery day once it is turned on.
Operating tips for using Climate
Ctrl. Timer
• The Climate Ctrl. Timer will only start when the power switch is in the LOCK/
OFF or ACC position.
• To turn off the Climate Ctrl. Timer func- tion, turn off the “Climate Ctrl. Timer1” and
"Climate Ctrl. Timer2" setting in the video
information display using the
button on the steering wheel. The start
and stop time settings will not be deleted
even if the Climate Ctrl. Timer function is
turned off.
• While the Climate Ctrl. Timer is operating, the Climate Ctrl. Timer indicator and the
charging status indicator lights flash. If
the Climate Ctrl. Timer is set to activate,
the Climate Ctrl. Timer indicator
illuminates.*
• If the Climate Ctrl. Timer starts operating while the vehicle is being charged, the
time required for charging will be longer.
• Operating the Climate Ctrl. Timer or re- mote climate control in an environment
where the temperature is low may de-
crease the rate of battery charge.
4-40Monitor, climate, audio, phone and voice recognition systems
Page 327 of 612
WARNING
• Do not leave children or adults who
would normally require the support
of others alone in your vehicle. Pets
should not be lef t alone either. They
could accidentally injure themselves
or others through inadvertent opera-
tion of the vehicle. Also, on hot, sunny
days, temperatures in a closed ve-
hicle could quickly become high
enough to cause severe or possibly
fatal injuries to people or animals.
• Properly secure all cargo with ropes
or straps to help prevent it from slid-
ing or shif ting. Do not place cargo
higher than the seatbacks. In a sud-
den stop or collision, unsecured
cargo could cause personal injury.
TIRE PRESSURE MONITORING
SYSTEM (TPMS)
Each tire, including the spare (if provided),
should be checked monthly when cold and
inflated to the inflation pressure recom-
mended by the vehicle manufacturer on
the vehicle placard or tire inflation pressure
label. (If your vehicle has tires of a different
size than the size indicated on the vehicle
placard or tire inflation pressure label, you should determine the proper tire inflation
pressure for those tires.)
As an added safety feature, your vehicle
has been equipped with a Tire Pressure
Monitoring System (TPMS) that illuminates
a low tire pressure telltale when one or
more of your tires is significantly under-
inflated. Accordingly, when the low tire
pressure telltale illuminates, you should
stop and check your tires as soon as pos-
sible, and inflate them to the proper pres-
sure. Driving on a significantly under-
inflated tire causes the tire to overheat and
can lead to tire failure. Under-inflation also
reduces power efficiency and tire tread life,
and may affect the vehicle’s handling and
stopping ability.
Please note that the TPMS is not a substi-
tute for proper tire maintenance, and it is
the driver’s responsibility to maintain cor-
rect tire pressure, even if under-inflation
has not reached the level to trigger illumi-
nation of the TPMS low tire pressure telltale.
Your vehicle has also been equipped with a
TPMS malfunction indicator to indicate
when the system is not operating properly.
The TPMS malfunction indicator is com-
bined with the low tire pressure telltale.
When the system detects a malfunction,
the telltale will flash for approximately oneminute and then remain continuously illu-
minated. This sequence will continue upon
subsequent vehicle start-ups as long as
the malfunction exists. When the malfunc-
tion indicator is illuminated, the system
may not be able to detect or signal low tire
pressure as intended. TPMS malfunctions
may occur for a variety of reasons, includ-
ing the installation of replacement or alter-
nate tires or wheels on the vehicle that
prevent the TPMS from functioning prop-
erly. Always check the TPMS malfunction
telltale af ter replacing one or more tires or
wheels on your vehicle to ensure that the
replacement or alternate tires and wheels
allow the TPMS to continue to function
properly.
Additional information
• When using a wheel without the TPMS
such as the spare tire, the TPMS does not
monitor the tire pressure of the spare tire.
• The TPMS will activate only when the ve- hicle is driven at speeds above 16 mph (25
km/h). Also, this system may not detect a
sudden drop in tire pressure (for example,
a flat tire while driving).
PRECAUTIONS WHEN STARTING AND
DRIVING
5-4Starting and driving
Page 329 of 612
•When using a wheel without the
TPMS such as the spare tire, the TPMS
will not function and the low tire
pressure warning light will flash for
approximately 1 minute. The light will
remain on af ter 1 minute. Have your
tires replaced and/or TPMS system
reset as soon as possible. It is recom-
mended that you visit a NISSAN cer-
tified LEAF dealer for this service.
• Replacing tires with those not origi-
nally specified by NISSAN could af-
fect the proper operation of the
TPMS.
• Do not inject any tire liquid or aerosol
tire sealant into the tires, as this may
cause a malfunction of the tire pres-
sure sensors.
CAUTION
• The TPMS may not function properly
when the wheels are equipped with
tire chains or the wheels are buried in
snow. •
Do not place metalized film or any
metal parts (antenna, etc.) on the
windows. This may cause poor re-
ception of the signals from the tire
pressure sensors, and the TPMS will
not function properly.
Some devices and transmitters may tem-
porarily interfere with the operation of the
TPMS and cause the low tire pressure
warning light to illuminate. Some examples
are:
• Facilities or electric devices using similar radio frequencies that are near the
vehicle.
• If a transmitter set to similar frequencies is being used in or near the vehicle.
• If a computer (or similar equipment) or a DC/AC converter is being used in or near
the vehicle.
The low tire pressure warning light may
illuminate in the following cases:
• If the vehicle is equipped with a wheel and tire without TPMS.
• If the TPMS has been replaced and the ID has not been registered.
• If the wheel is not originally specified by NISSAN. FCC Notice:
For USA:
This device complies with Part 15 of the
FCC Rules. Operation is subject to the fol-
lowing two conditions: (1) This device
may not cause harmful interference, and
(2) this device must accept any interfer-
ence received, including interference
that may cause undesired operation.
NOTE:
Changes or modifications not expressly
approved by the party responsible for
compliance could void the user’s author-
ity to operate the equipment.
For Canada:
This device contains licence-exempt
transmitter(s)/receiver(s) that comply
with Innovation, Science and Economic
Development Canada’s licence exempt
RSS(s). Operation is subject to the fol-
lowing two conditions: (1) this device
may not cause interference, and (2) this
device must accept any interference, in-
cluding interference that may cause un-
desired operation of the device.
5-6Starting and driving