key NISSAN MAXIMA 1998 A32 / 4.G Owner's Manual
[x] Cancel search | Manufacturer: NISSAN, Model Year: 1998, Model line: MAXIMA, Model: NISSAN MAXIMA 1998 A32 / 4.GPages: 231, PDF Size: 1.94 MB
Page 81 of 231

It is possible to lock/unlock all doors, to open
the driver's and front passenger's windows, to
release the trunk lid and to turn on or off the
interior light by using the remote controller
from outside the car.
Be sure to remove the key from the vehicle
before locking the doors and leaving it.
The remote controller can operate at a dis-
tance of approximately 49 ft (15 m) from the
vehicle. (The effective distance depends upon
the conditions around the vehicle.)
As many as four remote controllers can be
used with one vehicle. For information con-
cerning the purchase and use of additional
remote controllers, contact your NISSAN
dealer.Listed below are conditions or occur-
rences which will damage the remote
controller.
IDo not allow the remote controller to
become wet.
IDo not drop the remote controller.
IDo not strike the remote controller
sharply against another object.
IDo not place the remote controller foran extended period in an area where
temperatures exceed 140ÉF (60ÉC).
HOW TO USE MULTI-REMOTE
CONTROL SYSTEM
Locking doors1. Remove the ignition key.
2. Close all of the doors.
3. Push the
button on the multi-remote
controller.
4. The hazard indicators flash twice.
5. All of the doors lock.
When the
button is pushed with all doors
locked, the hazard indicator flashes twice as a
reminder that the doors are already locked.
Unlocking doors1. Push the
button on the multi-remote
controller. Only the driver side door un-
locks.
2. Push thebutton on the multi-remote
controller again within 5 seconds. The pas-
senger doors unlock.
3. The interior light will stay on for 30 secondswhen the interior light switch is in the center
qposition.
The interior light can be turned off without
waiting for 30 seconds by inserting the key into
the ignition or locking the doors with the multi-
remote controller or by pushing the interior
light button to OFF.
Opening the driver's and front
passenger's windows1. Push the
button on the multi-remote
controller for longer than 1.5 seconds after
the driver's door is unlocked.
2. The driver's and front passenger's windows
open.
The driver's and front passenger's windows
also open after all doors are unlocked with
the multi-remote controller.
The driver's and front passenger's win-
dows cannot be closed by using the
multi-remote controller.
3-6
Pre-driving checks and adjustments
Z
01.1.31/A32-D
X
Page 82 of 231

Releasing the trunk lid1. Push the
button on the multi-remote
controller for longer than 0.5 second.
2. The trunk lid opens.
The trunk lid will not open when the trunk lid
cancel lever is in the CANCEL position.
It can be opened only with the key.
See ªTrunk lidº later in this section for cancel
lever.
Using the panic alarmIf you are near your vehicle and feel threat-
ened, you may activate the panic alarm to call
attention as follows:
1. Push the
button on the multi-remote
controller for longer than 1.5 seconds.
2. The panic alarm and headlight will stay on
for 30 seconds.
3. The panic alarm stops when:
IIt has run for 30 seconds, or
ITheor the
button is pressed,
orIThe
button is pushed for longer
than 1.5 seconds on the multi-remote
controller.
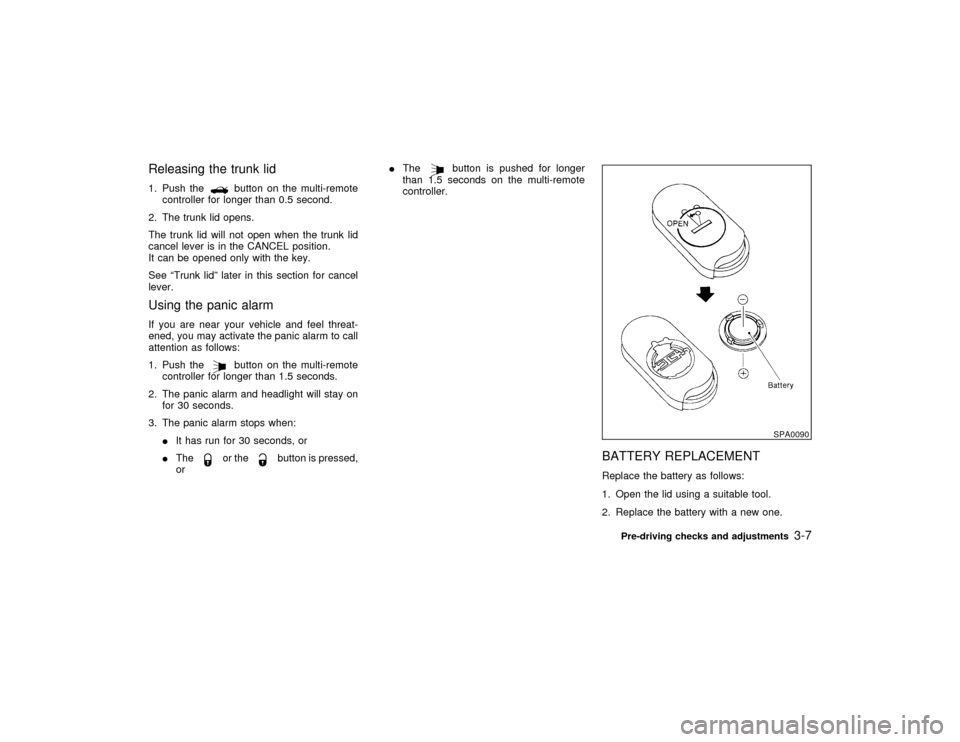
BATTERY REPLACEMENTReplace the battery as follows:
1. Open the lid using a suitable tool.
2. Replace the battery with a new one.
SPA0090
Pre-driving checks and adjustments
3-7
Z
01.1.31/A32-D
X
Page 85 of 231

OPENER OPERATIONType A:
The trunk lid release lever is located on the
outside of the driver's seat. To open the trunk
lid, pull up the trunk lid release lever. To close,push the trunk lid down securely.
Type B:
The trunk lid release button is located under
the driver's arm rest.
To open the trunk lid, push the release button.
To close, push the trunk lid down securely.
Cancel leverWhen the lever is in the cancel position, the
trunk lid cannot be opened with the trunk lid
release lever or handle. It can be opened only
with the key.
SPA0093
SPA0095
3-10
Pre-driving checks and adjustments
Z
01.1.31/A32-D
X
Page 86 of 231

KEY OPERATIONTo open the trunk lid, turn the key clockwise.
To close, lower and push the trunk lid down
securely.
OPENER OPERATIONType A:
To open the fuel filler lid, pull the opener lever.
To lock, close the fuel filler lid securely.
Type B:
To open the fuel filler lid, push the opener lever
down. To lock, close the fuel filler lid securely.
SPA0094
SPA0096
FUEL FILLER LID
Pre-driving checks and adjustments
3-11
Z
01.1.31/A32-D
X
Page 101 of 231

The air conditioning system in your NISSAN
vehicle is charged with a refrigerant designed
with the environment in mind.This refrigerant
will not harm the earth's ozone layer.How-
ever, special charging equipment and lubricant
are required when servicing your NISSAN air
conditioner. Using improper refrigerants or lu-
bricants will cause severe damage to your air
conditioning system. See ªCapacities and rec-
ommended fuel/lubricantsº in the ª10. Techni-
cal and consumer informationº section for air
conditioning system refrigerant and lubricant
recommendations.
Your NISSAN dealer will be able to service
your environmentally friendly air conditioning
system.The air conditioner system contains re-
frigerant under high pressure. To avoid
personal injury, any air conditioner ser-
vice should be done only by an experi-
enced technician with proper
equipment.
RADIOTo turn the radio on, turn the ignition key to
ACC or ON. If you listen to the radio with the
engine not running, turn the key to the ACC
position.
Radio reception is affected by station signal
strength, distance from radio transmitter, build-
ings, bridges, mountains and other external
influences. Intermittent changes in reception
quality normally are caused by these external
influences.
SERVICING AIR CONDITIONER AUDIO SYSTEM4-12
Heater, air conditioner and audio systems
Z
01.1.31/A32-D
X
Page 102 of 231

FM-AM RADIO WITH CASSETTE
PLAYER
Audio main operationPower/Volume control:
Turn the ignition key to ACC or ON, then push
the Power/Volume control knob. The mode
(radio or cassette) which was playing immedi-
ately before the system was turned off re-
sumes playing. When no cassette is loaded,
the radio comes on. Pushing the
Power/Volume control knob again turns the
system off.
Turn the Power/Volume control knob to adjust
the volume.
SAA0263
Heater, air conditioner and audio systems
4-13
Z
01.1.31/A32-D
X
Page 104 of 231

station is reached, the radio continues in the
SEEK mode at the lowest broadcast station.
Push the SEEK/SCAN tuning button
or
for more than 1.5 seconds. SCAN illu-
minates in the display window. SCAN tuning
begins from high to low or low to high frequen-
cies and stops at each broadcasting station for
5 seconds. Pushing the button again during
this 5 second period stops SCAN tuning and
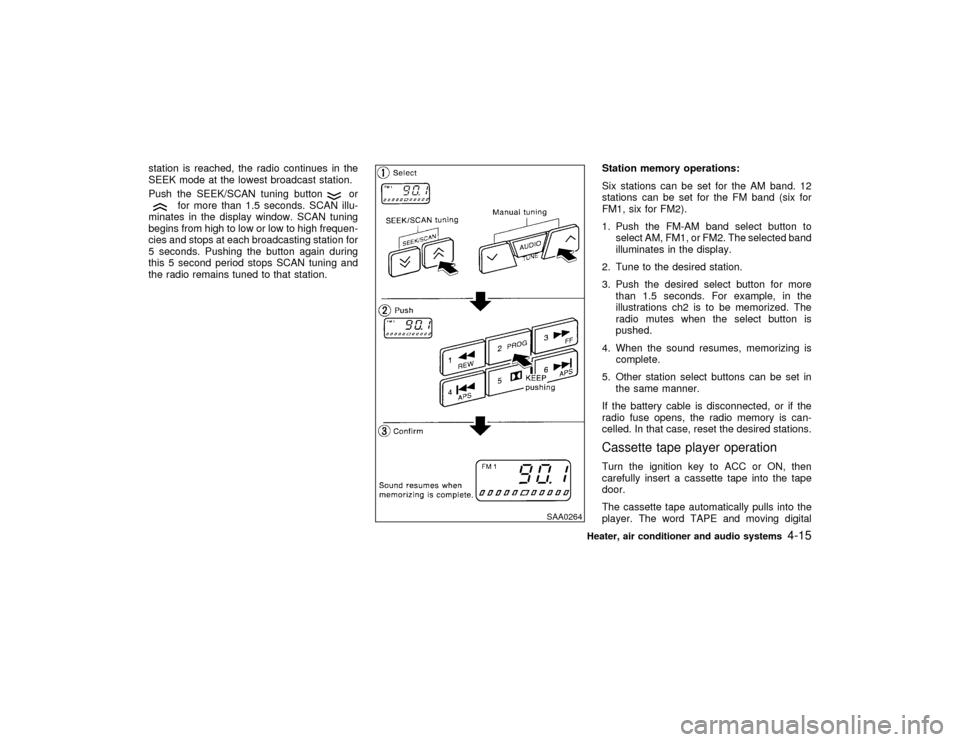
the radio remains tuned to that station.Station memory operations:
Six stations can be set for the AM band. 12
stations can be set for the FM band (six for
FM1, six for FM2).
1. Push the FM-AM band select button to
select AM, FM1, or FM2. The selected band
illuminates in the display.
2. Tune to the desired station.
3. Push the desired select button for more
than 1.5 seconds. For example, in the
illustrations ch2 is to be memorized. The
radio mutes when the select button is
pushed.
4. When the sound resumes, memorizing is
complete.
5. Other station select buttons can be set in
the same manner.
If the battery cable is disconnected, or if the
radio fuse opens, the radio memory is can-
celled. In that case, reset the desired stations.
Cassette tape player operationTurn the ignition key to ACC or ON, then
carefully insert a cassette tape into the tape
door.
The cassette tape automatically pulls into the
player. The word TAPE and moving digital
SAA0264
Heater, air conditioner and audio systems
4-15
Z
01.1.31/A32-D
X
Page 108 of 231

FM-AM RADIO WITH CASSETTE
PLAYER AND COMPACT DISC
(CD) PLAYER (Bose)
Audio main operationHead unit
The radio has an FM diversity reception sys-
tem, which employs two antennas. One is a
rod type antenna; the other is an antenna
printed on the window. This system automati-
cally switches to the antenna which is receiv-
ing less noise.
The tape deck employs a permalloy head
which allows for improved reproduction of high
frequency ranges. Noise is also greatly re-
duced by the combined use of the Dolby NR
(Noise Reduction) system.
Power/Volume control:
Turn the ignition key to ACC or ON, and then
push the POWER/VOLUME control knob while
the system is off to call up the mode (radio,
tape or CD) which was playing immediately
before the system was turned off. When no CD
or tape is loaded, the radio will come on. While
the system is on, pushing the
POWER/VOLUME control knob turns the sys-
tem off.
To turn the radio off, press the POWER/VOLUME control knob.
Turn the POWER/VOLUME control knob to
adjust the volume.
Heater, air conditioner and audio systems
4-19
Z
01.1.31/A32-D
X
Page 110 of 231

SEEK/SCAN tuning:
SEEK tuning:
Push the SEEK/SCAN tuning button
or
for less than 1.5 seconds. SEEK tuning
begins from high to low or low to high frequen-
cies and stops at the next broadcasting sta-
tion.
SCAN tuning :
Push the SEEK/SCAN tuning button
or
for more than 1.5 seconds. SCAN tuning
begins from high to low or low to high frequen-
cies and stops at each broadcasting station for
five seconds. Pushing the button again during
this 5 seconds period will stop SCAN tuning
and the radio will remain tuned to that station.
If the SEEK/SCAN tuning button is not pushed
within 5 seconds, SCAN tuning moves to the
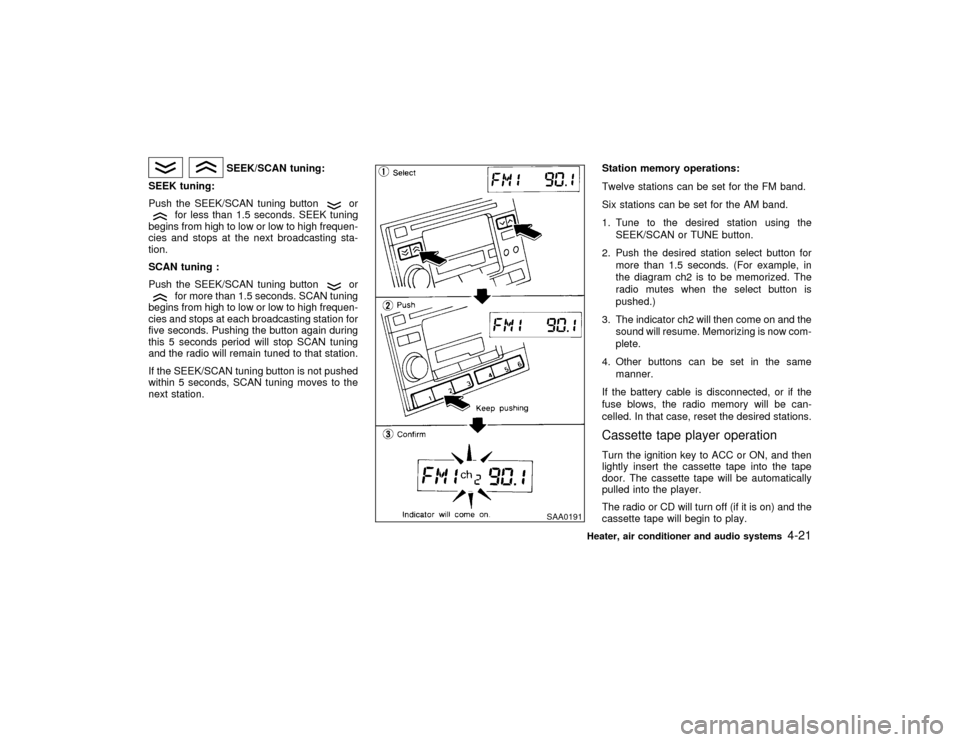
next station.Station memory operations:
Twelve stations can be set for the FM band.
Six stations can be set for the AM band.
1. Tune to the desired station using the
SEEK/SCAN or TUNE button.
2. Push the desired station select button for
more than 1.5 seconds. (For example, in
the diagram ch2 is to be memorized. The
radio mutes when the select button is
pushed.)
3. The indicator ch2 will then come on and the
sound will resume. Memorizing is now com-
plete.
4. Other buttons can be set in the same
manner.
If the battery cable is disconnected, or if the
fuse blows, the radio memory will be can-
celled. In that case, reset the desired stations.
Cassette tape player operationTurn the ignition key to ACC or ON, and then
lightly insert the cassette tape into the tape
door. The cassette tape will be automatically
pulled into the player.
The radio or CD will turn off (if it is on) and the
cassette tape will begin to play.
SAA0191
Heater, air conditioner and audio systems
4-21
Z
01.1.31/A32-D
X
Page 112 of 231

between selections. If there is a blank interval
within one program or there is no interval
between programs, the system may not stop in
the desired or expected location.
PROG (Program):
Push the PROG button to change the tape
side while the tape is being played.
The cassette tape will automatically change
directions to play the other side when the first
side is completed.Dolby NR (Noise Reduction):
Push the Dolby NR
button for Dolby NR
encoded tapes to reduce high frequency tape
noise. The indicator will come on.
Dolby noise reduction manufactured under li-
cense from Dolby Laboratories Licensing Cor-
poration. Dolby NR and the double-D symbol
are trademarks of Dolby Laboratories
Licensing Corporation.
Metal or chrome tape usage:
The cassette player will be automatically set to
high performance play when playing a metal or
chrome cassette tape.TAPE EJECT:
When this button is pushed with the tape
loaded, the tape will be ejected.When the tape is ejected while it is being
played, the system will be turned off.
Compact disc (CD) player operationIDuring cold weather or rainy days,
the player may malfunction due to the
humidity. If this occurs, remove the
CD and dehumidify or ventilate the
player completely.
IThe player may skip while driving on
rough roads.
IThe CD player sometimes cannot
function when the compartment tem-
perature is extremely high. Decrease
the temperature before use.
IDo not expose the CD to direct sun-
light.
IDo not use an 8 cm CD adapter as this
will cause malfunction.Turn the ignition key to the ACC or ON position
and insert the compact disc into the slot with
the label side facing up. The compact disc willbe guided automatically into the slot and start
playing.
After loading the disc, the number of tracks on
the disc and the play time will appear on the
display.
If the radio or tape is already operating, it will
automatically turn off and the compact disc will
play.
Do not force the compact disc into the
slot. This could damage the player.If the system has been turned off while the
compact disc was playing, pushing the
POWER/VOLUME control knob will start the
compact disc.
8 cm diameter compact discs can also be used
without an adapter.
PLAY/STOP:
When this button is pushed with the system off
and the compact disc loaded, the system will
turn on and the compact disc will start to play.
When this button is pushed with the compact
disc loaded but the tape or the radio playing,
the tape or radio will automatically be turned
Heater, air conditioner and audio systems
4-23
Z
01.1.31/A32-D
X