seat adjustment NISSAN MAXIMA 1998 A32 / 4.G Owners Manual
[x] Cancel search | Manufacturer: NISSAN, Model Year: 1998, Model line: MAXIMA, Model: NISSAN MAXIMA 1998 A32 / 4.GPages: 231, PDF Size: 1.94 MB
Page 6 of 231

Table of
Contents
Seats, restraints and supplemental air bag systemsInstruments and controlsPre-driving checks and adjustmentsHeater, air conditioner and audio systemsStarting and drivingIn case of emergencyAppearance and careDo-it-yourselfMaintenanceTechnical and consumer informationIndex
Z
01.1.31/A32-D
X
Page 9 of 231

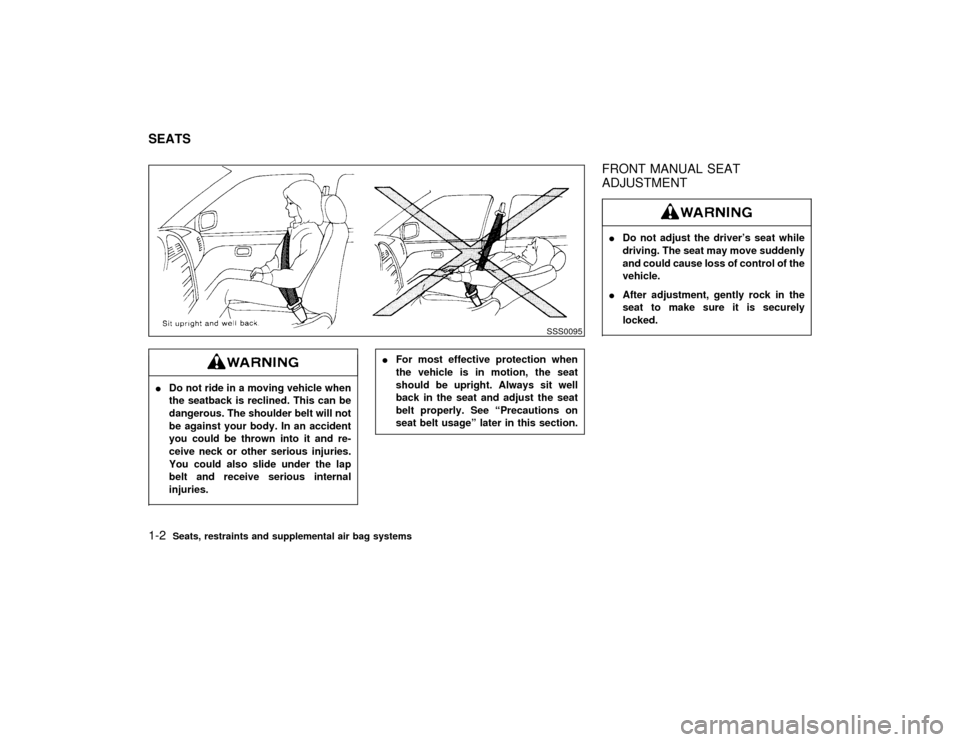
IDo not ride in a moving vehicle when
the seatback is reclined. This can be
dangerous. The shoulder belt will not
be against your body. In an accident
you could be thrown into it and re-
ceive neck or other serious injuries.
You could also slide under the lap
belt and receive serious internal
injuries.
IFor most effective protection when
the vehicle is in motion, the seat
should be upright. Always sit well
back in the seat and adjust the seat
belt properly. See ªPrecautions on
seat belt usageº later in this section.
FRONT MANUAL SEAT
ADJUSTMENTIDo not adjust the driver's seat while
driving. The seat may move suddenly
and could cause loss of control of the
vehicle.
IAfter adjustment, gently rock in the
seat to make sure it is securely
locked.
SSS0095
SEATS1-2
Seats, restraints and supplemental air bag systems
Z
01.1.31/A32-D
X
Page 11 of 231

FRONT POWER SEAT
ADJUSTMENTIDo not adjust the driver's seat while
driving in order that full attention may
be given to the driving operations.
IDo not leave children unattended in-
side the vehicle. They could unknow-
ingly activate switches or controls.
Unattended children could become
involved in serious accidents.Operating tipsIThe motor has an auto-reset overload pro-
tection circuit. If the motor stops during
operation, wait 30 seconds, then reactivate
the switch.
IDo not operate the power support seat
for a long period of time when the engine is
off. This will discharge the battery.
Forward and backwardMoving the switch forward or backward will
slide the seat forward or backward to the
desired position.
RecliningMove the recline switch backward until the
desired angle is obtained. To bring the seat-
back forward again, move the switch forward
and move your body forward. The seatback
will move forward.
SPA0098
1-4
Seats, restraints and supplemental air bag systems
Z
01.1.31/A32-D
X
Page 12 of 231

Seat lifter (Driver's seat)Push the front or rear end of the switch up or
down to adjust the angle and height of the seat
cushion.
Lumbar support (Driver's seat)The lumbar support feature provides lower
back support to the driver. Move the lever up
or down to adjust the seat lumbar area.
HEAD RESTRAINT ADJUSTMENTTo raise the head restraint, simply pull it up. To
lower, push the lock knob and push the head
restraint down.
Adjust the head restraints so the top is level
with the tops of your ears.Head restraints should be adjusted
properly as they may provide significant
protection against injury in an accident.
Do not remove them. Check the adjust-
SPA0100
SPA0467
SPA0014
Seats, restraints and supplemental air bag systems
1-5
Z
01.1.31/A32-D
X
Page 29 of 231

forward. The retractor should lock and re-
strict further belt movement.
If the retractor does not lock during this check
or if you have any questions about belt opera-
tion, see your NISSAN dealer.
Shoulder belt height adjustment
(For front seats)The shoulder belt anchor height should be
adjusted to the position best for you. (See
ªPrecautions on seat belt usageº earlier in this
section.) To adjust, squeeze the release but-
tons, and then move the shoulder belt anchor
to the desired position, so that the belt passes
over the center of the shoulder. The belt
should be away from your face and neck, but
not falling off of your shoulder. Release the
adjustment buttons to lock the shoulder belt
anchor into position.
IAfter adjustment, release the buttons
and try to move the shoulder belt
anchor up and down to make sure it
is securely fixed in position.
IThe shoulder belt anchor height
should be adjusted to the position
best for you. Failure to do so may
reduce the effectiveness of the entire
restraint system and increase the
chance or severity of injury in an
accident.
PD1321-A
1-22
Seats, restraints and supplemental air bag systems
Z
01.1.31/A32-D
X
Page 33 of 231

According to accident statistics, chil-
dren are safer when properly re-
strained in the rear seat than in the
front seat.
IAn improperly installed child re-
straint could lead to serious injury or
death in an accident.
In general, child restraints are designed to be
installed with a lap belt or the lap portion of a
three-point type seat belt.
Child restraints for infants and children of
various sizes are offered by several manufac-
turers. When selecting any child restraint,
keep the following points in mind:
Ichoose only a restraint with a label certify-
ing that it complies with Federal Motor
Vehicle Safety Standard 213 or Canadian
Motor Vehicle Safety Standard 213.
Icheck that child restraint in your vehicle to
be sure it is compatible with the vehicle's
seat and seat belt system. Choose a child
restraint that meets the guidelines of the
Society of Automotive Engineers recom-
mended practice J1819 for child restraint
installation.
Iif the child restraint is compatible with your
vehicle, place your child in the child re-straint and check the various adjustments
to be sure the child restraint is compatible
with your child. Always follow all recom-
mended procedures.
All US states and provinces of Canada
require that infants and small children be
restrained in approved child restraints at
all times while the vehicle is being oper-
ated.
IImproper use of a child restraint can
result in increased injuries for both
the infant or child and other occu-
pants in the vehicle.
IFollow all of the child restraint manu-
facturer's instructions for installation
and use. When purchasing a child
restraint, be sure to select one which
will fit your child and vehicle. It may
not be possible to properly install
some types of child restraints in your
vehicle.
IIf the child restraint is not anchored
properly, the risk of a child beinginjured in a collision or a sudden stop
greatly increases.
IAdjustable seatbacks should be posi-
tioned to fit the child restraint, but as
upright as possible.
IAfter attaching the child restraint,
test it before you place the child in it.
Tilt it from side to side. Try to tug it
forward and check to see if the belt
holds the restraint in place. If the
restraint is not secure, tighten the
belt as necessary, or put the restraint
in another seat and test it again.
IFor a front facing child restraint, if the
seat position where it is installed has
a three-point type lap/shoulder belt,
check to make sure the shoulder belt
does not go in front of the child's face
or neck. If it does, put the shoulder
belt behind the child restraint. If you
must install a front facing child re-
straint in the front seat, see later in
ªChild restraintsº for installation on
front passenger seat.
IWhen your child restraint is not in
use, store it in the trunk or keep it
1-26
Seats, restraints and supplemental air bag systems
Z
01.1.31/A32-D
X
Page 35 of 231

3. Remove all slack in the lap belt for a very
tight fit by pulling forcefully on the lap belt
adjustment.4. Before placing the child in the child re-
straint, use force to tilt the child restraint
from side to side, and tug it forward to make
sure that it is securely held in place.
5. If it is not secure, try to tighten the belt
again, or put the restraint in another seat.
6. Check to make sure the child restraint is
properly secured prior to each use.
Rear facingWhen you install a child restraint in a rear
center seat, follow these steps:
1. Position the child restraint on the seat as
illustrated. The direction of the child re-
straint depends on the type of the child
restraint and the size of the child. Always
follow the restraint manufacturer's instruc-
tions.
SSS0105
SSS0031
SSS0033
1-28
Seats, restraints and supplemental air bag systems
Z
01.1.31/A32-D
X
Page 36 of 231

2. Route the seat belt tongue through the child
restraint and insert it into the buckle until
you hear and feel the latch engage. Be sure
to follow the child restraint manufacturer's
instructions for belt routing.3. Remove all slack in the lap belt for a very
tight fit by pulling forcefully on the lap belt
adjustment.4. Before placing the child in the child re-
straint, use force to tilt the child restraint
from side to side, and tug it forward to make
sure that it is securely held in place.
5. If it is not secure, try to tighten the belt
again, or put the restraint in another seat.
6. Check to make sure the child restraint is
properly secured prior to each use.
SSS0035
SSS0036
SSS0106
Seats, restraints and supplemental air bag systems
1-29
Z
01.1.31/A32-D
X
Page 77 of 231

The master key can be used for all the locks.
Record the key number on the key number
plate and keep it in a safe place (such as your
wallet), not in the car. A key number plate is
supplied with your key. Keep the plate in a safe
place. NISSAN does not record key numbers
so it is very important to keep track of your key
number plate.A key number is only necessary when you
have lost all keys and do not have one to
duplicate from. If you still have a key, this key
can be duplicated by your NISSAN dealer or a
lock smith shop.
IAlways have the doors locked while
driving. Along with the use of seat
belts, this provides greater safety in
the event of an accident by helping to
prevent persons from being thrown
from the vehicle. This also helps keep
children and others from unintention-
ally opening the doors, and will help
keep out intruders.
IBefore opening any door, always look
for and avoid oncoming traffic.
IDo not leave children unattended in-
side the vehicle. They could unknow-
ingly activate switches or controls.
Unattended children could become
involved in serious accidents.
SPA0658
KEYSDOORS3-2
Pre-driving checks and adjustments
Z
01.1.31/A32-D
X
Page 85 of 231

OPENER OPERATIONType A:
The trunk lid release lever is located on the
outside of the driver's seat. To open the trunk
lid, pull up the trunk lid release lever. To close,push the trunk lid down securely.
Type B:
The trunk lid release button is located under
the driver's arm rest.
To open the trunk lid, push the release button.
To close, push the trunk lid down securely.
Cancel leverWhen the lever is in the cancel position, the
trunk lid cannot be opened with the trunk lid
release lever or handle. It can be opened only
with the key.
SPA0093
SPA0095
3-10
Pre-driving checks and adjustments
Z
01.1.31/A32-D
X