ECU NISSAN MAXIMA 2000 A33 / 5.G Owner's Guide
[x] Cancel search | Manufacturer: NISSAN, Model Year: 2000, Model line: MAXIMA, Model: NISSAN MAXIMA 2000 A33 / 5.GPages: 239, PDF Size: 1.97 MB
Page 169 of 239

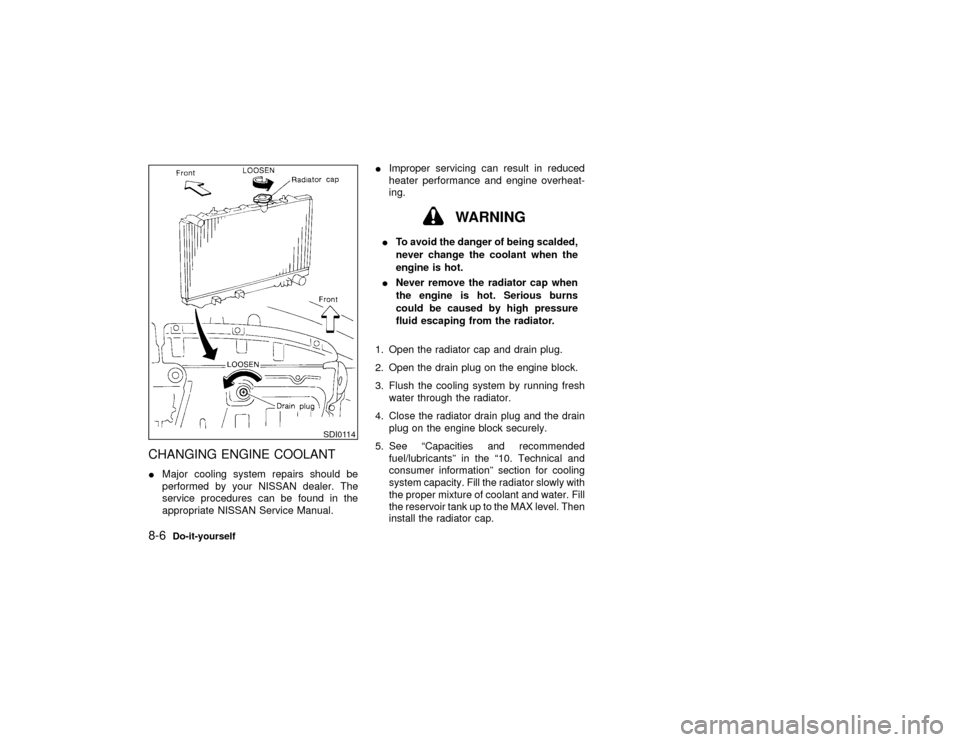
CHANGING ENGINE COOLANTIMajor cooling system repairs should be
performed by your NISSAN dealer. The
service procedures can be found in the
appropriate NISSAN Service Manual.IImproper servicing can result in reduced
heater performance and engine overheat-
ing.
WARNING
ITo avoid the danger of being scalded,
never change the coolant when the
engine is hot.
INever remove the radiator cap when
the engine is hot. Serious burns
could be caused by high pressure
fluid escaping from the radiator.
1. Open the radiator cap and drain plug.
2. Open the drain plug on the engine block.
3. Flush the cooling system by running fresh
water through the radiator.
4. Close the radiator drain plug and the drain
plug on the engine block securely.
5. See ªCapacities and recommended
fuel/lubricantsº in the ª10. Technical and
consumer informationº section for cooling
system capacity. Fill the radiator slowly with
the proper mixture of coolant and water. Fill
the reservoir tank up to the MAX level. Then
install the radiator cap.
SDI0114
8-6
Do-it-yourself
Z
00.1.17/A33-D/V5.0
X
Page 172 of 239

6. Remove the drain plug with a wrench and
completely drain the oil.
If oil filter is to be changed, remove and
replace it at this time. See later in ªEngine
oilº for changing engine oil filter.
CAUTION
Be careful not to burn yourself, as the
engine oil is hot.
Waste oil must be disposed of properly.
Check your local regulations.
7. Clean and re-install the drain plug and new
washer. Securely tighten the drain plug with
a wrench.
Drain plug tightening torque:
22 to 29 ft-lb
(29 to 39 N×m)
Do not use excessive force.
8. Refill engine with recommended oil and
install the cap securely.
See ªCapacities and recommended
fuel/lubricantsº in the ª10. Technical and
consumer informationº section for drain and
refill capacity. The drain and refill capacitydepends on the oil temperature and drain
time. Use these specifications for reference
only. Always use the dipstick to determine
when the proper amount of oil is in the
engine.
9. Start the engine.
Check for leakage around the drain plug.
Correct as required.
10.Turn the engine off and wait more than 10
minutes. Check the oil level with the dip-
stick. Add engine oil if necessary.
11.Dispose of waste oil in the proper manner.
WARNING
IProlonged and repeated contact with
used engine oil may cause skin can-
cer.
ITry to avoid direct skin contact with
used oil. If skin contact is made, wash
thoroughly with soap or hand cleaner
as soon as possible.
IKeep used engine oil out of reach of
children.
CHANGING ENGINE OIL FILTER1. Park the vehicle on a level surface and
apply the parking brake.
2. Turn the engine off.
3. Loosen the oil filter with an oil filter wrench.
(Depending on the engine model, a special
cap typewrench may be required. See
your NISSAN dealer if in doubt.) Remove
the oil filter by turning it by hand.
SDI0975
Do-it-yourself
8-9
Z
00.1.17/A33-D/V5.0
X
Page 176 of 239

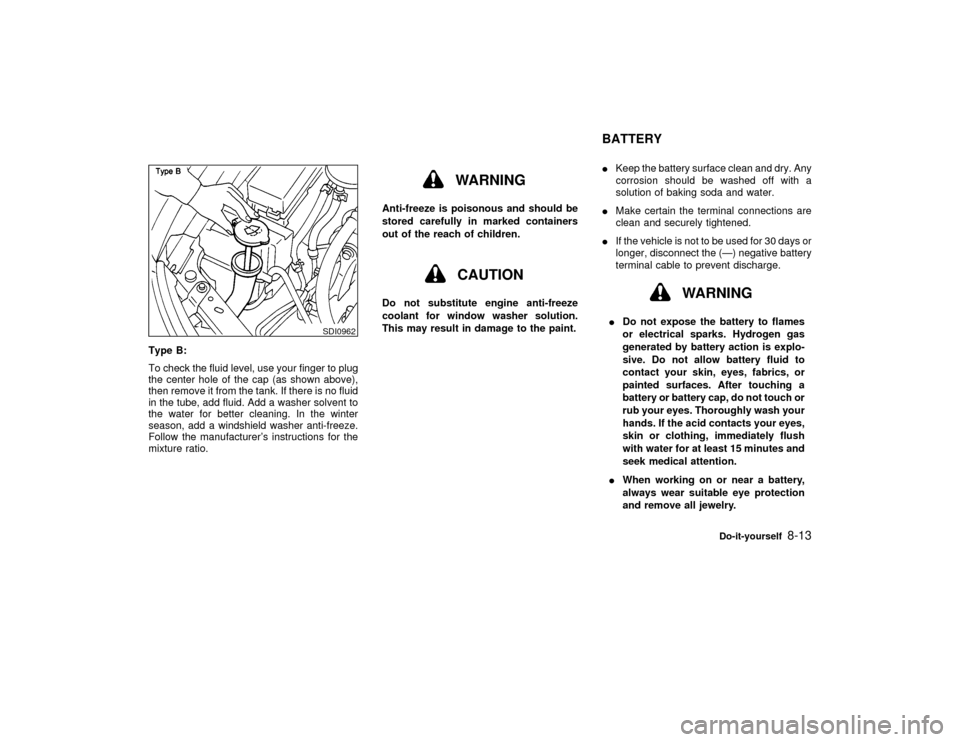
Type B:
To check the fluid level, use your finger to plug
the center hole of the cap (as shown above),
then remove it from the tank. If there is no fluid
in the tube, add fluid. Add a washer solvent to
the water for better cleaning. In the winter
season, add a windshield washer anti-freeze.
Follow the manufacturer's instructions for the
mixture ratio.
WARNING
Anti-freeze is poisonous and should be
stored carefully in marked containers
out of the reach of children.
CAUTION
Do not substitute engine anti-freeze
coolant for window washer solution.
This may result in damage to the paint.IKeep the battery surface clean and dry. Any
corrosion should be washed off with a
solution of baking soda and water.
IMake certain the terminal connections are
clean and securely tightened.
IIf the vehicle is not to be used for 30 days or
longer, disconnect the (Ð) negative battery
terminal cable to prevent discharge.
WARNING
IDo not expose the battery to flames
or electrical sparks. Hydrogen gas
generated by battery action is explo-
sive. Do not allow battery fluid to
contact your skin, eyes, fabrics, or
painted surfaces. After touching a
battery or battery cap, do not touch or
rub your eyes. Thoroughly wash your
hands. If the acid contacts your eyes,
skin or clothing, immediately flush
with water for at least 15 minutes and
seek medical attention.
IWhen working on or near a battery,
always wear suitable eye protection
and remove all jewelry.
SDI0962
BATTERY
Do-it-yourself
8-13
Z
00.1.17/A33-D/V5.0
X
Page 178 of 239

WARNING
Be sure the ignition key is in the OFF or
LOCK position. The engine could rotate
unexpectedly.
1. Visually inspect each belt for signs of un-
usual wear, cuts, fraying, oil adhesion or
looseness. If the belt is in poor condition or
loose, have it replaced or adjusted by your
NISSAN dealer.
2. Have the belts checked regularly for condi-tion and tension in accordance with the
maintenance schedule in this manual.
WARNING
Be sure the engine and ignition switch
are off and that the parking brake is
engaged securely.
CAUTION
Be sure to use the correct socket to
remove the spark plugs. An incorrect
socket can damage the spark plugs.
SDI0141
DRIVE BELTS SPARK PLUGS
Do-it-yourself
8-15
Z
00.1.17/A33-D/V5.0
X
Page 187 of 239

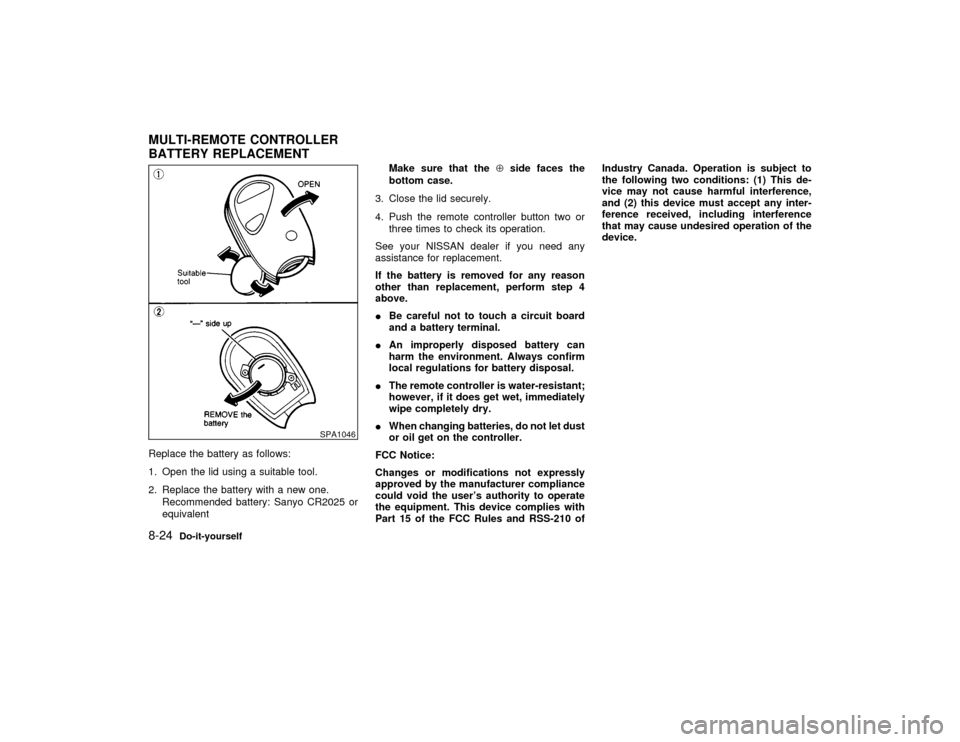
Replace the battery as follows:
1. Open the lid using a suitable tool.
2. Replace the battery with a new one.
Recommended battery: Sanyo CR2025 or
equivalentMake sure that theÅside faces the
bottom case.
3. Close the lid securely.
4. Push the remote controller button two or
three times to check its operation.
See your NISSAN dealer if you need any
assistance for replacement.
If the battery is removed for any reason
other than replacement, perform step 4
above.
IBe careful not to touch a circuit board
and a battery terminal.
IAn improperly disposed battery can
harm the environment. Always confirm
local regulations for battery disposal.
IThe remote controller is water-resistant;
however, if it does get wet, immediately
wipe completely dry.
IWhen changing batteries, do not let dust
or oil get on the controller.
FCC Notice:
Changes or modifications not expressly
approved by the manufacturer compliance
could void the user's authority to operate
the equipment. This device complies with
Part 15 of the FCC Rules and RSS-210 ofIndustry Canada. Operation is subject to
the following two conditions: (1) This de-
vice may not cause harmful interference,
and (2) this device must accept any inter-
ference received, including interference
that may cause undesired operation of the
device.
SPA1046
MULTI-REMOTE CONTROLLER
BATTERY REPLACEMENT8-24
Do-it-yourself
Z
00.1.17/A33-D/V5.0
X
Page 196 of 239

all year around, including snowy and icy road
conditions. All season tires are identified by
ALL SEASON and/or M&S on the tire sidewall.
Snow tires have better snow traction than all
season tires and may be more appropriate in
some areas.Summer tiresNISSAN specifies summer tires on some mod-
els to provide superior performance on dry
roads. Summer tire performance in snow and
ice will be substantially reduced. Summer tires
do not have the tire traction rating M&S on the
tire sidewall.
If you operate your vehicle in snowy or icy
conditions, NISSAN recommends the use of
snow or all season tires on all four wheels.Snow tiresIf snow tires are needed, it is necessary to
select tires equivalent in size and load rating to
the original equipment tires. If you do not, it
can adversely affect the safety and handling of
your vehicle.
Generally, snow tires will have lower speed
ratings than factory equipped tires and may
not match the potential maximum vehicle
speed. Never exceed the maximum speed
rating of the tire.If you operate your vehicle in snowy or icy
conditions, NISSAN recommends the use of
snow or all season tires on all four wheels.
For additional traction on icy roads, studded
tires may be used. However, some provinces
and states prohibit their use. Check local, state
and provincial laws before installing studded
tires. Skid and traction capabilities of studded
snow tires, on wet or dry surfaces, may be
poorer than that of non-studded snow tires.
TIRE CHAINSUse of tire chains may be prohibited according
to location. Check the local laws before install-
ing tire chains. When installing tire chains,
make sure they are of proper size for the tires
on your vehicle and are installed according to
the chain manufacturer's suggestions.Use
only SAE class S chains.Other types may
damage your vehicle. Use chain tensioners
when recommended by the tire chain manu-
facturer to ensure a tight fit. Loose end links of
the tire chain must be secured or removed to
prevent the possibility of whipping action dam-
age to the fenders or undercarriage. If pos-
sible, avoid fully loading your vehicle when
using tire chains. In addition, drive at a re-
duced speed. Otherwise, your vehicle may be
damaged and/or vehicle handling and perfor-
mance may be adversely affected.Never install tire chains on a T-type spare tire.
Do not use the chains on dry roads.
Do-it-yourself
8-33
Z
00.1.17/A33-D/V5.0
X
Page 202 of 239

During the normal day-to-day operation of the
vehicle, general maintenance should be per-
formed regularly as prescribed in this section.
If you detect any unusual sounds, vibrations or
smell, be sure to check for the cause or have
your NISSAN dealer do it promptly. In addition,
you should notify your NISSAN dealer if you
think that repairs are required.
When performing any checks or maintenance
work, see ªMaintenance precautionsº in the ª8.
Do-it-yourselfº section.EXPLANATION OF MAINTENANCE
ITEMSAdditional information on the following
items with ª*º is found in the ª8. Do-it-
yourselfº section.Outside the vehicleThe maintenance items listed here should be
performed from time to time, unless otherwise
specified.
Tires*:Check the pressure with a gauge pe-
riodically when at a service station, including
the spare, and adjust to the specified pressure
if necessary. Check carefully for damage, cuts
or excessive wear.
Wheel nuts*:When checking the tires, make
sure no nuts are missing, and check for anyloose nuts. Tighten if necessary.
Tire rotation*:Tires should be rotated every
7,500 miles (12,000 km).
Wheel alignment and balance:If the vehicle
pulls to either side while driving on a straight
and level road, or if you detect uneven or
abnormal tire wear, there may be a need for
wheel alignment.
If the steering wheel or seat vibrates at normal
highway speeds, wheel balancing may be
needed.
Windshield wiper blades*:Check for cracks
or wear if they do not wipe properly.
Doors and engine hood:Check that all doors
and the engine hood operate smoothly as well
as the trunk lid or back hatch. Also make sure
that all latches lock securely. Lubricate if nec-
essary. Make sure that the secondary latch
keeps the hood from opening when the pri-
mary latch is released.
When driving in areas using road salt or other
corrosive materials, check lubrication fre-
quently.
Inside the vehicleThe maintenance items listed here should be
checked on a regular basis, such as whenperforming periodic maintenance, cleaning the
vehicle, etc.
Lights*:Make sure that the headlights, stop
lights, tail lights, turn signal lights, and other
lights are all operating properly and installed
securely. Also check headlight aim.
Warning lights and chimes:Make sure that
all warning lights and chimes are operating
properly.
Windshield wiper and washer*:Check that
the wipers and washer operate properly and
that the wipers do not streak.
Windshield defroster:Check that the air
comes out of the defroster outlets properly and
in good quantity when operating the heater or
air conditioner.
Steering wheel:Check for changes in the
steering conditions, such as excessive free
play, hard steering or strange noises.
Seats:Check seat position controls such as
seat adjusters, seatback recliner, etc. to en-
sure they operate smoothly and that all latches
lock securely in every position. Check that the
head restraints move up and down smoothly
and that the locks (if equipped) hold securely
in all latched positions.
Seat belts:Check that all parts of the seat belt
GENERAL MAINTENANCE
Maintenance
9-3
Z
00.1.17/A33-D/V5.0
X
Page 203 of 239

system (for example, buckles, anchors, adjust-
ers and retractors) operate properly and
smoothly, and are installed securely. Check
the belt webbing for cuts, fraying, wear or
damage.
Accelerator pedal:Check the pedal for
smooth operation and make sure the pedal
does not catch or require uneven effort. Keep
the floor mats away from the pedal.
Clutch pedal*:Make sure the pedal operates
smoothly and check that it has the proper free
play.
Brakes:Check that the brakes do not pull the
vehicle to one side when applied.
Brake pedal and booster*:Check the pedal
for smooth operation and make sure it has the
proper distance under it when depressed fully.
Check the brake booster function. Be sure to
keep floor mats away from the pedal.
Parking brake*:Check that the lever has the
proper travel and make sure that the vehicle is
held securely on a fairly steep hill when only
the parking brake is applied.
Automatic transaxle P (Park) position
mechanism:On a fairly steep hill check that
the vehicle is held securely with the selector
lever in the P (Park) position without applying
any brakes.
Under the hood and the vehicleThe maintenance items listed here should be
checked periodically (for example, each time
you check the engine oil or refuel).
Windshield washer fluid*:Check that there
is adequate fluid in the tank.
Engine coolant level*:Check the coolant
level when the engine is cold.
Radiator and hoses:Check the front of the
radiator and clean off any dirt, insects, leaves,
etc., that may have accumulated. Make sure
the hoses have no cracks, deformation, dete-
rioration or loose connections.
Brake and clutch fluid levels*:Make sure
that the brake and clutch fluid levels are be-
tween the MAX and MIN lines on the reservoir.
Battery*:Check the fluid level in each cell. It
should be between the MAX and MIN lines.
Engine drive belts*:Make sure that no belt is
frayed, worn, cracked or oily.
Engine oil level*:Check the level on the
dipstick after parking the vehicle on a level
spot and turning off the engine.
Power steering fluid level* and lines:Check
the level in the reservoir tank with the engineoff. Check the lines for proper attachment,
leaks, cracks, etc.
Automatic transaxle fluid level*:Check the
level on the dipstick after putting the selector
lever in P (Park) position with the engine idling.
Exhaust system:Make sure there are no
loose supports, cracks or holes. If the sound of
the exhaust seems unusual or there is a smell
of exhaust fumes, immediately locate the
trouble and correct it. (See ªPrecautions when
starting and drivingº in the ª5. Starting and
drivingº section for exhaust gas (carbon mon-
oxide).)
Underbody:The underbody is frequently ex-
posed to corrosive substances such as those
used on icy roads or to control dust. It is very
important to remove these substances, other-
wise rust will form on the floor pan, frame, fuel
lines and around the exhaust system. At the
end of winter, the underbody should be thor-
oughly flushed with plain water, being careful
to clean those areas where mud and dirt may
accumulate. For additional information, see
ªCleaning exteriorº in the ª7. Appearance and
careº section.
Fluid leaks:Check under the vehicle for fuel,
oil, water or other fluid leaks after the vehicle
has been parked for a while. Water dripping
from the air conditioner after use is normal. If
9-4
Maintenance
Z
00.1.17/A33-D/V5.0
X
Page 224 of 239

ceeded. If GVWR is exceeded, remove
cargo as necessary. If either the front or
rear GAWR is exceeded, shift the load or
remove cargo as necessary.
LOADING TIPSIThe GVW must not exceed GVWR or
GAWR as specified on the F.M.V.S.S. cer-
tification label.
IDo not load the front and rear axle to the
GAWR. Doing so will exceed the GVWR.
WARNING
IProperly secure all cargo to help pre-
vent it from sliding or shifting. Do not
place cargo higher than the seat-
backs. In a sudden stop or collision,
unsecured cargo could cause per-
sonal injury.
IDo not load your vehicle any heavier
than the GVWR or the maximum front
and rear GAWRs. If you do, parts on
your vehicle can break, or it can
change the way your vehicle handles.
This could result in loss of controland cause personal injury.
IOverloading can shorten the life of
your vehicle. Failures caused by
overloading are not covered by your
warranty.
Your new vehicle was designed to be used
primarily to carry passengers and cargo. Re-
member that towing a trailer will place addi-
tional loads on your vehicle's engine, drive
train, steering, braking and other systems.
Information on trailer towing ability and the
special equipment required should be ob-
tained from your Nissan dealer. He can obtain
aNissan Trailer Towing Guidefor you.
TI1011M
TOWING A TRAILERTechnical and consumer information
10-15
Z
00.1.17/A33-D/V5.0
X
Page 226 of 239

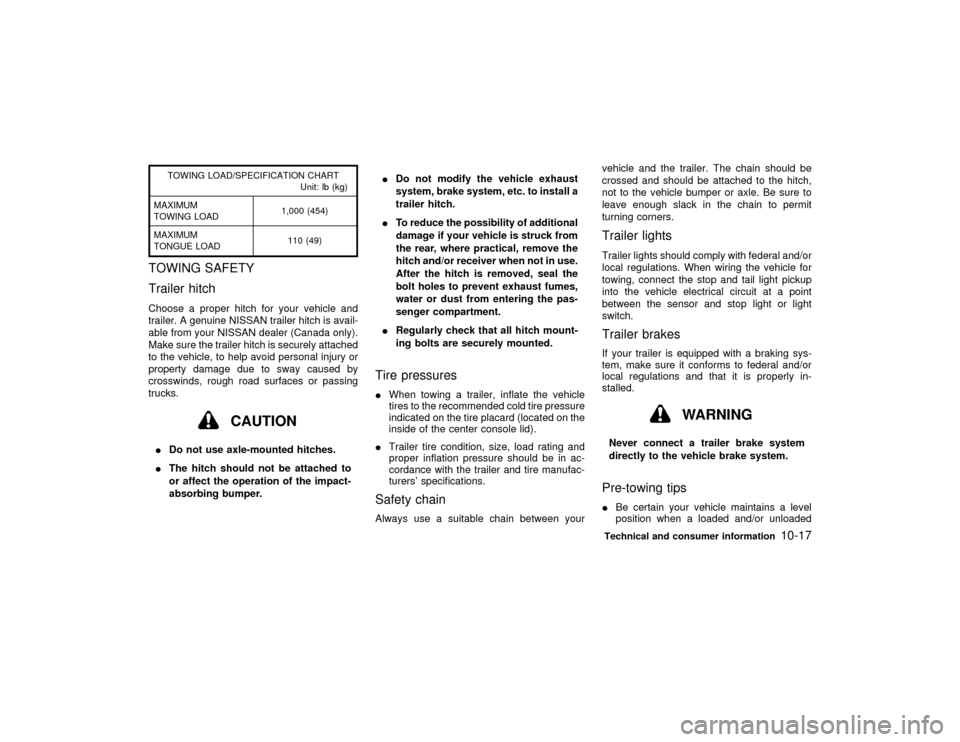
TOWING LOAD/SPECIFICATION CHART
Unit: lb (kg)
MAXIMUM
TOWING LOAD1,000 (454)
MAXIMUM
TONGUE LOAD110 (49)
TOWING SAFETY
Trailer hitchChoose a proper hitch for your vehicle and
trailer. A genuine NISSAN trailer hitch is avail-
able from your NISSAN dealer (Canada only).
Make sure the trailer hitch is securely attached
to the vehicle, to help avoid personal injury or
property damage due to sway caused by
crosswinds, rough road surfaces or passing
trucks.
CAUTION
IDo not use axle-mounted hitches.
IThe hitch should not be attached to
or affect the operation of the impact-
absorbing bumper.IDo not modify the vehicle exhaust
system, brake system, etc. to install a
trailer hitch.
ITo reduce the possibility of additional
damage if your vehicle is struck from
the rear, where practical, remove the
hitch and/or receiver when not in use.
After the hitch is removed, seal the
bolt holes to prevent exhaust fumes,
water or dust from entering the pas-
senger compartment.
IRegularly check that all hitch mount-
ing bolts are securely mounted.
Tire pressuresIWhen towing a trailer, inflate the vehicle
tires to the recommended cold tire pressure
indicated on the tire placard (located on the
inside of the center console lid).
ITrailer tire condition, size, load rating and
proper inflation pressure should be in ac-
cordance with the trailer and tire manufac-
turers' specifications.Safety chainAlways use a suitable chain between yourvehicle and the trailer. The chain should be
crossed and should be attached to the hitch,
not to the vehicle bumper or axle. Be sure to
leave enough slack in the chain to permit
turning corners.
Trailer lightsTrailer lights should comply with federal and/or
local regulations. When wiring the vehicle for
towing, connect the stop and tail light pickup
into the vehicle electrical circuit at a point
between the sensor and stop light or light
switch.Trailer brakesIf your trailer is equipped with a braking sys-
tem, make sure it conforms to federal and/or
local regulations and that it is properly in-
stalled.
WARNING
Never connect a trailer brake system
directly to the vehicle brake system.Pre-towing tipsIBe certain your vehicle maintains a level
position when a loaded and/or unloadedTechnical and consumer information
10-17
Z
00.1.17/A33-D/V5.0
X