automatic NISSAN MAXIMA 2001 A33 / 5.G Owners Manual
[x] Cancel search | Manufacturer: NISSAN, Model Year: 2001, Model line: MAXIMA, Model: NISSAN MAXIMA 2001 A33 / 5.GPages: 247, PDF Size: 1.99 MB
Page 30 of 247
you could be thrown into it and re-
ceive neck or other serious injuries.
You could also slide under the lap
belt and receive serious internal inju-
ries.
IFor most effective protection when
the vehicle is in motion, the seat
should be upright. Always sit well
back in the seat and adjust the seat
belt properly.
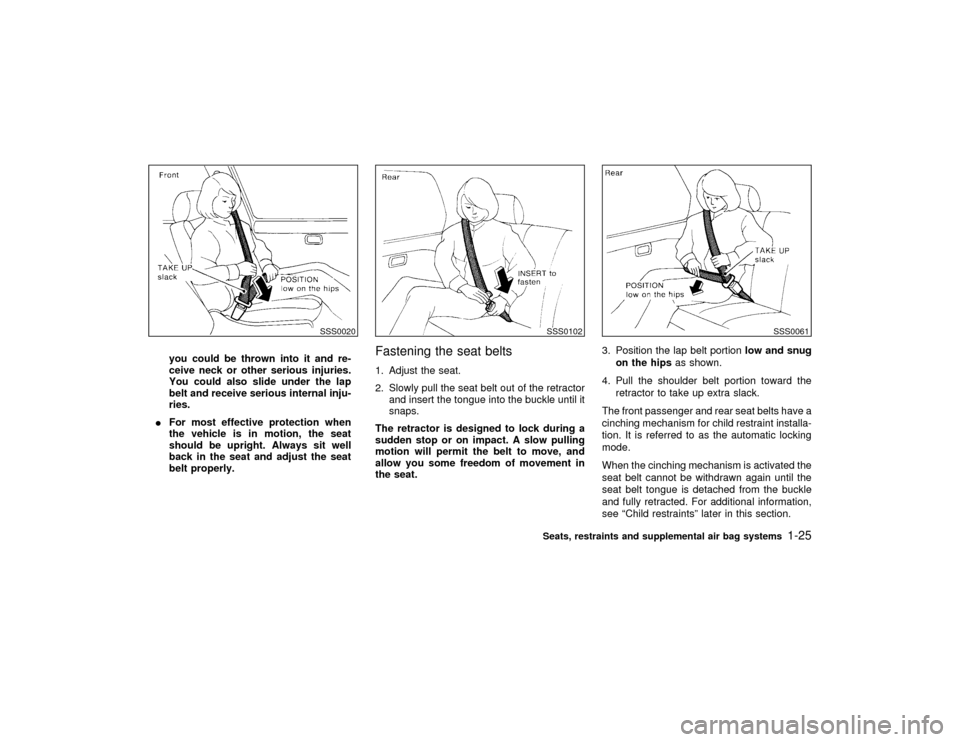
Fastening the seat belts1. Adjust the seat.
2. Slowly pull the seat belt out of the retractor
and insert the tongue into the buckle until it
snaps.
The retractor is designed to lock during a
sudden stop or on impact. A slow pulling
motion will permit the belt to move, and
allow you some freedom of movement in
the seat.3. Position the lap belt portionlow and snug
on the hipsas shown.
4. Pull the shoulder belt portion toward the
retractor to take up extra slack.
The front passenger and rear seat belts have a
cinching mechanism for child restraint installa-
tion. It is referred to as the automatic locking
mode.
When the cinching mechanism is activated the
seat belt cannot be withdrawn again until the
seat belt tongue is detached from the buckle
and fully retracted. For additional information,
see ªChild restraintsº later in this section.
SSS0020
SSS0102
SSS0061
Seats, restraints and supplemental air bag systems
1-25
Z
00.1.17/A33-D/V5.0
X
Page 31 of 247
The automatic locking mode should be
used only for child restraint installation.
During normal seat belt use by a passen-
ger, the locking mode should not be acti-
vated. If it is activated it may cause uncom-
fortable seat belt tension.
WARNING
When fastening the seat belts, be certain
that seatbacks are completely secured
in the latched position. If they are not
completely secured in the right position,
passengers may be injured in an acci-
dent or sudden stop.
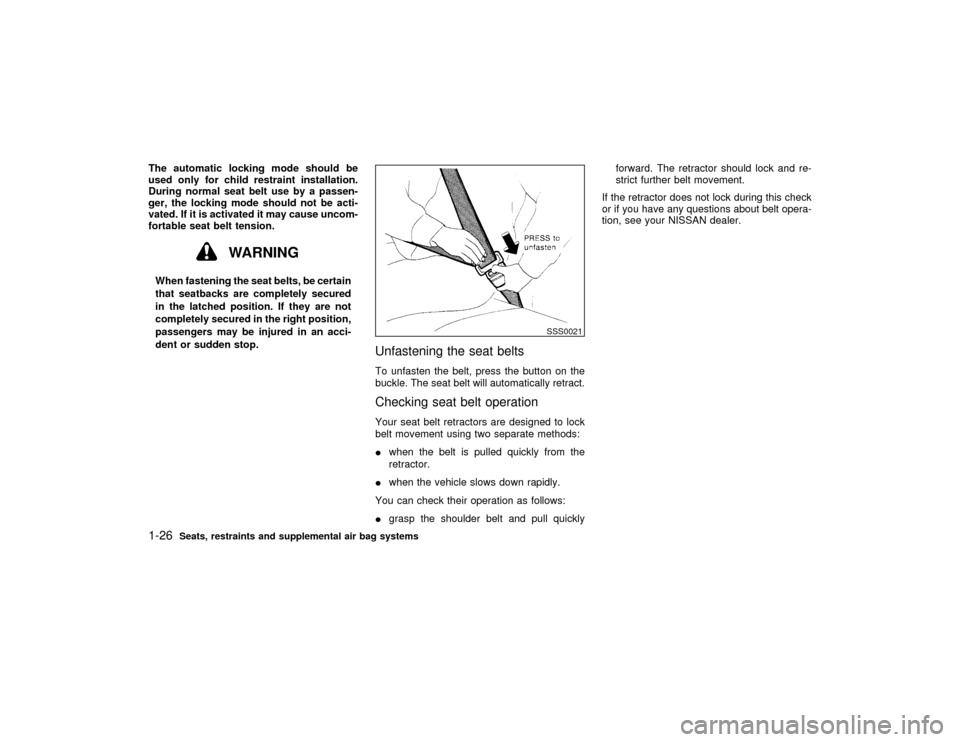
Unfastening the seat beltsTo unfasten the belt, press the button on the
buckle. The seat belt will automatically retract.Checking seat belt operationYour seat belt retractors are designed to lock
belt movement using two separate methods:
Iwhen the belt is pulled quickly from the
retractor.
Iwhen the vehicle slows down rapidly.
You can check their operation as follows:
Igrasp the shoulder belt and pull quicklyforward. The retractor should lock and re-
strict further belt movement.
If the retractor does not lock during this check
or if you have any questions about belt opera-
tion, see your NISSAN dealer.
SSS0021
1-26
Seats, restraints and supplemental air bag systems
Z
00.1.17/A33-D/V5.0
X
Page 36 of 247
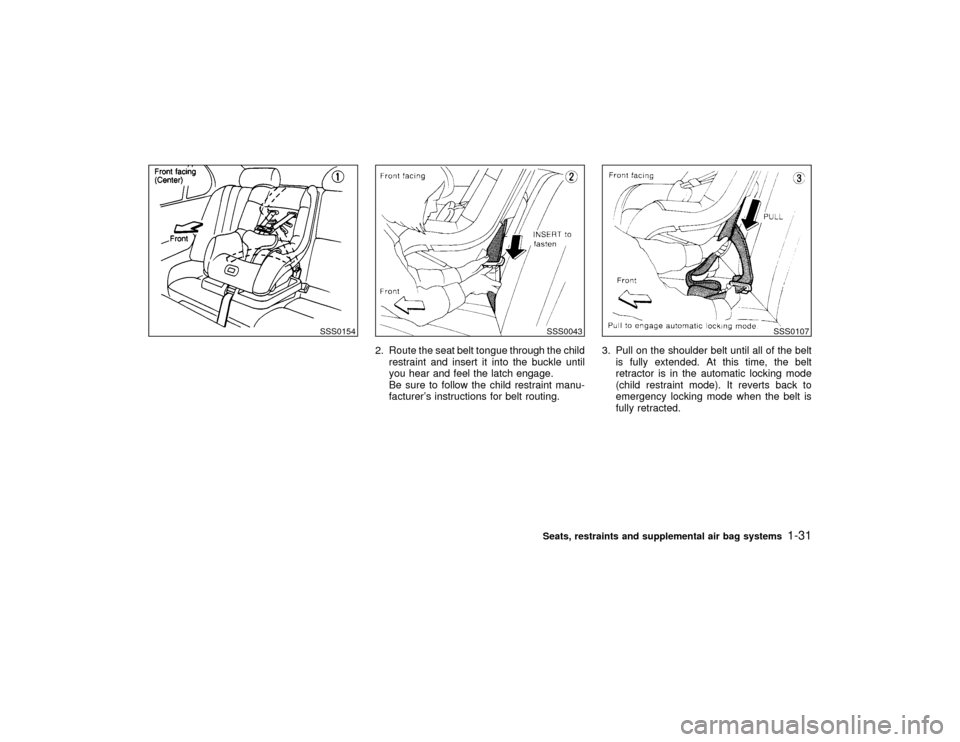
2. Route the seat belt tongue through the child
restraint and insert it into the buckle until
you hear and feel the latch engage.
Be sure to follow the child restraint manu-
facturer's instructions for belt routing.3. Pull on the shoulder belt until all of the belt
is fully extended. At this time, the belt
retractor is in the automatic locking mode
(child restraint mode). It reverts back to
emergency locking mode when the belt is
fully retracted.
SSS0154
SSS0043
SSS0107
Seats, restraints and supplemental air bag systems
1-31
Z
00.1.17/A33-D/V5.0
X
Page 37 of 247
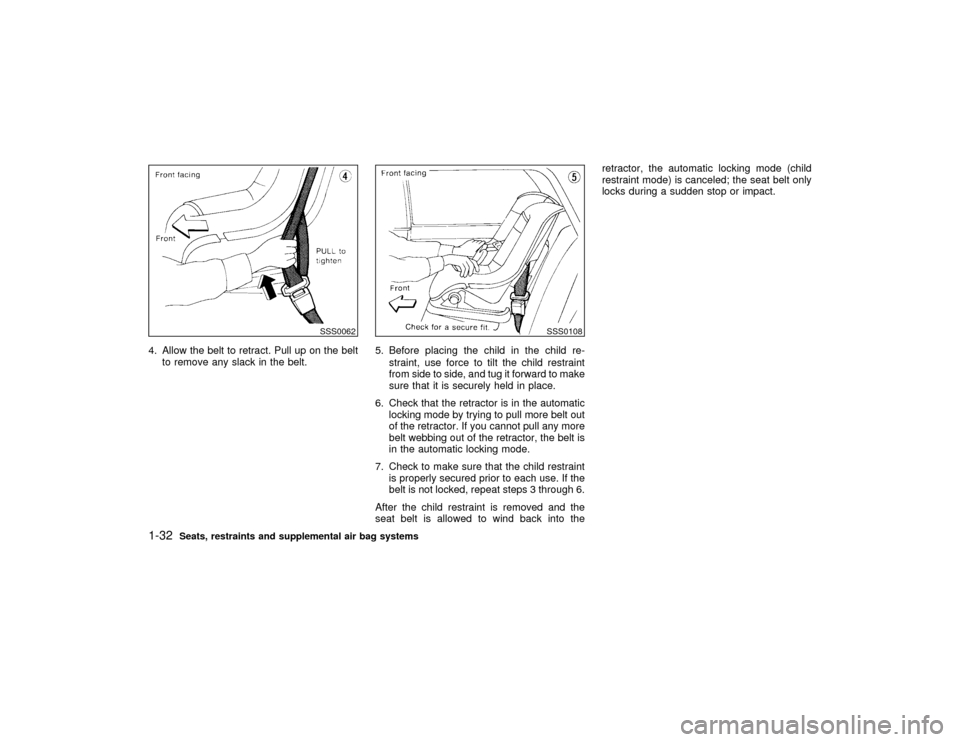
4. Allow the belt to retract. Pull up on the belt
to remove any slack in the belt.5. Before placing the child in the child re-
straint, use force to tilt the child restraint
from side to side, and tug it forward to make
sure that it is securely held in place.
6. Check that the retractor is in the automatic
locking mode by trying to pull more belt out
of the retractor. If you cannot pull any more
belt webbing out of the retractor, the belt is
in the automatic locking mode.
7. Check to make sure that the child restraint
is properly secured prior to each use. If the
belt is not locked, repeat steps 3 through 6.
After the child restraint is removed and the
seat belt is allowed to wind back into theretractor, the automatic locking mode (child
restraint mode) is canceled; the seat belt only
locks during a sudden stop or impact.
SSS0062
SSS0108
1-32
Seats, restraints and supplemental air bag systems
Z
00.1.17/A33-D/V5.0
X
Page 39 of 247
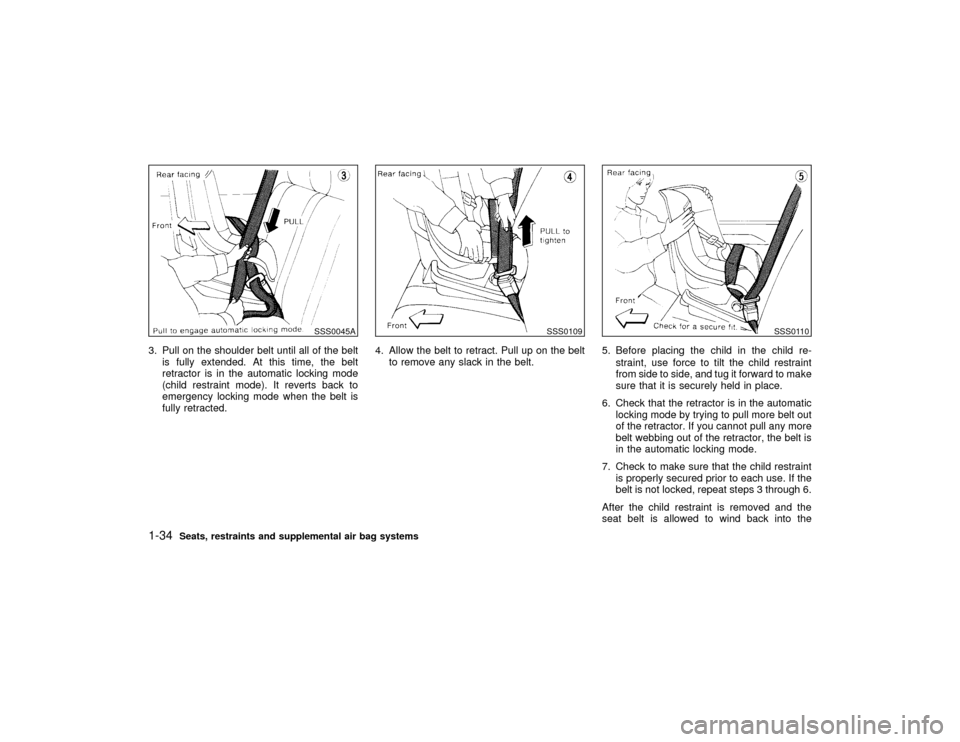
3. Pull on the shoulder belt until all of the belt
is fully extended. At this time, the belt
retractor is in the automatic locking mode
(child restraint mode). It reverts back to
emergency locking mode when the belt is
fully retracted.4. Allow the belt to retract. Pull up on the belt
to remove any slack in the belt.5. Before placing the child in the child re-
straint, use force to tilt the child restraint
from side to side, and tug it forward to make
sure that it is securely held in place.
6. Check that the retractor is in the automatic
locking mode by trying to pull more belt out
of the retractor. If you cannot pull any more
belt webbing out of the retractor, the belt is
in the automatic locking mode.
7. Check to make sure that the child restraint
is properly secured prior to each use. If the
belt is not locked, repeat steps 3 through 6.
After the child restraint is removed and the
seat belt is allowed to wind back into the
SSS0045A
SSS0109
SSS0110
1-34
Seats, restraints and supplemental air bag systems
Z
00.1.17/A33-D/V5.0
X
Page 40 of 247

retractor, the automatic locking mode (child
restraint mode) is canceled; the seat belt only
locks during a sudden stop or impact.
LATCH (LOWER ANCHORS AND
TETHER FOR CHILDREN)
SYSTEM
WARNING
IAttach LATCH system compatible
child restraints only at the locations
shown. If a child restraint is not se-
cured properly, your child could be
seriously injured or killed in an
accident.IDo not secure a child restraint in the
center rear seating position using the
child restraint lower anchors. The
child restraint will not be secured
properly.
IThe LATCH system anchors are de-
signed to withstand only those loads
imposed by correctly fitted child re-
straints. Under no circumstance are
they to be used for adult seat belts or
harnesses.
Some child restraints include two rigid or
webbing-mounted attachments that can be
connected to two anchors located at certain
seating positions in your vehicle. This system
is known as the LATCH (Lower Anchors and
Tether for Children) system. This system may
also be referred to as the ISOFIX or ISOFIX
compatible system. With this system, you do
not have to use a vehicle seat belt to secure
the child restraint. Your vehicle is equipped
with special anchor points that are used with
LATCH system compatible child restraints.
Check your child restraint for a label stating
that it is compatible with the LATCH system.
This information may also be in the child
restraint owner's manual. If you have such a
SSS0177ASeats, restraints and supplemental air bag systems
1-35
Z
00.1.17/A33-D/V5.0
X
Page 44 of 247
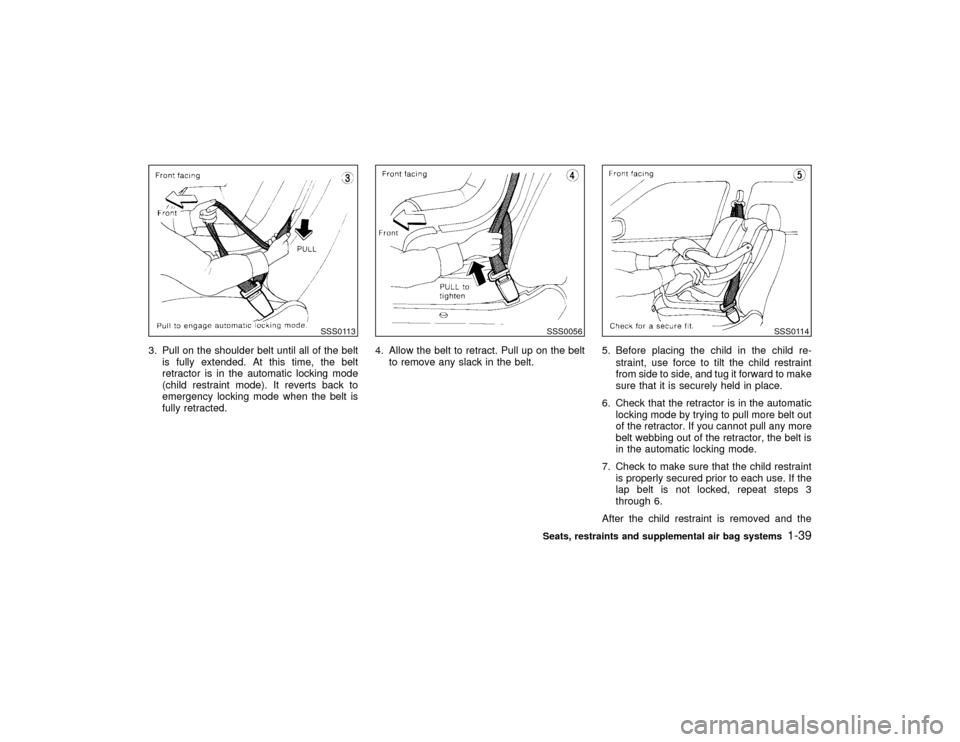
3. Pull on the shoulder belt until all of the belt
is fully extended. At this time, the belt
retractor is in the automatic locking mode
(child restraint mode). It reverts back to
emergency locking mode when the belt is
fully retracted.4. Allow the belt to retract. Pull up on the belt
to remove any slack in the belt.5. Before placing the child in the child re-
straint, use force to tilt the child restraint
from side to side, and tug it forward to make
sure that it is securely held in place.
6. Check that the retractor is in the automatic
locking mode by trying to pull more belt out
of the retractor. If you cannot pull any more
belt webbing out of the retractor, the belt is
in the automatic locking mode.
7. Check to make sure that the child restraint
is properly secured prior to each use. If the
lap belt is not locked, repeat steps 3
through 6.
After the child restraint is removed and the
SSS0113
SSS0056
SSS0114
Seats, restraints and supplemental air bag systems
1-39
Z
00.1.17/A33-D/V5.0
X
Page 45 of 247

seat belt is allowed to wind back into the
retractor, the automatic locking mode (child
restraint mode) is canceled; the seat belt only
locks during a sudden stop or impact.1-40
Seats, restraints and supplemental air bag systems
Z
00.1.17/A33-D/V5.0
X
Page 47 of 247

2 Instruments and controlsInstrument panel ....................................................... 2-2
Meters and gauges ................................................... 2-3
Speedometer and odometer ................................ 2-4
Tachometer .......................................................... 2-4
Engine coolant temperature gauge ...................... 2-5
Fuel gauge ........................................................... 2-5
Warning/indicator lights and audible reminders ........ 2-7
Checking bulbs ..................................................... 2-7
Warning lights....................................................... 2-7
Indicator lights ...................................................... 2-9
Audible reminders .............................................. 2-11
Brake pad wear warning .................................... 2-12
Security systems ..................................................... 2-12
Vehivle security system ...................................... 2-12
Nissan Vehicle Immobilizer System .................. 2-13
Windshield wiper and washer switch ...................... 2-14
Rear window and outside mirror (if so equipped)
defogger switch ....................................................... 2-15
Headlight and turn signal switch ............................. 2-16
Headlight switch ................................................. 2-16
Turn signal switch .............................................. 2-18
Fog light switch (if so equipped) ............................. 2-18
Hazard warning flasher switch ................................ 2-19
Horn......................................................................... 2-19Heated seats (if so equipped) ................................. 2-20
Traction control system (TCS) cancel switch
(if so equipped) ....................................................... 2-21
Power outlet ............................................................ 2-21
Cigarette lighter and ashtray (accessory) ............... 2-22
Storage .................................................................... 2-22
Trays................................................................... 2-22
Glasses case ...................................................... 2-23
Cup holder .......................................................... 2-23
Glove box ........................................................... 2-24
Console box ....................................................... 2-25
Cargo net (if so equipped) ................................. 2-25
Windows .................................................................. 2-26
Power windows .................................................. 2-26
Sunroof (if so equipped) ......................................... 2-28
Automatic sunroof .............................................. 2-28
Clock ....................................................................... 2-29
Adjusting the time............................................... 2-29
Interior light ............................................................. 2-29
Ceiling................................................................. 2-29
Personal light .......................................................... 2-30
Vanity mirror light (if so equipped) .......................... 2-31
Trunk light ............................................................... 2-32
Z
00.1.17/A33-D/V5.0
X
Page 56 of 247
light comes on when the parking brake is
applied.
Low brake fluid warning light:
The light warns of a low brake fluid level. If the
light comes on while the engine is running with
the parking brake not applied, stop the vehicle
and perform the following:
1. Check the brake fluid level. Add brake fluid
as necessary. See ªBrake and clutch fluidº
in the ªDo-it-yourselfº section.
WARNING
IYour brake system may not be work-
ing properly if the warning light is on.
Driving could be dangerous. If you
judge it to be safe, drive carefully to
the nearest service station for re-
pairs. Otherwise, have your vehicle
towed because driving it could be
dangerous.
IPressing the brake pedal with the
engine stopped and/or low brake fluid
level may increase your stopping dis-
tance and braking will require greaterpedal effort as well as greater pedal
travel.
IIf the brake fluid level is below the
MIN mark on the brake fluid reservoir,
do not drive until the brake system
has been checked at a NISSAN
dealer.
2. If the brake fluid level is correct, have the
warning system checked by a NISSAN
dealer.
or
Anti-lock brake
warning light (if so
equipped)
After turning the ignition key to the ON posi-
tion, the light will illuminate. The light will turn
off after about 2 seconds if the system is
operational.
If the light comes on while the engine is
running, it may indicate that the anti-lock brake
system is not functioning properly. Have the
system checked by your NISSAN dealer.
If an abnormality occurs in the system, the
anti-lock function will cease but the ordinary
brakes will continue to operate normally.If the light comes on while you are driving,
contact your NISSAN dealer for repair.
Low fuel warning light
This light comes on when the fuel in the tank is
getting low. Refuel as soon as it is convenient,
preferably before the fuel gauge reaches E.
There will be a small reserve of fuel remain-
ing in the tank when the fuel gauge needle
reaches E.INDICATOR LIGHTS
Overdrive off indicator light
This light comes on during driving when the
overdrive switch is pressed to prevent over-
drive operation.
The O/D OFF indicator light comes on for 2
seconds each time the ignition key is turned
ON. This shows the light is functioning prop-
erly.If the O/D OFF indicator light blinks for
approximately 8 seconds after coming on for
2 seconds, have your NISSAN dealer check
the transmission and repair it if necessary.The automatic transmission is equipped with
an electronic fail-safe mode. This system al-
lows the vehicle to be driven even in the event
of damage to the electrical circuits. If this
Instruments and controls
2-9
Z
00.1.17/A33-D/V5.0
X