wheel NISSAN MAXIMA 2001 A33 / 5.G Owners Manual
[x] Cancel search | Manufacturer: NISSAN, Model Year: 2001, Model line: MAXIMA, Model: NISSAN MAXIMA 2001 A33 / 5.GPages: 247, PDF Size: 1.99 MB
Page 14 of 247

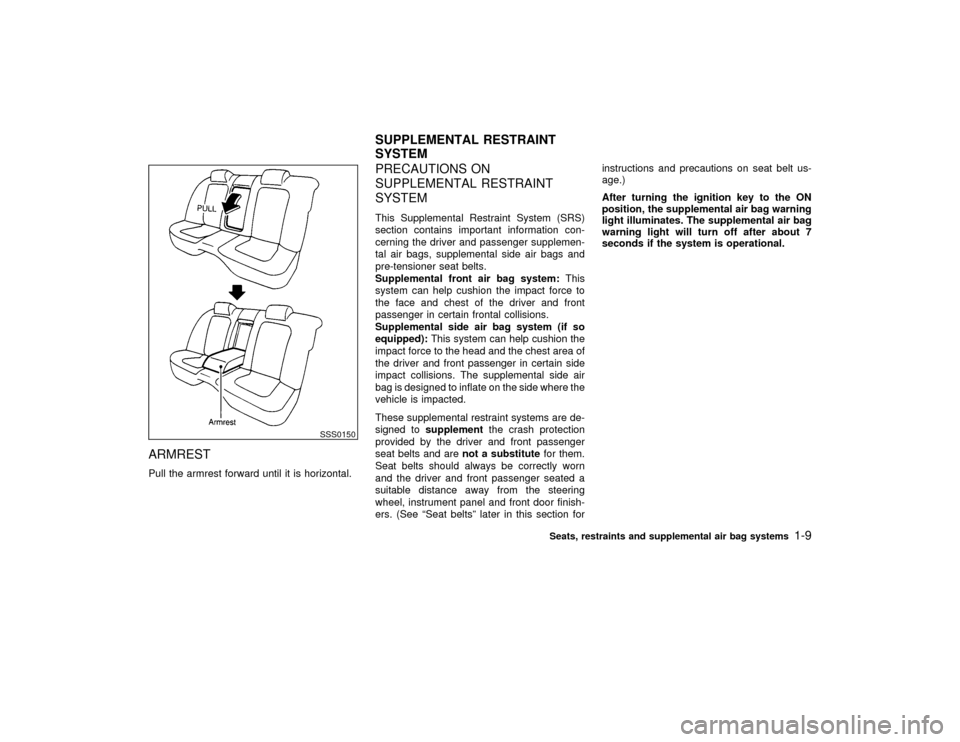
ARMRESTPull the armrest forward until it is horizontal.
PRECAUTIONS ON
SUPPLEMENTAL RESTRAINT
SYSTEMThis Supplemental Restraint System (SRS)
section contains important information con-
cerning the driver and passenger supplemen-
tal air bags, supplemental side air bags and
pre-tensioner seat belts.
Supplemental front air bag system:This
system can help cushion the impact force to
the face and chest of the driver and front
passenger in certain frontal collisions.
Supplemental side air bag system (if so
equipped):This system can help cushion the
impact force to the head and the chest area of
the driver and front passenger in certain side
impact collisions. The supplemental side air
bag is designed to inflate on the side where the
vehicle is impacted.
These supplemental restraint systems are de-
signed tosupplementthe crash protection
provided by the driver and front passenger
seat belts and arenot a substitutefor them.
Seat belts should always be correctly worn
and the driver and front passenger seated a
suitable distance away from the steering
wheel, instrument panel and front door finish-
ers. (See ªSeat beltsº later in this section forinstructions and precautions on seat belt us-
age.)
After turning the ignition key to the ON
position, the supplemental air bag warning
light illuminates. The supplemental air bag
warning light will turn off after about 7
seconds if the system is operational.
SSS0150
SUPPLEMENTAL RESTRAINT
SYSTEM
Seats, restraints and supplemental air bag systems
1-9
Z
00.1.17/A33-D/V5.0
X
Page 15 of 247

WARNING
IThe supplemental front air bags ordi-
narily will not inflate in the event of a
side impact, rear impact, roll over, or
lower severity frontal collision. Al-
ways wear your seat belts to help
reduce the risk or severity of injury in
various kinds of accidents.
IThe seat belts and the supplemental
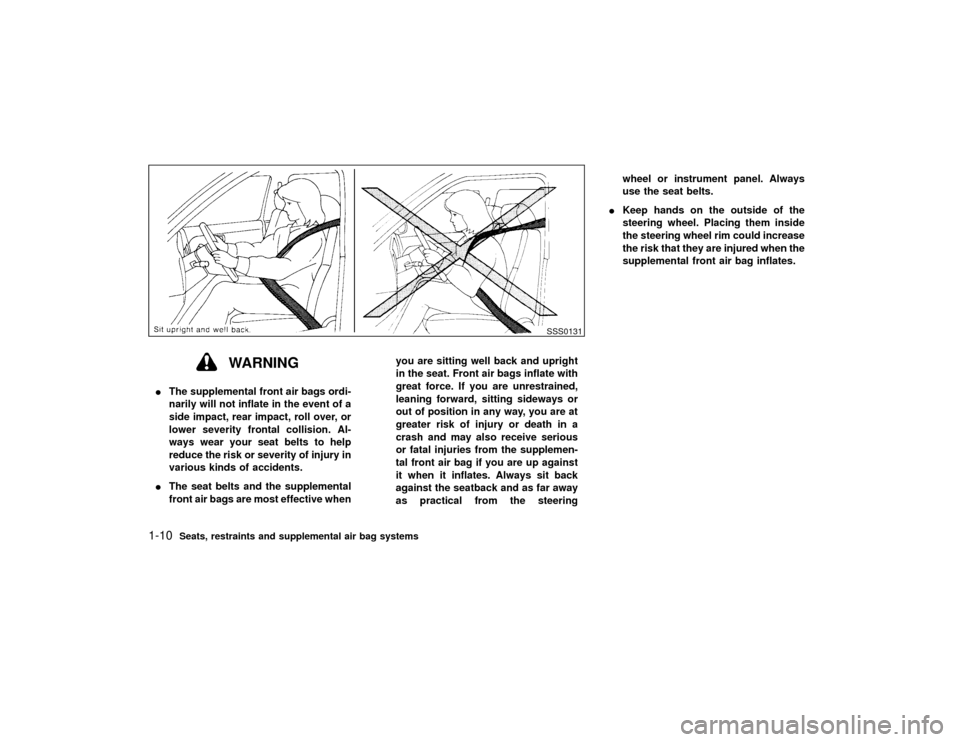
front air bags are most effective whenyou are sitting well back and upright
in the seat. Front air bags inflate with
great force. If you are unrestrained,
leaning forward, sitting sideways or
out of position in any way, you are at
greater risk of injury or death in a
crash and may also receive serious
or fatal injuries from the supplemen-
tal front air bag if you are up against
it when it inflates. Always sit back
against the seatback and as far away
as practical from the steeringwheel or instrument panel. Always
use the seat belts.
IKeep hands on the outside of the
steering wheel. Placing them inside
the steering wheel rim could increase
the risk that they are injured when the
supplemental front air bag inflates.
SSS0131
1-10
Seats, restraints and supplemental air bag systems
Z
00.1.17/A33-D/V5.0
X
Page 19 of 247

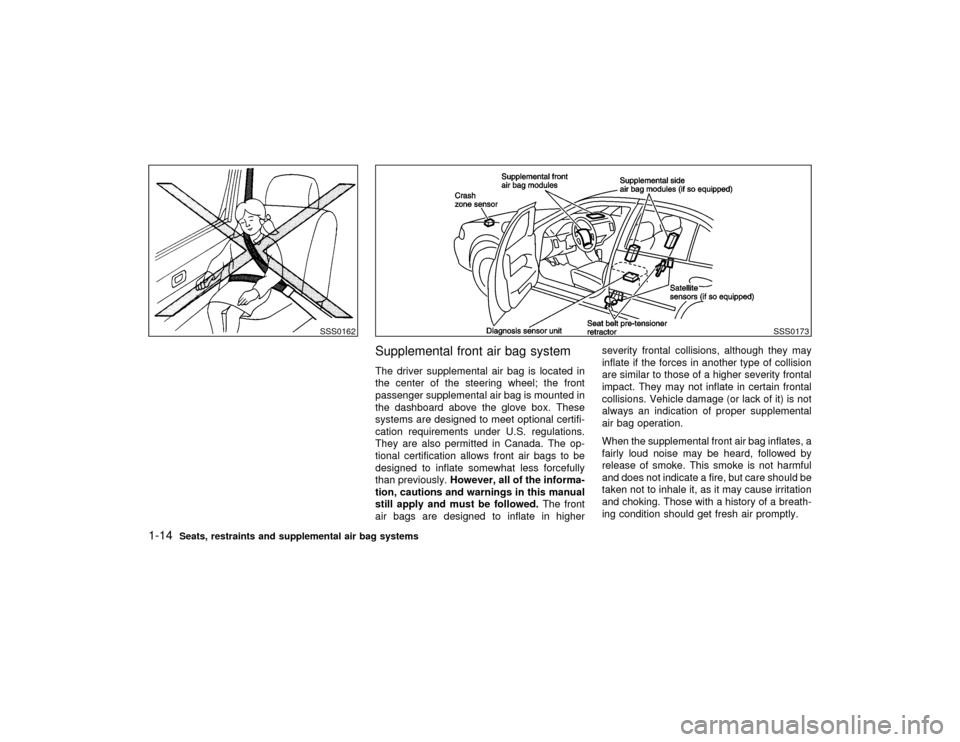
Supplemental front air bag systemThe driver supplemental air bag is located in
the center of the steering wheel; the front
passenger supplemental air bag is mounted in
the dashboard above the glove box. These
systems are designed to meet optional certifi-
cation requirements under U.S. regulations.
They are also permitted in Canada. The op-
tional certification allows front air bags to be
designed to inflate somewhat less forcefully
than previously.However, all of the informa-
tion, cautions and warnings in this manual
still apply and must be followed.The front
air bags are designed to inflate in higherseverity frontal collisions, although they may
inflate if the forces in another type of collision
are similar to those of a higher severity frontal
impact. They may not inflate in certain frontal
collisions. Vehicle damage (or lack of it) is not
always an indication of proper supplemental
air bag operation.
When the supplemental front air bag inflates, a
fairly loud noise may be heard, followed by
release of smoke. This smoke is not harmful
and does not indicate a fire, but care should be
taken not to inhale it, as it may cause irritation
and choking. Those with a history of a breath-
ing condition should get fresh air promptly.
SSS0162
SSS0173
1-14
Seats, restraints and supplemental air bag systems
Z
00.1.17/A33-D/V5.0
X
Page 20 of 247

Supplemental front air bags along with the use
of seat belts, helps to cushion the impact force
on the face and chest of the front occupants.
They can help save lives and reduce serious
injuries. However, an inflating front air bag
may cause facial abrasions or other injuries.
Front air bags do not provide restraint to the
lower body.
The seat belts should be correctly worn and
the driver and passenger seated upright as far
as practical away from the steering wheel or
dash board. Since the supplemental front air
bags inflates quickly in order to help protect
the front occupants, the force of the front air
bag inflating can increase the risk of injury if
the occupant is too close to or is against the air
bag module during inflation. The air bag will
deflate quickly after the collision is over.
After turning the ignition key to the ON
position, the supplemental air bag warning
light illuminates. The supplemental air bag
warning light will turn off after about 7
seconds if the system is operational.
WARNING
IDo not place any objects on the steer-
ing wheel pad or on the instrumentpanel. Also, do not place any objects
between any occupant and the steer-
ing wheel or instrument panel. Such
objects may become dangerous pro-
jectiles and cause injury if the supple-
mental front air bag inflates.
IRight after inflation, several air bag
system components will be hot. Do
not touch them; you may severely
burn yourself.
INo unauthorized changes should be
made to any components or wiring of
the supplemental front air bag sys-
tem. This is to prevent accidental
inflation of the air bag or damage to
the air bag system.
IDo not make unauthorized changes
to your vehicle's electrical system,
suspension system or front end
structure. This could affect proper
operation of the supplemental air bag
system.
ITampering with the supplemental
front air bag system may result inserious personal injury. Tampering
includes changes to the steering
wheel and the instrument panel as-
sembly by placing material over the
steering wheel pad, above the dash-
board, or by installing additional trim
material around the air bag system.
IWork around and on the supplemen-
tal front air bag system should be
done by an authorized NISSAN
dealer. Installation of electrical equip-
ment should also be done by an au-
thorized NISSAN dealer. The SRS wir-
ing harnesses* should not be
modified or disconnected. Unautho-
rized electrical test equipment and
probing devices should not be used
on the air bag system.
* The SRS wiring harnesses are cov-
ered with yellow insulation either just
before the harness connectors or
over the complete harness for easy
identification.
When selling your vehicle, we request that you
inform the buyer about the supplemental front
Seats, restraints and supplemental air bag systems
1-15
Z
00.1.17/A33-D/V5.0
X
Page 49 of 247

Windshield wiper/washer switch (P.2-14)
Instrument brightness control switch (P.2-17)Meters/gauges (P.2-3)
Security indicator light (P.2-12)
Headlight, fog light (if so equipped)
and turn signal switch (P.2-16)
Outside mirror remote control (P.3-15)Fuse box cover (P.8-21)
Tilting steering wheel lock lever (P.3-13)Driver supplemental air bag (P.1-9)
Ignition switch/steering lock (P.5-4) Cruise control main/set switch (P.5-14)
Power outlet (P.2-21) or cigarette lighter (accessory) (P.2-22)Hazard warning flasher switch (P.2-19) Ventilator (P.4-2)
Heater/air conditioner control (P.4-3)
Clock (P.2-29)
Radio/cassette player (P.4-14)/CD player (P.4-19) Rear window and outside mirror (if so equipped) defogger switch (P.2-15)
Passenger supplemental air bag (P.1-9)
Glove box (P.2-24)
Tray (P.2-22) or ashtray (accessory) (P.2-22)
SIC1566
See the page indicated in parentheses for operating details.
Traction control system (TCS) cancel switch (if so equipped) (P.2-21)
Steering switch for audio control (if so equipped) (P.4-24)
INSTRUMENT PANEL2-2
Instruments and controls
Z
00.1.17/A33-D/V5.0
X
Page 58 of 247

checked and repaired as necessary
could lead to poor driveability, reduced
fuel economy, and possible damage to
the emission control system.
Traction control system
indicator light (if so equipped)
The traction control system indicator light
should come on when you turn the ignition key
to ON. The light will go off as you start the
engine. If the indicator light does not come on
or go off, have the TCS checked by your
NISSAN dealer.
If the light stays on or comes on when you are
driving, there may be a problem with your
traction control system and it may not operate
properly. Have the system checked by your
NISSAN dealer.
The traction control system indicator light may
come on for the following reasons.
a) If the system is turned off by pressing
the button on the instrument panel, the
indicator light will come on and stay on.
To turn the system back on, press the
button again. The indicator light will go
off.b) If engine speed is above 4,000 rpm in a
selected gear. Use D range on low fric-
tion road surfaces.
If the traction control system indicator light
comes on and stays on for an extended period
of time when the system is turned on, have
your vehicle checked by your NISSAN dealer.
Slip indicator light (if so
equipped)
This light will blink on when your traction
control system is limiting wheel spin. Slippery
road conditions may exist if the slip indicator
light blinks on. If this happens, adjust your
driving accordingly.
You may feel or hear the system working, but
this is normal.
The light will blink on for a few seconds after
the traction control system stops limiting wheel
spin.
The slip indicator light also comes on when
you turn the ignition key to ON. The light will go
off as you start the engine. If the light does not
come on or go off, have the TCS checked by
your NISSAN dealer. The traction control sys-
tem operates in all transmission shift lever
positions. But the system can upshift the trans-mission only as high as the indicated shift lever
position.
AUDIBLE REMINDERS
Key reminder chimeThe chime will sound if the driver side door is
opened while the key is left in the ignition
switch (ignition switch is turned off). Remove
the key and take it with you when leaving the
vehicle.Light reminder chimeThe headlights will turn off when the front door
is opened with the light switch on unless the
ignition key is in the ON position.
When you turn the headlight switch ON again
after the lights automatically turn off and when
you open the driver's door, the lights will not
turn off automatically and a chime will sound
instead. See the battery saver system under
ªHeadlight switchº in this section for details.
Make sure to turn the light switch off when you
leave the vehicle.Seat belt warning chimeThe chime will sound for about 6 seconds
unless the drivers seat belt is securely fas-
tened.
Instruments and controls
2-11
Z
00.1.17/A33-D/V5.0
X
Page 66 of 247

Push the switch on to warn other drivers when
you must stop or park under emergency con-
ditions. All turn signal lights will flash.
Some state laws may prohibit the use of the
hazard warning flasher switch while driv-
ing.
WARNING
IIf stopping for an emergency, be sure
to move the vehicle well off the road.IDo not use the hazard warning flash-
ers while moving on the highway un-
less unusual circumstances force
you to drive so slowly that your ve-
hicle might become a hazard to other
traffic.
ITurn signals do not work when the
hazard warning flasher lights are on.
The flasher can be actuated with the ignition
switch either off or on.
To sound the horn, push the center pad area of
the steering wheel.
SIC1232
SIC1280
HAZARD WARNING FLASHER
SWITCHHORN
Instruments and controls
2-19
Z
00.1.17/A33-D/V5.0
X
Page 86 of 247

3 Pre-driving checks and adjustmentsKeys .......................................................................... 3-2
Doors ......................................................................... 3-3
Locking with key ................................................... 3-3
Locking with inside lock knob............................... 3-3
Locking with power door lock switch.................... 3-4
Child safety rear door lock ................................... 3-4
Multi-remote control system ...................................... 3-4
How to use multi-remote control system.............. 3-5
Battery replacement ............................................. 3-8
Hood .......................................................................... 3-9
Trunk lid .................................................................. 3-10
Opener operation ............................................... 3-10
Key operation ..................................................... 3-11Interior trunk lid release ..................................... 3-11
Fuel filler lid ............................................................. 3-12
Opener operation ............................................... 3-12
Fuel filler cap ...................................................... 3-12
Steering wheel ........................................................ 3-13
Tilt operation....................................................... 3-13
Sun visors ............................................................... 3-14
Mirrors ..................................................................... 3-14
Inside mirror ....................................................... 3-14
Automatic anti-dazzling inside mirror (if so
equipped)............................................................ 3-14
Outside mirrors ................................................... 3-15
Z
00.1.17/A33-D/V5.0
X
Page 98 of 247

after the fuel pump nozzle shuts off
automatically.
Continued refueling may cause fuel
overflow, resulting in fuel spray and
possibly a fire.
IUse only a genuine fuel filler cap as a
replacement. It has a built-in safety
valve needed for proper operation of
the fuel system and emission control
system. An incorrect cap can result in
a serious malfunction and possible
injury.
INever pour fuel into the throttle body
to attempt to start your vehicle.
CAUTION
IIf fuel is spilled on the car body, flush
it away with water to avoid paint dam-
age.
ITighten until the fuel filler cap clicks.
Failure to tighten the fuel filler cap
properly may cause the
mal-
function indicator lamp (MIL) to illu-minate. If the
lamp illuminates
because the fuel filler cap is loose or
missing, tighten or install the cap and
continue to drive the vehicle. The
lamp should turn off after a few
driving trips. If the
lamp does
not turn off after a few driving trips,
have the vehicle inspected by an au-
thorized NISSAN dealer.
IFor additional information, see the
ªMalfunction indicator lamp (MIL)º in
the ª2. Instruments and controlsº
section.
TILT OPERATIONPull the lock lever and while holding down,
adjust the steering wheel up or down to the
desired position.
Push the lock lever back into place to lock the
steering wheel in place.
WARNING
Do not adjust the steering wheel while
driving. You could lose control of your
vehicle and cause an accident.
SPA0234
STEERING WHEEL
Pre-driving checks and adjustments
3-13
Z
00.1.17/A33-D/V5.0
X
Page 125 of 247

to protect it. (without 8 cm diameter com-
pact discs)
CD IN indicator:
CD IN indicator appears on the display when
the CD is loaded with the system on.
CD CARE AND CLEANINGIHandle a CD by its edges. Never touch the
surface of the disc. Do not bend the disc.
IAlways place the discs in the storage case
when they are not being used.
ITo clean a disc, wipe the surface from the
center to the outer edge using a clean, soft
cloth. Do not wipe the disc using a circular
motion.
Do not use a conventional record cleaner or
alcohol intended for industrial use.
IA new disc may be rough on its inner and
outer edges. Remove the rough edges us-
ing the side of a pen or pencil as illustrated.
STEERING SWITCH FOR AUDIO
CONTROL (if so equipped)The audio system can be operated using the
controls on the steering wheel.MODE select switchPush the mode select switch to change the
mode in the sequence of AM, FM1, FM2, CD
and CD autochanger (if so equipped) and
Tape.Volume control switchesPush the upper or lower side switch to in-
crease or decrease the volume.
SAA0451
SAA0464
4-24
Heater, air conditioner and audio systems
Z
00.1.17/A33-D/V5.0
X