door lock NISSAN MAXIMA 2002 A33 / 5.G User Guide
[x] Cancel search | Manufacturer: NISSAN, Model Year: 2002, Model line: MAXIMA, Model: NISSAN MAXIMA 2002 A33 / 5.GPages: 247, PDF Size: 1.98 MB
Page 89 of 247
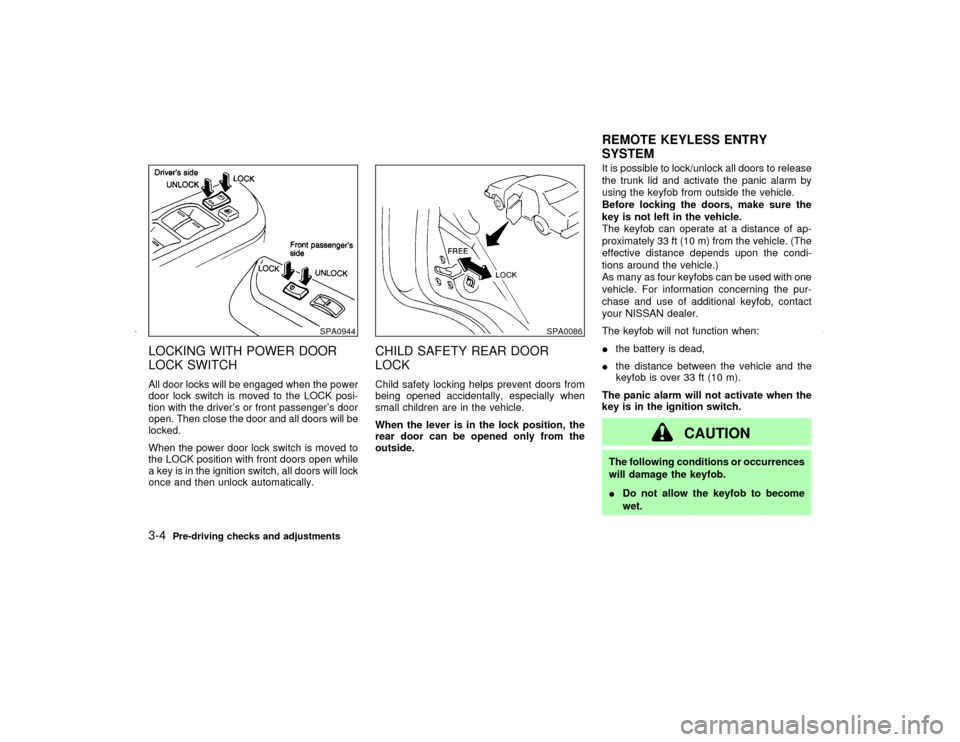
LOCKING WITH POWER DOOR
LOCK SWITCHAll door locks will be engaged when the power
door lock switch is moved to the LOCK posi-
tion with the driver's or front passenger's door
open. Then close the door and all doors will be
locked.
When the power door lock switch is moved to
the LOCK position with front doors open while
a key is in the ignition switch, all doors will lock
once and then unlock automatically.
CHILD SAFETY REAR DOOR
LOCKChild safety locking helps prevent doors from
being opened accidentally, especially when
small children are in the vehicle.
When the lever is in the lock position, the
rear door can be opened only from the
outside.It is possible to lock/unlock all doors to release
the trunk lid and activate the panic alarm by
using the keyfob from outside the vehicle.
Before locking the doors, make sure the
key is not left in the vehicle.
The keyfob can operate at a distance of ap-
proximately 33 ft (10 m) from the vehicle. (The
effective distance depends upon the condi-
tions around the vehicle.)
As many as four keyfobs can be used with one
vehicle. For information concerning the pur-
chase and use of additional keyfob, contact
your NISSAN dealer.
The keyfob will not function when:
Ithe battery is dead,
Ithe distance between the vehicle and the
keyfob is over 33 ft (10 m).
The panic alarm will not activate when the
key is in the ignition switch.
CAUTION
The following conditions or occurrences
will damage the keyfob.
IDo not allow the keyfob to become
wet.
SPA0944
SPA0086
REMOTE KEYLESS ENTRY
SYSTEM
3-4
Pre-driving checks and adjustments
Z
01.9.21/A33-D/V5.0
X
Page 91 of 247
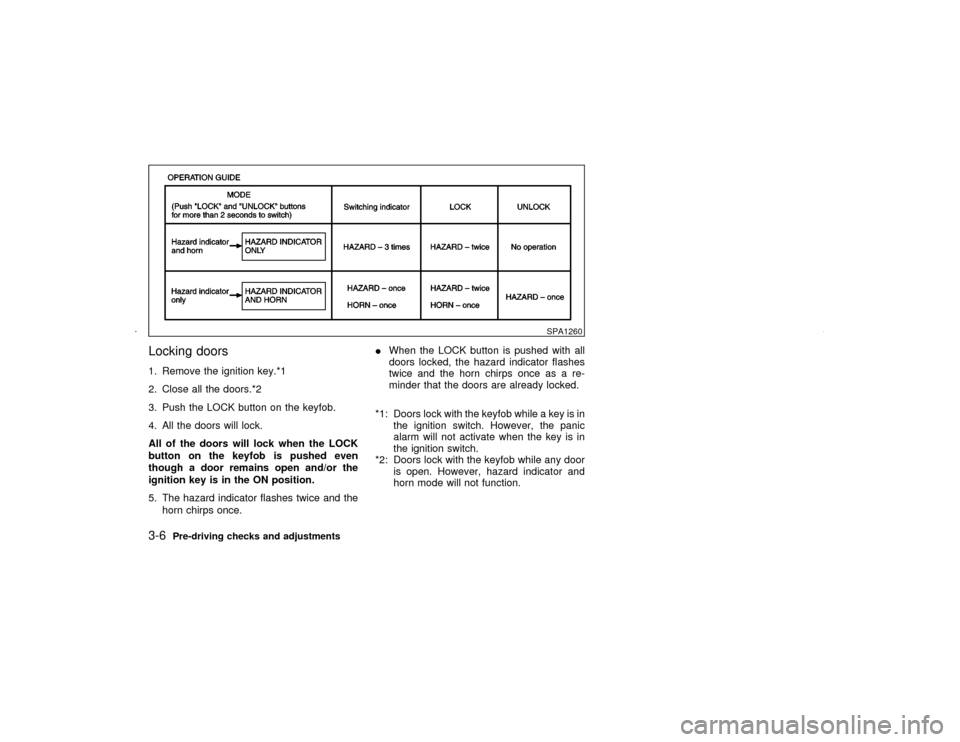
Locking doors1. Remove the ignition key.*1
2. Close all the doors.*2
3. Push the LOCK button on the keyfob.
4. All the doors will lock.
All of the doors will lock when the LOCK
button on the keyfob is pushed even
though a door remains open and/or the
ignition key is in the ON position.
5. The hazard indicator flashes twice and the
horn chirps once.IWhen the LOCK button is pushed with all
doors locked, the hazard indicator flashes
twice and the horn chirps once as a re-
minder that the doors are already locked.
*1: Doors lock with the keyfob while a key is in
the ignition switch. However, the panic
alarm will not activate when the key is in
the ignition switch.
*2: Doors lock with the keyfob while any door
is open. However, hazard indicator and
horn mode will not function.
SPA1260
3-6
Pre-driving checks and adjustments
Z
01.9.21/A33-D/V5.0
X
Page 92 of 247
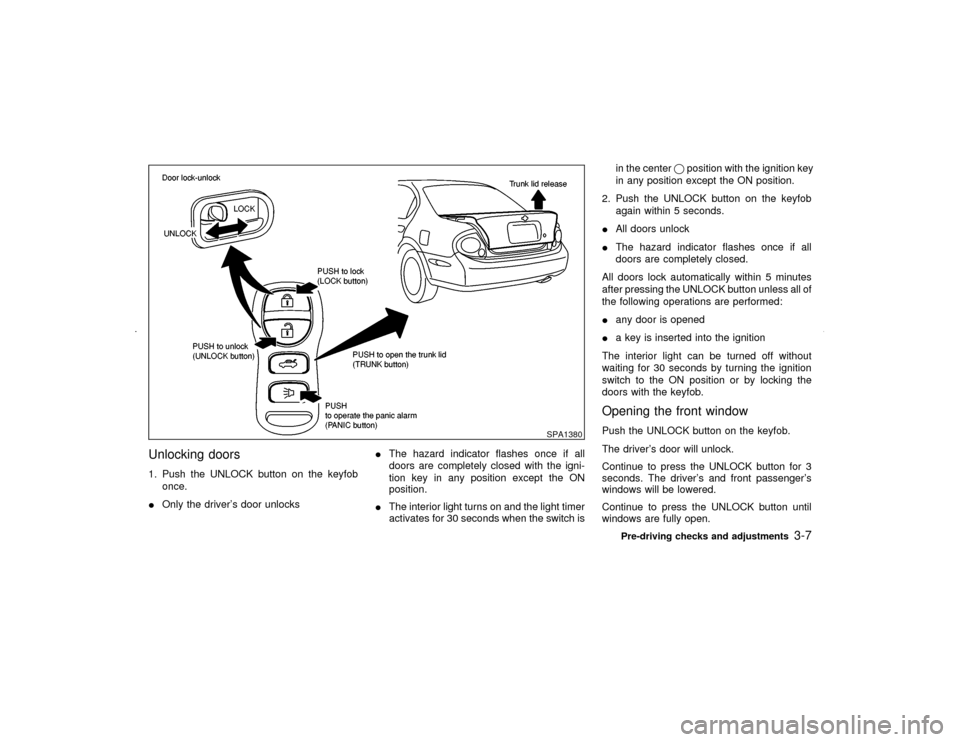
Unlocking doors1. Push the UNLOCK button on the keyfob
once.
IOnly the driver's door unlocksIThe hazard indicator flashes once if all
doors are completely closed with the igni-
tion key in any position except the ON
position.
IThe interior light turns on and the light timer
activates for 30 seconds when the switch isin the centerqposition with the ignition key
in any position except the ON position.
2. Push the UNLOCK button on the keyfob
again within 5 seconds.
IAll doors unlock
IThe hazard indicator flashes once if all
doors are completely closed.
All doors lock automatically within 5 minutes
after pressing the UNLOCK button unless all of
the following operations are performed:
Iany door is opened
Ia key is inserted into the ignition
The interior light can be turned off without
waiting for 30 seconds by turning the ignition
switch to the ON position or by locking the
doors with the keyfob.
Opening the front windowPush the UNLOCK button on the keyfob.
The driver's door will unlock.
Continue to press the UNLOCK button for 3
seconds. The driver's and front passenger's
windows will be lowered.
Continue to press the UNLOCK button until
windows are fully open.
SPA1380
Pre-driving checks and adjustments
3-7
Z
01.9.21/A33-D/V5.0
X
Page 93 of 247

To stop lowering the windows, release the
UNLOCK button.
To start lowering the windows, press the UN-
LOCK button again for 3 more seconds.
This function will operate after the ignition
switch is off and 45 seconds passed or either
the front door is opened.Releasing the trunk lid1. Push the TRUNK button on the keyfob for
longer than 0.5 seconds with the key re-
moved from the ignition key cylinder.
2. The trunk lid opens.
The trunk lid will not open when the trunk lid
cancel lever is in the CANCEL position.
It can be opened only with the key.
See ªTrunk lidº later in this section for cancel
lever.Using the panic alarmIf you are near your vehicle and feel threat-
ened, you may activate the alarm to call atten-
tion as follows:
1. Push the PANIC button on the keyfob for
longer than 0.5 secondswith the key
removed from the ignition key cylinder.
2. The theft warning alarm and headlights willstay on for 30 seconds.
3. The panic alarm stops when:
IIt has run for 30 seconds, or
IThe LOCK or the UNLOCK button is
pressed, or
IThe panic button or the trunk lid release
button is pushed on the keyfob for longer
than 0.5 seconds.
BATTERY REPLACEMENTReplace the battery as follows:
1. Open the lid using a suitable tool.
2. Replace the battery with a new one.
SPA1374
3-8
Pre-driving checks and adjustments
Z
01.9.21/A33-D/V5.0
X
Page 101 of 247
ignition switch is in the ACC or ON position.
Turn the control knob to right or left to select
the right or left outside mirror, then adjust.
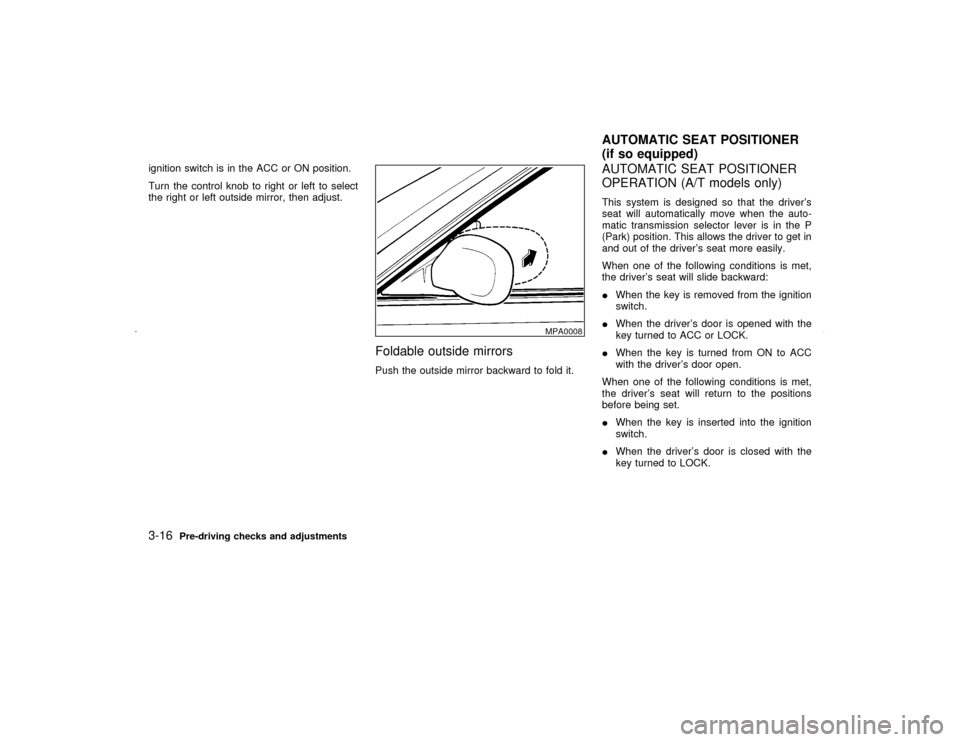
Foldable outside mirrorsPush the outside mirror backward to fold it.
AUTOMATIC SEAT POSITIONER
OPERATION (A/T models only)This system is designed so that the driver's
seat will automatically move when the auto-
matic transmission selector lever is in the P
(Park) position. This allows the driver to get in
and out of the driver's seat more easily.
When one of the following conditions is met,
the driver's seat will slide backward:
IWhen the key is removed from the ignition
switch.
IWhen the driver's door is opened with the
key turned to ACC or LOCK.
IWhen the key is turned from ON to ACC
with the driver's door open.
When one of the following conditions is met,
the driver's seat will return to the positions
before being set.
IWhen the key is inserted into the ignition
switch.
IWhen the driver's door is closed with the
key turned to LOCK.
MPA0008
AUTOMATIC SEAT POSITIONER
(if so equipped)
3-16
Pre-driving checks and adjustments
Z
01.9.21/A33-D/V5.0
X
Page 103 of 247

two times with the ignition key in the LOCK
position.
2. Reset the desired position using the previ-
ous procedure.
Selecting the memorized position1. A/T models:
Set the automatic transmission selector le-
ver to the P (Park) position.
M/T models:
Apply the parking brake securely when the
vehicle is stopped.
2. Turn the ignition ON.
3. Push the memory switch 1 or 2 fully for at
least 1 second.
The driver's seat will move to the memo-
rized position with the indicator light flash-
ing. Then the light will stay on for approxi-
mately 5 seconds.
When memory switch 1 or 2 is pushed with the
driver's door open and then the key inserted
into the ignition switch within approximately 1
minute, the driver's seat will move to the
memorized position. Ð A/T models only
System operationThe automatic drive positioner system will not
work or will stop operating under the following
conditions:
Iwhen the vehicle speed is above 4 MPH (7
km/h).
Iwhen any two or more of the memory
switches are simultaneously pressed while
the automatic drive positioner is operating.
Iwhen the adjusting switch for the driver's
seat is turned on while the automatic drive
positioner is operating.
Iwhen the cancel switch located on the
instrument panel is pushed to cancel.
Iwhen the memory switch 1 or 2 is not
pushed for at least 1 second.
Iwhen the seat has already been moved to
the memorized position.
Iwhen no seat position is stored in the
memory switch.
Iwhen the parking brake is not applied. Ð
M/T models
Iwhen the vehicle speed is above 4 MPH (7
km/h) while the parking brake is applied. Ð
M/T models
To restart the drive positioner system,move the parking brake to off and on.
Iwhen the engine is started while moving the
automatic drive positioner. Ð M/T models
3-18
Pre-driving checks and adjustments
Z
01.9.21/A33-D/V5.0
X
Page 136 of 247

5 Starting and drivingPrecautions when starting and driving ...................... 5-2
Exhaust gas (Carbon monoxide).......................... 5-2
Three way catalyst ............................................... 5-3
Avoiding collision and rollover .............................. 5-3
Drinking alcohol/drugs and driving ....................... 5-4
Ignition switch............................................................ 5-4
Automatic transmission ........................................ 5-4
Manual transmission ............................................ 5-5
Key positions ........................................................ 5-6
Nissan Vehicle Immobilizer System .................... 5-6
Before starting the engine ......................................... 5-7
Starting the engine .................................................... 5-7
Driving the vehicle ..................................................... 5-8
Automatic transmission ........................................ 5-8
Manual transmission .......................................... 5-11
Parking brake .......................................................... 5-12
Cruise control .......................................................... 5-13
Precautions on cruise control ............................. 5-13
Cruise control operations ................................... 5-14
Break-in schedule ................................................... 5-15
Increasing fuel economy ......................................... 5-15
Parking/parking on hills ........................................... 5-16
Power steering ........................................................ 5-17
Brake system .......................................................... 5-18Braking precautions............................................ 5-18
Anti-lock brake system (ABS) ........................... 5-18
Traction control system (if so equipped)................. 5-19
Cold weather driving ............................................... 5-20
Freeing a frozen door lock ................................. 5-20
Anti-freeze .......................................................... 5-20
Battery ................................................................ 5-20
Draining of coolant water ................................... 5-20
Tire equipment ................................................... 5-20
Special winter equipment ................................... 5-21
Driving on snow or ice ....................................... 5-21
Engine block heater (if so equipped) ................. 5-21
Z
01.9.21/A33-D/V5.0
X
Page 142 of 247

IMake sure the area around the vehicle is
clear.
IMaintenance items should be checked pe-
riodically, e.g., each time you check engine
oil.
ICheck that all windows and lights are clean.
IVisually inspect tires for their appearance
and condition. Also, check tires for proper
inflation.
ILock all doors.
IPosition seat and adjust head restraints.
IAdjust inside and outside mirrors.
IFasten seat belts and ask all passengers to
do likewise.
ICheck the operation of warning lights when
key is turned to the ON (3) position.1. Apply the parking brake.
2.Automatic transmission:
Move the selector lever to P (Park) or N
(Neutral). (P preferred.)
The starter is designed not to operate if the
selector lever is in one of the driving posi-
tions.
Manual transmission:
Move the shift lever to N (Neutral) position,
and depress the clutch pedal to the floor
while cranking the engine.
The starter is designed not to operate un-
less the clutch pedal is fully depressed.
3. Crank the enginewith your foot off the
accelerator pedalby turning the ignition
key to START. Release the key when the
engine starts. If the engine starts, but fails
to run, repeat the above procedure.
IIf the engine is very hard to start in
extremely cold or hot weather, de-
press the accelerator pedal and hold it
to help start the engine.
CAUTION
Do not operate the starter for more than
15 seconds at a time. If the engine does
not start, turn the key off and wait 10
seconds before cranking again, other-
wise the starter could be damaged.
4.Warm-up
Allow the engine to idle for at least 30
seconds after starting. Drive at moderate
speed for a short distance first, especially in
cold weather.
BEFORE STARTING THE ENGINE STARTING THE ENGINE
Starting and driving
5-7
Z
01.9.21/A33-D/V5.0
X
Page 155 of 247

on, this could cause the three way
catalyst to overheat and be damaged.
To avoid this, the TCS will automati-
cally turn off. Shifting the gear selec-
tor to D will reactivate the TCS.
WARNING
This system is designed to prevent the
wheels from spinning. However, it does
not prevent vehicle slipping or spinning
due to abrupt steering operation at high
speeds or by careless or dangerous
driving techniques. Be especially care-
ful when driving on slippery surfaces
and always drive safely.
FREEING A FROZEN DOOR LOCKTo prevent a door lock from freezing, apply
de-icer or glycerin to it through the key hole. If
the lock becomes frozen, heat the key before
inserting it into the key hole.ANTI-FREEZEIn the winter when it is anticipated that the
temperature will drop below 32ÉF (0ÉC), check
anti-freeze to assure proper winter protection.
For additional information, see ªEngine Cool-
ing Systemº in the ª8. Maintenance and do-it-
yourselfº section.BATTERYIf the battery is not fully charged during ex-
tremely cold weather conditions, the battery
fluid may freeze and damage the battery. To
maintain maximum efficiency, the battery
should be checked regularly. For additional
information, see ªBatteryº in the ª8. Mainte-
nance and do-it-yourselfº section.DRAINING OF COOLANT WATERIf the vehicle is to be left outside without
anti-freeze, drain the cooling system by open-
ing the drain valves located under the radiator
and on the engine block. Refill before operat-
ing the vehicle. See ªEngine cooling systemº in
the ª8. Maintenance and do-it-yourselfº sectionfor changing engine coolant.
TIRE EQUIPMENT1. SUMMER tires are of a tread design to
provide superior performance on dry pave-
ment. However, the performance of these
tires will be substantially reduced in snowy
and icy conditions. If you operate your
vehicle on snowy or icy roads, NISSAN
recommends the use of MUD & SNOW or
ALL SEASON tires on all four wheels.
Please consult your NISSAN dealer for the
tire type, size, speed rating and availability
information.
2. For additional traction on icy roads, studded
tires may be used. However, some prov-
inces and states prohibit their use. Check
local, state and provincial laws before in-
stalling studded tires.
Skid and traction capabilities of studded
snow tires, on wet or dry surfaces, may be
poorer than that of non-studded snow tires.
3. Tire chains may be used if desired. Make
sure they are of proper size for the tires on
your vehicle and are installed according to
the chain manufacturer's suggestions. Use
of tire chains may be prohibited according
to location. Check the local laws before
installing tire chains. When installing tire
COLD WEATHER DRIVING
5-20
Starting and driving
Z
01.9.21/A33-D/V5.0
X
Page 178 of 247
Tire rotation*:Tires should be rotated every
7,500 miles (12,000 km).
Wheel alignment and balance:If the vehicle
pulls to either side while driving on a straight
and level road, or if you detect uneven or
abnormal tire wear, there may be a need for
wheel alignment.
If the steering wheel or seat vibrates at normal
highway speeds, wheel balancing may be
needed.
For additional information regarding tires, refer
to ªImportant Tire Safety Informationº in the
Warranty Information Booklet (US) or ªTire
Safety Informationº in the Warranty and Road-
side Assistance Information booklet (Canada).
Windshield:Clean the windshield on a regu-
lar basis. Check the windshield at least every
six months for cracks or other damage. Have a
damaged windshield repaired by a qualified
repair facility.
Windshield wiper blades*:Check for cracks
or wear if they do not wipe properly.
Doors and engine hood:Check that all doors
and the engine hood operate smoothly as well
as the trunk lid or back hatch. Also make sure
that all latches lock securely. Lubricate if nec-
essary. Make sure that the secondary latchkeeps the hood from opening when the pri-
mary latch is released.
When driving in areas using road salt or other
corrosive materials, check lubrication fre-
quently.
Lights*:Clean the headlights on a regular
basis. Make sure that the headlights, stop
lights, tail lights, turn signal lights, and other
lights are all operating properly and installed
securely. Also check headlight aim.
Inside the vehicleThe maintenance items listed here should be
checked on a regular basis, such as when
performing periodic maintenance, cleaning the
vehicle, etc.
Warning lights and chimes:Make sure that
all warning lights and chimes are operating
properly.
Windshield wiper and washer*:Check that
the wipers and washer operate properly and
that the wipers do not streak.
Windshield defroster:Check that the air
comes out of the defroster outlets properly and
in good quantity when operating the heater or
air conditioner.
Steering wheel:Check for changes in the
steering conditions, such as excessive freeplay, hard steering or strange noises.
Seats:Check seat position controls such as
seat adjusters, seatback recliner, etc. to en-
sure they operate smoothly and that all latches
lock securely in every position. Check that the
head restraints move up and down smoothly
and that the locks (if equipped) hold securely
in all latched positions.
Seat belts:Check that all parts of the seat belt
system (for example, buckles, anchors, adjust-
ers and retractors) operate properly and
smoothly, and are installed securely. Check
the belt webbing for cuts, fraying, wear or
damage.
Accelerator pedal:Check the pedal for
smooth operation and make sure the pedal
does not catch or require uneven effort. Keep
the floor mats away from the pedal.
Clutch pedal*:Make sure the pedal operates
smoothly and check that it has the proper free
play.
Brakes:Check that the brakes do not pull the
vehicle to one side when applied.
Brake pedal and booster*:Check the pedal
for smooth operation and make sure it has the
proper distance under it when depressed fully.
Check the brake booster function. Be sure to
keep floor mats away from the pedal.
Maintenance and do-it-yourself
8-3
Z
01.9.21/A33-D/V5.0
X