NISSAN MAXIMA 2002 A33 / 5.G Manual PDF
Manufacturer: NISSAN, Model Year: 2002, Model line: MAXIMA, Model: NISSAN MAXIMA 2002 A33 / 5.GPages: 247, PDF Size: 1.98 MB
Page 71 of 247

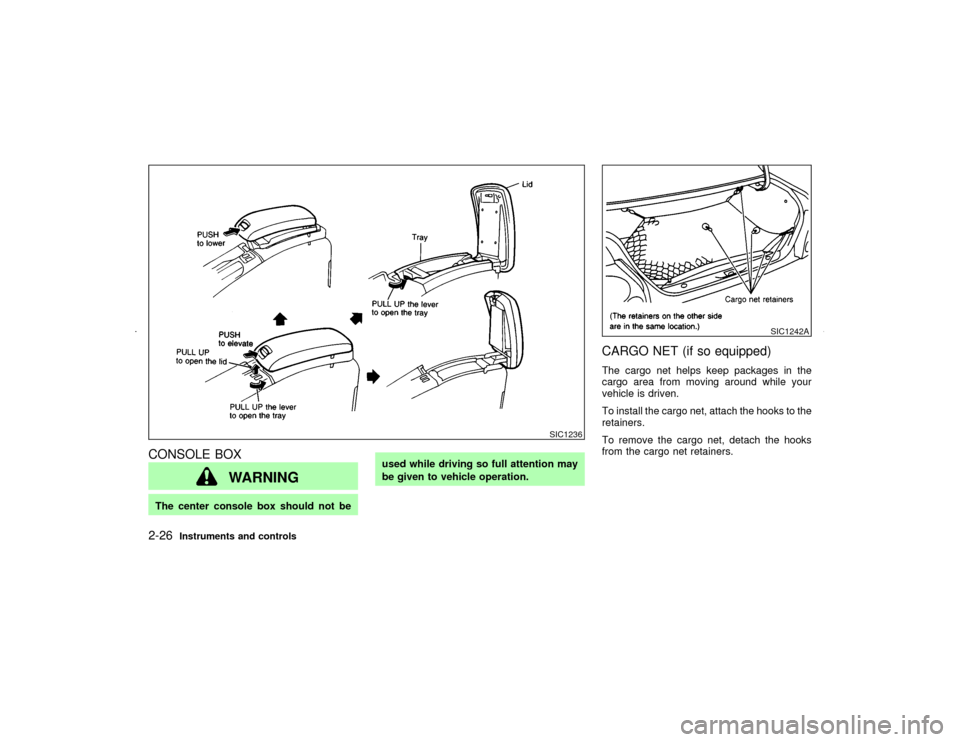
CONSOLE BOX
WARNING
The center console box should not beused while driving so full attention may
be given to vehicle operation.
CARGO NET (if so equipped)The cargo net helps keep packages in the
cargo area from moving around while your
vehicle is driven.
To install the cargo net, attach the hooks to the
retainers.
To remove the cargo net, detach the hooks
from the cargo net retainers.
SIC1236
SIC1242A
2-26
Instruments and controls
Z
01.9.21/A33-D/V5.0
X
Page 72 of 247

WARNING
IProperly secure all cargo to help pre-
vent it from sliding or shifting.
IBe sure to secure hooks into the
retainers. The cargo restrained in the
net must not exceed 30 lb (13.6 kg) or
the net may not stay secured.
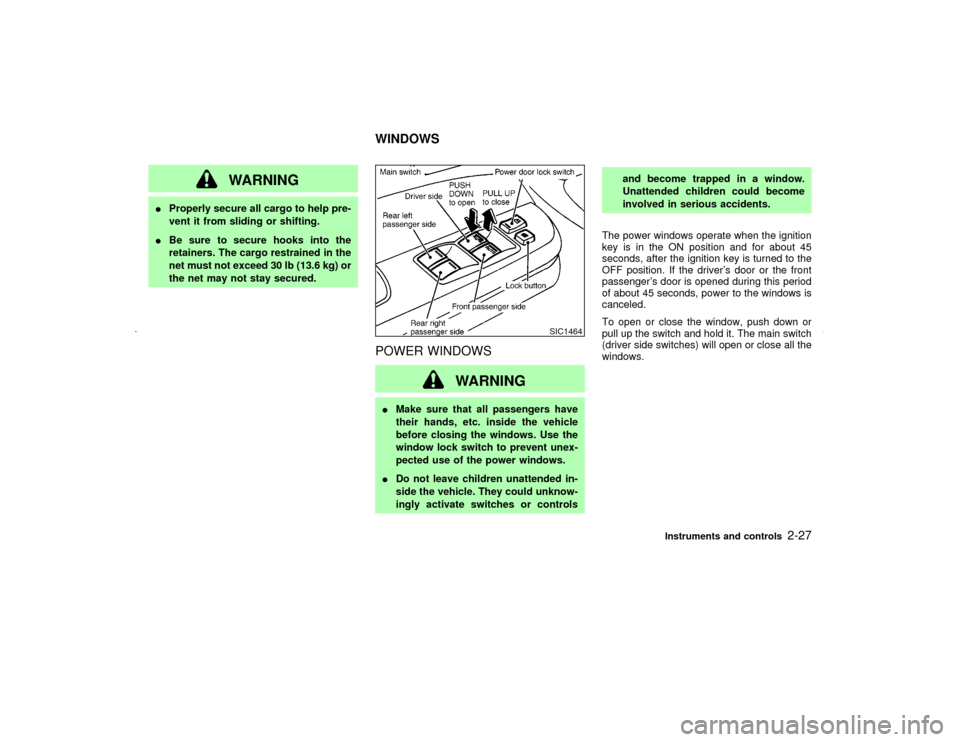
POWER WINDOWS
WARNING
IMake sure that all passengers have
their hands, etc. inside the vehicle
before closing the windows. Use the
window lock switch to prevent unex-
pected use of the power windows.
IDo not leave children unattended in-
side the vehicle. They could unknow-
ingly activate switches or controlsand become trapped in a window.
Unattended children could become
involved in serious accidents.
The power windows operate when the ignition
key is in the ON position and for about 45
seconds, after the ignition key is turned to the
OFF position. If the driver's door or the front
passenger's door is opened during this period
of about 45 seconds, power to the windows is
canceled.
To open or close the window, push down or
pull up the switch and hold it. The main switch
(driver side switches) will open or close all the
windows.
SIC1464
WINDOWS
Instruments and controls
2-27
Z
01.9.21/A33-D/V5.0
X
Page 73 of 247

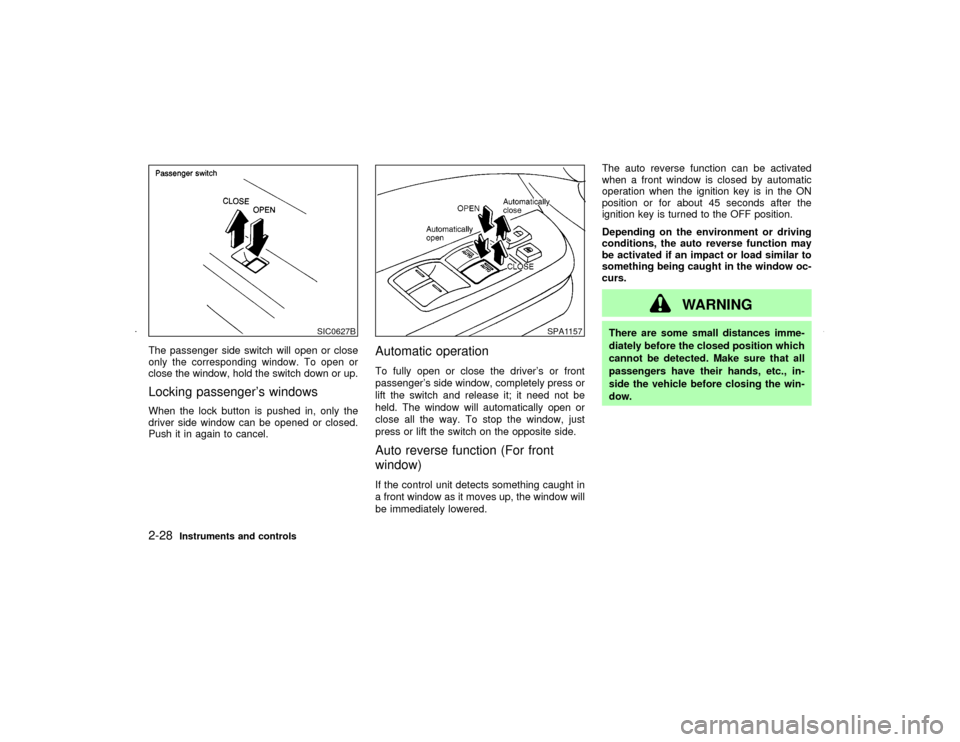
The passenger side switch will open or close
only the corresponding window. To open or
close the window, hold the switch down or up.Locking passenger's windowsWhen the lock button is pushed in, only the
driver side window can be opened or closed.
Push it in again to cancel.
Automatic operationTo fully open or close the driver's or front
passenger's side window, completely press or
lift the switch and release it; it need not be
held. The window will automatically open or
close all the way. To stop the window, just
press or lift the switch on the opposite side.Auto reverse function (For front
window)If the control unit detects something caught in
a front window as it moves up, the window will
be immediately lowered.The auto reverse function can be activated
when a front window is closed by automatic
operation when the ignition key is in the ON
position or for about 45 seconds after the
ignition key is turned to the OFF position.
Depending on the environment or driving
conditions, the auto reverse function may
be activated if an impact or load similar to
something being caught in the window oc-
curs.
WARNING
There are some small distances imme-
diately before the closed position which
cannot be detected. Make sure that all
passengers have their hands, etc., in-
side the vehicle before closing the win-
dow.
SIC0627B
SPA1157
2-28
Instruments and controls
Z
01.9.21/A33-D/V5.0
X
Page 74 of 247

AUTOMATIC SUNROOFThe sunroof will only operate when the ignition
key is in the ON position.
The automatic sunroof is operational for about
45 seconds, even if the ignition key is turned to
the OFF position. If the driver's door or the
front passenger's door is opened during this
period of about 45 seconds, power to the
sunroof is canceled.Sliding the sunroofTo open the roof, press the switch to the
side.To close the roof, press the switch to the
side.
Sliding position of lid can be chosen according
to sliding amount of switch.
To fully open or close the roof, completely
move the switch to the
or
side.
Restarting the sunroof sliding switchThe sliding switch will become inoperable after
the battery terminal is disconnected, the elec-
trical supply interrupted and/or some abnor-
mality detected. Use the following re-set pro-
cedure to return sunroof operation to normal.
1. If the sunroof lid is open, push the tilting
switch repeatedly toward tilt DOWN to fully
close the lid.
2. After the lid has closed all the way, keep
pushing the tilting switch toward tilt DOWN
for more than 1 second.Auto reverse function (When closing
the sunroof)If the control unit detects something caught in
the sunroof as it moves to the front, the
sunroof will immediately open backward.
The auto reverse function can be activated
when the sunroof is closed by automatic op-
eration when the ignition key is in the ONposition or for about 45 seconds after the
ignition key is turned to the OFF position.
Depending on the environment or driving
conditions, the auto reverse function may
be activated if an impact or load similar to
something being caught in the sunroof
occurs.
WARNING
There are some small distances imme-
diately before the closed position which
cannot be detected. Make sure that all
passengers have their hands, etc., in-
side the vehicle before closing the sun-
roof.Tilting the sunroofTo tilt up, first close the sunroof, then press
and hold the
side of the tilt switch. To tilt
down the sunroof, press and hold the
side.
Sun shadeOpen or close the sun shade by sliding it
backward or forward.
The shade will open automatically when the
SIC1746
SUNROOF (if so equipped)
Instruments and controls
2-29
Z
01.9.21/A33-D/V5.0
X
Page 75 of 247

sunroof is opened. However, it must be closed
manually.
WARNING
IIn an accident you could be thrown
from the vehicle through an open
sunroof. Always use seat belts and
child restraints.
IDo not allow anyone to stand up or
extend any portion of their body out
of the opening while the vehicle is in
motion or while the sunroof is clos-
ing.
CAUTION
IRemove water drops, snow, ice or
sand from the sunroof before open-
ing.
IDo not place any heavy object on the
sunroof or surrounding area.If the sunroof does not closeHave your NISSAN dealer check and repair
the sunroof.The digital clock displays time when the igni-
tion key is in ACC or ON.
If the power supply is disconnected, the clock
will not indicate the correct time. Readjust the
time.
ADJUSTING THE TIMEPush theHbutton to adjust the hour.
Push theMbutton to adjust the minute.The display of the trip computer is situated in
the tachometer display. When the ignition
switch is turned to ON, the display scrolls all
the modes of the trip computer and then shows
the mode chosen before the ignition switch is
turned OFF.
If the battery terminal is disconnected,
push the trip computer mode switch more
than 1 second to activate the computer.
SIC0910
SIC1749
CLOCK TRIP COMPUTER
2-30
Instruments and controls
Z
01.9.21/A33-D/V5.0
X
Page 76 of 247

When the ignition switch is turned to ON,
modes of the trip computer can be selected by
pushing once on the trip mode switch. The
following modes can be selected:Outside air temperature (ICY Ð ÉF
or ÉC)The outside air temperature is displayed in ÉF
or ÉC.
The outside air temperature mode includes a
low temperature warning feature: below 37ÉF
(3ÉC), the outside air temperature mode is
automatically selected and ICY indicator will
illuminate in order to draw the driver's atten-tion. Press the mode switch if you wish to
return to the mode that was selected before
the warning occurred. The ICY indicator will
continue blinking as long as the temperature
remains below 39ÉF (4ÉC).
Distance to empty (dte Ð mile or
km)The distance to empty (dte) mode provides
you with an estimation of the distance that can
be driven before refueling. The dte is con-
stantly being calculated, based on the amount
of fuel in the fuel tank and the actual fuel
consumption.
The display is updated every 30 seconds.
The dte mode includes a low range warning
feature: when the fuel level is low, the dte
mode is automatically selected and the digits
blink in order to draw the driver's attention.
Press the mode switch if you wish to return to
the mode that was selected before the warning
occurred. The dte mark (dte) will remain blink-
ing until the vehicle is refuelled.
When the fuel level drops even lower, the dte
display will change to (
).
NOTE:
IIf the amount of fuel added while the
ignition switch is OFF is small, the dis-play just before the ignition switch is
turned OFF may continue to be dis-
played.
IWhen driving uphill or rounding curves,
the fuel in the tank shifts, which may
momentarily change the display.
Average fuel consumption
(
or
)
The Average fuel consumption mode shows
the average fuel consumption since the last
reset. Resetting is done by pressing the mode
switch for more than approximately 1 second.
The display is updated every 30 seconds. At
about the first 1/3 miles (500 m) after a reset,
the display shows (
).
Average speed (
or
)
The average speed mode shows the average
vehicle speed since last reset. Resetting is
done by pressing the mode switch for more
than approximately 1 minute. The display is
updated every 30 seconds. The first 30 sec-
onds after a reset, the display shows (
).
Journey timeThe journey time mode shows the time since
the last reset. The displayed time can be reset
by pressing the mode switch for more than
approximately 1 second.
SIC1750
Instruments and controls
2-31
Z
01.9.21/A33-D/V5.0
X
Page 77 of 247

NOTE:
If a low temperature warning and low range
warning occur simultaneously, other dis-
play modes switch automatically to the
outside temperature display.
When the mode switch is pushed, the dis-
play switches to the mode chosen before
the warning display, and the ICY indicator
will blink.
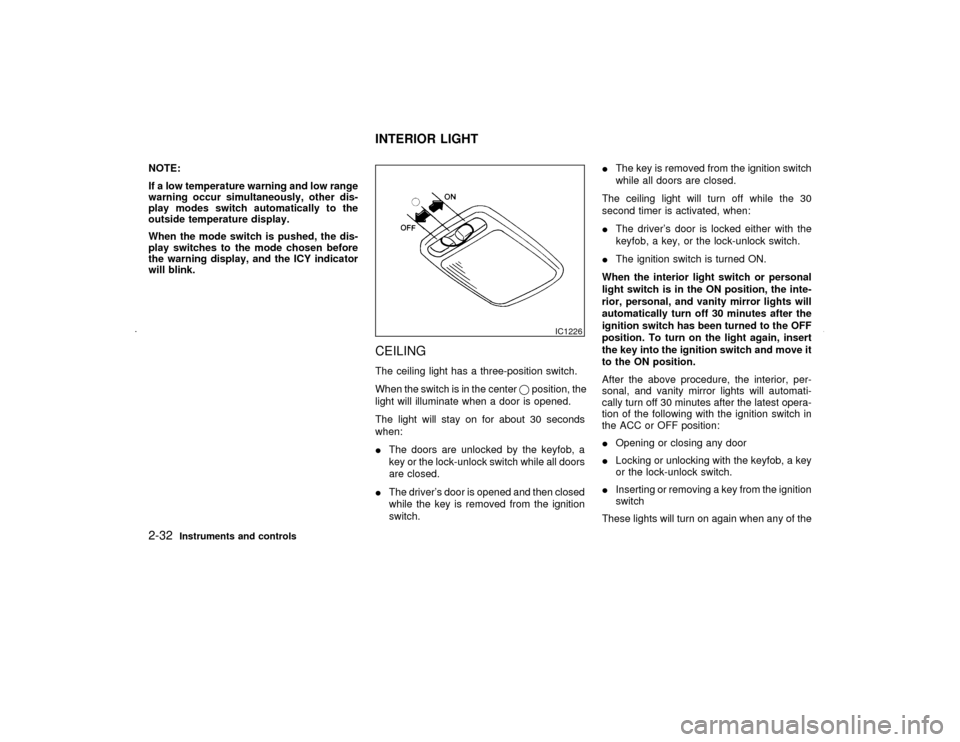
CEILINGThe ceiling light has a three-position switch.
When the switch is in the centerqposition, the
light will illuminate when a door is opened.
The light will stay on for about 30 seconds
when:
IThe doors are unlocked by the keyfob, a
key or the lock-unlock switch while all doors
are closed.
IThe driver's door is opened and then closed
while the key is removed from the ignition
switch.IThe key is removed from the ignition switch
while all doors are closed.
The ceiling light will turn off while the 30
second timer is activated, when:
IThe driver's door is locked either with the
keyfob, a key, or the lock-unlock switch.
IThe ignition switch is turned ON.
When the interior light switch or personal
light switch is in the ON position, the inte-
rior, personal, and vanity mirror lights will
automatically turn off 30 minutes after the
ignition switch has been turned to the OFF
position. To turn on the light again, insert
the key into the ignition switch and move it
to the ON position.
After the above procedure, the interior, per-
sonal, and vanity mirror lights will automati-
cally turn off 30 minutes after the latest opera-
tion of the following with the ignition switch in
the ACC or OFF position:
IOpening or closing any door
ILocking or unlocking with the keyfob, a key
or the lock-unlock switch.
IInserting or removing a key from the ignition
switch
These lights will turn on again when any of the
IC1226
INTERIOR LIGHT
2-32
Instruments and controls
Z
01.9.21/A33-D/V5.0
X
Page 78 of 247

above operations is performed after the lights
have turned off automatically. (The lights will
turn off 30 minutes after the latest operation of
the above as well.)
CAUTION
ITurn off the interior, personal and
vanity mirror lights when you leave
the vehicle.
IDo not use for extended periods of
time with the engine stopped. This
could result in a discharged battery.
When the interior light or the personal light
switch is in the ON position, the interior,
personal, and vanity mirror lights will auto-
matically turn off 30 minutes after the igni-
tion switch has been turned to the OFF
position. To turn on the light again, insert
the key into the ignition switch and move it
to the ON position.
After the above procedure, the interior, per-
sonal, or vanity mirror lights will automatically
turn off 30 minutes after the latest operation of
the following with the ignition switch in the
ACC or OFF position:
IOpening or closing any doorILocking or unlocking with the keyfob, a key
or the lock-unlock switch.
IInserting or removing a key from the ignition
switch
These lights will turn on again when any of the
above operations is performed after the lights
have turned off automatically. (The lights will
turn off 30 minutes after the latest operation of
the above as well.)
IC1019-B
SIC1747
PERSONAL LIGHT
Instruments and controls
2-33
Z
01.9.21/A33-D/V5.0
X
Page 79 of 247

CAUTION
ITurn off the interior, personal and
vanity mirror lights when you leave
the vehicle.
IDo not use for extended periods of
time with the engine stopped. This
could result in a discharged battery.
The light on the vanity mirror will turn on when
the cover on the vanity mirror is opened.
When the interior light or the personal light
switch is in the ON position, the interior,
personal, and vanity mirror lights will auto-
matically turn off 30 minutes after the igni-
tion switch has been turned to the OFF
position. To turn on the light again, insert
the key into the ignition switch and move it
to the ON position.The light illuminates when the trunk lid is
opened. When the trunk lid is closed, the light
will go off.
SIC0186
VANITY MIRROR LIGHT (if so
equipped)TRUNK LIGHT
2-34
Instruments and controls
Z
01.9.21/A33-D/V5.0
X
Page 80 of 247

The HomeLink
Universal Transceiver pro-
vides a convenient way to consolidate the
functions of up to three individual hand-held
transmitters into one built-in device.
The HomeLinkUniversal Transceiver power
will automatically turn off 30 minutes after the
ignition switch has been turned to the off
position.
HomeLink
Universal Transceiver:
IWill operate most Radio Frequency (RF)
devices such as garage doors, gates, home
and office lighting, entry door locks and
security systems.
IIs powered by your vehicle's battery. No
separate batteries are required. If the vehi-
cle's battery is discharged or is discon-
nected, HomeLink
will retain all program-
ming.
Once the HomeLinkUniversal Transceiver
is programmed, retain the original trans-
mitter for future programming procedures
(i.e., new vehicle purchases). Upon sale of
the vehicle, the programmed HomeLink
Universal Transceiver buttons should be
erased for security purposes. For addi-
tional information, refer to ªProgramming
HomeLink
º later in this section.
WARNING
IDo not use the HomeLink
Universal
Transceiver with any garage door
opener that lacks safety stop and
reverse features as required by fed-
eral safety standards. (These stan-
dards became effective for opener
models manufactured after April 1,
1982). A garage door opener which
cannot detect an object in the path of
a closing garage door and then auto-
matically stop and reverse, does not
meet current federal safety stan-
dards. Using a garage door opener
without these features increases the
risk of serious injury or death.
IDuring programming, your garage
door or gate may open or close. Make
sure that people and objects are clear
of the garage door or gate that you
are programming.
IYour vehicle's engine should be
turned off while programming theHomeLink
Universal Transceiver.
HomeLink
UNIVERSAL
TRANSCEIVER (if so equipped)
Instruments and controls
2-35
Z
01.9.21/A33-D/V5.0
X