steering NISSAN MAXIMA 2003 A33 / 5.G User Guide
[x] Cancel search | Manufacturer: NISSAN, Model Year: 2003, Model line: MAXIMA, Model: NISSAN MAXIMA 2003 A33 / 5.GPages: 247, PDF Size: 2.74 MB
Page 102 of 247

AUTOMATIC SEAT POSITIONER
OPERATION (A/T models only)This system is designed so that the driver's
seat will automatically move when the auto-
matic transmission selector lever is in the P
(Park) position. This allows the driver to get in
and out of the driver's seat more easily.
When one of the following conditions is met,
the driver's seat will slide backward:
IWhen the key is removed from the ignition
switch.
IWhen the driver's door is opened with the
key turned to ACC or LOCK.
IWhen the key is turned from ON to ACC
with the driver's door open.
When one of the following conditions is met,
the driver's seat will return to the positions
before being set.
IWhen the key is inserted into the ignition
switch.
IWhen the driver's door is closed with the
key turned to LOCK.
PROCEDURE FOR STORING
MEMORYTwo positions can be stored in the automatic
driver's seat positioner memory.Follow these
procedures to use the memory system.
1. A/T models:
Set the automatic transmission selector
lever to the P (Park) position.
M/T models:
Apply the parking brake securely when the
vehicle is stopped.
2. Turn the ignition ON.
3. Adjust the driver's seat and steering column
to the desired positions by manually oper-
ating each adjusting switch. For additional
information, see ªSeatsº in the ª1. Seats,
restraints and supplemental air bag sys-
temsº section and ªSteering wheelº earlier
in this section.
SPA1385
AUTOMATIC SEAT POSITIONER
(if so equipped)
Pre-driving checks and adjustments
3-17
Z
02.7.12/A33-D/V5.0
X
Page 106 of 247

4 Heater, air conditioner and audio systemsVentilators ................................................................. 4-2
Heater and air conditioner (Manual) ......................... 4-3
Controls ................................................................ 4-3
Heater operation................................................... 4-4
Air conditioner operation ...................................... 4-5
Air flow charts....................................................... 4-6
Heater and air conditioner (Automatic) (if so
equipped) .................................................................. 4-9
Automatic operation ............................................. 4-9
Manual operation................................................ 4-10
Operating tips ..................................................... 4-11
In-cabin microfilter .............................................. 4-11
Servicing air conditioner .......................................... 4-12Audio system........................................................... 4-12
FM radio reception ............................................. 4-13
AM radio reception ............................................. 4-13
Audio operation precautions .............................. 4-13
FM-AM radio with cassette player and compact disc
(CD) player ......................................................... 4-16
FM-AM radio with cassette player...................... 4-23
CD care and cleaning ........................................ 4-28
Steering switch for audio control ....................... 4-28
Antenna .............................................................. 4-29
Compact disc (CD) autochanger (if so
equipped)............................................................ 4-29
Car phone or CB radio ........................................... 4-30
Z
02.7.12/A33-D/V5.0
X
Page 133 of 247

CD CARE AND CLEANINGIHandle a CD by its edges. Never touch the
surface of the disc. Do not bend the disc.
IAlways place the discs in the storage case
when they are not being used.
ITo clean a disc, wipe the surface from the
center to the outer edge using a clean, soft
cloth. Do not wipe the disc using a circular
motion.
Do not use a conventional record cleaner or
alcohol intended for industrial use.
IA new disc may be rough on its inner and
outer edges. Remove the rough edges us-
ing the side of a pen or pencil as illustrated.
STEERING SWITCH FOR AUDIO
CONTROLThe audio system can be operated using the
controls on the steering wheel.MODE select switchPush the mode select switch to change the
mode in the sequence of AM, FM1, FM2, CD
and CD autochanger (if so equipped) and
Tape.Volume control switchesPush the upper or lower side switch to in-
crease or decrease the volume.
Tuning
Memory change (radio):
Push the tuning switch
or
for less
than 1.5 seconds to change the radio fre-
quency.
Seek tuning (radio):
Push the tuning switch
or
for more
than 1.5 seconds to seek the next or previous
radio station.
APS (Automatic Program Search) FF, APS
REW (tape/CD or CD changer):
Push the tuning switch
or
for less
1.5 seconds to return to the beginning of the
present program or skip to the next program.
Push several times to skip back or skip
through programs.
This system searches for the blank intervals
between selections. If there is a blank interval
within one program or there is no interval
between programs, the system may not stop in
the desired or expected location.
FF REW (tape or CD changer):
Push the tuning switch
or
for more
than 1.5 seconds to rewind or fast forward the
tape or to change the playing disc up or down.
To stop the FF or REW function, press the
SAA0451
SAA0545
4-28
Heater, air conditioner and audio systems
Z
02.7.12/A33-D/V5.0
X
Page 136 of 247

5 Starting and drivingPrecautions when starting and driving ...................... 5-2
Exhaust gas (Carbon monoxide).......................... 5-2
Three way catalyst ............................................... 5-3
Avoiding collision and rollover .............................. 5-3
Drinking alcohol/drugs and driving ....................... 5-4
Ignition switch............................................................ 5-4
Automatic transmission ........................................ 5-4
Manual transmission ............................................ 5-5
Key positions ........................................................ 5-6
Nissan Vehicle Immobilizer System .................... 5-6
Before starting the engine ......................................... 5-7
Starting the engine .................................................... 5-7
Driving the vehicle ..................................................... 5-8
Automatic transmission ........................................ 5-8
Manual transmission .......................................... 5-11
Parking brake .......................................................... 5-12
Cruise control .......................................................... 5-13
Precautions on cruise control ............................. 5-13
Cruise control operations ................................... 5-14
Break-in schedule ................................................... 5-15
Increasing fuel economy ......................................... 5-15
Parking/parking on hills ........................................... 5-16
Power steering ........................................................ 5-17
Brake system .......................................................... 5-18Braking precautions............................................ 5-18
Anti-lock brake system (ABS) ........................... 5-18
Traction control system (if so equipped)................. 5-19
Cold weather driving ............................................... 5-20
Freeing a frozen door lock ................................. 5-20
Anti-freeze .......................................................... 5-20
Battery ................................................................ 5-20
Draining of coolant water ................................... 5-20
Tire equipment ................................................... 5-20
Special winter equipment ................................... 5-21
Driving on snow or ice ....................................... 5-21
Engine block heater (if so equipped) ................. 5-21
Z
02.7.12/A33-D/V5.0
X
Page 140 of 247
LOCK position, proceed as follows to remove
the key:
1. Move the selector lever into the P (Park)
position.
2. Turn the ignition key slightly in the ON
direction.
3. Turn the key toward the LOCK position.
4. Remove the key.
If the key is removed from the ignition switch,
the selector lever cannot be moved from P
(Park) position.The selector lever can be
moved if the ignition switch is in the ON
position and the foot brake pedal is de-
pressed.
There is an OFF position in between LOCK
and ACC, although it does not show on the
lock cylinder. When the ignition is in OFF the
steering wheel is not locked.
In order for the steering wheel to be locked, it
must be turned about 1/6 of a turn counter-
clockwise from the straight up position.
To lock the steering wheel, turn the key to
the LOCK position. Remove the key. To
unlock the steering wheel, insert the key
and turn it gently while rotating the steer-
ing wheel slightly right and left.
WARNING
Never remove or turn the key to the
LOCK position while driving. The steer-
ing wheel will lock. This may cause the
driver to lose control of the vehicle and
could result in serious vehicle damage
and/or personal injury.
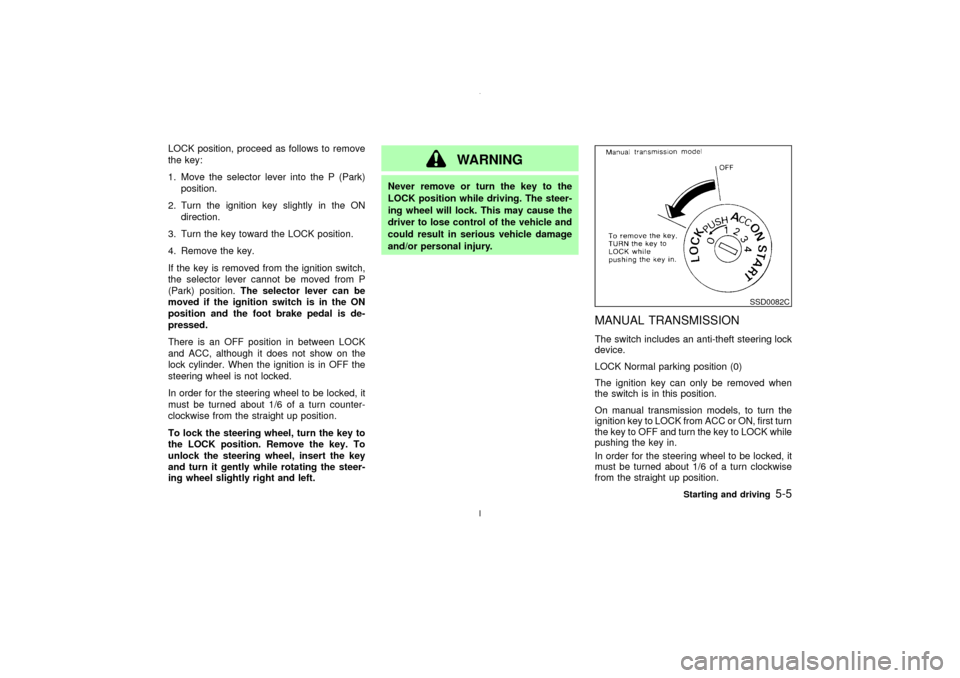
MANUAL TRANSMISSIONThe switch includes an anti-theft steering lock
device.
LOCK Normal parking position (0)
The ignition key can only be removed when
the switch is in this position.
On manual transmission models, to turn the
ignition key to LOCK from ACC or ON, first turn
the key to OFF and turn the key to LOCK while
pushing the key in.
In order for the steering wheel to be locked, it
must be turned about 1/6 of a turn clockwise
from the straight up position.
SSD0082C
Starting and driving
5-5
Z
02.7.12/A33-D/V5.0
X
Page 141 of 247
To lock the steering wheel, turn the key to
the LOCK position. Remove the key. To
unlock the steering wheel, insert the key
and turn it gently while rotating the steer-
ing wheel slightly right and left.
WARNING
Never remove or turn the key to the
LOCK position while driving. The steer-
ing wheel will lock. This may cause the
driver to lose control of the vehicle and
could result in serious vehicle damage
and/or personal injury.
KEY POSITIONSThe switch includes an anti-theft steering lock
device.
LOCK (Normal parking position) (0)
The ignition key can only be removed when
the switch is in this position.
OFF (1)
The engine can be turned off without locking
the steering wheel.
ACC (Accessories) (2)
This position activates electrical accessories
such as the radio when the engine is not
running.
ON (Normal operating position) (3)
This position turns on the ignition system and
the electrical accessories.
START (4)
This position activates the starter motor, start-
ing the engine.NISSAN VEHICLE IMMOBILIZER
SYSTEMThe Nissan Vehicle Immobilizer System will
not allow the engine to start without the use ofthe registered Nissan Vehicle Immobilizer Sys-
tem key.
If the engine fails to start using the registered
Nissan Vehicle Immobilizer System key, it may
be due to interference caused by another
Nissan Vehicle Immobilizer System key, an
automated toll road device or automated pay-
ment device on the key ring. Restart the en-
gine using the following procedures:
1. Leave the ignition switch in the ON position
for approximately 5 seconds.
2. Turn the ignition switch to the OFF or LOCK
position and wait approximately 10 sec-
onds.
3. Repeat step 1 and 2 again.
4. Restart the engine while holding the device
(which may have caused the interference)
separate from the registered Nissan Ve-
hicle Immobilizer System key.
If this procedure allows the engine to start,
NISSAN recommends placing the registered
Nissan Vehicle Immobilizer System key on a
separate key ring to avoid interference from
other devices.
5-6
Starting and driving
Z
02.7.12/A33-D/V5.0
X
Page 148 of 247
4. Before driving, be sure the brake warning
light goes out.
WARNING
IBe sure the parking brake is fully
released before driving. Failure to do
so can cause brake failure and lead to
an accident.
IDo not release the parking brake from
outside the vehicle.
IDo not use the gear shift in place of
the parking brake. When parking, be
sure the parking brake is fully en-
gaged.
IDo not leave children unattended in a
vehicle. They could release the park-
ing brake and cause an accident.
WARNING
Do not use the cruise control when driv-
ing under the following conditions:
Iit is not possible to keep the vehicle
at a set speed.
Iin heavy traffic or in traffic that varies
in speed.
Ion winding or hilly roads.
Ion slippery roads (rain, snow, ice,
etc.).
Iin very windy areas.
Doing so could cause a loss of vehicle
control and result in an accident.
CAUTION
On manual transmission models, do not
shift into N (Neutral) without depressing
the clutch pedal when the cruise control
is set. Should this occur, depress the
clutch pedal and turn the main switch off
immediately. Failure to do so may causeengine damage.
PRECAUTIONS ON CRUISE
CONTROLIIf the cruise control system malfunctions, it
cancels automatically. The SET indicator
light on the meter panel then blinks to warn
the driver.
IIf the SET indicator light blinks, turn the
cruise control main switch off and have the
system checked by your NISSAN dealer.
IThe SET indicator light may blink when the
cruise control main switch is turned on
while pushing the RES/ACCEL, COAST/
SET, or CANCEL switch (located on the
steering wheel). To properly set the cruise
control system, perform the preceding
steps in the order indicated.
CRUISE CONTROL
Starting and driving
5-13
Z
02.7.12/A33-D/V5.0
X
Page 152 of 247
WARNING
ISafe parking procedures require that
both the parking brake be set and the
transmission placed into P (Park) for
automatic transmission models or in
an appropriate gear for manual trans-
mission models. Failure to do so
could cause the vehicle to move un-
expectedly or roll away and result in
an accident.
IMake sure the automatic transmis-
sion selector lever has been pushed
as far forward as it can go and cannot
be moved without depressing the
button at the end of the lever.
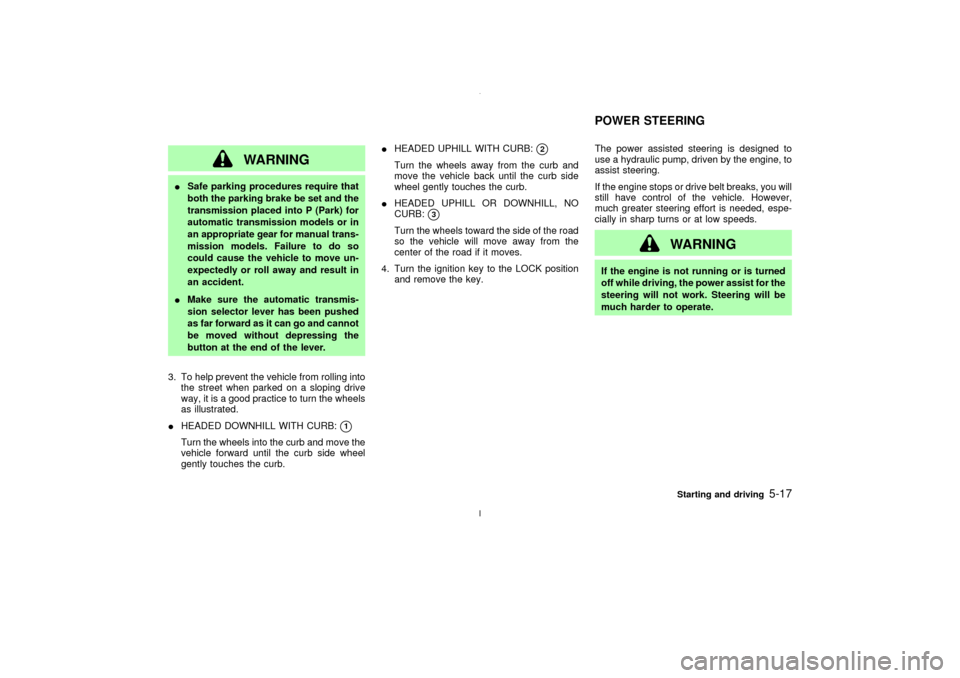
3. To help prevent the vehicle from rolling into
the street when parked on a sloping drive
way, it is a good practice to turn the wheels
as illustrated.
IHEADED DOWNHILL WITH CURB:
q1
Turn the wheels into the curb and move the
vehicle forward until the curb side wheel
gently touches the curb.IHEADED UPHILL WITH CURB:
q2
Turn the wheels away from the curb and
move the vehicle back until the curb side
wheel gently touches the curb.
IHEADED UPHILL OR DOWNHILL, NO
CURB:
q3
Turn the wheels toward the side of the road
so the vehicle will move away from the
center of the road if it moves.
4. Turn the ignition key to the LOCK position
and remove the key.The power assisted steering is designed to
use a hydraulic pump, driven by the engine, to
assist steering.
If the engine stops or drive belt breaks, you will
still have control of the vehicle. However,
much greater steering effort is needed, espe-
cially in sharp turns or at low speeds.
WARNING
If the engine is not running or is turned
off while driving, the power assist for the
steering will not work. Steering will be
much harder to operate.POWER STEERING
Starting and driving
5-17
Z
02.7.12/A33-D/V5.0
X
Page 153 of 247
BRAKING PRECAUTIONSThe brake system has two separate hydraulic
circuits. If one circuit malfunctions, you will still
have braking at two wheels.
Vacuum assisted brake
The brake booster aids braking by using en-
gine vacuum. If the engine stops, you can stop
the vehicle by depressing the brake pedal.
However, greater foot pressure on the brake
pedal will be required to stop the vehicle and
the stopping distance will be longer.
Wet brakes
When the vehicle is washed or driven through
water, the brakes may get wet. As a result,
your braking distance will be longer and the
vehicle may pull to one side during braking.
To dry brakes, drive the vehicle at a safe
speed while lightly pressing the brake pedal to
heat-up the brakes. Do this until the brakes
return to normal. Avoid driving the vehicle at
high speeds until the brakes function correctly.
Using the brakes
Avoid resting your foot on the brake pedal
while driving. This overheats the brakes, in-
creases wear on the brake linings and pads,
and reduces gas mileage.To help save the brakes and to prevent the
brakes from overheating, reduce speed and
downshift to a lower gear before going down a
slope or long grade. Overheated brakes may
reduce braking performance and could result
in loss of vehicle control.
WARNING
IWhile driving on a slippery surface,
be careful when braking, accelerating
or downshifting. Abrupt braking or
accelerating could cause the wheels
to skid and result in an accident.
IIf the engine is not running or is
turned off while driving, the power
assist for the brakes will not work.
Braking will be harder.ANTI-LOCK BRAKE SYSTEM (ABS)The anti-lock brake system controls the brakes
at each wheel so the wheels will not lock when
braking abruptly or when braking on slippery
surfaces. The system detects the rotation
speed at each wheel and varies the brake fluid
pressure to prevent each wheel from locking
and sliding. By preventing wheel lockup, thesystem helps the driver maintain steering con-
trol and helps to minimize swerving and spin-
ning on slippery surfaces.
Using the systemDepress the brake pedal and hold it down.
WARNING
Do not pump the brake pedal. Doing so
may result in increased stopping dis-
tances.Normal operationThe anti-lock brake system will not operate at
speeds below 3 to 6 MPH (5 to 10 km/h) to
completely stop the vehicle. (The speeds will
vary according to road conditions.) When the
anti-lock system senses that one or more
wheels are close to locking up, the actuator
(under the hood) rapidly applies and releases
hydraulic pressure (like pumping the brakes
very quickly). While the actuator is working,
you may feel a pulsation in the brake pedal
and hear a noise or vibration from the actuator
under the hood. This is normal and indicates
that the anti-lock system is working properly.
However, the pulsation may indicate that road
BRAKE SYSTEM5-18
Starting and driving
Z
02.7.12/A33-D/V5.0
X
Page 155 of 247
on, this could cause the three way
catalyst to overheat and be damaged.
To avoid this, the TCS will automati-
cally turn off. Shifting the gear selec-
tor to D will reactivate the TCS.
WARNING
This system is designed to prevent the
wheels from spinning. However, it does
not prevent vehicle slipping or spinning
due to abrupt steering operation at high
speeds or by careless or dangerous
driving techniques. Be especially care-
ful when driving on slippery surfaces
and always drive safely.
FREEING A FROZEN DOOR LOCKTo prevent a door lock from freezing, apply
de-icer or glycerin to it through the key hole. If
the lock becomes frozen, heat the key before
inserting it into the key hole.ANTI-FREEZEIn the winter when it is anticipated that the
temperature will drop below 32ÉF (0ÉC), check
anti-freeze to assure proper winter protection.
For additional information, see ªEngine Cool-
ing Systemº in the ª8. Maintenance and do-it-
yourselfº section.BATTERYIf the battery is not fully charged during ex-
tremely cold weather conditions, the battery
fluid may freeze and damage the battery. To
maintain maximum efficiency, the battery
should be checked regularly. For additional
information, see ªBatteryº in the ª8. Mainte-
nance and do-it-yourselfº section.DRAINING OF COOLANT WATERIf the vehicle is to be left outside without
anti-freeze, drain the cooling system by open-
ing the drain valves located under the radiator
and on the engine block. Refill before operat-
ing the vehicle. See ªEngine cooling systemº in
the ª8. Maintenance and do-it-yourselfº sectionfor changing engine coolant.
TIRE EQUIPMENT1. SUMMER tires are of a tread design to
provide superior performance on dry pave-
ment. However, the performance of these
tires will be substantially reduced in snowy
and icy conditions. If you operate your
vehicle on snowy or icy roads, NISSAN
recommends the use of MUD & SNOW or
ALL SEASON tires on all four wheels.
Please consult your NISSAN dealer for the
tire type, size, speed rating and availability
information.
2. For additional traction on icy roads, studded
tires may be used. However, some prov-
inces and states prohibit their use. Check
local, state and provincial laws before in-
stalling studded tires.
Skid and traction capabilities of studded
snow tires, on wet or dry surfaces, may be
poorer than that of non-studded snow tires.
3. Tire chains may be used if desired. Make
sure they are of proper size for the tires on
your vehicle and are installed according to
the chain manufacturer's suggestions. Use
of tire chains may be prohibited according
to location. Check the local laws before
installing tire chains. When installing tire
COLD WEATHER DRIVING
5-20
Starting and driving
Z
02.7.12/A33-D/V5.0
X