ignition NISSAN MAXIMA 2003 A33 / 5.G Workshop Manual
[x] Cancel search | Manufacturer: NISSAN, Model Year: 2003, Model line: MAXIMA, Model: NISSAN MAXIMA 2003 A33 / 5.GPages: 247, PDF Size: 2.74 MB
Page 140 of 247
LOCK position, proceed as follows to remove
the key:
1. Move the selector lever into the P (Park)
position.
2. Turn the ignition key slightly in the ON
direction.
3. Turn the key toward the LOCK position.
4. Remove the key.
If the key is removed from the ignition switch,
the selector lever cannot be moved from P
(Park) position.The selector lever can be
moved if the ignition switch is in the ON
position and the foot brake pedal is de-
pressed.
There is an OFF position in between LOCK
and ACC, although it does not show on the
lock cylinder. When the ignition is in OFF the
steering wheel is not locked.
In order for the steering wheel to be locked, it
must be turned about 1/6 of a turn counter-
clockwise from the straight up position.
To lock the steering wheel, turn the key to
the LOCK position. Remove the key. To
unlock the steering wheel, insert the key
and turn it gently while rotating the steer-
ing wheel slightly right and left.
WARNING
Never remove or turn the key to the
LOCK position while driving. The steer-
ing wheel will lock. This may cause the
driver to lose control of the vehicle and
could result in serious vehicle damage
and/or personal injury.
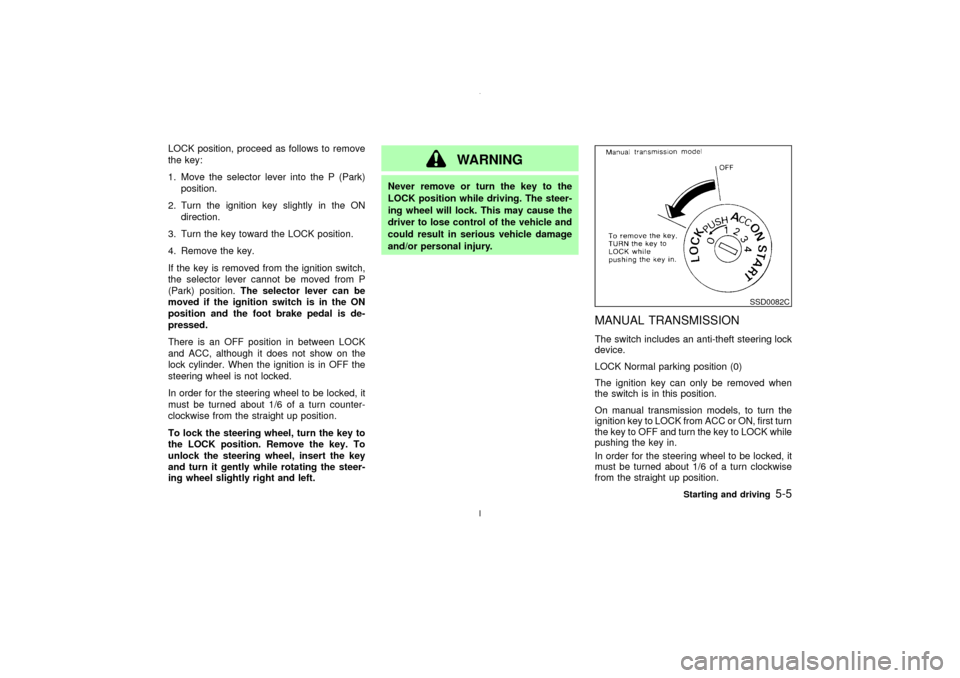
MANUAL TRANSMISSIONThe switch includes an anti-theft steering lock
device.
LOCK Normal parking position (0)
The ignition key can only be removed when
the switch is in this position.
On manual transmission models, to turn the
ignition key to LOCK from ACC or ON, first turn
the key to OFF and turn the key to LOCK while
pushing the key in.
In order for the steering wheel to be locked, it
must be turned about 1/6 of a turn clockwise
from the straight up position.
SSD0082C
Starting and driving
5-5
Z
02.7.12/A33-D/V5.0
X
Page 141 of 247
To lock the steering wheel, turn the key to
the LOCK position. Remove the key. To
unlock the steering wheel, insert the key
and turn it gently while rotating the steer-
ing wheel slightly right and left.
WARNING
Never remove or turn the key to the
LOCK position while driving. The steer-
ing wheel will lock. This may cause the
driver to lose control of the vehicle and
could result in serious vehicle damage
and/or personal injury.
KEY POSITIONSThe switch includes an anti-theft steering lock
device.
LOCK (Normal parking position) (0)
The ignition key can only be removed when
the switch is in this position.
OFF (1)
The engine can be turned off without locking
the steering wheel.
ACC (Accessories) (2)
This position activates electrical accessories
such as the radio when the engine is not
running.
ON (Normal operating position) (3)
This position turns on the ignition system and
the electrical accessories.
START (4)
This position activates the starter motor, start-
ing the engine.NISSAN VEHICLE IMMOBILIZER
SYSTEMThe Nissan Vehicle Immobilizer System will
not allow the engine to start without the use ofthe registered Nissan Vehicle Immobilizer Sys-
tem key.
If the engine fails to start using the registered
Nissan Vehicle Immobilizer System key, it may
be due to interference caused by another
Nissan Vehicle Immobilizer System key, an
automated toll road device or automated pay-
ment device on the key ring. Restart the en-
gine using the following procedures:
1. Leave the ignition switch in the ON position
for approximately 5 seconds.
2. Turn the ignition switch to the OFF or LOCK
position and wait approximately 10 sec-
onds.
3. Repeat step 1 and 2 again.
4. Restart the engine while holding the device
(which may have caused the interference)
separate from the registered Nissan Ve-
hicle Immobilizer System key.
If this procedure allows the engine to start,
NISSAN recommends placing the registered
Nissan Vehicle Immobilizer System key on a
separate key ring to avoid interference from
other devices.
5-6
Starting and driving
Z
02.7.12/A33-D/V5.0
X
Page 142 of 247

IMake sure the area around the vehicle is
clear.
IMaintenance items should be checked pe-
riodically, e.g., each time you check engine
oil.
ICheck that all windows and lights are clean.
IVisually inspect tires for their appearance
and condition. Also, check tires for proper
inflation.
ILock all doors.
IPosition seat and adjust head restraints.
IAdjust inside and outside mirrors.
IFasten seat belts and ask all passengers to
do likewise.
ICheck the operation of warning lights when
key is turned to the ON (3) position.1. Apply the parking brake.
2.Automatic transmission:
Move the selector lever to P (Park) or N
(Neutral). (P preferred.)
The starter is designed not to operate if the
selector lever is in one of the driving posi-
tions.
Manual transmission:
Move the shift lever to N (Neutral) position,
and depress the clutch pedal to the floor
while cranking the engine.
The starter is designed not to operate un-
less the clutch pedal is fully depressed.
3. Crank the enginewith your foot off the
accelerator pedalby turning the ignition
key to START. Release the key when the
engine starts. If the engine starts, but fails
to run, repeat the above procedure.
IWhen the engine is very hard to start in
extremely cold weather or when restarting,
depress the accelerator pedal a little (ap-
proximately 1/5 to the floor) and hold it then
crank the engine. Release the key and the
accelerator pedal when the engine starts.
IWhen the engine is very hard to start
because it is flooded, depress the accelera-tor pedal all the way to the floor and hold it.
Crank the engine for 5 to 6 seconds. After
cranking the engine, release the accelera-
tor pedal. Crank the enginewith your foot
off the accelerator pedalby turning the
ignition key to START. Release the key
when the engine starts. If the engine starts,
but fails to run, repeat the above procedure.
CAUTION
Do not operate the starter for more than
15 seconds at a time. If the engine does
not start, turn the key off and wait 10
seconds before cranking again, other-
wise the starter could be damaged.
4.Warm-up
Allow the engine to idle for at least 30
seconds after starting. Drive at moderate
speed for a short distance first, especially in
cold weather.
BEFORE STARTING THE ENGINE STARTING THE ENGINE
Starting and driving
5-7
Z
02.7.12/A33-D/V5.0
X
Page 143 of 247
AUTOMATIC TRANSMISSION
Gate type shiftThe automatic transmission in your vehicle is
electronically controlled by a transmission con-
trol module to produce maximum power and
smooth operation.
Shown on the following pages are the recom-
mended operating procedures for this trans-
mission. Follow these procedures for maxi-
mum vehicle performance and driving
enjoyment.Starting the vehicleAfter starting the engine, fully depress the foot
brake pedal before shifting the selector lever to
the R (Reverse), N (Neutral), D (Drive), 3, 2 or
1 position. Be sure the vehicle is fully stopped
before attempting to shift the selector lever.
This automatic transmission model is de-
signed so that the foot brake pedal must be
depressed before shifting from P (Park) to
any drive position while the ignition switch
is ON.
The selector lever cannot be moved out of
P (Park) position and into any of the other
gear positions if the ignition key is turned
to the LOCK, OFF or ACC position or if the
key is removed from the switch.1. Keep the foot brake pedal depressed and
shift into a driving gear.
2. Release the parking brake and foot brake,
then gradually start the vehicle in motion.
WARNING
IDo not depress the accelerator pedal
while shifting from P or N to R, D or
manual shift mode. Always depress
the brake pedal until shifting is com-
pleted. Failure to do so could cause
you to lose control and have an acci-
dent.
ICold engine idle speed is high, so use
caution when shifting into a forward
or reverse gear before the engine has
warmed up.
IOn slippery roads, do not downshift.
This may cause a loss of control.
INever shift to P or R while vehicle is
moving. This could cause an acci-
dent.
IIf the selector lever cannot be moved
from the P position while the engineis running and the brake pedal is
depressed, the stoplights may not
work. Malfunctioning stoplights
could cause an accident injuring
yourself and others.
CAUTION
When stopping the vehicle on an uphill
grade, do not hold the vehicle by de-
pressing the accelerator pedal. The foot
brakes should be used for this purpose.
DRIVING THE VEHICLE5-8
Starting and driving
Z
02.7.12/A33-D/V5.0
X
Page 144 of 247
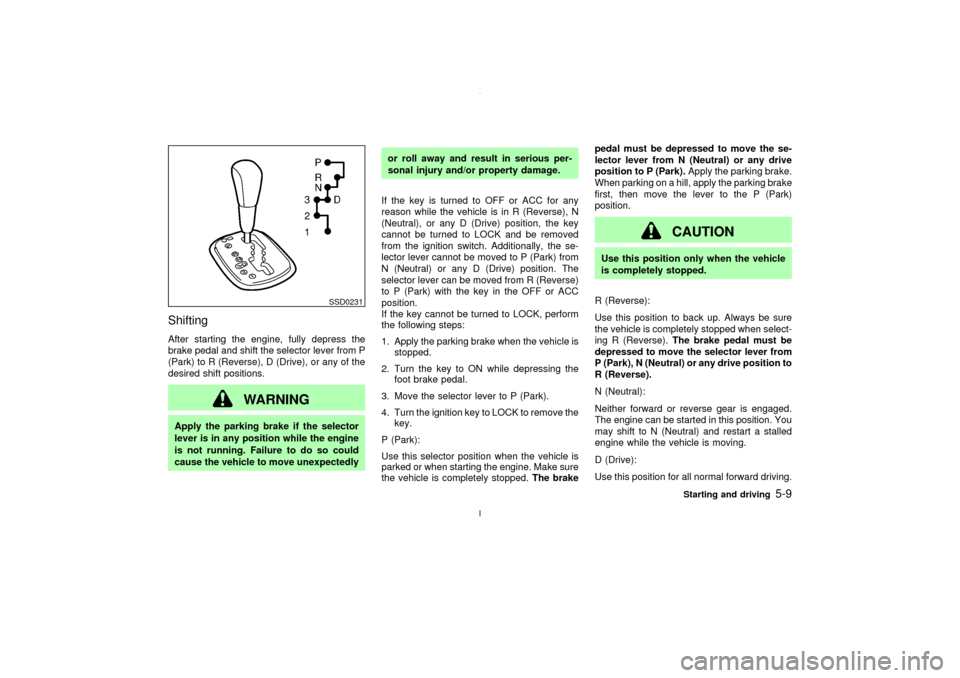
ShiftingAfter starting the engine, fully depress the
brake pedal and shift the selector lever from P
(Park) to R (Reverse), D (Drive), or any of the
desired shift positions.
WARNING
Apply the parking brake if the selector
lever is in any position while the engine
is not running. Failure to do so could
cause the vehicle to move unexpectedlyor roll away and result in serious per-
sonal injury and/or property damage.
If the key is turned to OFF or ACC for any
reason while the vehicle is in R (Reverse), N
(Neutral), or any D (Drive) position, the key
cannot be turned to LOCK and be removed
from the ignition switch. Additionally, the se-
lector lever cannot be moved to P (Park) from
N (Neutral) or any D (Drive) position. The
selector lever can be moved from R (Reverse)
to P (Park) with the key in the OFF or ACC
position.
If the key cannot be turned to LOCK, perform
the following steps:
1. Apply the parking brake when the vehicle is
stopped.
2. Turn the key to ON while depressing the
foot brake pedal.
3. Move the selector lever to P (Park).
4. Turn the ignition key to LOCK to remove the
key.
P (Park):
Use this selector position when the vehicle is
parked or when starting the engine. Make sure
the vehicle is completely stopped.The brakepedal must be depressed to move the se-
lector lever from N (Neutral) or any drive
position to P (Park).Apply the parking brake.
When parking on a hill, apply the parking brake
first, then move the lever to the P (Park)
position.
CAUTION
Use this position only when the vehicle
is completely stopped.
R (Reverse):
Use this position to back up. Always be sure
the vehicle is completely stopped when select-
ing R (Reverse).The brake pedal must be
depressed to move the selector lever from
P (Park), N (Neutral) or any drive position to
R (Reverse).
N (Neutral):
Neither forward or reverse gear is engaged.
The engine can be started in this position. You
may shift to N (Neutral) and restart a stalled
engine while the vehicle is moving.
D (Drive):
Use this position for all normal forward driving.
SSD0231
Starting and driving
5-9
Z
02.7.12/A33-D/V5.0
X
Page 146 of 247
system may be activated. This will occur
even if all electrical circuits are functioning
properly. In this case, turn the ignition key
OFF and wait for 3 seconds. Then turn the
key back to the ON position. The vehicle
should return to its normal operating con-
dition. If it does not return to its normal
operating condition, have your NISSAN
dealer check the transmission and repair if
necessary.
MANUAL TRANSMISSION
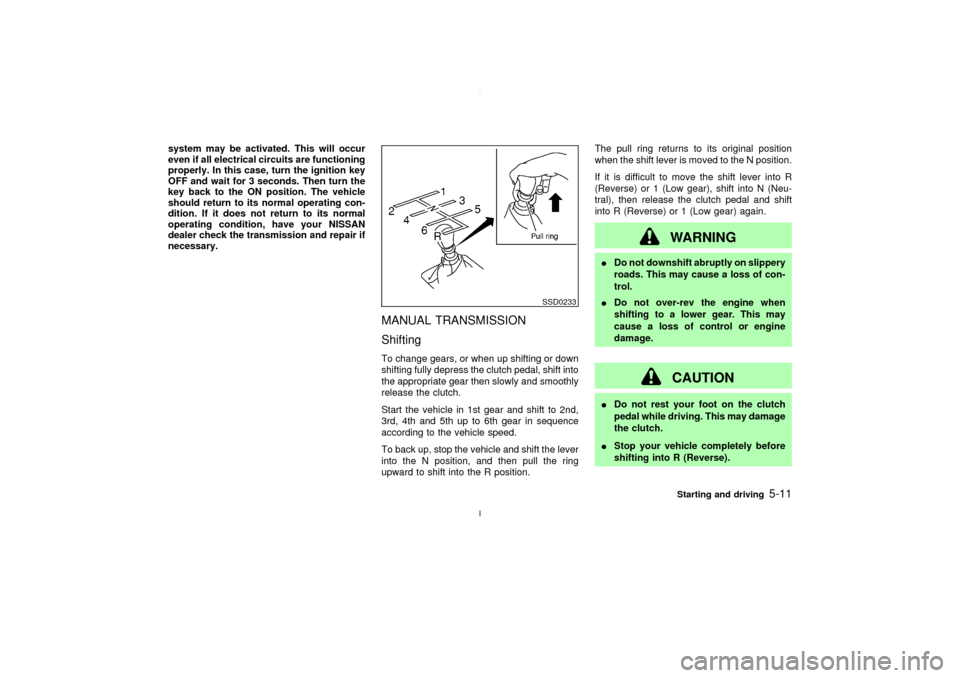
ShiftingTo change gears, or when up shifting or down
shifting fully depress the clutch pedal, shift into
the appropriate gear then slowly and smoothly
release the clutch.
Start the vehicle in 1st gear and shift to 2nd,
3rd, 4th and 5th up to 6th gear in sequence
according to the vehicle speed.
To back up, stop the vehicle and shift the lever
into the N position, and then pull the ring
upward to shift into the R position.The pull ring returns to its original position
when the shift lever is moved to the N position.
If it is difficult to move the shift lever into R
(Reverse) or 1 (Low gear), shift into N (Neu-
tral), then release the clutch pedal and shift
into R (Reverse) or 1 (Low gear) again.
WARNING
IDo not downshift abruptly on slippery
roads. This may cause a loss of con-
trol.
IDo not over-rev the engine when
shifting to a lower gear. This may
cause a loss of control or engine
damage.
CAUTION
IDo not rest your foot on the clutch
pedal while driving. This may damage
the clutch.
IStop your vehicle completely before
shifting into R (Reverse).
SSD0233
Starting and driving
5-11
Z
02.7.12/A33-D/V5.0
X
Page 152 of 247
WARNING
ISafe parking procedures require that
both the parking brake be set and the
transmission placed into P (Park) for
automatic transmission models or in
an appropriate gear for manual trans-
mission models. Failure to do so
could cause the vehicle to move un-
expectedly or roll away and result in
an accident.
IMake sure the automatic transmis-
sion selector lever has been pushed
as far forward as it can go and cannot
be moved without depressing the
button at the end of the lever.
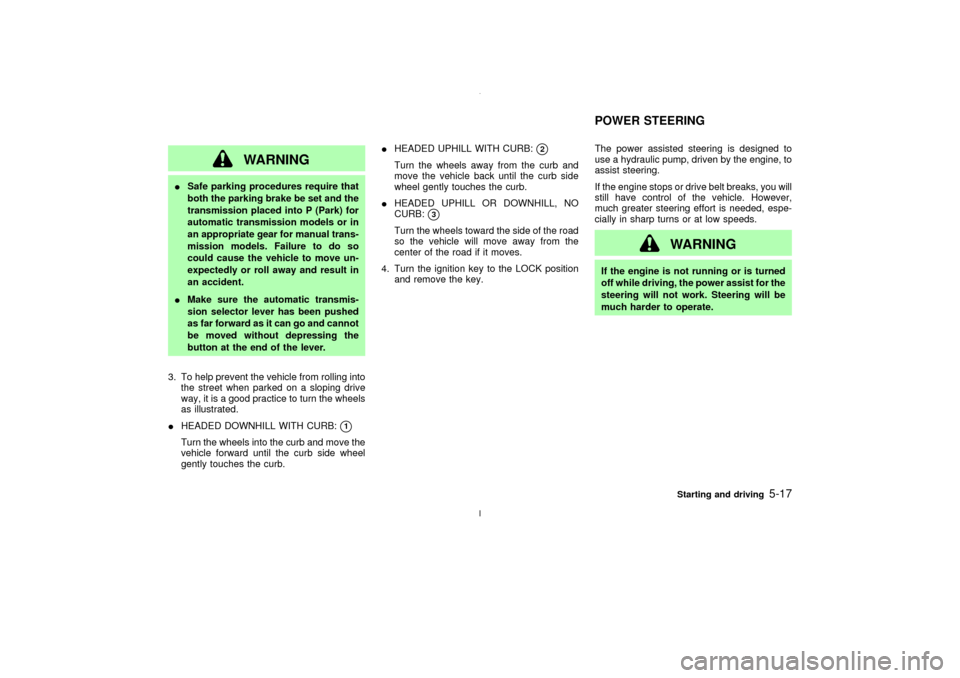
3. To help prevent the vehicle from rolling into
the street when parked on a sloping drive
way, it is a good practice to turn the wheels
as illustrated.
IHEADED DOWNHILL WITH CURB:
q1
Turn the wheels into the curb and move the
vehicle forward until the curb side wheel
gently touches the curb.IHEADED UPHILL WITH CURB:
q2
Turn the wheels away from the curb and
move the vehicle back until the curb side
wheel gently touches the curb.
IHEADED UPHILL OR DOWNHILL, NO
CURB:
q3
Turn the wheels toward the side of the road
so the vehicle will move away from the
center of the road if it moves.
4. Turn the ignition key to the LOCK position
and remove the key.The power assisted steering is designed to
use a hydraulic pump, driven by the engine, to
assist steering.
If the engine stops or drive belt breaks, you will
still have control of the vehicle. However,
much greater steering effort is needed, espe-
cially in sharp turns or at low speeds.
WARNING
If the engine is not running or is turned
off while driving, the power assist for the
steering will not work. Steering will be
much harder to operate.POWER STEERING
Starting and driving
5-17
Z
02.7.12/A33-D/V5.0
X
Page 168 of 247
CAUTION
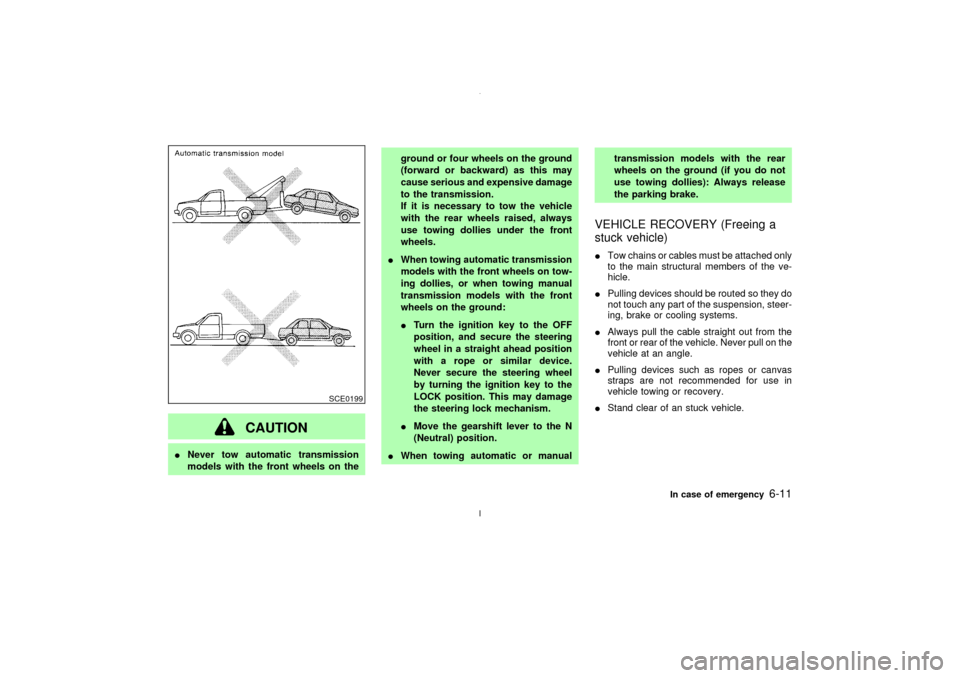
INever tow automatic transmission
models with the front wheels on theground or four wheels on the ground
(forward or backward) as this may
cause serious and expensive damage
to the transmission.
If it is necessary to tow the vehicle
with the rear wheels raised, always
use towing dollies under the front
wheels.
IWhen towing automatic transmission
models with the front wheels on tow-
ing dollies, or when towing manual
transmission models with the front
wheels on the ground:
ITurn the ignition key to the OFF
position, and secure the steering
wheel in a straight ahead position
with a rope or similar device.
Never secure the steering wheel
by turning the ignition key to the
LOCK position. This may damage
the steering lock mechanism.
IMove the gearshift lever to the N
(Neutral) position.
IWhen towing automatic or manualtransmission models with the rear
wheels on the ground (if you do not
use towing dollies): Always release
the parking brake.
VEHICLE RECOVERY (Freeing a
stuck vehicle)ITow chains or cables must be attached only
to the main structural members of the ve-
hicle.
IPulling devices should be routed so they do
not touch any part of the suspension, steer-
ing, brake or cooling systems.
IAlways pull the cable straight out from the
front or rear of the vehicle. Never pull on the
vehicle at an angle.
IPulling devices such as ropes or canvas
straps are not recommended for use in
vehicle towing or recovery.
IStand clear of an stuck vehicle.
SCE0199
In case of emergency
6-11
Z
02.7.12/A33-D/V5.0
X
Page 180 of 247
When performing any inspection or mainte-
nance work on your vehicle, always take care
to prevent serious accidental injury to yourself
or damage to the vehicle. The following are
general precautions which should be closely
observed.
WARNING
IPark the vehicle on a level surface,
apply the parking brake securely and
block the wheels to prevent the ve-
hicle from moving. For a manual
transmission, move the shift lever to
N (Neutral) position. For an automatic
transmission, move the selector lever
to P (Park) position.
IBe sure the ignition key is OFF or
LOCK when performing any parts re-
placement or repairs.
IYour vehicle is equipped with an au-
tomatic engine cooling fan. It may
come on at any time without warning,
even if the ignition key is in the OFF
position and the engine is not run-
ning. To avoid injury, always discon-nect the negative battery cable before
working near the fan.
IIf you must work with the engine
running, keep your hands, clothing,
hair and tools away from moving
fans, belts and any other moving
parts.
IIt is advisable to secure or remove
any loose clothing and any jewelry,
such as rings, watches, etc. before
working on your vehicle.
IAlways wear eye protection when-
ever you work on your vehicle.
IIf you must run the engine in an
enclosed space such as a garage, be
sure there is proper ventilation for
exhaust gases to escape.
INever get under the vehicle while it is
supported only by a jack. If it is nec-
essary to work under the vehicle,
support it with safety stands.
IKeep smoking materials, flame and
sparks away from fuel and the bat-tery.
IOn gasoline engine models with the
Multiport Fuel Injection (MFI) System,
the fuel filter or fuel lines should be
serviced by a NISSAN dealer because
the fuel lines are under high pressure
even when the engine is off.
CAUTION
IDo not work under the hood while the
engine is hot. Turn off the engine and
wait until it cools down.
INever connect or disconnect either
the battery or any transistorized com-
ponent connector while the ignition
key is on.
INever leave the engine or the auto-
matic transmission related compo-
nent harness connector discon-
nected while the ignition key is on.
IAvoid direct contact with used engine
oil and coolant. Improperly disposed
MAINTENANCE PRECAUTIONS
Maintenance and do-it-yourself
8-5
Z
02.7.12/A33-D/V5.0
X
Page 184 of 247
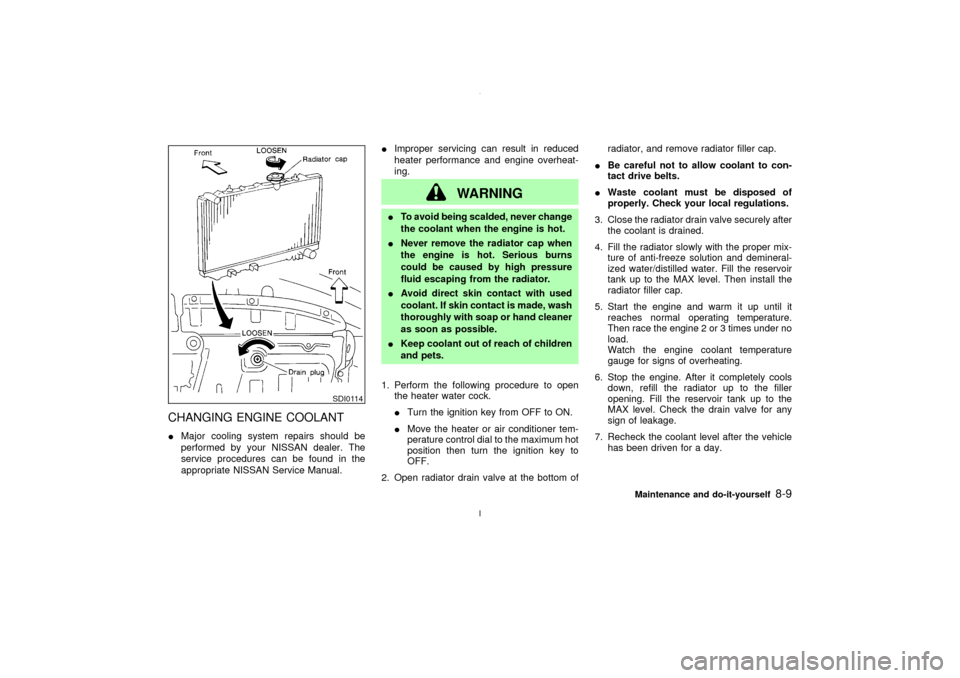
CHANGING ENGINE COOLANTIMajor cooling system repairs should be
performed by your NISSAN dealer. The
service procedures can be found in the
appropriate NISSAN Service Manual.IImproper servicing can result in reduced
heater performance and engine overheat-
ing.
WARNING
ITo avoid being scalded, never change
the coolant when the engine is hot.
INever remove the radiator cap when
the engine is hot. Serious burns
could be caused by high pressure
fluid escaping from the radiator.
IAvoid direct skin contact with used
coolant. If skin contact is made, wash
thoroughly with soap or hand cleaner
as soon as possible.
IKeep coolant out of reach of children
and pets.
1. Perform the following procedure to open
the heater water cock.
ITurn the ignition key from OFF to ON.
IMove the heater or air conditioner tem-
perature control dial to the maximum hot
position then turn the ignition key to
OFF.
2. Open radiator drain valve at the bottom ofradiator, and remove radiator filler cap.
IBe careful not to allow coolant to con-
tact drive belts.
IWaste coolant must be disposed of
properly. Check your local regulations.
3. Close the radiator drain valve securely after
the coolant is drained.
4. Fill the radiator slowly with the proper mix-
ture of anti-freeze solution and demineral-
ized water/distilled water. Fill the reservoir
tank up to the MAX level. Then install the
radiator filler cap.
5. Start the engine and warm it up until it
reaches normal operating temperature.
Then race the engine 2 or 3 times under no
load.
Watch the engine coolant temperature
gauge for signs of overheating.
6. Stop the engine. After it completely cools
down, refill the radiator up to the filler
opening. Fill the reservoir tank up to the
MAX level. Check the drain valve for any
sign of leakage.
7. Recheck the coolant level after the vehicle
has been driven for a day.
SDI0114
Maintenance and do-it-yourself
8-9
Z
02.7.12/A33-D/V5.0
X