instrument panel NISSAN MAXIMA 2003 A33 / 5.G Owners Manual
[x] Cancel search | Manufacturer: NISSAN, Model Year: 2003, Model line: MAXIMA, Model: NISSAN MAXIMA 2003 A33 / 5.GPages: 247, PDF Size: 2.74 MB
Page 13 of 247

ARMRESTPull the armrest forward until it is horizontal.
PRECAUTIONS ON
SUPPLEMENTAL RESTRAINT
SYSTEMThis Supplemental Restraint System (SRS)
section contains important information con-
cerning the driver and passenger supplemen-
tal air bags, supplemental side air bags and
pre-tensioner seat belts.
Supplemental front air bag system:This
system can help cushion the impact force to
the face and chest of the driver and front
passenger in certain frontal collisions.
Supplemental side air bag system (if so
equipped):This system can help cushion the
impact force to the head and the chest area of
the driver and front passenger in certain side
impact collisions. The supplemental side air
bag is designed to inflate on the side where the
vehicle is impacted.
These supplemental restraint systems are de-
signed tosupplementthe crash protection
provided by the driver and front passenger
seat belts and arenot a substitutefor them.
Seat belts should always be correctly worn
and the driver and front passenger seated a
suitable distance away from the steering
wheel, instrument panel and front door finish-
ers. (See ªSeat beltsº later in this section forinstructions and precautions on seat belt us-
age.)
After turning the ignition key to the ON
position, the supplemental air bag warning
light illuminates. The supplemental air bag
warning light will turn off after about 7
seconds if the system is operational.
SSS0150
SUPPLEMENTAL RESTRAINT
SYSTEM
1-8
Seats, restraints and supplemental air bag systems
Z
02.7.12/A33-D/V5.0
X
Page 14 of 247
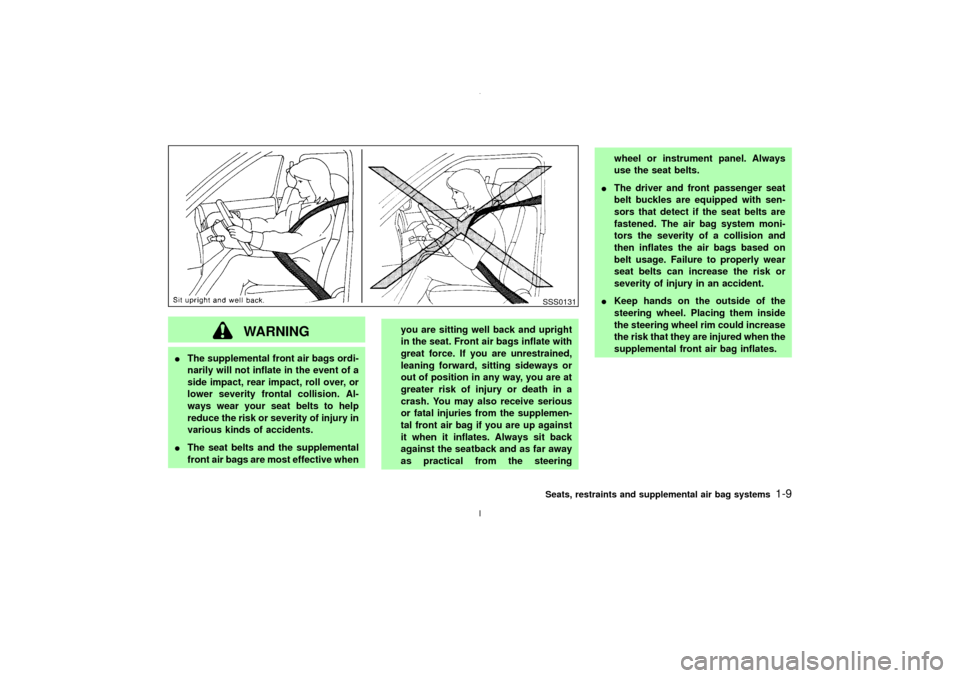
WARNING
IThe supplemental front air bags ordi-
narily will not inflate in the event of a
side impact, rear impact, roll over, or
lower severity frontal collision. Al-
ways wear your seat belts to help
reduce the risk or severity of injury in
various kinds of accidents.
IThe seat belts and the supplemental
front air bags are most effective whenyou are sitting well back and upright
in the seat. Front air bags inflate with
great force. If you are unrestrained,
leaning forward, sitting sideways or
out of position in any way, you are at
greater risk of injury or death in a
crash. You may also receive serious
or fatal injuries from the supplemen-
tal front air bag if you are up against
it when it inflates. Always sit back
against the seatback and as far away
as practical from the steeringwheel or instrument panel. Always
use the seat belts.
IThe driver and front passenger seat
belt buckles are equipped with sen-
sors that detect if the seat belts are
fastened. The air bag system moni-
tors the severity of a collision and
then inflates the air bags based on
belt usage. Failure to properly wear
seat belts can increase the risk or
severity of injury in an accident.
IKeep hands on the outside of the
steering wheel. Placing them inside
the steering wheel rim could increase
the risk that they are injured when the
supplemental front air bag inflates.
SSS0131Seats, restraints and supplemental air bag systems
1-9
Z
02.7.12/A33-D/V5.0
X
Page 19 of 247
Only one front air bag may inflate in a crash,
depending on the crash severity and whether
the front occupants are belted or unbelted.
This does not indicate improper performance
of the system. If you have any questions about
the performance of your air bag system,
please contact your NISSAN dealer.
When the supplemental front air bag inflates, a
fairly loud noise may be heard, followed by
release of smoke. This smoke is not harmful
and does not indicate a fire. Care should be
taken not to inhale it, as it may cause irritation
and choking. Those with a history of a breath-
ing condition should get fresh air promptly.
Supplemental front air bags, along with the
use of seat belts, helps to cushion the impact
force on the face and chest of the front occu-
pants. They can help save lives and reduce
serious injuries. However, an inflating front air
bag may cause facial abrasions or other inju-
ries. Front air bags do not provide restraint to
the lower body.
The seat belts should be correctly worn and
the driver and passenger seated upright as far
as practical away from the steering wheel or
dash board. The supplemental front air bags
inflates quickly in order to help protect the front
occupants. Because of this, the force of the
front air bag inflating can increase the risk ofinjury if the occupant is too close to, or is
against, the air bag module during inflation.
The air bag will deflate quickly after the colli-
sion is over.
After turning the ignition key to the ON
position, the supplemental air bag warning
light illuminates. The supplemental air bag
warning light will turn off after about 7
seconds if the system is operational.
WARNING
IDo not place any objects on the steer-
ing wheel pad or on the instrument
panel. Also, do not place any objects
between any occupant and the steer-
ing wheel or instrument panel. Such
objects may become dangerous pro-
jectiles and cause injury if the supple-
mental front air bag inflates.
IRight after inflation, several air bag
system components will be hot. Do
not touch them; you may severely
burn yourself.
INo unauthorized changes should be
made to any components or wiring ofthe supplemental front air bag sys-
tem. This is to prevent accidental
inflation of the air bag or damage to
the air bag system.
IDo not make unauthorized changes
to your vehicle's electrical system,
suspension system or front end
structure. This could affect proper
operation of the supplemental air bag
system.
ITampering with the supplemental
front air bag system may result in
serious personal injury. Tampering
includes changes to the steering
wheel and the instrument panel as-
sembly by placing material over the
steering wheel pad, above the dash-
board, or by installing additional trim
material around the air bag system.
IWork around and on the supplemen-
tal front air bag system should be
done by an authorized NISSAN
dealer. Installation of electrical equip-
ment should also be done by an au-
thorized NISSAN dealer. The SRS wir-
1-14
Seats, restraints and supplemental air bag systems
Z
02.7.12/A33-D/V5.0
X
Page 23 of 247

SUPPLEMENTAL AIR BAG
WARNING LABELSWarning labels about the supplemental air bag
system are placed in the vehicle as shown in
the illustration.
SUPPLEMENTAL AIR BAG
WARNING LIGHTThe supplemental air bag warning light, dis-
playing
in the instrument panel, monitors
the circuits of the supplemental front air bag
and supplemental side air bag systems, and
pre-tensioner seat belt. The circuits monitored
by the air bag warning light are the diagnosis
sensor unit, satellite sensors, front air bag
modules, side air bag modules and all related
wiring, and pre-tensioner seat belt.
After turning the ignition key to the ON posi-
tion, the supplemental air bag warning light
illuminates. The supplemental air bag warning
SPA0945B
SPA1097
1-18
Seats, restraints and supplemental air bag systems
Z
02.7.12/A33-D/V5.0
X
Page 45 of 247

2 Instruments and controlsInstrument panel ....................................................... 2-2
Meters and gauges ................................................... 2-3
Speedometer and odometer ................................ 2-4
Tachometer .......................................................... 2-4
Engine coolant temperature gauge ...................... 2-5
Fuel gauge ........................................................... 2-5
Compass display (if so equipped)............................. 2-6
Warning/indicator lights and audible reminders ........ 2-9
Checking bulbs ..................................................... 2-9
Warning lights....................................................... 2-9
Indicator lights .................................................... 2-12
Audible reminders .............................................. 2-13
Security systems ..................................................... 2-14
Vehivle security system ...................................... 2-14
Nissan Vehicle Immobilizer System .................. 2-15
Windshield wiper and washer switch ...................... 2-16
Rear window and outside mirror (if so equipped)
defogger switch ....................................................... 2-17
Headlight and turn signal switch ............................. 2-18
Xenon headlights................................................ 2-19
Headlight switch ................................................. 2-19
Turn signal switch .............................................. 2-21
Fog light switch (if so equipped) ............................. 2-21
Hazard warning flasher switch ................................ 2-22Horn......................................................................... 2-22
Heated seats (if so equipped) ................................. 2-23
Heated steering wheel (if so equipped) .................. 2-24
Traction control system (TCS) cancel switch
(if so equipped) ....................................................... 2-24
Power outlet ............................................................ 2-24
Cigarette lighter and ashtray (accessory) ............... 2-25
Storage .................................................................... 2-26
Trays................................................................... 2-26
Sunglasses holder .............................................. 2-26
Cup holder .......................................................... 2-27
Glove box ........................................................... 2-27
Console box ....................................................... 2-28
Cargo net (if so equipped) ................................. 2-28
Windows .................................................................. 2-29
Power windows .................................................. 2-29
Sunroof (if so equipped) ......................................... 2-31
Automatic sunroof .............................................. 2-31
Clock ....................................................................... 2-32
Adjusting the time............................................... 2-32
Trip computer .......................................................... 2-32
Interior light ............................................................. 2-34
Ceiling................................................................. 2-34
Personal light .......................................................... 2-35
Z
02.7.12/A33-D/V5.0
X
Page 47 of 247

1. Instrument brightness control switch
(P.2-20)
2. Headlight, fog light (if so equipped) and turn
signal switch (P.2-18)
3. Traction control system (TCS) cancel
switch (if so equipped) (P.2-24)
4. Meters/gauges (P.2-3)
5. Rear window and outside mirror (if so
equipped) defroster switch Ð type B
(P.2-17)
6. Windshield wiper/washer switch (P.2-16)
7. Ventilator (P.4-2)
8. Rear window and outside mirror (if so
equipped) defroster switch Ð Type Auto
A/C (P.2-17)
9. Heater/air conditioner control (P.4-3) or
radio/cassette player (4-16)
10. Clock (P.2-32)
11. Security indicator light (P.2-14)
12. Radio/cassette player (P.4-16)/CD player
(P.4-16) or Navigation system*
13. Passenger supplemental air bag (P.1-8)
14. Fuse box cover (P.8-24)
15. Automatic drive positioner system cancel
switch (if so equipped) (P.3-18)
16. Heated steering switch (if so equipped)
(P.2-23)
17. Outside mirror remote control (P.3-15)
18. Steering switch for audio control (P.4-28)
and trip computer (P.2-32)
19. Driver supplemental air bag (P.1-8)
20. Tilting steering wheel lock lever (P.3-14)
21. Cruise control main/set switch (P.5-14)
22. Ignition switch/steering lock (P.5-4)
SIC1736
INSTRUMENT PANEL2-2
Instruments and controls
Z
02.7.12/A33-D/V5.0
X
Page 58 of 247
fuel economy, and possible damage to
the emission control system.
Slip indicator light (if so
equipped)
This light will blink on when your traction
control system (TCS) is limiting wheel spin.
Slippery road conditions may exist if the slip
indicator light blinks on. If this happens, adjust
your driving accordingly.
You may feel or hear the system working, but
this is normal.
The light will blink on for a few seconds after
the traction control system stops limiting wheel
spin.
The slip indicator light also comes on when
you turn the ignition key to ON. The light will
turn off after about 2 seconds if the system is
operational. If the light does not come on or go
off, have the traction control system checked
by your NISSAN dealer. The system operates
in all transmission shift lever positions. But the
system can upshift the transmission only as
high as the indicated shift lever position.
Traction control system
indicator light (if so equipped)
After turning the ignition key to the ON posi-
tion, the light will illuminate. The light will turn
off after about 2 seconds if the traction control
system (TCS) is operational.
If the light stays on or comes on when you are
driving, it may indicate the traction control
system is not functioning properly. Have the
system checked by your NISSAN dealer.
The traction control system indicator light may
come on for the following reasons.
a) If the system is turned off by pressing
the button on the instrument panel, the
indicator light will come on and stay on.
To turn the system back on, press the
button again. The indicator light will go
off.
b) If engine speed is above 4,000 rpm in a
selected gear. Use D range on low fric-
tion road surfaces.
If the traction control system indicator light
comes on and stays on for an extended period
of time when the system is turned on, have
your vehicle checked by your NISSAN dealer.
Turn signal/hazard indicator
lights
The light flashes when the turn signal switch
lever or hazard switch is turned on.AUDIBLE REMINDERS
Key reminder chimeThe chime will sound if the driver's side door is
opened while the key is left in the ignition
switch (ignition switch is turned off). Remove
the key and take it with you when leaving the
vehicle.Light reminder chimeThe chime will sound when the front door is
opened with the headlight switch on unless the
ignition key is in the ON position.
Make sure to turn the light switch off when you
leave the vehicle.Seat belt warning chimeThe chime will sound for about 6 seconds
unless the drivers seat belt is securely fas-
tened.Brake pad wear warningThe disc brake pads have audible wear warn-
ings. When a brake pad requires replacement,
Instruments and controls
2-13
Z
02.7.12/A33-D/V5.0
X
Page 65 of 247
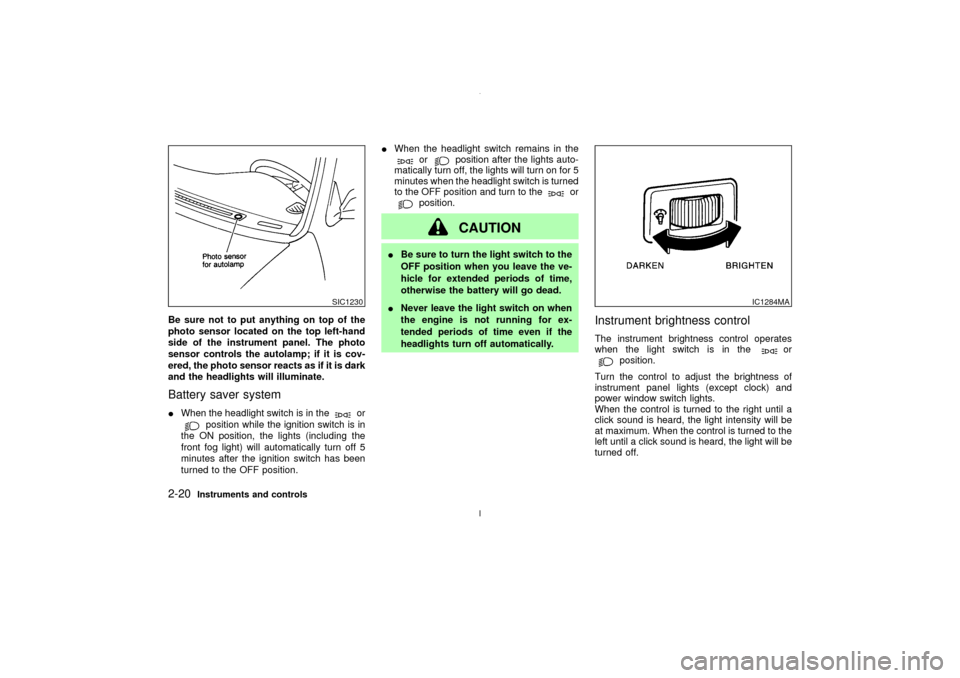
Be sure not to put anything on top of the
photo sensor located on the top left-hand
side of the instrument panel. The photo
sensor controls the autolamp; if it is cov-
ered, the photo sensor reacts as if it is dark
and the headlights will illuminate.Battery saver systemIWhen the headlight switch is in the
or
position while the ignition switch is in
the ON position, the lights (including the
front fog light) will automatically turn off 5
minutes after the ignition switch has been
turned to the OFF position.IWhen the headlight switch remains in the
or
position after the lights auto-
matically turn off, the lights will turn on for 5
minutes when the headlight switch is turned
to the OFF position and turn to the
or
position.
CAUTION
IBe sure to turn the light switch to the
OFF position when you leave the ve-
hicle for extended periods of time,
otherwise the battery will go dead.
INever leave the light switch on when
the engine is not running for ex-
tended periods of time even if the
headlights turn off automatically.
Instrument brightness controlThe instrument brightness control operates
when the light switch is in the
or
position.
Turn the control to adjust the brightness of
instrument panel lights (except clock) and
power window switch lights.
When the control is turned to the right until a
click sound is heard, the light intensity will be
at maximum. When the control is turned to the
left until a click sound is heard, the light will be
turned off.
SIC1230
IC1284MA
2-20
Instruments and controls
Z
02.7.12/A33-D/V5.0
X
Page 95 of 247
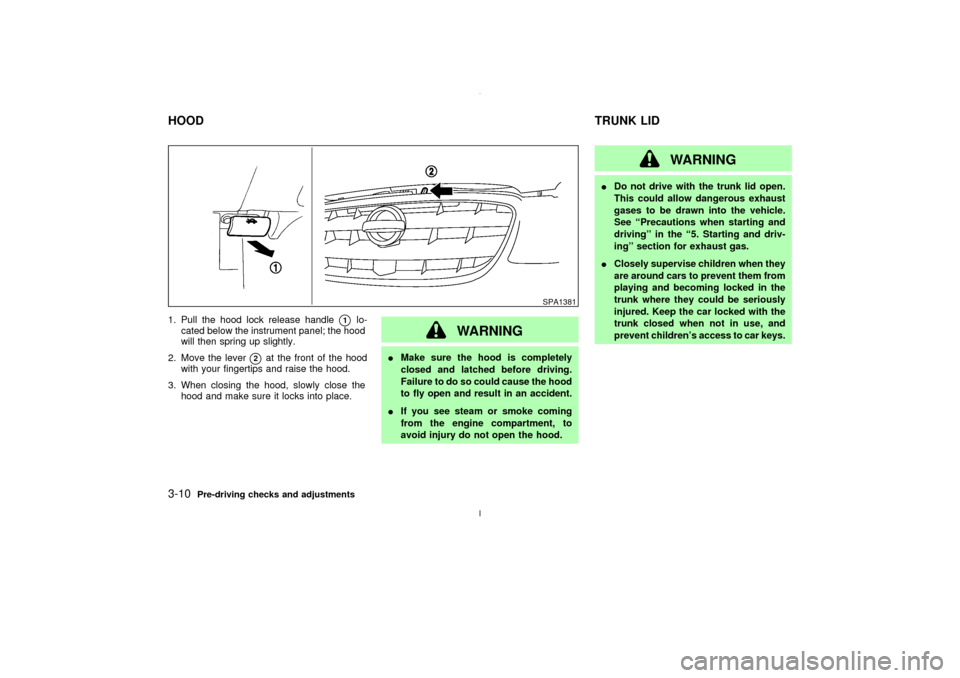
1. Pull the hood lock release handle
q1
lo-
cated below the instrument panel; the hood
will then spring up slightly.
2. Move the lever
q2
at the front of the hood
with your fingertips and raise the hood.
3. When closing the hood, slowly close the
hood and make sure it locks into place.
WARNING
IMake sure the hood is completely
closed and latched before driving.
Failure to do so could cause the hood
to fly open and result in an accident.
IIf you see steam or smoke coming
from the engine compartment, to
avoid injury do not open the hood.
WARNING
IDo not drive with the trunk lid open.
This could allow dangerous exhaust
gases to be drawn into the vehicle.
See ªPrecautions when starting and
drivingº in the ª5. Starting and driv-
ingº section for exhaust gas.
IClosely supervise children when they
are around cars to prevent them from
playing and becoming locked in the
trunk where they could be seriously
injured. Keep the car locked with the
trunk closed when not in use, and
prevent children's access to car keys.
SPA1381
HOODTRUNK LID3-10
Pre-driving checks and adjustments
Z
02.7.12/A33-D/V5.0
X
Page 103 of 247

During this step, do not turn the ignition to
any positions other than ON.
4. Push the SET switch and, within 5 seconds,
push the memory switch 1 or 2 fully for at
least 1 second.
The indicator light for the pushed memory
switch will come on and stay on for approxi-
mately 5 seconds after pushing the switch.
After the indicator light goes off, the se-
lected positions are stored in the selected
memory (1 or 2).
If memory is stored in the same memory
switch, the previous memory will be de-
leted.
Confirming memory storageITurn the ignition ON and push the SET
switch. If the main memory has not been
stored, the indicator light will come on for
approximately 0.5 seconds. When the
memory has stored the position, the indica-
tor light will stay on for approximately 5
seconds.
IIf the battery cable is disconnected, or if the
fuse blows, the memory will be canceled. In
such a case, reset the desired positions
using the following procedures.
1. Open and close the driver's door more thantwo times with the ignition key in the LOCK
position.
2. Reset the desired position using the previ-
ous procedure.
Selecting the memorized position1. A/T models:
Set the automatic transmission selector le-
ver to the P (Park) position.
M/T models:
Apply the parking brake securely when the
vehicle is stopped.
2. Turn the ignition ON.
3. Push the memory switch 1 or 2 fully for at
least 1 second.
The driver's seat will move to the memo-
rized position with the indicator light flash-
ing. Then the light will stay on for approxi-
mately 5 seconds.
When memory switch 1 or 2 is pushed with the
driver's door open and then the key inserted
into the ignition switch within approximately 1
minute, the driver's seat will move to the
memorized position. Ð A/T models only
System operationThe automatic drive positioner system will not
work or will stop operating under the following
conditions:
Iwhen the vehicle speed is above 4 MPH (7
km/h).
Iwhen any two or more of the memory
switches are simultaneously pressed while
the automatic drive positioner is operating.
Iwhen the adjusting switch for the driver's
seat is turned on while the automatic drive
positioner is operating.
Iwhen the cancel switch located on the
instrument panel is pushed to cancel.
Iwhen the memory switch 1 or 2 is not
pushed for at least 1 second.
Iwhen the seat has already been moved to
the memorized position.
Iwhen no seat position is stored in the
memory switch.
Iwhen the parking brake is not applied. Ð
M/T models
Iwhen the vehicle speed is above 4 MPH (7
km/h) while the parking brake is applied. Ð
M/T models
To restart the drive positioner system,
3-18
Pre-driving checks and adjustments
Z
02.7.12/A33-D/V5.0
X