center console NISSAN MAXIMA 2004 A34 / 6.G User Guide
[x] Cancel search | Manufacturer: NISSAN, Model Year: 2004, Model line: MAXIMA, Model: NISSAN MAXIMA 2004 A34 / 6.GPages: 280, PDF Size: 3.99 MB
Page 92 of 280

Console box storage
Pull up on the lever to open the console box.
Remove the inside tray to store a large object.
The console box may be used for storage of
cellular phones. Open the access hole cover
s1
to route a cord to the power outlet.
REAR CENTER CONSOLE (if so
equipped)
Pull up on the lever to open the console box.Some rear center consoles are equipped with a
light inside the console box. The light may be
turned ons1and offs2with the switch.
LIC0405LIC0426WIC0697
2-32Instruments and controls
ZREVIEW COPY:Ð2004 Maxima(max)
Owners Manual(owners)ÐUSA English(nna)
10/07/03Ðtbrooks
X
Page 99 of 280

1. Arm rail
2. Screen
3. Caution label
4. Sun shade arms
The rear sun shade operates when the ignition
key is in the ACC or ON position.
The rear sun shade switches are located on the
front and rear center consoles.
To raise the screen, push the upper side of the
switch.
To lower the screen, push the lower side of the
switch.
The switch need not be held down.
CAUTION
cDo not place objects (such as newspa-
pers, handkerchiefs, etc.) on the screen
inlet port. Doing so may entangle these
objects in the screen when it is extend-
ing or retracting, causing improper op-
eration or damage to the screen.
cDo not push the sun shade arm with
your hands, etc., as this may deform it.
Improper operation or damage to the
screen may result.cDo not hang any object on the arm rail
as this may result in improper operation
or damage the screen.
cDo not forcefully pull the screen. Doing
so may elongate the screen. Improper
operation or damage to the screen may
result.
The interior light has a three-position switch and
operates regardless of ignition switch position.
cWhen the switch is in the ON position
s1,
the interior light illuminates, regardless of
door position. The light will go off after 30
minutes unless the ignition key is in the ACC
or ON position.
Without sunroof
LIC0413
INTERIOR LIGHT
Instruments and controls2-39
ZREVIEW COPY:Ð2004 Maxima(max)
Owners Manual(owners)ÐUSA English(nna)
10/07/03Ðtbrooks
X
Page 101 of 280

Console light
The console lights1will turn on whenever the
headlights are illuminated. To turn the console
light off while the headlights are illuminated, push
the interior light switch to the OFF position.
REAR
To turn on both personal reading lights, press the
switch to thepositions1. To turn the lights
off, return the switch to the center position.
To turn on a single personal reading light, press
the switch to the
positions2. To turn a
single personal reading light off, return the switch
to the center position.The light illuminates when the trunk lid is opened.
When the trunk lid is closed, the light goes off.
For bulb replacement procedures, refer to “Bulb
replacement” in the “Maintenance and do-it-
yourself” section of this manual.
Models with sunroof
LIC0415LIC0417
TRUNK LIGHT
Instruments and controls2-41
ZREVIEW COPY:Ð2004 Maxima(max)
Owners Manual(owners)ÐUSA English(nna)
10/07/03Ðtbrooks
X
Page 117 of 280

cClosely supervise children when they
are around cars to prevent them from
playing and becoming locked in the
trunk where they could be seriously in-
jured. Keep the car locked, with the rear
seatback and trunk lid securely latched
when not in use, and prevent children’s
access to car keys.
The trunk lid opener lever is located below the
armrest of the driver’s door trim panel. To open
the trunk lid, pull the opener lever out.
To close the trunk lid, lower and push the trunk lid
down securely.
Cancel switch
When the cancel switch located inside the glove
box is OFF, the trunk lid cannot be opened with
the trunk lid release switch. It can be opened with
the keyfob.SECONDARY TRUNK LID RELEASE
To open the trunk lid from the rear seat, fold down
the rear seat or trunk compartment access lid (for
models with rear console) , and pull the rear seat
trunk release handle
s1. To close, push the trunk
lid down securely.
LPD0186
Rear seat without center console
LPD0200
Pre-driving checks and adjustments3-11
ZREVIEW COPY:Ð2004 Maxima(max)
Owners Manual(owners)ÐUSA English(nna)
10/20/03Ðarosenma
X
Page 118 of 280

INTERIOR TRUNK LID RELEASE
WARNING
Closely supervise children when they are
around cars to prevent them from playing
and becoming locked in the trunk where
they could be seriously injured. Keep the
car locked, with the rear seatback and
trunk lid securely latched when not in use,
and prevent children’s access to car keys.
The interior trunk lid release mechanism provides
a means of escape for children and adults in the
event they become locked inside the trunk.To open the trunk from the inside, pull the illumi-
nated release handle until the lock releases and
push up on the trunk lid. The release handle is
made of a material that glows in the dark after a
brief exposure to ambient light.
The handle is located inside the trunk compart-
ment on the interior of the trunk lid.
Rear seat with center console
LPD0201LPD0187
3-12Pre-driving checks and adjustments
ZREVIEW COPY:Ð2004 Maxima(max)
Owners Manual(owners)ÐUSA English(nna)
10/20/03Ðarosenma
X
Page 192 of 280

4. Lower the vehicle slowly until the tire
touches the ground. Then, with the wheel
nut wrench, tighten the wheel nuts securely
in the sequence illustrated (
sA,sB,sC,sD,
sE) . Lower the vehicle completely.
WARNING
cIncorrect wheel nuts or improperly
tightened wheel nuts can cause the
wheel to become loose or come off.
This could cause an accident.
cDo not use oil or grease on the wheel
studs or nuts. This could cause the nuts
to become loose.
cRetighten the wheel nuts when the ve-
hicle has been driven for 600 miles
(1,000 km) (also in cases of a flat tire,
etc.) .
As soon as possible, tighten the wheel nuts
to the specified torque with a torque
wrench.
Wheel nut tightening torque:
80 ft-lb (108 N·m)
The wheel nuts must be kept tightened to
specification at all times. It is recom-
mended that wheel nuts be tightened to
specifications at each lubrication interval.Adjust tire pressure to the COLD pressure.
COLD pressure: After vehicle has been
parked for three hours or more or driven
less than 1 mile (1.6 km) .
COLD tire pressures are shown on the tire
placard affixed to the center console.
5. Securely store the flat tire and jacking equip-
ment in the vehicle.
6. Place the spare tire cover and the trunk floor
carpeting over the damaged tire.
7. Close the trunk.
WARNING
cAlways make sure that the spare tire
and jacking equipment are properly se-
cured after use. Such items can become
dangerous projectiles in an accident or
sudden stop.
cThe spare tire is designed for emer-
gency use. See specific instructions un-
der the heading “Wheels and tires” in
the “Maintenance and do-it-yourself”
section of this manual.To start your engine with a booster battery, the
instructions and precautions below must be fol-
lowed.
WARNING
cIf done incorrectly, jump starting can
lead to a battery explosion, resulting in
severe injury or death. It could also
damage your vehicle.
cExplosive hydrogen gas is always
present in the vicinity of the battery.
Keep all sparks and flames away from
the battery.
cDo not allow battery fluid to come into
contact with eyes, skin, clothing or
painted surfaces. Battery fluid is a cor-
rosive sulfuric acid solution which can
cause severe burns. If the fluid should
come into contact with anything, imme-
diately flush the contacted area with
water.
cKeep battery out of the reach of
children.
cThe booster battery must be rated at 12
volts. Use of an improperly rated battery
can damage your vehicle.
JUMP STARTING
6-6In case of emergency
ZREVIEW COPY:Ð2004 Maxima(max)
Owners Manual(owners)ÐUSA English(nna)
10/07/03Ðtbrooks
X
Page 259 of 280

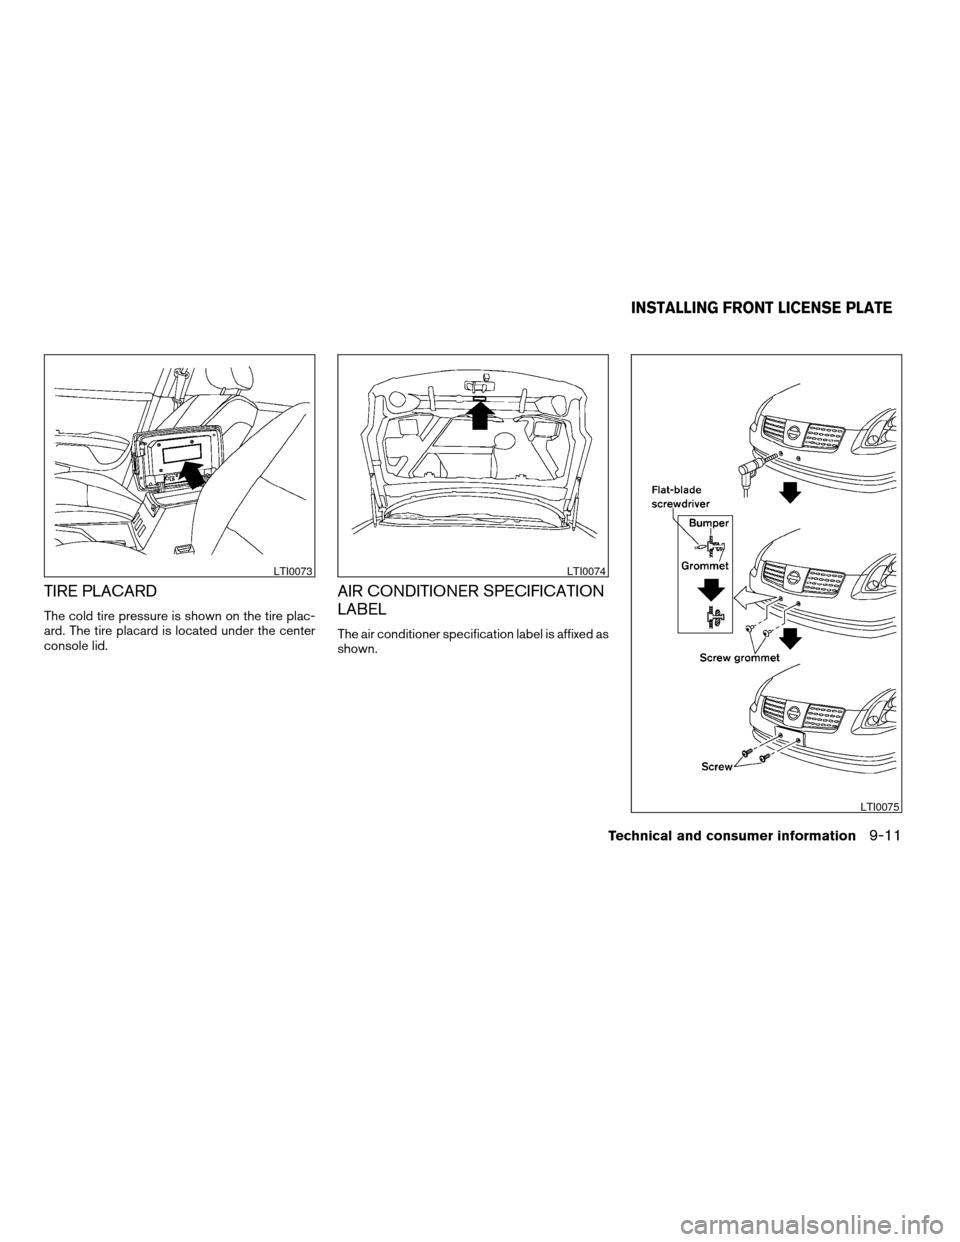
TIRE PLACARD
The cold tire pressure is shown on the tire plac-
ard. The tire placard is located under the center
console lid.
AIR CONDITIONER SPECIFICATION
LABEL
The air conditioner specification label is affixed as
shown.
LTI0073LTI0074
LTI0075
INSTALLING FRONT LICENSE PLATE
Technical and consumer information9-11
ZREVIEW COPY:Ð2004 Maxima(max)
Owners Manual(owners)ÐUSA English(nna)
10/20/03Ðarosenma
X