flat tire NISSAN MAXIMA 2004 A34 / 6.G Owners Manual
[x] Cancel search | Manufacturer: NISSAN, Model Year: 2004, Model line: MAXIMA, Model: NISSAN MAXIMA 2004 A34 / 6.GPages: 280, PDF Size: 3.99 MB
Page 9 of 280
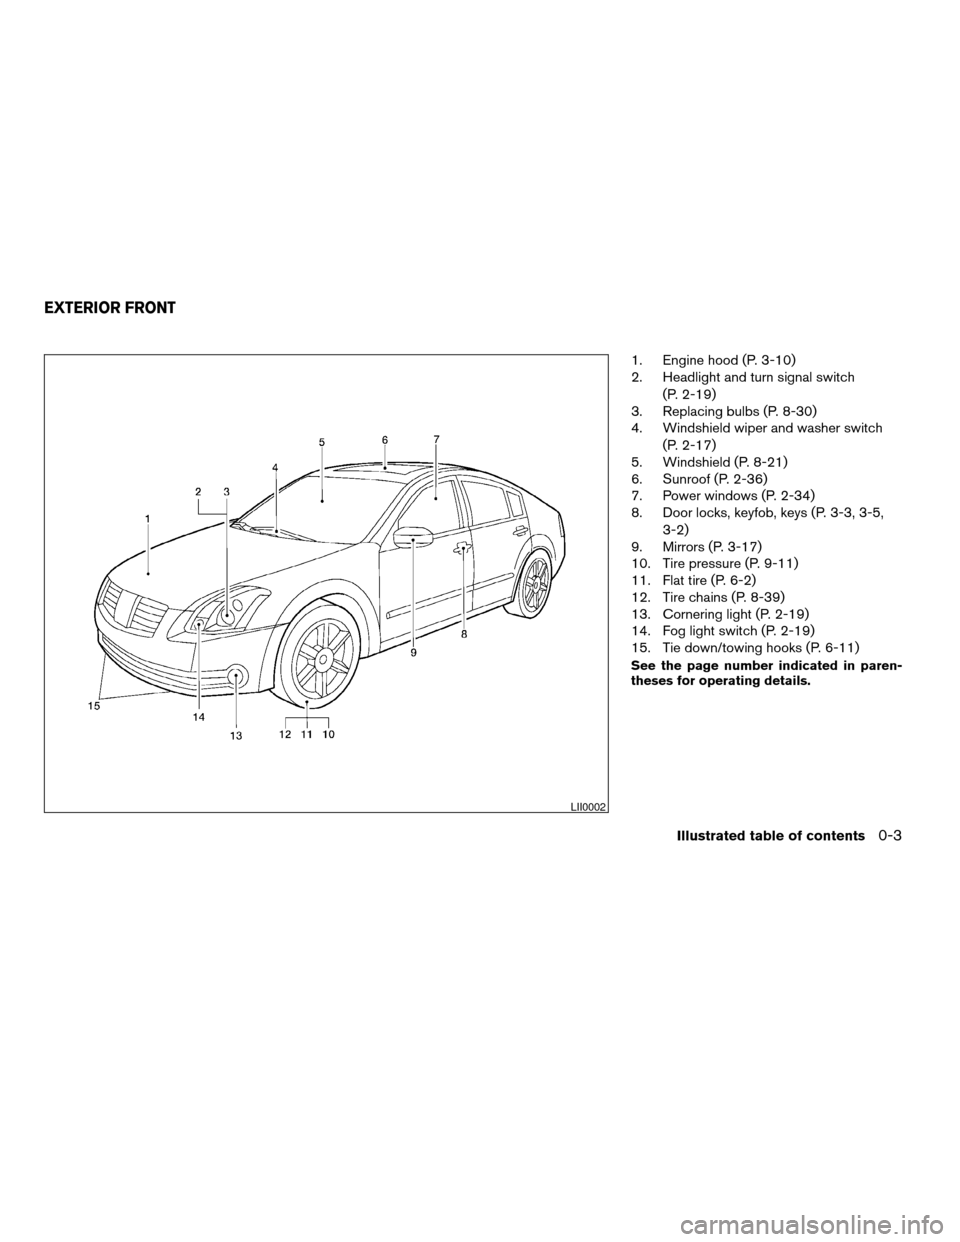
1. Engine hood (P. 3-10)
2. Headlight and turn signal switch
(P. 2-19)
3. Replacing bulbs (P. 8-30)
4. Windshield wiper and washer switch
(P. 2-17)
5. Windshield (P. 8-21)
6. Sunroof (P. 2-36)
7. Power windows (P. 2-34)
8. Door locks, keyfob, keys (P. 3-3, 3-5,
3-2)
9. Mirrors (P. 3-17)
10. Tire pressure (P. 9-11)
11. Flat tire (P. 6-2)
12. Tire chains (P. 8-39)
13. Cornering light (P. 2-19)
14. Fog light switch (P. 2-19)
15. Tie down/towing hooks (P. 6-11)
See the page number indicated in paren-
theses for operating details.
LII0002
EXTERIOR FRONT
Illustrated table of contents0-3
ZREVIEW COPY:Ð2004 Maxima(max)
Owners Manual(owners)ÐUSA English(nna)
10/20/03Ðarosenma
X
Page 168 of 280

cMake sure the area around the vehicle is
clear.
cCheck fluid levels such as engine oil, cool-
ant, brake and clutch fluid, and window
washer fluid as frequently as possible, or at
least whenever you refuel.
cCheck that all windows and lights are clean.
cVisually inspect tires for their appearance
and condition. Also check tires for proper
inflation.
cLock all doors.
cPosition seat and adjust head restraints.
cAdjust inside and outside mirrors.
cFasten seat belts and ask all passengers to
do likewise.
cCheck the operation of warning lights when
the key is turned to the ON (3) position. See
“Warning/indicator lights and audible re-
minders” in the “Instruments and controls”
section of this manual.1. Apply the parking brake.
2.Automatic transmission:
Move the shift selector lever to P (Park) or N
(Neutral) . P (Park) is recommended.
The shift selector lever cannot be
moved out of P (Park) and into any of
the other gear positions if the ignition
key is turned to the OFF position or if
the key is removed from the ignition
switch.
The starter is designed not to operate if
the shift selector lever is in any of the
driving positions.
Manual transmission:
Move the shift lever to N (Neutral) . Depress
the clutch pedal to the floor while cranking
the engine.
The starter is designed not to operate
unless the clutch pedal is fully de-
pressed.
3. Crank the enginewith your foot off the
accelerator pedalby turning the ignition
key to START. Release the key when the
engine starts. If the engine starts, but fails to
run, repeat the above procedure.cIf the engine is very hard to start in ex-
tremely cold weather or when restarting,
depress the accelerator pedal a little (ap-
proximately 1/3 to the floor) and hold it
and then crank the engine. Release the
key and the accelerator pedal when the
engine starts.
cIf the engine is very hard to start because
it is flooded, depress the accelerator
pedal all the way to the floor and hold it.
Crank the engine for 5-6 seconds. After
cranking the engine, release the accel-
erator pedal. Crank the enginewith your
foot off the accelerator pedalby turn-
ing the ignition key to START. Release the
key when the engine starts. If the engine
starts, but fails to run, repeat the above
procedure.
CAUTION
Do not operate the starter for more than
15 seconds at a time. If the engine does
not start, turn the key off and wait 10
seconds before cranking again, otherwise
the starter could be damaged.
BEFORE STARTING THE ENGINE STARTING THE ENGINE
5-6Starting and driving
ZREVIEW COPY:Ð2004 Maxima(max)
Owners Manual(owners)ÐUSA English(nna)
10/07/03Ðtbrooks
X
Page 177 of 280
To reset at a faster cruising speed,use one
of the following three methods.
cDepress the accelerator pedal. When the
vehicle attains the desired speed, push and
release the COAST/SET switch.
cPush and hold the RES/ACCEL switch.
When the vehicle attains the speed you de-
sire, release the switch.
cPush and release the RES/ACCEL switch.
Each time you do this, the set speed in-
creases by about 1 MPH (1.6 km/h) .
To reset at a slower cruising speed,use one
of the following three methods.
cLightly tap the brake pedal. When the ve-
hicle attains the desired speed, push the
COAST/SET switch and release it.
cPush and hold the COAST/SET switch. Re-
lease the switch when the vehicle slows to
the desired speed.
cPush and release the COAST/SET switch.
Each time you do this, the set speed de-
creases by about 1 MPH (1.6 km/h) .
To resume the preset speed,push and re-
lease the RES/ACCEL switch. The vehicle re-
turns to the last set cruising speed when the
vehicle speed is over 30 MPH (48 km/h) .CAUTION
During the first 1,200 miles (2,000 km) ,
follow these recommendations to obtain
maximum engine performance and en-
sure the future reliability and economy of
your new vehicle. Failure to follow these
recommendations may result in short-
ened engine life and reduced engine
performance.
cAvoid driving for long periods at constant
speed, either fast or slow, and do not run the
engine over 4,000 rpm.
cDo not accelerate at full throttle in any gear.
cAvoid quick starts.
cAvoid hard braking as much as possible.
cDo not tow a trailer for the first 500 miles
(800 km) . Your engine, axle or other parts
could be damaged.cAccelerate slowly and smoothly. Maintain
cruising speeds with a constant accelerator
position.
cDrive at moderate speeds on the highway.
Driving at high speed lowers fuel economy.
cAvoid unnecessary stopping and braking.
Maintain a safe distance behind other ve-
hicles.
cUse a proper gear range which suits road
conditions. On level roads, shift into high
gear as soon as possible.
cAvoid unnecessary engine idling.
cKeep your engine tuned up.
cFollow the recommended periodic mainte-
nance schedule.
cKeep the tires inflated to the correct pres-
sure. Low tire pressure increases tire wear
and lowers fuel economy.
cKeep the wheels in correct alignment. Im-
proper alignment increases tire wear and
lowers fuel economy.
cAir conditioner operation lowers fuel
economy. Use the air conditioner only when
necessary.
BREAK-IN SCHEDULE INCREASING FUEL ECONOMY
Starting and driving5-15
ZREVIEW COPY:Ð2004 Maxima(max)
Owners Manual(owners)ÐUSA English(nna)
10/07/03Ðtbrooks
X
Page 185 of 280

the tires on your vehicle and are installed
according to the chain manufacturer’s sug-
gestions.Use only SAE Class “S”
chains.Class “S” chains are used on ve-
hicles with restricted tire to vehicle clear-
ance. Vehicles that can use Class “S” chains
are designed to meet the minimum clear-
ances between the tire and the closest ve-
hicle suspension or body component re-
quired to accommodate the use of a winter
traction device (tire chains or cables) . The
minimum clearances are determined using
the factory equipped tire size. Other types
may damage your vehicle. Use chain ten-
sioners when recommended by the tire
chain manufacturer to ensure a tight fit.
Loose end links of the tire chain must be
secured or removed to prevent the possibil-
ity of whipping action damage to the fenders
or underbody. If possible, avoid fully loading
your vehicle when using tire chains. In addi-
tion, drive at a reduced speed. Otherwise,
your vehicle may be damaged and/or vehicle
handling and performance may be adversely
affected.
Never install tire chains on spare tires. Do
not use tire chains on dry roads.SPECIAL WINTER EQUIPMENT
It is recommended that the following items be
carried in the vehicle during winter:
cA scraper and stiff-bristled brush to remove
ice and snow from the windows and wiper
blades.
cA sturdy, flat board to be placed under the
jack to give it firm support.
cA shovel to dig the vehicle out of snowdrifts.
cExtra window washer fluid to refill the reser-
voir tank.
DRIVING ON SNOW OR ICE
WARNING
cWet ice (32°F, 0°C and freezing rain) ,
very cold snow or ice can be slick and
very hard to drive on. The vehicle will
have much less traction or “grip” under
these conditions. Try to avoid driving on
wet ice until the road is salted or
sanded.
cWhatever the condition, drive with cau-
tion. Accelerate and slow down with
care. If accelerating or downshifting too
fast, the drive wheels will lose even
more traction.cAllow more stopping distance under
these conditions. Braking should be
started sooner than on dry pavement.
cAllow greater following distances on
slippery roads.
c
Watch for slippery spots (glare ice) .
These may appear on an otherwise clear
road in shaded areas. If a patch of ice is
seen ahead, brake before reaching it. Try
not to brake while on the ice, and avoid
any sudden steering maneuvers.
cDo not use the cruise control on slip-
pery roads.
cSnow can trap dangerous exhaust
gases under your vehicle. Keep snow
clear of the exhaust pipe and from
around your vehicle.
ENGINE BLOCK HEATER (if so
equipped)
An engine block heater to assist in extreme cold
temperature starting is available through a
NISSAN dealer.
WARNING
Do not use your heater with an ungrounded
electrical system or two-pronged (cheater)
adapters. You can be injured by an electrical
shock if you use an ungrounded connection.
Starting and driving5-23
ZREVIEW COPY:Ð2004 Maxima(max)
Owners Manual(owners)ÐUSA English(nna)
10/07/03Ðtbrooks
X
Page 187 of 280

6 In case of emergency
Flat tire...........................................6-2
Changing a flat tire.............................6-2
Jump starting.....................................6-6
Push starting......................................6-8If your vehicle overheats............................6-9
Towing your vehicle...............................6-10
Towing recommended by NISSAN..............6-10
Vehicle recovery (freeing a stuck vehicle).........6-11
ZREVIEW COPY:Ð2004 Maxima(max)
Owners Manual(owners)ÐUSA English(nna)
10/20/03Ðarosenma
X
Page 188 of 280

CHANGING A FLAT TIRE
If you have a flat tire, follow the instructions be-
low.
Stopping the vehicle
1. Safely move the vehicle off the road and
away from traffic.
2. Turn on the hazard warning flashers.
3. Park on a level surface and apply the parking
brake. Shift the manual transmission into R
(Reverse) , or the automatic transmission
into P (Park) .
4. Turn off the engine.
5. Raise the hood to warn other traffic and to
signal professional road assistance person-
nel that you need assistance.
6. Have all passengers get out of the vehicle
and stand in a safe place, away from traffic
and clear of the vehicle.
WARNING
cMake sure the parking brake is securely
applied and the manual transmission is
shifted into R (Reverse) , or the auto-
matic transmission into P (Park) .cNever change tires when the vehicle is
on a slope, ice or slippery areas. This is
hazardous.
cNever change tires if oncoming traffic is
close to your vehicle. Wait for profes-
sional road assistance.
Blocking wheels
Place suitable blockss1at both the front and
back of the wheel diagonally opposite the flat tire
s2to prevent the vehicle from rolling when it is
jacked up.
WARNING
Be sure to block the wheel as the vehicle
may move and result in personal injury.
WCE0044
FLAT TIRE
6-2In case of emergency
ZREVIEW COPY:Ð2004 Maxima(max)
Owners Manual(owners)ÐUSA English(nna)
10/07/03Ðtbrooks
X
Page 192 of 280
4. Lower the vehicle slowly until the tire
touches the ground. Then, with the wheel
nut wrench, tighten the wheel nuts securely
in the sequence illustrated (
sA,sB,sC,sD,
sE) . Lower the vehicle completely.
WARNING
cIncorrect wheel nuts or improperly
tightened wheel nuts can cause the
wheel to become loose or come off.
This could cause an accident.
cDo not use oil or grease on the wheel
studs or nuts. This could cause the nuts
to become loose.
cRetighten the wheel nuts when the ve-
hicle has been driven for 600 miles
(1,000 km) (also in cases of a flat tire,
etc.) .
As soon as possible, tighten the wheel nuts
to the specified torque with a torque
wrench.
Wheel nut tightening torque:
80 ft-lb (108 N·m)
The wheel nuts must be kept tightened to
specification at all times. It is recom-
mended that wheel nuts be tightened to
specifications at each lubrication interval.Adjust tire pressure to the COLD pressure.
COLD pressure: After vehicle has been
parked for three hours or more or driven
less than 1 mile (1.6 km) .
COLD tire pressures are shown on the tire
placard affixed to the center console.
5. Securely store the flat tire and jacking equip-
ment in the vehicle.
6. Place the spare tire cover and the trunk floor
carpeting over the damaged tire.
7. Close the trunk.
WARNING
cAlways make sure that the spare tire
and jacking equipment are properly se-
cured after use. Such items can become
dangerous projectiles in an accident or
sudden stop.
cThe spare tire is designed for emer-
gency use. See specific instructions un-
der the heading “Wheels and tires” in
the “Maintenance and do-it-yourself”
section of this manual.To start your engine with a booster battery, the
instructions and precautions below must be fol-
lowed.
WARNING
cIf done incorrectly, jump starting can
lead to a battery explosion, resulting in
severe injury or death. It could also
damage your vehicle.
cExplosive hydrogen gas is always
present in the vicinity of the battery.
Keep all sparks and flames away from
the battery.
cDo not allow battery fluid to come into
contact with eyes, skin, clothing or
painted surfaces. Battery fluid is a cor-
rosive sulfuric acid solution which can
cause severe burns. If the fluid should
come into contact with anything, imme-
diately flush the contacted area with
water.
cKeep battery out of the reach of
children.
cThe booster battery must be rated at 12
volts. Use of an improperly rated battery
can damage your vehicle.
JUMP STARTING
6-6In case of emergency
ZREVIEW COPY:Ð2004 Maxima(max)
Owners Manual(owners)ÐUSA English(nna)
10/07/03Ðtbrooks
X
Page 237 of 280
If you have a flat tire, see the “In case of
emergency” section of this manual.
TIRE PRESSURE
Tire inflation pressure
Check the tire pressures (including the spare)
often and always prior to long distance trips. The
recommended tire pressure specifications are
shown on the Tire and Loading Information label
(this label is also known as the tire placard) under
the9Recommended Cold Tire Inflation Pressure9
heading. The Tire and Loading Information label
is affixed to the driver side center pillar. Tire
pressures should be checked regularly because:
cMost tires naturally lose air over time.
cTires can lose air suddenly when driven over
potholes or other objects or if the vehicle
strikes a curb while parking.
The tire pressures should be checked when the
tires are cold. The tires are considered COLD
after the vehicle has been parked for 3 or more
hours, or driven less than 1 mile (1.6 km) at
moderate speeds.
Incorrect tire pressure, including under in-
flation, may adversely affect tire life and
vehicle handling.
WARNING
cImproperly inflated tires can fail sud-
denly and cause an accident.
cThe vehicle weight capacity is indicated
on the Tire and Loading Information
label. Do not load your vehicle beyond
this capacity. Overloading your vehicle
may result in reduced tire life, unsafe
operating conditions due to premature
tire failure, or unfavorable handling
characteristics and could also lead to a
serious accident. Loading beyond the
specified capacity may also result in
failure of other vehicle components.
cBefore taking a long trip, or whenever
you heavily load your vehicle, use a tire
pressure gauge to ensure that the tire
pressures are at the specified level.
cDo not drive your vehicle over 85 MPH
(137 km/h) unless it is equipped with
high speed rated tires. Driving faster
than 85 MPH (137 km/h) may result in
tire failure, loss of control and possible
injury.cFor additional information regarding
tires, refer to “Important Tire Safety In-
formation” (US) or “Tire Safety Informa-
tion” (Canada) in the Warranty Informa-
tion Booklet.
WHEELS AND TIRES
Maintenance and do-it-yourself8-33
ZREVIEW COPY:Ð2004 Maxima(max)
Owners Manual(owners)ÐUSA English(nna)
10/20/03Ðarosenma
X
Page 239 of 280
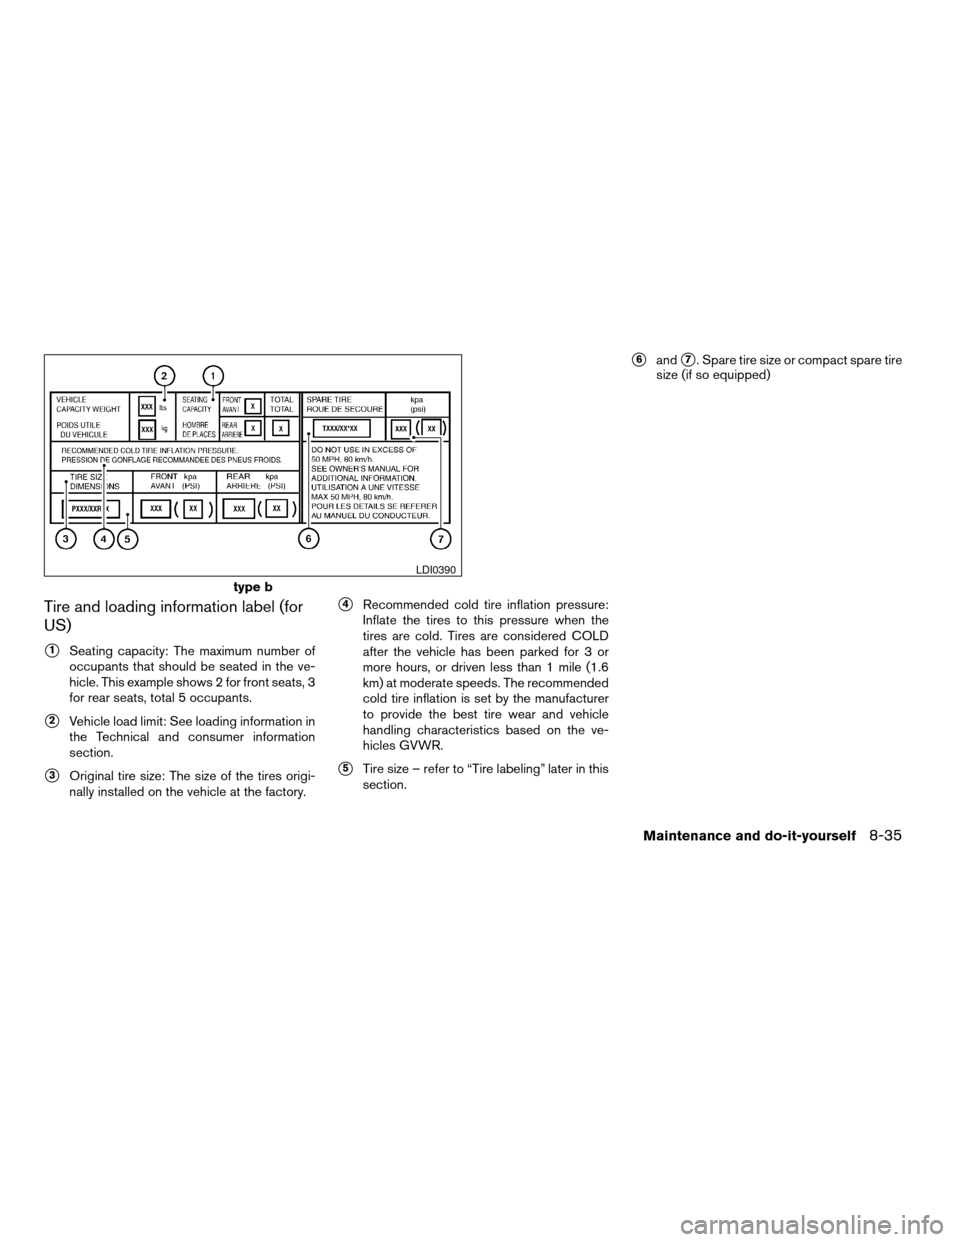
Tire and loading information label (for
US)
s1Seating capacity: The maximum number of
occupants that should be seated in the ve-
hicle. This example shows 2 for front seats, 3
for rear seats, total 5 occupants.
s2Vehicle load limit: See loading information in
the Technical and consumer information
section.
s3Original tire size: The size of the tires origi-
nally installed on the vehicle at the factory.
s4Recommended cold tire inflation pressure:
Inflate the tires to this pressure when the
tires are cold. Tires are considered COLD
after the vehicle has been parked for 3 or
more hours, or driven less than 1 mile (1.6
km) at moderate speeds. The recommended
cold tire inflation is set by the manufacturer
to provide the best tire wear and vehicle
handling characteristics based on the ve-
hicles GVWR.
s5Tire size – refer to “Tire labeling” later in this
section.
s6ands7. Spare tire size or compact spare tire
size (if so equipped)
type b
LDI0390
Maintenance and do-it-yourself8-35
ZREVIEW COPY:Ð2004 Maxima(max)
Owners Manual(owners)ÐUSA English(nna)
10/20/03Ðarosenma
X
Page 242 of 280
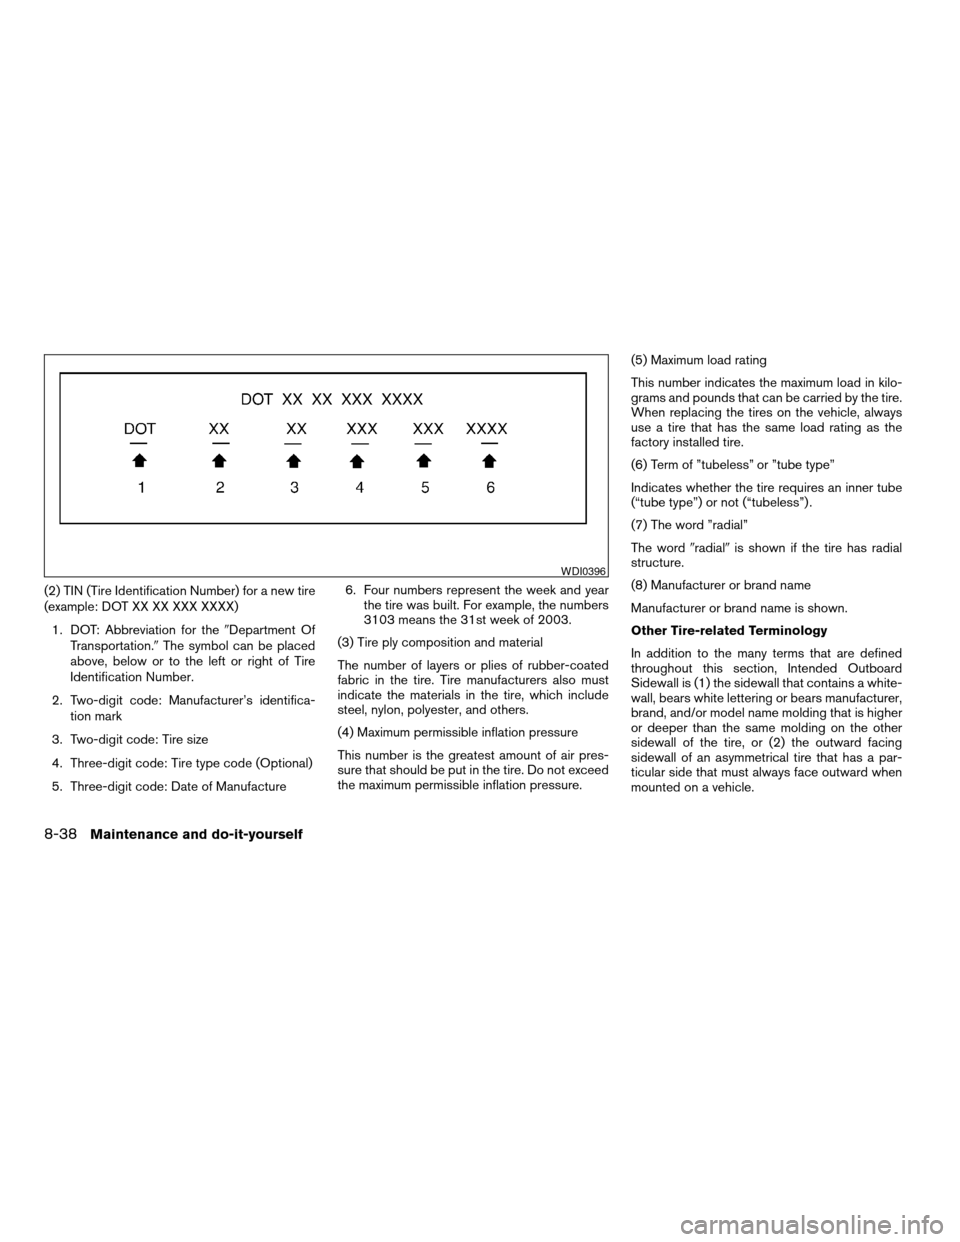
(2) TIN (Tire Identification Number) for a new tire
(example: DOT XX XX XXX XXXX)
1. DOT: Abbreviation for the9Department Of
Transportation.9The symbol can be placed
above, below or to the left or right of Tire
Identification Number.
2. Two-digit code: Manufacturer’s identifica-
tion mark
3. Two-digit code: Tire size
4. Three-digit code: Tire type code (Optional)
5. Three-digit code: Date of Manufacture6. Four numbers represent the week and year
the tire was built. For example, the numbers
3103 means the 31st week of 2003.
(3) Tire ply composition and material
The number of layers or plies of rubber-coated
fabric in the tire. Tire manufacturers also must
indicate the materials in the tire, which include
steel, nylon, polyester, and others.
(4) Maximum permissible inflation pressure
This number is the greatest amount of air pres-
sure that should be put in the tire. Do not exceed
the maximum permissible inflation pressure.(5) Maximum load rating
This number indicates the maximum load in kilo-
grams and pounds that can be carried by the tire.
When replacing the tires on the vehicle, always
use a tire that has the same load rating as the
factory installed tire.
(6) Term of ”tubeless” or ”tube type”
Indicates whether the tire requires an inner tube
(“tube type”) or not (“tubeless”) .
(7) The word ”radial”
The word9radial9is shown if the tire has radial
structure.
(8) Manufacturer or brand name
Manufacturer or brand name is shown.
Other Tire-related Terminology
In addition to the many terms that are defined
throughout this section, Intended Outboard
Sidewall is (1) the sidewall that contains a white-
wall, bears white lettering or bears manufacturer,
brand, and/or model name molding that is higher
or deeper than the same molding on the other
sidewall of the tire, or (2) the outward facing
sidewall of an asymmetrical tire that has a par-
ticular side that must always face outward when
mounted on a vehicle.
WDI0396
8-38Maintenance and do-it-yourself
ZREVIEW COPY:Ð2004 Maxima(max)
Owners Manual(owners)ÐUSA English(nna)
10/20/03Ðarosenma
X