lock NISSAN MAXIMA 2004 A34 / 6.G Owners Manual
[x] Cancel search | Manufacturer: NISSAN, Model Year: 2004, Model line: MAXIMA, Model: NISSAN MAXIMA 2004 A34 / 6.GPages: 280, PDF Size: 3.99 MB
Page 9 of 280
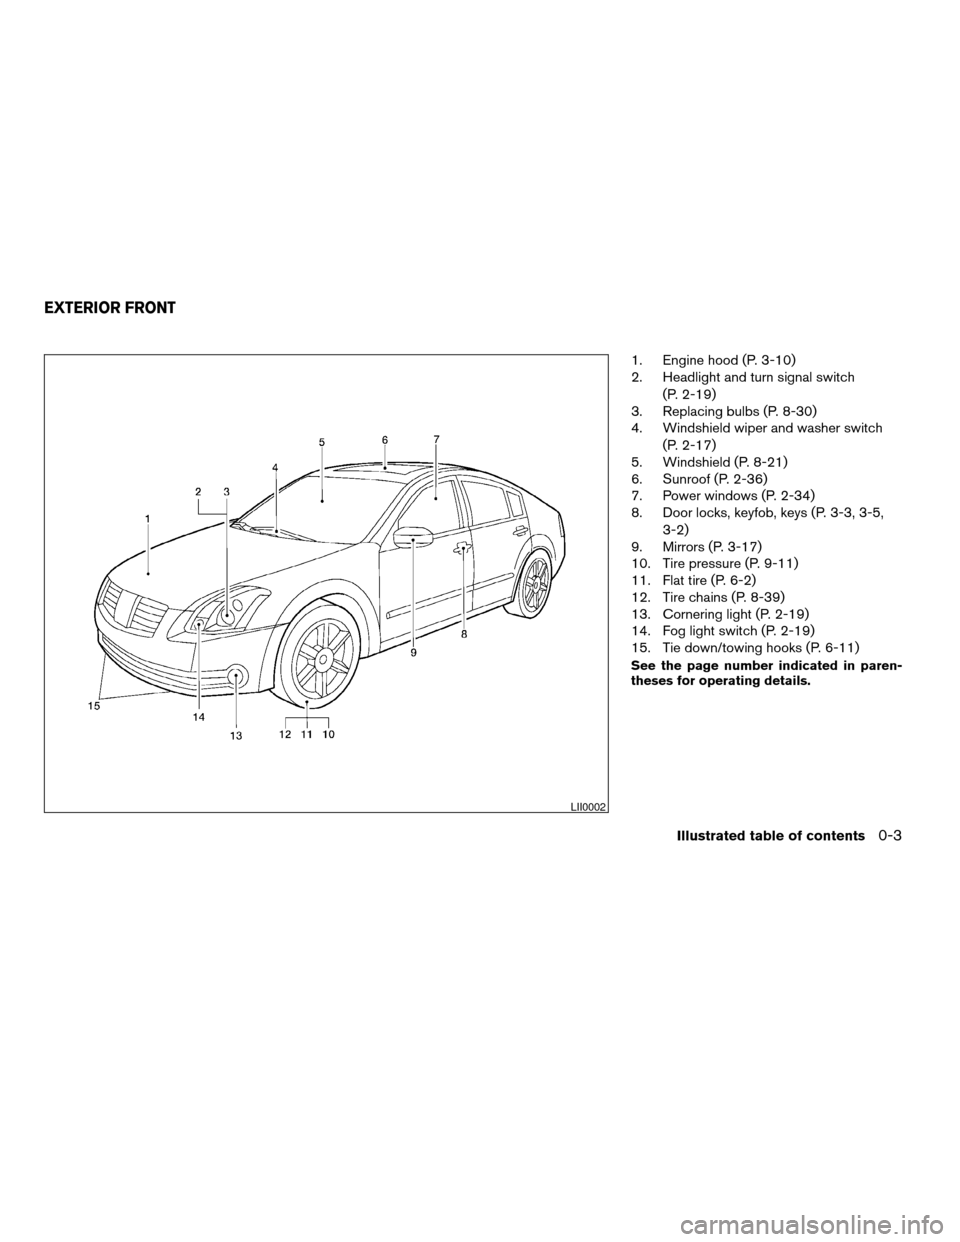
1. Engine hood (P. 3-10)
2. Headlight and turn signal switch
(P. 2-19)
3. Replacing bulbs (P. 8-30)
4. Windshield wiper and washer switch
(P. 2-17)
5. Windshield (P. 8-21)
6. Sunroof (P. 2-36)
7. Power windows (P. 2-34)
8. Door locks, keyfob, keys (P. 3-3, 3-5,
3-2)
9. Mirrors (P. 3-17)
10. Tire pressure (P. 9-11)
11. Flat tire (P. 6-2)
12. Tire chains (P. 8-39)
13. Cornering light (P. 2-19)
14. Fog light switch (P. 2-19)
15. Tie down/towing hooks (P. 6-11)
See the page number indicated in paren-
theses for operating details.
LII0002
EXTERIOR FRONT
Illustrated table of contents0-3
ZREVIEW COPY:Ð2004 Maxima(max)
Owners Manual(owners)ÐUSA English(nna)
10/20/03Ðarosenma
X
Page 10 of 280
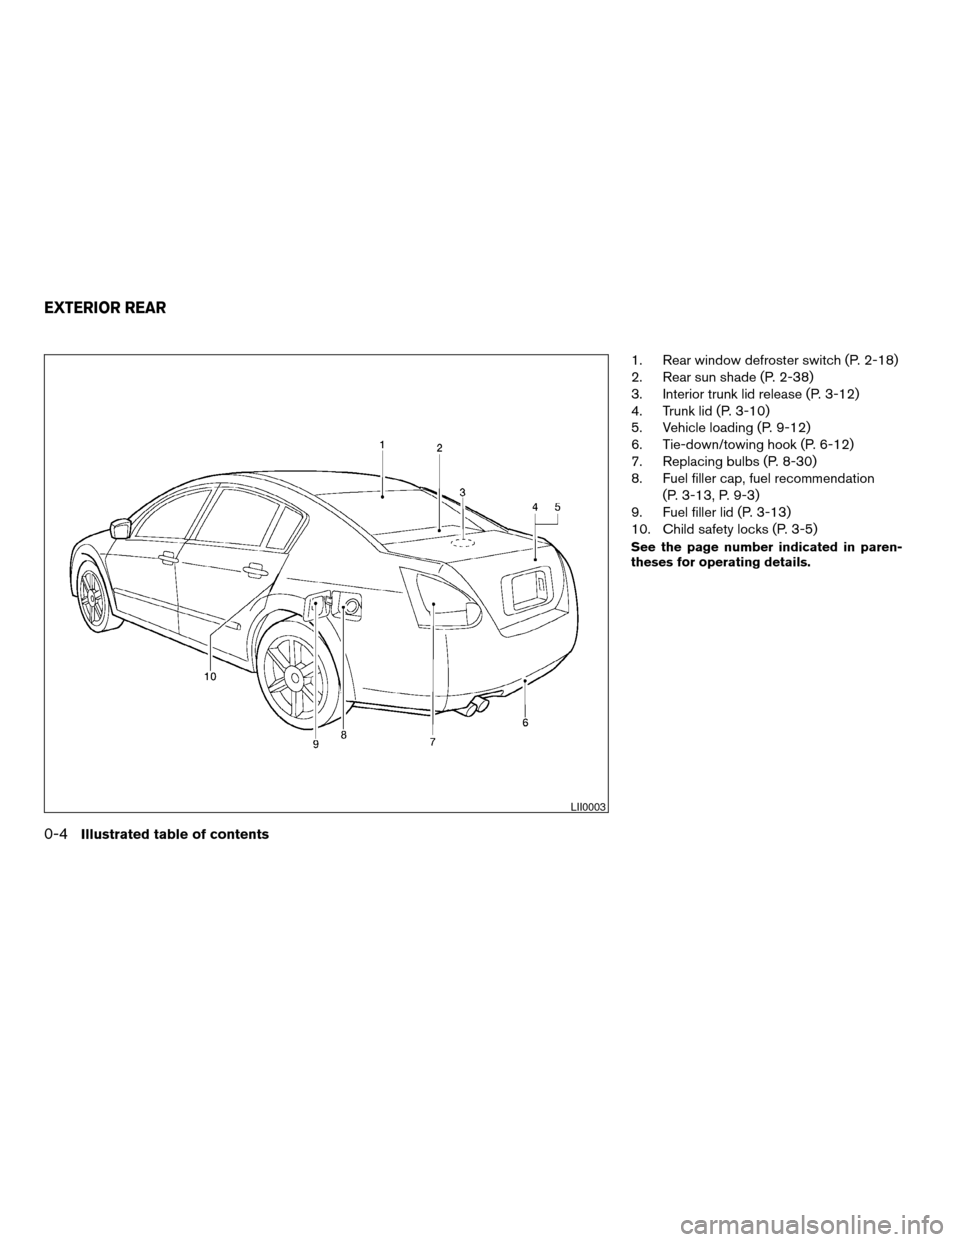
1. Rear window defroster switch (P. 2-18)
2. Rear sun shade (P. 2-38)
3. Interior trunk lid release (P. 3-12)
4. Trunk lid (P. 3-10)
5. Vehicle loading (P. 9-12)
6. Tie-down/towing hook (P. 6-12)
7. Replacing bulbs (P. 8-30)
8. Fuel filler cap, fuel recommendation
(P. 3-13, P. 9-3)
9. Fuel filler lid (P. 3-13)
10. Child safety locks (P. 3-5)
See the page number indicated in paren-
theses for operating details.
LII0003
EXTERIOR REAR
0-4Illustrated table of contents
ZREVIEW COPY:Ð2004 Maxima(max)
Owners Manual(owners)ÐUSA English(nna)
10/20/03Ðarosenma
X
Page 14 of 280

1. Power steering fluid reservoir (P. 8-13)
2. Engine oil filler cap (P. 8-8)
3. Brake fluid reservoir (P. 8-13)
4. Clutch fluid reservoir (M/T model)
(P. 8-14)
5. Air cleaner (P. 8-18)
6. Battery (P. 8-15)
7. Fuse/fusible link box (P. 8-23)
8. Transmission dipstick (A/T models)
(P. 8-11)
9. Engine oil dipstick (P. 8-8)
10. Radiator cap (P. 8-7)
11. Fuse block (P. 8-23)
12. Windshield washer fluid reservoir
(P. 8-14)
13. Engine coolant reservoir (P. 8-7)
See the page number indicated in paren-
theses for operating details.
WII0006
ENGINE COMPARTMENT LOCATIONS
0-8Illustrated table of contents
ZREVIEW COPY:Ð2004 Maxima(max)
Owners Manual(owners)ÐUSA English(nna)
10/20/03Ðskoniecz
X
Page 15 of 280

Warning
lightName Page
or
Anti-lock brake
warning light2-9
Automatic
transmission
check warning
light (if so
equipped)2-10
or
Brake warning
light2-10
Charge warning
light2-10
Door open
warning light2-10
Warning
lightName Page
Engine oil pres-
sure light2-10
Low fuel warn-
ing light2-11
Low windshield
washer fluid
warning light2-11
Seat belt warn-
ing light and
chime2-11
Supplemental
air bag warning
light2-11
Trunk lid open
warning light2-11
Indicator
lightName Page
Automatic
transmission
position indica-
tor light (A/T
models)2-12
CRUISE main
switch indicator
light2-12
Cruise SET
switch indicator
light2-12
High beam in-
dicator light
(blue)2-12
Malfunction
indicator lamp
(MIL)2-12
WARNING/INDICATOR LIGHTS
Illustrated table of contents0-9
ZREVIEW COPY:Ð2004 Maxima(max)
Owners Manual(owners)ÐUSA English(nna)
10/20/03Ðskoniecz
X
Page 18 of 280
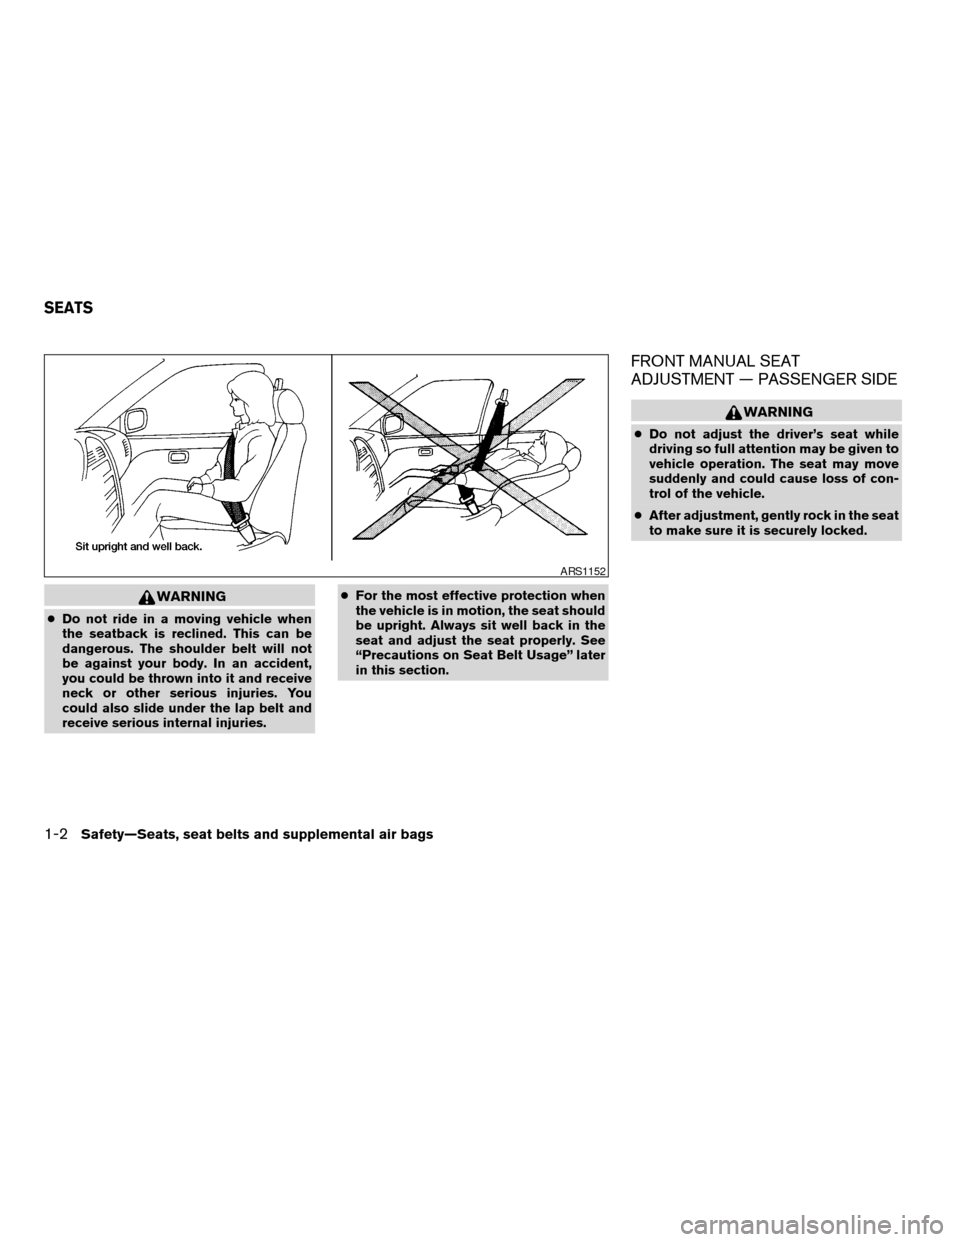
WARNING
cDo not ride in a moving vehicle when
the seatback is reclined. This can be
dangerous. The shoulder belt will not
be against your body. In an accident,
you could be thrown into it and receive
neck or other serious injuries. You
could also slide under the lap belt and
receive serious internal injuries.cFor the most effective protection when
the vehicle is in motion, the seat should
be upright. Always sit well back in the
seat and adjust the seat properly. See
“Precautions on Seat Belt Usage” later
in this section.
FRONT MANUAL SEAT
ADJUSTMENT — PASSENGER SIDE
WARNING
cDo not adjust the driver’s seat while
driving so full attention may be given to
vehicle operation. The seat may move
suddenly and could cause loss of con-
trol of the vehicle.
cAfter adjustment, gently rock in the seat
to make sure it is securely locked.
ARS1152
SEATS
1-2Safety—Seats, seat belts and supplemental air bags
ZREVIEW COPY:Ð2004 Maxima(max)
Owners Manual(owners)ÐUSA English(nna)
10/07/03Ðtbrooks
X
Page 19 of 280
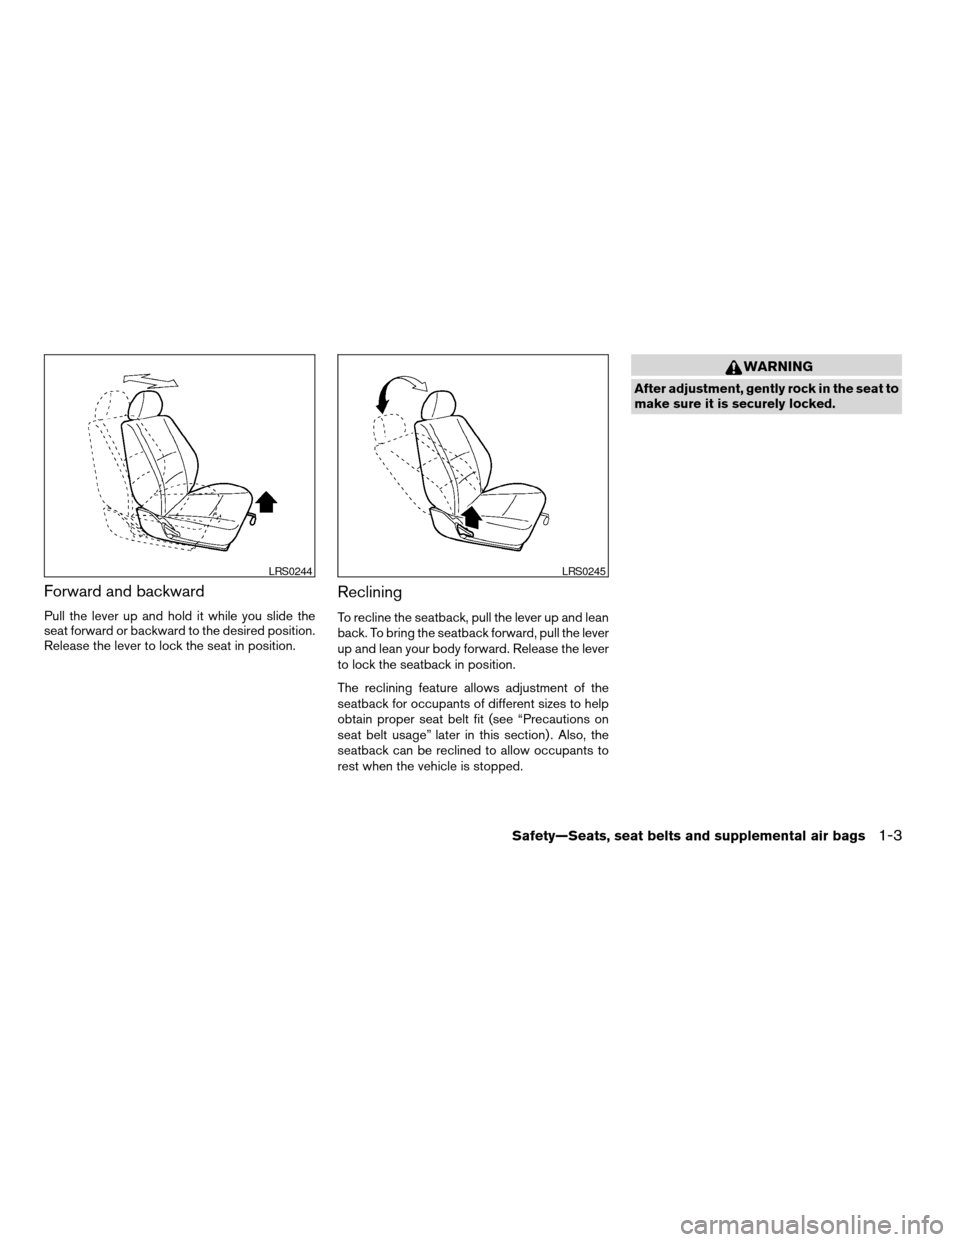
Forward and backward
Pull the lever up and hold it while you slide the
seat forward or backward to the desired position.
Release the lever to lock the seat in position.
Reclining
To recline the seatback, pull the lever up and lean
back. To bring the seatback forward, pull the lever
up and lean your body forward. Release the lever
to lock the seatback in position.
The reclining feature allows adjustment of the
seatback for occupants of different sizes to help
obtain proper seat belt fit (see “Precautions on
seat belt usage” later in this section) . Also, the
seatback can be reclined to allow occupants to
rest when the vehicle is stopped.
WARNING
After adjustment, gently rock in the seat to
make sure it is securely locked.
LRS0244LRS0245
Safety—Seats, seat belts and supplemental air bags1-3
ZREVIEW COPY:Ð2004 Maxima(max)
Owners Manual(owners)ÐUSA English(nna)
10/07/03Ðtbrooks
X
Page 22 of 280
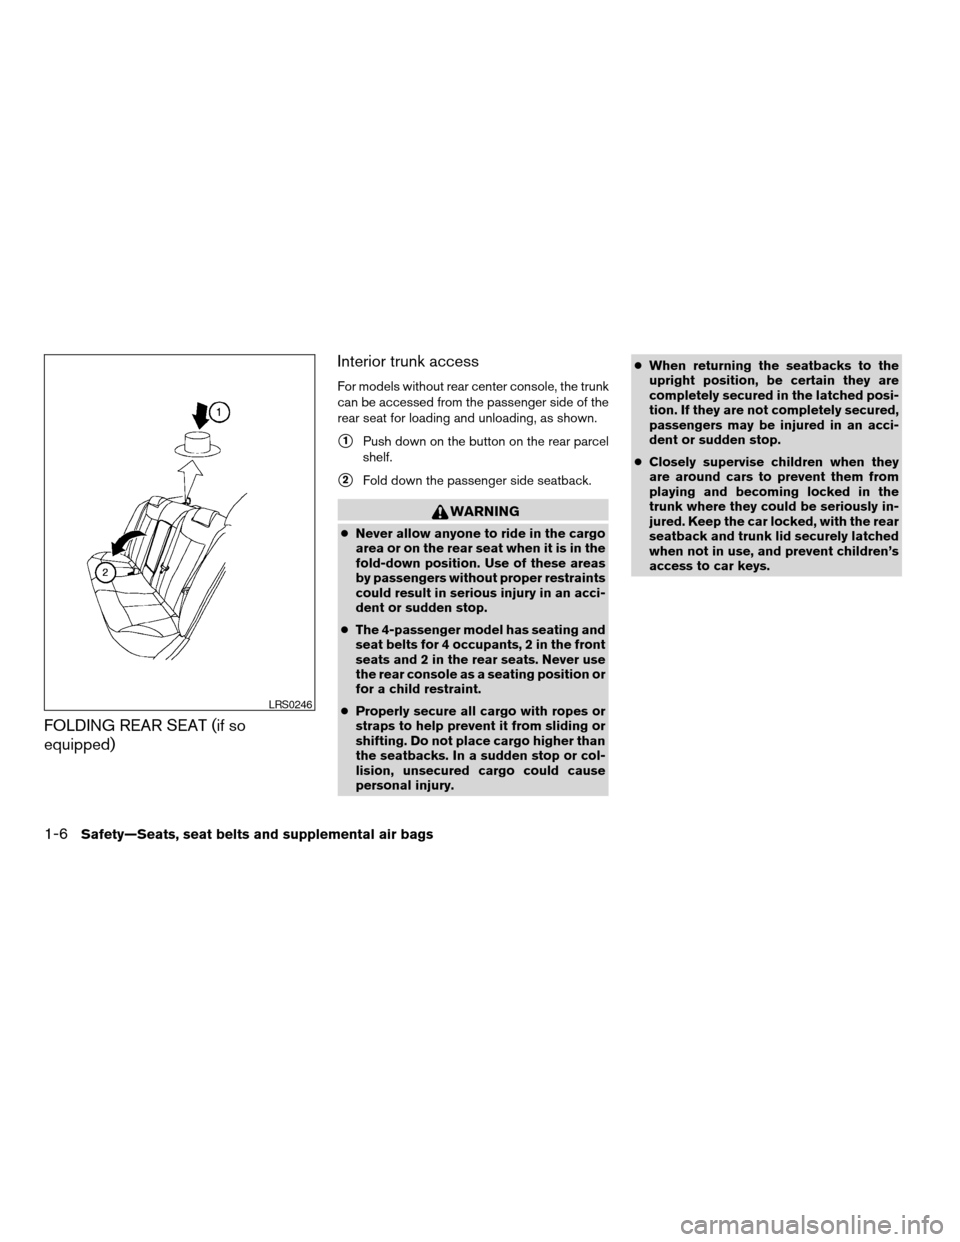
FOLDING REAR SEAT (if so
equipped)Interior trunk access
For models without rear center console, the trunk
can be accessed from the passenger side of the
rear seat for loading and unloading, as shown.
s1Push down on the button on the rear parcel
shelf.
s2Fold down the passenger side seatback.
WARNING
cNever allow anyone to ride in the cargo
area or on the rear seat when it is in the
fold-down position. Use of these areas
by passengers without proper restraints
could result in serious injury in an acci-
dent or sudden stop.
cThe 4-passenger model has seating and
seat belts for 4 occupants, 2 in the front
seats and 2 in the rear seats. Never use
the rear console as a seating position or
for a child restraint.
cProperly secure all cargo with ropes or
straps to help prevent it from sliding or
shifting. Do not place cargo higher than
the seatbacks. In a sudden stop or col-
lision, unsecured cargo could cause
personal injury.cWhen returning the seatbacks to the
upright position, be certain they are
completely secured in the latched posi-
tion. If they are not completely secured,
passengers may be injured in an acci-
dent or sudden stop.
cClosely supervise children when they
are around cars to prevent them from
playing and becoming locked in the
trunk where they could be seriously in-
jured. Keep the car locked, with the rear
seatback and trunk lid securely latched
when not in use, and prevent children’s
access to car keys.
LRS0246
1-6Safety—Seats, seat belts and supplemental air bags
ZREVIEW COPY:Ð2004 Maxima(max)
Owners Manual(owners)ÐUSA English(nna)
10/07/03Ðtbrooks
X
Page 23 of 280
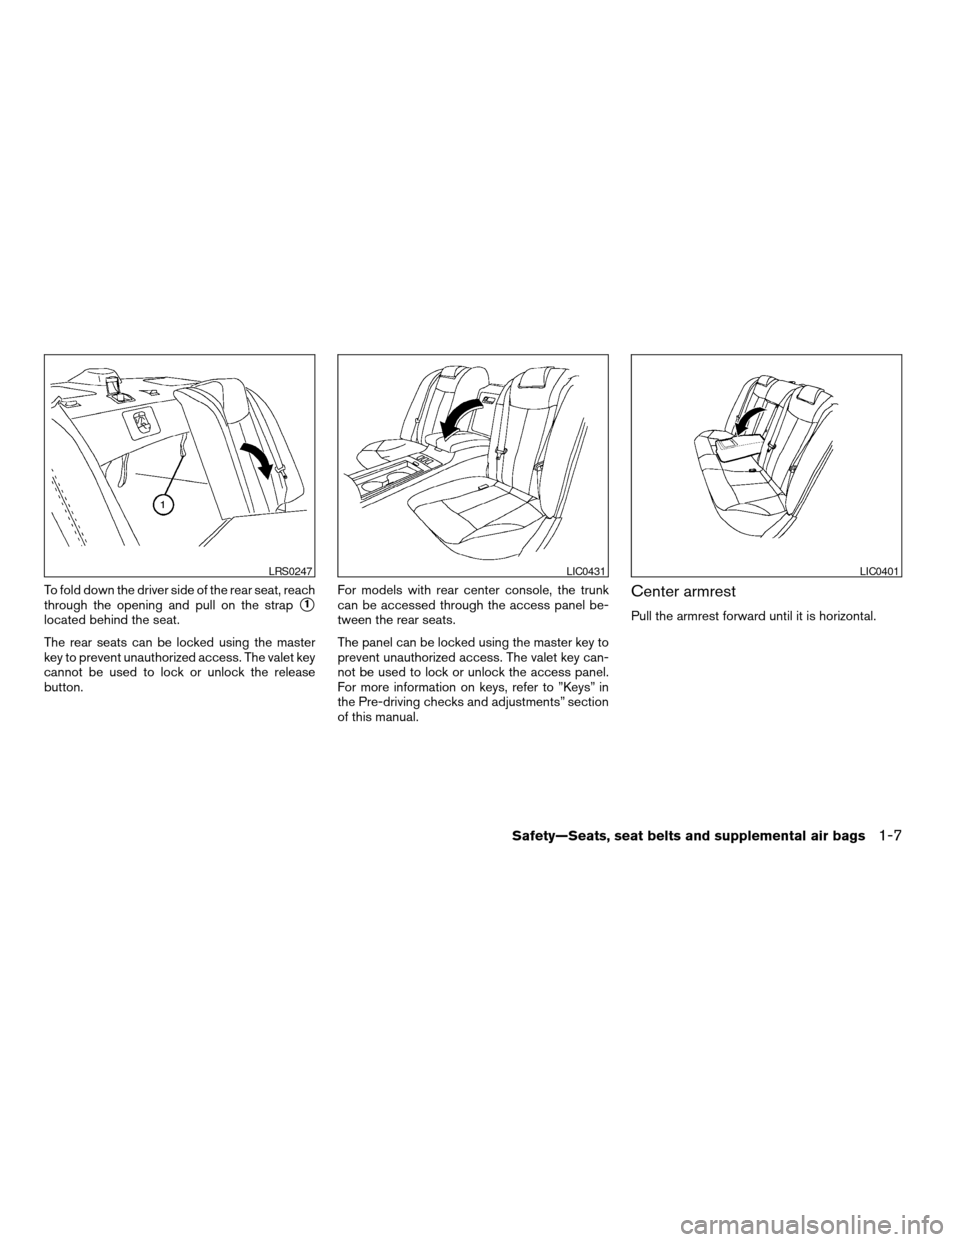
To fold down the driver side of the rear seat, reach
through the opening and pull on the strap
s1
located behind the seat.
The rear seats can be locked using the master
key to prevent unauthorized access. The valet key
cannot be used to lock or unlock the release
button.For models with rear center console, the trunk
can be accessed through the access panel be-
tween the rear seats.
The panel can be locked using the master key to
prevent unauthorized access. The valet key can-
not be used to lock or unlock the access panel.
For more information on keys, refer to ”Keys” in
the Pre-driving checks and adjustments” section
of this manual.
Center armrest
Pull the armrest forward until it is horizontal.
LRS0247LIC0431LIC0401
Safety—Seats, seat belts and supplemental air bags1-7
ZREVIEW COPY:Ð2004 Maxima(max)
Owners Manual(owners)ÐUSA English(nna)
10/07/03Ðtbrooks
X
Page 24 of 280
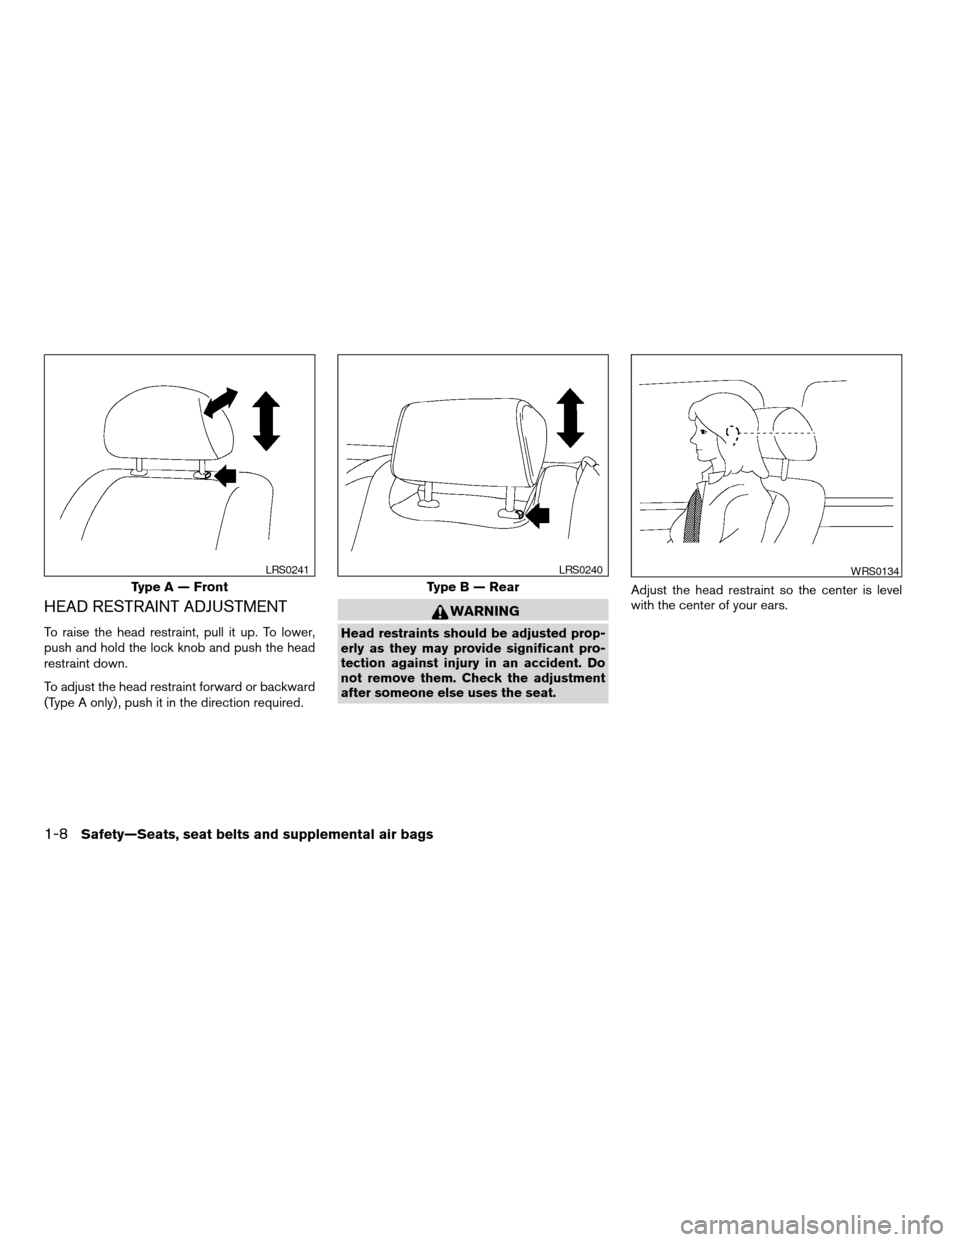
HEAD RESTRAINT ADJUSTMENT
To raise the head restraint, pull it up. To lower,
push and hold the lock knob and push the head
restraint down.
To adjust the head restraint forward or backward
(Type A only) , push it in the direction required.
WARNING
Head restraints should be adjusted prop-
erly as they may provide significant pro-
tection against injury in an accident. Do
not remove them. Check the adjustment
after someone else uses the seat.Adjust the head restraint so the center is level
with the center of your ears.
Type A — Front
LRS0241
Type B — Rear
LRS0240WRS0134
1-8Safety—Seats, seat belts and supplemental air bags
ZREVIEW COPY:Ð2004 Maxima(max)
Owners Manual(owners)ÐUSA English(nna)
10/07/03Ðtbrooks
X
Page 38 of 280

WARNING
If the supplemental air bag warning light
is on, it could mean that the supplemental
front air bag, supplemental side air bag,
curtain side-impact air bag systems
and/or pre-tensioner seat belt systems
will not operate in an accident.
Repair and replacement procedure
The supplemental front air bags, supplemental
side air bags, curtain side-impact air bags and
pre-tensioner seat belts are designed to inflate
on a one-time-only basis. As a reminder, unless it
is damaged, the supplemental air bag warning
light remains illuminated after inflation has oc-
curred. Repair and replacement of these supple-
mental air bag systems should be done only by a
NISSAN dealer.
When maintenance work is required on the ve-
hicle, the supplemental front air bags, supple-
mental side air bags, curtain side-impact air
bags, pre-tensioner seat belts and related parts
should be pointed out to the person performing
the maintenance. The ignition key should always
be in the LOCK position when working under the
hood or inside the vehicle.
WARNING
cOnce a supplemental front air bag,
supplemental side air bag or curtain
side-impact air bag has inflated, the air
bag module will not function again and
must be replaced. Additionally, if any of
the supplemental front air bags inflate,
the activated pre-tensioner seat belts
must also be replaced. The air bag mod-
ule and pre-tensioner seat belt system
should be replaced by a NISSAN dealer.
The air bag module and pre-tensioner
seat belt system cannot be repaired.
cThe supplemental front air bag, side air
bag and curtain side-impact air bag sys-
tems, and the pre-tensioner seat belt
system should be inspected by a
NISSAN dealer if there is any damage to
the front end or side portion of the
vehicle.
cIf you need to dispose of the supple-
mental air bag, pre-tensioner seat belt
system or scrap the vehicle, contact a
NISSAN dealer. Correct supplemental
air bag and pre-tensioner seat belt sys-
tem disposal procedures are set forth in
the appropriate NISSAN Service
Manual. Incorrect disposal procedures
could cause personal injury.
1-22Safety—Seats, seat belts and supplemental air bags
ZREVIEW COPY:Ð2004 Maxima(max)
Owners Manual(owners)ÐUSA English(nna)
10/07/03Ðtbrooks
X