tire pressure NISSAN MAXIMA 2004 A34 / 6.G Owners Manual
[x] Cancel search | Manufacturer: NISSAN, Model Year: 2004, Model line: MAXIMA, Model: NISSAN MAXIMA 2004 A34 / 6.GPages: 280, PDF Size: 3.99 MB
Page 9 of 280
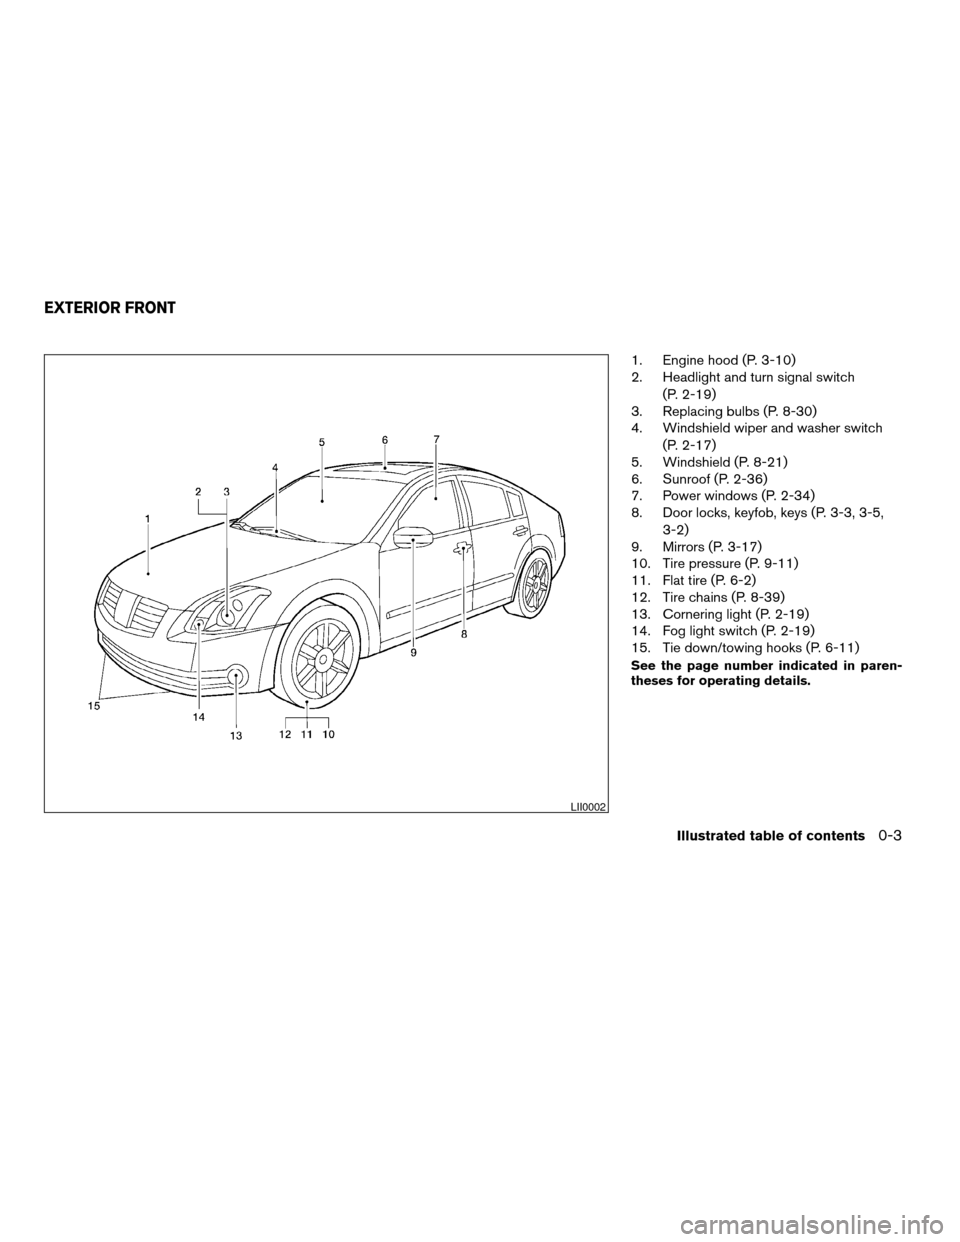
1. Engine hood (P. 3-10)
2. Headlight and turn signal switch
(P. 2-19)
3. Replacing bulbs (P. 8-30)
4. Windshield wiper and washer switch
(P. 2-17)
5. Windshield (P. 8-21)
6. Sunroof (P. 2-36)
7. Power windows (P. 2-34)
8. Door locks, keyfob, keys (P. 3-3, 3-5,
3-2)
9. Mirrors (P. 3-17)
10. Tire pressure (P. 9-11)
11. Flat tire (P. 6-2)
12. Tire chains (P. 8-39)
13. Cornering light (P. 2-19)
14. Fog light switch (P. 2-19)
15. Tie down/towing hooks (P. 6-11)
See the page number indicated in paren-
theses for operating details.
LII0002
EXTERIOR FRONT
Illustrated table of contents0-3
ZREVIEW COPY:Ð2004 Maxima(max)
Owners Manual(owners)ÐUSA English(nna)
10/20/03Ðarosenma
X
Page 177 of 280
To reset at a faster cruising speed,use one
of the following three methods.
cDepress the accelerator pedal. When the
vehicle attains the desired speed, push and
release the COAST/SET switch.
cPush and hold the RES/ACCEL switch.
When the vehicle attains the speed you de-
sire, release the switch.
cPush and release the RES/ACCEL switch.
Each time you do this, the set speed in-
creases by about 1 MPH (1.6 km/h) .
To reset at a slower cruising speed,use one
of the following three methods.
cLightly tap the brake pedal. When the ve-
hicle attains the desired speed, push the
COAST/SET switch and release it.
cPush and hold the COAST/SET switch. Re-
lease the switch when the vehicle slows to
the desired speed.
cPush and release the COAST/SET switch.
Each time you do this, the set speed de-
creases by about 1 MPH (1.6 km/h) .
To resume the preset speed,push and re-
lease the RES/ACCEL switch. The vehicle re-
turns to the last set cruising speed when the
vehicle speed is over 30 MPH (48 km/h) .CAUTION
During the first 1,200 miles (2,000 km) ,
follow these recommendations to obtain
maximum engine performance and en-
sure the future reliability and economy of
your new vehicle. Failure to follow these
recommendations may result in short-
ened engine life and reduced engine
performance.
cAvoid driving for long periods at constant
speed, either fast or slow, and do not run the
engine over 4,000 rpm.
cDo not accelerate at full throttle in any gear.
cAvoid quick starts.
cAvoid hard braking as much as possible.
cDo not tow a trailer for the first 500 miles
(800 km) . Your engine, axle or other parts
could be damaged.cAccelerate slowly and smoothly. Maintain
cruising speeds with a constant accelerator
position.
cDrive at moderate speeds on the highway.
Driving at high speed lowers fuel economy.
cAvoid unnecessary stopping and braking.
Maintain a safe distance behind other ve-
hicles.
cUse a proper gear range which suits road
conditions. On level roads, shift into high
gear as soon as possible.
cAvoid unnecessary engine idling.
cKeep your engine tuned up.
cFollow the recommended periodic mainte-
nance schedule.
cKeep the tires inflated to the correct pres-
sure. Low tire pressure increases tire wear
and lowers fuel economy.
cKeep the wheels in correct alignment. Im-
proper alignment increases tire wear and
lowers fuel economy.
cAir conditioner operation lowers fuel
economy. Use the air conditioner only when
necessary.
BREAK-IN SCHEDULE INCREASING FUEL ECONOMY
Starting and driving5-15
ZREVIEW COPY:Ð2004 Maxima(max)
Owners Manual(owners)ÐUSA English(nna)
10/07/03Ðtbrooks
X
Page 181 of 280

ing abruptly or when braking on a slippery road.
Thus, difficult steering and swerving of the ve-
hicle due to locked wheels is minimized. The
system detects the wheel rotation rate and elec-
tronically controls the pressure applied to each
brake. Slight vibration on the brake pedal accom-
panied by noise usually occurs while the ABS
system is operating. Such vibration and noise
encountered during abrupt braking is not a prob-
lem, but indicates that the system is functioning
properly. However, the pulsation may indicate
that road conditions are hazardous and extra care
is required while driving.
Self-test feature
The anti-lock brake system consists of electronic
sensors and hydraulic solenoids controlled by a
computer. The computer has a built-in diagnostic
feature that tests the system each time you start
the engine and move the vehicle at a low speed in
forward or reverse. When the self-test occurs,
you may hear a ‘‘clunk’’ noise and/or feel a pulsa-
tion in the brake pedal. This is normal and is not
an indication of any malfunction. If the computer
senses any malfunction, it switches the anti-lock
brake system off and turns on the ABS brake
warning light on the instrument panel. The brake
system then operates normally, but without anti-
lock assistance.If a malfunction occurs in the system, the anti-
lock function will not operate, but the standard
vehicle brake system will continue to operate
normally. The ABS brake warning light will then
come on.
If the light comes on during the self-test or while
driving, take the vehicle to a NISSAN dealer for
repair.
WARNING
cThe anti-lock brake system is a sophis-
ticated device, but it cannot prevent ac-
cidents resulting from careless or dan-
gerous driving techniques. It can help
maintain vehicle control during braking
on slippery surfaces, but remember that
the stopping distance on slippery sur-
faces will be longer than on normal
surfaces even with the anti-lock brake
system. Stopping distances may also
be longer on rough, gravel or snow cov-
ered roads, or if you are using tire
chains. Tire type and condition may also
affect braking effectiveness. Always
maintain a safe distance from the ve-
hicle in front of you. Ultimately, the re-
sponsibility for safety of self and others
rests in the hands of the driver.cTire type and condition of tires may also
affect braking effectiveness.
cWhen replacing tires, install the speci-
fied size of tires on all four wheels.
cWhen installing a spare tire, make sure
it is the proper size and type as speci-
fied on the tire placard. For tire placard
location information, refer to “Tire plac-
ard” in the “Technical and consumer
information” section of this manual.
cRefer to “Wheels and tires” in the
“Maintenance and do-it-yourself” sec-
tion of this manual.
Starting and driving5-19
ZREVIEW COPY:Ð2004 Maxima(max)
Owners Manual(owners)ÐUSA English(nna)
10/07/03Ðtbrooks
X
Page 192 of 280
4. Lower the vehicle slowly until the tire
touches the ground. Then, with the wheel
nut wrench, tighten the wheel nuts securely
in the sequence illustrated (
sA,sB,sC,sD,
sE) . Lower the vehicle completely.
WARNING
cIncorrect wheel nuts or improperly
tightened wheel nuts can cause the
wheel to become loose or come off.
This could cause an accident.
cDo not use oil or grease on the wheel
studs or nuts. This could cause the nuts
to become loose.
cRetighten the wheel nuts when the ve-
hicle has been driven for 600 miles
(1,000 km) (also in cases of a flat tire,
etc.) .
As soon as possible, tighten the wheel nuts
to the specified torque with a torque
wrench.
Wheel nut tightening torque:
80 ft-lb (108 N·m)
The wheel nuts must be kept tightened to
specification at all times. It is recom-
mended that wheel nuts be tightened to
specifications at each lubrication interval.Adjust tire pressure to the COLD pressure.
COLD pressure: After vehicle has been
parked for three hours or more or driven
less than 1 mile (1.6 km) .
COLD tire pressures are shown on the tire
placard affixed to the center console.
5. Securely store the flat tire and jacking equip-
ment in the vehicle.
6. Place the spare tire cover and the trunk floor
carpeting over the damaged tire.
7. Close the trunk.
WARNING
cAlways make sure that the spare tire
and jacking equipment are properly se-
cured after use. Such items can become
dangerous projectiles in an accident or
sudden stop.
cThe spare tire is designed for emer-
gency use. See specific instructions un-
der the heading “Wheels and tires” in
the “Maintenance and do-it-yourself”
section of this manual.To start your engine with a booster battery, the
instructions and precautions below must be fol-
lowed.
WARNING
cIf done incorrectly, jump starting can
lead to a battery explosion, resulting in
severe injury or death. It could also
damage your vehicle.
cExplosive hydrogen gas is always
present in the vicinity of the battery.
Keep all sparks and flames away from
the battery.
cDo not allow battery fluid to come into
contact with eyes, skin, clothing or
painted surfaces. Battery fluid is a cor-
rosive sulfuric acid solution which can
cause severe burns. If the fluid should
come into contact with anything, imme-
diately flush the contacted area with
water.
cKeep battery out of the reach of
children.
cThe booster battery must be rated at 12
volts. Use of an improperly rated battery
can damage your vehicle.
JUMP STARTING
6-6In case of emergency
ZREVIEW COPY:Ð2004 Maxima(max)
Owners Manual(owners)ÐUSA English(nna)
10/07/03Ðtbrooks
X
Page 205 of 280
8 Maintenance and do-it-yourself
Maintenance requirements..........................8-2
General maintenance..............................8-2
Explanation of general maintenance items.........8-2
Maintenance precautions...........................8-5
Engine compartment check locations................8-6
Engine cooling system.............................8-7
Checking engine coolant level...................8-7
Changing engine coolant........................8-8
Engine oil.........................................8-8
Checking engine oil level........................8-8
Changing engine oil............................8-9
Changing engine oil filter.......................8-10
4-speed automatic transmission fluid...............8-11
Temperature conditions for checking.............8-11
5-speed automatic transmission fluid...............8-12
Power steering fluid...............................8-13
Brake and clutch fluid.............................8-13
Brake fluid....................................8-13
Clutch fluid...................................8-14
Window washer fluid.............................8-14
Window washer fluid reservoir..................8-14
Battery..........................................8-15
Jump starting.................................8-16
Drive belts.......................................8-17Spark plugs......................................8-17
Replacing spark plugs.........................8-17
Air cleaner.......................................8-18
In-cabin microfilter.............................8-18
Windshield wiper blades..........................8-21
Cleaning.....................................8-21
Replacing....................................8-21
Parking brake and brake pedal.....................8-22
Checking parking brake........................8-22
Checking brake pedal..........................8-22
Brake booster.................................8-23
Fuses...........................................8-23
Engine compartment...........................8-23
Passenger compartment.......................8-25
Keyfob battery replacement........................8-26
Lights...........................................8-27
Headlights....................................8-27
Exterior and interior lights.......................8-28
Wheels and tires.................................8-33
Tire pressure..................................8-33
Tire labeling...................................8-36
Types of tires..................................8-39
Tire chains....................................8-39
Changing wheels and tires.....................8-40
ZREVIEW COPY:Ð2004 Maxima(max)
Owners Manual(owners)ÐUSA English(nna)
10/20/03Ðarosenma
X
Page 207 of 280
When driving in areas using road salt or other
corrosive materials, check lubrication frequently.
Lights*Clean the headlights on a regular basis.
Make sure that the headlights, stop lights, tail
lights, turn signal lights, and other lights are all
operating properly and installed securely. Also
check headlight aim.
Road wheel nuts*When checking the tires,
make sure no wheel nuts are missing, and check
for any loose wheel nuts. Tighten if necessary.
Tire rotation*Tires should be rotated every
7,500 miles (12,000 km) .
Tires*Check the pressure with a gauge often
and always prior to long distance trips. If neces-
sary, adjust the pressure in all tires, including the
spare, to the pressure specified. Check carefully
for damage, cuts or excessive wear.
Wheel alignment and balanceIf the vehicle
should pull to either side while driving on a
straight and level road, or if you detect uneven or
abnormal tire wear, there may be a need for wheel
alignment. If the steering wheel or seat vibrates at
normal highway speeds, wheel balancing may be
needed.
cFor additional information regarding tires,
refer to “Important Tire Safety Information”
(US) or “Tire Safety Information” (Canada) in
the Warranty Information Booklet .WindshieldClean the windshield on a regular
basis. Check the windshield at least every six
months for cracks or other damage. Have a dam-
aged windshield repaired by a qualified repair
facility.
Windshield wiper blades*Check for cracks or
wear if they do not wipe properly.
Inside the vehicle
The maintenance items listed here should be
checked on a regular basis, such as when per-
forming periodic maintenance, cleaning the ve-
hicle, etc.
Additional information on the following
items with an “*” is found later in this sec-
tion.
Accelerator pedalCheck the pedal for smooth
operation and make sure the pedal does not bind
or require uneven effort. Keep the floor mat away
from the pedal.
Automatic transmission P (Park) position
mechanismOn a fairly steep hill check that your
vehicle is held securely with the selector lever in
the P position without applying any brakes.
Brake pedal and booster*Check the pedal for
smooth operation and make sure it has the proper
distance under it when depressed fully. Checkthe brake booster function. Be certain to keep the
floor mat away from the pedal.
BrakesCheck that the brakes do not pull the
vehicle to one side when applied.
Clutch pedal*Make sure the pedal operates
smoothly and check that it has the proper free
travel.
Parking brake*Check that the lever has the
proper travel and confirm that your vehicle is held
securely on a fairly steep hill with only the parking
brake applied.
SeatsCheck seat position controls such as seat
adjusters, seatback recliner, etc. to ensure they
operate smoothly and all latches lock securely in
every position. Check that the head restraints
move up and down smoothly and the locks (if so
equipped) hold securely in all latched positions.
Seat beltsCheck that all parts of the seat belt
system (for example, buckles, anchors, adjusters
and retractors) operate properly and smoothly,
and are installed securely. Check the belt web-
bing for cuts, fraying, wear or damage.
Steering wheelCheck for changes in the steer-
ing system, such as excessive freeplay, hard
steering or strange noises.
Warning lights and chimesMake sure all
warning lights and chimes are operating properly.
Maintenance and do-it-yourself8-3
ZREVIEW COPY:Ð2004 Maxima(max)
Owners Manual(owners)ÐUSA English(nna)
10/20/03Ðarosenma
X
Page 237 of 280
If you have a flat tire, see the “In case of
emergency” section of this manual.
TIRE PRESSURE
Tire inflation pressure
Check the tire pressures (including the spare)
often and always prior to long distance trips. The
recommended tire pressure specifications are
shown on the Tire and Loading Information label
(this label is also known as the tire placard) under
the9Recommended Cold Tire Inflation Pressure9
heading. The Tire and Loading Information label
is affixed to the driver side center pillar. Tire
pressures should be checked regularly because:
cMost tires naturally lose air over time.
cTires can lose air suddenly when driven over
potholes or other objects or if the vehicle
strikes a curb while parking.
The tire pressures should be checked when the
tires are cold. The tires are considered COLD
after the vehicle has been parked for 3 or more
hours, or driven less than 1 mile (1.6 km) at
moderate speeds.
Incorrect tire pressure, including under in-
flation, may adversely affect tire life and
vehicle handling.
WARNING
cImproperly inflated tires can fail sud-
denly and cause an accident.
cThe vehicle weight capacity is indicated
on the Tire and Loading Information
label. Do not load your vehicle beyond
this capacity. Overloading your vehicle
may result in reduced tire life, unsafe
operating conditions due to premature
tire failure, or unfavorable handling
characteristics and could also lead to a
serious accident. Loading beyond the
specified capacity may also result in
failure of other vehicle components.
cBefore taking a long trip, or whenever
you heavily load your vehicle, use a tire
pressure gauge to ensure that the tire
pressures are at the specified level.
cDo not drive your vehicle over 85 MPH
(137 km/h) unless it is equipped with
high speed rated tires. Driving faster
than 85 MPH (137 km/h) may result in
tire failure, loss of control and possible
injury.cFor additional information regarding
tires, refer to “Important Tire Safety In-
formation” (US) or “Tire Safety Informa-
tion” (Canada) in the Warranty Informa-
tion Booklet.
WHEELS AND TIRES
Maintenance and do-it-yourself8-33
ZREVIEW COPY:Ð2004 Maxima(max)
Owners Manual(owners)ÐUSA English(nna)
10/20/03Ðarosenma
X
Page 239 of 280
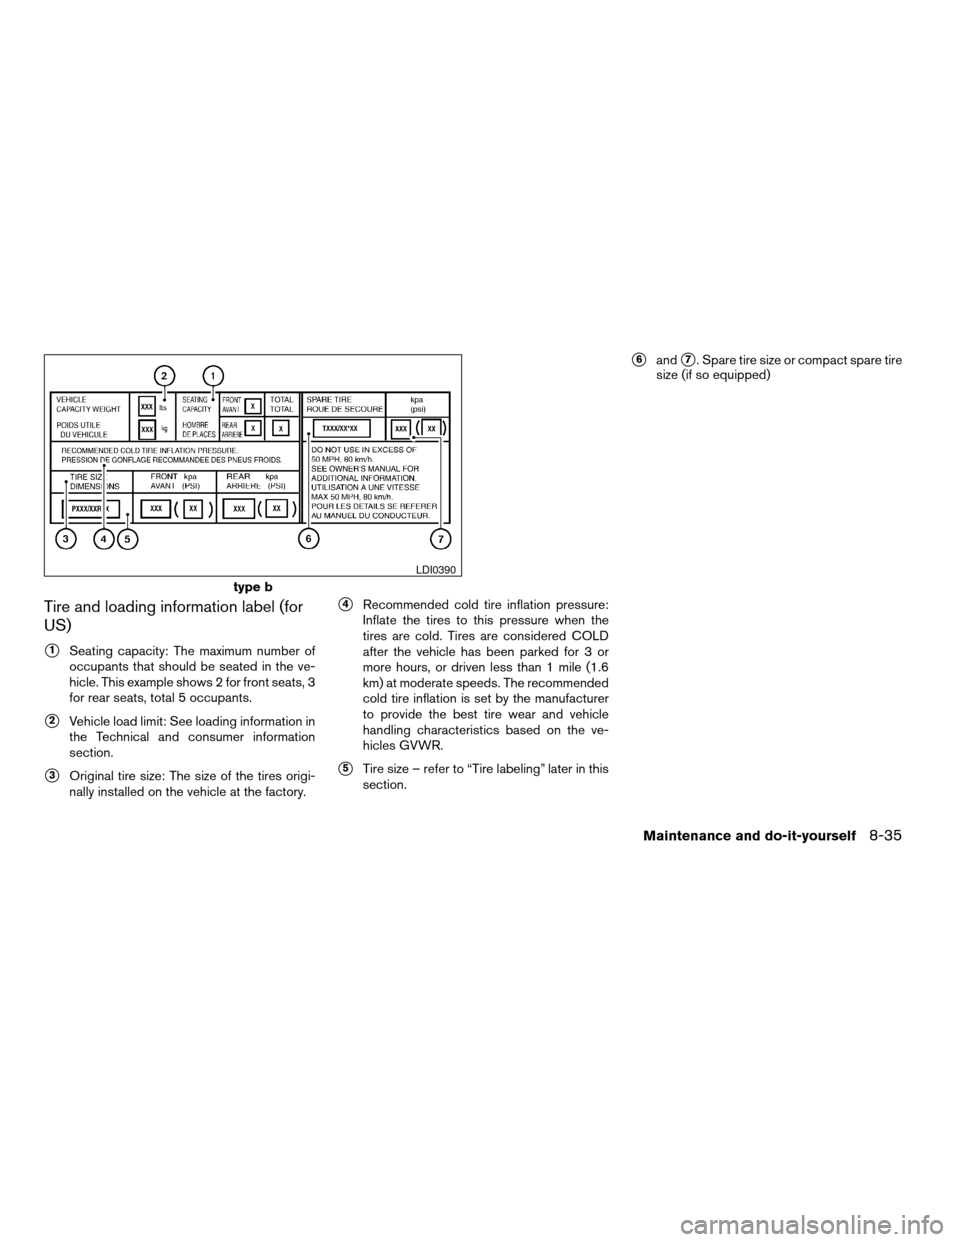
Tire and loading information label (for
US)
s1Seating capacity: The maximum number of
occupants that should be seated in the ve-
hicle. This example shows 2 for front seats, 3
for rear seats, total 5 occupants.
s2Vehicle load limit: See loading information in
the Technical and consumer information
section.
s3Original tire size: The size of the tires origi-
nally installed on the vehicle at the factory.
s4Recommended cold tire inflation pressure:
Inflate the tires to this pressure when the
tires are cold. Tires are considered COLD
after the vehicle has been parked for 3 or
more hours, or driven less than 1 mile (1.6
km) at moderate speeds. The recommended
cold tire inflation is set by the manufacturer
to provide the best tire wear and vehicle
handling characteristics based on the ve-
hicles GVWR.
s5Tire size – refer to “Tire labeling” later in this
section.
s6ands7. Spare tire size or compact spare tire
size (if so equipped)
type b
LDI0390
Maintenance and do-it-yourself8-35
ZREVIEW COPY:Ð2004 Maxima(max)
Owners Manual(owners)ÐUSA English(nna)
10/20/03Ðarosenma
X
Page 240 of 280
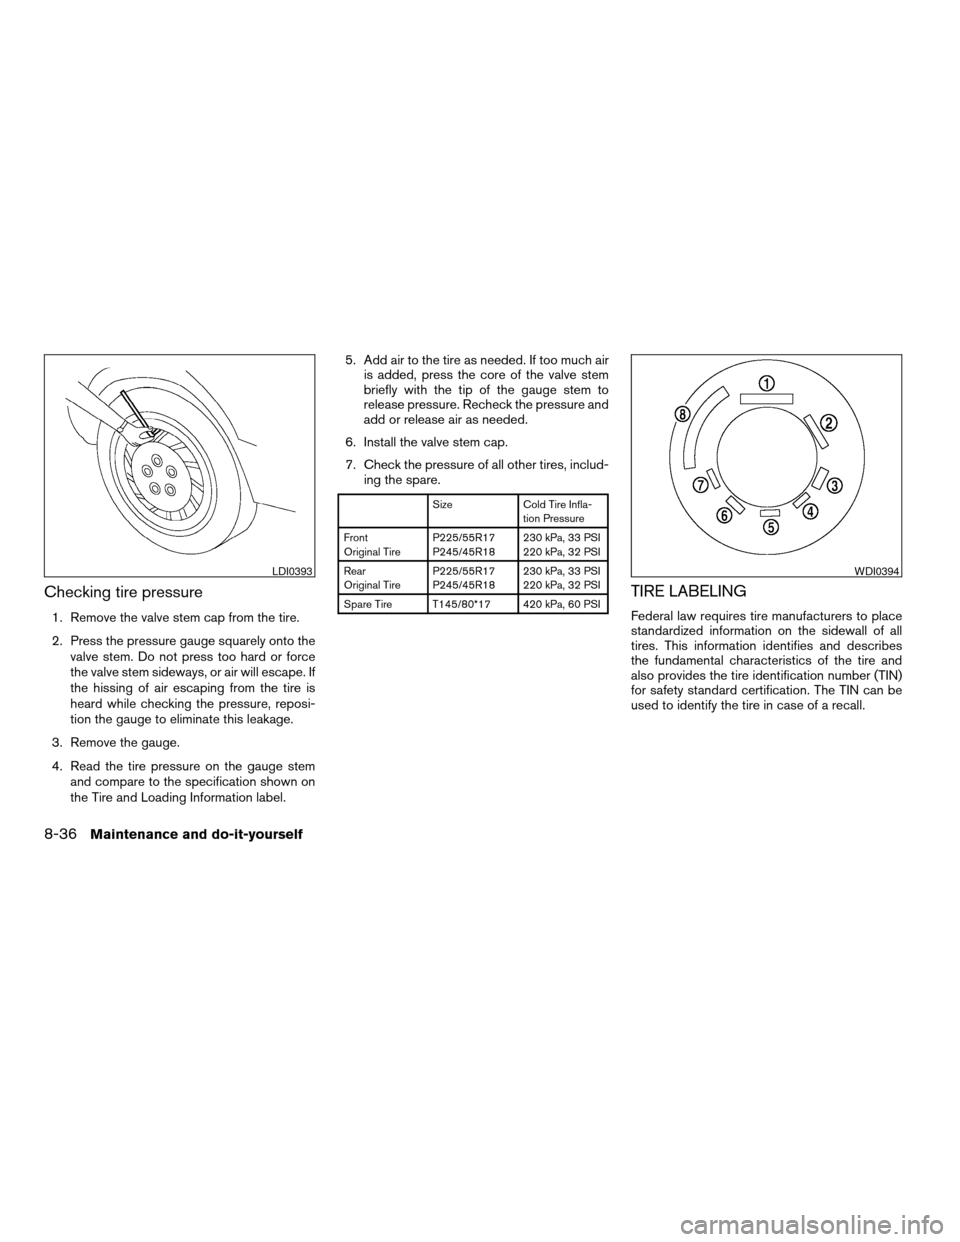
Checking tire pressure
1. Remove the valve stem cap from the tire.
2. Press the pressure gauge squarely onto the
valve stem. Do not press too hard or force
the valve stem sideways, or air will escape. If
the hissing of air escaping from the tire is
heard while checking the pressure, reposi-
tion the gauge to eliminate this leakage.
3. Remove the gauge.
4. Read the tire pressure on the gauge stem
and compare to the specification shown on
the Tire and Loading Information label.5. Add air to the tire as needed. If too much air
is added, press the core of the valve stem
briefly with the tip of the gauge stem to
release pressure. Recheck the pressure and
add or release air as needed.
6. Install the valve stem cap.
7. Check the pressure of all other tires, includ-
ing the spare.
Size Cold Tire Infla-
tion Pressure
Front
Original TireP225/55R17
P245/45R18230 kPa, 33 PSI
220 kPa, 32 PSI
Rear
Original TireP225/55R17
P245/45R18230 kPa, 33 PSI
220 kPa, 32 PSI
Spare Tire T145/80*17 420 kPa, 60 PSI
TIRE LABELING
Federal law requires tire manufacturers to place
standardized information on the sidewall of all
tires. This information identifies and describes
the fundamental characteristics of the tire and
also provides the tire identification number (TIN)
for safety standard certification. The TIN can be
used to identify the tire in case of a recall.
LDI0393WDI0394
8-36Maintenance and do-it-yourself
ZREVIEW COPY:Ð2004 Maxima(max)
Owners Manual(owners)ÐUSA English(nna)
10/20/03Ðarosenma
X
Page 242 of 280
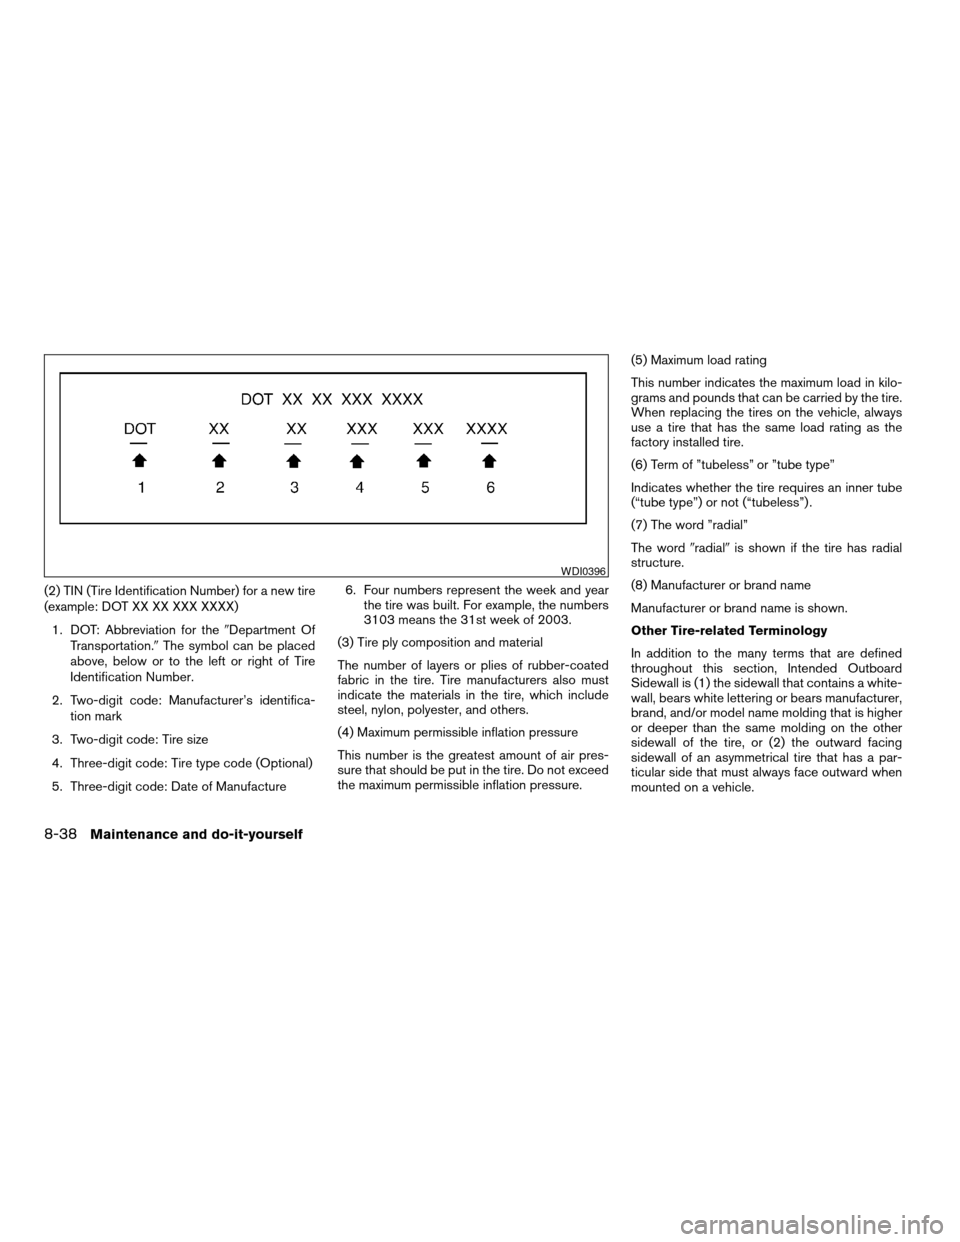
(2) TIN (Tire Identification Number) for a new tire
(example: DOT XX XX XXX XXXX)
1. DOT: Abbreviation for the9Department Of
Transportation.9The symbol can be placed
above, below or to the left or right of Tire
Identification Number.
2. Two-digit code: Manufacturer’s identifica-
tion mark
3. Two-digit code: Tire size
4. Three-digit code: Tire type code (Optional)
5. Three-digit code: Date of Manufacture6. Four numbers represent the week and year
the tire was built. For example, the numbers
3103 means the 31st week of 2003.
(3) Tire ply composition and material
The number of layers or plies of rubber-coated
fabric in the tire. Tire manufacturers also must
indicate the materials in the tire, which include
steel, nylon, polyester, and others.
(4) Maximum permissible inflation pressure
This number is the greatest amount of air pres-
sure that should be put in the tire. Do not exceed
the maximum permissible inflation pressure.(5) Maximum load rating
This number indicates the maximum load in kilo-
grams and pounds that can be carried by the tire.
When replacing the tires on the vehicle, always
use a tire that has the same load rating as the
factory installed tire.
(6) Term of ”tubeless” or ”tube type”
Indicates whether the tire requires an inner tube
(“tube type”) or not (“tubeless”) .
(7) The word ”radial”
The word9radial9is shown if the tire has radial
structure.
(8) Manufacturer or brand name
Manufacturer or brand name is shown.
Other Tire-related Terminology
In addition to the many terms that are defined
throughout this section, Intended Outboard
Sidewall is (1) the sidewall that contains a white-
wall, bears white lettering or bears manufacturer,
brand, and/or model name molding that is higher
or deeper than the same molding on the other
sidewall of the tire, or (2) the outward facing
sidewall of an asymmetrical tire that has a par-
ticular side that must always face outward when
mounted on a vehicle.
WDI0396
8-38Maintenance and do-it-yourself
ZREVIEW COPY:Ð2004 Maxima(max)
Owners Manual(owners)ÐUSA English(nna)
10/20/03Ðarosenma
X