ECO mode NISSAN MAXIMA 2005 A34 / 6.G Owner's Manual
[x] Cancel search | Manufacturer: NISSAN, Model Year: 2005, Model line: MAXIMA, Model: NISSAN MAXIMA 2005 A34 / 6.GPages: 288, PDF Size: 4.71 MB
Page 155 of 288

Air recirculation
Push the air recirculation button to recirculate
interior air inside the vehicle. The indicator light
on the button will come on.
The air recirculation cannot be activated when
the air conditioner is in the front defrosting mode.
Fresh air
Push the button to draw outside air into the
passenger compartment. The indicator light on
the button will come on.
Automatic intake air control
In the AUTO mode, the intake air will be con-
trolled automatically. To manually control the in-
take air, push the air recirculate or fresh air but-
ton. To return to the automatic control mode,
push the same button for about 2 seconds. The
indicator lights (both air recirculate and fresh air
buttons) will flash twice, and then the intake air
will be controlled automatically.
Air flow control
Pushing the MODE (manual air flow control) but-
ton selects the air outlet to:
— Air flows from center and side
ventilators.
— Air flows from center and side
ventilators and foot outlets.
— Air flows mainly from foot outlets.
— Air flows from defroster outlets
and foot outlets.
To turn system off
Push the OFF button.
OPERATING TIPS
cWhen the engine coolant temperature and
outside air temperature are low, the air flow
from the foot outlets may not operate for a
maximum of 150 seconds. However, this is
not a malfunction. After the coolant tempera-
ture warms up, air flow from the foot outlets
will operate normally.The sunload sensor, located on the top passen-
ger side of the instrument panel, helps the system
maintain a constant temperature. Do not put any-
thing on or around this sensor.
WHA0209
Display screen, heater, air conditioner and audio systems4-19
ZREVIEW COPYÐ2005 Maxima(max)
Owners ManualÐUSA_English(nna)
09/01/04Ðtbrooks
X
Page 161 of 288

Audio main operation
The tape deck employs a permalloy head which
allows for improved reproduction of high fre-
quency ranges. Noise is also greatly reduced by
the combined use of the Dolby NR (Noise Re-
duction) system. The auto loudness circuit en-
hances the low frequency range automatically in
both radio reception and tape and CD playback.
ON·OFF/Volume control:
Turn the ignition key to ACC or ON, and then
push the ON·OFF/Volume control knob while the
system is off to call up the mode (radio, tape or
CD) which was playing immediately before the
system was turned off.
To turn the system off, press the ON·OFF/Volume
control knob.
Turn the ON·OFF/Volume control knob to adjust
the volume.
This vehicle has speed sensitive control volume
(SSV) for audio (type B only) . The audio volume
changes as the driving speed changes.AUDIO knob (BASS, TREBLE, FADE, BAL-
ANCE, (SSV if so equipped and NR (Dolby)
— Type B only)):
Press the AUDIO knob to change the mode as
follows:
BASS!TREBLE!FADE!BALANCE!
SSV (Type B only)!NR (when cassette playing,
Type B only)
To adjust Bass, Treble, Fade and Balance, press
the AUDIO knob until the desired mode appears
in the display. Turn the Tuning knob to adjust
Bass and Treble to the desired level. You can also
use the Tuning knob to adjust Fader and Balance
modes. Fader adjusts the sound level between
the front and rear speakers and Balance adjusts
the sound between the right and left speakers.
To change the SSV mode (Type B only) to OFF,
LOW, MID or HIGH, turn the Tuning knob to right
or left.
To change the NR (Dolby) mode to OFF or ON,
turn the Tuning knob to right or left while cassette
tape is playing. When Dolby is ON, the
mark is displayed.
Dolby noise reduction manufactured under li-
cense from Dolby Laboratories Licensing Corpo-
ration. Dolby NR and the double-D symbol
are trademarks of Dolby Laboratories Licensing
Corporation.
Once you have adjusted the sound quality to the
desired level, press the AUDIO knob repeatedly until
the radio, cassette tape or CD display reappears.
Otherwise, the radio, cassette tape or CD display
will automatically reappear after about 10 seconds.
Display CD text:
To change the text displayed while playing a CD,
press the AUDIO knob until “Display Mode” ap-
pears.
Turn the Tuning knob within 2 seconds. The text
will change as follows:
Track numberÃ!Track titleÃ!Disc titleÃ!
Track number
Display satellite radio text:
To change the text displayed while listening to
satellite radio, press the AUDIO knob until “Dis-
play Mode” appears.
Turn the Tuning knob within 2 seconds. The text
will change as follows:
Channel numberÃ!Channel nameÃ!Artist
Ã!TitleÃ!Channel number
Pause/mute button:
To mute or pause the audio sound, push the
PAUSE/MUTE button.
To release the mute or pause, push the button
again.
Display screen, heater, air conditioner and audio systems4-25
ZREVIEW COPYÐ2005 Maxima(max)
Owners ManualÐUSA_English(nna)
09/01/04Ðtbrooks
X
Page 163 of 288

RDS can display:
cStation call sign, such as “WHFR 98.3”.
cStation name, such as “The Groove”.
cMusic or programming type such as “Clas-
sical”, “Country”, or “Rock”.
cTraffic reports about delays or construction.
If the station broadcasts RDS information, the
RDS icon is displayed.
Program type (PTY):
PTY can be used to search for a certain program
type. Certain areas have a limited number of
stations that transmit RDS. Many stations trans-
mit call letters and frequencies only.
Searching or scanning by program type may yield
a limited number of selections.
When PROG/RPT button is pressed for more
than 1.5 seconds during FM or SAT mode, the
PTY name of the current tuned station is dis-
played. During this time if the PTY data code is
zero or the data is unreadable, the display will
show NONE.
To change the PTY:
1. Press the PROG/RPT button.2. Press the TUNE button (
or)to
chose a specific program type. Refer to the
illustration.
The display will show “SEEK, SCAN?”SEEK tuning:
3. After selecting a program type, push the
SEEK button (
or) for less than
1.5 seconds within 10 seconds. Tuning to
the PTY station will start. If you do not push
the SEEK button within the 10 second pe-
riod, the PTY mode will be canceled.
SCAN tuning:
4. Push the
orbutton for more
than 1.5 seconds to scan the PTY name
stations and stop at each broadcasting sta-
tion for 5 seconds. Pushing the button again
during this 5 second period will stop SCAN
tuning and the radio will remain tuned to that
station. If the
orbutton is not
pushed within 5 seconds, SCAN tuning
moves to the next station.
Cassette tape player operation
Turn the ignition key to ACC or ON, then lightly
insert the cassette tape into the tape door. The
cassette tape will be automatically pulled into the
player.
The radio or CD will turn off (if it is on) and the
cassette tape will begin to play.
LHA0275
Display screen, heater, air conditioner and audio systems4-27
ZREVIEW COPYÐ2005 Maxima(max)
Owners ManualÐUSA_English(nna)
09/01/04Ðtbrooks
X
Page 168 of 288

cA new disc may be rough on the inner and
outer edges. Remove the rough edges by
rubbing the inner and outer edges with the
side of a pen or pencil as illustrated.
1. Volume control switch
2. MODE select switch
3. POWER on/off switch
4. Tuning switch
STEERING WHEEL SWITCH FOR
AUDIO CONTROL
The audio system can be operated using the
controls on the steering wheel.
POWER on/off switch
With the ignition key turned to the ACC or ON
position, push the POWER switch to turn the
audio system on or off.
MODE select switch
Push the mode select switch to change the mode
in the following sequence: Preset A, Preset B,
Preset C, TAPE, CD and SAT (if so equipped) .
Volume control switches
Push the volume control switch to increase or
decrease the volume.
Tuning
Memory change (radio):
Push the tuning switch (
or) for less
than 1.5 seconds to change the radio frequency.
Seek tuning (radio):
Push the tuning switch (
or) for
more than 1.5 seconds to seek the next or previ-
ous radio station.
FF, REW (tape and CD):
Push the tuning switch (
or) for less
1.5 seconds to return to the beginning of the
present program or skip to the next program.
Push several times to skip back or skip through
programs.
The automatic program search searches for the
blank intervals between selections on cassette
tapes. If there is a blank interval within a program
LHA0269
4-32Display screen, heater, air conditioner and audio systems
ZREVIEW COPYÐ2005 Maxima(max)
Owners ManualÐUSA_English(nna)
09/01/04Ðtbrooks
X
Page 169 of 288
or there is no interval between programs, the
system may not stop in the desired or expected
location.
When playing a tape, push the tuning switch
(
or) for more than 1.5 seconds to
rewind or fast forward the tape.
To stop the FF or REW function, press the
orbutton for less than 1.5 seconds again.
When playing a CD in the CD changer (if so
equipped) , push the tuning switch (
or) for more than 1.5 seconds to change
between discs when multiple CDs are loaded.
ANTENNA
Window antenna
The antenna pattern is printed inside the rear
window.
CAUTION
cDo not place metalized film near the
rear window glass or attach any metal
parts to it. This may cause poor recep-
tion or noise.cWhen cleaning the inside of the rear
window, be careful not to scratch or
damage the rear window antenna.
Lightly wipe along the antenna with a
dampened soft cloth.When installing a CB, ham radio or car phone in
your NISSAN, be sure to observe the following
cautions, otherwise the new equipment may ad-
versely affect the engine control system and
other electronic parts.
WARNING
cA cellular telephone should not be used
while driving so full attention may be
given to vehicle operation. Some juris-
dictions prohibit the use of cellular tele-
phones while driving.
cIf you must make a call while your ve-
hicle is in motion, the hands free cellu-
lar phone operational mode (if so
equipped) is highly recommended. Ex-
ercise extreme caution at all times so
full attention may be given to vehicle
operation.
cIf a conversation in a moving vehicle
requires you to take notes, pull off the
road to a safe location and stop your
vehicle before doing so.
CAR PHONE OR CB RADIO
Display screen, heater, air conditioner and audio systems4-33
ZREVIEW COPYÐ2005 Maxima(max)
Owners ManualÐUSA_English(nna)
09/01/04Ðtbrooks
X
Page 175 of 288
MANUAL TRANSMISSION
The ignition switch includes a device that helps
prevent accidental removal of the key while driv-
ing.
The key can only be removed when the ignition
switch is in the LOCK position.
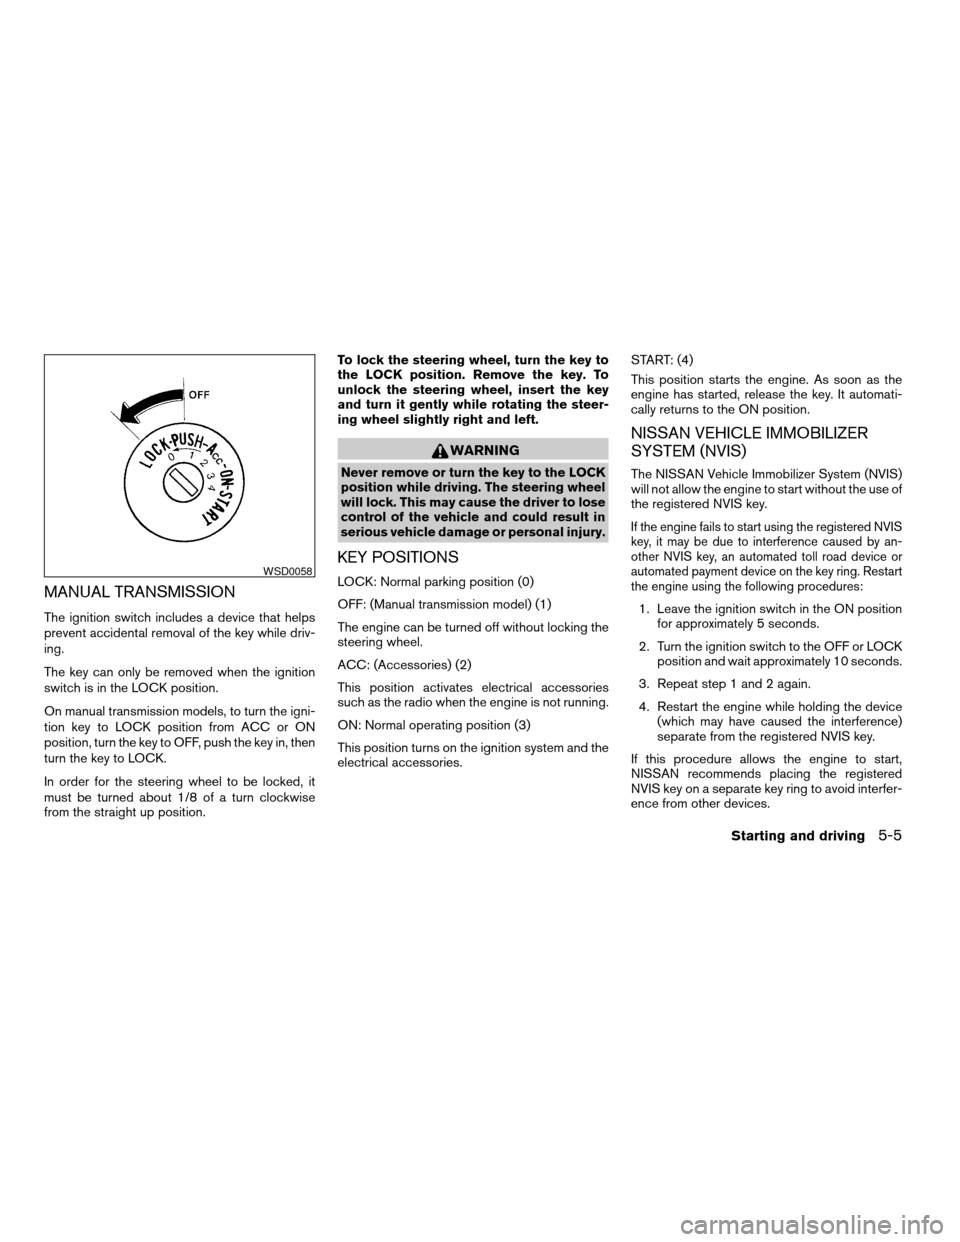
On manual transmission models, to turn the igni-
tion key to LOCK position from ACC or ON
position, turn the key to OFF, push the key in, then
turn the key to LOCK.
In order for the steering wheel to be locked, it
must be turned about 1/8 of a turn clockwise
from the straight up position.To lock the steering wheel, turn the key to
the LOCK position. Remove the key. To
unlock the steering wheel, insert the key
and turn it gently while rotating the steer-
ing wheel slightly right and left.
WARNING
Never remove or turn the key to the LOCK
position while driving. The steering wheel
will lock. This may cause the driver to lose
control of the vehicle and could result in
serious vehicle damage or personal injury.
KEY POSITIONS
LOCK: Normal parking position (0)
OFF: (Manual transmission model) (1)
The engine can be turned off without locking the
steering wheel.
ACC: (Accessories) (2)
This position activates electrical accessories
such as the radio when the engine is not running.
ON: Normal operating position (3)
This position turns on the ignition system and the
electrical accessories.START: (4)
This position starts the engine. As soon as the
engine has started, release the key. It automati-
cally returns to the ON position.
NISSAN VEHICLE IMMOBILIZER
SYSTEM (NVIS)
The NISSAN Vehicle Immobilizer System (NVIS)
will not allow the engine to start without the use of
the registered NVIS key.
If the engine fails to start using the registered NVIS
key, it may be due to interference caused by an-
other NVIS key, an automated toll road device or
automated payment device on the key ring. Restart
the engine using the following procedures:
1. Leave the ignition switch in the ON position
for approximately 5 seconds.
2. Turn the ignition switch to the OFF or LOCK
position and wait approximately 10 seconds.
3. Repeat step 1 and 2 again.
4. Restart the engine while holding the device
(which may have caused the interference)
separate from the registered NVIS key.
If this procedure allows the engine to start,
NISSAN recommends placing the registered
NVIS key on a separate key ring to avoid interfer-
ence from other devices.
WSD0058
Starting and driving5-5
ZREVIEW COPYÐ2005 Maxima(max)
Owners ManualÐUSA_English(nna)
09/01/04Ðtbrooks
X
Page 177 of 288
4. Allow the engine to idle for at least 30 sec-
onds after starting. Do not race the engine
while warming it up. Drive at moderate
speed for a short distance first, especially in
cold weather.
In cold weather, keep the engine running for
a minimum of 2–3 minutes before shutting it
off. Starting and stopping the engine over a
short period of time may make the vehicle
more difficult to start.AUTOMATIC TRANSMISSION (if so
equipped)
WARNING
cDo not depress the accelerator pedal
while shifting from P (Park) or N (Neu-
tral) to R (Reverse) , D (Drive) , 2 or 1.
Always depress the brake pedal until
shifting is completed. Failure to do so
could cause you to lose control and
have an accident.
cCold engine idle speed is high, so use
caution when shifting into a forward or
reverse gear before the engine has
warmed up.
cNever shift to P (Park) or R (Reverse)
while the vehicle is moving. This could
cause an accident.
CAUTION
cWhen stopping the vehicle on an uphill
grade, do not hold the vehicle by de-
pressing the accelerator pedal. The foot
brake should be used for this purpose.
cDo not downshift abruptly on slippery
roads. This may cause a loss of control.The automatic transmission in your vehicle is
electronically controlled to produce maximum
power and smooth operation.
The recommended operating procedures for this
transmission are shown on the following pages.
Follow these procedures for maximum vehicle
performance and driving enjoyment.
Starting the vehicle
1. After starting the engine, fully depress the
foot brake pedal before attempting to move
the shift selector lever out of the P (Park)
position.
2. Keep the foot brake pedal depressed and
move the shift selector lever into a driving
gear.
3. Release the foot brake, then gradually start
the vehicle in motion.
The automatic transmission is designed so
the foot brake pedal MUST be depressed
before shifting from P (Park) to any drive
position while the ignition switch is in the
ON position.
The shift selector lever cannot be moved
out of P (Park) and into any of the other
gear positions if the ignition key is turned
to the LOCK, OFF or ACC position or if the
key is removed.
DRIVING THE VEHICLE
Starting and driving5-7
ZREVIEW COPYÐ2005 Maxima(max)
Owners ManualÐUSA_English(nna)
09/01/04Ðtbrooks
X
Page 179 of 288

Manual shift mode
When the selector lever is shifted from D to the
manual shift gate with the vehicle stopped or
while driving, the transmission enters the manual
shift mode. Shift ranges can be selected manu-
ally.
In the manual shift mode, the shift range is dis-
played on the position indicator in the meter.
When shifting the shift lever to the manual shift
gate, the position indicator first displays M4
(Fourth)
Shift ranges up or down one by one as follows:
M1Ã!M2Ã!M3Ã!M4Ã!M5M5 (Fifth):
Use this position for all normal forward driving.
M4 (Fourth):
For driving up or down long slopes where engine
braking would be advantageous.
M3 (Third) and M2 (Second):
Use for hill climbing or engine braking on downhill
grades.
M1 (First):
Use this position when climbing steep hills slowly
or driving slowly through deep snow, sand or
mud, or for maximum engine braking on steep
downhill grades.
cRemember not to drive at high speeds for
extended periods of time in lower than M4
range. This reduces fuel economy.
When shifting up:
Move the selector lever to the + (up) side. (Shifts
to higher range.)
When shifting down:
Move the selector lever to the2(down) side.
(Shifts to lower range.)
cThe transmission will automatically down-
shift the gears. (For example, if you select the3rd range, the transmission will shift down
between the 3rd and 1st gears.)
cMoving the selector lever rapidly to the same
side twice will shift the ranges in succession.
When canceling the manual shift mode:
Return the selector lever to the D position to
return the transmission to the normal driving
mode.
cIn the manual shift mode, the transmis-
sion may not shift to the selected gear.
This helps maintain driving perfor-
mance and reduces the chance of ve-
hicle damage or loss of control.
cIn the manual shift mode, the transmis-
sion may shift up automatically to a
higher range than selected if the en-
gine speed is too high. When the ve-
hicle speed decreases, the transmis-
sion automatically shifts down and
shifts to 1st gear before the vehicle
comes to a stop.
LSD0071
Starting and driving5-9
ZREVIEW COPYÐ2005 Maxima(max)
Owners ManualÐUSA_English(nna)
09/01/04Ðtbrooks
X
Page 185 of 288

cAccelerate slowly and smoothly. Maintain
cruising speeds with a constant accelerator
position.
cDrive at moderate speeds on the highway.
Driving at high speed lowers fuel economy.
cAvoid unnecessary stopping and braking.
Maintain a safe distance behind other ve-
hicles.
cUse a proper gear range which suits road
conditions. On level roads, shift into high
gear as soon as possible.
cAvoid unnecessary engine idling.
cKeep your engine tuned up.
cFollow the recommended periodic mainte-
nance schedule.
cKeep the tires inflated to the correct pres-
sure. Low tire pressure increases tire wear
and lowers fuel economy.
cKeep the wheels in correct alignment. Im-
proper alignment increases tire wear and
lowers fuel economy.
cAir conditioner operation lowers fuel
economy. Use the air conditioner only when
necessary.cWhen cruising at highway speeds, it is more
economical to use the air conditioner and
leave the windows closed to reduce drag.
cUse the recommended viscosity engine oil.
See “Engine oil and oil filter recommenda-
tion” in “Technical and consumer informa-
tion” later in this manual.
INCREASING FUEL ECONOMY
Starting and driving5-15
ZREVIEW COPYÐ2005 Maxima(max)
Owners ManualÐUSA_English(nna)
09/01/04Ðtbrooks
X
Page 186 of 288
WARNING
cDo not stop or park the vehicle over
flammable materials such as dry grass,
waste paper or rags. They may ignite
and cause a fire.
cSafe parking procedures require that
both the parking brake be set and the
transmission placed into P (Park) for
automatic transmission models or in an
appropriate gear for manual transmis-
sion models. Failure to do so could
cause the vehicle to move unexpectedly
or roll away and result in an accident.Make sure the shift lever has been
pushed as far forward as it can go and
cannot be moved without depressing
the foot brake pedal.
cNever leave the engine running while
the vehicle is unattended.
cDo not leave children unattended inside
the vehicle. They could unknowingly ac-
tivate switches or controls. Unattended
children could become involved in seri-
ous accidents.
1. Firmly apply the parking brake.2.Manual transmission models:
Place the shift lever in the R (Reverse) posi-
tion. When parking on an uphill grade, place
the shift lever in 1st gear.
Automatic transmission models:
Move the shift selector lever to the P (Park)
position.
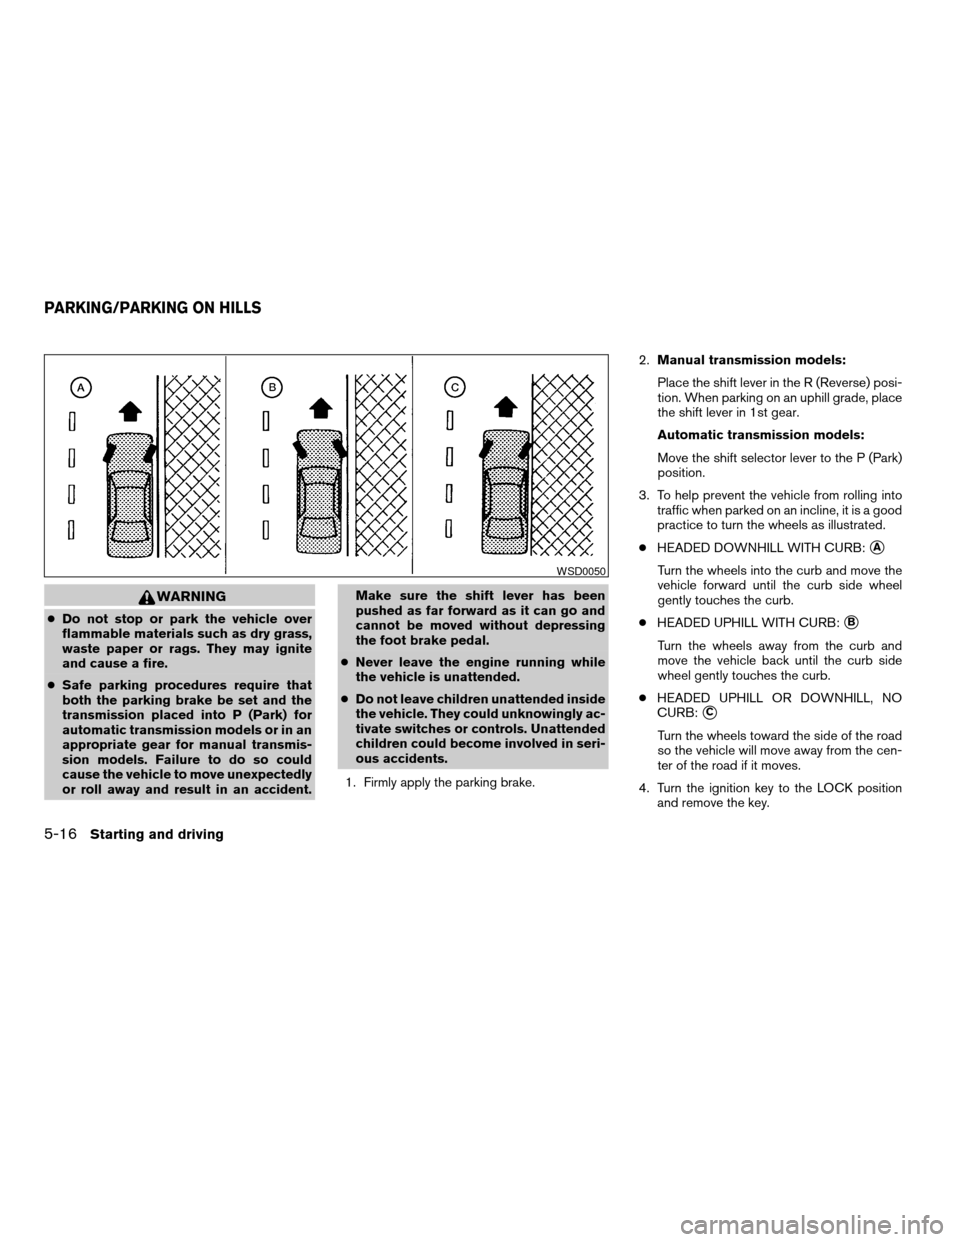
3. To help prevent the vehicle from rolling into
traffic when parked on an incline, it is a good
practice to turn the wheels as illustrated.
cHEADED DOWNHILL WITH CURB:
sA
Turn the wheels into the curb and move the
vehicle forward until the curb side wheel
gently touches the curb.
cHEADED UPHILL WITH CURB:
sB
Turn the wheels away from the curb and
move the vehicle back until the curb side
wheel gently touches the curb.
cHEADED UPHILL OR DOWNHILL, NO
CURB:
sC
Turn the wheels toward the side of the road
so the vehicle will move away from the cen-
ter of the road if it moves.
4. Turn the ignition key to the LOCK position
and remove the key.
WSD0050
PARKING/PARKING ON HILLS
5-16Starting and driving
ZREVIEW COPYÐ2005 Maxima(max)
Owners ManualÐUSA_English(nna)
09/01/04Ðtbrooks
X