spare tire location NISSAN MAXIMA 2005 A34 / 6.G Owners Manual
[x] Cancel search | Manufacturer: NISSAN, Model Year: 2005, Model line: MAXIMA, Model: NISSAN MAXIMA 2005 A34 / 6.GPages: 288, PDF Size: 4.71 MB
Page 189 of 288
cWhen installing a spare tire, make sure
it is the proper size and type as speci-
fied on the tire placard. For tire placard
location information, refer to “Tire plac-
ard” in the “Technical and consumer
information” section of this manual.
cRefer to “Wheels and tires” in the
“Maintenance and do-it-yourself” sec-
tion of this manual.When accelerating on slippery surfaces the tire
may spin or slip. With the vehicle traction control
system (TCS) , sensors detect these movements
and control the braking and engine output to help
improve vehicle stability while accelerating.
cWhen the traction control system is operat-
ing, the slip indicator in the instrument panel
blinks.
cIf the slip indicator blinks, the vehicle is un-
der slippery conditions. Be sure to drive
carefully. See “Slip indicator light” and “Trac-
tion control system (TCS) off indicator light”
in the “Instruments and controls” section of
this manual.
cIf a malfunction occurs in the system,
the
andindicator lights
come on in the meter panel.
As long as these lights are on, the traction control
function is canceled. The vehicle will behave like
a vehicle without the system.
WARNING
cThe traction control system is designed
to help improve driving stability but
does not prevent accidents due to
abrupt steering operation at high
speeds or by careless or dangerous
driving techniques. Reduce vehicle
speed and be especially careful when
driving and cornering on slippery sur-
faces and always drive carefully.
cIf brake related parts such as brake
pads, rotors and calipers are not stan-
dard equipment or are extremely dete-
riorated, the traction control system
may not operate properly and the
indicator light may come on.
cDo not modify the vehicle’s suspension.
If suspension parts such as shock ab-
sorbers, struts, springs and bushings
are not standard equipment or are ex-
tremely deteriorated, the traction con-
trol system may not operate properly
and the
indicator light may come
on.
TRACTION CONTROL SYSTEM (TCS)
(if so equipped)
Starting and driving5-19
ZREVIEW COPYÐ2005 Maxima(max)
Owners ManualÐUSA_English(nna)
09/01/04Ðtbrooks
X
Page 192 of 288
For details, see ‘‘Changing engine coolant’’ in the
‘‘Maintenance and do-it-yourself’’ section of this
manual.
TIRE EQUIPMENT
1. SUMMER tires have a tread designed to
provide superior performance on dry pave-
ment. However, the performance of these
tires will be substantially reduced in snowy
and icy conditions. If you operate your ve-
hicle on snowy or icy roads, NISSAN recom-
mends the use of MUD & SNOW or ALL
SEASON TIRES on all four wheels. Please
consult a NISSAN dealer for the tire type,
size, speed rating and availability informa-
tion.
2. For additional traction on icy roads, studded
tires may be used. However, some U.S.
states and Canadian provinces prohibit their
use. Check local, state and provincial laws
before installing studded tires.
Skid and traction capabilities of studded
snow tires on wet or dry surfaces may be
poorer than that of non-studded snow tires.
3. Tire chains may be used.
CAUTION
Tire chains/cables cannot be installed on
P245/45R18 size tires. Installation of the
tire chains/cables on P245/45R18 size
tires will cause damage to the vehicle. If
you plan to use tire chains/cables, you
should install P225/55R17 size tires on
your vehicle.
Use of tire chains may be prohibited accord-
ing to location. Check the local laws before
installing tire chains. When installing tire
chains, make sure they are of proper size for
the tires on your vehicle and are installed
according to the chain manufacturer’s sug-
gestions.Use only SAE Class “S”
chains.Class “S” chains are used on ve-
hicles with restricted tire to vehicle clear-
ance. Vehicles that can use Class “S” chains
are designed to meet the minimum clear-
ances between the tire and the closest ve-
hicle suspension or body component re-
quired to accommodate the use of a winter
traction device (tire chains or cables) . The
minimum clearances are determined using
the factory equipped tire size. Other types
may damage your vehicle. Use chain ten-
sioners when recommended by the tire
chain manufacturer to ensure a tight fit.
Loose end links of the tire chain must besecured or removed to prevent the possibil-
ity of whipping action damage to the fenders
or underbody. If possible, avoid fully loading
your vehicle when using tire chains. In addi-
tion, drive at a reduced speed. Otherwise,
your vehicle may be damaged and/or vehicle
handling and performance may be adversely
affected.
Never install tire chains on spare tires. Do
not use tire chains on dry roads.
SPECIAL WINTER EQUIPMENT
It is recommended that the following items be
carried in the vehicle during winter:
cA scraper and stiff-bristled brush to remove
ice and snow from the windows and wiper
blades.
cA sturdy, flat board to be placed under the
jack to give it firm support.
cA shovel to dig the vehicle out of snowdrifts.
cExtra window washer fluid to refill the reser-
voir tank.
5-22Starting and driving
ZREVIEW COPYÐ2005 Maxima(max)
Owners ManualÐUSA_English(nna)
09/01/04Ðtbrooks
X
Page 251 of 288
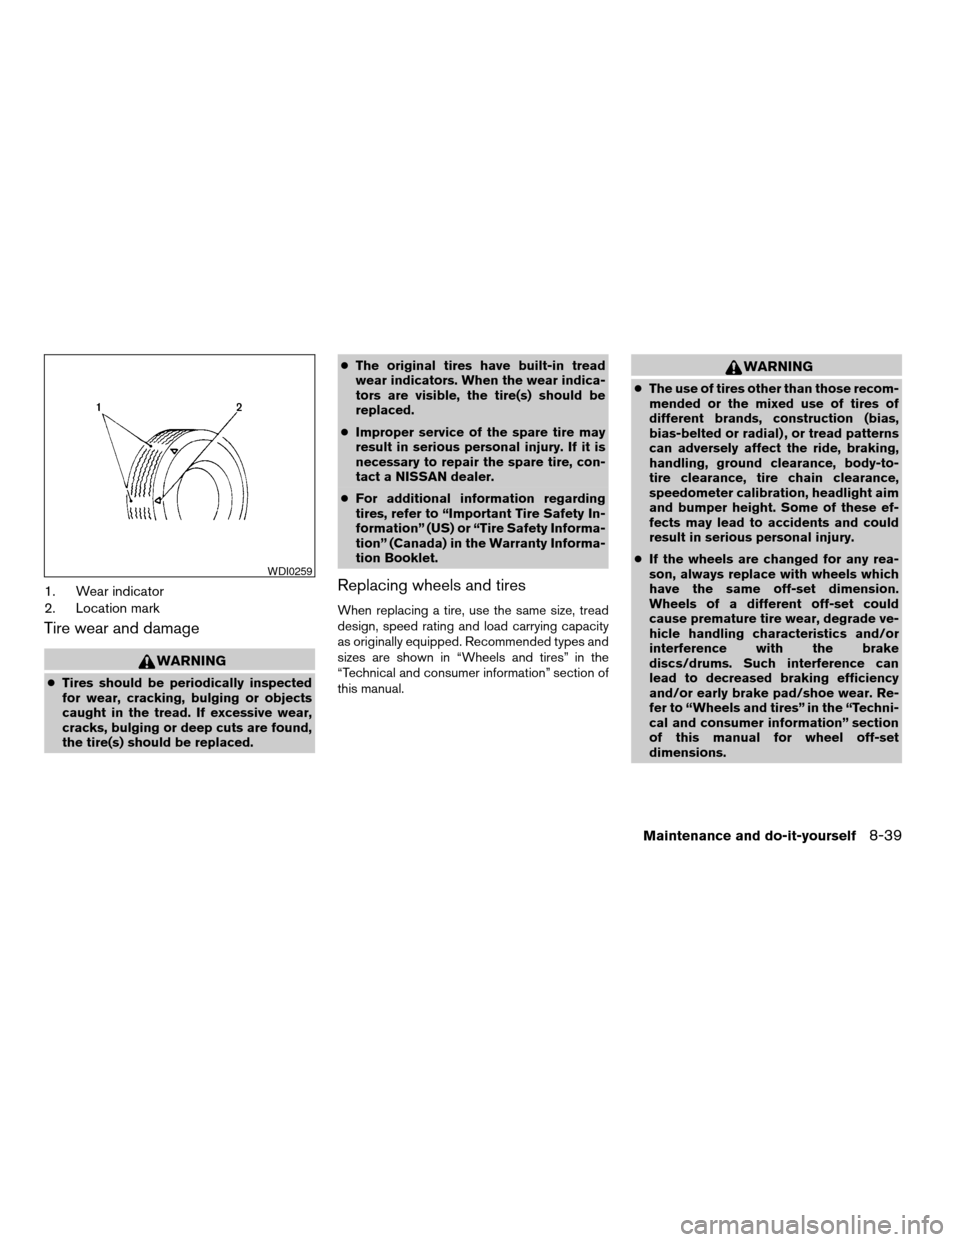
1. Wear indicator
2. Location mark
Tire wear and damage
WARNING
cTires should be periodically inspected
for wear, cracking, bulging or objects
caught in the tread. If excessive wear,
cracks, bulging or deep cuts are found,
the tire(s) should be replaced.cThe original tires have built-in tread
wear indicators. When the wear indica-
tors are visible, the tire(s) should be
replaced.
cImproper service of the spare tire may
result in serious personal injury. If it is
necessary to repair the spare tire, con-
tact a NISSAN dealer.
cFor additional information regarding
tires, refer to “Important Tire Safety In-
formation” (US) or “Tire Safety Informa-
tion” (Canada) in the Warranty Informa-
tion Booklet.
Replacing wheels and tires
When replacing a tire, use the same size, tread
design, speed rating and load carrying capacity
as originally equipped. Recommended types and
sizes are shown in “Wheels and tires” in the
“Technical and consumer information” section of
this manual.
WARNING
cThe use of tires other than those recom-
mended or the mixed use of tires of
different brands, construction (bias,
bias-belted or radial) , or tread patterns
can adversely affect the ride, braking,
handling, ground clearance, body-to-
tire clearance, tire chain clearance,
speedometer calibration, headlight aim
and bumper height. Some of these ef-
fects may lead to accidents and could
result in serious personal injury.
cIf the wheels are changed for any rea-
son, always replace with wheels which
have the same off-set dimension.
Wheels of a different off-set could
cause premature tire wear, degrade ve-
hicle handling characteristics and/or
interference with the brake
discs/drums. Such interference can
lead to decreased braking efficiency
and/or early brake pad/shoe wear. Re-
fer to “Wheels and tires” in the “Techni-
cal and consumer information” section
of this manual for wheel off-set
dimensions.
WDI0259
Maintenance and do-it-yourself8-39
ZREVIEW COPYÐ2005 Maxima(max)
Owners ManualÐUSA_English(nna)
09/01/04Ðtbrooks
X
Page 266 of 288

Use the following steps to mount the front license
plate:
Before mounting the license plate, confirm that
the following parts are enclosed in the plastic
bag:
cLicense plate bracket
cLicense plate bracket screws x 2
cLicense plate screws x 2
cScrew grommets x 2
1. Make a shallow hole in the bumper fascia at
the location marks (small dimples) using a
0.39 in (10 mm) drill. To avoid damaging the
area behind the fascia, apply only light pres-
sure to the drill.
2. Insert the grommets into the holes in the
bumper fascia.
3. Insert a small flat-bladed screwdriver into
the grommet hole to turn the threaded part of
the grommet 90°.
4. Mount the license plate bracket using the
two longer screws.
5. Use the two shorter hex head screws to
mount the license plate to the license plate
bracket.WARNING
cIt is extremely dangerous to ride in a
cargo area inside a vehicle. In a colli-
sion, people riding in these areas are
more likely to be seriously injured or
killed.
cDo not allow people to ride in any area
of your vehicle that is not equipped with
seats and seat belts.
cBe sure everyone in your vehicle is in a
seat and using a seat belt properly.
TERMS
It is important to familiarize yourself with the fol-
lowing terms before loading your vehicle:
cCurb Weight (actual weight of your vehicle)
- vehicle weight including: standard and op-
tional equipment, fluids, emergency tools,
and spare tire assembly. This weightdoes
notinclude passengers and cargo.
cGVW (Gross Vehicle Weight) - curb weight
plus the combined weight of passengers
and cargo.
cGVWR (Gross Vehicle Weight Rating) -
maximum total weight (load) limit specified
for the vehicle.cGAWR (Gross Axle Weight Rating) - maxi-
mum weight (load) limit specified for the
front or rear axle.
DETERMINING VEHICLE LOAD
CAPACITY
The load capacity of this vehicle is determined by
weight, not by available cargo space. For ex-
ample, a luggage rack, bike carrier, cartop carrier
or similar equipment does not increase load car-
rying capacity of your vehicle.
To determine vehicle load capacity:
Vehicle weight can be determined by using a
commercial-grade scale, found at places such as
a truck stop, gravel quarry, grain elevator, or a
scrap metal recycling facility.
1. Determine the curb weight of your vehicle.
2. Compare the curb weight amount to the
GVWR specified for your vehicle to deter-
mine how much more weight your vehicle
can carry.
VEHICLE LOADING INFORMATION
9-12Technical and consumer information
ZREVIEW COPYÐ2005 Maxima(max)
Owners ManualÐUSA_English(nna)
09/01/04Ðtbrooks
X