NISSAN MAXIMA 2006 A34 / 6.G Owners Manual
Manufacturer: NISSAN, Model Year: 2006, Model line: MAXIMA, Model: NISSAN MAXIMA 2006 A34 / 6.GPages: 312, PDF Size: 4.88 MB
Page 131 of 312

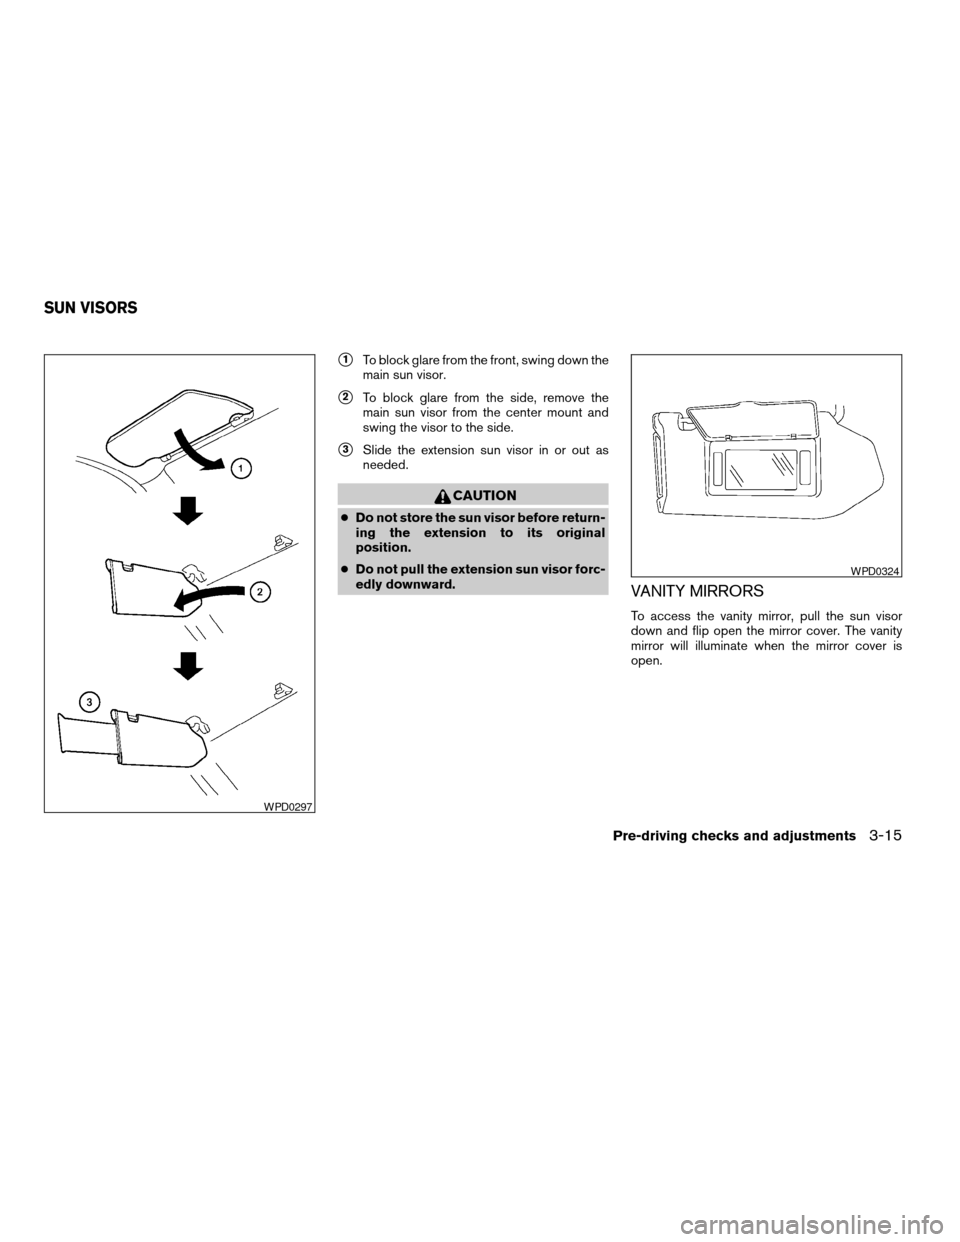
s1To block glare from the front, swing down the
main sun visor.
s2To block glare from the side, remove the
main sun visor from the center mount and
swing the visor to the side.
s3Slide the extension sun visor in or out as
needed.
CAUTION
cDo not store the sun visor before return-
ing the extension to its original
position.
cDo not pull the extension sun visor forc-
edly downward.
VANITY MIRRORS
To access the vanity mirror, pull the sun visor
down and flip open the mirror cover. The vanity
mirror will illuminate when the mirror cover is
open.
WPD0297
WPD0324
SUN VISORS
Pre-driving checks and adjustments3-15
ZREVIEW COPYÐ2006 Maxima(max)
Owners ManualÐUSA_English(nna)
06/22/05Ðtbrooks
X
Page 132 of 312

AUTOMATIC ANTI-GLARE
REARVIEW MIRROR
The inside mirror is designed so that it automati-
cally dims according to the intensity of the head-
lights of the vehicle following you. The automatic
anti-glare feature operates only when the ignition
switch is in the ON position.
The indicator light
s1will illuminate when the
automatic anti-glare feature is operating.
To turn off the automatic anti-glare feature, press:
cthe O button for inside mirrors without
compass.cthe
button for inside mirrors with
compass.
The indicator light will turn off.
To turn on the automatic anti-glare feature again,
press:
cthe | button for inside mirrors without
compass.
cthe
button for inside mirrors with
compass.
The indicator light will turn on.Some vehicles are also equipped with automatic
anti-glare outside mirrors. For additional informa-
tion, see “Automatic anti-glare outside mirrors”
later in this section.
For information on HomeLinkTUniversal Trans-
ceiver operation, see the “HomeLinkTUniversal
Transceiver” in the “Instrument and controls” sec-
tion of this manual.
For information on the compass display (if so
equipped) , see “Compass display” in the “Instru-
ments and controls” section of this manual.
NOTE:
Do not hang any objects over the sensors
s2or apply glass cleaner to the sensors.
Doing so will reduce the sensitivity of the
sensors, resulting in improper operation.Without compass
WPD0332
With compass
WPD0333
MIRRORS
3-16Pre-driving checks and adjustments
ZREVIEW COPYÐ2006 Maxima(max)
Owners ManualÐUSA_English(nna)
06/22/05Ðtbrooks
X
Page 133 of 312

OUTSIDE MIRRORS
The outside mirror remote control will operate
only when the ignition switch is in the ACC or ON
position.
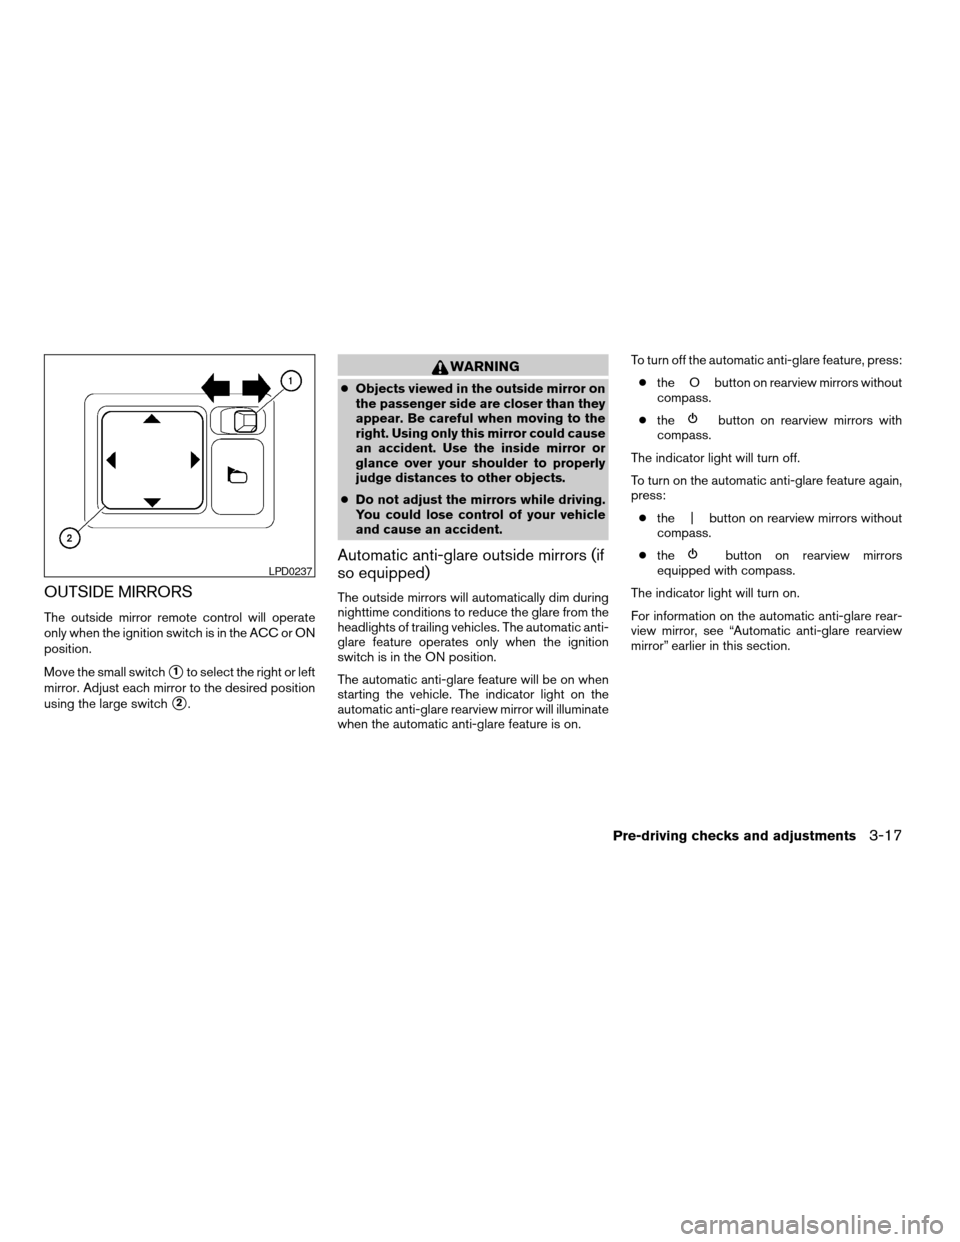
Move the small switch
s1to select the right or left
mirror. Adjust each mirror to the desired position
using the large switch
s2.
WARNING
cObjects viewed in the outside mirror on
the passenger side are closer than they
appear. Be careful when moving to the
right. Using only this mirror could cause
an accident. Use the inside mirror or
glance over your shoulder to properly
judge distances to other objects.
cDo not adjust the mirrors while driving.
You could lose control of your vehicle
and cause an accident.
Automatic anti-glare outside mirrors (if
so equipped)
The outside mirrors will automatically dim during
nighttime conditions to reduce the glare from the
headlights of trailing vehicles. The automatic anti-
glare feature operates only when the ignition
switch is in the ON position.
The automatic anti-glare feature will be on when
starting the vehicle. The indicator light on the
automatic anti-glare rearview mirror will illuminate
when the automatic anti-glare feature is on.To turn off the automatic anti-glare feature, press:
cthe O button on rearview mirrors without
compass.
cthe
button on rearview mirrors with
compass.
The indicator light will turn off.
To turn on the automatic anti-glare feature again,
press:
cthe | button on rearview mirrors without
compass.
cthe
button on rearview mirrors
equipped with compass.
The indicator light will turn on.
For information on the automatic anti-glare rear-
view mirror, see “Automatic anti-glare rearview
mirror” earlier in this section.LPD0237
Pre-driving checks and adjustments3-17
ZREVIEW COPYÐ2006 Maxima(max)
Owners ManualÐUSA_English(nna)
06/22/05Ðtbrooks
X
Page 134 of 312

Manual folding outside mirrors (if so
equipped)
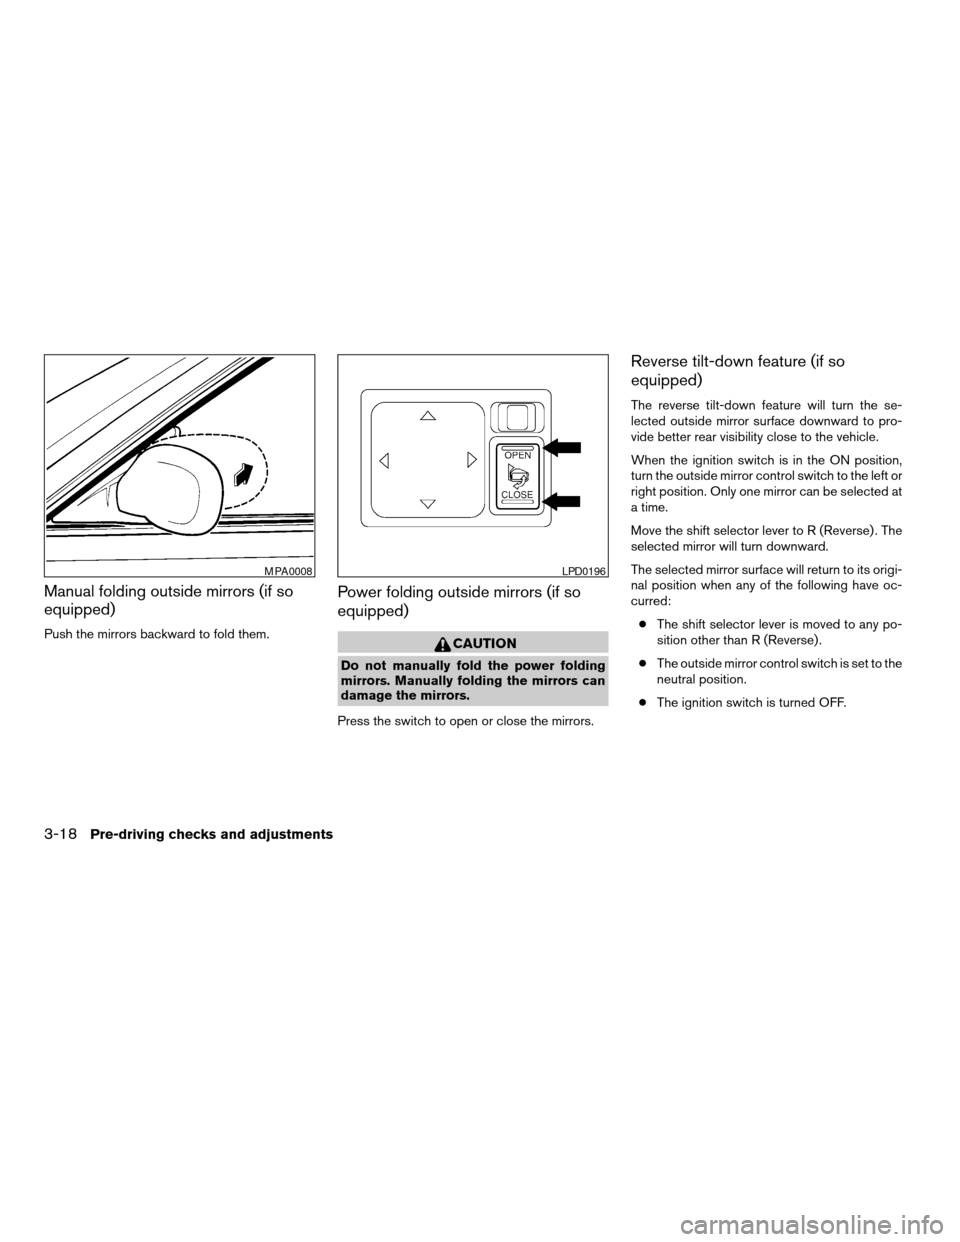
Push the mirrors backward to fold them.
Power folding outside mirrors (if so
equipped)
CAUTION
Do not manually fold the power folding
mirrors. Manually folding the mirrors can
damage the mirrors.
Press the switch to open or close the mirrors.
Reverse tilt-down feature (if so
equipped)
The reverse tilt-down feature will turn the se-
lected outside mirror surface downward to pro-
vide better rear visibility close to the vehicle.
When the ignition switch is in the ON position,
turn the outside mirror control switch to the left or
right position. Only one mirror can be selected at
a time.
Move the shift selector lever to R (Reverse) . The
selected mirror will turn downward.
The selected mirror surface will return to its origi-
nal position when any of the following have oc-
curred:
cThe shift selector lever is moved to any po-
sition other than R (Reverse) .
cThe outside mirror control switch is set to the
neutral position.
cThe ignition switch is turned OFF.
MPA0008LPD0196
3-18Pre-driving checks and adjustments
ZREVIEW COPYÐ2006 Maxima(max)
Owners ManualÐUSA_English(nna)
06/22/05Ðtbrooks
X
Page 135 of 312

NOTE:
If the outside mirror control switch is in the
neutral position, neither mirror will turn
downward when the shift selector lever is
moved to R (Reverse) .
For more information regarding this feature and
how to save the R (Reverse) mirror tilt-down
adjustment in the automatic drive positioner
memory, refer to “Automatic drive positioner” later
in this section.
Heated mirrors (if so equipped)
The electric control type outside mirrors (if so
equipped) can be heated to defrost, defog, or
de-ice for improved visibility. Press the rear win-
dow defogger switch to activate the heating
function. Press the switch again to deactivate, or
the heating function will automatically turn off
after approximately 15 minutes.The automatic drive positioner system has two
features:
cMemory storage function
cEntry/exit function (for automatic transmis-
sion model only)
MEMORY STORAGE FUNCTION
Two positions for the driver’s seat, steering col-
umn, and outside mirrors can be stored in the
automatic drive positioner memory. Follow these
procedures to use the memory system.
1. For vehicles equipped with automatic trans-
mission, set the shift selector lever to the P
(Park) position.
For vehicles equipped with manual trans-
mission, place the shift lever in the N (Neu-
tral) position and set the parking brake.
2. Turn the ignition ON.
LPD0197
AUTOMATIC DRIVE POSITIONER (if
so equipped)
Pre-driving checks and adjustments3-19
ZREVIEW COPYÐ2006 Maxima(max)
Owners ManualÐUSA_English(nna)
06/22/05Ðtbrooks
X
Page 136 of 312

3. Adjust the driver’s seat, steering column and
outside mirrors to the desired positions by
manually operating each adjusting switch.
For additional information, see “Seats” in the
“Safety—Seats, seat belts and supplemen-
tal restraint system” section and “Tilting tele-
scopic steering column” and “Outside mir-
rors” earlier in this section.
During this step, do not turn the ignition to
any positions other than ON.
4. Push the SET switch and, within 5 seconds,
push the memory switch (1 or 2) fully for at
least 1 second.
The indicator light for the pushed memory
switch will come on and stay on for approxi-
mately 5 seconds after pushing the switch.
After the indicator light goes off, the se-
lected positions are stored in the selected
memory (1 or 2) .
If memory is stored in the same memory switch,
the previous memory will be deleted.
Linking a keyfob to a stored memory
position
Each keyfob can be linked to a stored memory
position (memory switch 1 or 2) with the follow-
ing procedure.1.
Follow the steps for storing a memory position.
2. While the indicator light for the memory
switch being set is illuminated for 5 sec-
onds, press the
button on the keyfob.
The indicator light will blink. After the indica-
tor light goes off, the keyfob is linked to that
memory setting.
With the key removed from the ignition switch,
press the
button on the keyfob. The driv-
er’s seat and outside mirrors will move to the
memorized position.
NOTE:
If a new memory position is saved to the
memory switch, the keyfob automatically
re-links.
Procedure for storing the outside
mirror positions for best visibility when
backing up
An outside mirror position for backing up can be
stored for each memory switch (1 and 2) .
1. Set the parking brake.
2.
Turn the ignition ON. (Do not start the engine.)
3. Push the memory switch 1 or 2 fully for at
least 1 second to operate the automatic
drive positioner.4. Turn the outside mirror control switch to L
(left) .
5. Depress the brake pedal.
6. Move the automatic transmission shift lever
to R (Reverse) .
7. Adjust the mirror to the desired viewing po-
sition for backing up by operating the out-
side mirror control switch.
8. Push the SET switch and, within 5 seconds,
push the memory switch 1 or 2 selected in
step 3 fully for at least 1 second.
cThe indicator light for the pushed memory
switch will come on and stay on for approxi-
mately 5 seconds after pushing the switch.
After the indicator light goes off, the se-
lected mirror position is stored in the se-
lected memory (1 or 2) .
9. Turn the outside mirror control switch to R
(right) . Repeat the above procedure to ad-
just the right mirror position and store in the
selected memory.
cWhen the driver’s seat, accelerator and
brake pedals, and outside mirrors are not in
the memorized position, the outside mirror
will move with the initial tilt-down angle.
3-20Pre-driving checks and adjustments
ZREVIEW COPYÐ2006 Maxima(max)
Owners ManualÐUSA_English(nna)
06/22/05Ðtbrooks
X
Page 137 of 312

Confirming memory storage
cTurn the ignition ON and push the SET
switch. If the main memory has not been
stored, the indicator light will come on for
approximately 0.5 seconds. When the
memory has stored the position, the indica-
tor light will stay on for approximately 5 sec-
onds.
cIf the battery cable is disconnected, or if the
fuse opens, the memory will be canceled. In
such a case, reset the desired positions
using the following procedures.
1. Open and close the driver’s door more than
two times with the ignition key in the LOCK
position.
2. Reset the desired position using the previ-
ous procedure.
Selecting the memorized position
For vehicles equipped with automatic transmis-
sion, set the selector lever to the P (Park) posi-
tion.
For vehicles equipped with manual transmission,
place the shift lever in the N (Neutral) position
and set the parking brake.Then:
cWithin 45 seconds of opening the driver’s
door, push the memory switch (1 or 2) fully
for at least 1 second, or
cTurn the ignition switch to the ON position
and push the memory switch (1 or 2) fully for
at least 1 second.
The driver’s seat, accelerator and brake pedals,
and outside mirrors will move to the memorized
position with the indicator light blinking, and then
the light will stay on for approximately 5 seconds.
ENTRY/EXIT FUNCTION (for
automatic transmission model)
This system is designed so that the driver’s seat
and steering column will automatically move
when the automatic transmission selector lever is
in the P (Park) position. This allows the driver to
get into and out of the driver’s seat more easily.
(This feature is not available on manual transmis-
sion model.)
The driver’s seat will slide backward and the
steering wheel will move up:
cWhen the key is removed from the ignition
switch and the driver’s door is opened.cWhen the driver’s door is opened with the
key turned to LOCK.
cWhen the key is turned from ACC to LOCK
with the driver’s door open.
The driver’s seat and steering wheel will return to
previous position:
cWhen the key is inserted into the ignition
switch and the driver’s door is closed.
cWhen the driver’s door is closed with the key
turned to LOCK.
cWhen the key is turned from ACC to ON
while the automatic transmission selector
lever is in the P (Park) position.
The entry/exit feature can be adjusted or can-
celed. See “Personalized settings menu” (ve-
hicles without navigation system) or “Vehicle
electronic systems” (vehicles with navigation sys-
tem) in the “Display screen, heater, air condi-
tioner, audio and phone systems” section of this
manual.
Pre-driving checks and adjustments3-21
ZREVIEW COPYÐ2006 Maxima(max)
Owners ManualÐUSA_English(nna)
06/22/05Ðtbrooks
X
Page 138 of 312

SYSTEM OPERATION
The automatic drive positioner system will not
work or will stop operating under the following
conditions:
cWhen the vehicle speed is above 4 MPH (7
km/h) .
cWhen any of the memory switches are
pushed while the automatic drive positioner
is operating.
cWhen the adjusting switch for the driver’s
seat is turned on while the automatic drive
positioner is operating.
cWhen the memory switch (1 or 2) is not
pushed and held for at least 1 second.
cWhen the seat has been already moved to
the memorized position.
cWhen no seat position is stored in the
memory switch.
cWhen the automatic transmission selector
lever is moved from P (Park) to any other
position.cWhen the driver’s door remains open more
than 45 seconds and the ignition switch is
not in the ON position.
The automatic drive positioner system can be
adjusted and canceled. See “Personalized set-
tings menu” (vehicles without navigation system)
or “Vehicle electronic systems” (vehicles with
navigation system) in the “Display screen, heater,
air conditioner, audio and phone systems” sec-
tion of this manual.
3-22Pre-driving checks and adjustments
ZREVIEW COPYÐ2006 Maxima(max)
Owners ManualÐUSA_English(nna)
06/22/05Ðtbrooks
X
Page 139 of 312

4 Display screen, heater, air conditioner,
audio and phone systems
Control panel buttons — without navigation system....4-2
Names of components..........................4-3
How to use JOYSTICK and “ENTER” button.......4-3
How to use “BACK” button......................4-3
How to use “TRIP” button.......................4-3
How to use “FUEL ECON” button................4-4
Clock.........................................4-4
How to use “E/M” (English/Metric) button.........4-4
How to use
(maintenance) button..........4-5
How to use the “SETTING” button................4-5
button...................................4-6
Control panel buttons — with navigation system.......4-7
Names of the components.......................4-8
How to use joystick and “ENTER” button..........4-8
How to use “BACK” button......................4-8
Setting up the start-up screen...................4-8
How to use the “TRIP” button....................4-9
How to use the “SETTING” button...............4-11
Setting the display (Audio or HVAC display):.....4-11
button..................................4-16
Ventilators.......................................4-16
Heater and air conditioner (automatic)..............4-17
Automatic operation...........................4-18Manual operation..............................4-19
Operating tips.................................4-19
Servicing air conditioner...........................4-20
Audio system....................................4-20
Radio........................................4-20
FM radio reception............................4-20
AM radio reception............................4-21
Satellite radio reception (if so equipped).........4-21
Audio operation precautions....................4-21
FM-AM-SAT radio with cassette player and
compact disc (CD) player (Type A)/CD
changer (Type B)..............................4-24
CD care and cleaning..........................4-32
Steering wheel switch for audio control..........4-33
Antenna......................................4-33
Car phone or CB radio............................4-34
BluetoothTHands-Free Phone System
(if so equipped)..................................4-35
Using the system..............................4-36
Control buttons...............................4-38
Getting started................................4-38
List of voice commands........................4-40
Speaker adaptation (SA) mode..................4-45
Troubleshooting guide.........................4-48
ZREVIEW COPYÐ2006 Maxima(max)
Owners ManualÐUSA_English(nna)
06/23/05Ðtbrooks
X
Page 140 of 312

WARNING
cPositioning of the heating or air condi-
tioning controls and display controls
should not be done while driving in or-
der that full attention may be given to
the driving operation.
cDo not disassemble or modify this sys-
tem. If you do, it may result in accidents,
fire, or electrical shock.
cDo not use this system if you notice any
abnormality, such as a frozen screen or
lack of sound. Continued use of the
system may result in accident, fire or
electric shock.
cIn case you notice any foreign object in
the system hardware, spill liquid on it,
or notice smoke or smell coming from
it, stop using the system immediately
and contact your nearest NISSAN
dealer. Ignoring such conditions may
lead to accidents, fire or electrical
shock.
When you use this system, make sure the engine
is running.
If you use the system with the engine not
running (ignition ON or ACC) for a long
time, it will use up all the battery power,
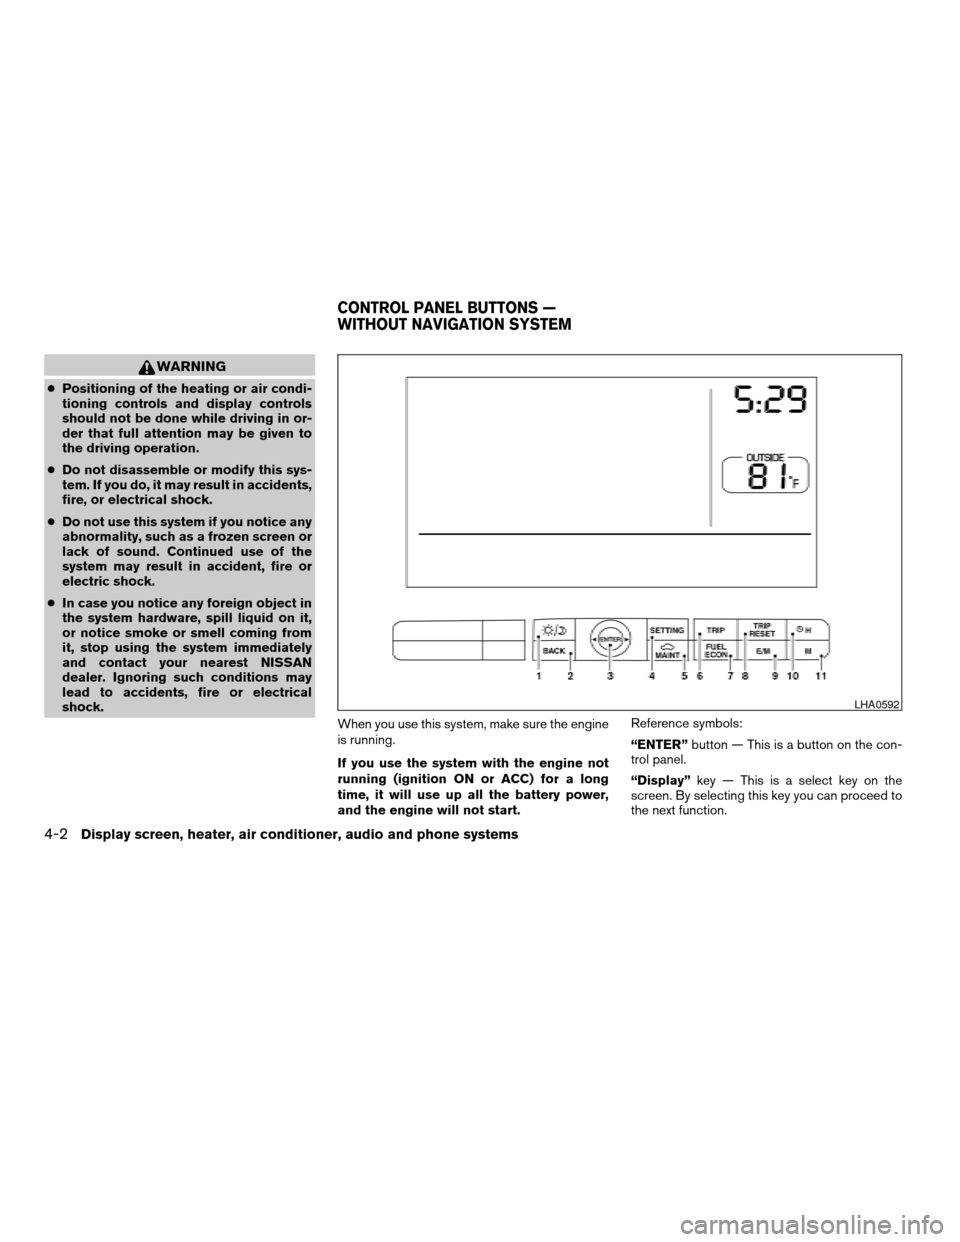
and the engine will not start.Reference symbols:
“ENTER”button — This is a button on the con-
trol panel.
“Display”key — This is a select key on the
screen. By selecting this key you can proceed to
the next function.
LHA0592
CONTROL PANEL BUTTONS —
WITHOUT NAVIGATION SYSTEM
4-2Display screen, heater, air conditioner, audio and phone systems
ZREVIEW COPYÐ2006 Maxima(max)
Owners ManualÐUSA_English(nna)
06/22/05Ðtbrooks
X